Buzzkill
-
Posts
2,049 -
Joined
-
Last visited
Content Type
Profiles
Forums
Articles
Gallery
Downloads
Events
Everything posted by Buzzkill
-
If you want to see some interesting help tickets, look up The Chronicles of George. Just make sure you aren't taking a drink of anything when you start reading them.
-
Alternatives to propane torch for local heating on a quick job
Buzzkill replied to Cleave's topic in Gas Forges
Is this something you just want to do one time for this project, or do you want this capability in general moving forward? If it's a one time thing you could wrap the blade portion in a water soaked towel and you should be able to heat on a coal or charcoal forge and bend the tang without ruining the temper. If you want the capability in general then you could build a propane burner of Mikey's or Frosty's design, which could be used for local heat (with a flame retention nozzle installed). You could also buy an induction system designed for mechanics to help remove rusted nuts, but you'd be getting close to the price of a torch setup at that point. I believe you can also still buy an acetylene plumber's torch which gets hotter than a handheld propane torch, but not as hot as oxy/acetylene. Getting portable focused high intensity heat is going to be a challenge if you don't want to spend any money. -
Some of the saws used to have a trigger lock that opened the carb a bit, but not wide open, to aid in starting. Now they usually have a self setting high idle that engages when you pull the trigger once before attempting to start them.
-
If you have too much gas and air being pushed into the forge anywhere near the correct ratios you will get a large amount of dragon's breath out of the openings. Too little will cause a flameout or just low temps. Too much air (not enough fuel) will cause oxidation (forge scale) to form while the piece is still in the forge. Too much gas (not enough air) causes excess CO to be produced, and in extreme cases will limit the temps you can reach. I haven't run a blown burner in a while, but I always tuned by eye and ear. Try to find the spot with the loudest flames, which should be a medium blue color, and then I'd back the air off just a hair so I'd stay on the rich side of neutral to avoid scale forming in the forge. If you have a pressure gauge and your gas input line is restricted enough to show pressure, you may want note the pressure where you got the temps you want for general forging and welding. After that you can set the gas pressure and use the air controls to tune the flame and you should end up at the same temperature you had before.
-
What's your latest blade look like? Post em and let us see.
Buzzkill replied to HondoWalker's topic in Knife Making
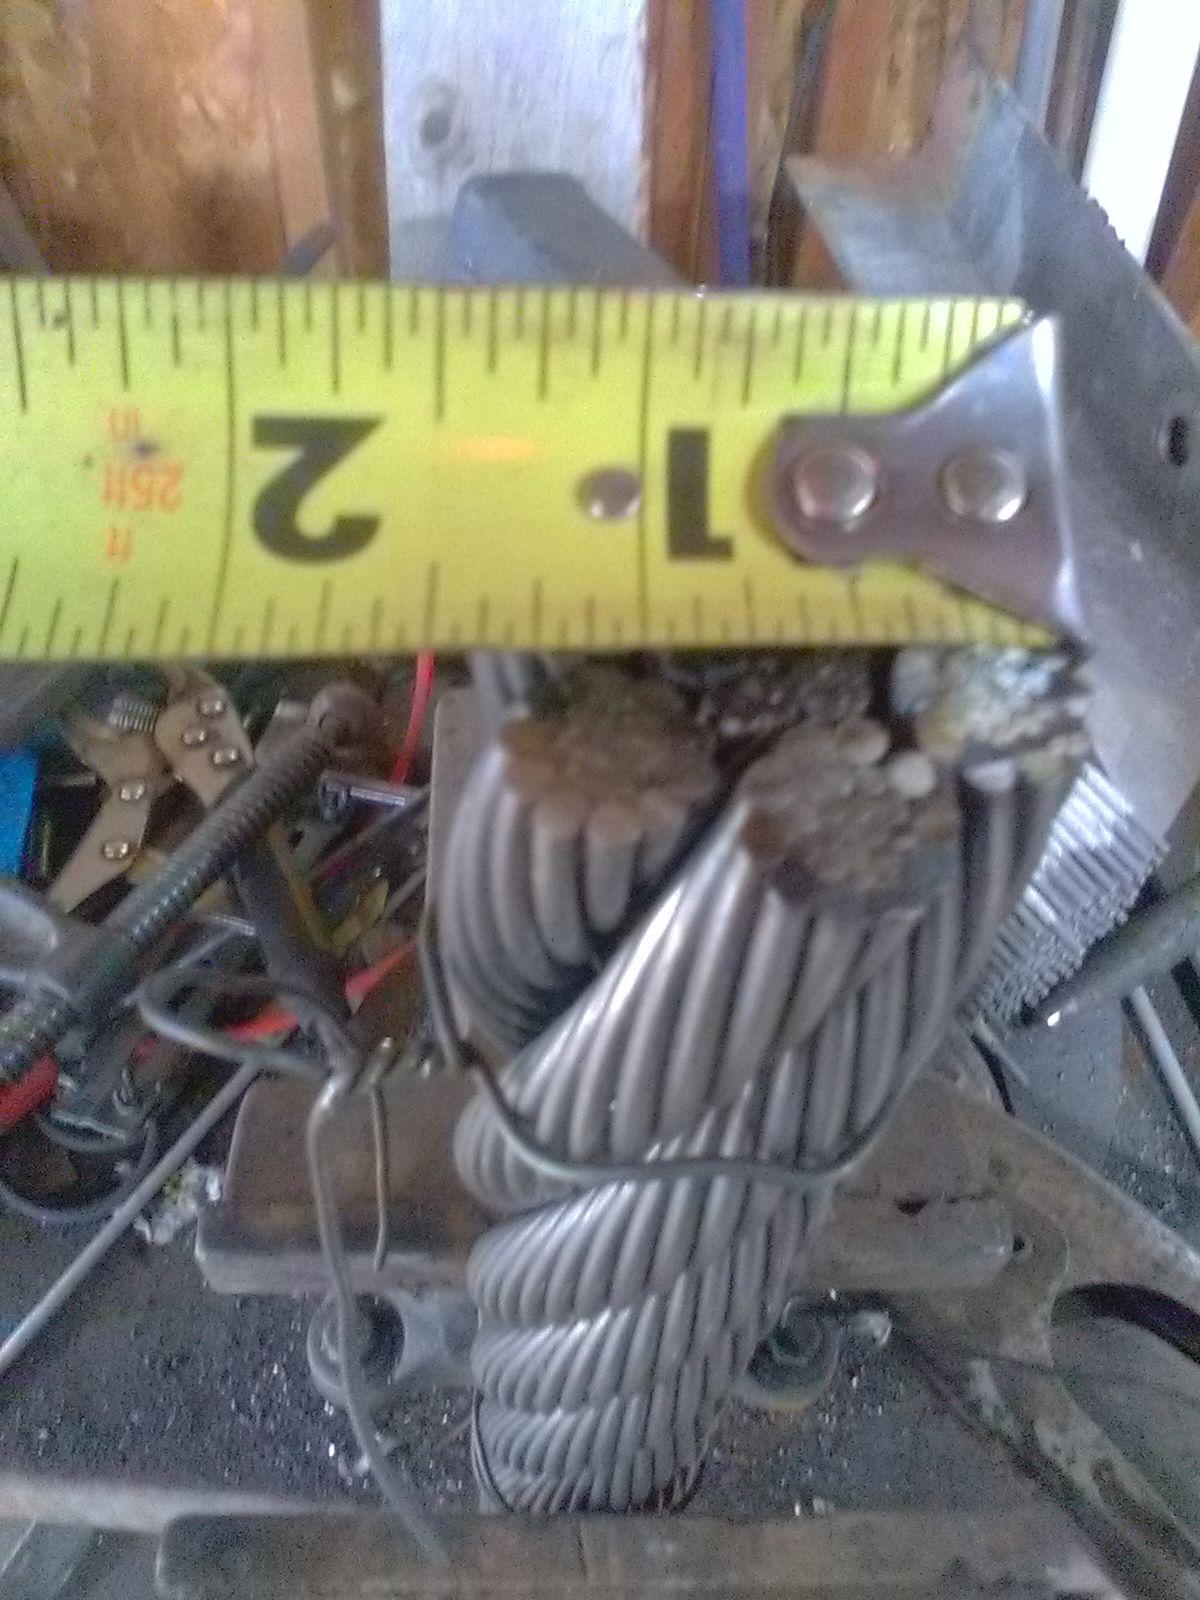
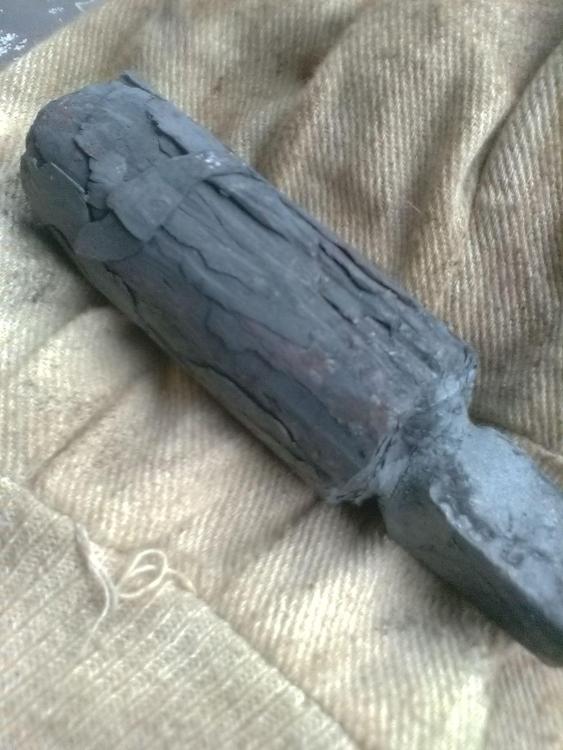
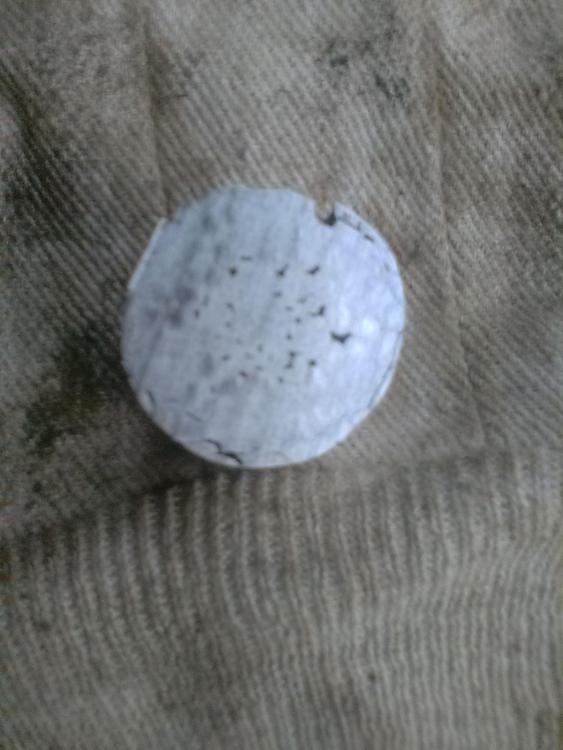
Thanks for the tips, guys. That was my first attempt at forge welding cable, and in my head it made more sense to apply the force to the cable in all directions as much as possible to get a good weld, but I can see the V shape working there as well. If successful I probably would have made a small blade from it, but it was mainly a test case. I only used about 3 inches of the cable I have, so I have more than enough left for a couple full size knives. We're in the hottest part of the year now and I have a few other projects I want to get back to, so this one will probably go to the back burner again for a while. -
Easy stainless steel for at home heat treating?
Buzzkill replied to mooseman645's topic in Heat Treating Knives, Blades etc
That sounds like a simple question, but it's really not. If you are asking if you can get a stainless knife steel to harden by heating it past critical and quenching the answer is yes. However, that will not get the most out of the steel. High carbon stainless steels contain more elements in the alloys than simple carbon steels. Those other elements need to go into solution in the steel before quenching in order to achieve the combination of hardness and toughness they were designed to provide. Corrosion resistance can also be affected if the correct heat treatment sequence is not followed properly. For those elements to go into solution both time and temperature are required. That means holding a specific temperature within a fairly tight range for a specified amount of time. In some cases there are several temperatures that must be attained and held so that the elements all go into solution in the correct order for maximum results. This is nearly impossible to do with a charcoal forge, and since quench temperatures for those steels also tend to be higher than those for simple carbon steels, carbon loss can be an issue. That's why you often see stainless foil pouches used when preparing for quench. It keeps the oxygen away from the steel which prevents the carbon from burning off. A lot of the stainless steels benefit from a cryo-tempering cycle as well. So, if you just want to harden a blade for your personal use you might get by with a simple heat treatment, but to me it would be fraudulent to sell a stainless steel knife that wasn't heat treated properly. If you want to do it properly you will need some form of oven that can achieve high temperatures (1900-2000 degrees F is not uncommon for stainless knife steels) and hold those temps for a while. -
What's your latest blade look like? Post em and let us see.
Buzzkill replied to HondoWalker's topic in Knife Making
Here's a few pics of my quasi-failure cable weld.
-
What's your latest blade look like? Post em and let us see.
Buzzkill replied to HondoWalker's topic in Knife Making
Well, my attempt was neither a colossal failure, nor an unmitigated success. There was a lot of grease on all the components, and it appeared to have been cut with an abrasive chop saw. There were a lot of little gritty bits stuck in the grease. So, I disassembled the piece of cable, and using a combination of kerosene, time, and a wire brush I got it all cleaned up and reassembled it. I electric welded a "tong grab" bar on one end and also welded across both ends to keep everything together then dipped it back into the kerosene. I was using a propane forge. To me it's easier to determine when you get to welding heat without burning the stock. The problem is I needed to take it out once to twist the cable tight before starting to hammer on it. This allowed the outer pieces to oxidize a bit before it went back into the forge. After the twist I reheated to forge welding temperature and used the tooling I made to attempt to weld it. The tooling is basically top and bottom dies each with 1 inch half round. I think 1.25 inch would have been better, but I didn't have any round stock that size to create the tooling. After 5 or 6 heats and the corresponding trips to the power hammer I let it cool and then cut it with the band saw. Ultimately what I got was an outer layer that didn't weld well - probably about a quarter inch deep. The next layer moving in towards the center appeared to weld quite well. The center most piece was not fully welded, but I don't know if that was due to the technique or if I just didn't heat and hit long and hard enough to adequately compress the center. My conclusion is that the kerosene or oil dip method is not well suited for forge welding cable, mainly due to the need to remove and twist the cable before setting the welds with a hammer. After that somewhat disappointing result I did a quick stack of 15N20 and 80CrV2 flat stock using the oil dip method and that welded up just fine. I haven't used flux in this forge yet, so now I have to decide if forge welding the cable is worth it. I do have a piece of stainless pipe I might use as a baffle and to keep flux out of the rest of the forge. -
What's your latest blade look like? Post em and let us see.
Buzzkill replied to HondoWalker's topic in Knife Making
I use a paste that contains both the flux and the solder. I solder guards in place after completing the heat treatment (and in the case above after the etching as well), so I choose solders with melting points around 400 degrees F, and I heat from the tang side to avoid overheating the blade. This has worked for me with brass, stainless steel, and pattern welded guards. -
What's your latest blade look like? Post em and let us see.
Buzzkill replied to HondoWalker's topic in Knife Making
Thanks for the update. The cable I have is 1.5 inch diameter I think and has rather thick individual strands. I'm pondering trying a 3 or 4 inch length without flux. I might go back to kerosene for that and let it soak a while if I see anything thick in there when I cut it. I have a "but first" situation though. I really need to make some tooling for the power hammer to have a decent shot at getting good welds on round stock. We'll see how my weekend goes. -
Anvil Stands. Make'em nice and clean
Buzzkill replied to David Kailey's topic in Stands for Anvils, Swage Blocks, etc
Sorry to nitpick here, but this is a world wide forum. Two 6 inch pipes gives you 1/2 the area of a single 12 inch pipe. I know it sounds counterintuitive, but each 6 inch pipe would provide 28.269 square inches of area for a total of 56.538 square inches when combined. A single 12 inch diameter pipe provides an area of 113.076 square inches - double the combined 6 inch pipes. Regardless, it's still an interesting work-around, and if it draws the smoke out like you want it to then it's a good idea. Looks like a great work space, but it's far too clean at the moment. -
What's your latest blade look like? Post em and let us see.
Buzzkill replied to HondoWalker's topic in Knife Making
I haven't tried that method with cable yet. To be clear I do grind all mating surfaces to shiny steel before stacking. I'm not sure it works this way, but my reasoning is this: The oil keeps oxygen off the steel surface initially. When it burns off it consumes any remaining oxygen in the forge. Whatever carbon is left behind can possibly be absorbed into the billet. Originally I used kerosene, but it's kinda stinky so I switched to oil and have the same result. However, if the grease is very thick or there is much oxidation on the cable I'm not sure it will work well. Now you've got me wanting to try this on the piece of cable I have sooner than later. Maybe this weekend if it's not too miserable to forge. -
What's your latest blade look like? Post em and let us see.
Buzzkill replied to HondoWalker's topic in Knife Making
A slotted guard that only protrudes on the cutting side might work as well. Once soldered and/or pinned into place it would be plenty sturdy. The knife I show a few posts up has such a guard. John's question is a good one though. With that blade shape how likely is it that anyone would be stabbing or doing anything else that would lend itself to the hand slipping down onto the cutting edge? To me it seems you'd be pulling more than pushing. -
What's your latest blade look like? Post em and let us see.
Buzzkill replied to HondoWalker's topic in Knife Making
Welllll, the notches on the top are actually file work that creates a pattern if viewed from the spine. I wasn't going to do any file work originally, but I apparently ground deeper at the edges of the billet than in the middle when creating the channels for the ladder pattern. I could have ground about a quarter inch off the spine or ground the blade thinner, but I opted to disguise the small indentations that remained on the spine edge with the file work. I agree that a leather sheath would be preferable, but I don't have the leather working tools any more, and time is always at a premium as well. I'm not sure exactly how many hours I have in it. I think I have around 6 hours or so just getting the layer count, the rough profile forged, and the ladder pattern cut in. I have a tendency to work on more than one thing at a time when forging, so that makes it a bit difficult to accurately assign time. Since it's a hobby that I would (will) do regardless of whether I can sell anything I don't stress too much over the profitability. I would guess I have close to 30 hours total though. -
What's your latest blade look like? Post em and let us see.
Buzzkill replied to HondoWalker's topic in Knife Making
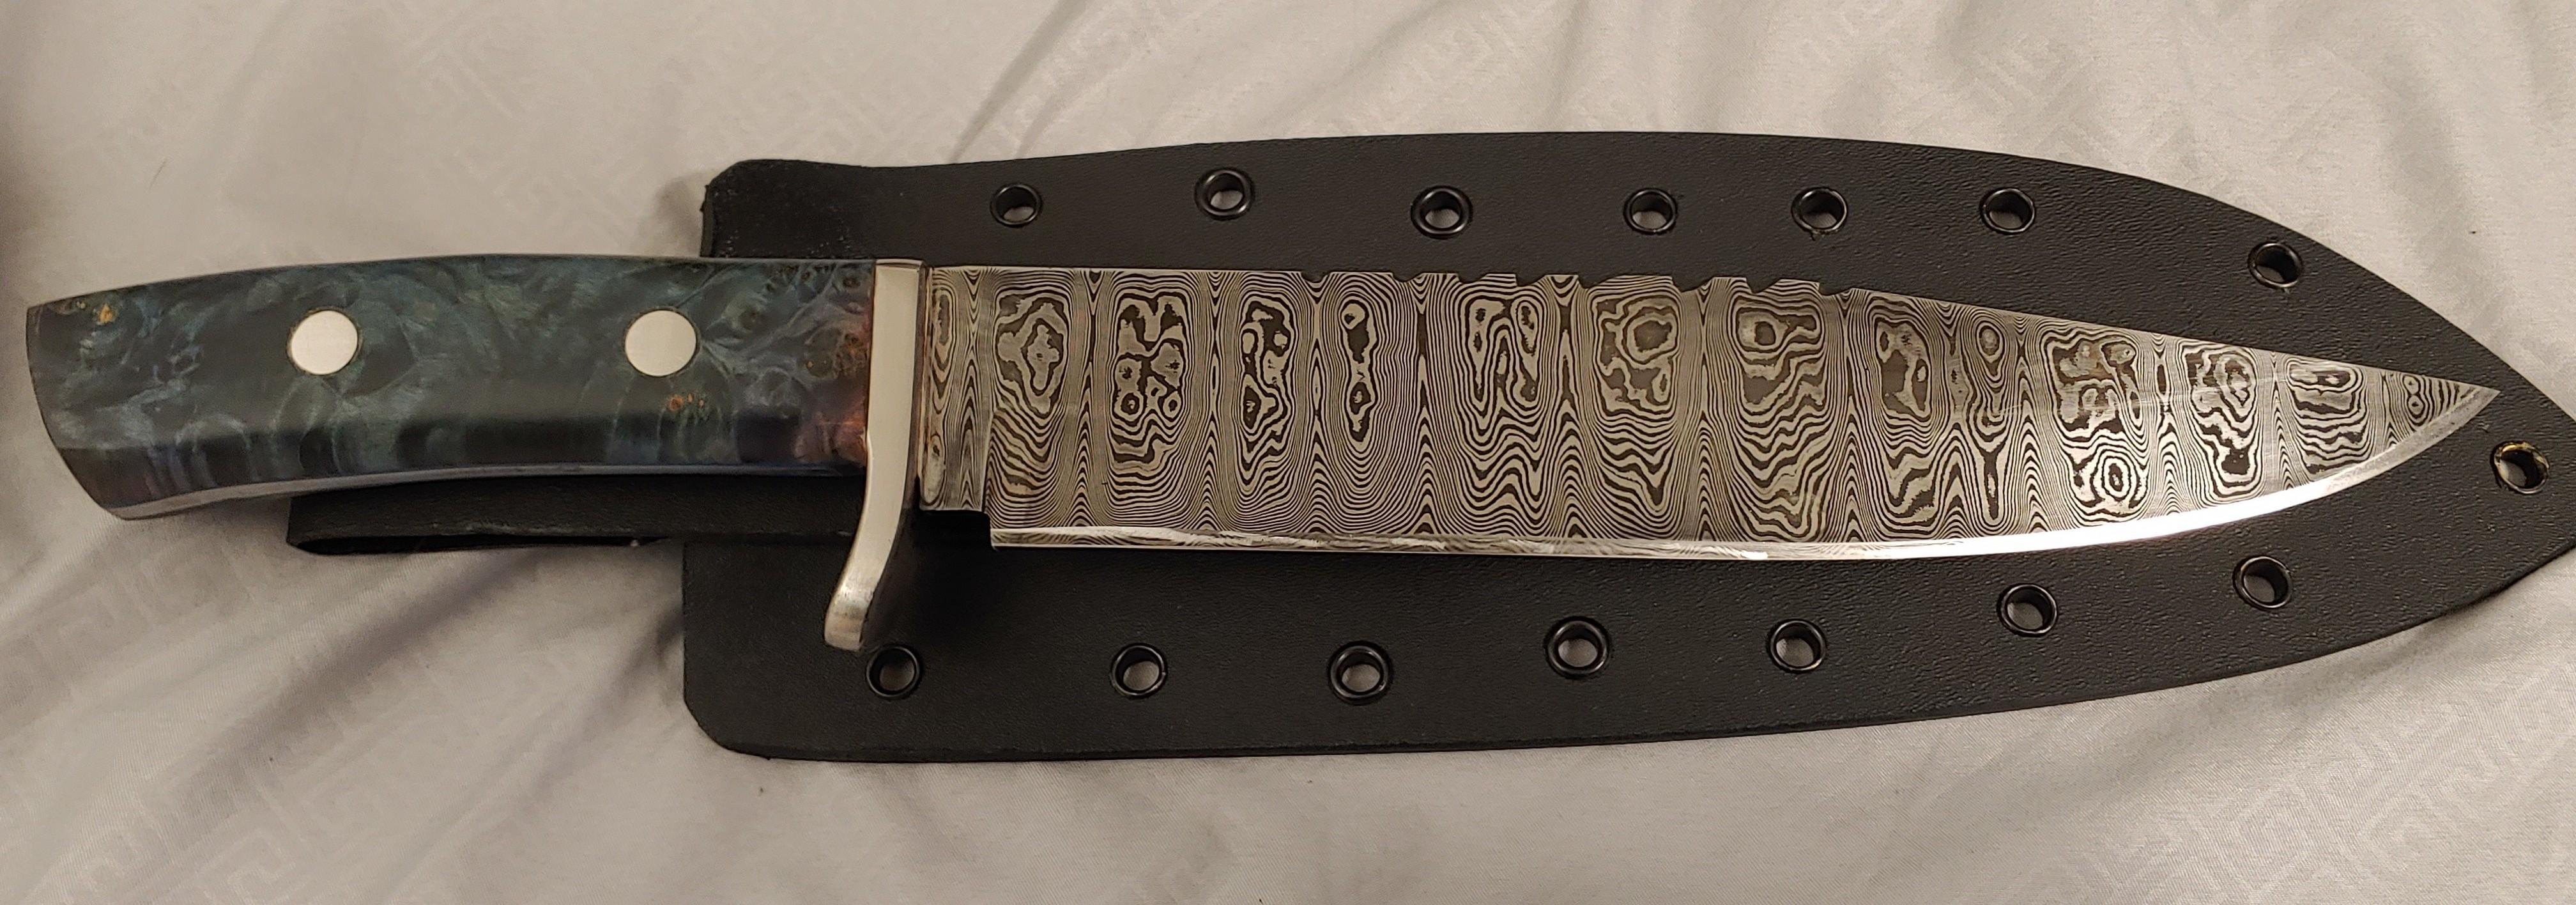
Here's the last one I completed. It's 120+ layers of 15N20 and 80CrV2. Guard and pins are stainless. Handle is stabilized and dyed burl (don't remember which species of tree). This is my first ladder pattern blade. I'm really liking not using any flux so I don't have to worry about inclusions. After cleaning and stacking all the pieces and a dip into oil it went into the forge and welded up nicely. As always I'm open to constructive criticism, so let me know if/how you think I could improve anything. Thanks for looking.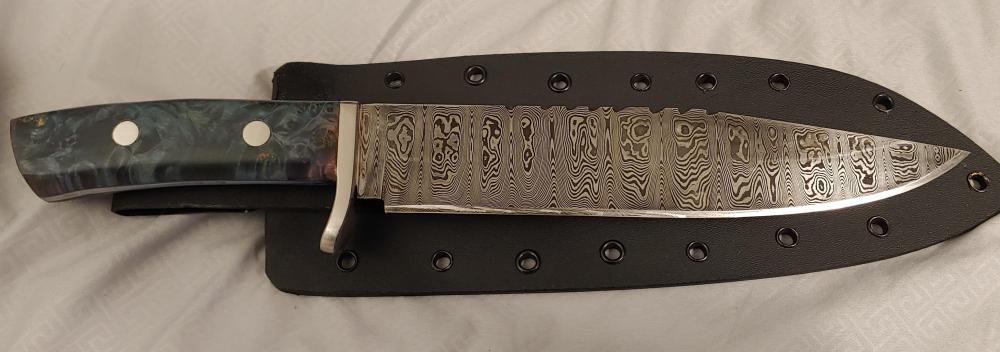
-
In your situation I'd probably opt for a literal hunk of steel to start with. You should be able to obtain something between free and junk prices that will fit the bill, save you a bunch of money, and let you get started beating on hot steel. Here's some examples of improvised anvils: https://www.iforgeiron.com/topic/52308-a-collection-of-improvised-anvils/
-
I suggest you purchase some books first. One of the great things about blacksmithing is that we can make a lot of the tools we need once we have the knowledge and a little skill. Here's a link to our book review section: https://www.iforgeiron.com/forum/40-book-reviews/ Welcome to the addiction.
-
If you plan to use flux I suggest you use a sacrificial removable slab on the floor. Kastolite is somewhat flux resistant, but over time it can turn into a gooey sticky mess at welding temps if it has been exposed to a lot of flux. High alumina kiln shelf has been recommended by some. Split hard firebrick is something I've also seen recommended. A stainless tray filled with kitty litter has been suggested before as well.
-
Yeah, you won't get any appreciable pressure to read with the gauge there. Like Frosty said, there is usually a place on a regulator for a gauge. If it didn't come with a gauge it will probably have a threaded plug in that spot. You can just remove the plug and install your gauge there. I can't think of a particularly beneficial reason to install a gauge where you have yours. It make the most sense on, or as near as possible to, the regulator imho.
-
No, that will not give you good results with Kastolite. It should seem almost too dry when it's mixed properly. If you squeeze a handful it should retain the shape without any water dripping out of it. The manufacturer ratios of water to dry mix are what you should use. I personally hold back a little bit of the dry mix, add all the water to the majority of the mix, stir until the water is well distributed, then add the last bit of dry mix and stir again until thoroughly mixed before application. It doesn't even trowel well. For me the best method has been to wet the surface I'm applying it to, then drop roughly a handful of material where I want it, then pat it gently but firmly using either a putty knife or a rubber (or nitrile) gloved hand to get the desired thickness and to get a nearly smooth outer surface. It is water setting, so you have a limited amount of time after mixing to work it into place before it starts to harden up. You don't have to rush it, but you can't wait an hour after mixing before application.
-
It's usually a mistake to try to compare the pressure and results of someone else's burner/forge combination with yours. These DIY builds lack the precision to do reliable apples to apples comparisons. Since you are using 1/4" pipe as the fuel line you should not expect much, if any, pressure to register on your gauge. The only real purpose of a gauge in this situation is repeatability. If you know you need a certain pressure of fuel with properly adjusted air to reach a desired temperature, you can make a note of that and set that pressure when you start your forge the next time. If you want to see pressure on your gauge you'll have to restrict the fuel supply line enough so that some amount of pressure is required for you to get the volume of gas per unit of time needed to achieve your desired temperature. That can be done with a smaller orifice where the fuel is injected into the system, a significantly smaller diameter supply line, a needle valve between the regulator and the mixing tube, or even (not recommended) kinking or smashing the fuel supply line a bit. If you use a needle valve you should "set it and forget it" and just use your regulator to adjust pressure if you want to be able to repeat results. If you change the needle valve you change the amount of restriction in the line, and then the pressure readings become unreliable for getting the same temperature results. Regardless, don't worry about the pressure someone else uses in their system. To the extent that it's useful at all, the pressure can just tell you what you need in your system to get the temps you want.
-
I assumed, perhaps in correctly, that he wanted to be able to essentially set a desired temperature and have the PID take care of keeping it constant. I thought about doing this some years ago shortly after I started smithing. If you set up an idle circuit that always provides the minimum amount of fuel and air required to keep the flame lit and then a separate controlled circuit can add fuel and air in the correct ratio as an "on/off" option then in theory it can be accomplished. However, after gaining a little experience I decided it was not work the time and effort to try to set up something like that for general forging. Most of the alloys we use don't require that level of precision for forging temperatures, and I think it is valuable to learn to judge temperatures by eye anyway. Of course moving from a dimly lit building into direct sunlight can throw our color perceptions off by a wide margin, but that's about the only scenario I can see where being able to "dial a temperature" might be worth the hassle. On the other hand, controlling the temperature more accurately for heat treating purposes is more valuable. My personal determination there was that an electric oven was much better suited to the task than a propane fired system. Although it takes my 110v heat treating oven about 3 hours to reach close to 2000 degrees F, I can control the heat within a few degrees accurately and consistently from room temperature all the way up to the max temp. So far I've used it mainly for tempering, but I do have some AEB-L that I plan to attempt to heat treat soon. The bottom line is the tinkerer in me loves the idea of the "dial a temp" propane forge, but the limited experience I've had and the practical side of me says it's not worth the effort for general forging. If a propane forge is setup up for general forging temps it's also fairly difficult to bring the temps down low enough for tempering, so I can't recommend it for that purpose either. It's one of those ideas that sounds a lot better and more practical than it really is imho.
-
Oil Quench --- What Type to Use?
Buzzkill replied to kayakersteve's topic in Heat Treating Knives, Blades etc
There's also a plate quench to use in between air and oil in some cases. -
I personally like having the tank pressure gauge. When I hear something out of the ordinary from my burner I can tell at a glance if it's due to low pressure from the tank. I can also see the drop in pressure before the tank goes empty. I usually get about 20 minutes or so after the pressure drops low before the tank goes empty. Each to his own I guess, but I'm happy to have that gauge on my setup.
-
What did you do in the shop today?
Buzzkill replied to Mark Ling's topic in Blacksmithing, General Discussion
FWIW, I've found that about 1.2 to 1.3 inch diameter is about right for the finger hole on karambits I've made. Of course that can certainly vary somewhat depending on the end user, but that's what has worked for me.