Buzzkill
-
Posts
2,049 -
Joined
-
Last visited
Content Type
Profiles
Forums
Articles
Gallery
Downloads
Events
Everything posted by Buzzkill
-
I think it's clear to all of us that you have done a fair amount of homework before diving into the deep end. Kudos to you for that. I wish I had when I was starting. Your modified plan seems pretty sound to me. I'm looking forward to seeing your work. If the initiative you've shown on getting your forge built right is an indication of how you operate in general then I have high expectations about your quality of work.
-
The point of my comment regarding the burners is where they are aimed, not their placement. Your drawing indicates you have them aimed at the center line of the kiln shelf. What I was suggesting is to either aim the burners near the edge of the kiln shelf closest to them or at the opposite wall slightly higher than the floor. Either of those options will create more swirl than aiming the burners at the center line of the floor. Kastolite is not something you use *instead* of ITC, Plistex, or Matrikote. Typically we put a layer of Kastolite over rigidized fiber blanket and then apply one or more coats of the aforementioned products to the Kastolite layer. Adding a kiln wash layer after the ITC layer would mostly defeat the purpose of the ITC I believe. For the last couple D-shaped (or mailbox shaped if you prefer that term) forges I have built I just use insulating firebricks to block off the forge openings, which means that the length of the forge (unlike the other 2 dimensions) remains the same as the shell length - or very close to it anyway. I find it easier both in building the forge and in use if it has uniform openings at both ends. I can just block off all or part of an opening as needed and am not limited by a permanent design feature which restricts stock shape and size to a greater degree. Your forge and your choice though.
-
Here's my 2 cents. The internal dimensions are the most important. You didn't indicate what you plan to forge so it's hard for us to evaluate whether your plan is suitable. Generally speaking, sixteen inches is longer than needed for most things if you can pass the stock through both ends. You are paying for fuel to heat the entirety of your forge chamber, so the bigger you make that chamber the more it costs you to heat it. For me 10 to 12 inches in length is about right. The height is also a couple inches more than I would use, but it's not crazy big. You don't appear to have any plan to line the fiber blanket with a hard coating that can take some physical abuse of stock rubbing or stabbing into it. There are some people who build their forges that way, but you will most likely have to reline your forge more often if you go that route. ITC 100 is expensive and is not better than a couple other coatings for this application, such as Plistex or Matrikote. It appears as though you plan to aim your burners at the center of the floor. Getting the flames to swirl is preferred in a gas forge and that is better accomplished by aiming the flames at the near side of the floor or at the opposite wall at an angle rather than at the middle of the floor. For a gas forge ideally you won't have direct flame impingement on the stock. The flames heat up the internal surfaces and those radiate the heat back into the forge interior to heat the stock. You *can* heat your steel by aiming the burners directly at it, but if combustion is not complete before the flames reach the stock you can get some scaling and/or super-heated spots that can have detrimental effects. That's a bigger concern with high carbon steel though. To answer your question, we recommend that the end of the burners be just inside the shell - about 1/4 to 3/8". So compared to the surface of the forge chamber the ends of the burners are recessed 1.5 to 2 inches, depending on the thickness of the lining and coatings.
-
There is another option for making them have better edge retention. You can weld high carbon steel to the bit area. This could be done by forge welding or electric arc - as long as you get full penetration welds. Beveling the edges to be welded and welding from both sides has worked for me with other projects. Of course then you have to clean up the welded area and then go through the heat treating steps for the alloy that you weld on.
-
What did you do in the shop today?
Buzzkill replied to Mark Ling's topic in Blacksmithing, General Discussion
I have the uncanny ability to be unable to find something that was in my hands 30 seconds earlier and I have moved less than 10 feet from the last location that I know I had it in my hands. Along with that ability I can intentionally put something in a place where I know I'll be able to find it - and then promptly forget where that location happens to be. Normally I'll find the lost object at a later time when looking for something else I've misplaced - or stashing another object in a place I can't forget. I can't be sure, but I suspect there are shop gremlins whose goal in life is to cause (or intensify) insanity in anyone focused on a project. -
What's your latest blade look like? Post em and let us see.
Buzzkill replied to HondoWalker's topic in Knife Making
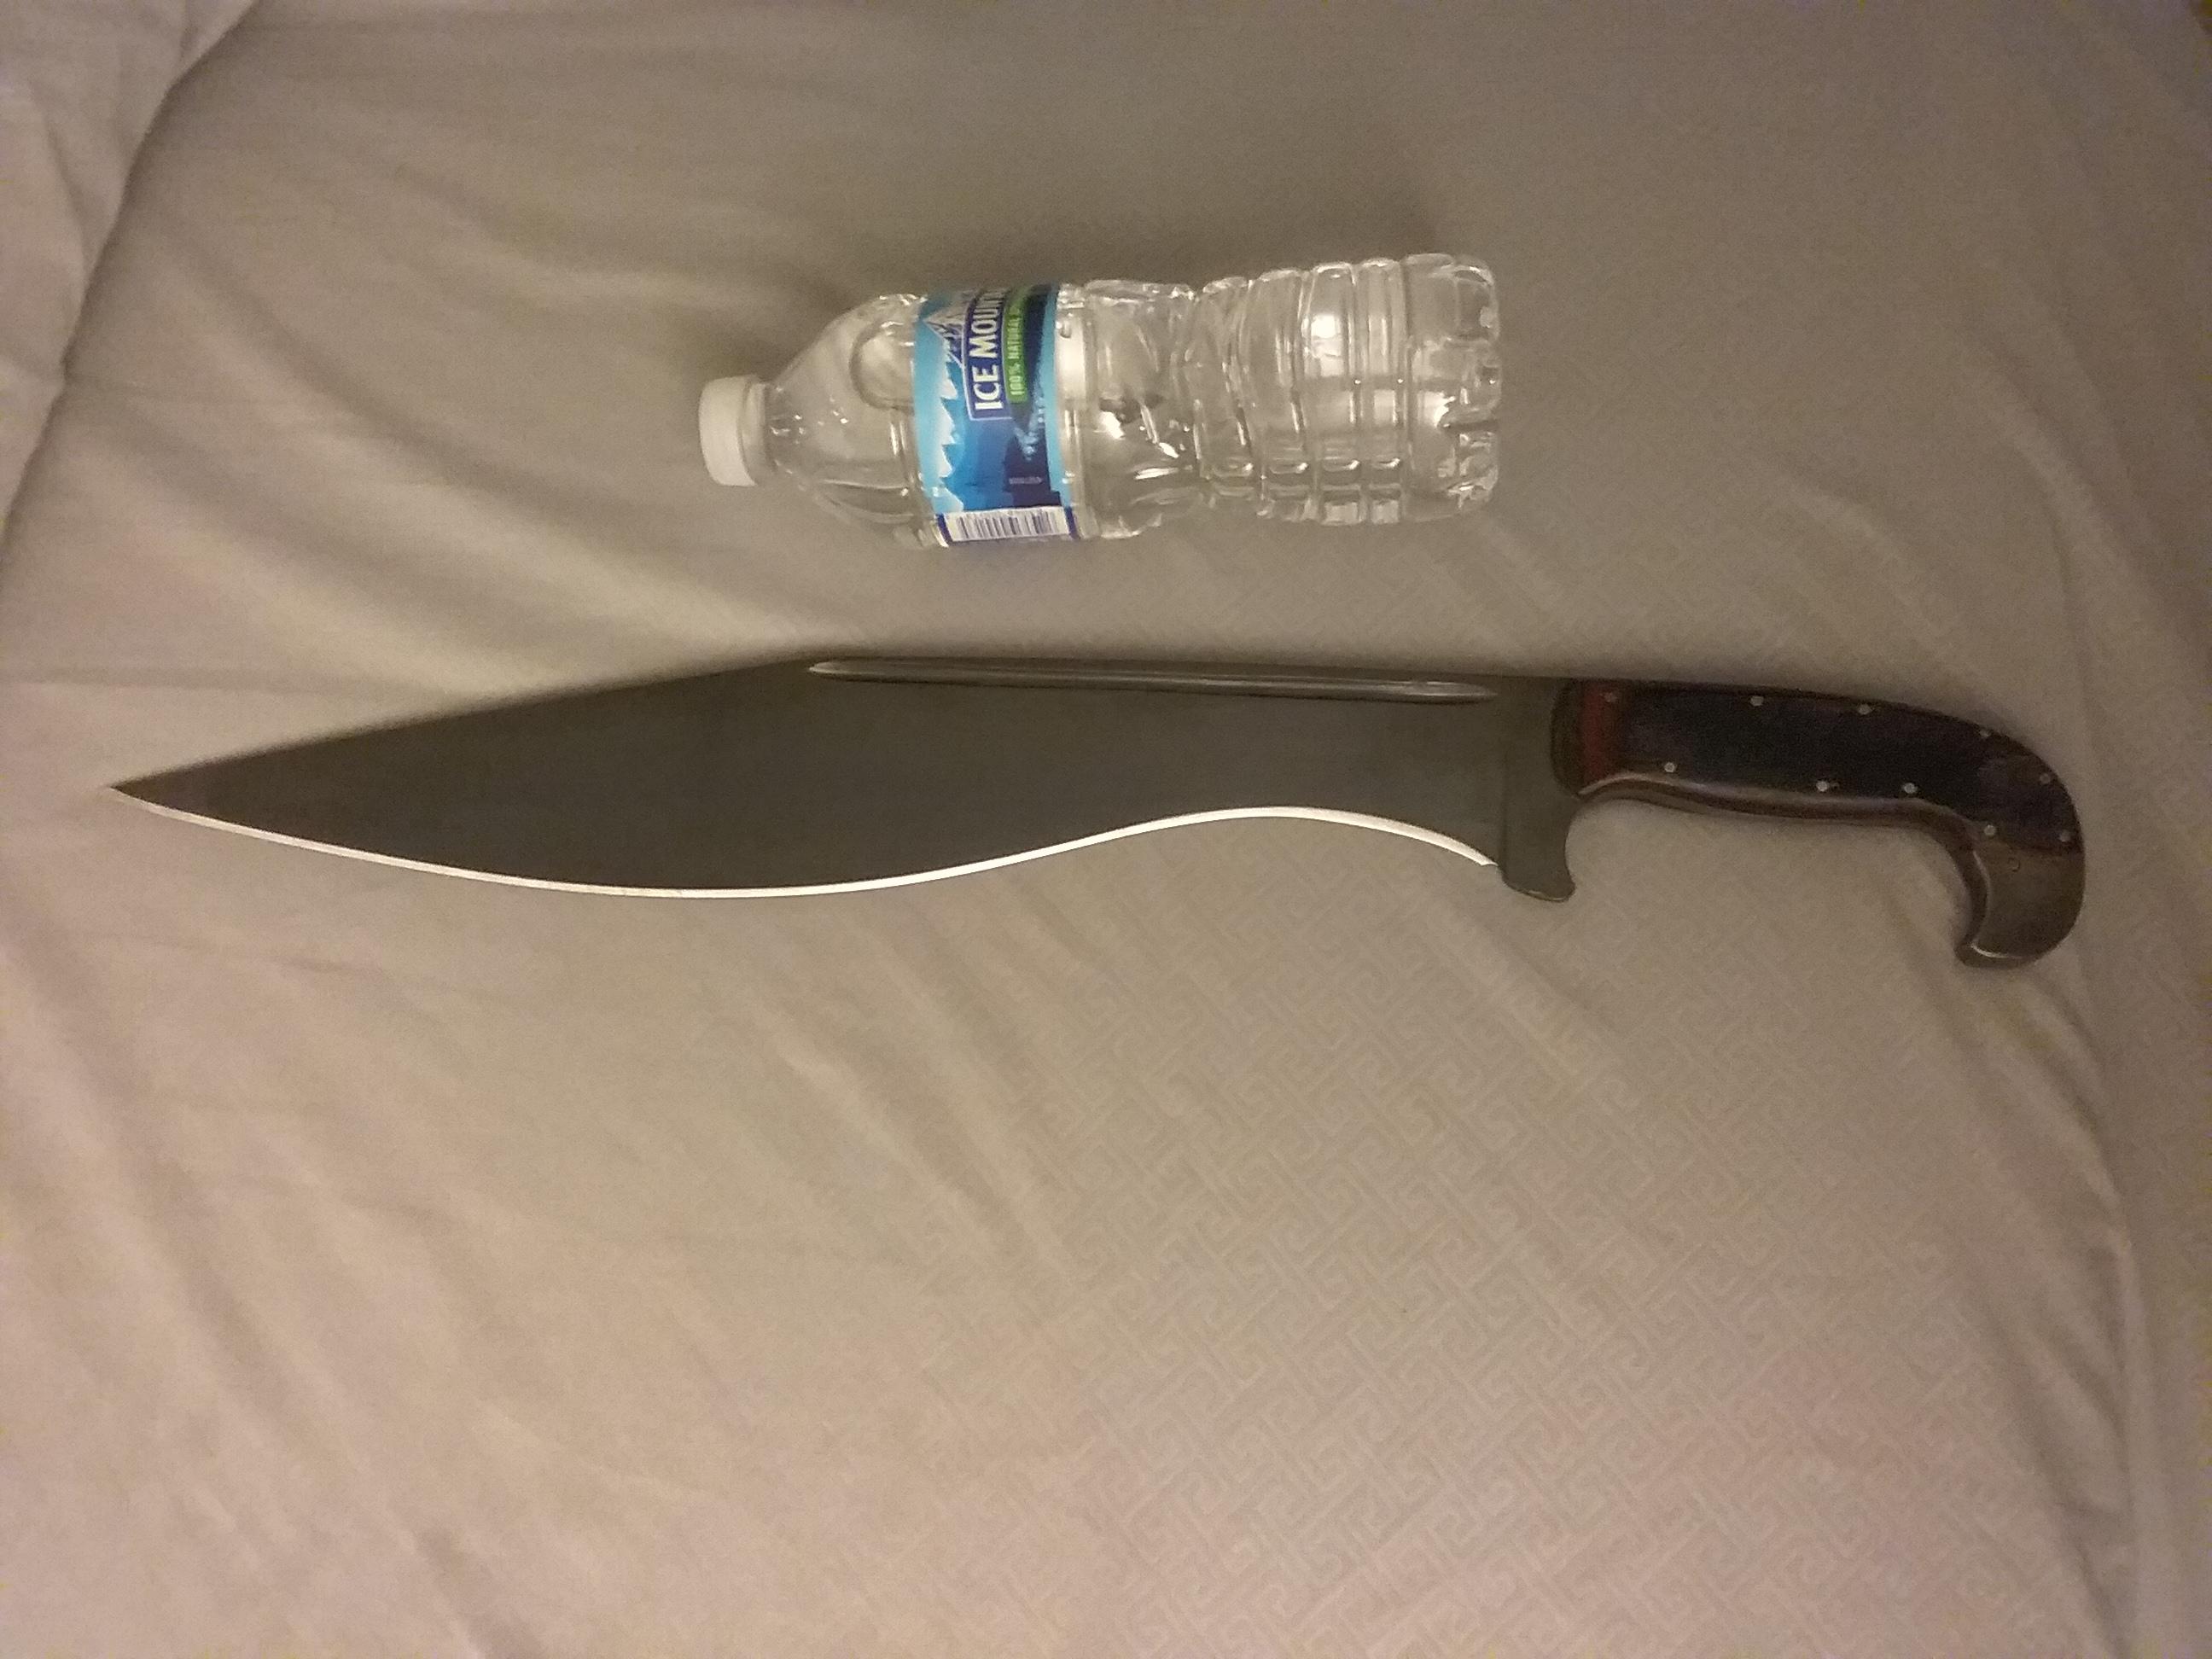
Here's one I finished a few days ago. A friend of mine wanted a "really big, scary looking knife" that would be suitable for something like a zombie apocalypse. This is what I came up with. Obviously it is heavily influenced by the kopis sword. It's 80CrV2, sanded to 400 grit and then cold blued. I put the water bottle in the picture for scale. It's 20 inches long overall, 2.5 inches at the widest spot on the belly, and 3/8" at the thickest point on the spine. It weighs in at 2 lbs, 2.5 oz. He seems happy with it, so I am too.
-
Here's a way to narrow down the potential problems: switch the fuel input lines for the burners. If the problem stays with the same burner then the issue can only be in the burner itself (or where the burner enters the forge). However, if the problem switches to the other burner, then you have a supply issue. Once you can narrow the possibilities down a little we can work through them one at a time until we discover what caused the change.
-
Typically the type of fire brick that is sold at hardware stores is the heavy hard fire brick. These bricks are not very insulating, which means they soak up a lot of heat, and that can cause a forge to take a long time to heat up. It may also limit the max heat you can reach. If you are going to use bricks for the forge body you want insulating fire bricks (IFB). These are much lighter, much more fragile, and much more expensive. However, they can withstand the heat produced in the forge and they hold the heat in much better. The recent consensus on here is that Morgan K-26 bricks are among the best insulating fire bricks available at this time. You still may want to put a piece of kiln shelf, or possibly even a hard fire brick, on the floor to protect the more fragile bricks from mechanical damage as you move stock in and out of the forge.
-
You also may find the size and shape of that kiln somewhat limiting for blade work. If you only intend to make relatively small knives it will probably be fine. Larger blades may not fit well in it. However, if it's in working order I'd probably snap that up for $100.
-
Rusty oceanfront 316 SS gate in Los Angeles - I'm at wits' end
Buzzkill replied to mb9's topic in Finishes for Metal
I'd guess that either that isn't 316 SS or it's from a batch that barely meets the minimum specifications. The business I'm in uses a lot of 316 cargo tanks for corrosive materials. We've seen this a bit in the past couple decades. With improved precision it seems that steel producers are able to keep to the low end of the requirements for composition in alloys. As a result we have 30 year old SS tanks that show less susceptibility to corrosion than those built in the last 10 years even though they all are 316SS. We've begun to have new tanks built using Duplex 2205 recently for better corrosion resistance, but the oldest ones have only been in service about 2 years so I can't give a good comparison to 316 yet. -
Fabricated anvil build (I'm new)
Buzzkill replied to Vinito's topic in Anvils, Swage Blocks, and Mandrels
Remember, if the tongs are close to what you need, you can heat up the jaws, place the stock between them, and hammer them to a better fit. You can adjust the reins for a comfortable grip at the same time. -
I can't help but wonder if those SS sleeves I used in my latest NARB could be used in wood test blocks to give you more time.
-
My gear was weighed once when I was out in the field. I was carrying just over 120 lbs. That included weapon, ammunition, kevlar helmet, water, radio, encryption device, extra batteries, rucksack, etc. etc. However, this was done when the weather was reasonably warm. I didn't have the "good to -40 degrees" goose down sleeping bag, snowshoes, or heavier clothing with me. Like George indicated though, we had a small amount of gear separated so we could drop the heavy rucksack quickly if we were engaged. That would take me down to about 45 to 50 pounds of gear, but fairly well distributed on the body. I can tell you that in full gear someone would have to lift me on to a horse though. It didn't matter how big or fit you were. Ten or more hours of walking with all that gear on wore everyone out. I thought they were just playing a trick on the new guy when they first told me all we had to carry. They weren't.
-
The efficiency part maybe, but how well can you do a temper cycle with an induction forge?
-
Even in that case there is frequently a difference of about 1200 degrees F between those two processes. Not many forges can use the same burner setup for both hardening heat and tempering cycles.
-
What I've observed with the ribbon burners I've made/used is that each hole produces a separate flame cone. Especially if the burner is running fuel rich then there is a secondary flame envelope that does tend to merge with those produced by the other nozzles. However, I don't think that's a particularly hot flame. As far as I can tell it's best to have as close to complete combustion as possible in the primary flame cones for getting the most heat out of the least amount of fuel. If the flames are on the oxidizing side of neutral they can still be quite hot, but scale will form on the stock while it's still in the forge. That's less than ideal for general forging and can make forge welding significantly more difficult. When it comes to heat treating, it depends on which part of the heat treatment you are referring to. Normalizing and preparing for quench require significantly different temperatures than tempering cycles. The even heat there can be beneficial. My forge is only about 10 inches deep though, so anything beyond that length still has to be moved in and out of the forge at both ends to achieve even heat on the whole piece. The noise reduction compared to single port burners sold me on the ribbon burners as much as anything. One other thing I forgot to mention earlier is that for the naturally aspirated (sometimes referred to as venturi) ribbon burners, they are much less susceptible to disruption from breezes than single port burners seem to be. I forge outside a fair amount of the time so some days this can be a significant factor for me.
-
While this is true it doesn't tell the whole story. If you don't clean the steel some of the scale will pop off when you hammer it, but not all of it. The portions that do not flake off tend to become thicker with subsequent heats and then as you hammer on the steel you are driving those oxidized portions down into your work piece. Once they are embedded below the working surface it becomes quite difficult to remove them. Brushing every time you remove the steel from the forge limits the thickness of the scale that is formed and therefore the depth that scale is pushed into the steel as you hammer. When you do clean your work later by something like a vinegar soak or wire wheel, the surface appears (and is) pitted where all those pieces of scale that you removed were driven down past the surface. At that point to get a smooth surface you'll have to grind/file to the depth of the deepest pit. You can also try forging some more after cleaning it up, but if you repeat the actions that created the problem you'll just wind up with a thinner and thinner blade. Another thing that can help after you are done getting the shape and thickness you want is to use planishing blows (rapid and lighter than forging strikes) at a lower temperature than forging to help smooth out the surface. Flatters can also be used, but again you want steel as close to scale free as you can get when doing these things - hence the lower temperature.
-
In some ways your question is similar to saying you don't understand why some people prefer tomato slices on a sandwich. People like what they like. I've been interested in knives, fire, explosives, and firearms since I was young. I can't tell you why exactly. I just like them. Forging knives allows me to work with fire to make blades. That combines two of those interests at the same time. I enjoy forging tools and decorative things as well, but I am more drawn to blades than other things. I don't really enjoy standing in front of the grinder for extended periods of time, but I do like the forging and the end result. I do get a sense of satisfaction from creating something useful for myself or someone else that can potentially be enjoyed for generations.
-
I had a guy try that one on me in the early 90's when I was on Bourbon Street. I already knew the gag and told him so, but that didn't deter him. He changed to "I bet I can tell you how many kids your dad had." And the punch line there is "Your dad didn't have any kids. Your mom had them all." I ended up talking with the guy for a while and I asked him why he does what he does. He told me he can bring home around $300 on a good day and he sets his own hours. Kinda hard to argue with that.
-
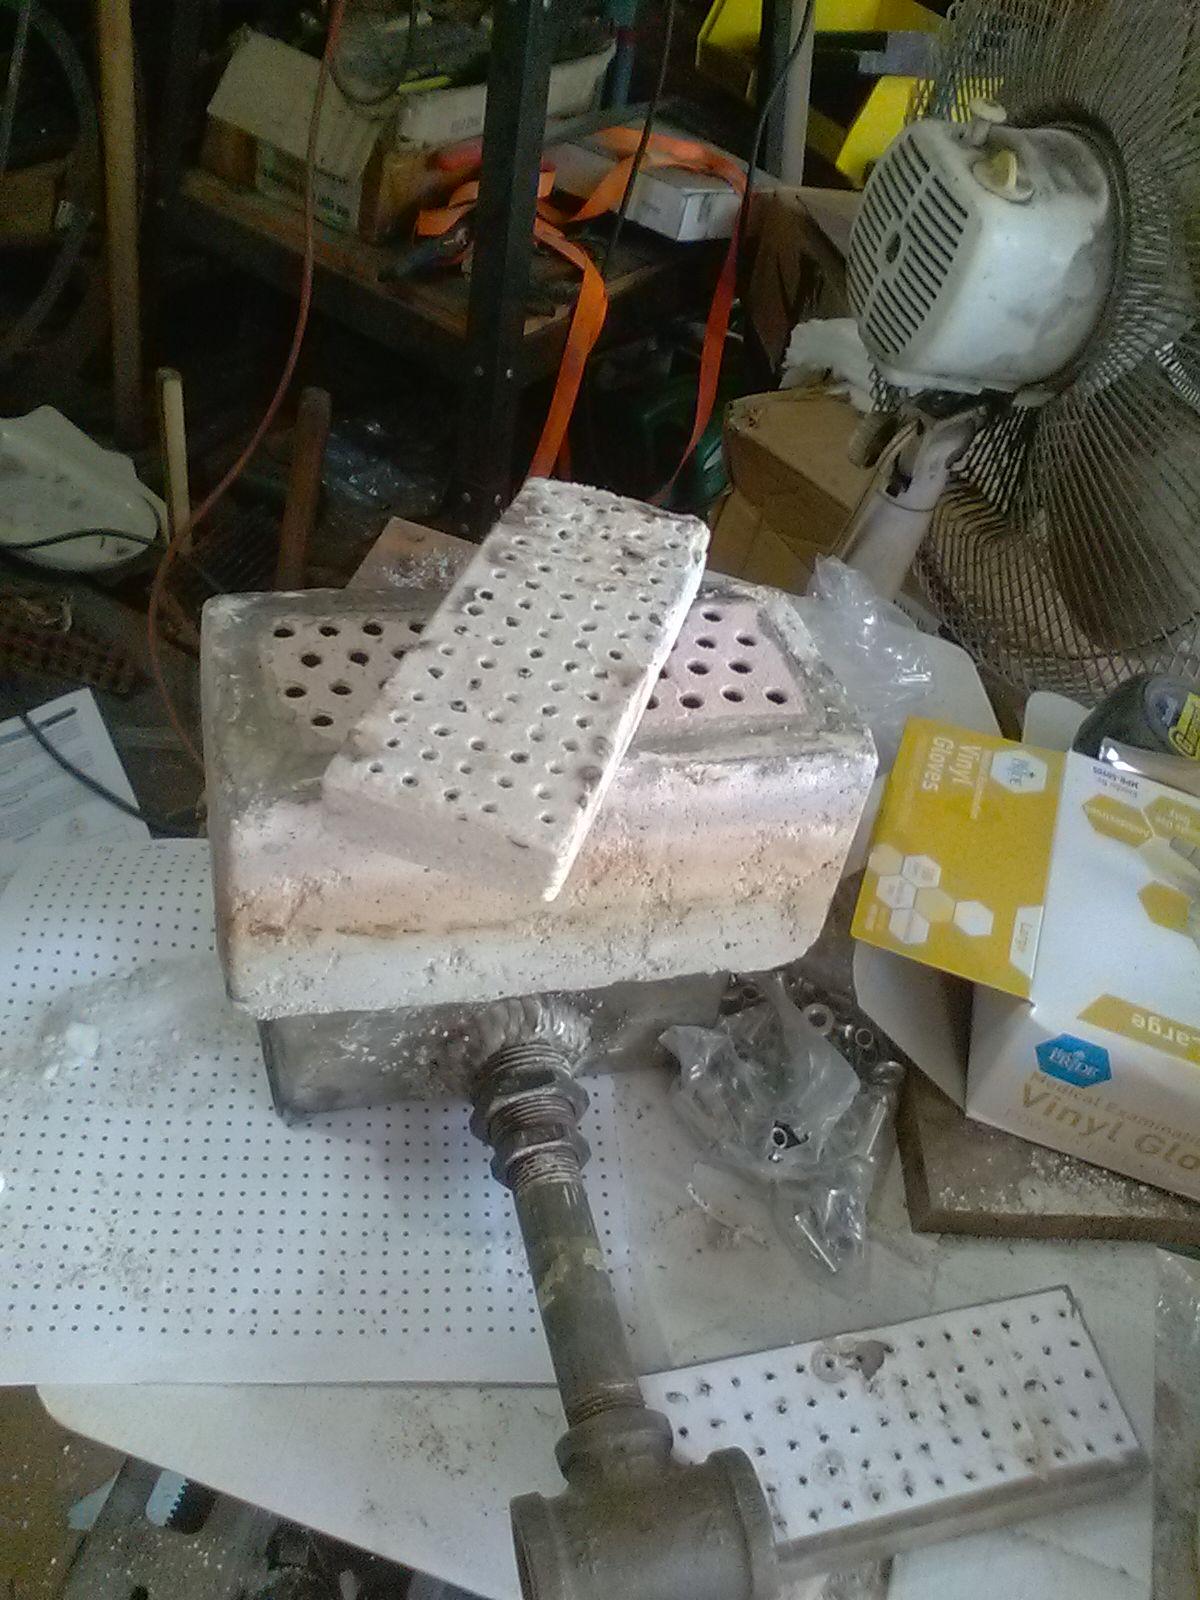
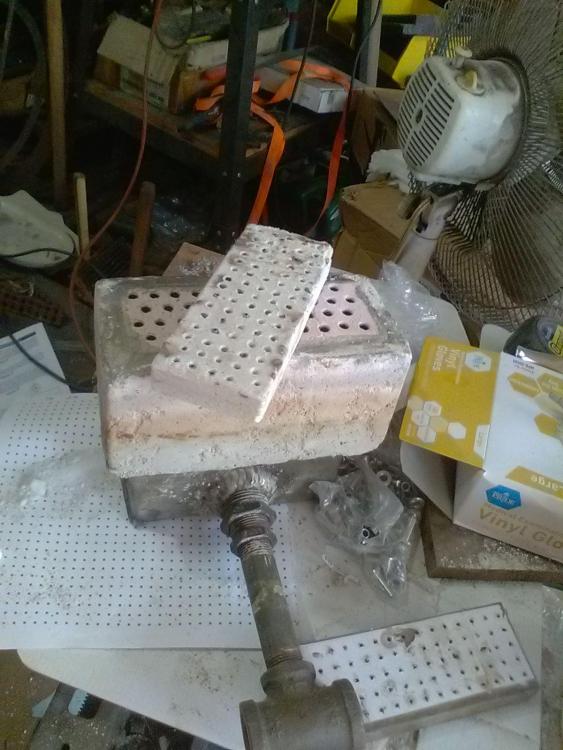
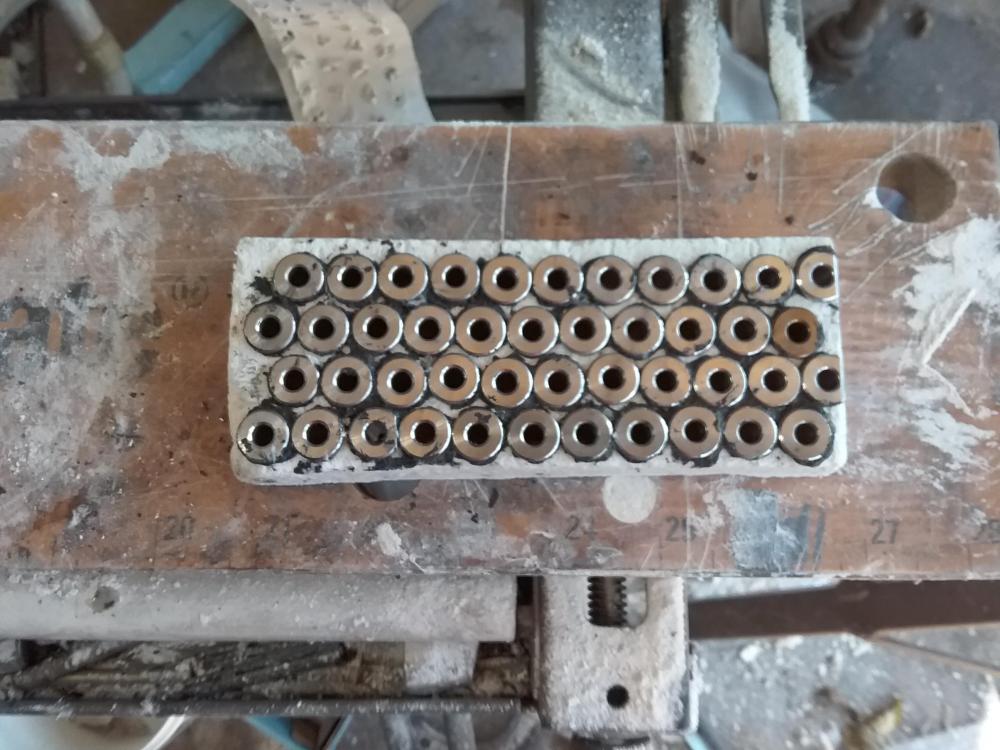
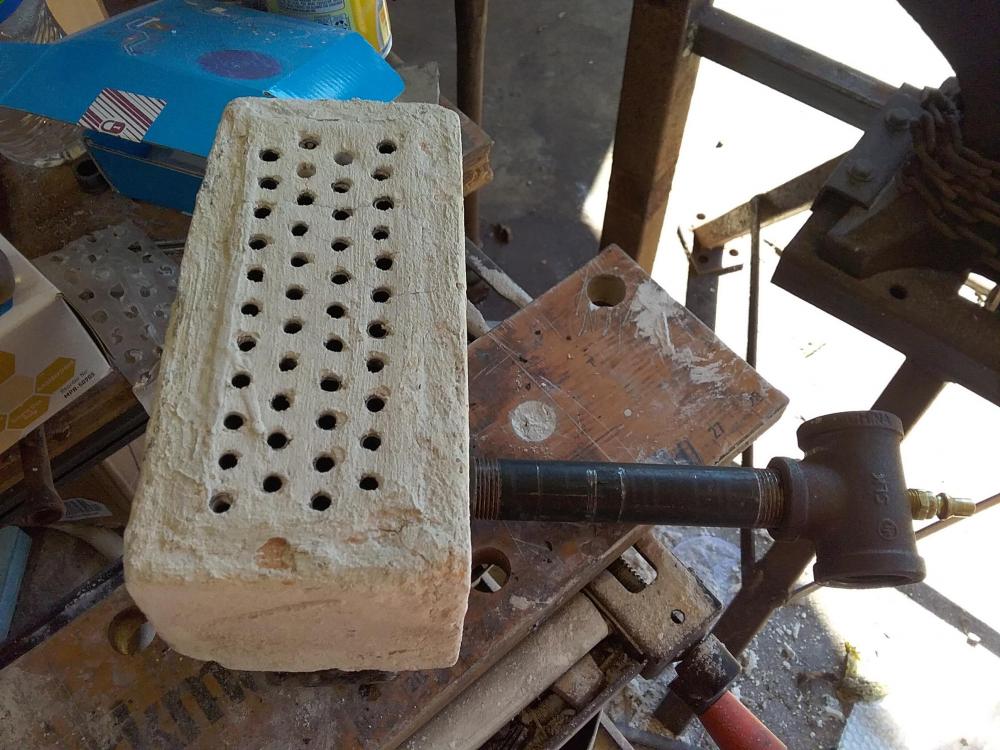
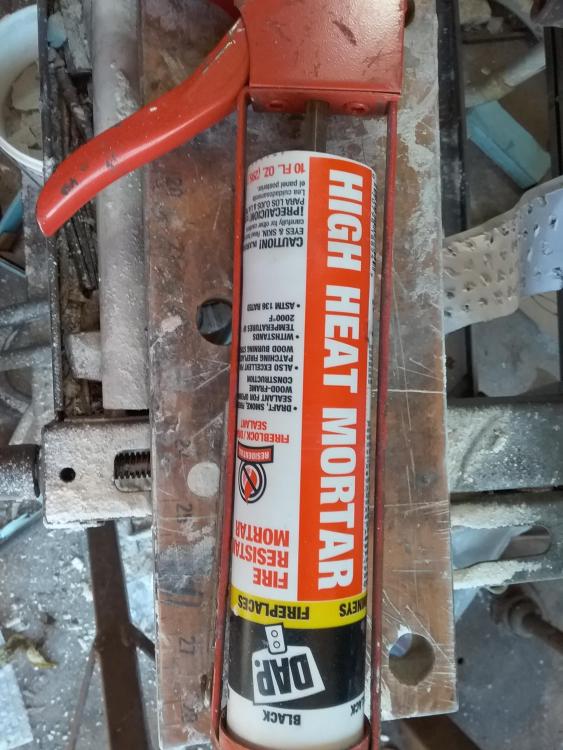
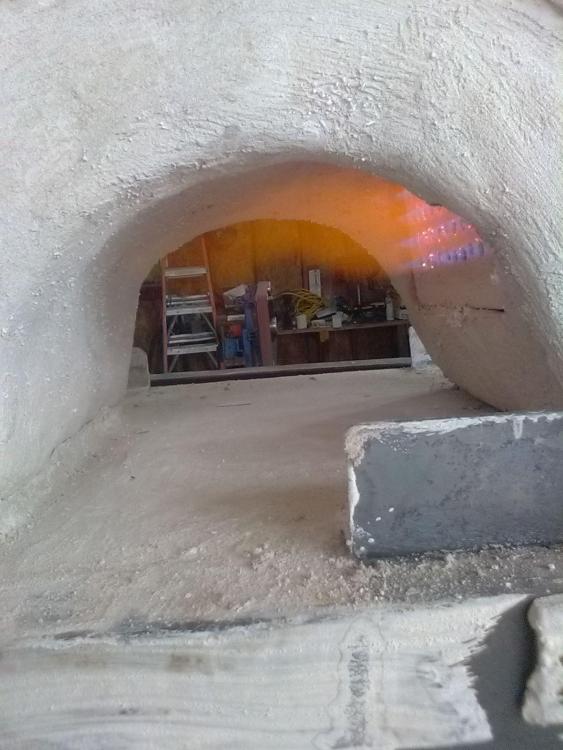
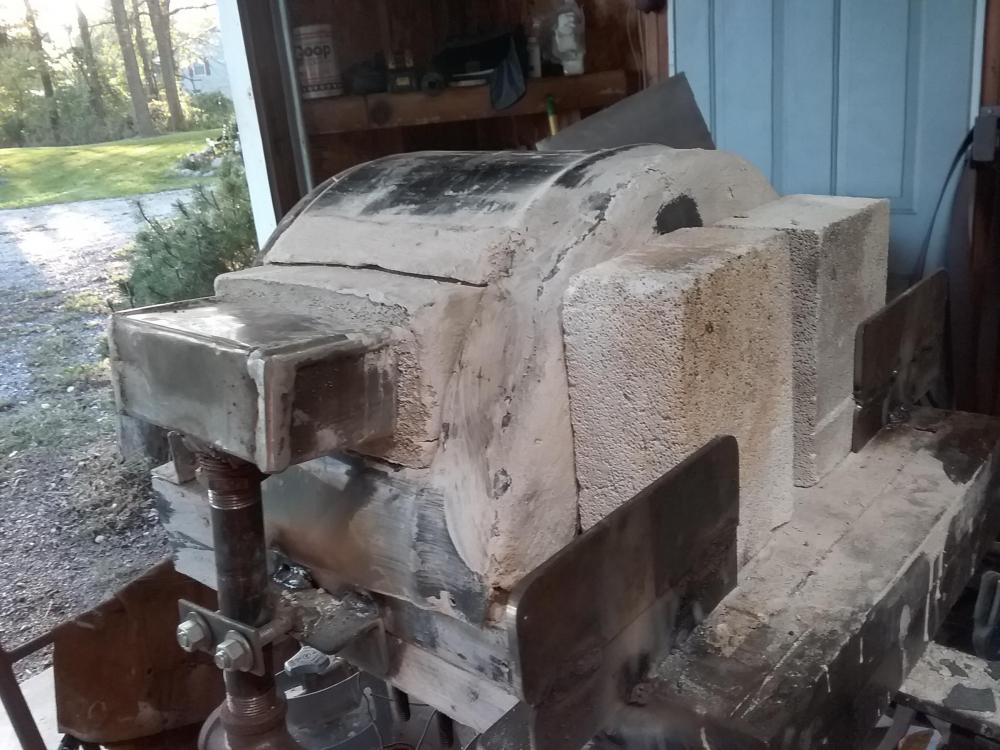
I've been on lifting restrictions due to surgery recovery the last couple months, so I decided to rebuild my forge and I worked on a new NARB design as well. The last NARB I made used a portion of an IFB with lots of 1/8" holes drilled in it. It worked well for a while, but lately I was having to turn the pressure up significantly to keep it from burning back into the plenum. I dislike casting burners, so I'm always trying to think of designs that will function well and allow me to replace the burner head without casting a new one. Here's what I came up with (with some consultation with Frosty in PMs): I used a piece of fiber board rated for 2600 degrees F for an "insert" into a cast refractory "box" that is cast directly onto a steel plenum made from folding sheet metal (around 1/16" thick) into a box with an open end. The refractory box has a lip about 1/8" placed so that the fiber board insert rests on it and is flush with the edge of the refractory box on the flame side. I didn't start taking pictures until after I had already cast the refractory box onto the plenum and tested a fiber board insert or two. I'll share what pictures I have though. This pic shows the burner after testing and another insert sitting on the burner face for reference. That one had 75 "nozzlettes" with inner diameter of 2 mm. It wasn't enough throughput, so I moved to bigger holes. I ended up using stainless steel sleeves in the holes in hopes that this will prevent/reduce degradation of the fiber board in use. I had wanted to try this before with cast burner heads, but was concerned that the difference in thermal expansion would cause problems. Fiber board has enough "give" to it that this should not be a problem. The sleeves I used have this description "T316 Stainless Steel Protective Protector Sleeves for 1/8" 5/32" 3/16" Deck Cable Railing Kit." Here's what an insert looks like from the plenum side after all the sleeves have been installed and cemented in place: This gives me 44 holes on slightly larger than 2" x 6" fiber board insert. The ID of these sleeves is 13/64", and the length of them is such that they don't quite reach the opposite side of the fiber board I used on the flame side - which is what I wanted. The fiber board was listed as .8 inches thick btw. The next pic shows the burner after cementing the fiber board in place, test firing, and then coating the flame face with a kiln wash that is supposed to be good up to 3000 degrees F. Here's a pic of the cement I used to keep the sleeves in place and to glue the fiber board to the cast refractory box. It's only rated for 2000 degrees F, so I don't know how it will hold up long term. The next pic shows the burner functioning with no visible pressure showing on the gauge, so less than 1 psi. This is what it looks like from the outside of the forge. I tried a number of different combinations of 1/2" and 3/4" T burner modifications. In the end I believe my best results were with a standard 3/4" T burner setup using a .030 mig tip that was trimmed back a little over halfway compared to the opening when viewing from the side. That took me from cold forge to "forging orange" in about 10 minutes. It took me a total of 20 to 25 minutes to reach what I'll call "butter stick yellow" heat where I'm comfortable forge welding high carbon steel. After running at forge welding heat for 20 minutes or so I turned it back down to less than 1 psi without it burning back into the plenum. There are some issues though. First off, I can't keep it lit outside the forge even with very low pressure. It blows the flames off the burner face. Inside the forge it stays lit, but there is some flame lift away from the burner face until the forge gets hot. If I did my calculations right this burner has about 80% of the throughput capacity of a 19 crayon hole burner. However, with the shorter nozzlettes and the different material the friction is certainly different. I'm not educated/smart enough to try to figure out a direct comparison between the two. Secondly, in my forge at least, this design suffered from what I'll call "harmonic howling." This is a sound similar to, but more intense than, blowing across the top of an empty glass bottle. It is affected by a combination of back pressure and temperature - and maybe other things as well. Once it starts it can be stopped by covering the air intakes to reduce the flow or by turning the regulator down. Over time as the forge heats up greater pressure can be used without the phenomenon occurring, but it really can be annoying when it's happening. I did a little online research and found that model steam engine propane burners sometimes have the same issue, for whatever that's worth. I've only had this in use for a handful of hours, so I have no clue as to the longevity. My goal was to create something that functions well and that I could quickly refurbish without having to do more casting. Hopefully when/if it fails I can just remove the old fiber board insert, cement in another one and get back to business. However, it won't surprise me too much if my cast refractory box fails before or when the fiber board does. I used sifted Kastolite 30 for the box because that's what I had on hand, but I believe there are better options out there. I didn't need to make the steel portion of the plenum quite so long. That could have been about 1.5 inches shorter, and I don't think it would have negatively affected anything. Since the plenum is so large I get a pretty good pop when I shut the gas off and the FAM inside the plenum ignites. I still need to get the forge interior coated with Plistex, but it is functional as it is and so far the burner seems to be performing in line with my expectations.
-
I know there is a pic in the instructions that shows this, but I'm not sure it's recommended. My experience with T burners is anything that impedes or changes the direction of the fuel air mixture flow before it enters the forge tends to negatively affect the burner performance.
-
I have used a single port T burner in a forge and then used the same T burner attached to a ribbon burner in the same forge afterwards. Of course I had to cut a hole in the forge to accommodate the ribbon burner, so that resulted in a change to the forge interior (and the ribbon burner was top-mounted while the single port was side-mounted), but otherwise it's apples to apples. I didn't take temperatures, use a stopwatch, or weigh propane tanks. What I can tell you is that I could achieve the same heat (by my eye) using lower pressure in the same T burner set up when using the ribbon burner. That is an indication of requiring less fuel to accomplish the same thing - i.e. greater efficiency. I'm not out to prove or disprove anything to anyone. I'm sharing my personal experience/observations. For me the ribbon burner overall wins hands down. The factors for me are 1) it's MUCH quieter than a single port burner, 2) it provides a MUCH more even heat distribution within the forge, and 3) It appears to require slightly less fuel than the same single port burner in the same forge. Someone may want to take the time and trouble to collect and compile all the necessary data to prove things in a quantifiable way. I'd rather spend my time heating and beating on steel.
-
Personally I'd just do stock removal with that size stock. You just don't have enough excess thickness to move the metal around much and you will lose some material due to scale and grinding out errant hammer marks. I like at least 1/4" thick stock to start with. Others may have their own preferences. Looks like TP already beat me to it.
-
This is an oversimplification, but think of the difference of a single water hose with a specified amount of pressure shooting into a mostly enclosed area. Now think of the same supply hose having the stream divided into smaller streams shooting into the same mostly enclosed space. Which one do you think will result in more water staying in the space for more time? We're not talking about a difference of twice as long or anything like that. Just slightly longer. It is more complicated than that in reality. Typically the total area of all the individual holes (or nozzlettes as we sometimes call them) in a ribbon burner is greater than the area of the mixing tube that feeds it. There is friction between the fuel air mixture and the walls of whatever it passes through. The surface area causing friction in a ribbon burner is not inconsequential. The result is that complete combustion can occur in a shorter distance and with slower flames in a ribbon burner compared to a single port burner. My personal observation is that a ribbon burner is slightly more efficient and definitely provides more even heating within a forge compared to a single port burner. Another major issue for me is that ribbon burners tend to be significantly quieter than single port burners. Even if there was not any gain in efficiency, that factor alone would be enough for me.
-
Tire hammer build questions
Buzzkill replied to IronChef's topic in Power Hammers, Treadle Hammers, Olivers
I also built a tire hammer without any plans, so specific questions about that design I can't help with. However, for the anvil I acquired quite a bit of 3/4" thick by 6 inch wide steel. I'm only part way through the anvil creation, but when done I'll have 8 pieces with full perimeter welds to give me a 6x6" anvil 30 inches tall. I was fortunate enough to obtain this steel for a little over scrap price from an acquaintance who does a lot of junking and knows to look for certain things for me. I would not have wanted to purchase the steel new right now.