anvil
-
Posts
3,246 -
Joined
-
Last visited
Content Type
Profiles
Forums
Articles
Gallery
Downloads
Events
Everything posted by anvil
-
No matter what brand you use, I suggest you look into a gas saver attachment. This gives you a place to hang your torch that will cut it off and a pilot to relight it. You don't have to reset your gas and ox every time you shut down. This is especially handy for doing jewelry work.
-
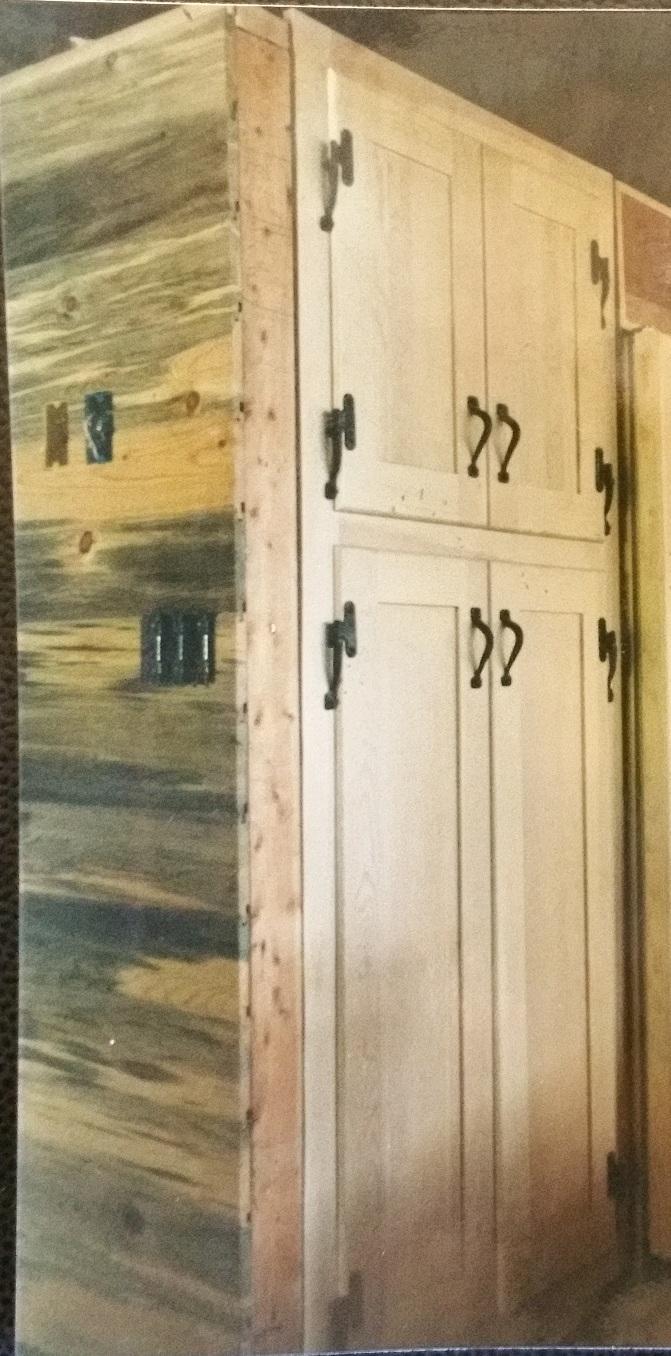
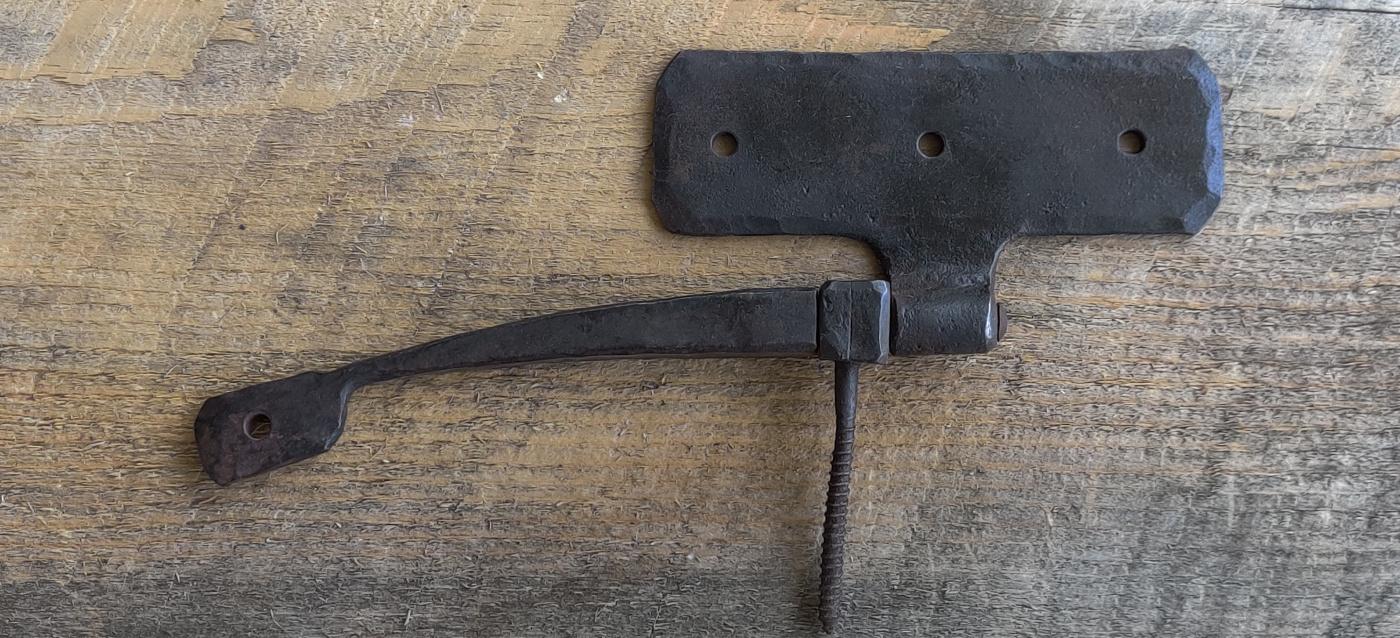
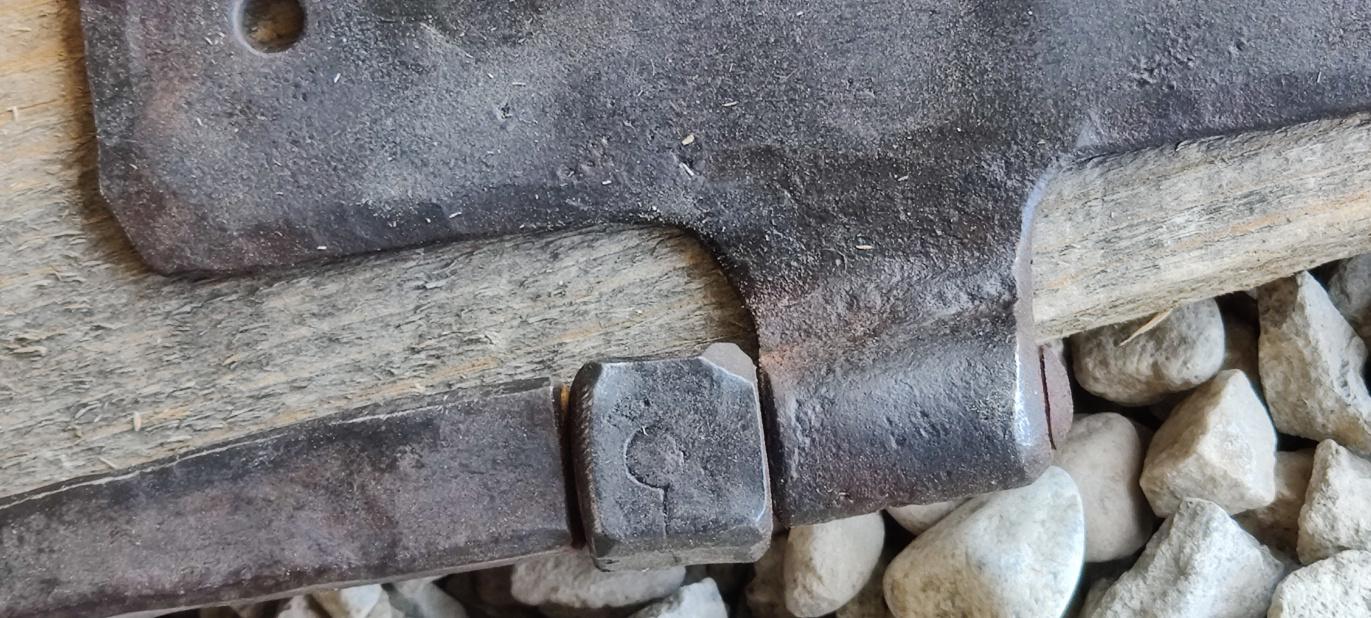
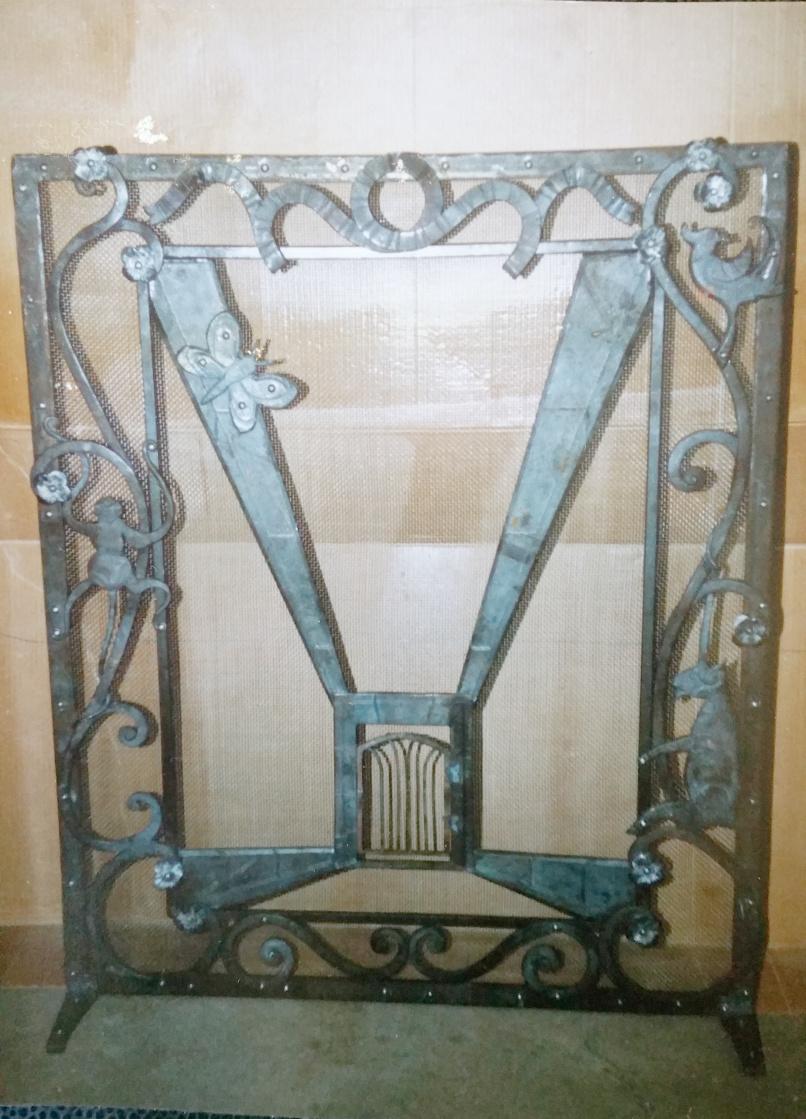
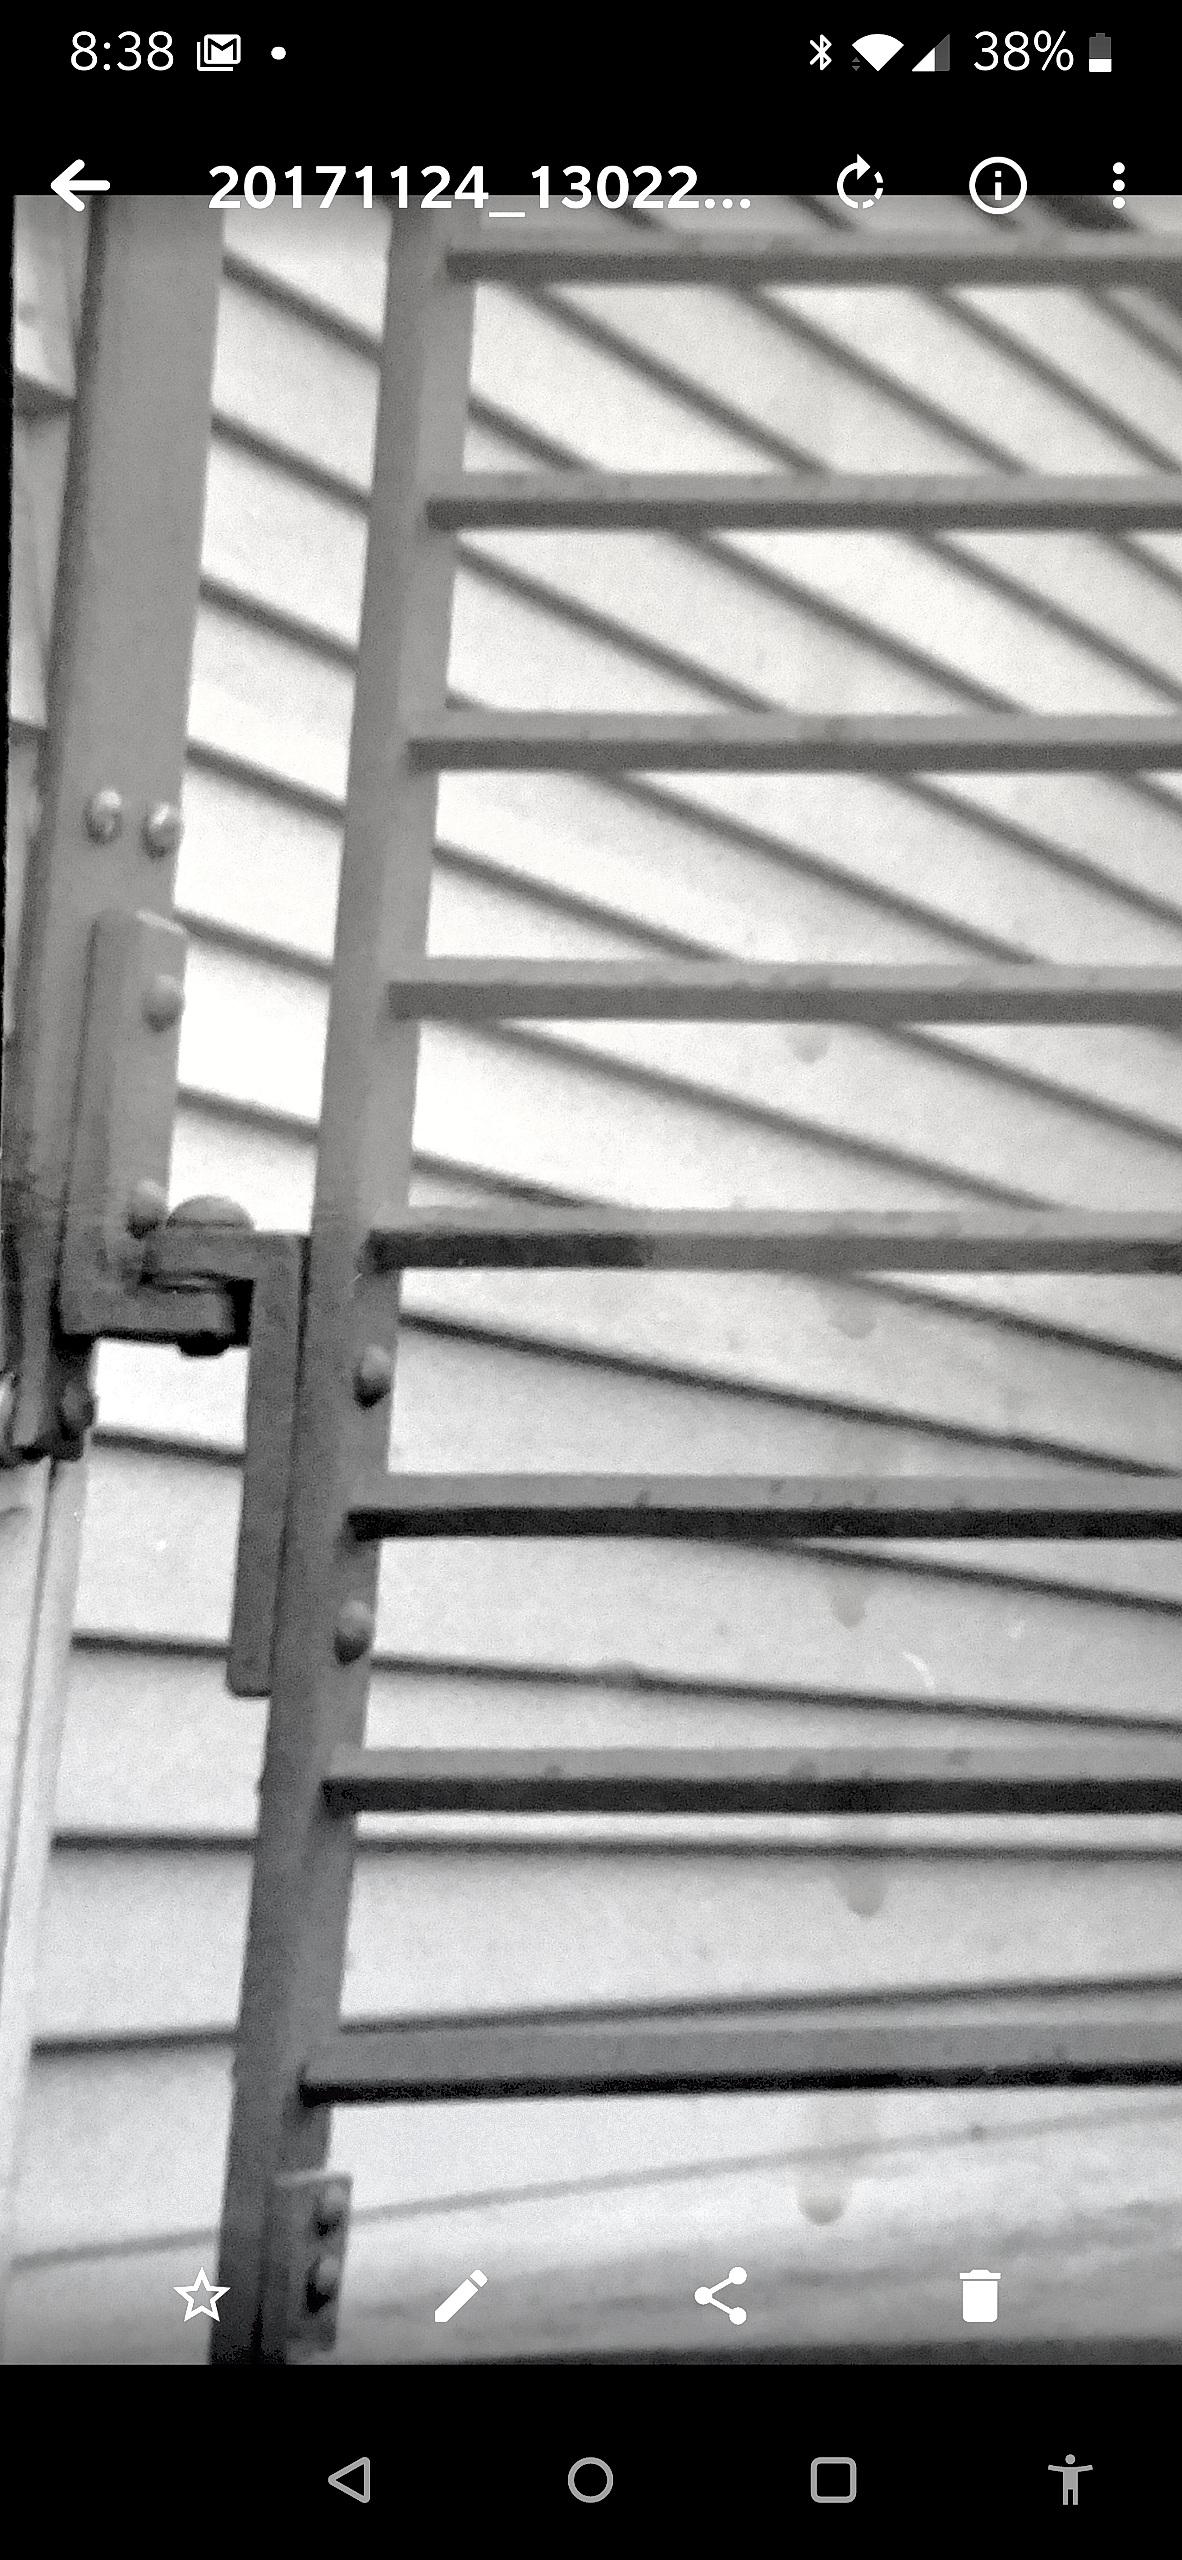
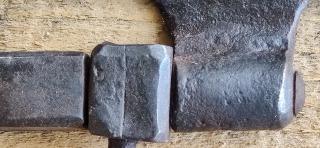
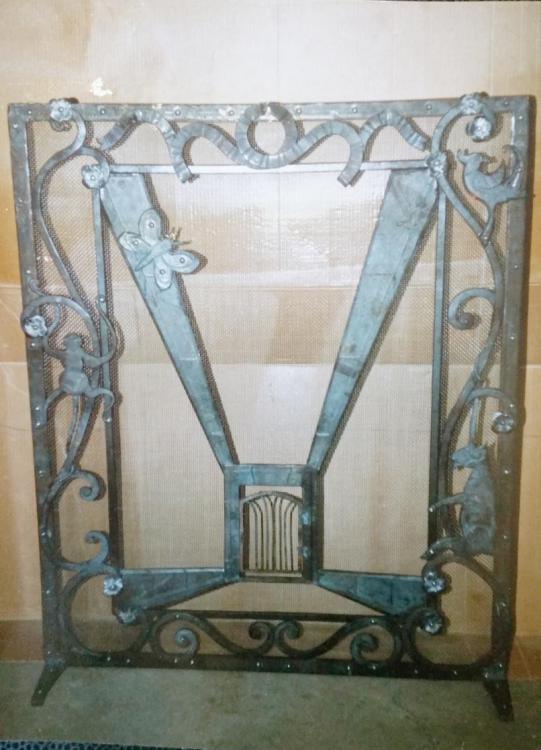
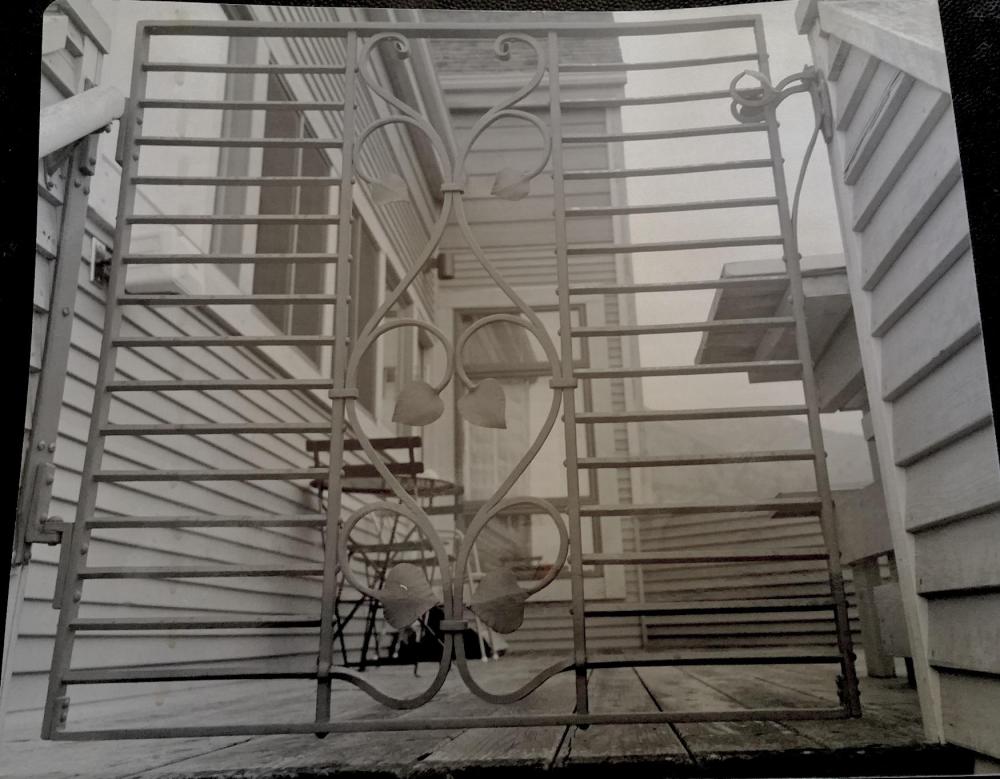
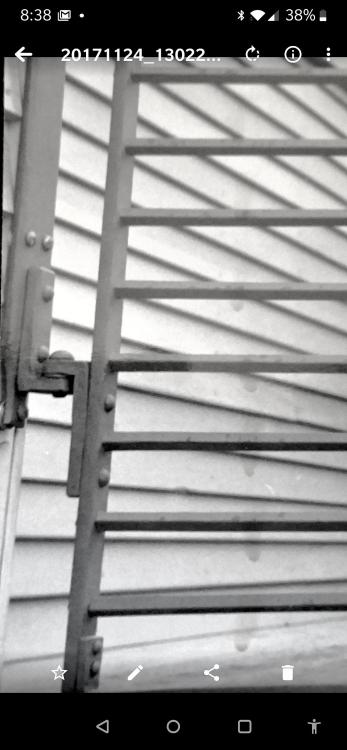
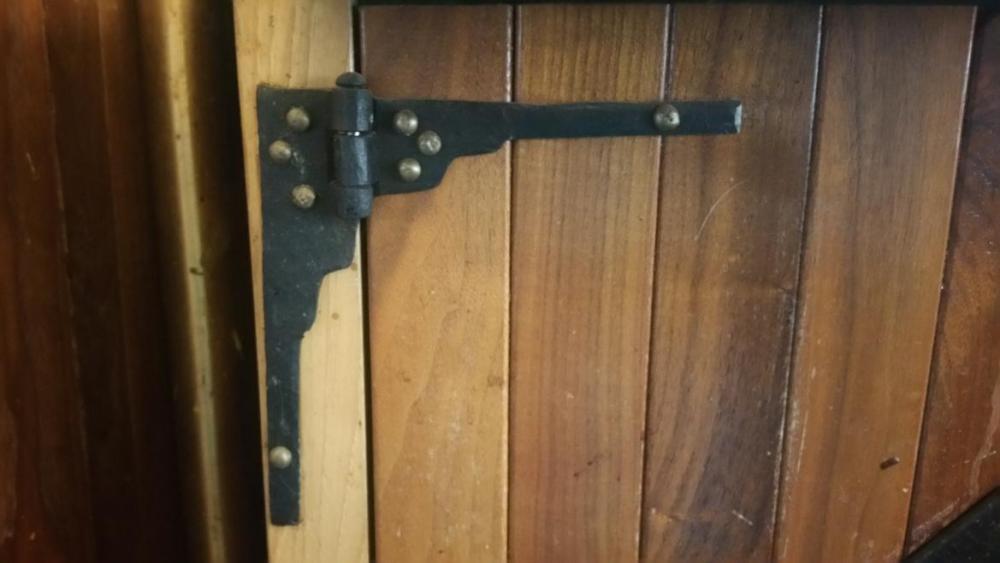
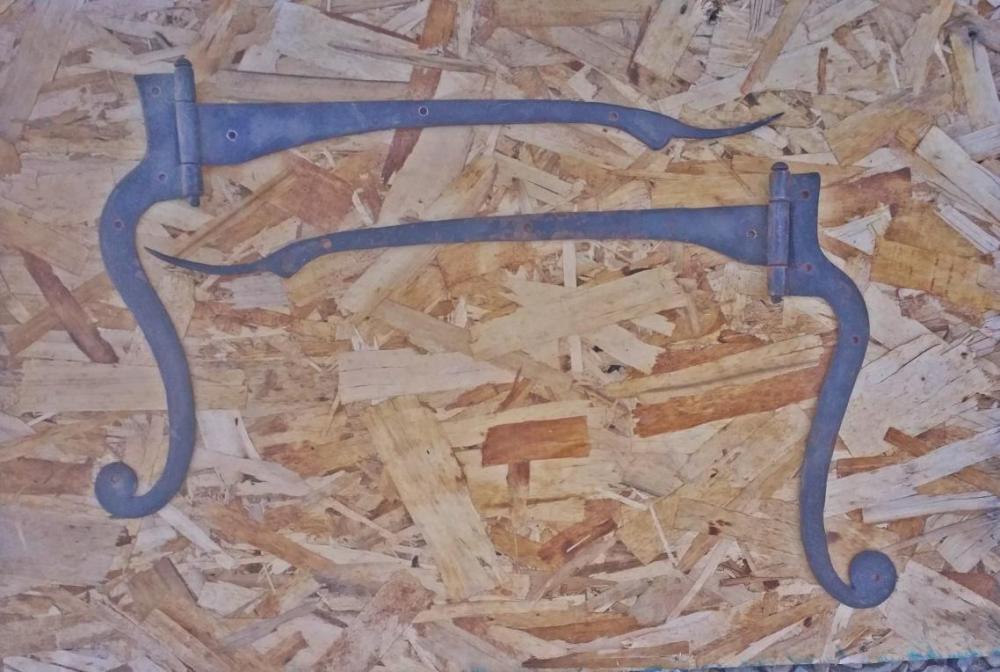
 I thought I'd show other things that need hinges. Forged Hardware is a great way to make some good money as a part time or full time smith these hinges are a simple butt hing with a forge welded barrel. The purpose of this iron is to not be the focal point but to accent the woodwork and draw your eye to the wood details. It is an oversized door so I added oilite bushings and a thrust washer. The finials on the eustion match the seashell carved into the door. This is the heaviest hinge I've made. 3/8" mild steel Forged welded barrel. I often add a oilite or brass washer to protect the steel from wear. Rat tail hinges are one of my favorite hinges This one was for a set of French doors. Fog welded barrel. The attachment is a lag screw with the head cut off, then I added a forge welded collar for mass. A delicate weld here done in one heat. The length of this piece matches the offset of the cabinet door. This has no off set the door was flush with the jamb. I've never had the luxury to just practice, so I make a sample that tells the story of how it's made and to find the boogers and traps. Then OJT to for "practice". It took about half the job to be able to get this forge weld in one heat and not have the butt weld etc to disappear. Pintle hinges for fireplace screen. Rolled barrel. For those who prefer forge welded barrels, the top hinge barrel is forge welded to the strap. The choice between rolled or forge welded barrels for me is determined by many things. Basically the time difference is minimal, so the choice is esthetics of each job. This is a fire screen for a nursery. It is a perspective drawing in iron. Notice the perimeter scroll (sides and bottom) are one piece. I made the garden Gate with working hinges. Little butterfly hinges with a rolled barrel. Lol, it's a traditional made gate and the frame is made with 3/8" square stock, I believe. A garden Gate. Playing with line. The pickets match the siding and are on the diamond. The bottom pickets are one piece with the center scrolls. Simple hinges from forged right angle bends and a large rivet Cabinet hinge for a friend. Lol, he forgot to add the brass washer. I did these for a log house. I used this pattern for exterior doors, interior doors, and cabinetry. Each was a different size.
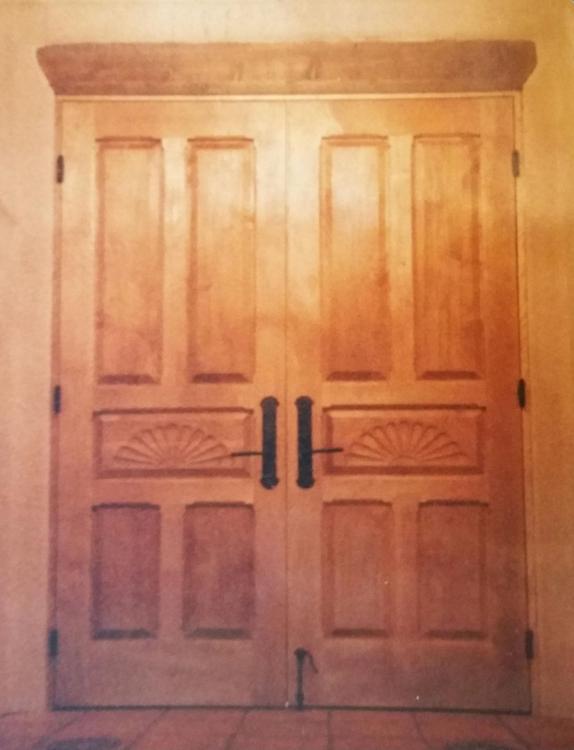
.thumb.jpg.173aa01c6e0f42f28f85a4b954dce502.jpg)
.thumb.jpg.8e460c092c8d2f4e54a79179b72dc89d.jpg)


-
Awesome! It's really great to see this come together. A friend and I built a bellows for my first shop. Memory says it was the one I liked the best. I will prolly build one for my new shop. The double chamber on the top is intriguing. Thanks for the timely inspiration
-
I just got in from working on my shop and I'm whipped! It doesn't take much anymore! Thank goodness for young labor. I would enjoy a discussion with you anytime especially on this aspect of our craft. I'm from an engineering background,, 2-1/2 years before I chose my iron path. Coupled with a bunch of years as a farrier it took a long time to figure out such terms as "artist blacksmith" and how I fit into that strange thang. I think it was a long ago article in the Ring by, if I remember correctly, Pete Renzetti, or one of the true art Smith's of that era. He broke art into 3 parts. Fine art, applied art and commercial art. The utter simplicity of it has been with me ever since. Fine art had one primary purpose. That is to create an emotion. Applied art had two primary purposes. To create an emotion and it must have a function. If you build a "WoW" gate, it should at least be able to some degree keep the dog In and the bad guys out. Thus began my acceptance of me being an Applied Artist. I put the crafts in this catagory as well. My next major learning was a workshop in Prague with Vaclav Jarosh in '87. He demoed at Flagstaff in '86 and critiqued American Smith's as strong in technique and very weak in the art history of our craft. Thru ABANA he created a workshop for 10 smith's in two different groups. He called this Art history for the Architectural Blacksmith. We covered all art periods and made tooling and a representative samples from about 9th century to contemporary. A lot to cover in a month, to say the least. It was a major influence on me. Lol, I'm pretty tired, so will end by saying my knowledge fits well with " in the kingdom of the blind, the one eyed man is king" concept. I'd never attempt a stand-up discussion with a first year art history major, but I do have a bit of knowledge as to what blacksmith details are from what period. I'd share Prague iron pics with you here and love to see yours as well if there is any interest.
-
Nice. Consider this, the size of your tool will quickly tell you the size limits of what you can cut. If things go wonky, you have reached your size limit. Want to cut heavier stock? Make a bigger hand shear.
-
Nice piece, Thomas, and I pretty much agree with you up til your last sentence. Before Yellen, you must also consider the contemporary pathway of industrial blacksmithing. What industrialization and mechanization did for industrial Smith's was to harness incredible amounts of power. Just look at the many huge contemporary forges and hammers to work and forge massive pieces of iron. And, the techniques to do so have not changed. To draw out a shaft of many tons from a billet, it's still forged square, octogon, round. I would go so far to say that the contemporary industrial smith is still the "King of all crafts" and is the tool maker for all. Imagine computer chips without the abilities of the industrial Smith. Back to Yellen. He did in no way He in fact at his moment in time stood at the end of a long line of architectural Smith's that preceded him back far beyond the Gothic period. He, and "traditional architectural Smith's", of our day, may have been during a time of being "badly bent" in the US, but not so in Europe. Architectural smithing in Europe has always been strong. At the very least, Europe has always had a need for qualified Smith's to do restoration work of all kinds. The trail of architectural iron in the US, even as young as we are compared to Europe, is vibrant from the earliest time of our history to the day. Lol, basically I believe that if one wants to make a living as a "blacksmith" in our contemporary time, there are three basic choices. Industrial smith, architectural smith, farrier.
-
And $350 seems high to me.
-
Antique arms shop, New Orleans Photo Heavy
anvil replied to 671jungle's topic in Gunsmithing, Muskets, Flintlocks etc
Brass knuckle revolver knife,,, now that's the kinda knife to take to a knife fight. -
Some thoughts on charcoal
anvil replied to Laynne's topic in Solid Fuels: Coal, Coke, Charcoal, Wood, etc
If you are getting your charcoal from screening ash from a wood burner, then this is pretty inefficient. However If it meets your forging needs, then all is well. If you do much forging, I suspect this method won't give you enough charcoal. Do a Google search on " how to make charcoal" (if you haven't done this) and there are some pretty efficient methods. Especially if you live a country lifestyle and have easy access to wood. Check out the two barrel method. At it's simplest this takes a 55 gal and a 30 gal barrel. Have fun -
Lol, some like a rr anvil vertical and some horizontal. I prefer horizontal. As far as levelling a piece of hot iron, or any iron for that matter, a flat face is superior. Sorry Swede but I strongly disagree. Here's why. When you straighten a piece of iron, you hit the high side. With a bit of hammer control, you do not ever hit hard enough to forge the piece, meaning when removing high spots, never hit your work if there is no air betwixt your iron and the anvil. However, just because an anvil face is not flat doesn't make it a bad anvil. You can still level your work with hammer control.
-
Rebound has little to no effect on your forging. Rebound indicates the quality of a cast anvil. Meaning no voids in the casting. If you have a high carbon face welded to a wrought iron body, it indicates the quality of the weld. The single most important item is the connection between anvil and stump/stand and the connection between stand and ground. I prefer a wooden stump buried ~3' in the ground. I was a full time farrier for quite a while and there is a world of difference between my 124# farrier anvil sitting on my metal stand which sits on anything from road to, well, second hand well dried hay and any of my shop anvils securely mounted to stand and ground. When I'm in someone else's shop and using their anvil the first thing I notice is anvil height. However it is easy to overcome. Second is vibration from how the anvil is connected. Why is an ASO or a large piece of mild steel a poor choice for an anvil? Pretty simple, over a very short time of use, the face and edges will ding or chip quickly and these will show up in your work.
-
Congrats. Sounds like you have successfully reinvented the wheel.
-
trenton anvil cracked at the waist. worth welding?
anvil replied to dreadnaught's topic in Anvil Reviews by brand
What Thomas said. A full penetration weld with the face in water. Perhaps a way of agitating the water just in case. I believe these are wrought iron bodies. I would know for sure before starting. Then I'd follow a modified Gunther anvil repair www.anvilmag.com He uses two rod. A filler and a cap. The filler rod he recommends is very friendly with welding wrought iron. Use this rod for your full penetration weld. Follow their suggestions. There is no need to use the second rod, but this is, I believe a great way for welding wrought to wrought. -
Good job!
-
I see. Other than it's use, they look the same. By use I mean a coil spring or s leaf spring are obvious. But two straight pieces of steel could be anything. Try a file if you are at a scrap dealer. Use the edge. Cut a vee notch. Mild steel will cut a bit easier than higher carbon steels. Lol, even this needs experience. Check your phone book for steel suppliers. Even a medium sized town should have one. Check your phone book for welding shops. They have known types of steel and sometimes free drop. They also can point you to a close by steel supplier. Have fun
-
3/4" square mild steel is a good size and type of steel to make tongs. You will need, at times to quench(cool) your tongs and if you use "high carbon steels" they can harden and break.
-
Advice for setting up old anvil
anvil replied to Trees's topic in Anvils, Swage Blocks, and Mandrels
I would follow what Chelonian said. You have the most important part and the most used part,, the face of your anvil. With a bit of practice about 90% of your work can be done there. If you add another key tool, a post vice, amongst other things, it can hold any hardy tools you might have. -
Experience with Blacksmiths Paradise?
anvil replied to bajajoaquin's topic in Anvils, Swage Blocks, and Mandrels
Lol, and of course there are those who sell old cars for scrap and fill the trunk with rocks. -
Here's another approach instead of single or multiple sets of scrolling tongs, learn to turn your scroll finials over the edge of the anvil and use a scrolling wrench/bending forks in your post vice for the rest of your scroll. Depending on the scroll, I turn anywhere from 6" to a foot and a half over the edge of my anvil. The rest is at my post vice. I have no dedicated scrolling tongs and rarely use the horn. I learned to do my "scrolling" over the horn as a farrier. I.E., "turning a shoe". When I became a traditional Smith I took this skill set and moved to the edge of my anvil and post vice with scrolling wrench and bending forks. I believe you are way more flexible as to scroll shapes this way than with scrolling tongs, and with practice, there is no problem matching many pieces done this way. For what it's worth, I'm left handed and do understand,,, first hand,,, you might say,,, the benefit to proper handed tongs.
-
Snows gone. I'll take some pics and post today along with some samples of it's usage.
-
It appears to me that you need to get it hot. Dull red is too cold. Never forget,,, When it's red, it's dead. When it's yellow, it's mellow!
-
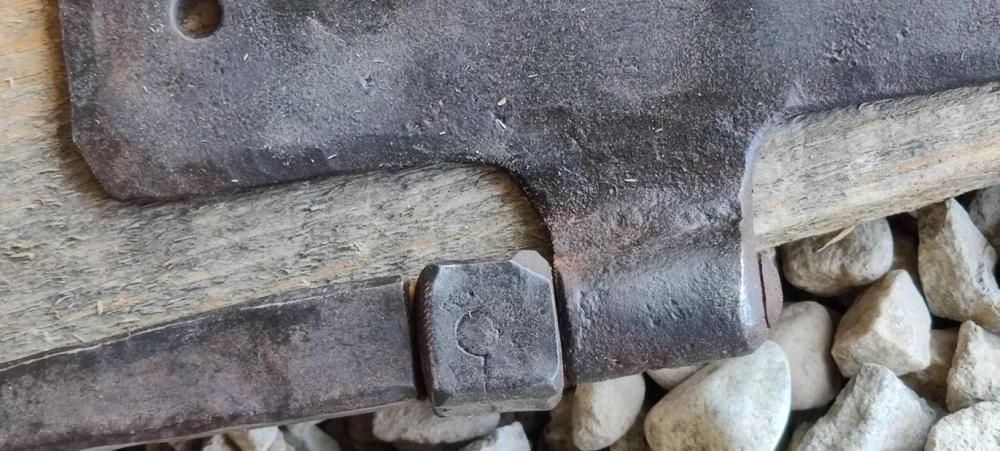
Snows almost gone. I got nearly 18" of heavy wet snow. We needed it. Words are tough so I'll try again The front face is vertical and flat. This creates the vertical side in the example. The opposite side is at an angle and convex from side to side, not up to down. The cutting edge is convex These last two convex edge/surface make it easy to follow a scribed line and not make ding marks. They also make it a very nice tool to cut curved lines because the convex edge is easy to walk around. Also, if the tool is held at an angle(not vertical) you can smoothly make a varied reveal kinda like a champfer'd edge as you proceed around the curve whilst maintaining a vertical inside edge. It's a handy tool. Hope this helps.
-
De Re Metalica It's one of the best. I'd buy it, but if you search you will find a pdf https://en.m.wikipedia.org/wiki/De_re_metallica
-
It's chiseled in. The chisel has one face flat and vertical. The opposite face is at an angle and slightly rounded. The cutting edge is slightly rounded as well in order to walk the chisel along your scribed line and not leave any dingmark's.. I'll see if I can get a pic of mine. Alas, we had a major snow yesterday, so it might be a day or so to find it.
-
Lol,, truth hurts.

.jpg.86f6464143548659eef36ec1b3b156c2.jpg)
.jpg.ab7e71751dceb7531dc632bc04d74181.jpg)