
Rashelle
-
Posts
504 -
Joined
-
Last visited
Content Type
Profiles
Forums
Articles
Gallery
Downloads
Events
Everything posted by Rashelle
-
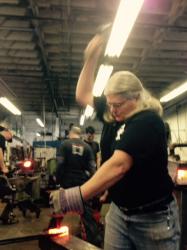
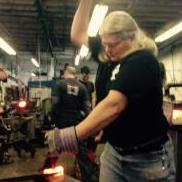
Hi Bob, I had posted the results of a week class at Brian Brazeals in an earlier post. I then later found a close up shot of some of the tools and tried to add it to the earlier thread, but couldn't get it added in. Glenn then came on and said to start another thread and he'd merge them. So I did this one. It does come across as a bit disjointed this way with no "story behind it sitting here. :D I know it. I had to do a double take constantly as I was striking on the ones I struck. It does give the impression of his head as the target. :D
-
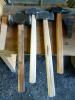
Thank you Eric and Eddie. There is something immensely satisfying about making ones own tools and tooling and then using them. It helps having good guides along the way. It was a very productive week and I'm glad I went. I found another good picture here showing a close-up of a couple of the tools.
-
I thought I'd share the results of my week at Brians with y'all. I had a wonderful time and it was well worth the time off from work (Ok most things are well worht the time off from my regular work but this was a good way to spend vacation time.) It was also nice to meet some of the others in the area such as Lyle and Woody. Brian and Karen along with Ed were wonderful hosts.
-
Entry Level Blacksmith Accreditation
Rashelle replied to Dale M.'s topic in Blacksmithing, General Discussion
I've realized I have a personal interest in a curriculum. The only bearing my interest has is on myself and as it applies to me. There are plenty of classes out there that advertise themselves as intermediate, advance, beginners. Without some form of standard it is up to the individual to rank themselves. Thus a person who is advanced may judge themselves as intermediate and find themselves in a beginning/intermediate class, or one who really should be focusing on the fundamentals finds themselves way behind in a intermediate or advanced class. All due from mistakenly judging themself at a different skill then how the instructor would rank them. With a curriculum (for those who desire it only) it would allow one to quickly figure out where they stand and take steps to aquire the skills for the more advanced stuff. In the end everything is made up of processes and the individual elements brought together to form a whole. But if you have nothing to set your personal standard against you end up not knowing what you don't know. Again this is my thoughts as they apply to me. -
Handforged flux spoon
Rashelle replied to Daniel Lea (AKA 99pppo)'s topic in Tools, general discussion
Cool. I like the way yours looks. Seeing it sitting on it's own made me think that the next time I make one I could do it free standing with the bowl of the spoon lowered so it could stand on it's own and have flux in it. -
Bill Epps in his teaching tapes bugs and birds does a dragonfly and a hummingbird I think it was the same set up for each.
-
I use mainly a 2lbs followed by a 3lbs crosspein. Which will change to whatever size rounding hammer I make at Brian's in about a week. About the only time I use a smaller then 2 lbs one (even when forge welding I habitually use the 2 lbs) is when using a ball pein when riveting.
-
It's a well deserved feeling of pride and accomplishment when one acts on the feeling that "I can do this" and is proven right. I've done a couple repairs on a friend of mines vehicle myself using skills/tools from blacskmithing and I feel you have earned well deserved bragging rights. I volunteer at a national historic site and occasionally get people who think that there is no application for this in the modern hi-tech world. Despite the fact that hi tech is based on low tech. I'm long winded at times apparently, what I'm saying is cool and good job!
-
Cool Colleen. I really like your fire set.
-
I saw him today (Saturday). I'm impressed. He did a cupping tool, hammer, drift, heart bottle opener, and a copper ring. In 4 hours while giving a well said description of what he was doing and why when doing so. Alec was articulate and I'm glad I had the chance to see his demo today. Rashelle
-
Wouldn't tire foam pose a bit of a risk for the gas fumes inside the tire and a hot metal puncture?
-
Go for it. Makes it nice and safe for towels and stuff as long as you blunt and or turn the end in a little extra.
-
Cool, I like leaf hooks. Made a pair with forge welded on double leaves on top and a leaf as the hook for a 1840's rifle not long ago and really like the look of leaves on hooks. Am still waiting on the pic of the rifle hanging from them. Yours looks good. Rashelle
-
Cool looks like you did a good job and had a wonderful time. Makes me look even more forward to going there in May. LOL I may have to get a t-shirt too.
-
I check the forums most every day but don't comment much. This sword I really like. I've had it in my mind to try my hand at a gladius and a seax someday. After seeing this I may just have to try for something similar first as far as making a sword someday goes.
-
I routinely use a 2 lbs Hofi style followed, by a 2 lbs czech (knock off) converted into a rounding/cross pein, followed by a 3 lbs Hofi a ball pein and a larger sledge. I figure after Brian's class I'll sooner or later make myself a 2.5 lbs one, with the intention of seeing about going to that for the most part. For the most part I don't need anything bigger then the 2-3 lbs I usually use and if I do I can look for a striker, lol.
-
Cool now I can see what I'll have to live up to after May. As my intent is to after coming back here, from Brian's, to turn around and make some hammers as others have expressed a desire to make their own hammer also.
-
Hi Mick, That one brief line. "It was used to force open the mouths of slaves who were trying to starve themselves on the voyage across the Atlantic." Followed by the picture. Shows in such a simple item a small taste of the brutality of the slave trade. I didn't know what to say at first and still don't. Other then your post and skill without a lot of fanfare brings to life things that we as a society tend to forget. Rashelle
-
Cool. I really like the coiled one that looks like it was from a file with scales. I also enjoy making strikers mainly the bright ovals and C style with shoulders. In fact I may be teaching someone both tomorrow and another person on Sunday to make them.
-
I also have not forge welded 5160 to itself. I have forge welded it to mild steel. As you are doing an eye weld, I'll tell you how I first learned how to forge weld. I started by using something along the size of 1/16"x1/2" flat stock. It may of been 1/8"x1/2" flat stock seems, It was just small around that size. Being smaller it was harder to do due to the fact that it lost the heat quick. Lol that taught me to be quick about it and know how hard to hit where for the first hits before pulling it from the fire. What I was making were miniature Fort Vancouver Hudson Bay camp axes. As I was using less then 2' of material at a time and it was tiny I was able to make many attempts in a rapid succession learning each time. Thus was accomplished wrapped eye axe welds. By miniature I mean jewelry sized. As they were found at the Fort Vancouver site. LOL though the archeologists maintain they were toys rather then jewelry we can leave them to argue that out they make neat little pendants and you can do a lot of forge welds in a small amount of time with little stock loss. I later made some slightly bigger miniature axes. Wow did they go easier, due to learning it on the smaller stock these held the heat longer. But back to the purpose of my reply. Doing these or something similar can gain you the skill working on smaller scale faster then trying to learn on your own on something bigger. You can then later work on the bigger stuff and it'll usually go smoother. Just a thought for a way to practice. Rashelle
-
[Video] Forging a Small Bearded Axe
Rashelle replied to Gundog48's topic in Axes, Hatchets, Hawks, Choppers, etc
A couple things, I'm typing as I'm watching. I'm not sure how hot your getting the area you're working on but since the rest of the head seems dark you may not be getting the area you are working on hot enough. It could be though Just can't tell from a video and lighting. You can use the horn of the anvil for drawing out as well as a rounding hammer, and the pein, that way you are working it from both sides effectively. While you are drawing out the blade with the pein you can place the blade over the horn and work with the horn in line with the pein. Making, a couple pairs of tongs for gripping hammer and or axe heads might be a good idea. That will give you better tong hand control by enabling you to grip the work piece more efficiently. Making a holdfast can also help. As well as making an arm that can swing out from the pritchel hole to stabalize long pieces or welded on handles. By the time you get 14 minutes in the heat is looking better on the work piece, some of the time. Thumb off the hammer handle, you are impeding the rebound of the hammer by making it work back against your thumb. Thus causing strain on your thumb by pressing it down against the hammer handle. Try to get in the habit of guiding the hammer down holding it more loosely, and thus letting the rebound bring the hammer back up rather then your arm. When using a chisel, punch or handled tool by yourself you can secure the piece in a pair of tongs, use a tong ring if needed, push the piece up against the shoulder of the cutting plate, (resting on the anvil or using a hardy tool to back it can also work), place the tongs/ handle/whatever in the thigh/hip/waist intersection. push in with your body that will then use pressure to hold the piece in place. When hammering down against the head in the vice you may want to either quench the wings/ eye area and or use a drift to help prevent deformation of the eye. After hammering against the vice shaping the pole the blade seemed at an angle to the eye. If lacking a drift a bar can be place in the eye the blade placed in the vice and the bar turned to correct the eye/blade alignment. Keep up the good work. It's nice seeing people making videos and working on things. Rashelle -
Cool, keep up the good work. I really like the leafs on the hooks on the rack. How'd you get the green color?
-
Here is a thought. Do it as a separate pass through piece. Leave extra material to the side of the socket, make a good snug fit, with the insert piece having a groove that can have the socket close and lock onto (like wings which can be bent out on the socket prior to inserting), then insert into socket, bend socket wings in locking it in place. Possibly put a shaft side bevel into it, which when the shaft is driven into the socket will then slightly split the shaft within the socket wedging it tighter into place. So you would then in effect be using it as an interior hidden wedge. Another thought. Like mentioned above forge weld it. A way that may work would be two matching halves (like wings coming out from the base of the spear head), bend them over onto each other and weld. Or just plain and simply do it as a separate pass through piece without the locking wings on the socket, tap it into place, insert the shaft which then seats it. Those are the three thoughts that immediately come to mind.
-
I agree with David, The best hammer for forging is the hammer that works best for you. Some people prefer the Brian Brazeal style, other a Hofi, some make their own, still others will swear by a farriers rounding hammer or a Peddinghaus, other people make their own ,etc. There's a good chance with any given hammer style that the owner of the hammer has modified the handle, a lot will also have the pein and face of the hammer modified. What it comes down to is what the individual is comfortable with, which may go back to initial training, nostalgia, physics (such as how the handle shape fits and works in the hand and the weight of the hammer. ) For some projects one hammer may work better then another depending on what you are doing. For example yesterday I turned an old ball pein into a hot cut, I initially used a 3 lbs Hofi hammer on the horn, I finished the edging with a 2 lbs Hofi hammer ( with a handle I made myself) on the face of the anvil, still later I was directing a striker who was using a sledge to strike. So it comes down to comfort, preference, use. Making the best hammer the hammer that works best for the individual according to the project at hand.
-
Oh cool. I like it and am now thinking about a strainer made the same way.
