

Goods
-
Posts
1,169 -
Joined
-
Last visited
Content Type
Profiles
Forums
Articles
Gallery
Downloads
Events
Everything posted by Goods
-
Weather has been pretty strange here, but had a nice surprise today! darn that rotation thing...

-
Sorry, missed the picture of the pallets. Do you mean forklift tines? Pictures will help.
-

Identify Anvil marked: G O * D * R O T
Goods replied to Water_Operator 1's topic in Anvils, Swage Blocks, and Mandrels
Friday end of the day spelling error ;P -
Show us your forged chain.
Goods replied to jlpservicesinc's topic in Blacksmithing, General Discussion
For me, while I still am not good at it by any means, it seemed much easier to learn from doing faggot welds on 1/2” square. The 1/2” material would hold welding heat longer, and didn’t have to worry about alignment. Of course, had to make sure it was clean of scale before closing the bend (and have to put a scarf on the correct side) but I still find this to be the easiest weld for me. I’ve had some difficulty doing the same weld in 1/4” square (to build up mass for a flux spoon bowls). I had to move my anvil closer to the forge and work fast to avoid dropping below welding temp. I’ve also learned that using a lighter hammer works better for me. You don’t really want to deform the material, just set the weld. Once I’ve done two rounds of welding to set the weld and blend the edges. I move back to a heavy hammer or heavy blows to forge it to shape. (Using forging blows too soon, may put shearing force on the weld interface.) All of the welds I’ve done successfully used 20 mule, but I’ve started cooking it down and grinding it. Don’t know that it really makes a difference, but when it’s not bubbling up forming a shell, I can see the coverage better, and it’s not all over the floor and forge when I’m done. Only my experience, David -
I personally do not recommend using chain, but I’m sure some will argue with me and that’s ok. We all do what works for us. When I got my anvil, it rang very loudly (150# Cast steel columbian). I mounted it on an ash stump bedded in silicon with spikes driven tight. The ring is almost gone now and I don’t have chains in the way when working. (For example, bending long 90degree angles.) If I did it again I would probably do it a little different, but not with chains. Just my opinion, David
-
Buzzkill, you could cast it full thickness on the outside edges, leaving the face recessed on the backside. This could cause thermal stress where the thickness increases though.
-
What did you do in the shop today?
Goods replied to Mark Ling's topic in Blacksmithing, General Discussion
I got the forging done on my wrought square turning hammer (Sound better?). Sorry, no pics. It’s slow cooling in vermiculite right now. Lots of file work next. Cheechwizard, looks like a good start on the Axe! Keep up the work everyone, David -
Would it be possible to reduce the friction by just reducing the thickness of the burners face? Obviously there would have to be some balance between the heat transfer in the face, thickness and cooling effect of the FAM moving through the block. With so many small holes cooling the face, I’ve been thinking through greatly reducing the thickness and coating the face with plistex(?) to reduce the heat absorption to make an interesting burner. I’ve even considered taking an old pizza baking “stone” to try it with, but I have no idea what temperature that type of ceramic can withstand. Honestly, I have so little time in the shop, I still have barely scraped the surface of what I can do with my solid fuel forge. Just thinking out loud, David
-
What did you do in the shop today?
Goods replied to Mark Ling's topic in Blacksmithing, General Discussion
Square rounding hammer just doesn’t sound right does it... They certainly seem popular, and I’m pretty used to having square faces on my hammers. Still need to think it through, David -
What did you do in the shop today?
Goods replied to Mark Ling's topic in Blacksmithing, General Discussion
JLP, at this time I’m thinking it will become a rounding hammer. I’m not sure if it’s going to be a “square” rounding hammer or have round or octagon faces. For now I’ve been more focused on skill building. David -
What you may want to look for is a manually operated 4/3 block center directional control valve or A/B blocked with P to T. Both spring return to center. My terminology may be of a bit on the 2nd one. Be very aware of the center porting. Porting wrong and it could be dangerous (lots of ways to may it dangerous actually), but putting the pressure back to tank may save strain on your pump. It’s been a while since I’ve spec’d hydraulics out myself. Keep us posted on your progress, David
-
What did you do in the shop today?
Goods replied to Mark Ling's topic in Blacksmithing, General Discussion
Finally had a little time in the forge tonight! Helped my boy draw out a rail clip some for a. sword staff(?) he’s working on. For me I got a chance to weld the faces on my wrought hammer. Still a lot of work to do! Enjoy you time in front of the fire! David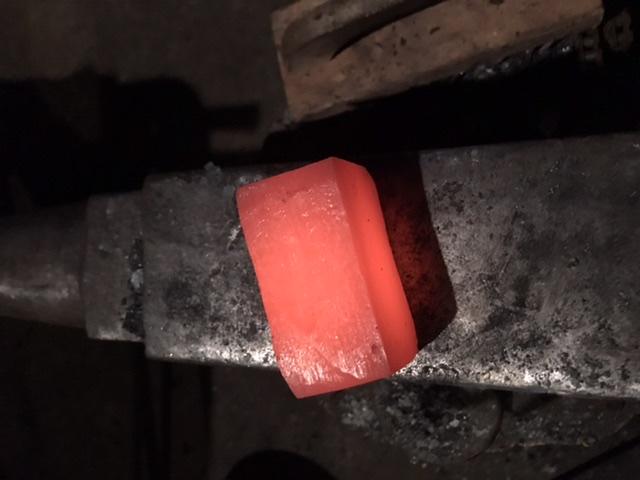
-
Put the wet coal dust clumps on the edge of the fire. As the coal dust cokes it will form solid chunks of coke. Same thing happens with with larger coal forming solid shelves and walls of coke around the fire. Enjoy, David
-
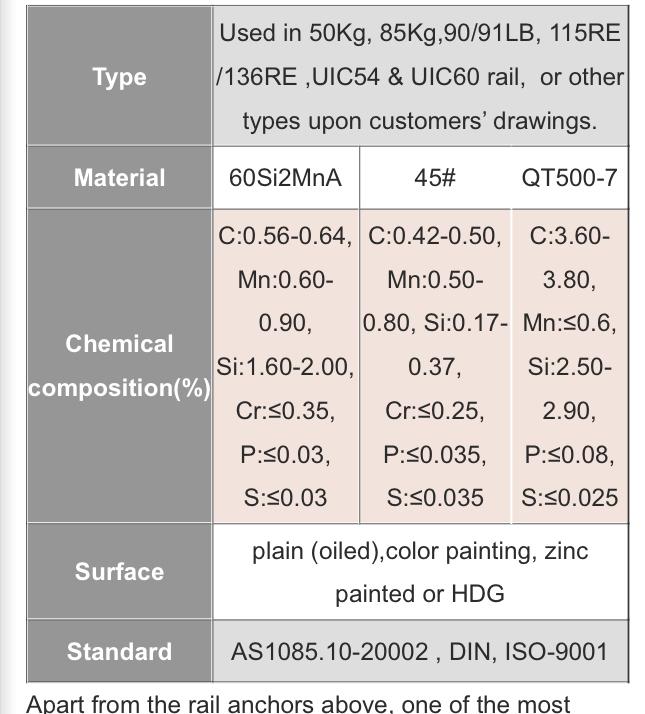
Here is the page that I copied: [Commercial link removed per TOS] First time posting a link, and this phone doesn’t always agree with me. Hopefully, it works. Also, just noticed this is a Chinese manufacturer, so may not be representative of scrap from old rail line repair/upgrade. Hopefully still useful, David
-
The 0.45C will work better for tough tools than knives. 0.7C is probably around the bottom end for straight carbon steel blades. Stick with the canola oil for quenching thin sections of medium carbon and most thicknesses of high carbon, but warm it up think coffee temperature. Doing so will decrease the viscosity and increase the cooling rate. To help prevent warping do a few normalizing cycles before quenching . That should help refine the grain structure and also relieve internal stresses left from forging. That’s my amateur input and may not be perfect, so I’ll defer to Steve’s much greater expertise. David (Steve, you posted just as I was writing...)
-
I have a substantial quantity of railroad scrap from the crew who was working by my house and spent sometime researching it. It tough stuff! I’ve made most of my hand held punches and chisels from the “unit V” style but have done anything with the FAIR type yet. Below it what I found for the anchor material (at least from one manufacturer). Mostly the 60Si2MnA, but didn’t copy the whole page. Enjoy, David
-
What did you do in the shop today?
Goods replied to Mark Ling's topic in Blacksmithing, General Discussion
Nothing outstanding, but here’s what I’ve been up to. Finally got my buffalo forge repaired and clayed, so I tried it out. At home, I’ve been having trouble forge welding, so first up was faggot weld on the bowl end of the flux spoon. That went well, so moved on to working on a wrought iron billet and spring steel faces for a hammer. Right now, it at about 2.75lbs. Started running low on coal and didn’t want to get into trying to weld the faces on with limited fuel, so decided to try a diamond on the end of the spoon. The collar welded up very nice, but the diamond was pretty small (1/4” square wrapped onto 1/4” square) and went a bit wonky (over worked it...). Not happy with it, but it was just and exercise in learning. Also took the time to handle the top fuller posted previously and rehandled a flatter made from a lump hammer just after I started smithing. David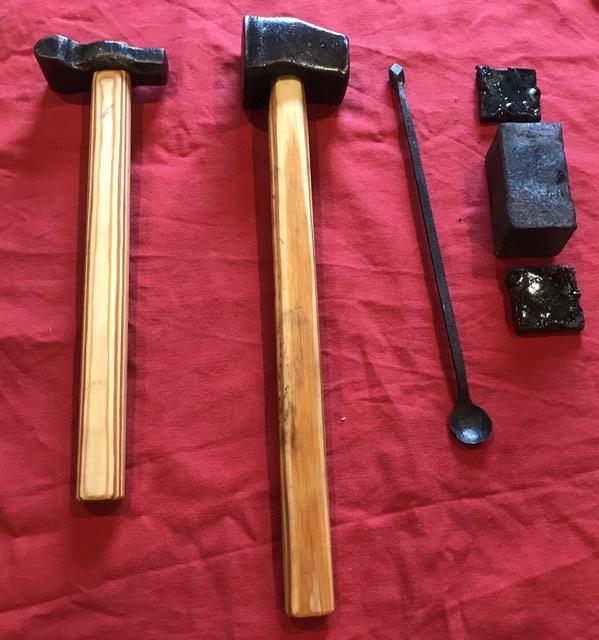
-
I was going to comment that it looks good also, but I understand you perspective. When I have an image in my head of what I want to make and if doesn’t come out the way I wanted, I usually end up over working it and destroying it or just throw it in the (now large) scrap pile. Honestly, it’s a nice hammer. David
-
first trial towards forging a conrod
Goods replied to BeaverNZ's topic in Power Hammers, Treadle Hammers, Olivers
So, next step? High performance light weight forged Ti connecting rod? Very cool results! David -
Help getting smooth finish
Goods replied to JK Scotland's topic in Blacksmithing, General Discussion
How hot was it when you were forging it? It almost looks burnt. Enjoy the addiction, David -
Good new on both fronts. Successful build and health improving! A box bellows like this could work really well for a demo setup. I imagine it can be made much lighter than a cast iron crank blow, not to mention that it has a bit of an ancient feel to it. stay healthy, David
-
So are you pleased with how the box bellows worked out?
-
With the amount of work he’s turning out, I’d say you dead on! David
-
I’ve had a very similar failure while making a ball pein hammer myself. Mine however developed before the quench. It happened while drawing the cheek on the opposite side. I assume it cooled/quenched between the face of the anvil and the drift, and broke from the hammer blows on the cheek I was working on. This could have been a similar crack that broke through from the quench. Also, the in the pic above it looks fine on the handle. Was it not quench yet or did it break in use? Did you temper the eye after quenching (usually done with a hot drift)? Keep at it, I love seeing the progress! David
-
Jlp, just as in your swage post, can you elaborate on how you how you welded these up? I can’t seem the think of a “simple” way to do the welding of the wing. Thanks, David