MC Hammer
Members
-
Joined
-
Last visited
Everything posted by MC Hammer
-
Very good information SLAG! The good news for me is that my shop runs out of my basement so it's stable and cool down there all year round. I will have this tank on wheels though so it can be used outside the building. No blade is worth a fire accident. I'm definitely going to come up with a lid before I purchase the oil. Ideally I'll have a metal lid for snuffing out flame ups, but it would be great to find a plastic lid to put on there after the oil is cool and ready for storage in the shop. I know they make locking lids, but I for the life of me can't find someone just selling the metal locking lids.
-
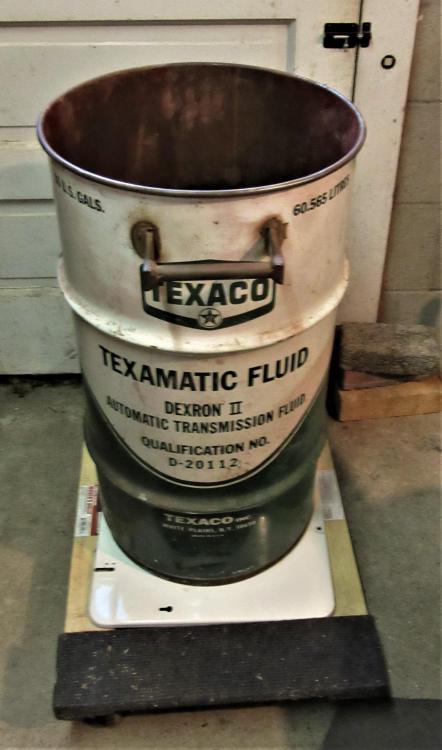
Yes Steve and Slag, that is the major downside to vegetable oil and canola oil is that it will eventually go rancid whereas the Parks and others do not. I thought about mineral oils too, but for that price you might as well go with Parks or Black Bear. Thanks Slag for the tip on vitamin E capsules. How many do you recommend? Here's a picture of the Texaco barrel I picked up. Someone welded a convient handle on it somewhere down the line. It kills the value of them, but I bought it to use and I'm plenty happy it has the handle. The welding job was very good too. I half expected a poor weld and a loose handle when I went to look at it.
-
Steve, I'd read about the screen at the bottom and also something to protect the bottom from a dropped knife blade puncture. Both great ideas. Frosty, I thought about hitting up some local eateries for their discarded oil but I worry about the seriously degraded nature of it if it has been used for a while. New canola isn't too bad to buy and comes in 5 gallon plastic containers where I am. 2 and a little of a 3rd should fill it to a safe level. Now I've got to find or make a nice top that will keep things out of it and keep it from oxidizing too much and going rancid.
-
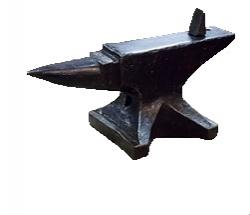
My take on your anvil is that the rivet head is from the original wrought iron starting piece. With some of the older wrought iron anvils with steel plate tops, they started out with a pile of wired up wrought iron scraps and forged them into one solid piece. Some of these companies advertised that they used the best quality wrought iron scrap. My guess would be that the rivet isn't wrought iron possibly and got thrown in the original starter stack. It never fully forge welded to the stack so when it started to be used it caused an issue. This is just a theory because I see the hardy hole remnants behind that rivet so the rivet wasn't plugging up a hardy or pritchel hole remnant. I also look at the wrought iron around that rivet and see that it was in a pretty good forge welding place but the rivet was not so much. I could be totally wrong on this, but I'll let others weigh in.
-
Thanks for the positive feedback Steve. I'd checked out McMaster-Carr and Black Bear for quenching oil. Great stuff, but way out of my price range right now. Parks 50 and the likes are definitely the best choices, but I'll need to wait a bit before taking the plunge. I can do canola oil at the moment and I was told 5160 likes canola. I have a quantity of 5160 and can buy it new pretty easily through a spring shop connection I have. I'll practice on the scrap 5160 I have first so I can get a feel for things. My barrel is 27 inches tall and 14 inches in diameter so I'd rather fill it up further than with 7 gallons so I don't have to bend over it when I quench so if there is a flame-up I can be standing to the side. I'm thinking 12 gallons gets me 3/4 full and at a level where I can quench comfortably.
-
I'd like to use a 16 gallon Texaco oil barrel I picked on Craig's List as an oil quench tank. I plan on using canola oil at first because most of the blades I'll be making will be 5160. I plan on making a lid for it in case of any flash issues and to keep it clean of all the things in my shop that might want to crawl into it. I plan on filling it up with 12 or 13 gallons of oil so it's not easily sloshed out and also plan on putting it on a mobile stand so it can be wheeled outside for quenching. I'll preheat the oil by hanging a heated railroad spike in the barrel. I see a lot of guys quenching in metal tubes that seem like too little oil and too big of a chance of overheating the oil. It seems that the steel tubes are just big enough for a quench or two at best. So my question is if a 16 gallon metal barrel is too big? What are the downsides of having an oil quench barrel this big? I've been forging for several years now and want to start making edged tools, knives, and axe heads. I made my first knife this year just to see if I could do it correctly and ended up with a nice little kitchen knife. This experience hardly qualifies me to make knives, but I would like to start experimenting in that direction.
-
Wow, you were given all of that! It takes most of us a long time to find those two things when we have cash in hand and willing to pay a fair price. Great job finding it! As others suggest, take a wire brush to it. The angle grinder wire cup brush makes quick work of stripping it but make sure you wear eye protection as the little wires fly out and stick in things. I once had one stick right in my forehead. If I had to guess I would say it is a Trenton just purely based on shape, but it lacks the bottom characteristics of a Trenton. It lacks the feet of a Peter Wright. So my vote is Trenton or Hay Budden. Show us pictures of it all cleaned up and pretty!
-
I recommend against the channel for the bands. I did that on one of my stumps and it prevents me from tapping the band down to tighten it. I've cut the bands on mine twice just to take up the shrinkage from the wood. The top band I didn't put in a channel and now when it loosens I just tap it down. Eventually I hope my stump quits shrinking and I can screw the bands into it.
-
I would have to agree. Save your money and wait. The more you wait, the more money you save up and the better chance you have at scoring an anvil. Sure, there's forklift tines, blocks of steel, sledge hammer heads, etc......There's a reason almost everyone here on this forum has an anvil though. You don't need a London Pattern anvil, this is true, but if you look hard and long enough you will be happier with an anvil vs. an improvised anvil. Kinda like saying you don't need a kayak to run the rapids, a log is all you need to float on and a rope to tie your legs to the log / a stick for a paddle, that will get you by. The proper tools DO help. Keep looking for an anvil, the TPAAAT method does work, but it takes time. It took me over a year to find a decent anvil. I used an old borrowed no namer that was 75 lbs (and it wasn't a whole lot better than an ASO) at first while I saved and looked for a good anvil. Don't rush into it. If it takes you 2 years to find a decent anvil, use that time to also find tongs and hammers / read all the blacksmithing books you can get your hands on. Do it right and you won't be sorry.
-
There are a lot of anvils out there, so don't be in a rush to get one just to have one and get stuck with something damaged like the one you pictured. I remember feeling like I needed an anvil and I was on the hunt pretty hard for one. I understand that feeling completely, but I was determined to find a decent one that I could afford and waited well over a year to get mine. It was through a friend's, friend's nephew that I found mine. I'd pass on anything like what you have pictured unless the price reflects the damage. I"d pay $50 - $75 for that anvil at best if the face was in great shape and had great rebound. Perhaps the horn can be fixed, and perhaps not but either way it's not worth $275 in my opinion. Keep looking! I have two anvils now and the first one I had to search hard for but the second one fell in my lap for $50. If you have $275 saved up, wait until you have about $400 and you should be able to have your pick of decent serviceable anvils to choose from that weigh a little more. About 150 pounds is a good shop size anvil to look for. Good luck, and let us know when you do find your anvil.
-
I bet they'd work just fine, but I think they'd take up more room being longer 5 gallon buckets work just fine, and really, you don't need all the water my half barrel holds but it does look much cooler than an orange 5 gallon bucket. I noticed the home centers that sell the half barrels also sell plastic inserts for them so if you want the look without messing with the barrel being swelled you could go that route. The only problem will be when the oak slats dry out and it becomes really obvious you have a flappy half barrel. For me, I like the connection to the old and that's what the barrel is really.
-
So I bought one of those half whiskey barrels to use as a slack tub in my blacksmith shop. Yes, a 5 gallon bucket will work, but I mostly bought it for the nostalgia of having one. I bought it last spring and stored it in my basement over the winter. Come spring my half barrel had dried out so that you could see right through most of the barrel slats. I read about stashing them in a creek or a pool, but I had neither of those options. I did have a kiddie pool, but that only would have filled up the barrel about half way. Here's what I did and it worked so I thought I'd share it: You have to get that end slot (the bottom) swelled first. I put mine outside when the weather predicted 2 days of soaking rain. After that, it would hold a little water in the bottom so I brought it into the shop and just started putting 2 buckets of water in it twice a day. I have a drain in the shop floor so the water ran right down into the drain. I thought it was major progress when I managed to get 3 inches to stay in there over night. I wet some towels and put them on the rim of the half barrel and started splashing water on the inside surface every time I added water. This really helped, and I was gaining an inch every day. I found at about 5 inches that draping the towels over the outside helped as well to swell those areas. After about a week of this I'm up to about 10 inches that the half barrel will hold without leaking. I have about 2 more inches to go and then I'll keep her full so it doesn't dry out again! I was smart and have the half barrel sitting up on blocks so I don't get premature rot. My best advice if you are thinking of buying one of these is to look over the selection at the home center and pick the one that you cannot wiggle the slats or see through them, then take it home and fill it with water immediately. My guess is it will hold water really well when "fresh".
-
I'm guessing it's a Badger by the looks, but it could also be a Vulcan after looking at the symbol on the stamp. I'd say $2 per pound for that anvil. Badgers & Vulcan's are sort of at the bottom of the anvil quality scale. They still work though, so hammer some hot metal on it and enjoy it.
-
About 1830 the pritchel hole was added to anvils. Yours doesn't have a pritchel hole so we do know with certainty that this anvil is older than 1830. I do not believe this was made as a sawyer's anvil but that it is colonial. It lacks the 5th foot which some believe is a trait of the oldest colonial anvils. I'm not sure I can subscribe to this 5th foot idea. The closest I can say is that this anvil could date from the 1600's to the mid 1700's based on what I read in AIA by Postman. I think I'd keep it if it were me. At this point it's an artifact and there aren't too many of them left that are this old. Let's say that this anvil was made in 1750....That thing has been through the Revolutionary war, Civil War, both World Wars, and so on. She deserves to be taken care of well. You could sell it to some idiot who decides to grind the top flat and make it all pretty and silver again with an angle grinder & flap disk. You are the latest caretaker of this anvil and all the others before you took great care of her. It's now your responsibility to honor all the men who fed their families, possibly produced goods that freed our Country, and who loved that anvil like a friend.
-
I too would ask one of your husbands blacksmithing buddies to go with you to look at the anvil. Stuff like ring sound and rebound need to be tested. You sound like the very best of wives to do this for your husband, so let the surprise from him be real by getting a great anvil that someone with knowledge has inspected with you. Pictures would be helpful as we could at least tell you if it looked good.
-
150 pounds is a good shop size, so a lot depends on what you want to do with it like others said. I have 179 pound anvil on a huge stump and it was a pain to move in and out of my garage so the 118 pound anvil would be a lot easier to move around. If it were me though, I'd want to invest in something closer to the 150 pound mark.
-
Look up a flintknapping friend of mine, Roy Miller. He owns a quarry right on Flint Ridge. The fossil type stuff is cast aside in the pits by Roy and other flintknappers because they can't use it. I have some beautiful crystal formations from there. The Nether's farm is another place that lets you quarry flint or whatever you pick up. I've made punches out of coil spring and they work great. I cut them in pieces, then I normalized them a couple of times before I put a hammer to them. Once I got them octagon in shape (prevents them rolling all over the place) and the tip in the shape I wanted, I normalized them again I think 3 times then went in for my final heat up to non-magnetic, then a soak at that temp. When I quenched mine, I did them in water. I quenched the tip end first, then the struck end and left the heat in the middle to run up to both ends until I got the color I wanted. It helps to have a grinding stone there to polish it right after the quench so you can see the colors really well. Some might think the normalizing is overkill, but those springs have taken a lot of abuse and stress so I'd rather relieve that as much as I can. I also prefer to cut what I need out of the coil springs instead of trying to unwind them into a straight piece. I think that's a lot of stress on a rapidly cooling piece of metal. I think it can be done, but cutting a piece out is just as easy in my book. Good luck and show us the punches and things you get out of it.
-
Visited my favorite junk shop yesterday and found a little cross peen hammer head that looks to me to be hand forged and definitely a blacksmith shop used hammer. I also picked up 10 old files with some of them being Nicholson's and other's Heller's and two labeled as Fisher's. I've never seen the Fisher's before and they had an eagle on them. Maybe I just never paid that much attention in the past. I also found a nice 4 x 4 inch block of steel with different square diameter lines machined into it. It will make a great hardy tool some day when welded to a base. All for $15. I don't mind paying $1 each for old files. The worn out ones can always be made into knives. I got lucky and found that all of them are in great usable shape.
-
You and I are both scratching our heads. I'm not sure why either but I've read it in a number of books. When I began blacksmithing, I thought these guys must know something I don't and now I'm used to having my anvil pointing that way. My other Fisher anvil is behind me at about 10 o'clock so the horn is pointing to about 1 o'clock. I tend to use that horn more because I can stand in front of it better and work around it better. I'd say this is a great reason to own more than one anvil
-
I started out pointing my anvil at the forge and that's the way I have it oriented. I'm right handed and it doesn't seem to impede my forging on the horn at all. Try it both ways and see what you like the most. I'd set out to make 3 different things with it one way, and make the same 3 things again the other way. Note which seems to flow better and go with it. The old timers claim your anvil should always be pointed toward the forge. I took that advice, but I don't think it really matters.
-
It looks to me to be one of the old English types of anvils based on the feet and legs, but that horn shouldn't be flat on the top nor should there be a cut-out on the front feet. I'd go with old English anvil as a guess. There were tons of makers back then, but Mouse Hole Forge is one of the biggest producers of anvils at that particular period in time. I'd say clean the whole anvil up with a wire wheel on an angle grinder. Just take the rust off and see if there are any further markings. You'd be surprised what rust covers up or obscures.
-
You won't be sorry for using the caulk. I used 100% silicone caulking and it worked great. My Trenton went from ringing loudly to a deadened ring at best. I don't plan on ever seperating the anvil from the stump, but if I have to I'm not at all worried about removing the silicone. It's not going to be like a head gasket job, I'd just scrape off and remove what I can and put more on to stick it there again. Let us know how it turns out.
-
The center of this stand is 11 1/4 x 11 1/4 inches. Since the swage block is 11 x 11 I wanted some room in there to spare so I didn't have a tight fit. Here's the measurements for all the swage block features:
-
I've been forging for a few years now and just ordered my first touchmarks. I ordered a small one and a large one to cover all the work I'll be doing. It's cheaper if you order them at the same time. My touchmarks are made form O1 tool steel and heat treated correctly by the seller. It is important to mark your work, but sadly many of my early things I made for around the house are not marked. Though they'll never fall into the wrong hands, some day they will be out there when I'm long dead and gone. I think it's important to wait to get a touchmark made until you really know what sort of things you enjoy making. It also gives you time to figure out a great name for your forge or a symbol that is meaningful to you. While researching the historic blacksmiths in my area and where their shops were, I found out my town used to be named Yorkshire back in the 1700's and early 1800's, hence Yorkshire Forge was selected to be be my forge name. I put this on my touchmark along with my first initial and last name. In the middle is an actual shape of my anvil I forge with. I feel having an anvil on your touchmark shows it's modern work and it communicates everything you need to say in one symbol even if your name or forge name is not as clear. They cost a lot of money to have made, so be sure you know what you want. I did a lot of research before coming up with my touchmark. I really feel strongly that you should have your name included in it because if you have say a cross as your symbol it really doesn't tell future generations much about who made it. Even initials are a guess. A name can be researched. I picked up a pig sticker antique knife from a junk shop that had the blacksmith's name stamped in it. I was able to track him down through research and find out where he lived and worked. I kept that info with the knife so now there's some history behind it. Without the name on it, I wouldn't have known anything about who made it but now there's this connection with the maker.
.thumb.JPG.54bc2ea190a0be52b8d36efd9558ddcd.JPG)
-
Wow it took you that long for you to go hunt that down? Glad you found it and she's a beauty. Please post pictures of it after you clean it up. I just got a lead on a swage block that my dad remembers being outside my grandpa's old barn that was torn down years ago. The current owners said I can look back there and take anything I want.

.JPG.1858f62afd808e9770a0f1902c5a4687.JPG)