MC Hammer
Members
-
Joined
-
Last visited
Everything posted by MC Hammer
-
You have a very nice anvil there. Smith and O'Leary were out of Chicago and like TP said they rebuilt anvils made by others.
-
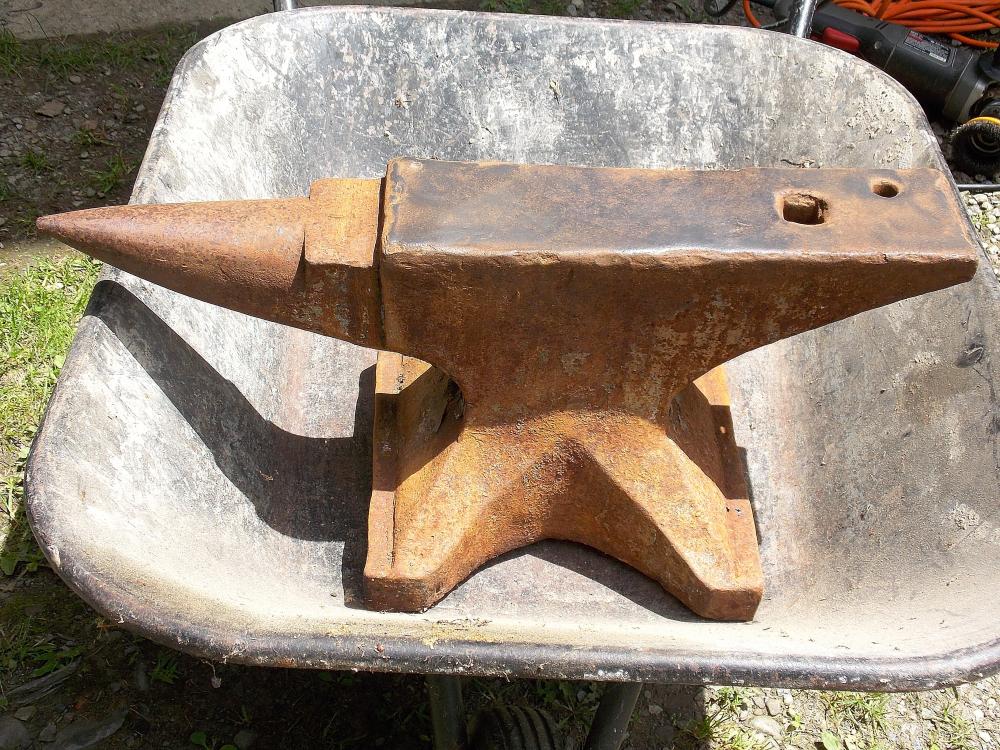
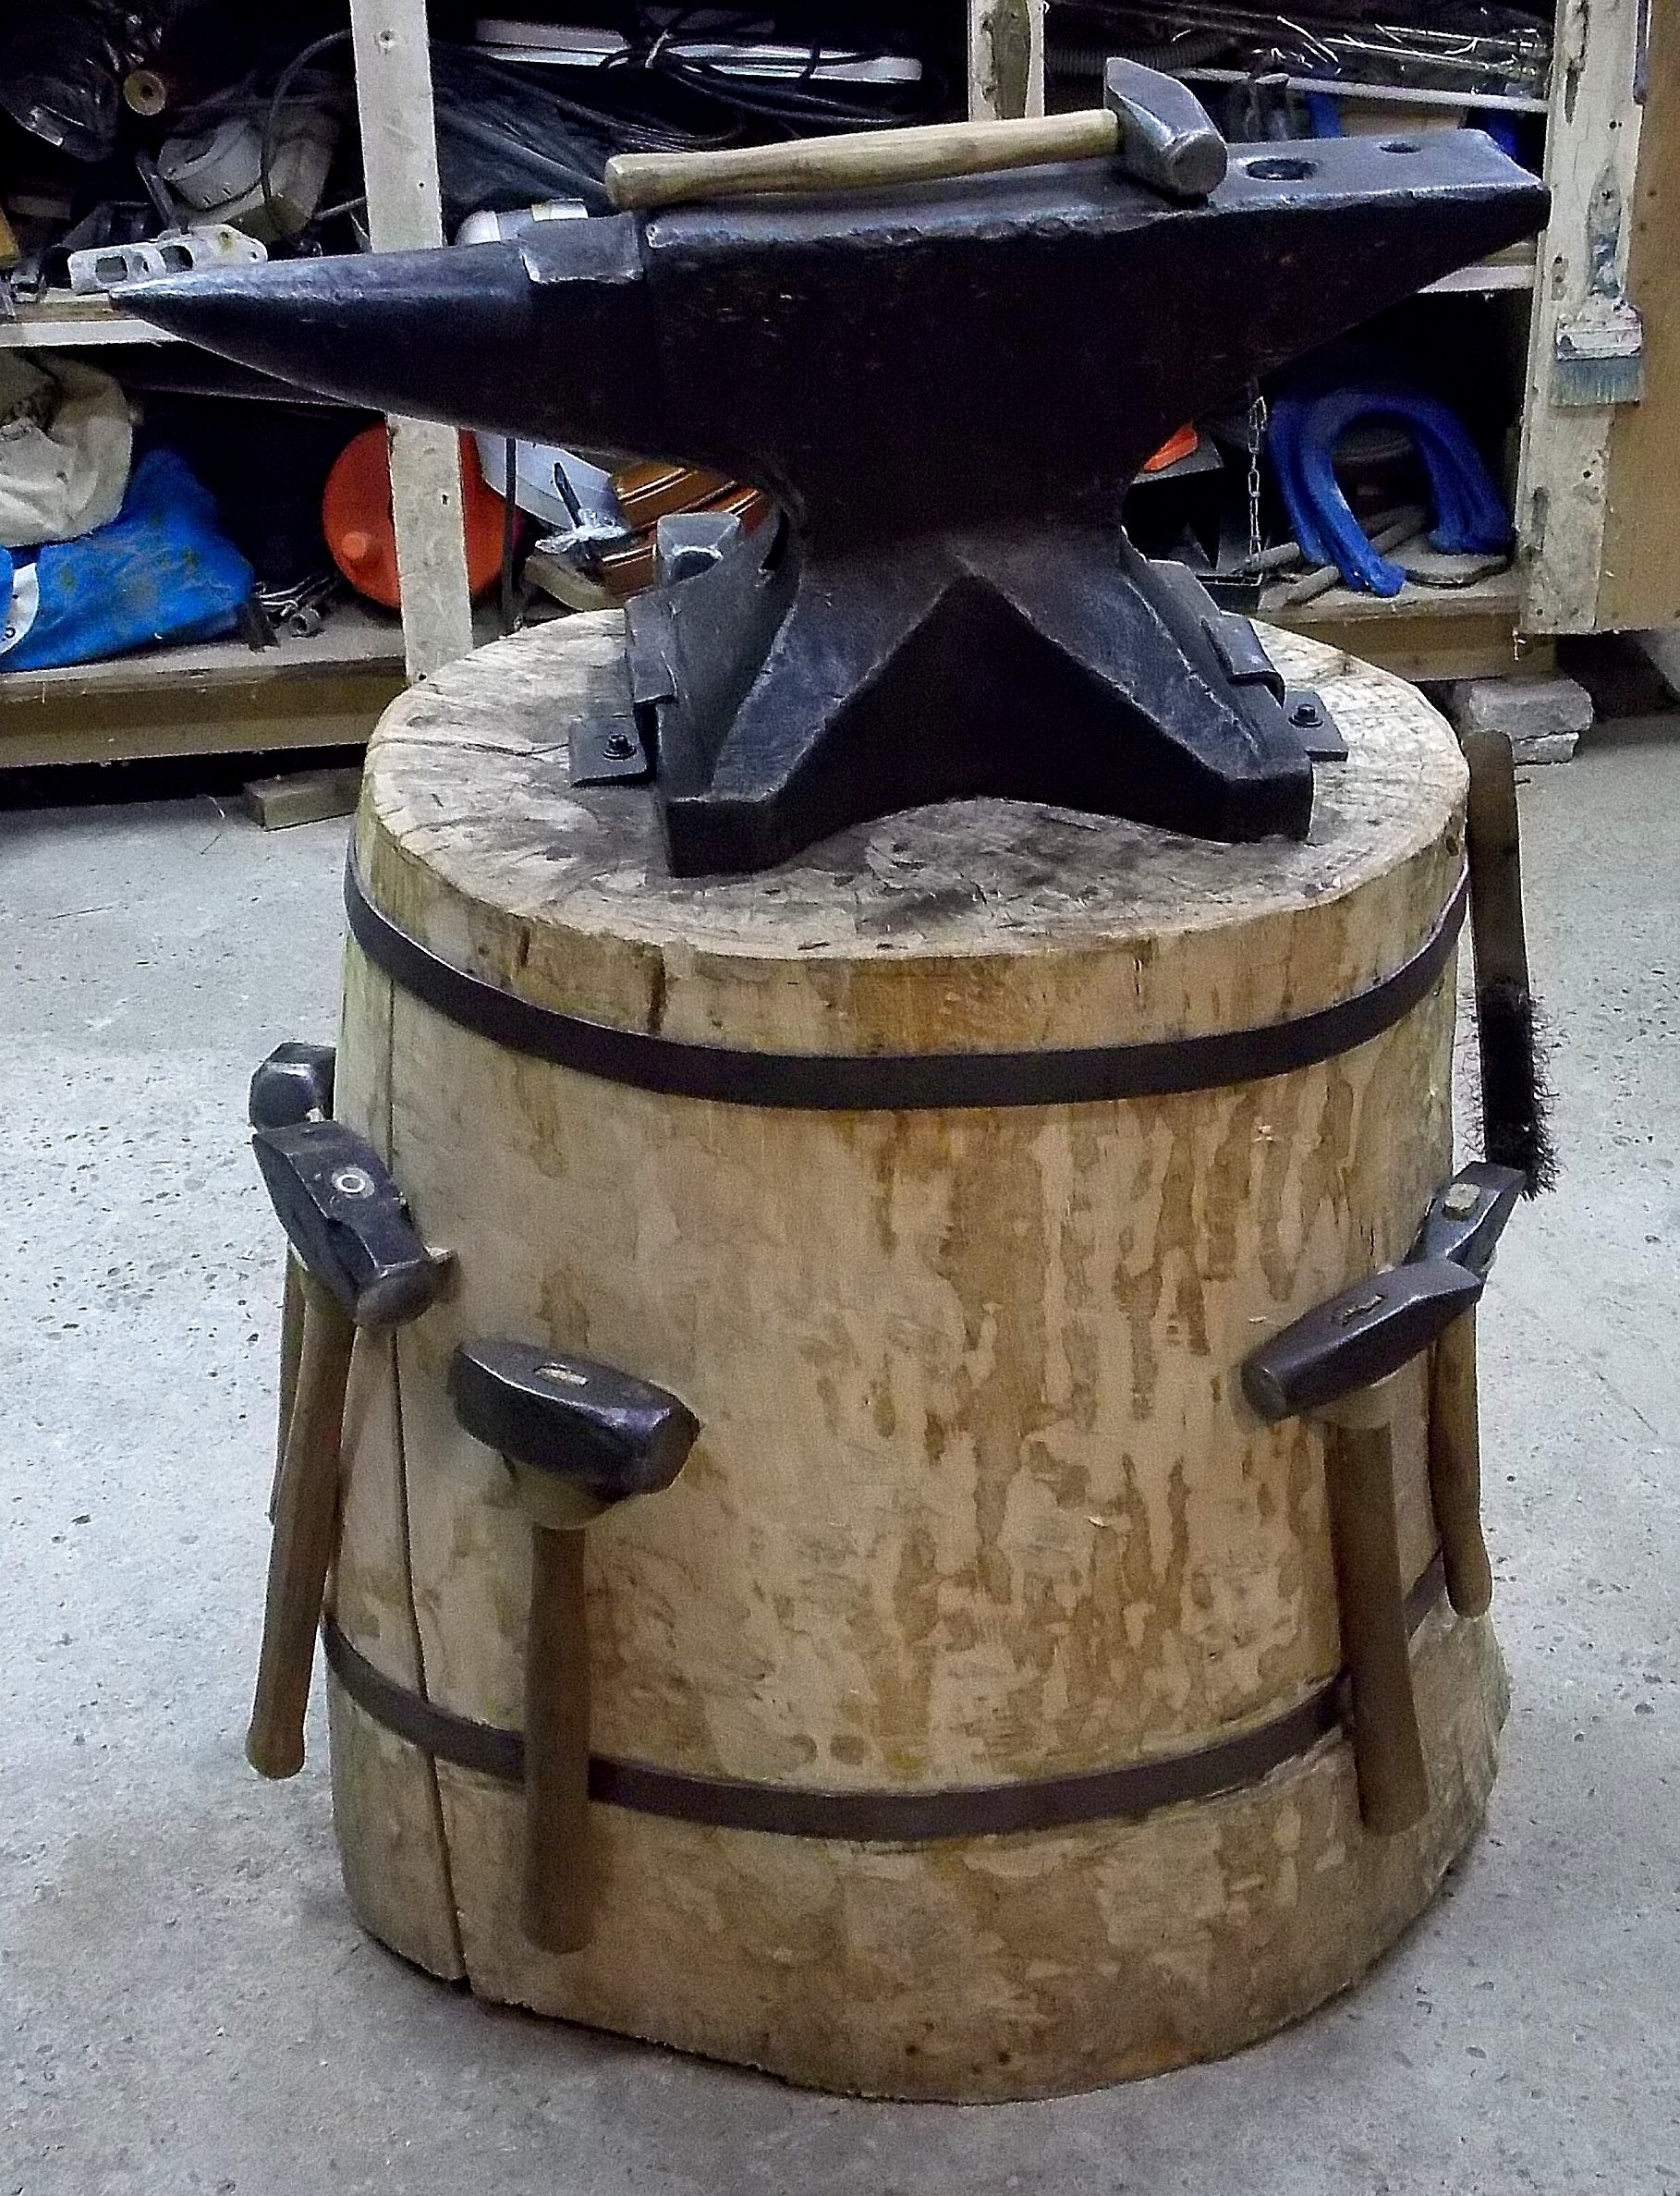
My vote is colonial as well. Anvils in America by Postman states that colonial anvils didn't have the cut-off shelves up to 1780 so I would feel confident in saying your anvil is 1780 or older. Your anvil looks a lot like the one in the Rochester Historical Society. It has one hole in the tail of it and is of similar shape. That has a date of 1632 on it but many feel that date was chiseled in later and that it may not really be that old. I'd see no problem wire wheeling it. Wash it well with just soap & water. Get a quality wire wheel attachment and put it on an angle grinder. Lightly run it over the surface just to take the rust off. Don't apply pressure! Your goal is not to get it down to bare shiny metal, but to get the rust off and preserve the centuries of dark patina. Once you've removed all the rust, was it again with soap & water and then oil it. BLO (boiled linseed oil) works and so does new 5W-30 motor oil. What you have there is a genuine artifact and I think you have to approach it in that manner. How many old anvils like yours are still around? I don't know, but dang few and may only number in the thousands at this point in time. Can you forge on it? Yes, you can. Should you forge on it? In my opinion, if it were mine, I would not forge on it. If you are new to forging you could damage it unintentionally. Your anvil is a part of colonial history. Clean it up and be proud of it, but think long and hard about using it to learn blacksmithing. I'm not saying you can't, because it is your anvil and you can do what you like with it. Clean it up and show us some pictures of it all clean and beautiful. The process I and others describe for cleaning had this results for me. Before picture: After Cleaning: That dark patina you see on my anvil is what you want to protect when you clean yours up. It shouldn't look silver in color and don't grind the surface at all.

-
I agree with everyone else. This is too much when considering all the damage to the one side. I once contacted a craigslist guy who had an anvil listed at $850. It was a Peter Wright looking English anvil and it was 230 pounds. I spoke to him on the phone and he really knew nothing about anvils or blacksmithing. I'm not an expert, but I educated him on what his anvil actually weighed by telling him the stamp was in English pound weight. This immediately established with him that I was knowledgeable. I then spoke to him about the size and the market and that I was a blacksmith and I'd be looking to pay $500 (I started low). He then admitted to me that all he really wanted to get was $500 out of it. In the end I decided to pass because of the weight and at the time I was moving everything in and out of my garage to forge, but it illustrates that people without knowledge really do have a low number they want to get out of it and showing up with $400 or $500 in cash will likely close the deal. On the new anvils you are looking at, I think a good shop size anvil is 150 - 180 pounds. At that weight you'd never have to buy another anvil most likely. New, that's a hefty price, but easily reachable in the used / old anvil market. You can always forge small things on a larger anvil but you can't always forge heavy things on a smaller anvil. If I had all the money in the world, I'd buy a new double horned anvil from one of the better modern makers of anvils.
-
Prices have gone crazy, but I've always felt there are two markets for anvils really. The first is the crazy collector/newbie market like Ebay and Craigslist where $6 per pound or more seems to be the norm. I've seen some crazy high prices on sub-quality anvils. Guys like you could cash in by going there if you want to. The second market is the blacksmith market. These are guys that see an anvil as a great tool and intend to use it. Buyers here can walk away from stupid prices. Here I think $3-$4 per pound is reasonable with some old timers refusing to pay even that. I personally would choose the blacksmith market to sell it if it were me. I'd want to know it was going to someone who would appreciate and care for something I've appreciated and cared for over the years. At 311 pounds you paid about $1.92 per pound. Now you have yourself a dilemma. You could hit market one at $5 per pound and cash in on a big payday of over $1,500 more than doubling your original investment. Or, you could hit market two at $3.50 per pound and clear almost a $500 profit. Nobody can condemn you which way you go with it.
-
Interesting. I've never heard of this. I wonder if it has something to do with it being outside? I haven't noticed any rust developing on mine. I guess I'll just watch for it, but I can't see it doing any noticeable damage to it.
-
Yup, just don't put a lot of pressure on the angle grinder that has the wire brush wheel on it. Let the wire brush do the work. Oh and wear safety glasses to. Those wires fly off at a million miles an hour and have embedded in my skin before. You don't want that to happen with your eyes. The respirator is a great idea too. I always use one when cleaning up an anvil.
-
Looks like there's a fair amount of grey paint still left on it. I notice you are using cleaners or something on it. The best way is to take that wire wheel on an angle grinder and remove all that rust and paint. You may find other layers of paint under the grey and it looks like there's red paint under the grey. You'll be surprised what rust and paint will hide as far as markings go. On my Fisher, I didn't even notice the weight mark because it was so rusty. Once the wire wheel passed over the foot it was very clear. On my German Trenton I didn't notice the weight until the rust was taken off with the wire wheel. It's really the only way to clean up an anvil besides electrolysis.
-
So far people have been talking about caulk and construction adhesive, but I think 100% pure silicone caulking works the best. It's tough, and it has held up just fine. I wouldn't use lead either. The key with these situations is to not overthink it. Keep it simple.
-
Funny how that happens Thomas. If you could see her now she's grown a few more hammers since that picture.
-
For the money you could probably find yourself a nice old one again that hasn't been messed with like yours was. You don't need a 200 # or even a 300# anvil to do good shop work. I have 179 # Trenton that does everything with a 160 # Fisher as a second anvil. Maybe your plan should be to look for 150# - 180# anvil and use the money from the sale to get a decent one in that range. Just a thought. Or maybe look for a used new one so you aren't paying the top price. Just another thought. Deals are out there if you look really, really hard.
-
Great find on the anvil! If you want to clean it up, wash it good with soap & water then let it dry completely before taking a wire wheel on an angle grinder to the surface. The wire wheel will remove the rust without removing the patina or the precious steel of the anvil. Do not grind the surface or the edges until you've forged on it for a year or more. You'll know by them if a little nick here or there affects your forging. Once you've wire wheeled it, wash it again with soap & water then after it dries completely put a light coat of oil on it. I use new 5W 30 motor oil. Don't put used motor oil on it. Some spray them with clear acrylic while others used boiled linseed oil. I prefer the new motor oil. Don't press down hard when wire wheeling the anvil clean, let the wheel do the work and wear safety glasses for your eyes and gloves on your hands. That wire wheel will remove your hide something fierce. Here's what the above process did for my anvil: Before: After:

-
Welcome Brandon. There's so much good information here to read. I know I just read and read for months before joining. Your forge and railroad track will get you started. What has won my wife's heart over is all the useful hooks and things I've made for the house. My first knife was a size of kitchen knife that she needed. She really sees the usefulness of this craft and hobby. When I do all the cabinet pulls I think it will just be the icing on the cake.
-
Mine is from harbor frieght but it's pretty strong. It held a hammer Saturday, I thought I'd put my 1.5 # hammer on it to see how it did. Just enough magnetic power to hold it, It holds tongs with just enough power that I can pluck it off without moving the arm or having to drag it off.
-
I forged all day Saturday and didn't have any issues with scale. I wonder if yours is higher so you are dragging the tool across the magnet and that's what is magnetizing your tools? Mine is lower so I pull my tools almost directly off the arm with minimum dragging if any.
-
Hmmm, I haven't noticed this with my tools. I just forged yesterday and everything is fine with my tools so far. I even have tongs I've stuck on there and so far nothing. Is it a game changer for you Das in terms of it's usability?
-
-
I like the axe thing Das. I've been really wanting to make one lately but I still have my first knife to finish. Like you, I don't have a decent grinder so it's slow going.
-
Beautiful! Nicely done. Who wouldn't be happy receiving one of those for Christmas?
-
Having only made my first knife a month or so ago I can tell you that the easy part is done Normalizing, quenching, tempering and grinding is where all the work is. I think that if this is the first thing you've ever forged that you did pretty well. I never recommend starting forging with knife making because all the skills I've learned since starting forging were needed by me when I made my first knife. I'd recommend grinding all the scale off and looking for cracks before you quench it just to see how you did. One rookie mistake is hammering high carbon steel when it's far too cool (red heat or below) which can cause stress fractures. Grinding will also allow you to correct the blade shape. Don't grind a right angle where the tang meets the blade as that will cause a stress area. Leave your blade thickish when quenching as this will help your warping. Finish the knife and show us pictures. Above all, be proud of what you did. How many people in your neighborhood forged a metal blade this week? Guaranteed probably zero. Don't get discouraged by the process and keep going with it. I would recommend making some hooks and things for your shop just to practice hammer control and drawing out and other base skills.
-
Das, Looks great and I hope it works well for you. I think the key is having it set higher where the scale and grindings from the belt grinder will be less likely to find their way up there. I like it! Having that stuff within reach just makes forging all the less frustrating I think. I'd like to see more people try it and maybe after a couple of variations we can collectively come up with the best possible magnetic tool holder.
-
Ahh, yes all that grinding would make for a lot of metal stuff to gather. I'll keep everyone posted.
-
I just made this the magnetic arm yesterday so I haven't had it in use a lot. The one thing it has going for it is the height it's at. Scale does fly and that's why we all wear eye protection, but not as much reaches that height as say something at anvil level or below. I'll keep reporting back. The magnet I use to check my metal when quenching does accumulate scale just kicking around the shop, but a brush easily knocks it clean so I imagine the same periodic cleaning would work for the magnetic arm. I also do not plan to be putting hot tools on it. If I use a punch correctly it should not be that hot. I quench my punches to avoid overheating them. With tongs, if the jaw end is hot I can put the rein end on there, but I generally leave my tongs I'm working with near the forge. I think some good common sense applied to the use of this device will solve most of the potential pitfalls. In the end, it's usefulness will (I believe) outweigh most of the concerns raised so far. I do not believe any tools will be magnetized on this arm, otherwise those that place magnets on their anvils would be having problems with fuzzy anvils
-
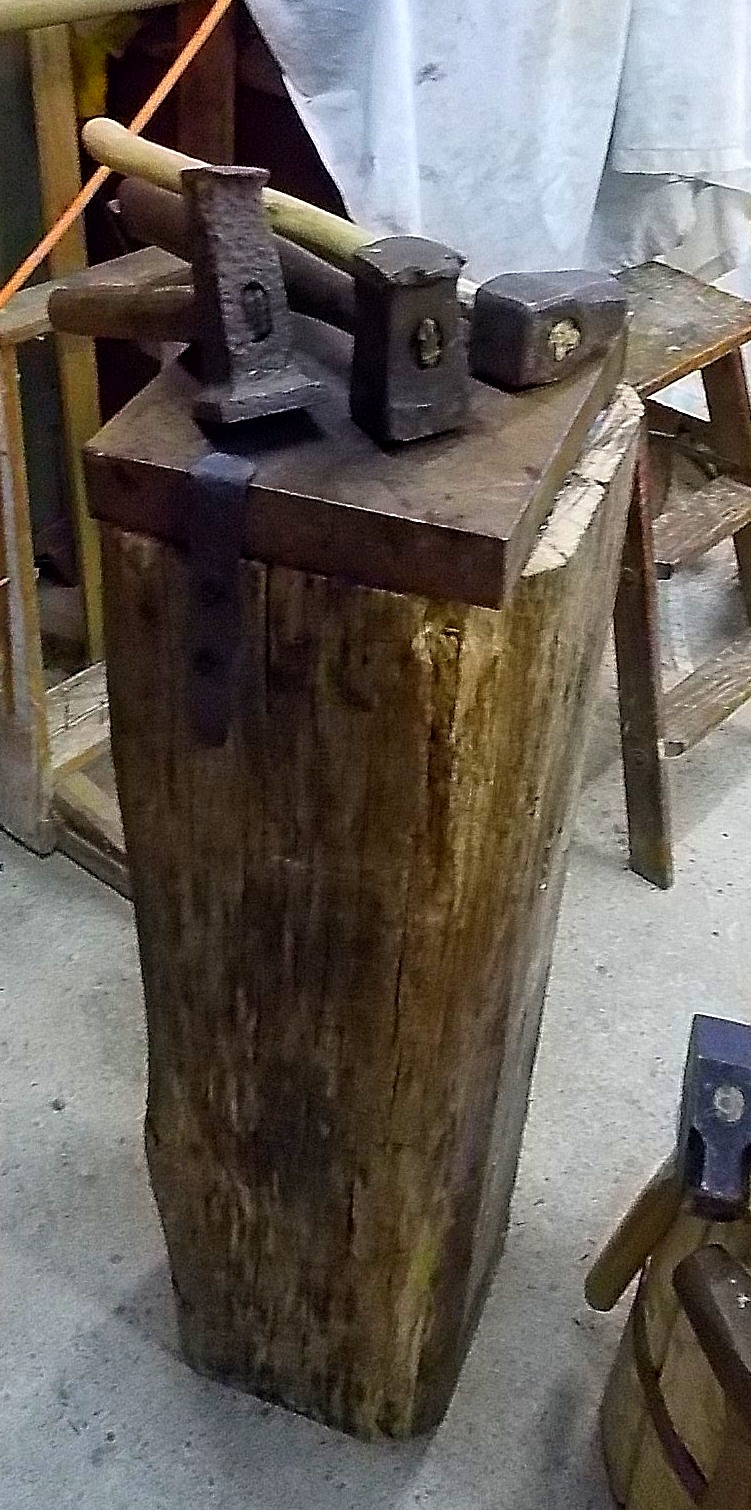
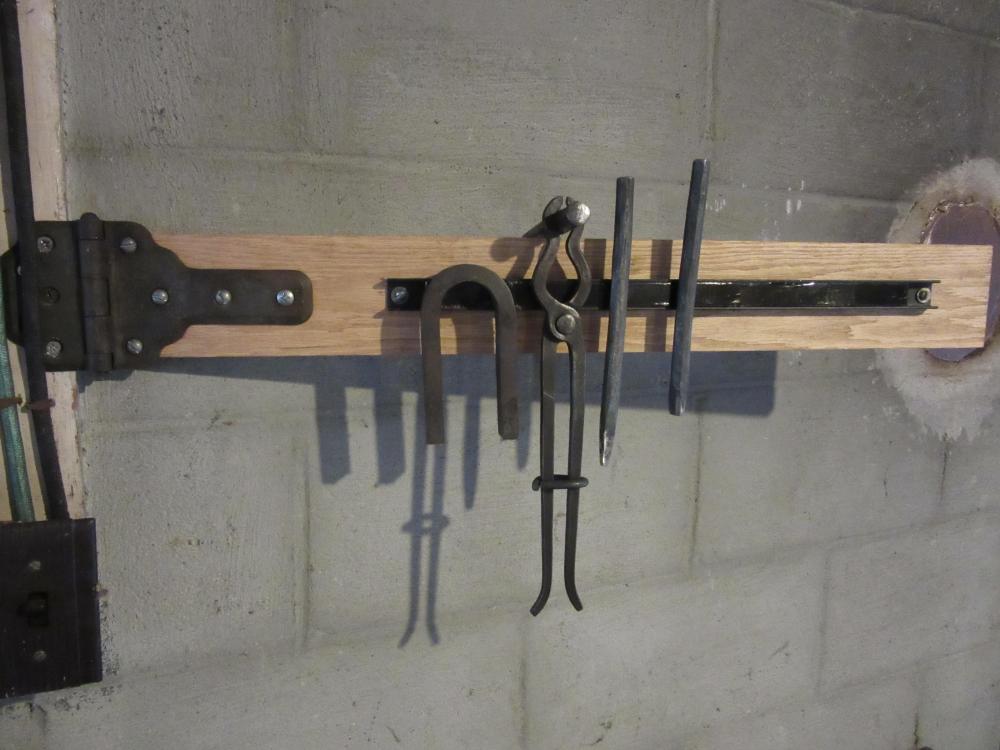
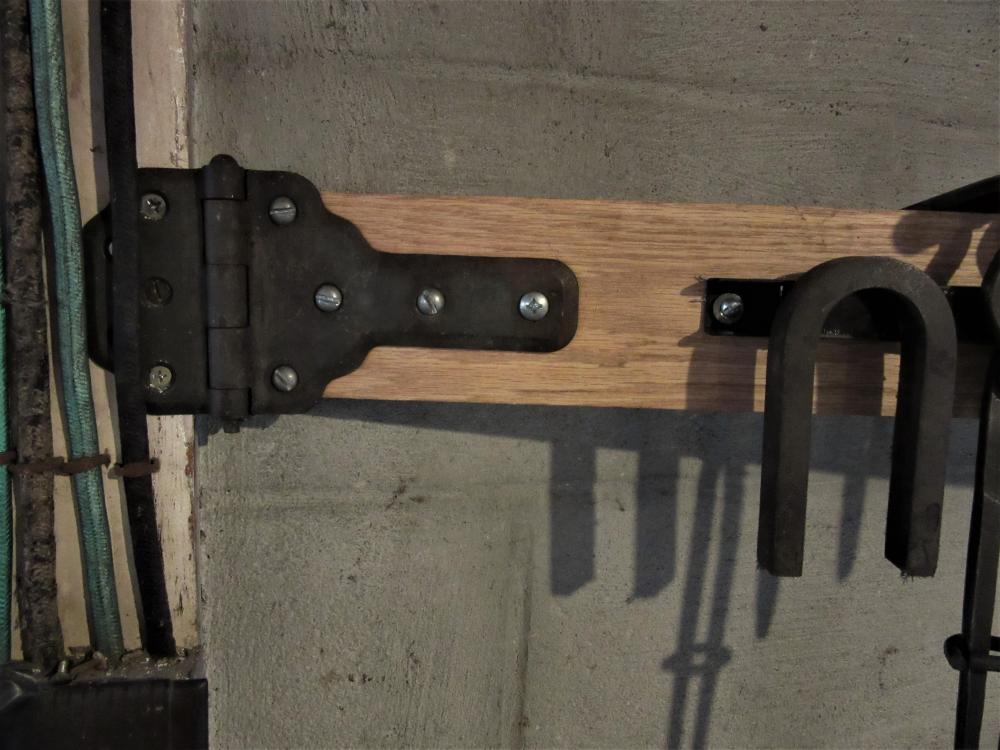
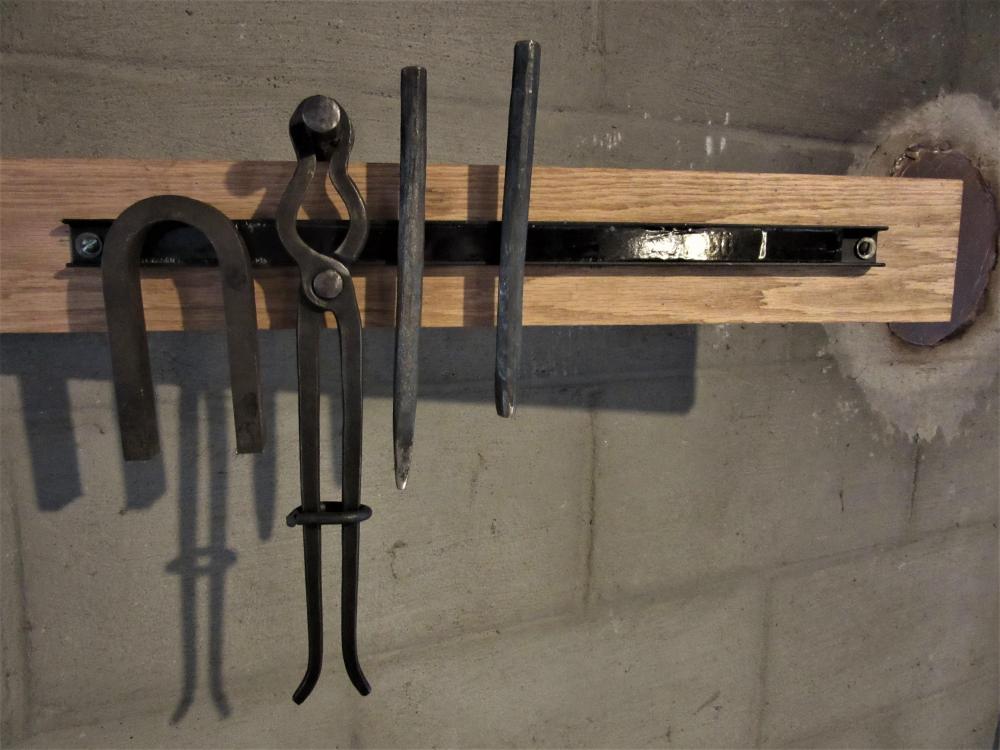
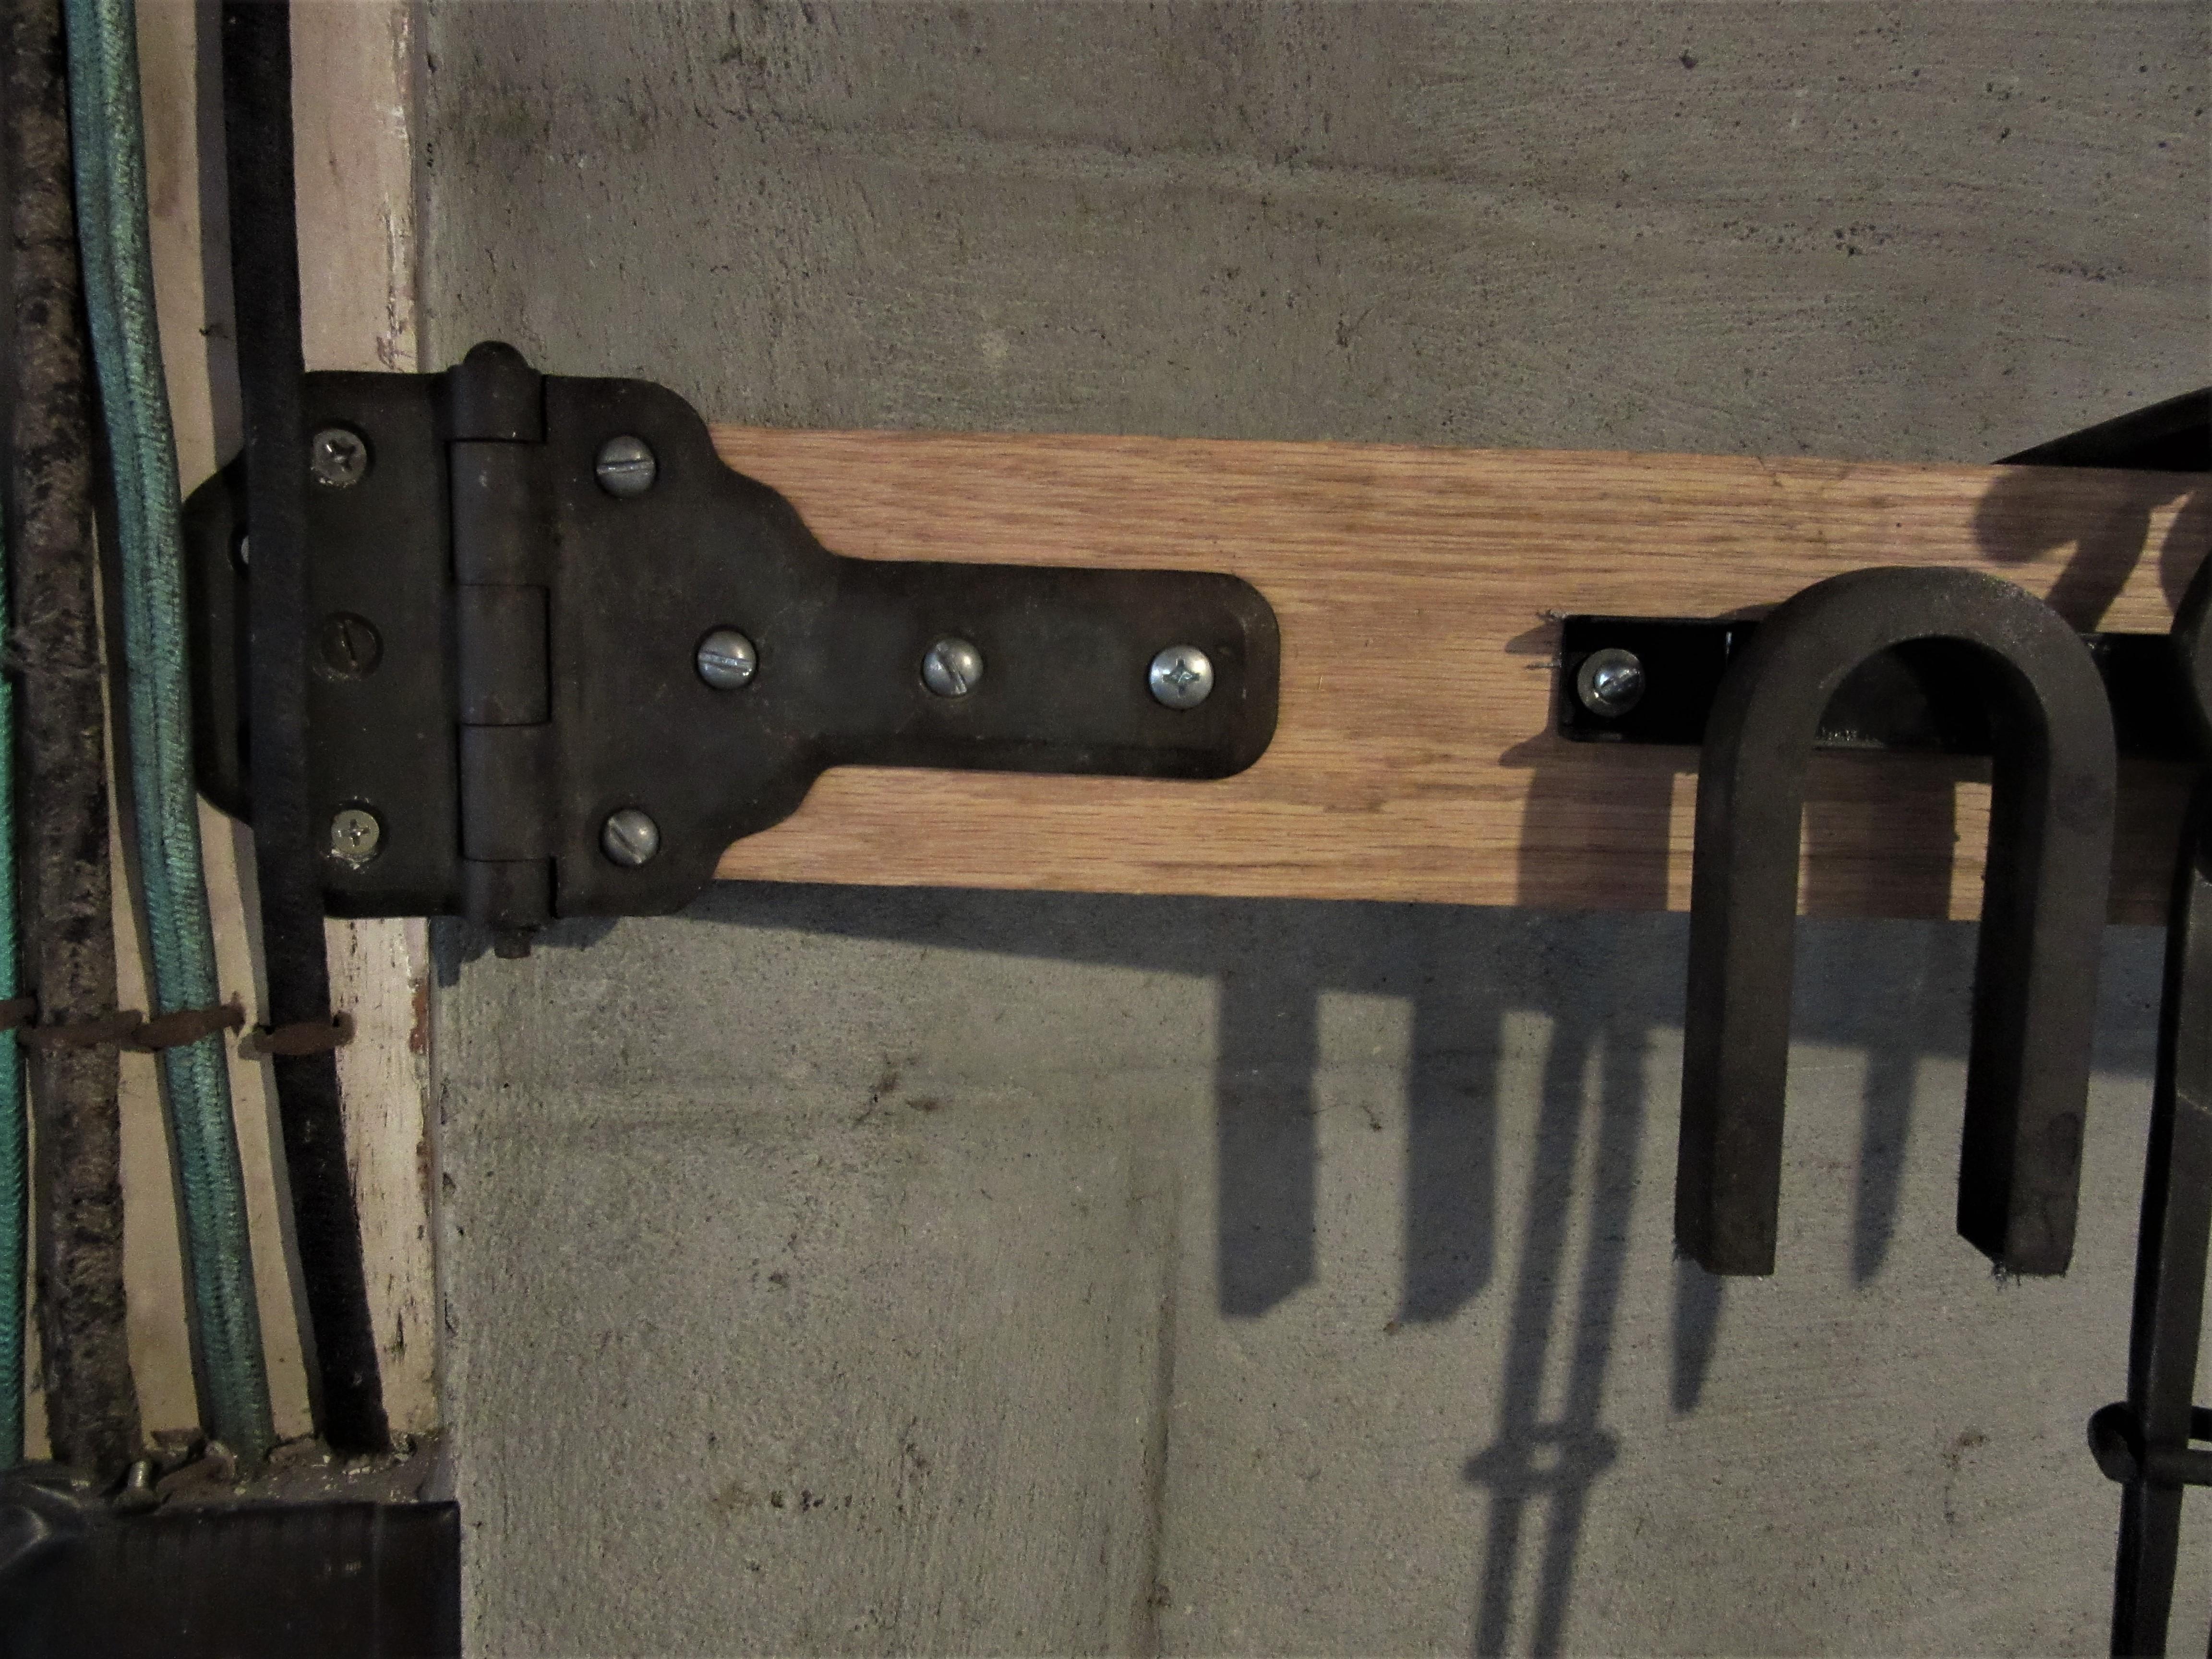
I'm pretty meticulous about setting out the tools I need for the forging project at hand and for planning things out before I even light the forge. This saves me a lot of time, but somehow in the middle of forging things start piling up at the base of the anvil and falling off my anvil stump and rolling on the shop floor or any number of stashed items here and there while forging. I thought a lot about a small table next to the anvil but that's just another thing to navigate around when working. I wanted something different and didn't figure it out until I got one of those large magnetic strips that is made for organizing tools above a work bench. I thought about how nice it would be to have that near my anvil and within an arm's reach of where I was forging. As the wheels turned I remembered this heavy duty hinge I picked out of the trash somewhere and the oak scrap wood I also found in someone's trash. Pictured below is what I came up with. It swings out from being flat against the wall to right out over the horn of the anvil. I can easily take a step toward it to grab a tool or replace a tool back there. I bolted the magnetic strip and the one side of the hinge onto the oak board believing screws might just pull out under weight. My magnetic arm can hold several pairs of tongs, a bunch of punches / chisels, you name it and it won't sag or bend. The best part is that I can move it out of my way if needed or closer if needed. I've decided to keep the arm clear and only use it for holding the tools I'm using for a particular forging session. Presto, no more piles of tools clanking around on my anvil stump and falling on the floor. I thought I'd share this with everyone in case someone else might what to build one.
.thumb.JPG.fd0af8957d8e834bd24ee6d9d05814c0.JPG)
-
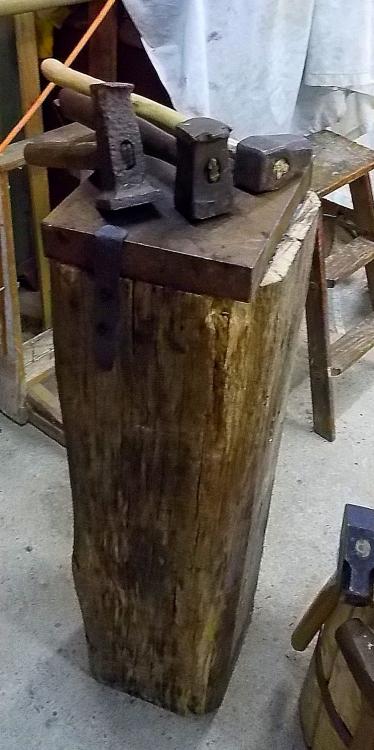
Here's what I made so I have crisp/square edges if needed or a completely flat surface. I siliconed it down to the post w/ brackets.
-
Very nice, I would love 2 hardy holes and can see a lot of good uses for that.


.JPG.5eb01d032ab5c56331c2b17c795f8228.JPG)