iron woodrow Posted August 17, 2012 Share Posted August 17, 2012 ps, your shop inspires medisgusts me! Quote Link to comment Share on other sites More sharing options...
macbruce Posted August 17, 2012 Share Posted August 17, 2012 DD your shop looks like a gathering of mechanical Ents who possibly have long discussions in the wee hours...Leave a light on for em'. As for big machinest vices, they stay true, grab hard and are nice and low for Hobbits like me.....I love my 8'' parker. Quote Link to comment Share on other sites More sharing options...
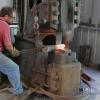
Dillon Sculpture Posted August 17, 2012 Author Share Posted August 17, 2012 I believe they are jealous of each other, trying to one up the other every chance I give them... Couldn't resist any longer, fired her up today on the small compressor, just as I remember, WHAT A BEAST! Took about 6 hits to bring my air reserve from 100 to 50 psi. I will probably just get my treadle worked out in the same manner as the 200. I did drill and tap for a 3/4" line to the chest just in case I want to pull a Sarver. Quote Link to comment Share on other sites More sharing options...
FieryFurnace Posted August 18, 2012 Share Posted August 18, 2012 The hammer club... I really should be ashamed, but I'm not B) <_< what are you forging????? Ship anchors or RR engines? Quote Link to comment Share on other sites More sharing options...
John Larson Posted August 18, 2012 Share Posted August 18, 2012 DD, your new shop capabilities and amenities are inspiring. Love the ceiling height and overhead crane. You can do your work without other workers if you want to. The setting of those steam hammers by yourself made a big statement to me. Quote Link to comment Share on other sites More sharing options...
Dillon Sculpture Posted August 18, 2012 Author Share Posted August 18, 2012 Thanks John, I would have to say you are a inspiration to me as well, I love reading your blog and am amazed of what you have achieved. As far as the work, I would probably be up for most anything from industrial to art, what do you have in mind :D My idea is to use the steam hammers with tooling to create sculpture with massive deformation on a intimate scale. I have fiddled with the idea some, capturing a moment in a mark that can last centuries, a mark that says power is behind its execution, that is what has been driving me and my work. I am still in awe of the forging process and it inspires me on a daily basis. Thanks for the question Dave. Quote Link to comment Share on other sites More sharing options...
Timothy Miller Posted August 18, 2012 Share Posted August 18, 2012 So when can I come down and forge some anvils? Quote Link to comment Share on other sites More sharing options...
Dillon Sculpture Posted August 18, 2012 Author Share Posted August 18, 2012 Whenever your ready Tim, I'll help you forge em out but you'll have to do all the file work yourself, and make mine real purdy! I still owe Larry a 12" post vice, what else we got on the list? Quote Link to comment Share on other sites More sharing options...
Dillon Sculpture Posted August 20, 2012 Author Share Posted August 20, 2012 Time to play... Quote Link to comment Share on other sites More sharing options...
Daniel.85 Posted August 20, 2012 Share Posted August 20, 2012 Such a beast! After a month of anticipation you better not forget about us, :) We want videos of that thing!! Did you ever build that 1million btu forge for these hammers? Is that still the plan? Quote Link to comment Share on other sites More sharing options...
nuge Posted August 20, 2012 Share Posted August 20, 2012 Sweet arena Dr. Dillon. Lifetime full of hard work right there, congrats. Quote Link to comment Share on other sites More sharing options...
John Larson Posted August 20, 2012 Share Posted August 20, 2012 Hurray! The shiny edges of the die faces suggests you have had the dies remade. That was fast. Quote Link to comment Share on other sites More sharing options...
David Browne Posted August 21, 2012 Share Posted August 21, 2012 Time to play... Michael, I see that you have once again re-set your upper limits with this latest hammer. Can't wait to see that thing in action. -DB Quote Link to comment Share on other sites More sharing options...
Dillon Sculpture Posted August 21, 2012 Author Share Posted August 21, 2012 :) :) :) :) :) Grinning ear to ear :) :) :) :) :) Quote Link to comment Share on other sites More sharing options...
Judson Yaggy Posted August 21, 2012 Share Posted August 21, 2012 Can you hear us all shouting our questions and praise over the hiss of shifting valves and the wham wham wham of steel being squished into cool shapes? For our sake I hope you can, for your enjoyment I hope you can't! Quote Link to comment Share on other sites More sharing options...
Dillon Sculpture Posted August 21, 2012 Author Share Posted August 21, 2012 What? Huh? Sorry I had my ear plugs in.... Sorry, I missed responding. Daniel, l am leaning towards gas again but haven't started yet. I do have a few large size forges that will keep me busy though :P Nuge, seems like it has taken a lifetime and I guarantee all these hammers will out last me! John, I have just been running them to see where they will settle, the bottom has centered up pretty well so I may take a bit off both front and back but I'm going to wait a bit more. David, I was hoping this would be my hobby shop someday, with the real shop having the big hammers :ph34r: Quote Link to comment Share on other sites More sharing options...
Ric Furrer Posted August 22, 2012 Share Posted August 22, 2012 the real shop having the big hammers :ph34r: Like this? Ric Quote Link to comment Share on other sites More sharing options...
John Larson Posted August 22, 2012 Share Posted August 22, 2012 DD, after I watched Ric's LOC video from the 30s I rewatched Grant Sarver's video of his 750 one-piece steam hammer. I can see how he used a slotted lever to help control the throttle valve via the treadle, and I can see how he used a chain to have adjsutable treadle control of the motion valve, but I do not undwerstand where he directs his added air flow from the inlet source. Is it to the bottom of the piston so that it rises at a rate controlled by the hand ball valve to then get the motion valve to trigger the down stroke? Er what? Quote Link to comment Share on other sites More sharing options...
gator13 Posted August 22, 2012 Share Posted August 22, 2012 Now that's a shop.... party at your place this weekend? Quote Link to comment Share on other sites More sharing options...
Dillon Sculpture Posted August 22, 2012 Author Share Posted August 22, 2012 Thats the one Ric, John, the auxiliary air supply is piped into the middle of the valve chest as a secondary throttle. You could not take it to the bottom because it would just go out the exhaust without the motion valve in the bottom position. The chain connects the treadle to the handle that is on the motion control linkage, this is where it get fuzzy. I think the handle bypasses the sword and sends the ram down as the throttle opens via the treadle. I tried this on the 200 and it really gave a good wallop. The one thing I can't figure is why his machine doesn't lock when he raises the ram, he seems to be able to get it started very easily unlike my 200 when it is locked. Maybe it's just the weight? My control over the 700 so far has been much like the video of the 200, but it is a pain to not have the ram up when you start. I may do some pluming soon and see how the secondary will work out. I pulled out some tooling I have been dying to use, a few ball swages and sizing dies, not sure about the funnel shaped ones though? When i used the ball swages before I had trouble getting the end to fill? Quote Link to comment Share on other sites More sharing options...
Dillon Sculpture Posted August 22, 2012 Author Share Posted August 22, 2012 Now that's a shop.... party at your place this weekend? You bring the wine and women :rolleyes: Quote Link to comment Share on other sites More sharing options...
JNewman Posted August 22, 2012 Share Posted August 22, 2012 Hot cutting the end off using a scissor cutter or Grinding the corners off helps a lot with bigger ball swages. It helps to fill the end. If you don't do that you can end up with shuts in the end which don't show up till you flatten the ball or till you punch a hole in the flattened ball. If you are just aiming for a big decorative ball it is not as important but it does make filling the end much easier. Quote Link to comment Share on other sites More sharing options...
iron woodrow Posted August 22, 2012 Share Posted August 22, 2012 when i use to make water valve handles, with a flattened 50mm ball, and sometimes 60mm ball, i found that if i pushed and pulled while turning in the swedge, i got far more control over the filling of the ball, and far fewer shuts in the forming. i also found that taking the corner off with a quick grind before putting it in the swedge helped a lot too, just as john suggests. Quote Link to comment Share on other sites More sharing options...
Ric Furrer Posted August 22, 2012 Share Posted August 22, 2012 I pulled out some tooling I have been dying to use, a few ball swages and sizing dies, not sure about the funnel shaped ones though? When i used the ball swages before I had trouble getting the end to fill? the cone...rotate rotate rotate...while feeding into the swage...I use one of those on production widgets here. If you are too timid the end duckbills, but if you give 20-40% closure to the die before rotating the flashing forges back in...if the flashing is too think it folds...best to have an angle grinder ready to take it off if that is the case...hot metal goes fast with a stone wheel. Ball swage...I'd have an exit to the swage as well or it will pinch and not fill....maybe wallow out the area around the ball or it will look like Saturn. If you are doing one off balls then use round stock of the correct volume and taller so the swage upsets the material into the widest part of the swage. If it is a 2" ball and you feed in 2" stock then it is grossly overfilled. To some extent the metal flows from the widest to the top of the sphere as the swage comes together as it flows with the curve. Ric Quote Link to comment Share on other sites More sharing options...
Dillon Sculpture Posted August 22, 2012 Author Share Posted August 22, 2012 Thanks guys I'll give that a try! The cone has a 1-1/2" stem on the end I was thinking it was somehow used in relation to the ball swage. Can't figure if you use it to neck down before the ball swage or smooth out after the ball swage? I don't think I would want to try and feed it from the end it may launch like a rocket! It would have to be full contact from front out the back but those sharp edges on the round part? That is for sizing not shaping, right? Quote Link to comment Share on other sites More sharing options...
Recommended Posts
Join the conversation
You can post now and register later. If you have an account, sign in now to post with your account.