JNewman Posted August 22, 2012 Share Posted August 22, 2012 The cone may have been for making hooks. The way I was taught to make a hook is to forge a ball on the end of a bar then taper the bar with a fairly steep taper from the ball to the bar size. Then flatten and punch the ball and then taper the end of the bar. So you end up with a cigar shape with the loop on the steeper end. Or it could be for a totally different job nothing to do with the ball swages. Quote Link to comment Share on other sites More sharing options...
Ric Furrer Posted August 22, 2012 Share Posted August 22, 2012 The trick is to key the stock in where the deformation locks it into the swage. I get more issues when I use forge lube oil..which I do for some swaging, but for these extreme tapers and other such swages where kick-out is an issue it is best not to use any. I use mine under the 45 ton press...kick-out is still a concern, but less so than with the hammer. Ric Quote Link to comment Share on other sites More sharing options...
iron woodrow Posted August 22, 2012 Share Posted August 22, 2012 i would imagine that one would rough out the taper on a taper block, then smoothe out inthe swedge Quote Link to comment Share on other sites More sharing options...
Dillon Sculpture Posted August 22, 2012 Author Share Posted August 22, 2012 I may give it a try but I think it will lead to flashing and folds. I think it's just for sizing, for what I don't know... Built a guard for my new treadle setup. HEAT-N-BEAT Quote Link to comment Share on other sites More sharing options...
JNewman Posted August 22, 2012 Share Posted August 22, 2012 Built a guard for my new treadle setup. HEAT-N-BEAT Looks good but I would put a guard over the treadle as well. My hammer came with a large guard over the treadle and it has yet to get in the way and is a convenient place to drop all the tools for the job you are working on. I am often using 2 or 3 tools per heat and it is convenient to be able to just drop them and pick up the next all right in front of the anvil. The only problem is I often end up with tools for 3-4 different jobs laying there, but looking at how neat you keep your shop that shouldn't be a problem for you. I would agree that the taper would have to be roughed out before using that cone swage. I just finished forging some cones with a swage and I roughed them out on the flat dies to a tapered hex then tapered them some more on a taper die hex then 12 sides and finally the conical swage. Something to keep in mind about the relief on a lot of old swages is that when those swages were made they may have had to file the relief because they didn't have the grinders we have today. If I had to file the relief on all my swages rather being able to use the assortment of grinders I have, lots of my swages would probably have less than ideal relief. Leo the retired industrial blacksmith who stops by my shop regularly talks about filing relief in swages. Quote Link to comment Share on other sites More sharing options...
John Larson Posted August 22, 2012 Share Posted August 22, 2012 Thanks for taking the time to explain, Danger. No need to comment here: If I've got this straight, Grant just created a second way for feeding air to the hammer valve so he could control "idle" speed and he uses the chain on the treadle to the control valve so as to be able to set the idle location of the tup rather high and then when he stepped on the treadle he brought the center of reciprocation movement downward. In my head, at least, this makes sense. I guess his treadle movement still mostly controlled air flow. Quote Link to comment Share on other sites More sharing options...
Dillon Sculpture Posted August 22, 2012 Author Share Posted August 22, 2012 John, I thought about the guard on the treadle but it is very difficult to get close to the dies because of the frame, so I figure I can put my foot on the frame with a block on the treadle and get in close. As you and Woody confirm that you need to rough the part first then finish with the swage. I may just smash a piece to see what happens :blink: Not sure how old they are maybe 50 60 yrs. but they are beatiful! John, You understand as I do, but then again that man was a genius, equipped with a mind for unbelievable forging adventure while staying true blue -_- Quote Link to comment Share on other sites More sharing options...
iron woodrow Posted August 23, 2012 Share Posted August 23, 2012 what happened to the chambersburg in question!?? Quote Link to comment Share on other sites More sharing options...
forgemaster Posted August 23, 2012 Share Posted August 23, 2012 When using balling swages it is a good idea to put some small coal pieces or coal dust in the swages, before putting the job in there and also when you stop, from time to time to empty the scale out, put some more coal in. (helps to stop the job sticking, and also acts like a lubricant) If you are having problems with the end piping you could try cutting the end off with a set of butterfly tools first. Phil Quote Link to comment Share on other sites More sharing options...
Dillon Sculpture Posted August 23, 2012 Author Share Posted August 23, 2012 what happened to the chambersburg in question!?? Not sure? What question? Quote Link to comment Share on other sites More sharing options...
Dillon Sculpture Posted August 23, 2012 Author Share Posted August 23, 2012 Thanks Phil, I was hoping you would throw in. Have any ideas about the funnel shaped die? Quote Link to comment Share on other sites More sharing options...
peacock Posted August 23, 2012 Share Posted August 23, 2012 I use a lot of ball swages. Mine fill best and with no laps on the end if I use square stock. Corners top to bottom and rotate 90. The coners only have to move 45 degrees to fill the hole, and it takes less power to push the stock out the end of the bar, you get much less stock coming back out the stem. On very large balls I fuller the neck with a spring fuller then knock the end corners down a little on the flat dies. When you use square stock the balls come out bigger than the original stock Quote Link to comment Share on other sites More sharing options...
iron woodrow Posted August 23, 2012 Share Posted August 23, 2012 Not sure? What question? the one grant did his mod on? surely if it still exists someone could have a look to see how he did it? Quote Link to comment Share on other sites More sharing options...
Justin Carnecchia Posted August 23, 2012 Share Posted August 23, 2012 The hammer Grant was running in his video was a Bell Quote Link to comment Share on other sites More sharing options...
r smith Posted August 23, 2012 Share Posted August 23, 2012 I remember Grant said in a post some years back that the hammer in this video was scrapped long ago. I was bummed at the time I read that. :( Quote Link to comment Share on other sites More sharing options...
Ric Furrer Posted August 23, 2012 Share Posted August 23, 2012 As you and Woody confirm that you need to rough the part first then finish with the swage. I may just smash a piece to see what happens :blink: My taper is on 1.5" diameter round to 1/2" round over 2". I do this in one heat using just the swage under the press. No muss no fuss no other tooling...made maybe 1500 of them for the job over the years in the same swage. Ric Quote Link to comment Share on other sites More sharing options...
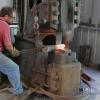
Dillon Sculpture Posted August 24, 2012 Author Share Posted August 24, 2012 I may have some help tomorrow, we'll see... My favorite is Grant punching trawl weights on that hammer, you can really see what it will do! I count at least 120 beats a minute but the best part is at 1:15 ((TING)) Quote Link to comment Share on other sites More sharing options...
mofokaye Posted August 24, 2012 Share Posted August 24, 2012 I remember Grant said in a post some years back that the hammer in this video was scrapped long ago. I was bummed at the time I read that. :( Hard to justify even if the whole thing had cracked in half... Quote Link to comment Share on other sites More sharing options...
Dillon Sculpture Posted August 25, 2012 Author Share Posted August 25, 2012 Got the exhaust all piped up, which make the install 100%. A little over two months, but I was able to slip in a bit of vacation time and I had to wait for my crete on the second pour. All taken in I figure a few weeks of actual labor and around $2000 if anyone is interested in DIY. Now what can I do with a bit of left over pvc and a large air supply.... :ph34r: I tried the tooling without much luck, even after necking the piece down with a fuller it chopped the heck out of it. Who ever made these tools is probably laughing in their grave! I think you would have to have the part real close before trying to finish with these tools. I really don't want to screw them up but, If i relieved the edges do you think I would have better results? The 1-1/2" tenon tool worked real well, I did have the size within a 1/4". I will also point out the inside surface of the tools are fairly pitted. Quote Link to comment Share on other sites More sharing options...
monstermetal Posted August 25, 2012 Share Posted August 25, 2012 So have you done any work yet or you just going to stand around and look at them awhile... Quote Link to comment Share on other sites More sharing options...
John Larson Posted August 25, 2012 Share Posted August 25, 2012 An expert on tooling for under a power hammer is Ralph Sproul up in Maine or NH. Send him an e-mail via New England blacksmiths and he can be of a lot of help. My two cents. Quote Link to comment Share on other sites More sharing options...
JNewman Posted August 25, 2012 Share Posted August 25, 2012 I am sure you would have much better results if you relieved the edges. I will take pictures of a couple of 2" ball swages I have when I go in on Monday. You do do have to go slow at first with ball swages. The ones I have were much more relieved than those when I got them and I relieved them even more. When you first mentioned sharp corners I thought you were talking about the cone which didn't look too bad. I went back and looked at your ball swage pictures which look way too sharp. Quote Link to comment Share on other sites More sharing options...
Judson Yaggy Posted August 25, 2012 Share Posted August 25, 2012 Ralph S. is in New Hampshire. His contact info is indeed on the NEB website. He definitely has a certain spark when it comes to applying all that power hammer tooling info that Clifton Ralph and Steve Parker have been teaching all these years. Quote Link to comment Share on other sites More sharing options...
Dillon Sculpture Posted August 26, 2012 Author Share Posted August 26, 2012 No work here, just play! Besides its hard to get anything done between the 10 o'clock and 2 o'clock shows for the tour groups, at 5 bucks a head I may not have to work anymore :lol: I did have a small problem forging yesterday, at one point forging on some 3" square I found myself wishing I had a bit more power! :huh: Thanks for the info on the dies, I will be going over the Clifton videos again and I will try to contact Mr. Sproul. Quote Link to comment Share on other sites More sharing options...
Madmike Posted August 27, 2012 Share Posted August 27, 2012 at one point forging on some 3" square I found myself wishing I had a bit more power! :huh: So you're going to buy and fix the 'Creusot hammer' soon :rolleyes: Quote Link to comment Share on other sites More sharing options...
Recommended Posts
Join the conversation
You can post now and register later. If you have an account, sign in now to post with your account.