Alan Evans
-
Posts
1,990 -
Joined
-
Last visited
Content Type
Profiles
Forums
Articles
Gallery
Downloads
Events
Everything posted by Alan Evans
-
welding and bifocals/progressives
Alan Evans replied to natenaaron's topic in Welding/Fab General Discussion
Glad that solved your problem as well...The only disadvantage I have found with the mask magnifying lenses is that I no longer have an excuse for a wobbly bead! Alan -
welding and bifocals/progressives
Alan Evans replied to natenaaron's topic in Welding/Fab General Discussion
Literally a pain in the neck trying to align eye, lens, mask window and weld pool! The best solution I have found so far is one of the magnifying lenses that fit inside the mask...ask your welding supplies place. You can get them in various dioptres. When coupled with varifocals it is fine for most positions. Really awkward TIG stuff I swap the prescription varifocal safety glasses for a pair of cheap reading glasses...but the mask magnifier is the key... Alan -
Twentieth Century welder rod issues
Alan Evans replied to 51 Papy's topic in Welding/Fab General Discussion
No consolation, or necessarily appropriate to the Op's problem...I had an old oil cooled AC welder. It was largely idle after I bought a MIG, but when we needed it after a year or two, it worked fine again for a day, and then was dead the next day. I was told it was because condensation had got into the windings and heat turned it to steam and that disturbed the shellac. Mine blew, but am wondering if the OP's has just lost a few coils and is getting reduced output. Are there any smoothing/striking capacitors in the box which would give it a start but then not maintain? Alan -
Very useful, my everyday leg vice is on its own stand. Curious that the anvils are not supported more rigidly given the weight of the whole. The vice has its own vertical support so the flat upright is wasted where it is...Be better to have verticals underneath the anvils and let the vice be supported by the bench plate....may be worth dropping a post or two down or a brace diagonally across to stop them bouncing. I would also get rid of the cutting dross from the edge of the bench plate, definitely out of keeping with the quality of the vice. Alan
-
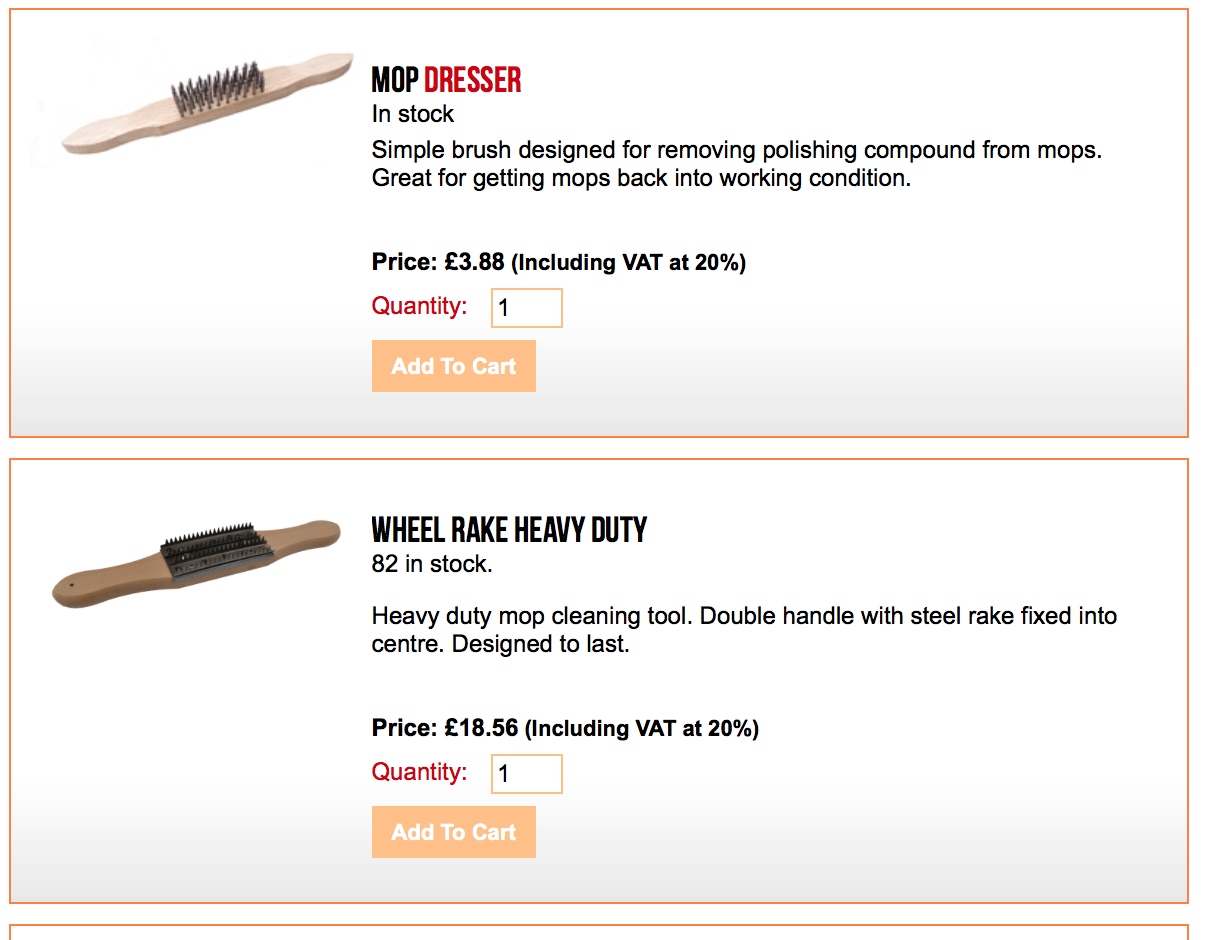
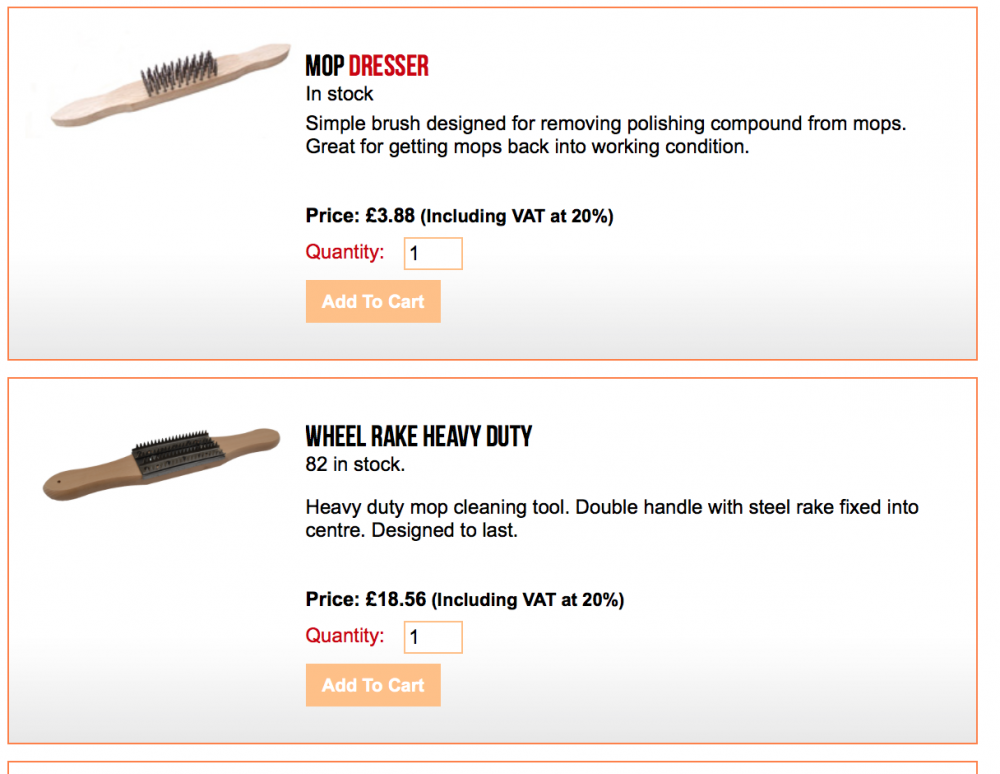
Plus one on Kozzy's suggestions. I have always known that as a wheel "rake" rather than a wheel dresser. I have always used an ordinary 5 or 6 row wire brush to "dress" buffing wheels. The dedicated dressers have two handles similar to the rake, but I have managed without....You could always try an ordinary wire brush while you are waiting for the bespoke tool to arrive. For a mirror finish you might also try using Menzerna P175 Yellow Super Finish compound...price is about 5 times any other, but it is easily 10 times better. Cut factor 1, Gloss factor 9.5 And also Vienna Lime to wipe over in between compound grades and after the process to remove any remaining traces of the preceding wax/compound. It works like magic, I am always surprised how effective it is each time I use it. Alan "Vienna Lime Powder...Cleaning powder for polished items.Very fine grade. Pure white in colour.Its not actually a lime powder but a Precipitated Calcium Carbonate powder. Harmless refined chalk power."
-
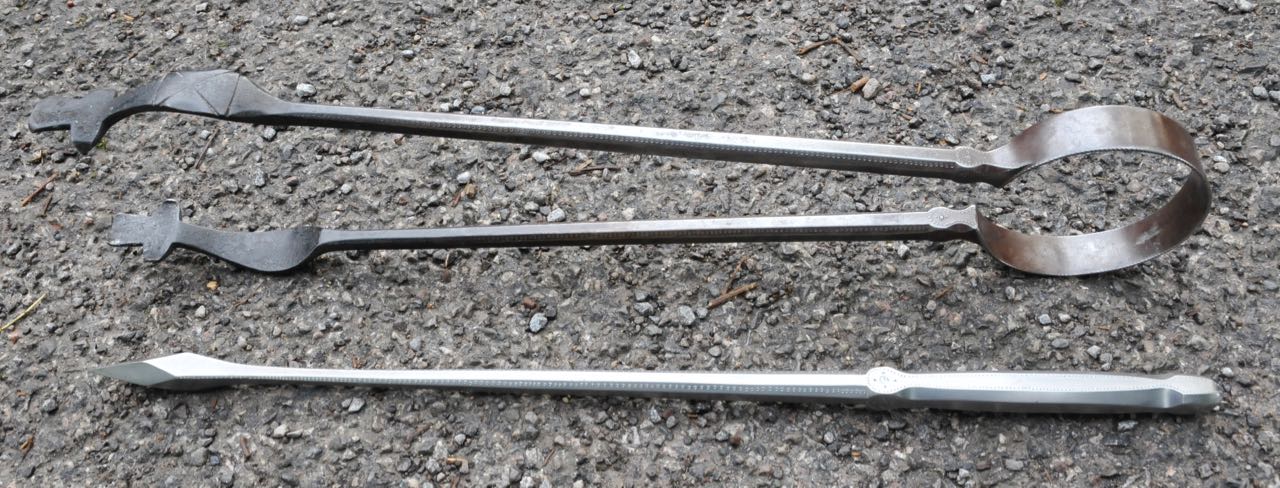
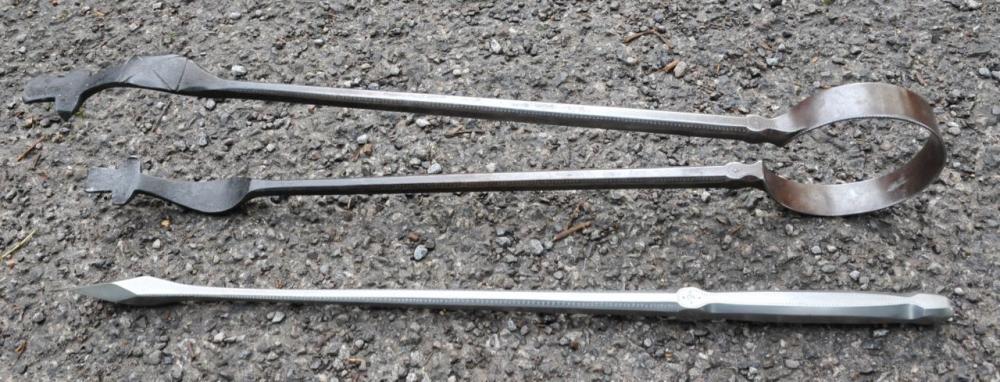
Not mine...as I said, I just made the poker to reflect the style of the client's Gimson/Bucknell tongs. The tongs illustrated are originals. The poker is an amalgam of my poker balance and diamond point/heat sink ideas and the decorative detailing from the Gimson designs. Well if the photo has helped you diagnose the problem that's great. I have a few other images of the implements from different angles if you want them... As I said above you could make a repair using a similar construction to the twisty ones you posted...but with a wider and thinner spring from sheet metal. The width of the tong spring gives the positive alignment of the jaws (so they don't parrot/crossbill) and the thinness takes the stress out of it and makes them easily flexible. The springiness is fairly minimal, you virtually open them as you would a top hinge pair. By spreading the movement over a fairly long thin spring there should not be anywhere that gets fatigued through overwork. Alan
-
There are a few youtube videos of automatic chain link fence making machines and you can see the weaving blade rotating in a helical guide which draws the wire along the blade as it is formed. Is that right Michael? I have seen something similar on a much smaller scale making oval links for silver chain. Alan
-
I have used either PhotoShop or Vectorworks on a Mac for similar-ish setting out when I am forming or cutting out the letters. I have also specified the font and size to a signmaker so he could print out some self-adhesive rubber stencils which I could stick on the project and use the shot blast to texture the plate surface. But I would have thought that any text processor would do for your purposes if you just play with the printing percentage to match your punch size. It is interesting how in a few years our standard of mechanical lettering has improved. With the advent of the computer and their ability to kern text effortlessly...both the standard metal punches and the typewriter are effectively monospaced systems which was the norm. Courier being the monospaced font most Mac systems retain. Any kerning with the punches was done by eye, but then if you wanted really elegant lettering you used burrels or hammer gravers and engraved it...or acid resist and a stylus and etched it. Did you mention the the disc because you are looking to set out your text on an arc to suit? If so, then my old copy of Photoshop would probably struggle, the Vectorworks text handling would be best. But I would have thought any publishing or illustration programme would have that capacity. I think a guide bar system of smaller diameter discs would be essential for regularity if the text is on an arc...uneven kerning would be much less noticeable. Alan
-
Wasn't there some saying along the lines of tackle shops are there to lure fishermen...or new fishing tackle catches more fishermen than fish? Alan
-
Not a party pooper...more a curious sort of echo! Alan
-
My punches, some second hand sets, have a line or a cross ground on one face which you can feel under your fingers to make sure they are the right way up. Two things I have done to help get the legend looking good... Clamp a guide rail of 12mm (1/2") square or similar, and rest the bottom or top edge of the punches on it to give you horizontal and rotational alignment. It helps prevent the possible flinch and movement. Grip the punch in "mole" or "vice" grips or similar snap action pliers...or some tongs with a slip ring, which enables you to see the business end of the punch clearly without it being obscured by your hand. As above, I often use a copper mallet. One good clout is better than two light ones. I would try a "dead blow" shot filled hammer if I had one. Alan
-
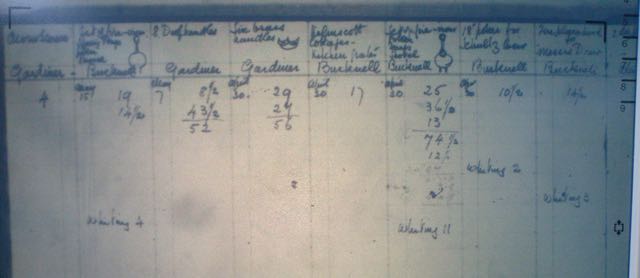
In that case I would say those are more than likely by Bucknell to Gimson's design. Cotswold Arts and Crafts. Norman Bucknell the son was still making them into the 1990s at the age of 80 or so! See if you can get the client to photograph the spring, so we can see where the cracks are forming to be able to help analyse the cause. An Honourable repair would be to rivet in a piece of sheet to your spread area...make a feature of the rivets, and take the opportunity to play with the profile of the spring to make a positive contribution to the piece. The bigger the loop, the longer the spring, the less the stress. I made a poker to match a similar set of Gimson/Bucknell tongs and the chasing and dot marking octupled the forging time...mind you the draw filling that they did at the time on those meant that when I researched on the Gimson Workbook in Cheltenham Art Museum and Art Gallery collection they took around 121/2 hours for their standard design poker. I had taken 14 hours...so with modern equipment like a power hammer or two, a belt grinder, drum and angle sander I was not too far out for a one-off, working to my design but another's aesthetic. By way of comparison...my own pokers...forged from 16mm (5/8") square with a well balanced full taper chamfered shaft, an anthropometric handle and with an armour bright finish took about half an hour to forge and half an hour to finish if I did them in a batch of ten or so. Alan
-
Don't the dots take forever! The Gimson designed ones made by Bucknel father and son were mild steel and looked similar. Some are well over 100 years old and still in use. Where are the cracks developing? Are they from work hardening, or weak points (bruises, knicks) in the spring forging? Why did you do any heat treatment? What heat treatment did you do? How evenly did you get the thickness of the spread? What material did you start with: new, second hand, clean surface, rust pitted? How did you heat it? Did you burn it at any point? I have to say that robustness notwithstanding, yours are in a different league to the fabricated ones...very elegant. Alan
-
Steam Driven Blacker hammer
Alan Evans replied to John B's topic in Power Hammers, Treadle Hammers, Olivers
May have been a Heinz 57 and made up from bits from a different model...as I mentioned mine has much heavier solid bars, and one is even heavier than the other....the ones on Alan Knight's traversing hammer were much thinner shafts into sockets at either end I seem to remember. Was it actually working? I can see it has been oiled but not much scale around and the tool surfaces look a bit rusty. I am thinking of getting a donkey engine to run my 5cwt Massey as I don't have 3 phase here. But maybe a big generator would be easier to set up. Brian Russel had a little combustion engine driving his Goliath direct...the advantage was he could vary the speed as well the blow pressure. Alan -
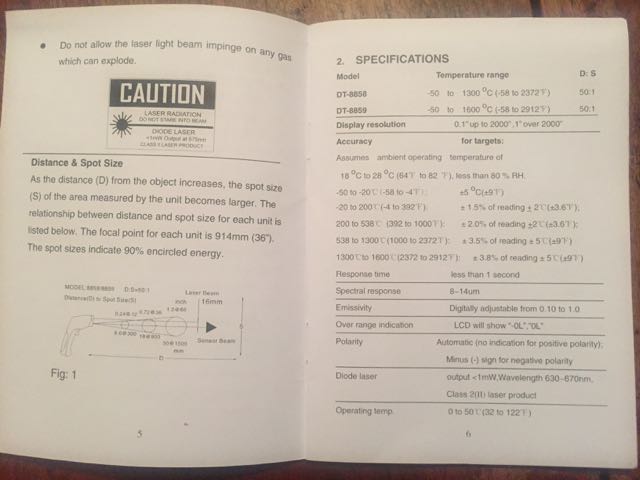
Short answer is no idea. Need another one to compare it with! It seems to give reasonable results...ambient temperature of objects in the room etc. My one has a trimming system to cope with the emissivity of different materials, I presume the more expensive ones would also have a similar way to calibrate them. According to the book of words, less than+/- 3.8% at the top of the range +/- 5˚C between 1300 and 1600˚C And +/- 1.5% or +/- 2˚C between -20 to 200˚C Alan


-
Steam Driven Blacker hammer
Alan Evans replied to John B's topic in Power Hammers, Treadle Hammers, Olivers
Blimey never seen one with a bent top arm/link/ shaft before! Though interestingly my old non-traverse one has a much heavier top link, I always assumed it was a non OEM replacement. Maybe the original suffered the same way. Alan -
Show me your drawing board
Alan Evans replied to Gergely's topic in Blacksmithing, General Discussion
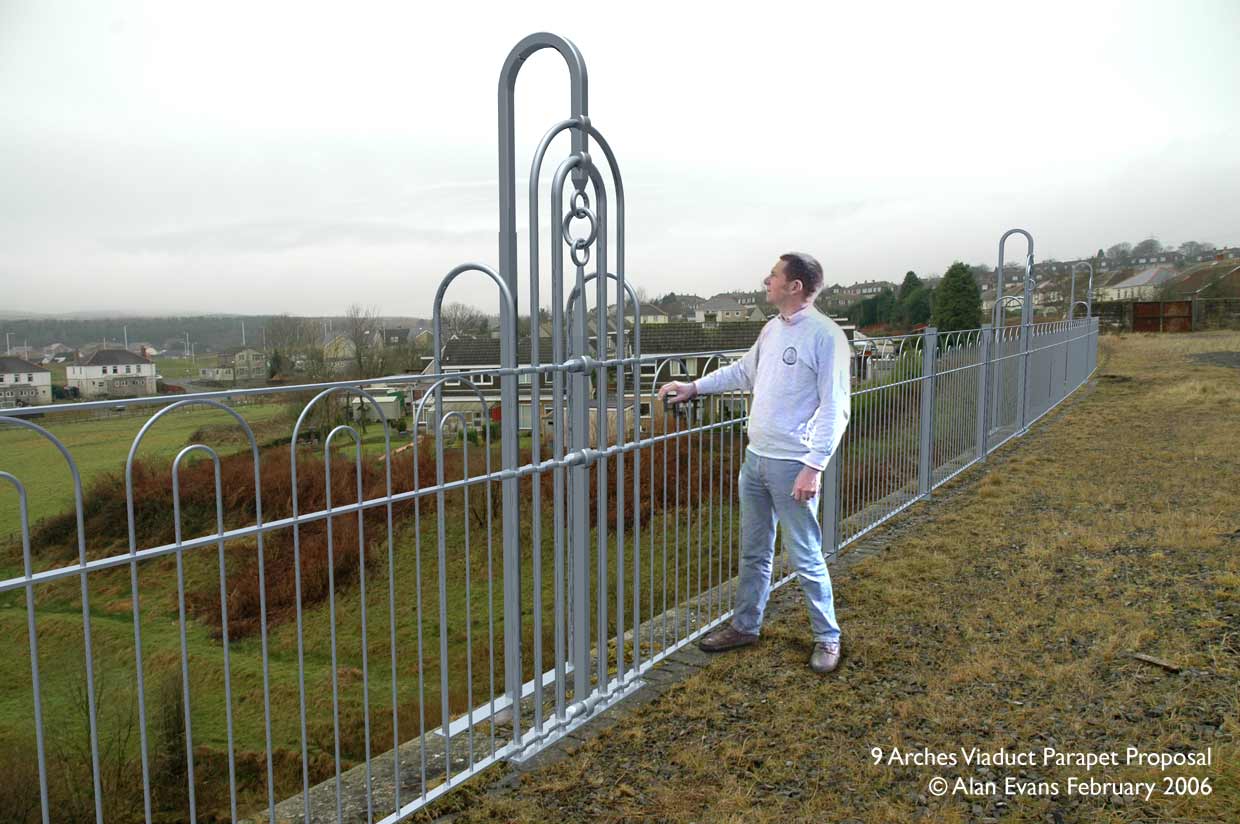
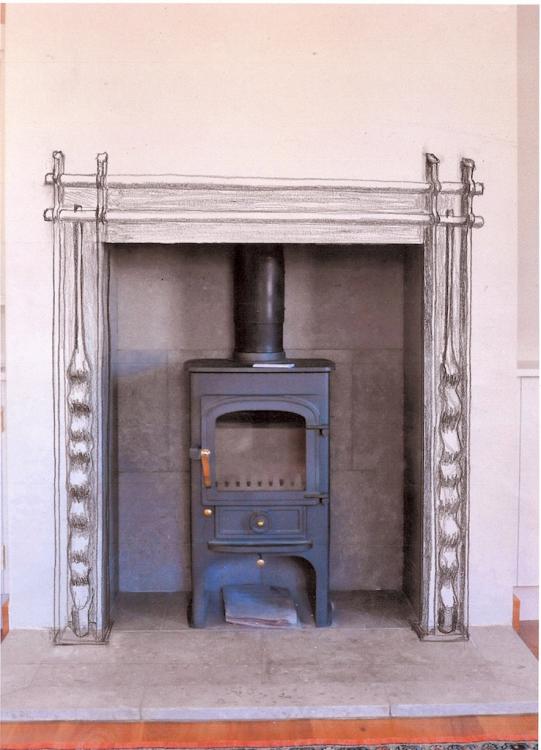
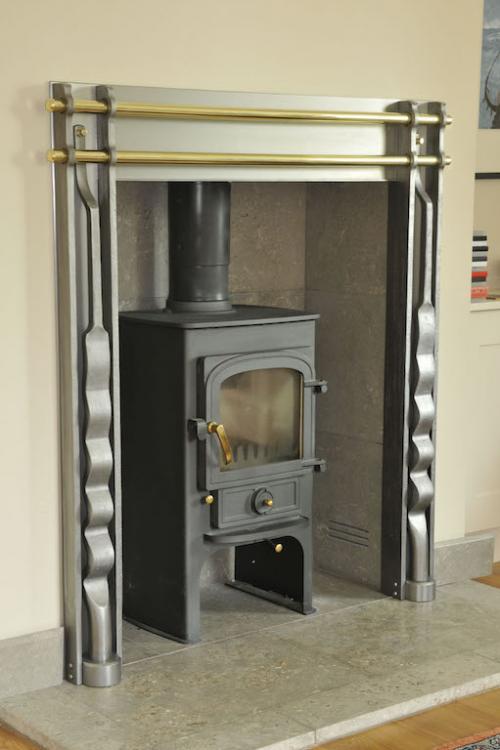
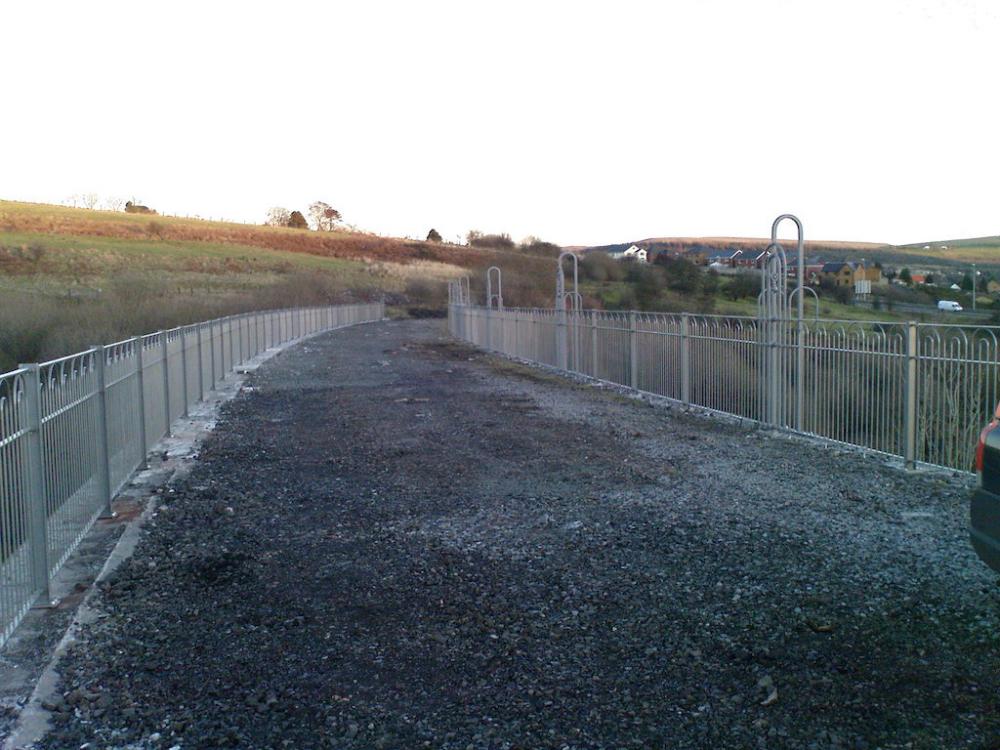
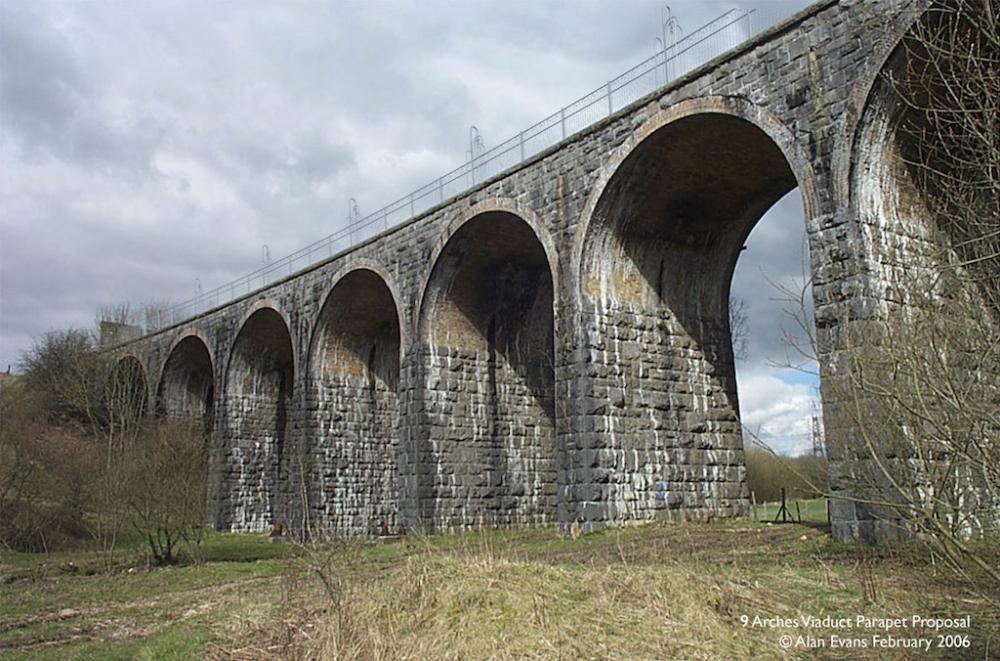
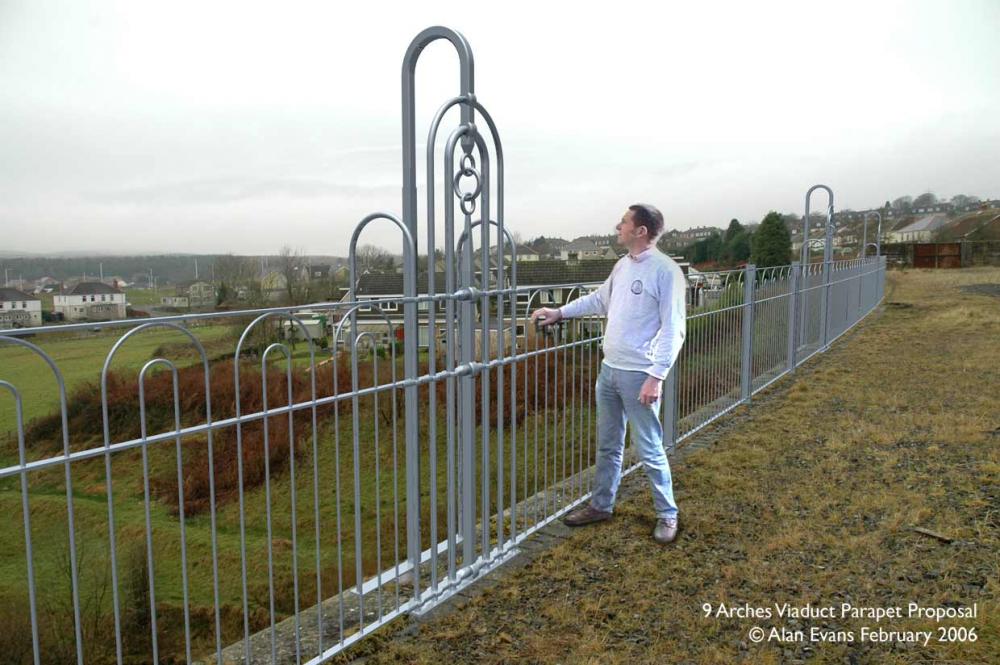
It all depends on the project and my proposal. I use paper and a Ø7mm (5/16") 4B clutch pencil, in preference for presentation drawings. But often will do a photomontage on a site photograph in Photoshop. Or sometimes draw directly onto a site photo If it is small enough I draw full size on the bench and assemble the piece on the drawing I have a classic AO draughting table with a an X-Y drafting head which is rarely used now apart from as a sketching surface. In the early 1990s I taught myself to use CAD (MiniCad/Vectorworks) and 3D modelling (FormZ) which I used for the big architectural projects. With the later versions of the software you could make up quite convincing photorealist images by superimposing the rendered model on a site photo in Photoshop. The great advantage is that you can be micron accurate over tens of metres which you could never draw out full size. I managed to accurately model a railing scheme for a Victorian railway viaduct on a rising curve over a hundred odd metres long which would have been a pain any other way. The first images of the following pairs are virtual railings if you did not spot it! For full size drawings in the workshop I use the floor, the bench or some 3 x 1.5 metre (10' x 5") birch ply boards with pencil the surface I refresh by a roller and emulsion paint. They can be bolted together for the lay-out drawing and dismantle to use as component lay-on boards. Alan p.s The viaduct can now be called the 999 Arches viaduct...


-
Vulcan and Kohlswa anvil literature needed
Alan Evans replied to Kozzy's topic in Anvils, Swage Blocks, and Mandrels
This is the online catalogue page http://www.kohlswagjuteri.se/brancher-smidesstad.asp?activeImg=brancher&activeLang=se&activeChild=brancher-smidesstad pdf copy Kohlswa Gjuteri.pdf -
If long term is a long way away...short term, if the ground sheet idea is not appropriate, then you could maybe cover the ground with wood chippings which would be readily floated off the shovel full of brass and then reused. If your sorters get a share of the profit at least it is in their interest to do a good job in order for you (and the sorters) to get the best rate from the yard. You need a few teenage nieces and nephews so at least it is all in the family! Alan
-
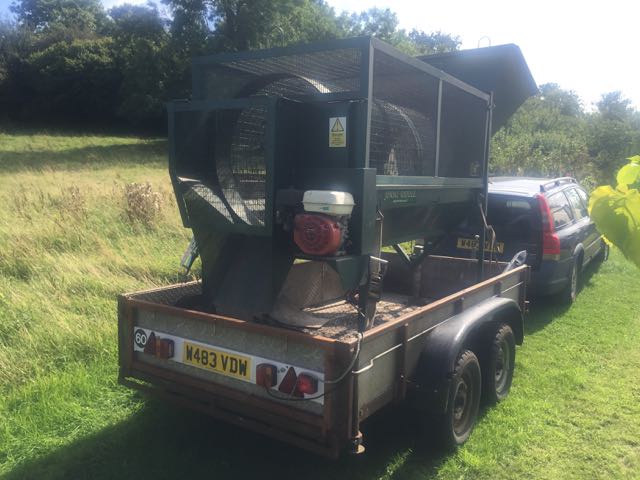
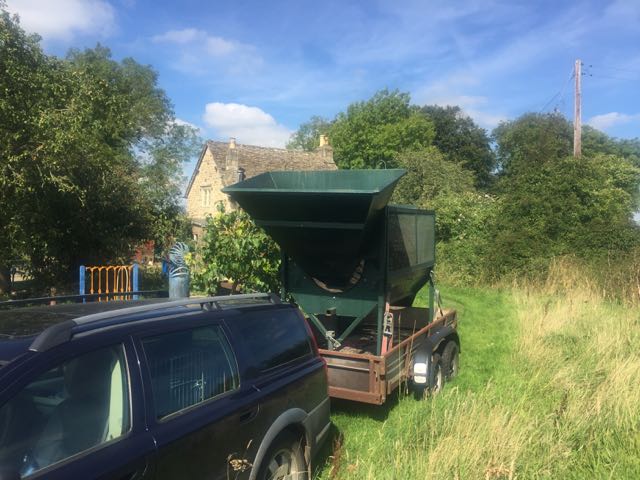
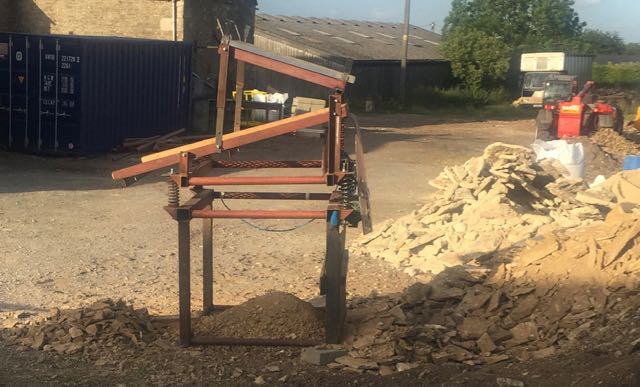
I was prompted to make those suggestions because I just happen to have the Community Composting Trommel on the back of the trailer, I have to replace the drive wheel. This (apparently) home made vibrating screen I saw on a local building site looked quite effective, but I have only seen it at rest rather than working. Sorts three sizes. But I actually think employing teenagers the best solution, followed by getting the scrappy to come by and collect the brass unsorted. Alan
.jpg.4e77a631e6b0c9fa4b3993455497aecd.jpg)
-
Vulcan and Kohlswa anvil literature needed
Alan Evans replied to Kozzy's topic in Anvils, Swage Blocks, and Mandrels
I happened to download this for an off-net friend a few months ago... Alan pricelist_anvils.pdf -
Give a few teenagers a holiday job. Not too bad a job if they can get paid to spend time together...provide a sound system and drinks. Take a sample bucket to the scrap yard see if the reduced rate they offer makes it worthwhile to sell as is. Get them to come and give you a price with them doing the clearing. Set up a trommel with various mesh dimensions to sort sizes of material. Or simpler version of tilted mesh panels mounted on springs with a motor with an eccentric weight on the spindle for vibration. The screens would at least lose the dust and leave bits larger than the cases which would make it easier to sort by hand. Invest in a few ground sheets for the brass to land on at the firing points and sweep them up every day in the future. Make every shooter responsible for clearing the firing point at the end of their session....provide buckets. Alan
-
I was told that the Markon alternators were so well regulated that they could run anything, including sensitive electronics...Mine had a fault, the vibration from the Lister LT1 had shaken the circuit board fixings loose and it had been replaced incorrectly by the previous owner...which caused this beautifully smoothing control board to short out and blow up on occasion...on the third panel I realised the underlying mounting fault and sorted it. From then on it was 100% reliable. However that is only information re. the generator not the plasma. Perhaps you could figure who would use plasma on site and ask them. Aluminium or stainless steel building cladding installers? An interesting company I worked with on an installation of railings on a viaduct once were Up and Under. They were underwater and working-off-rope-at-height engineers...maybe they would be able to advise? Ask Oxford or Hypertherm direct, get it in writing? Alan P.S. Another thought is to try http://www.r-techwelding.co.uk/welding-equipment/plasma-cutter/ They are actual designers and makers of their own range of machines, based near Gloucester. They seem very good quality and well priced. I have no personal experience but only know of people who have had their machines and are delighted with them. A father and son set up the business, in the years before the father used to do all my mig and tig servicing and had a very good reputation. As the actual makers they would be in a good position to advise the best configuration for you. Alan
-
We have a wood or coal burning stove with a couple of glazed doors for heat in the sitting room. It is welded from 4 and 5mm mild steel plate. the floor and part way up the sides is lined lined with 20mm thick fire brick tiles. In coal burning mode it has a free standing cast iron grid with riddling device which is set about 50mm (2") above the floor. In wood burning mode, as we use it, you take out the grid and just burn it on a bed of ash on the fire brick. Maybe it would be helpful if you posted an image of your unit, just in order to stop me rambling about every possible form of fire box.... Alan
-
If you have a manual for the unit...do you have the unit? Are you just replacing it? If so can you just match the existing grate? The usual form of fire bars is as I described my forged ones above. They are set on edge so that the narrow edge faces the heat and their bulk below acts as a heat sink. They have wide lumps on either end and sometimes in the middle which create spaces between them. Even the more resistant cast iron ones are this way...although the cheap knick-and-snap-to-length grids usually are square section bars and rely on the material properties rather than their cross section for longevity. I did make up some wooden patterns which mirrored my forged bars, and had them cast by a local foundry. They worked out very expensive, over three times the cost of the mild steel and I did not think they would last three times longer. I offered them to customers who invariably went for the forged steel option. I have not had any requests for replacements...so they evidently outlasted the clients at least. But if its for wood just a plate will work and be easy clean, Cast iron would be traditional, Stainless Steel will last longer than mild, mild will last fine, and be cheaper initially. But the time they have burnt out a few times over one hundred years a bespoke Cast iron plate would probably work out cheapest but there is not a lot in it. Cheapest and simplest as I said above is buy a readymade cast iron drop-in grid and make shelf supports in the box to suit. Allow clearance for the grate/fire bars/floor plate to freely expand and contract with the heat. I am maybe also at cross purposes. Using the word box frequently, are you talking about an enclosed wood burner / wood furnace rather than an open fire basket? My comments were from the assumption it was an open fire basket. Alan