D.Rotblatt
-
Posts
335 -
Joined
-
Last visited
Content Type
Profiles
Forums
Articles
Gallery
Downloads
Events
Everything posted by D.Rotblatt
-
I just reread my own post and that potentially comes off wrong, sounds like I invented the NARB. Wayne Coe first made the ribbon burner and printed instructions which were copied by many for years. Frosty modified Wayne’s ribbon burner to run with a naturally aspirated burner instead of forced air. I modified it further by reducing the hole size and increasing the number. Just a lucky addition to some great work before me.
-
Put a blast gate just after the fan. About $12 on Amazon. That will adjust the air flow. the flame is hottest at neutral. What is the interior dimensions of the forge?
-
It was a difficult decision...I put it off as long as I could. Spain...tinker with burners...Spain....tinker....tinker in Spain? sigh On that note - anyone know of any good museums with arms and armor exhibits there, or anything else that might be metal related I'd love some suggestions. PM me!
-
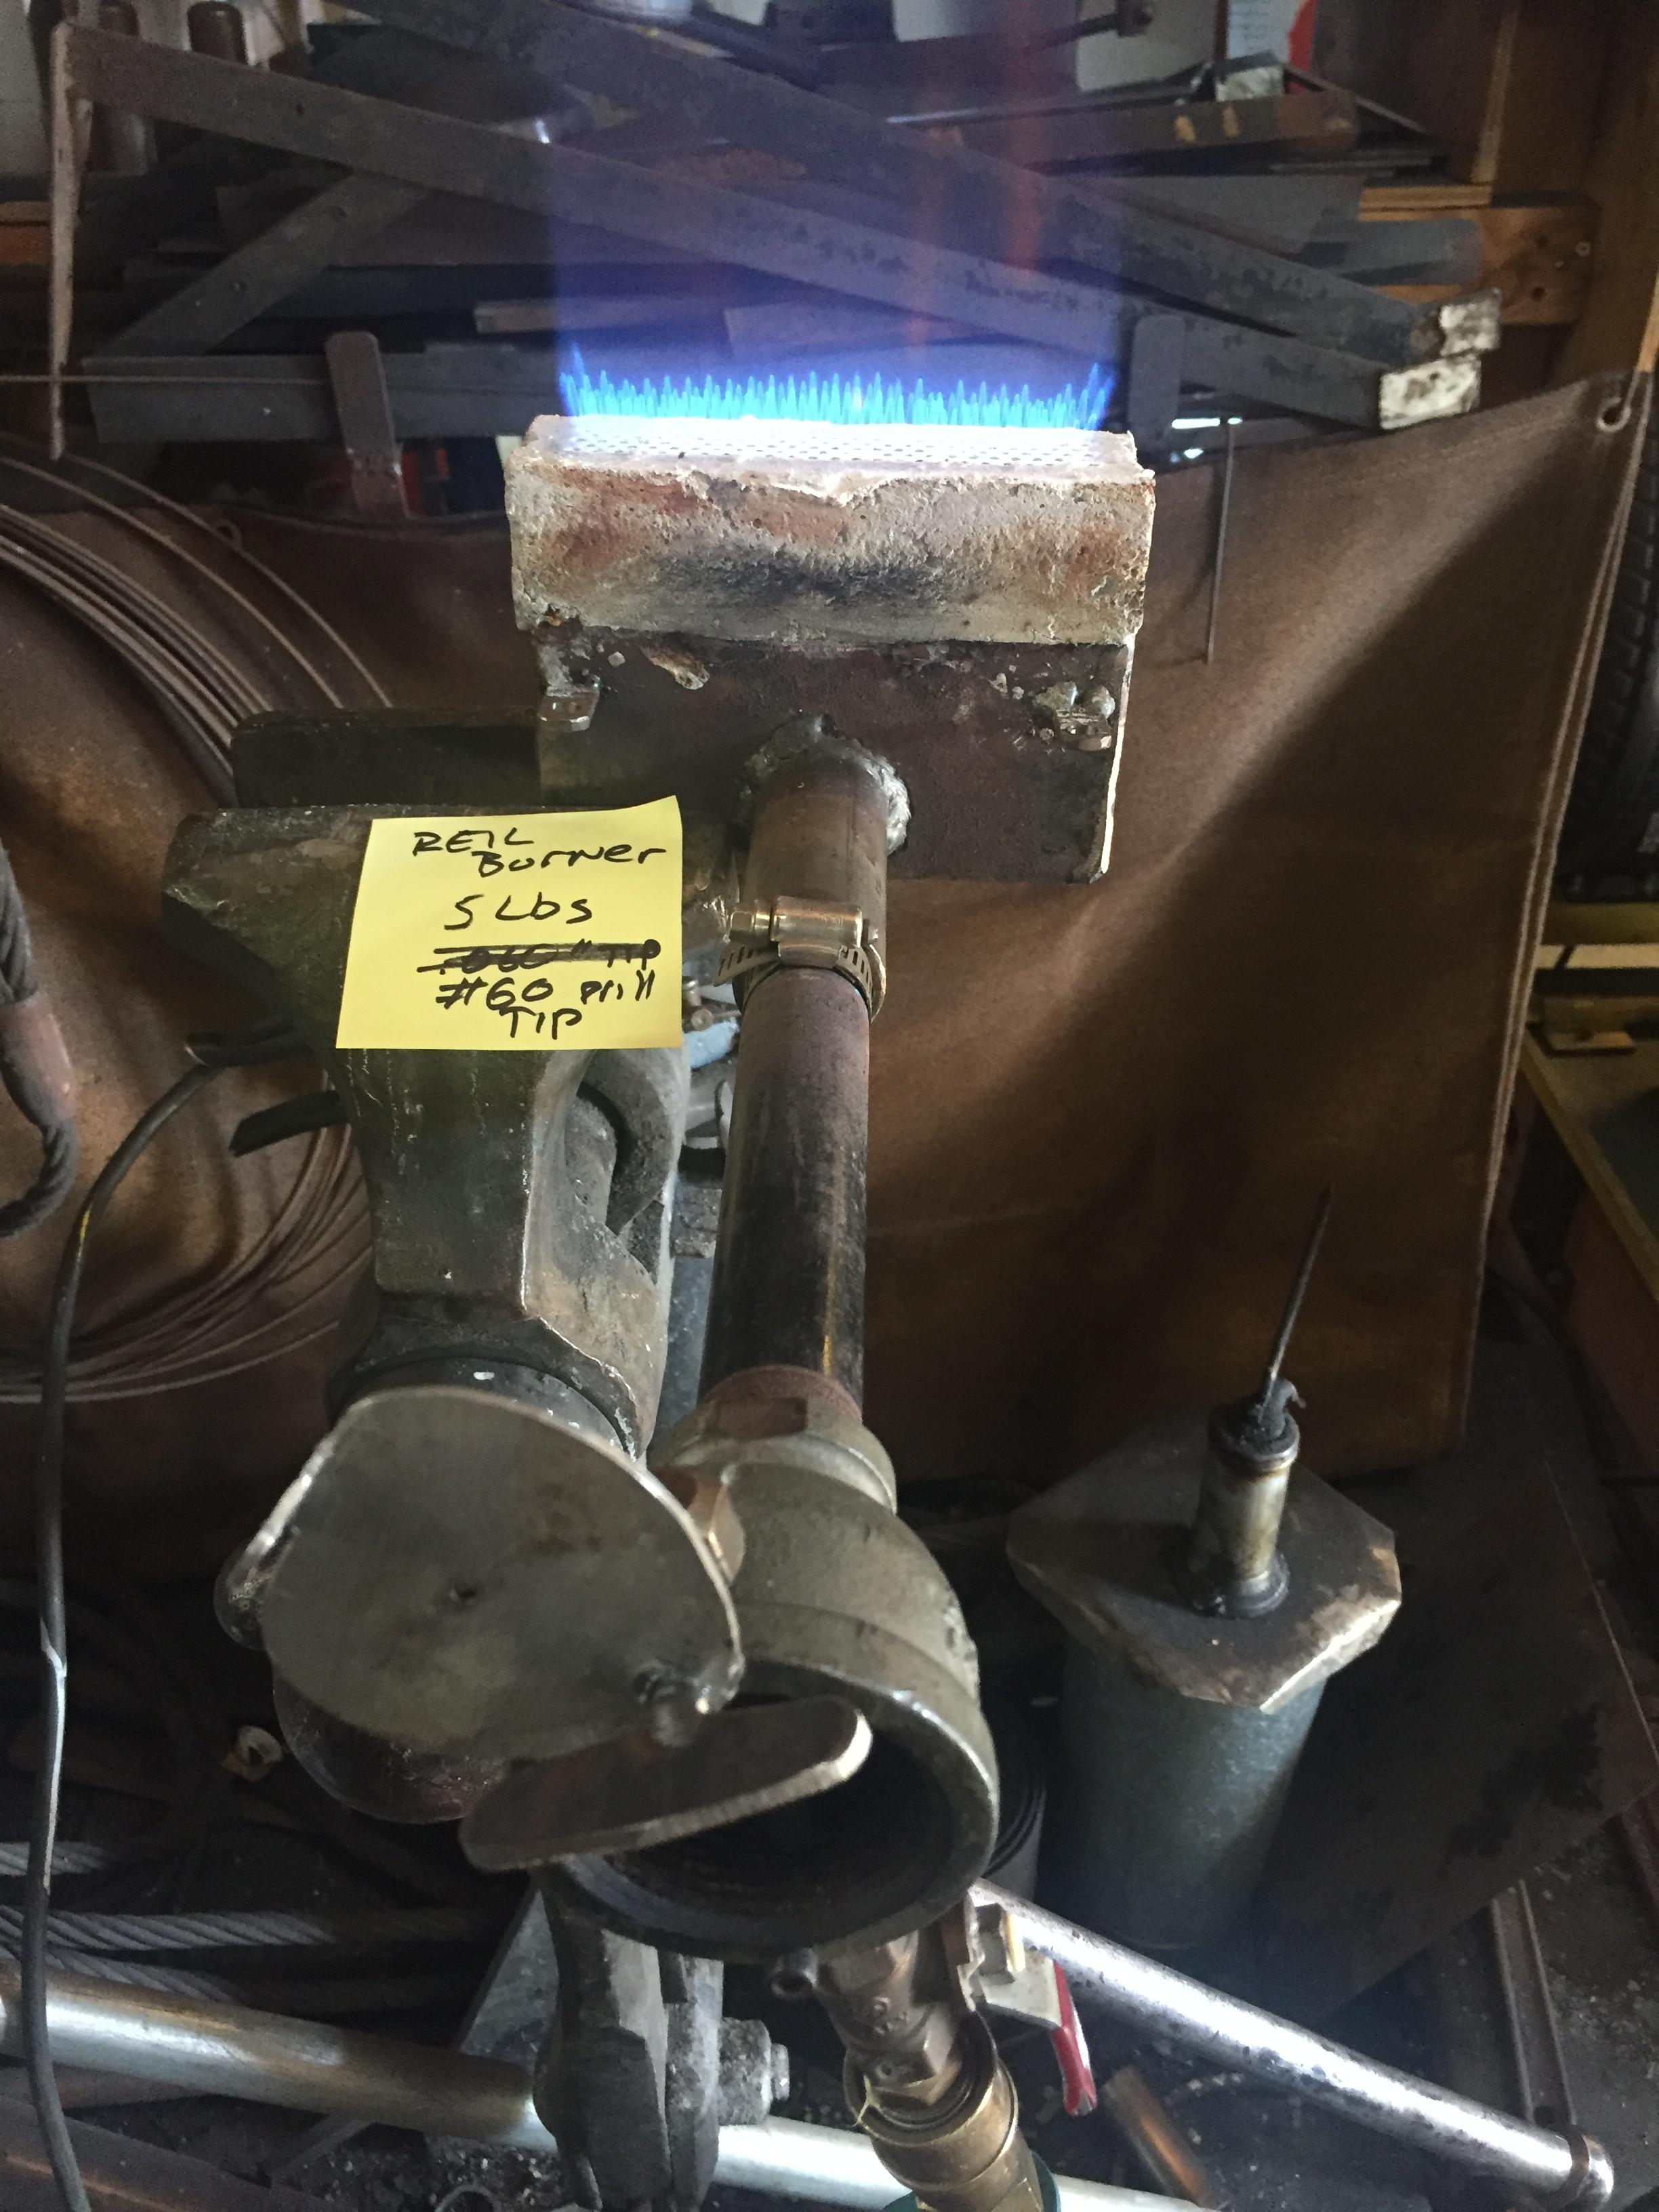
Just drop little bits of refractory between the rows and push them down with a knife. Takes some time, but it does work. Someone here just used steel rods that were well greased up, the stiffness helped and they all pulled out easily the next day after it set up. You can get stainless welding rod in 1/8" or just steel rod at home depot. Just make sure the ends don't have burrs. Also, if I was going with more holes, I would use a larger burner face. They don't have to be so close together. Maybe a 3" or 3.5" x 8" face. I'm playing with the 3D printed injectors now, so don't wait on me. Try a few wooden test blocks if you have the time. I do have plans to make a larger burner with several hundred holes for my forced air forge, but I'm off to Spain in two weeks with my son and won't be back til August. Injectors and Ribbon burners: I've been playing with different types of injectors on a 3/4" x 8" black pipe burner. I'm testing the better results two ways: I put a 1.25" nozzle on the pipe, or I plug it into the NARB. One thing I've noticed with the NARB is that it's incredibly forgiving when it comes to the type of injector. It seems to have a slightly richer flame then the standard burner with nozzle. Basically I have to put a size smaller mig tip on the injector to get a neutral flame. My Reil burner (with #60 hole) works as well as the high end injectors - the flame is about the same length as one with a .040 mig tip. My guess: a little bit more backpressure and with the right elbow and opening in the plenum there is more time for the gas to mix. Upshot is that high end injectors may be a waste of time with ribbon burners. DanR
-
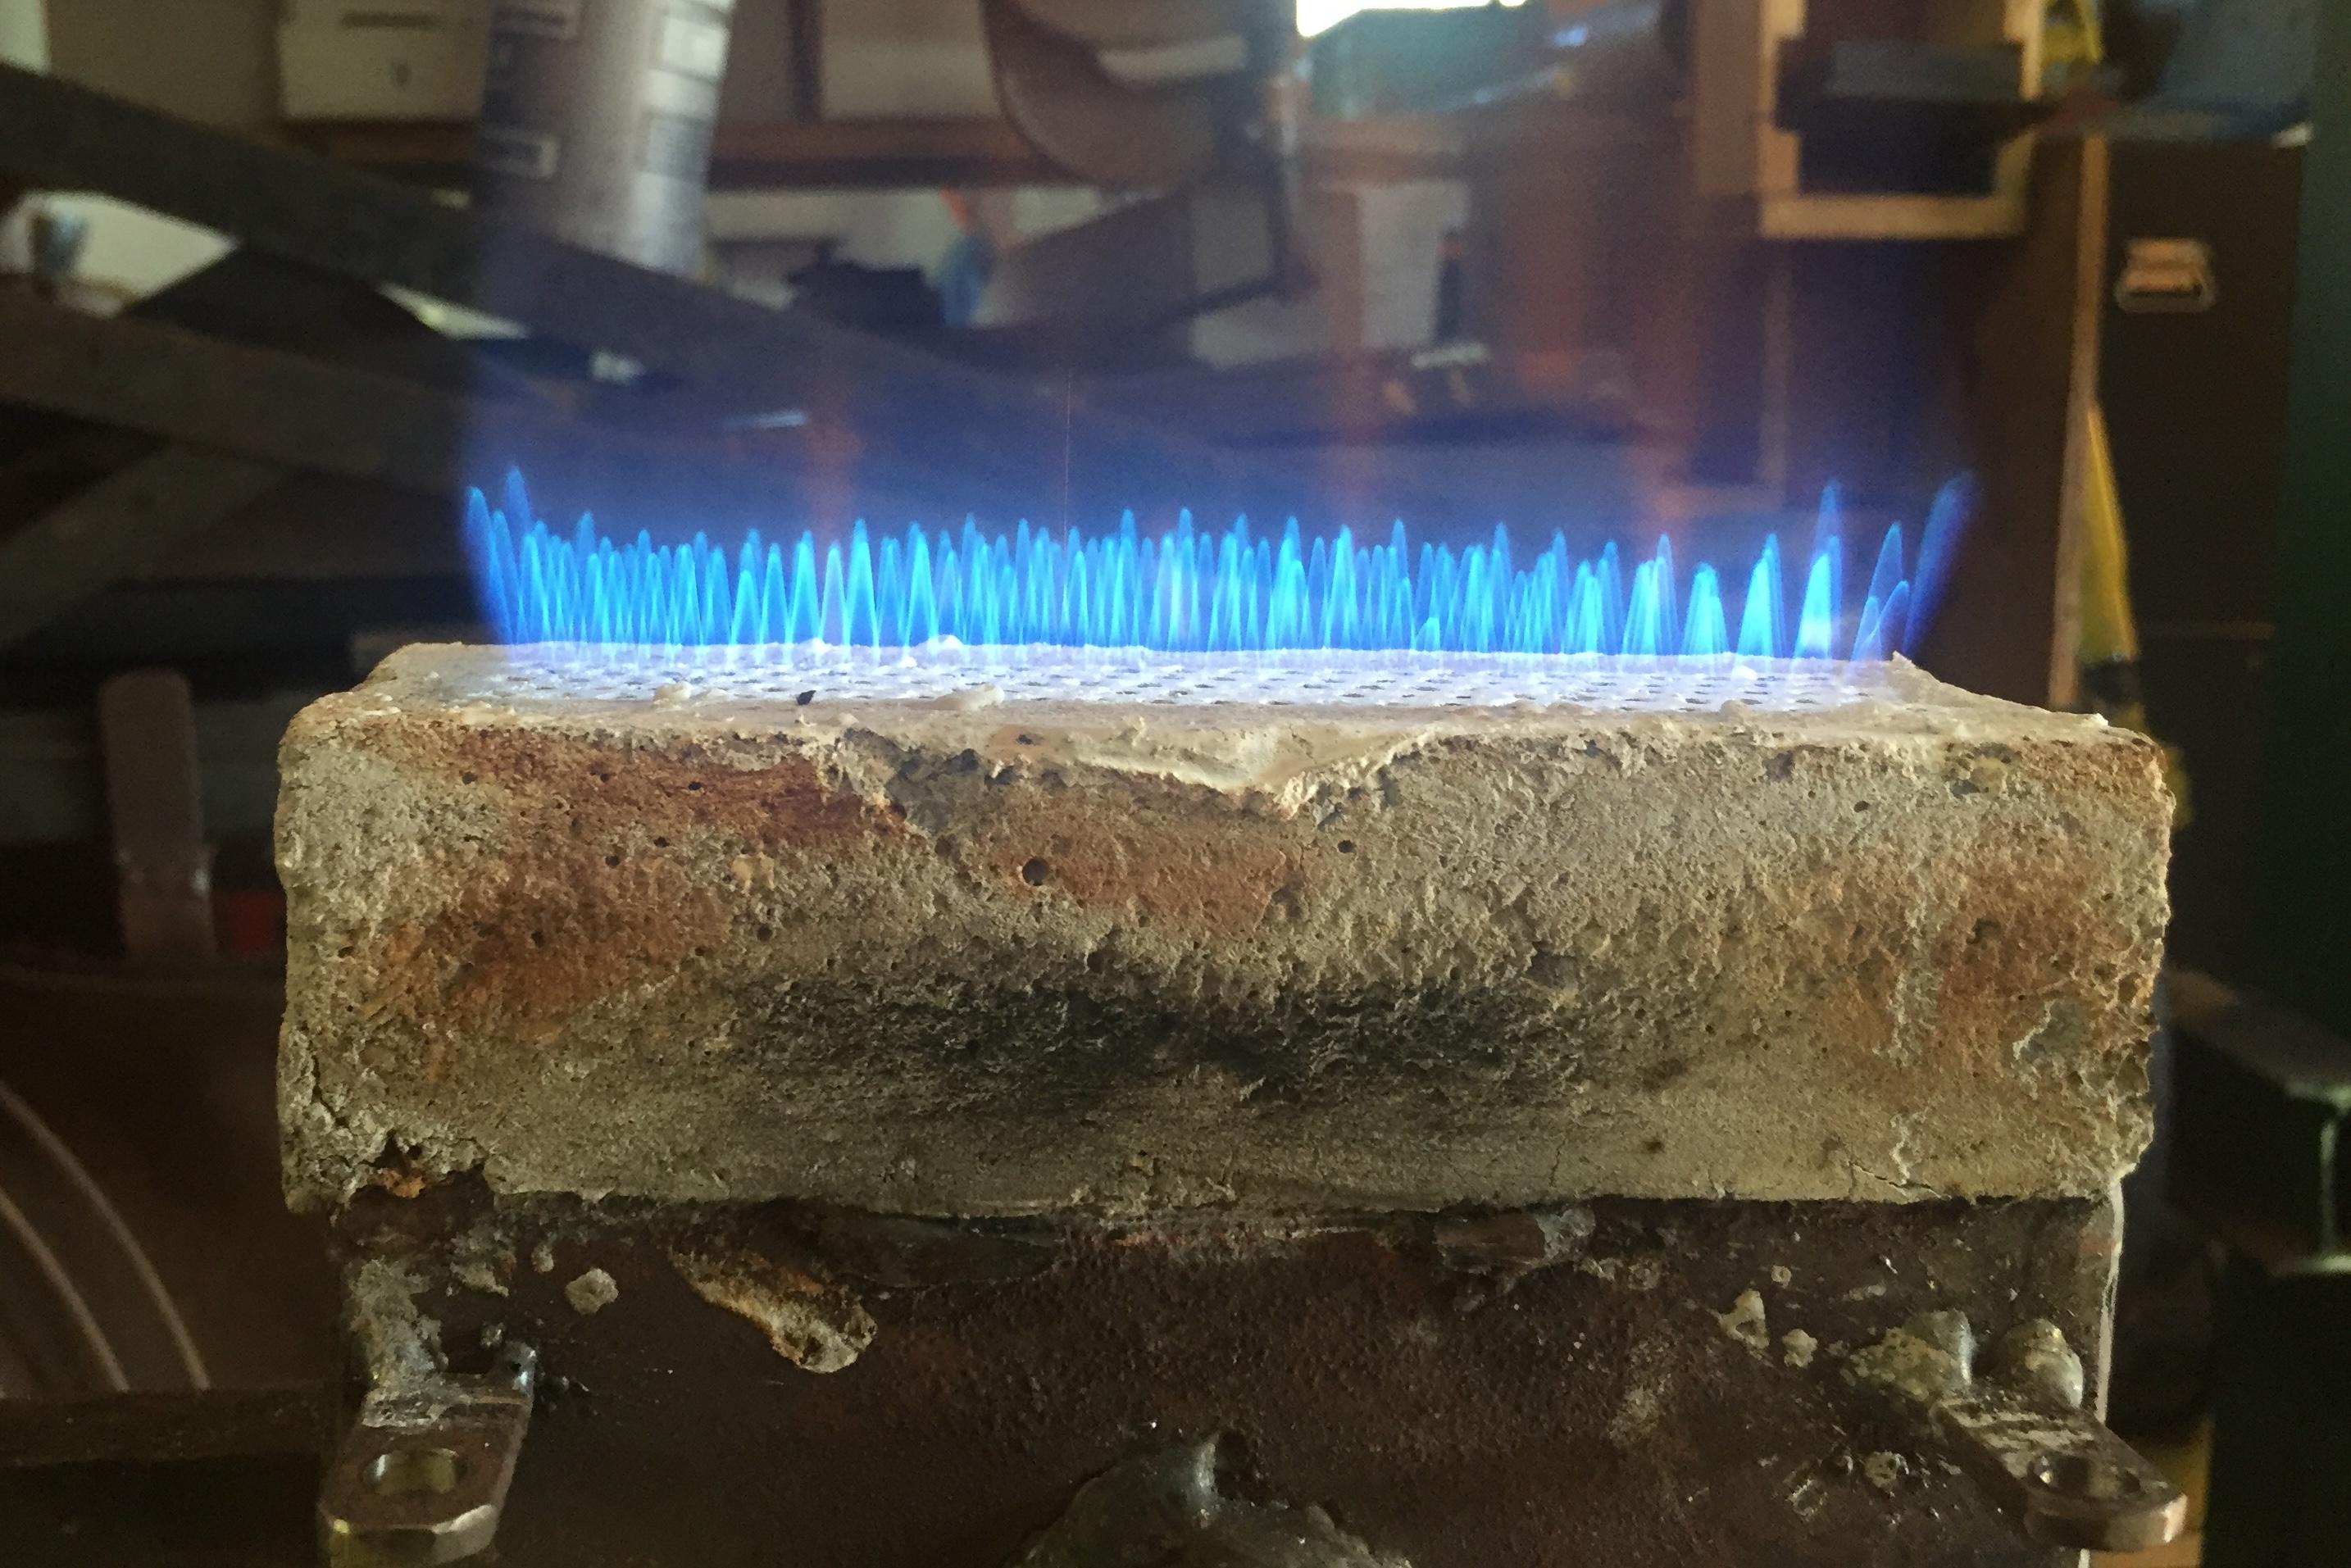
FYI, I have my burner in a forge with a very small interior diameter. Close to your 5.5x5.5 size. My burner is pointing straight down from the top. The flames are less than an inch long even at 15 lbs pressure (over welding heat) and so the propane is fully combusted well above the floor. I'm getting no scaling (when using a slightly reducing mixture), and welding without flux. Chris and Frosty; You may want to try a wood test block or two to see if you can go with more holes then the 122. I just kept increasing the number until it worked. While it works well, it might work better with more holes - though I couldn't fit more in the size block I had (8 x 2.5). This is an experiment that has just begun. I tried it because it seemed that everyone had just blindly followed what Wayne Coe had done, which had worked, but seemed to have some problems with backfiring at low pressures. Don't make the same mistake with mine, it works, but may not be ideal. Keep on pushing the boundaries. DanR
-

Naturally Aspirated Ribbon Burner. Photo heavy.
D.Rotblatt replied to Frosty's topic in Ribbon Burners
Agreed. I was purely talking about welding temps, not twisting temps. Two different things. Stress risers are also an issue to be aware of. Good observations. DanR -
Naturally Aspirated Ribbon Burner. Photo heavy.
D.Rotblatt replied to Frosty's topic in Ribbon Burners
I'm not criticizing. Its fun to test the limits. But respectfully, I just did a nice twist with two billets of 1095 and 15n20 @125 layers that was all welded at 2300 or so. I think I did at least 5 twists in opposite directions on them. Just saying you don't need the high heat to weld...and it saves on rebuilding the forge But I admit, now and again I do like to let it rip! Especially when working with Wrought Iron. -
Naturally Aspirated Ribbon Burner. Photo heavy.
D.Rotblatt replied to Frosty's topic in Ribbon Burners
Those suckers got HOT! FYI: I've successfully forge welded without flux down to 2250 on my pyrometer (using reducing flame). I usually weld around 2350 just to make sure. 2250 looks pretty cool to me, but the welds were perfect. As long as I clean the surfaces anally and use known steel, I have a nearly 100% success rate. It's not about heat, it's about cleanliness and pressure. DanR -
3D printed plastic burner experiments (photo heavy)
D.Rotblatt replied to Another FrankenBurner's topic in Gas Forges
We love google....Here's a little article on heat treating of iron: https://www.industrialheating.com/articles/94644-heat-treatment-of-cast-irons Basically in a nutshell, to anneal, heat to 1450-1650 for 1 hour/inch, cools at about 100 degree/hour, so overnight should work. Different alloys have different times/temps. Needs a electric furnace to properly anneal. DanR -
As a point of reference; with a 250 cu inch forge (about 6" diameter, 8" deep), using a single Reil type burner (which has a .041 jet size), my forge would run for a weekend of demos on a 20 lb propane tank (small bbq tank). I would guess about 8-12 hours (as someone up there already said).
-
First: Happy Birthday! Have a good one and a good year! I agree with Frosty, he put it better then me. I have lower back issues as well (only 62 years on mine), so bending over again and again all day is not a good thing. Bad enough that my power hammer is low - I end up sitting on a 5 gal can while working it or my back is in spasm that evening. I wear light welding glasses for any forge welding (the kind for oxy-acetyline), and for regular forging i'm running about 2000F, which is not as bad for the eyes. Even then I often wear the welding glasses. I agree, not good to stare into the heated maw of fire!
-
3D printed plastic burner experiments (photo heavy)
D.Rotblatt replied to Another FrankenBurner's topic in Gas Forges
A number of them. I started using it for pommels and quillions on knives - which were brass. Kind a pain to cast. Then I found silicon bronze was a wonder to cast, no flux necessary, casts easy, beautiful look, etc. The first I got was from scrap form a boiler, but I use either Herculoy or Everdur alloys now. Then I started doing metal sculpture, and bronze is the classic way to go. I think it's what I'm used to. I've also done aluminum and silver. But now I have to try iron! Fantastic that your little 1/2" burner was able to heat up the furnace to at least 2300F. Just looked it up and was surprised that the melting point of gray iron is 2100-2200F, which is about the pouring temp of silicon bronze. It says the pouring temp is from 2450 to 2700 (thick to thin walled castings). Not too bad. Its on my list! Which grows and grows and ..... sigh DanR -
Naturally Aspirated Ribbon Burner. Photo heavy.
D.Rotblatt replied to Frosty's topic in Ribbon Burners
Using 1/8" holes instead of crayon sized holes has solved this problem. Look back starting on Page 22 of this post I talk about my NARB mod using 122 holes @ .125" After a 2 hours session of forge welding I am able to turn it down to almost no pressure bringing the forge down to 1450 degreed F for heat treating. No back fire. I'm forging at about 4lbs using a reil burner as the injector. Dan R -
3D printed plastic burner experiments (photo heavy)
D.Rotblatt replied to Another FrankenBurner's topic in Gas Forges
Cast iron!!!! Now that's cool! I've done large bronze pours, but not iron. I'm inspired! What kind of iron, and what kind of crucible? DanR -
sorry you've received no replies... Most of us make our own rather than buying one. The only farriers forge I know of is through NC Tool Company. I've not seen their forges, but I have a few of their burners and they work well. Don't now what it costs to ship out to your neck of the world though. Good Luck! DanR
-
I like my forge high, near eye level so I'm not bending down all the time looking in it. I actually have a high stool that I sit on while the metal is heating which puts me at eye level for the forge. A high forge saves on the back, but you have to have a wider stable base to keep it from falling over because it can be top heavy. Others may feel differently. Looking forward to seeing pics of it in action! DanR
-
3D printed plastic burner experiments (photo heavy)
D.Rotblatt replied to Another FrankenBurner's topic in Gas Forges
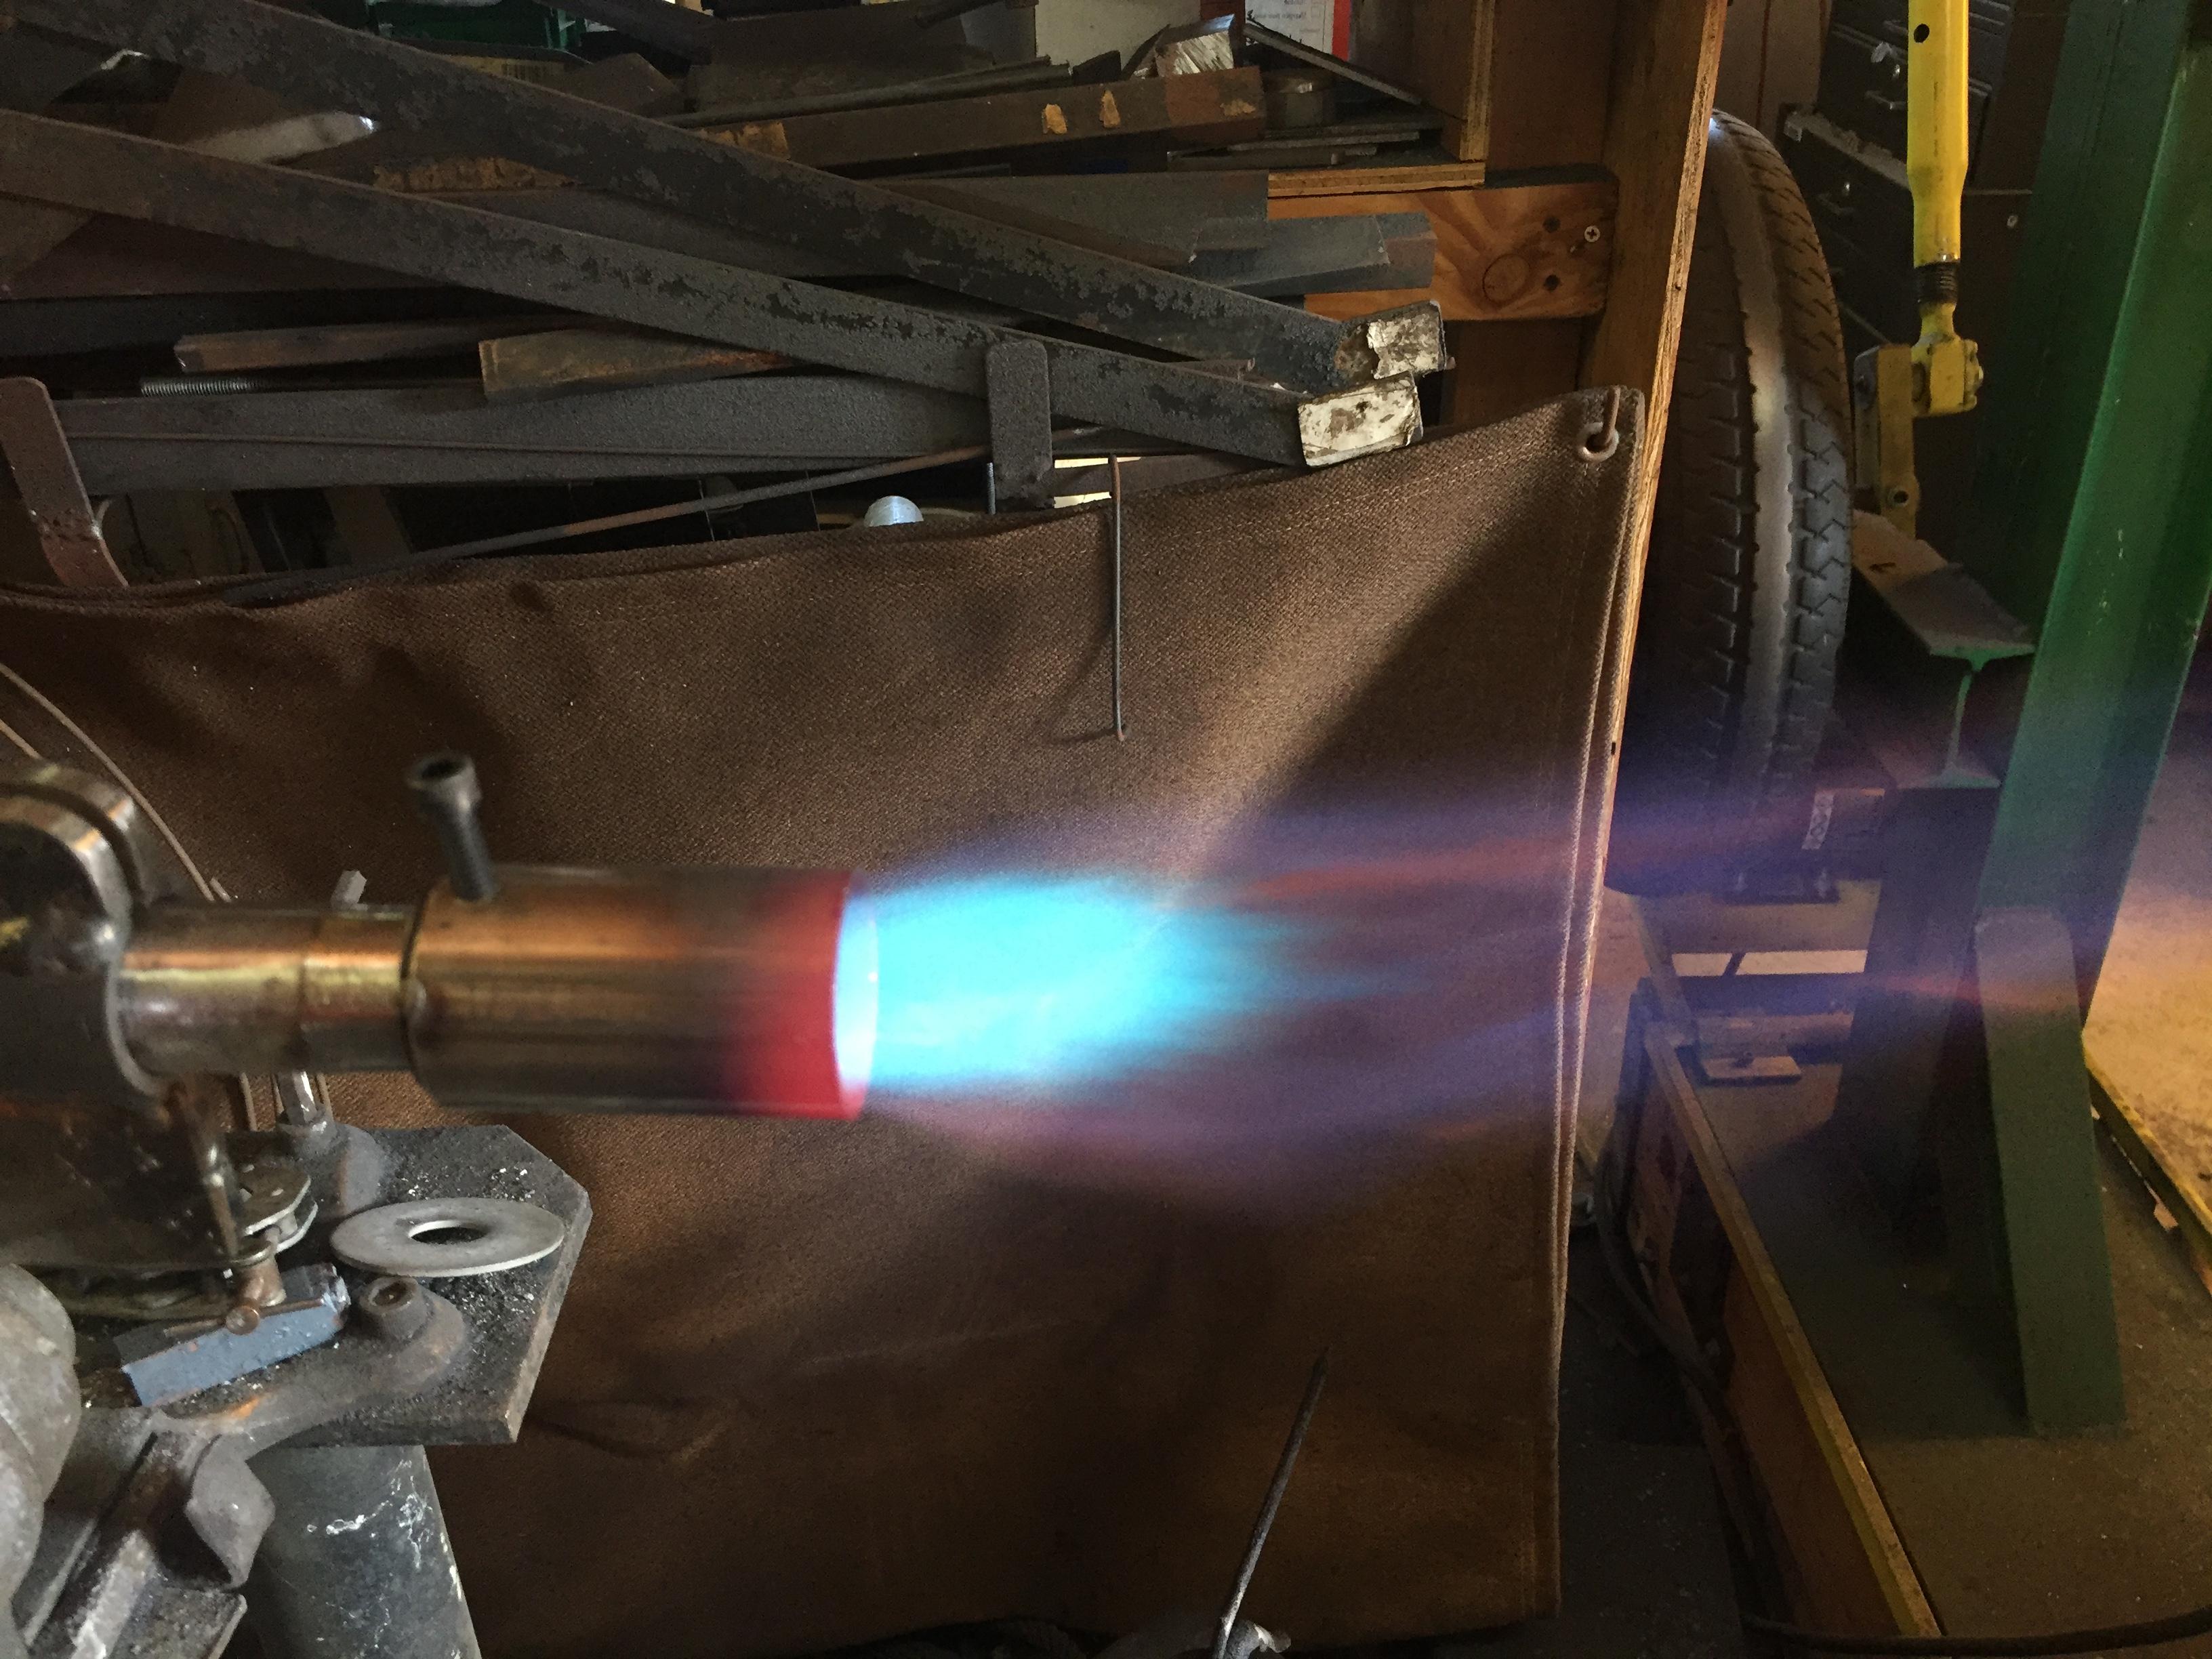
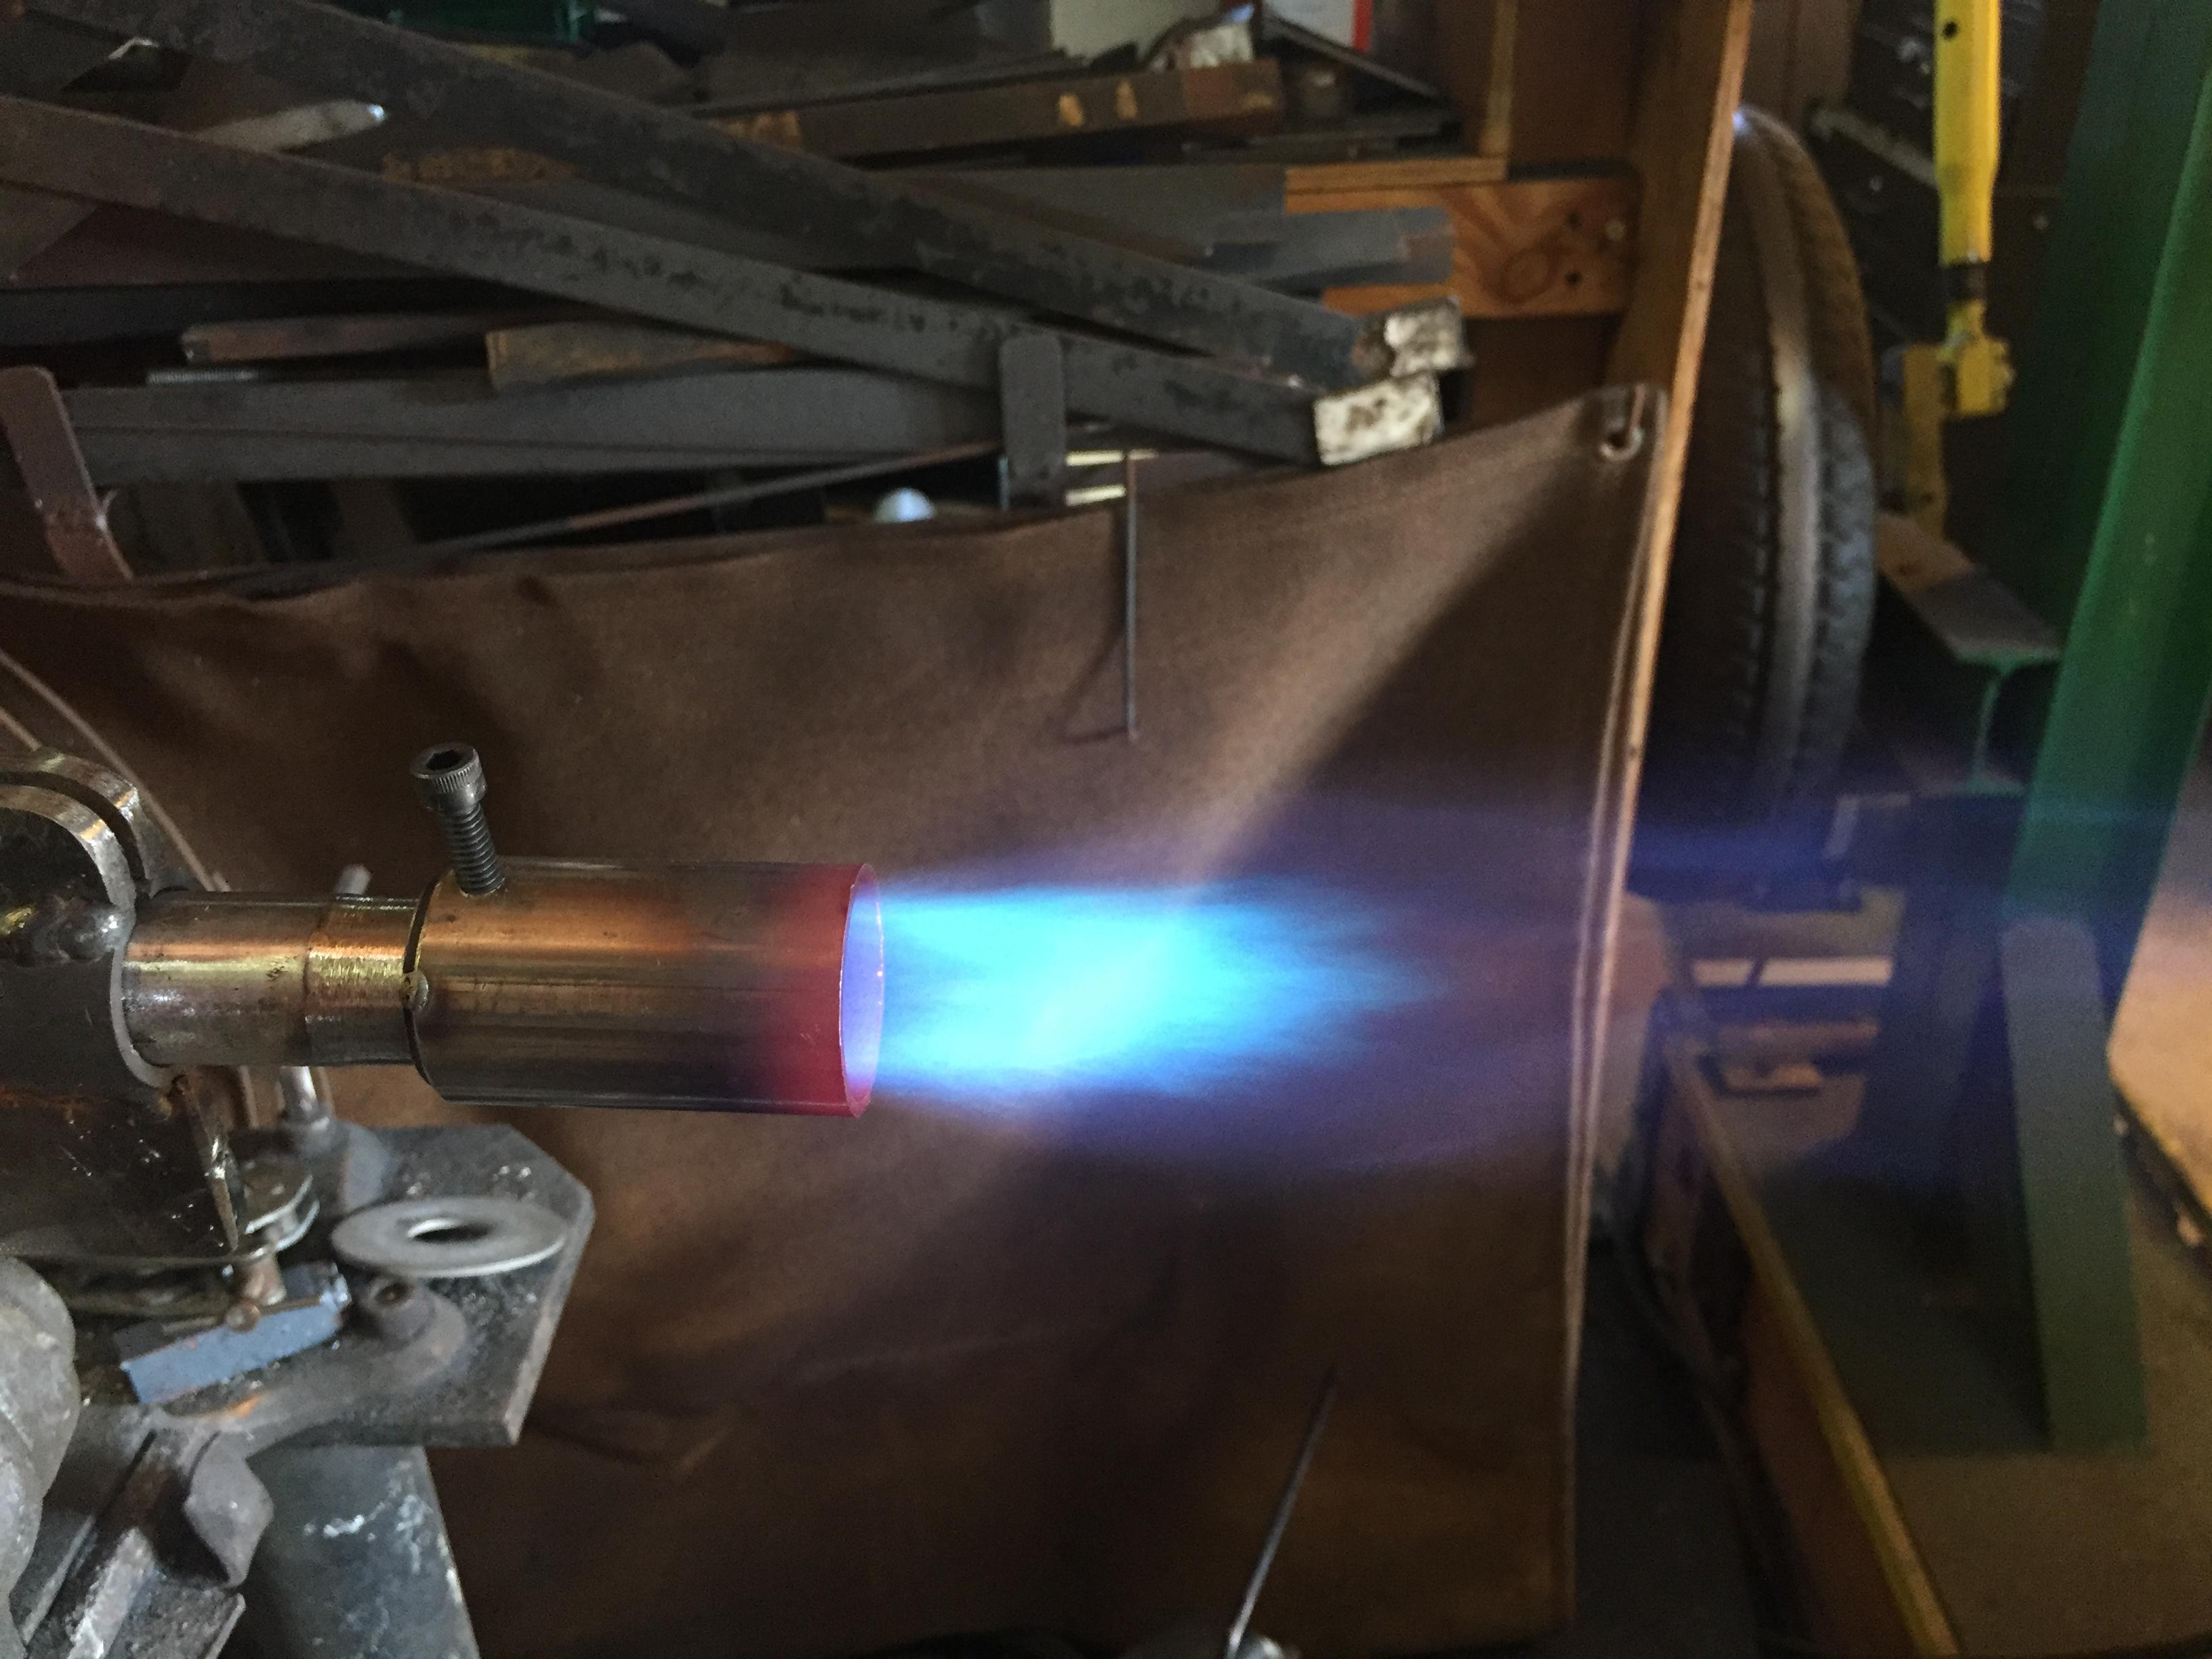
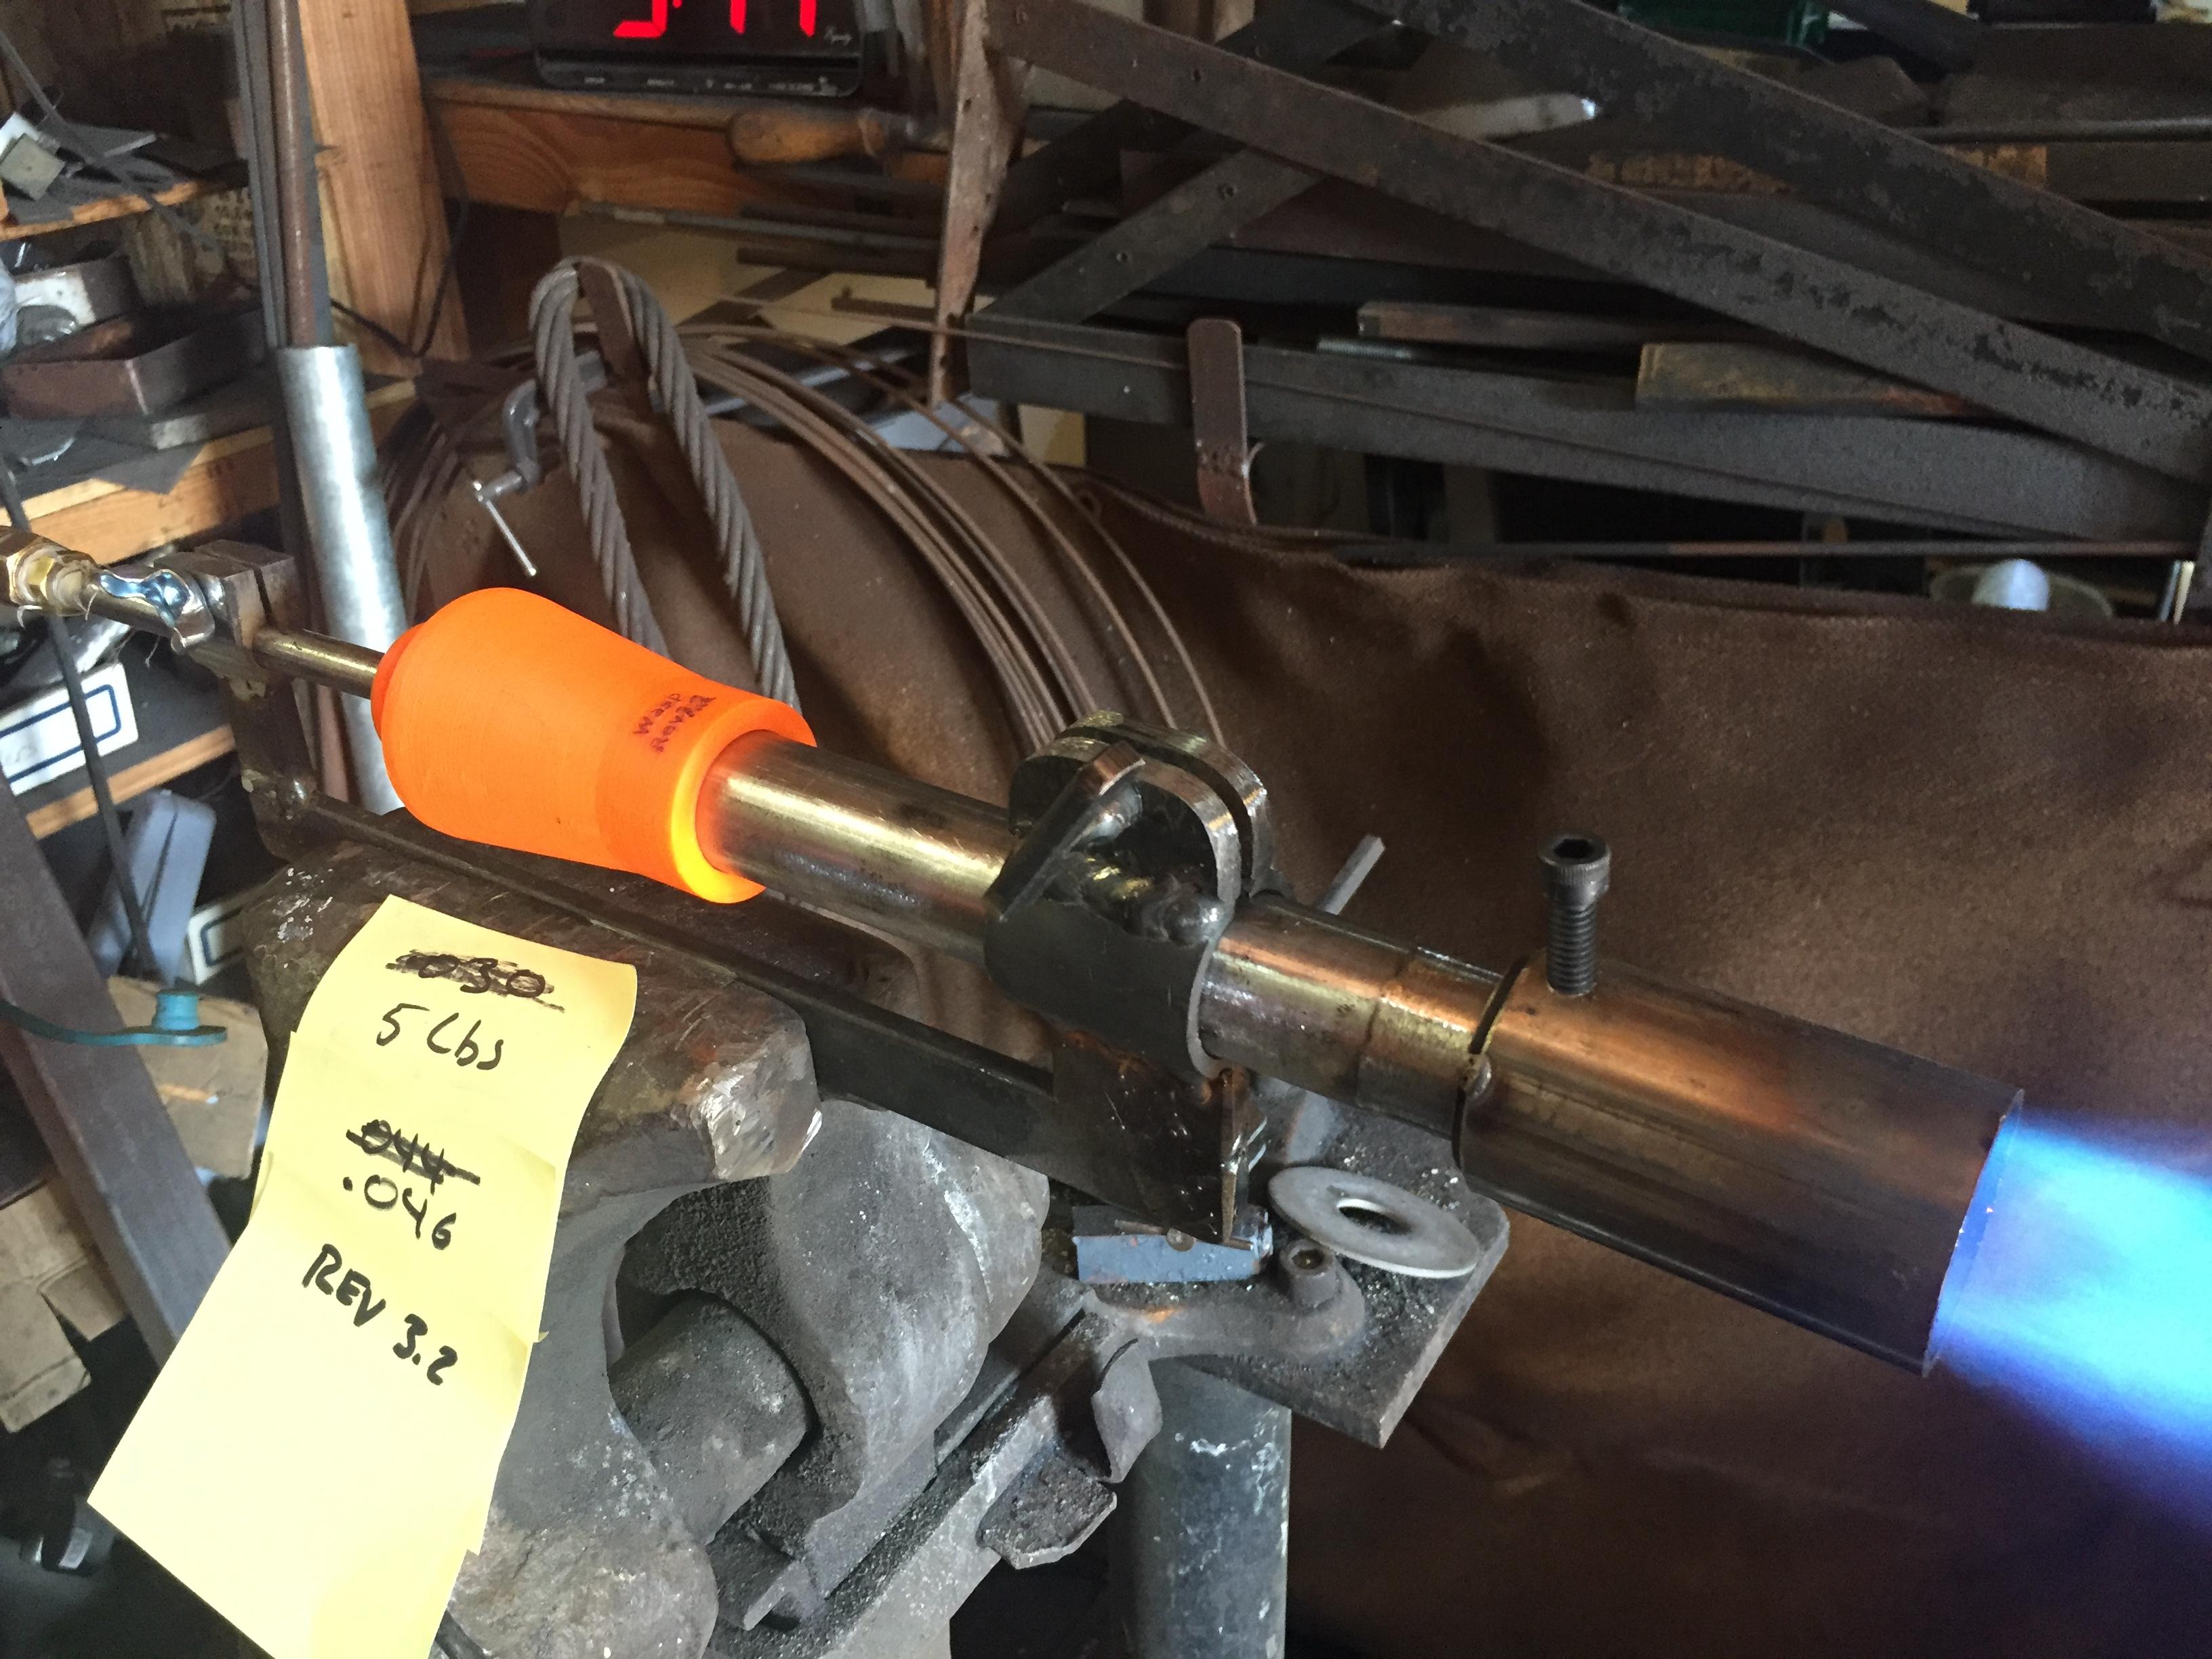
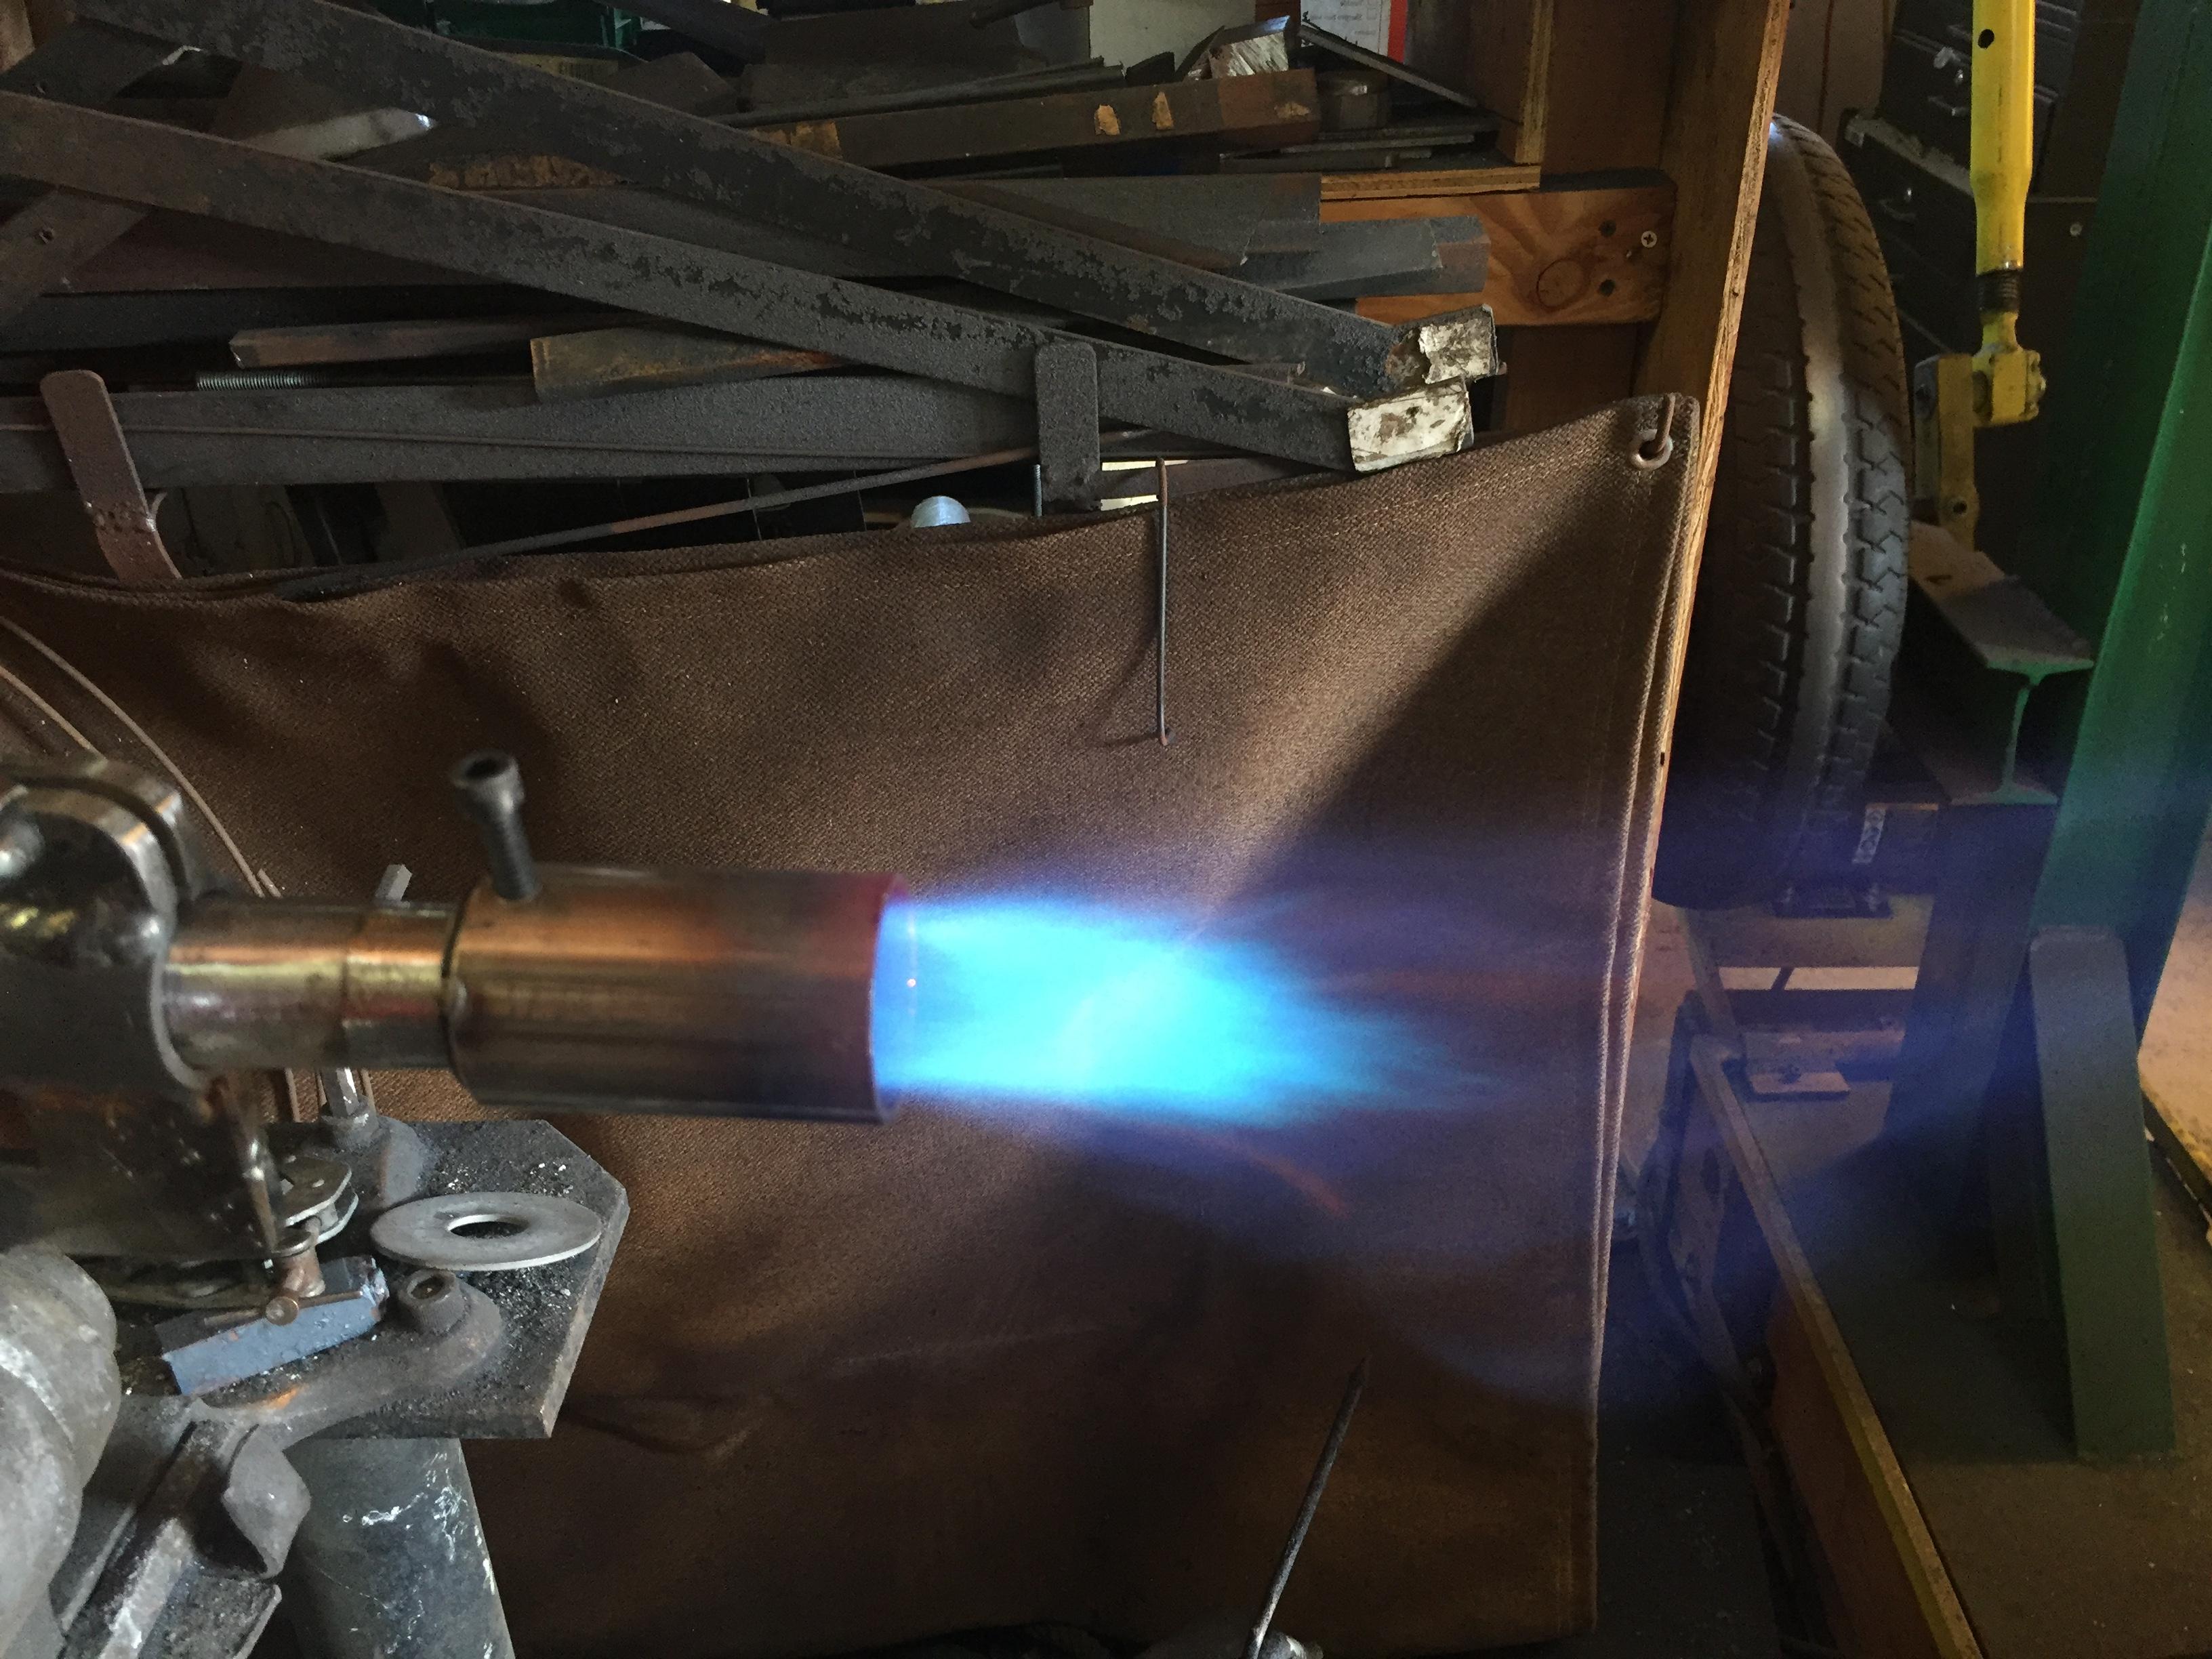
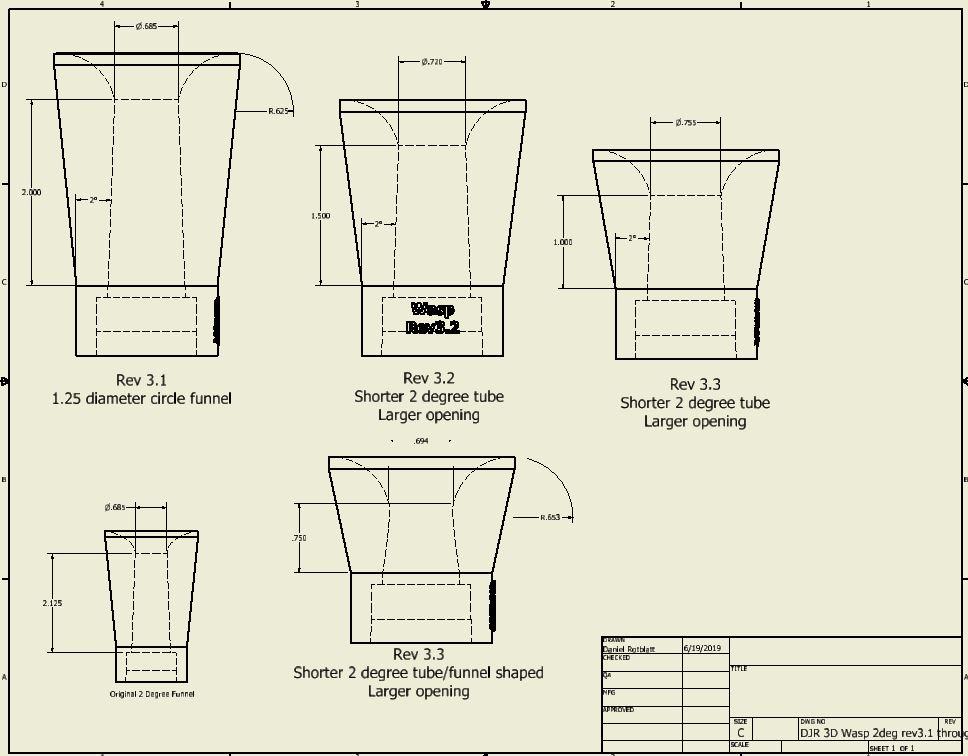
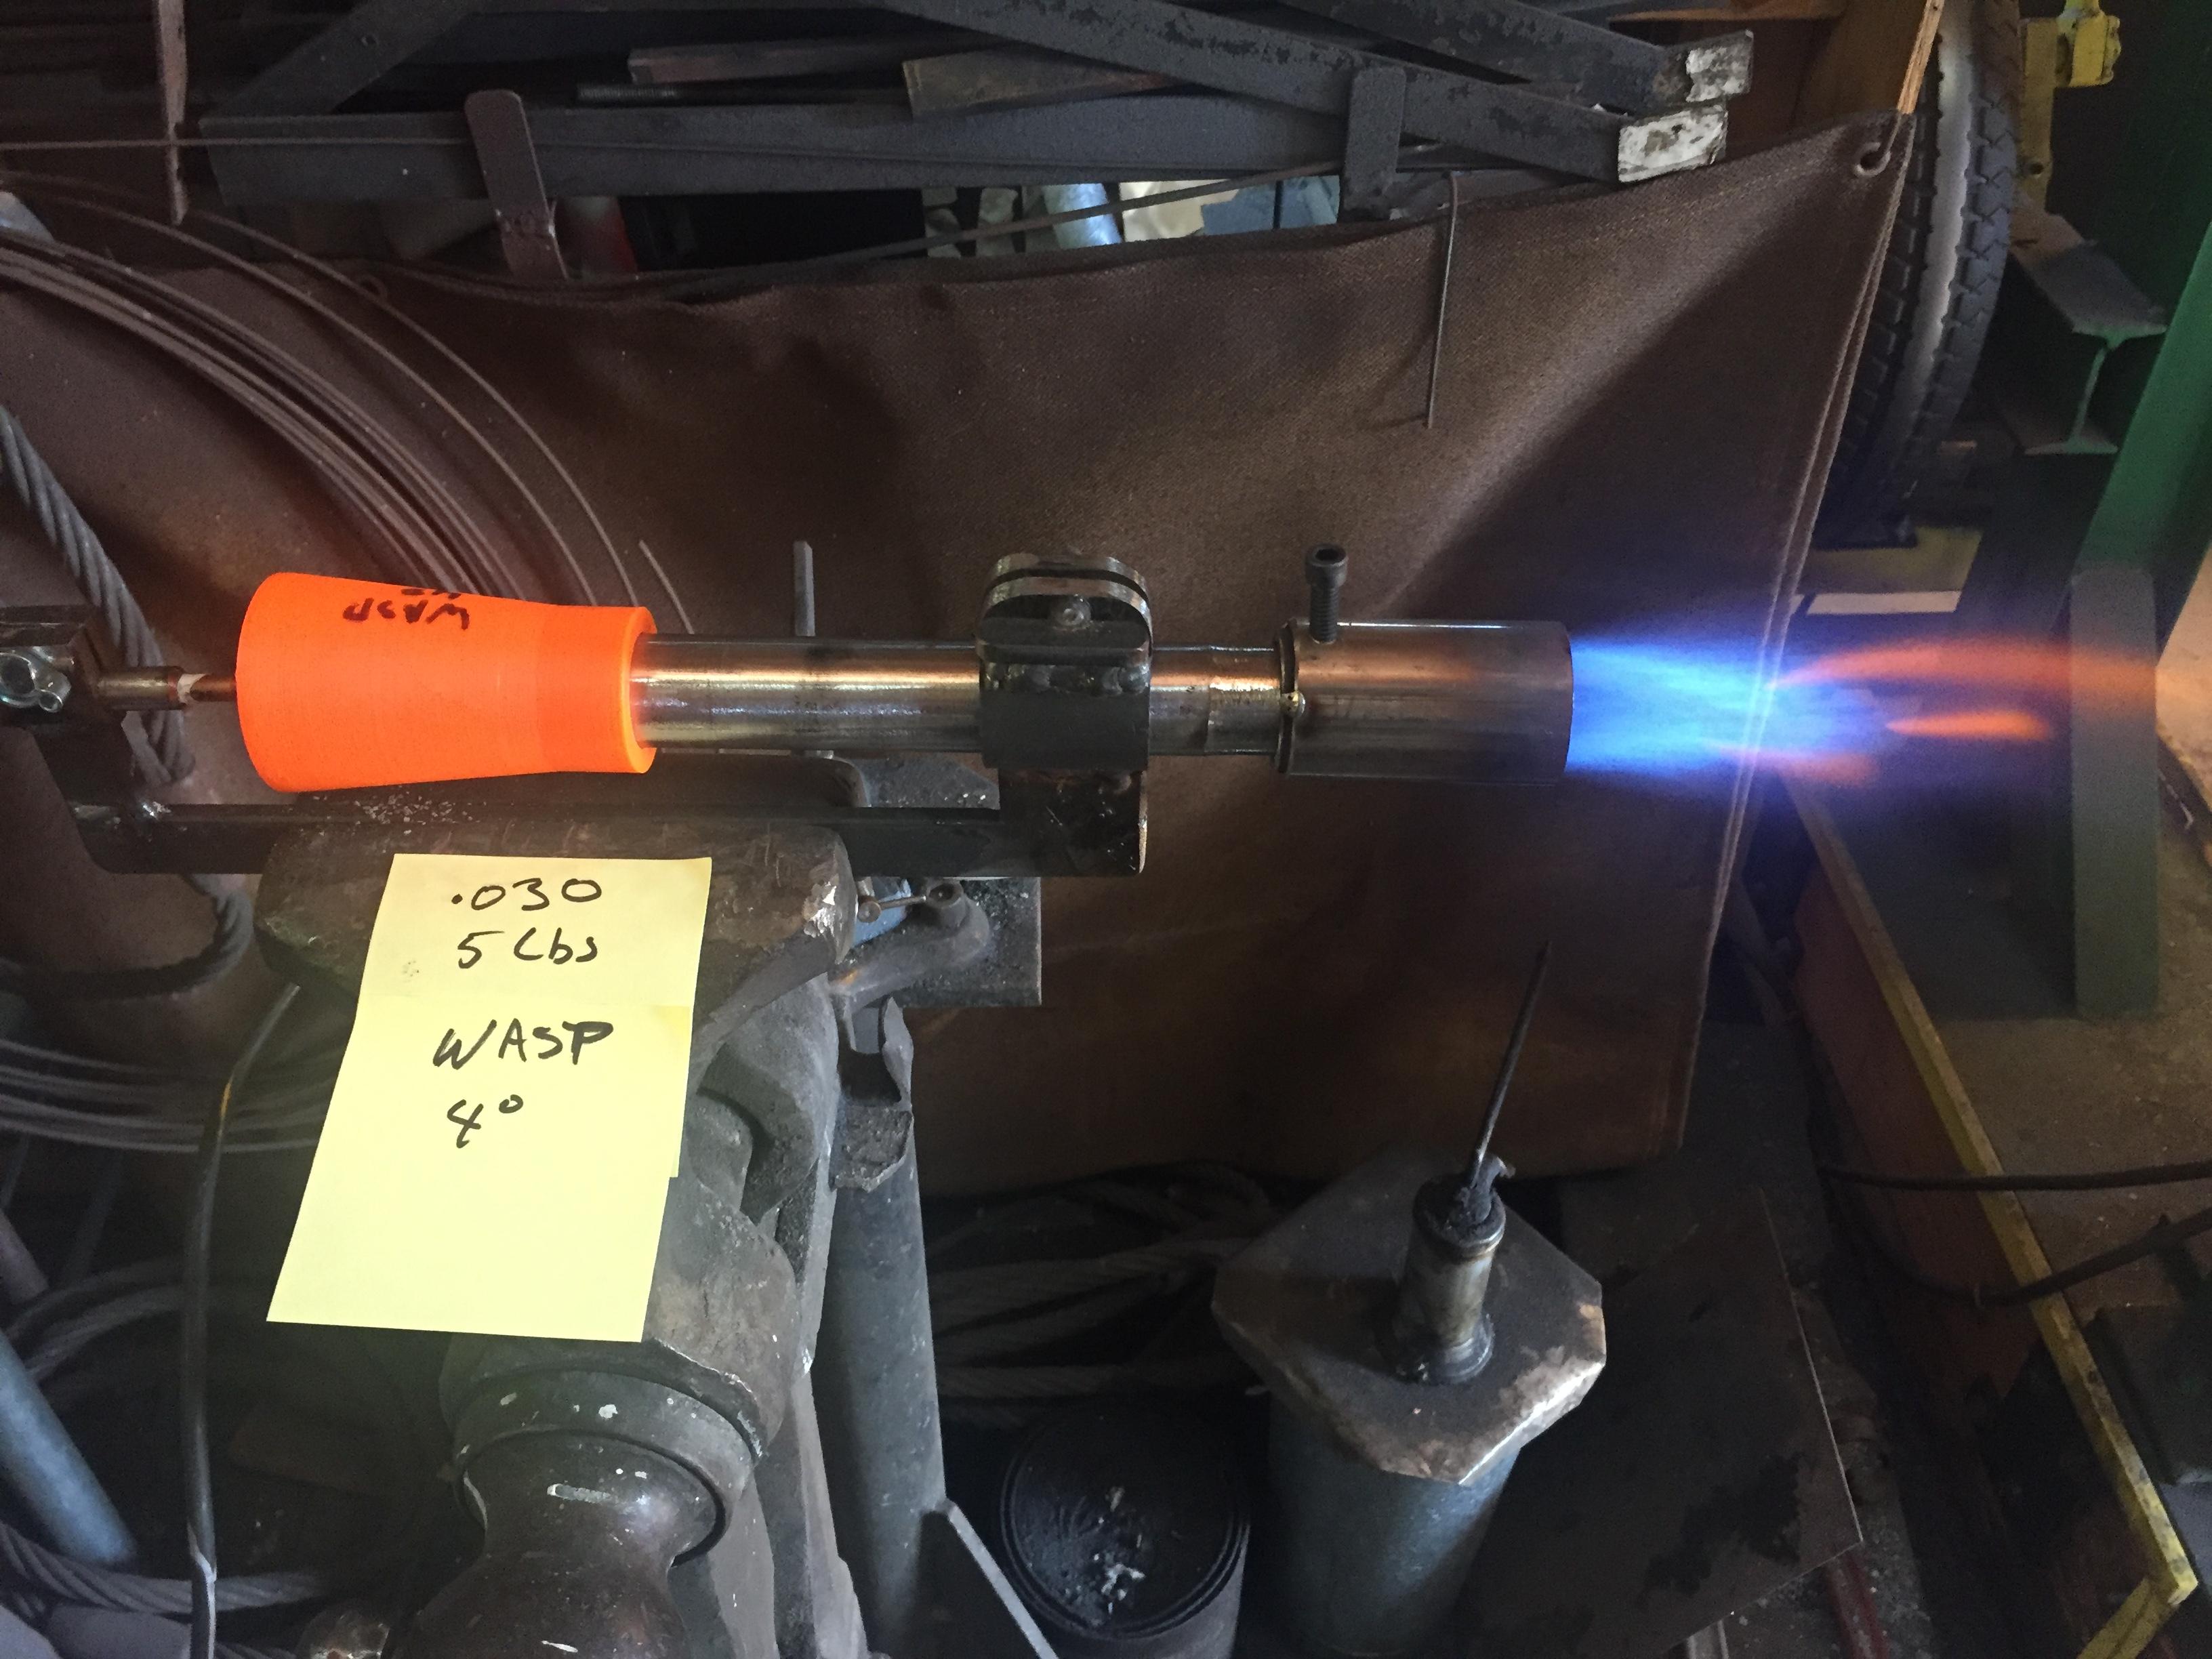
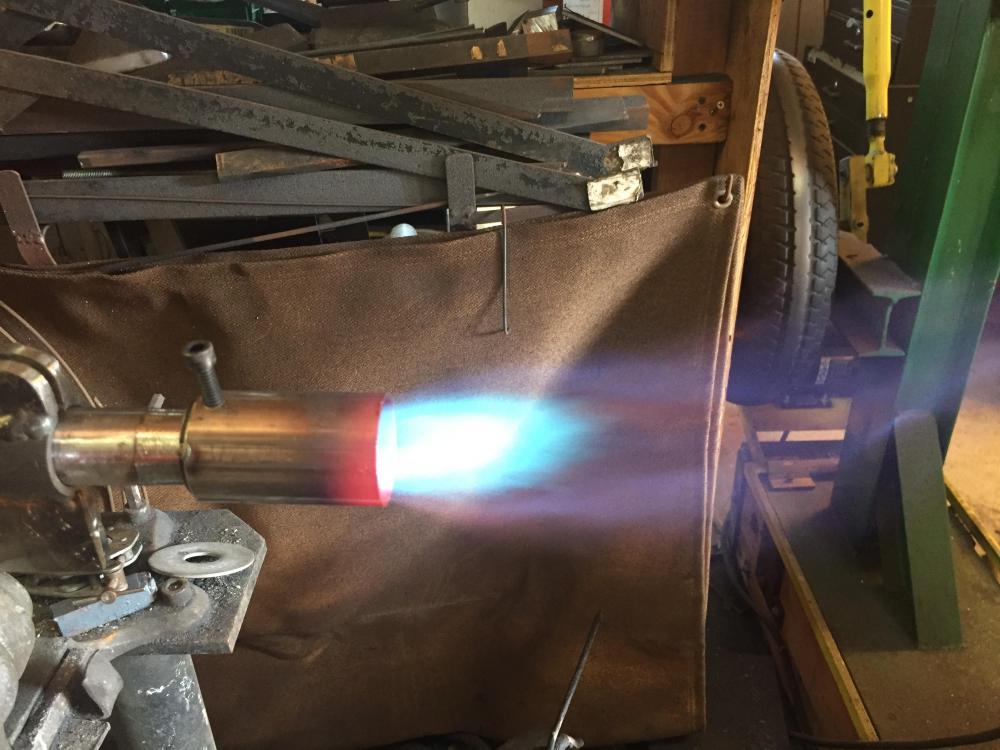
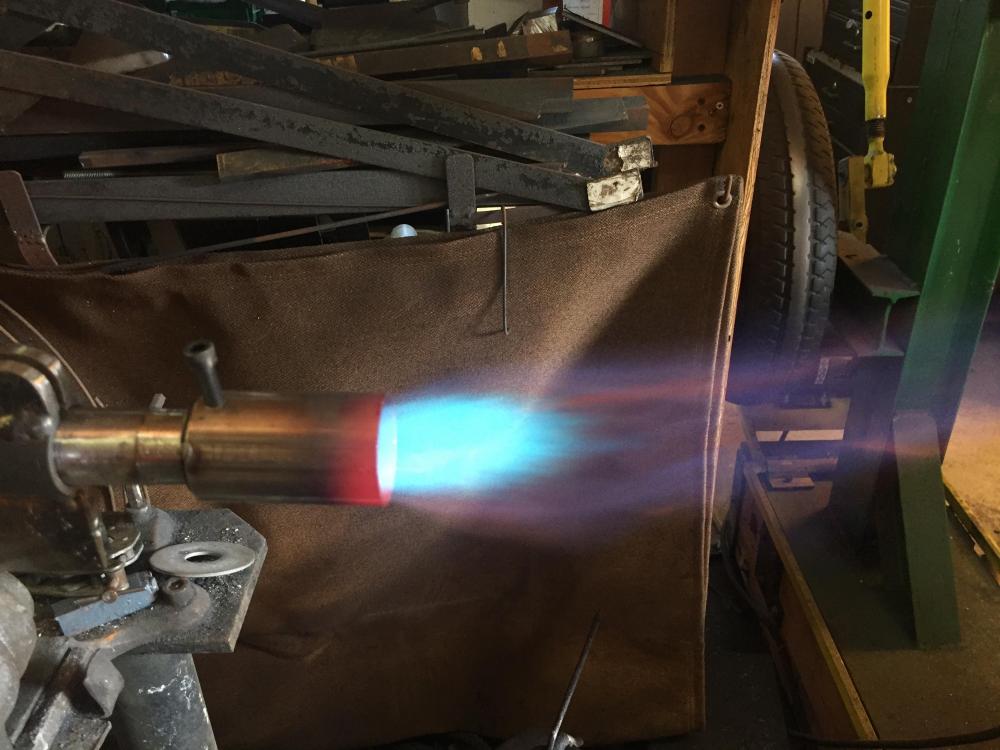
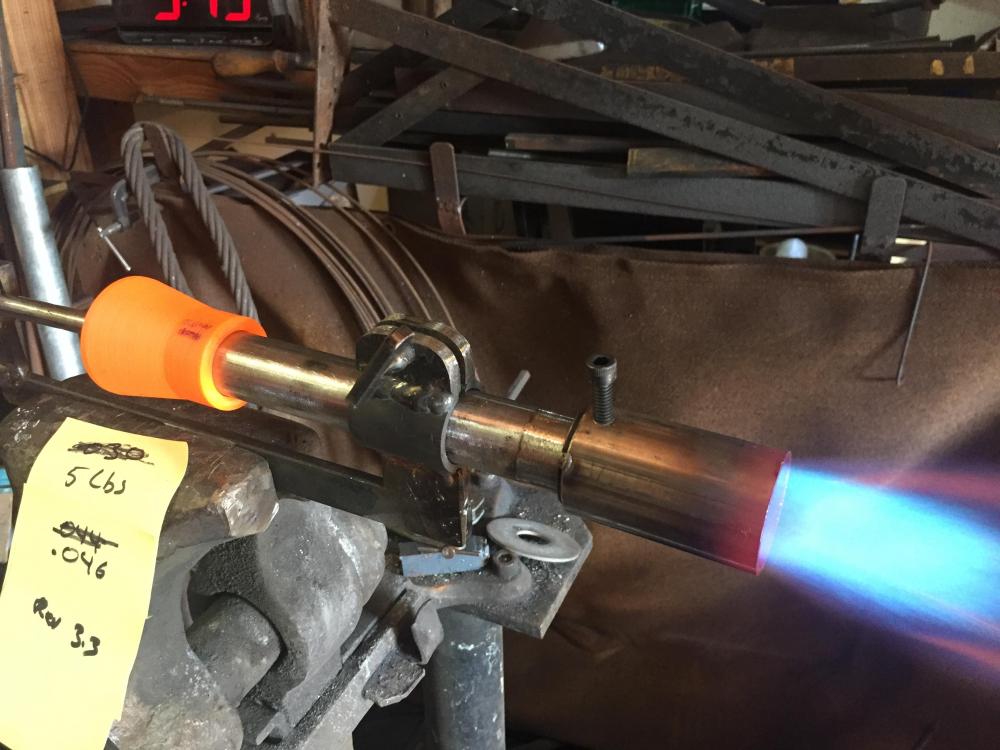
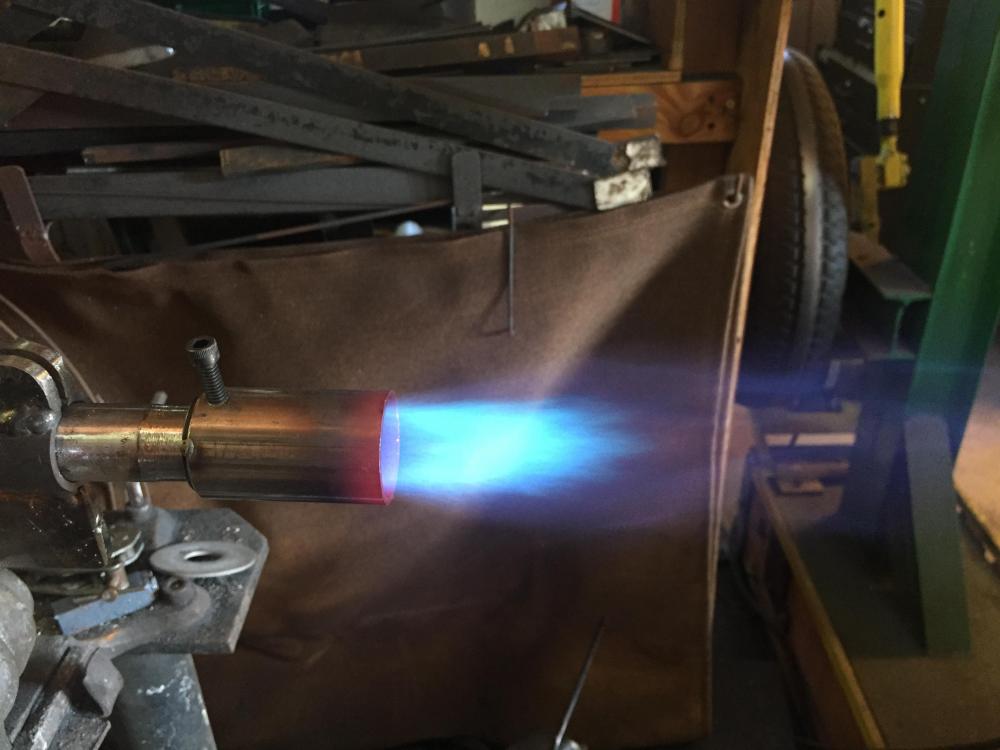
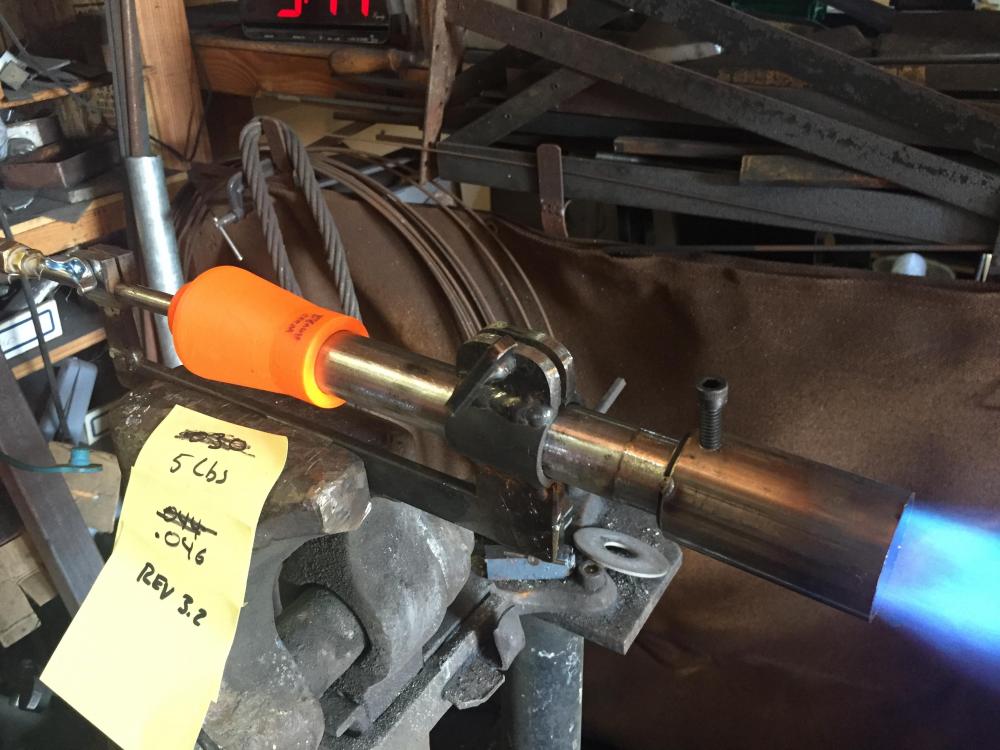
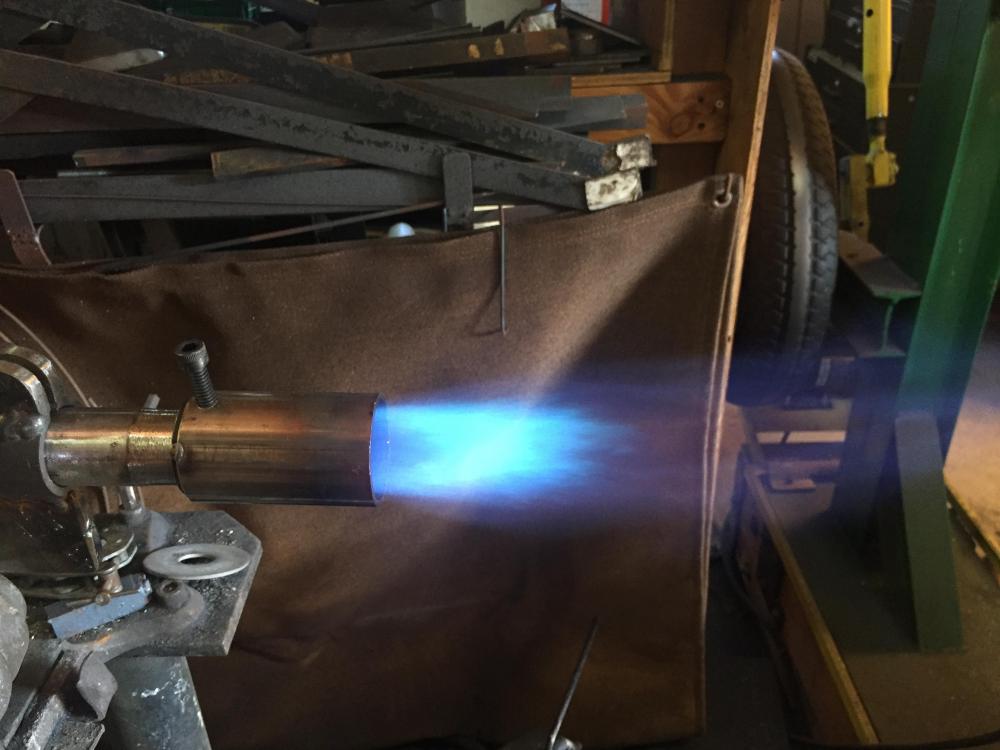
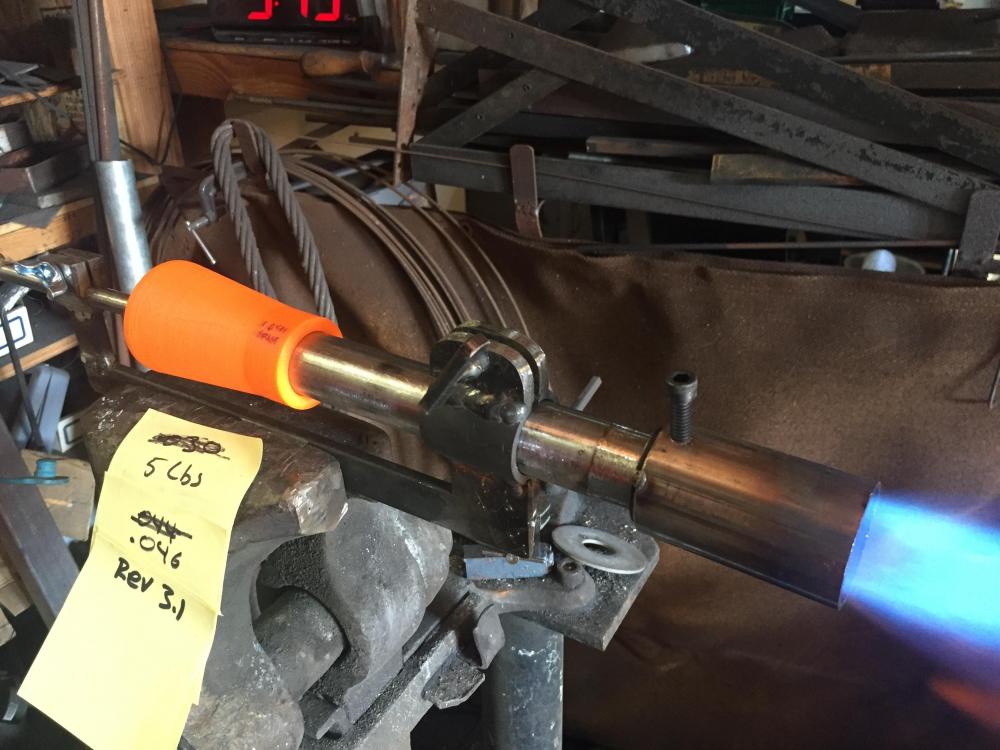
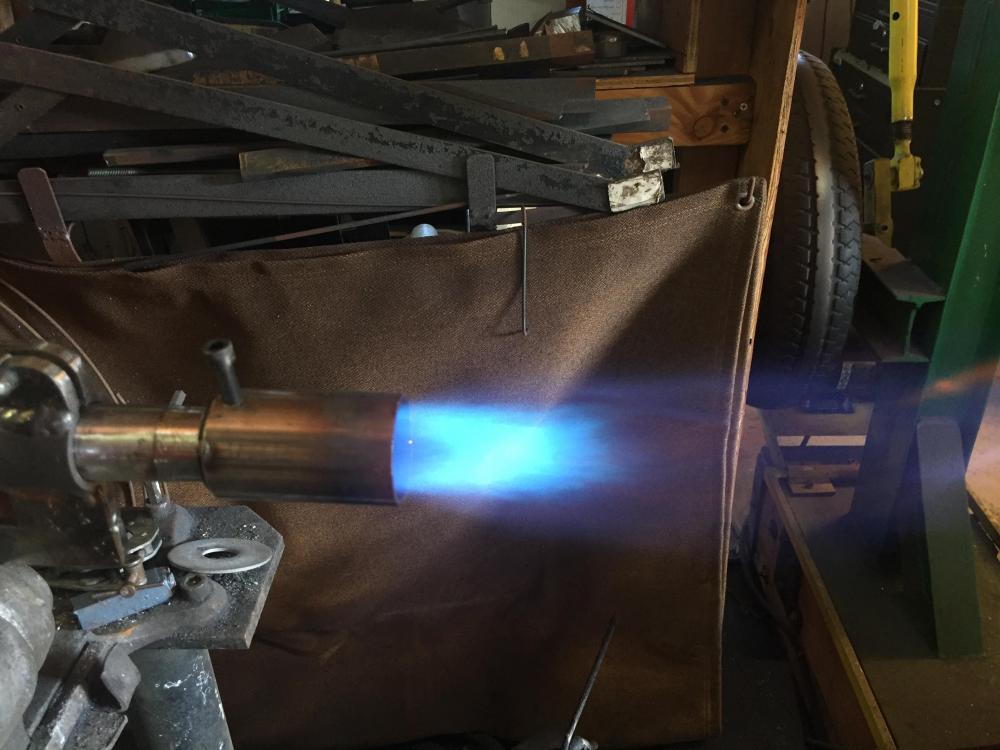
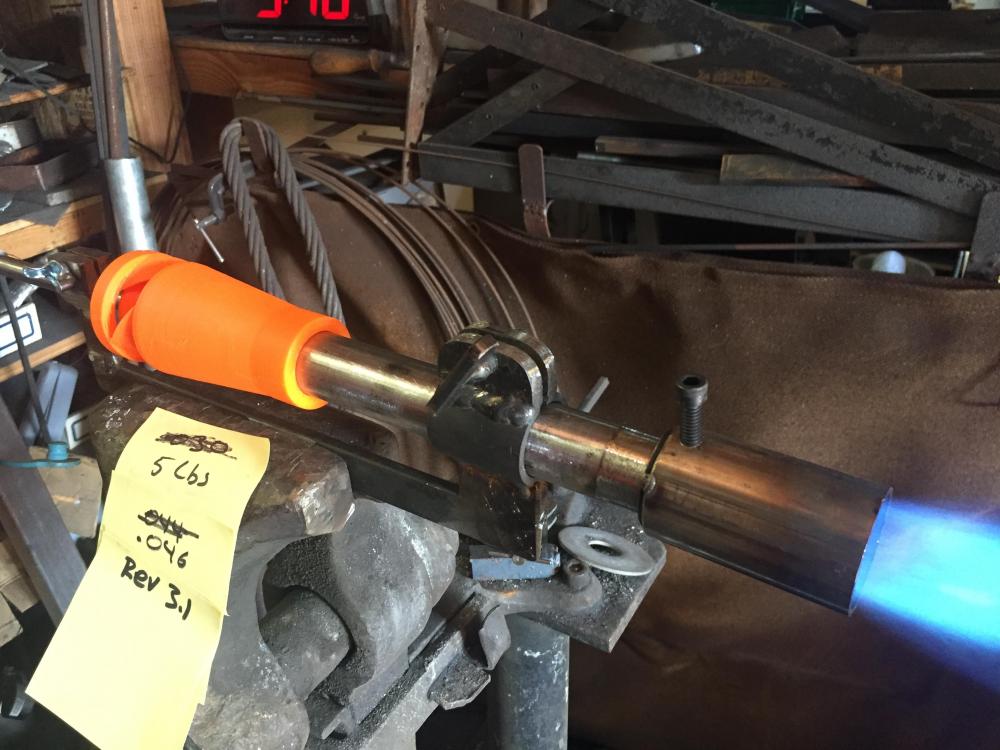
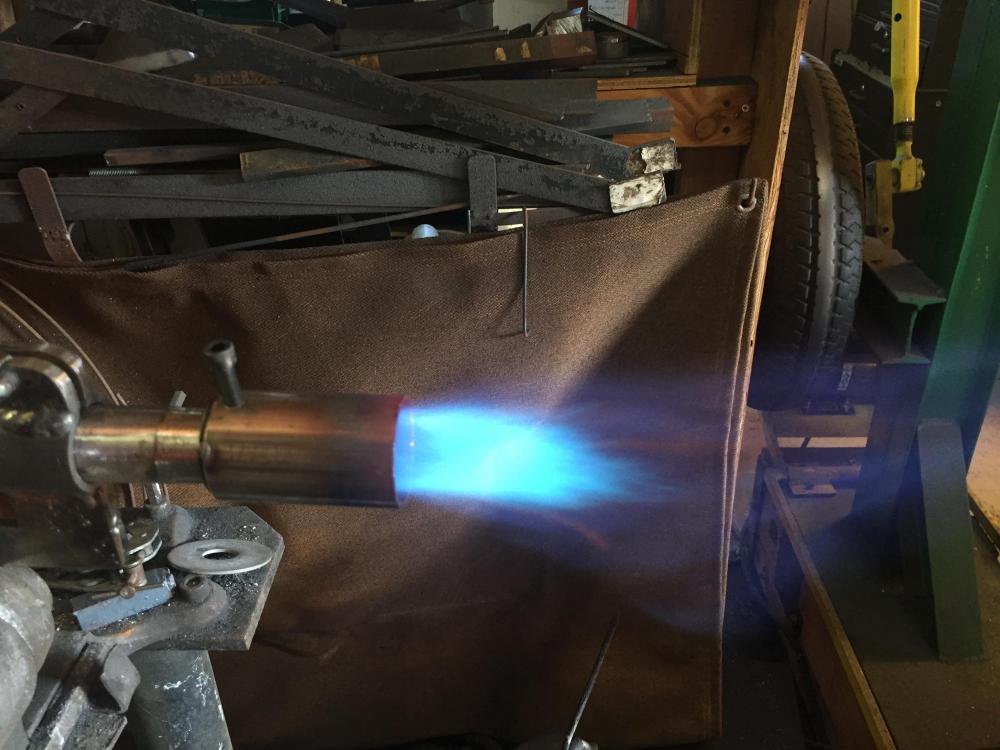
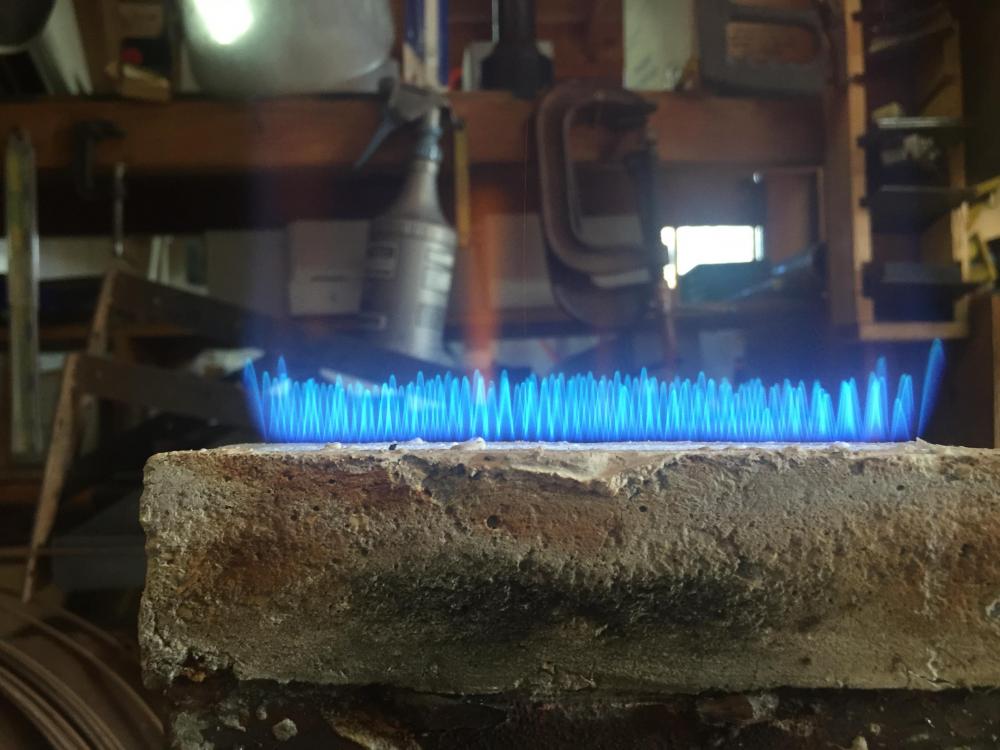
LOL, Loved that show! Life is cool, we get to play with fire and hit hot stuff with hammers! Well, here's the latest iterations. Those below plus rev3.1 with AFB's Fancy Intake. If you can't read the plans below; from left to right rev 3.1, 3.2, 3.3. second row: original 2 degree wasp, rev3.4 (it is mis-marked 3.3). I made one change from the original 2degree wasp injector and that was to change the intake funnel from a spline made funnel to a simple arc with diameter of 1.25". This did work better then the original, it pulled more air. On most of these I would have liked to go with a slightly larger mig tip. The next size up I had was .052, and that gave a rich green flame. I think just a thousandth or two larger would do the trick. Here's pics of all the burns. Same .046 mig tip @5lbs. I tuned them by choking them til the flame turned slightly green, then pulling back til the green was gone - aiming at a neutral. I used a tripod so the camera was the same distance from each flame. I also set exposure to the flame as it seemed more accurate to what I was seeing. Conclusions on bottom, but most of these worked easily. ___ Rev3.1: ___ Rev3.1 with spiral: ___ Rev3.2 ___ rev3.3 ___ rev3.4 ___ Rev3.1 vs rev3.1s (with spiral intake). I really noticed little difference. There didn't seem to be much swirl. 3.1s seemed a little more stable, but when I pulled the choke back to allow for more air it didn't go as lean as rev3.1. Rev3.1 was pretty awesome, I need to try it with a slightly larger mig tip. Rev3.2 and 3.3 have progressively shorter tubes after the intake hole, and larger intakes. I didn't notice much difference, but I'll have to play around with some mig tips slightly bigger to see if they tune in. I need to buy some # drills. Rev3.4 was a surprise. I just experimented and ignored the 2 degree slope. Instead I made a spline curve. The intake hole is bigger then 3.1 but smaller then the other two. It had a flame that was very good looking, no inner cone at all. It is small and would be easy to cast. The flame was smaller then the other injectors but went from lean to rich easily. It bears more work. DanR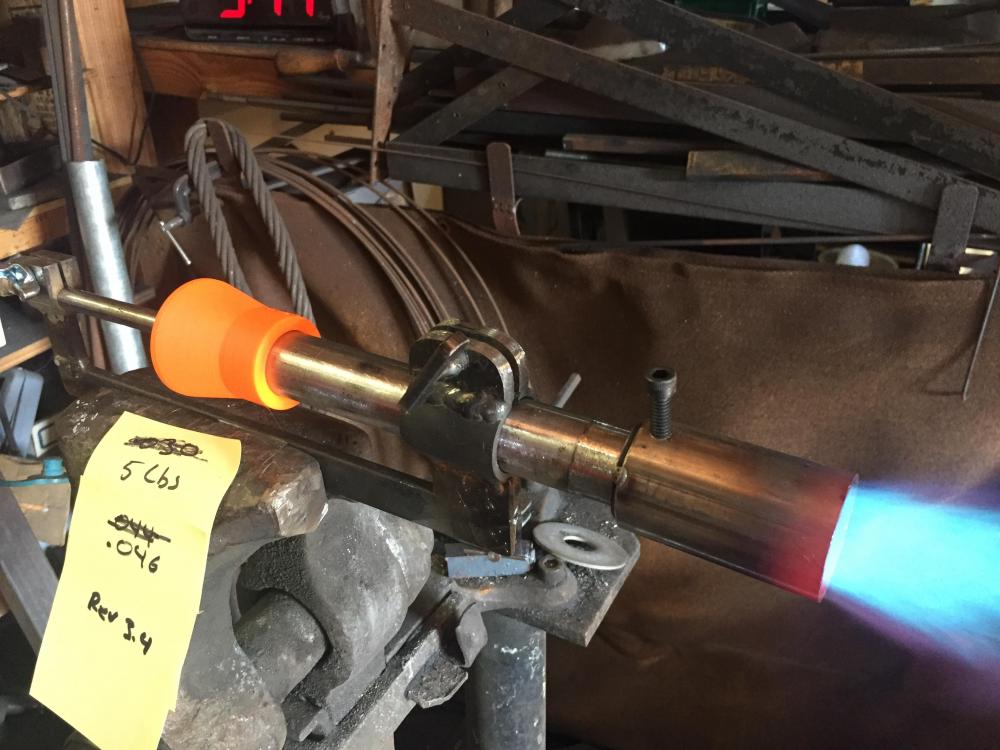

-
3D printed plastic burner experiments (photo heavy)
D.Rotblatt replied to Another FrankenBurner's topic in Gas Forges
The wasp style was very stable at nearly 0 pressure. Low enough so the flame went lazy orange. If true in a forge, that means I can just turn it down lower and it has a higher upper end! -
3D printed plastic burner experiments (photo heavy)
D.Rotblatt replied to Another FrankenBurner's topic in Gas Forges
Yes, the red dimension. Seems I've been making all my tapers twice as wide as necessary for decades. I always think of 1:12 on roofs and such, so when I first made tapered nozzles 20 years ago or so, I didn't use the included angle, just one side. Probably explains way the flame pulled so far into the nozzle and burnt them up over time...sigh. "Fancy Intake"... I like that name! Anyway, I just added your "Fancy Intake" (best I could guess from your pics) to the 2 degree wasp burner. I put an open top so I can use my same moveable choke system. We'll see if there is any difference. I'll print it up today or tonight. If it works it makes a much more difficult sand cast, but with the open top end it might be doable. Cool thing about the 3d printer is I can make a core mold with it...haven't done that yet so that's kind of an exciting thought! Yup...I just want to go to a 1" pipe...but that kind of defeats the point. DanR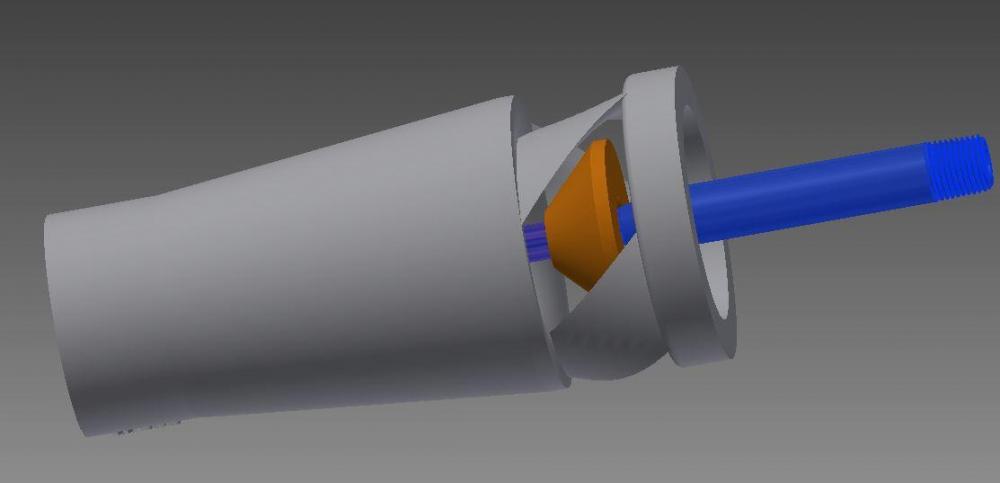
-
3D printed plastic burner experiments (photo heavy)
D.Rotblatt replied to Another FrankenBurner's topic in Gas Forges
Actually, there was nothing in there about that spiral intake....that's out of the box! -
3D printed plastic burner experiments (photo heavy)
D.Rotblatt replied to Another FrankenBurner's topic in Gas Forges
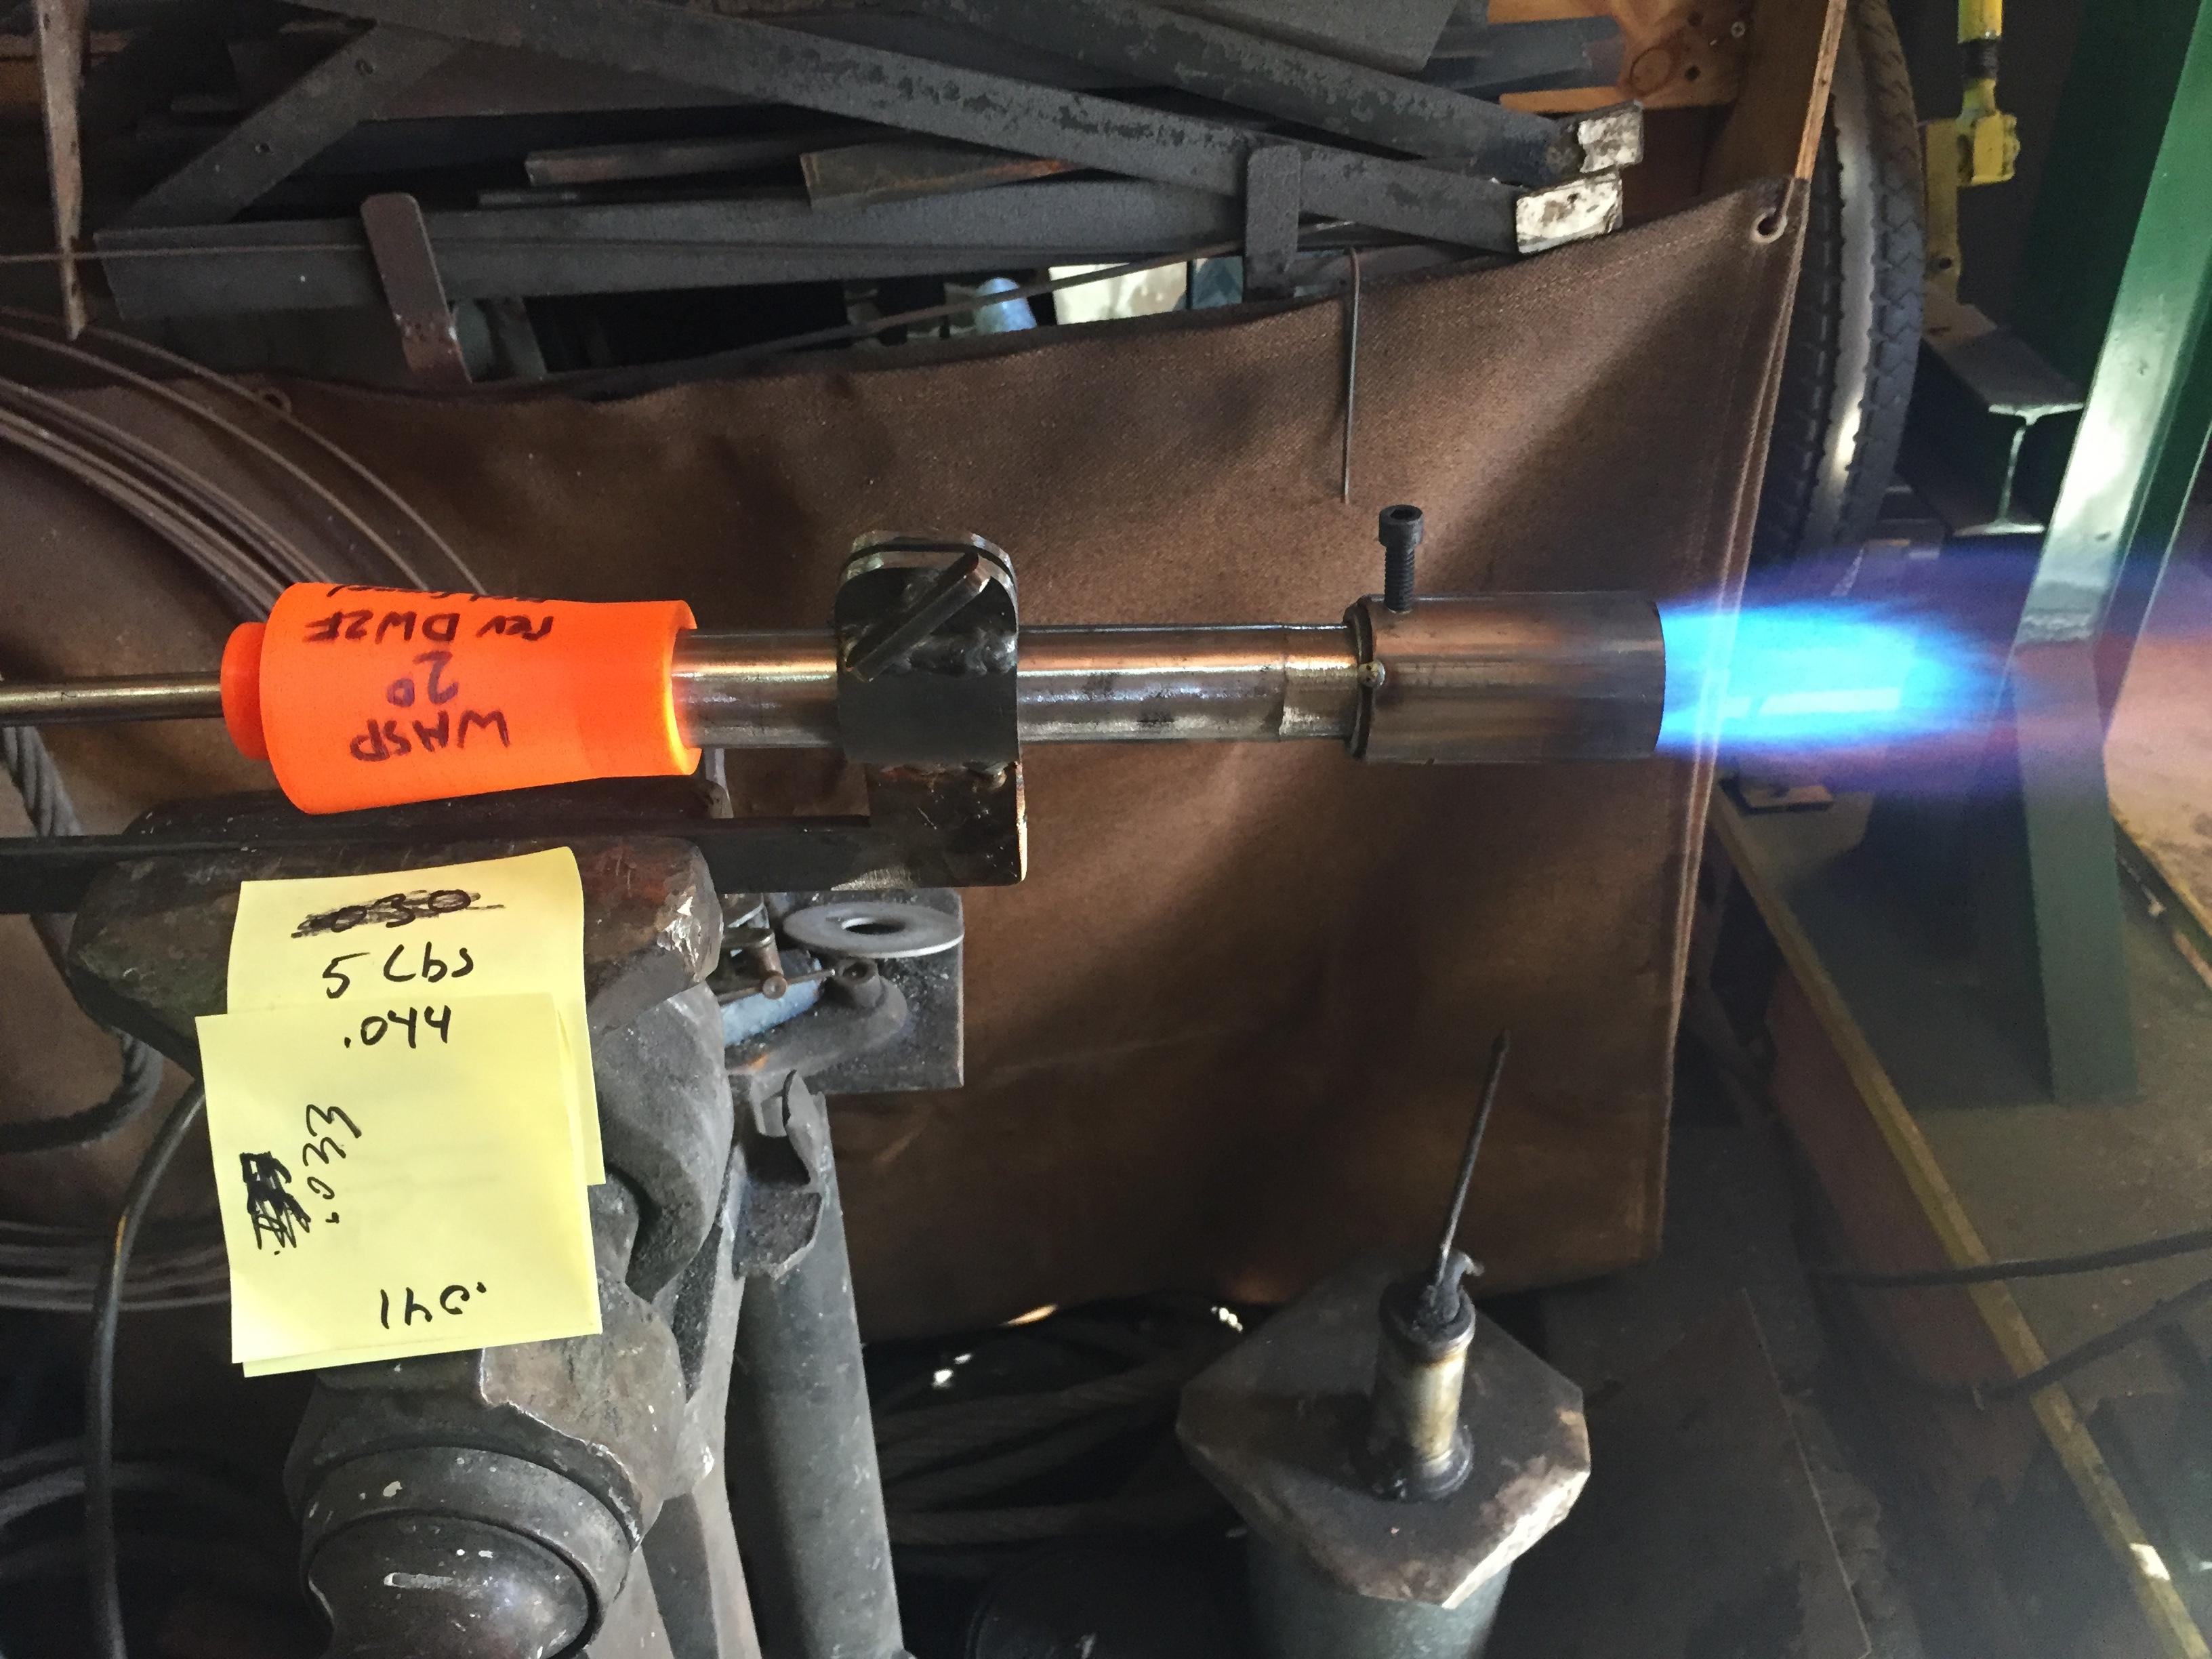
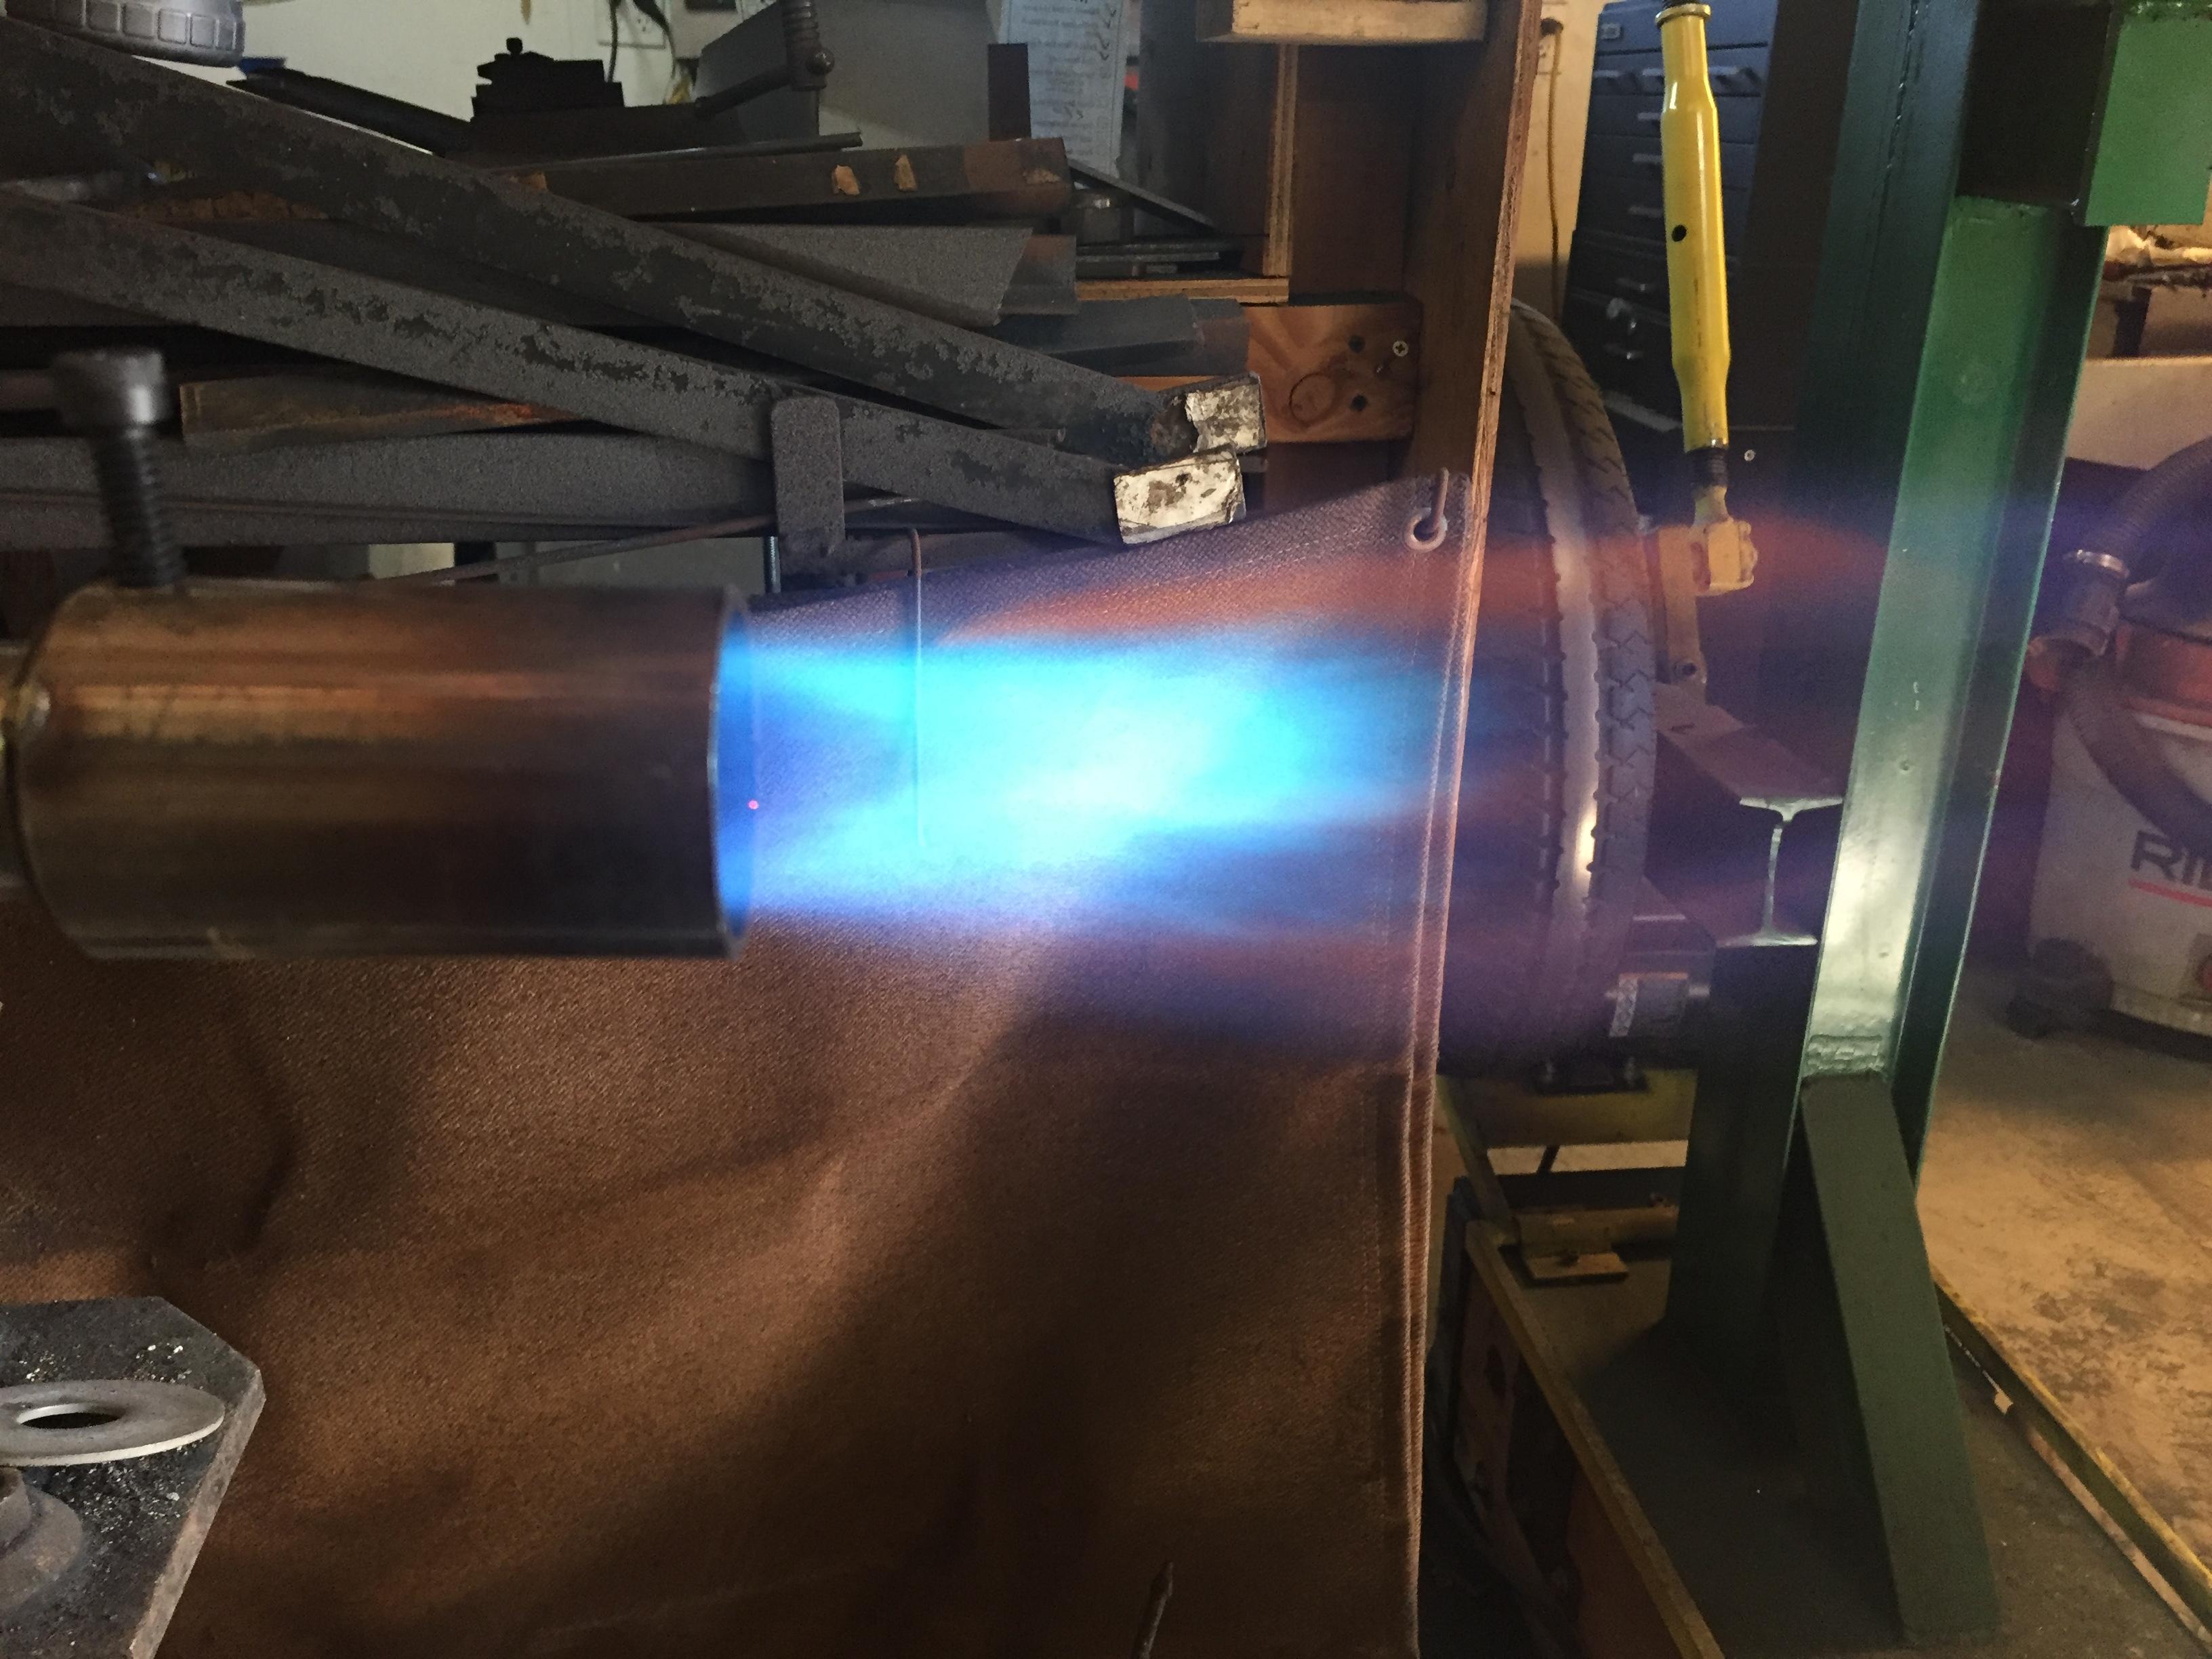
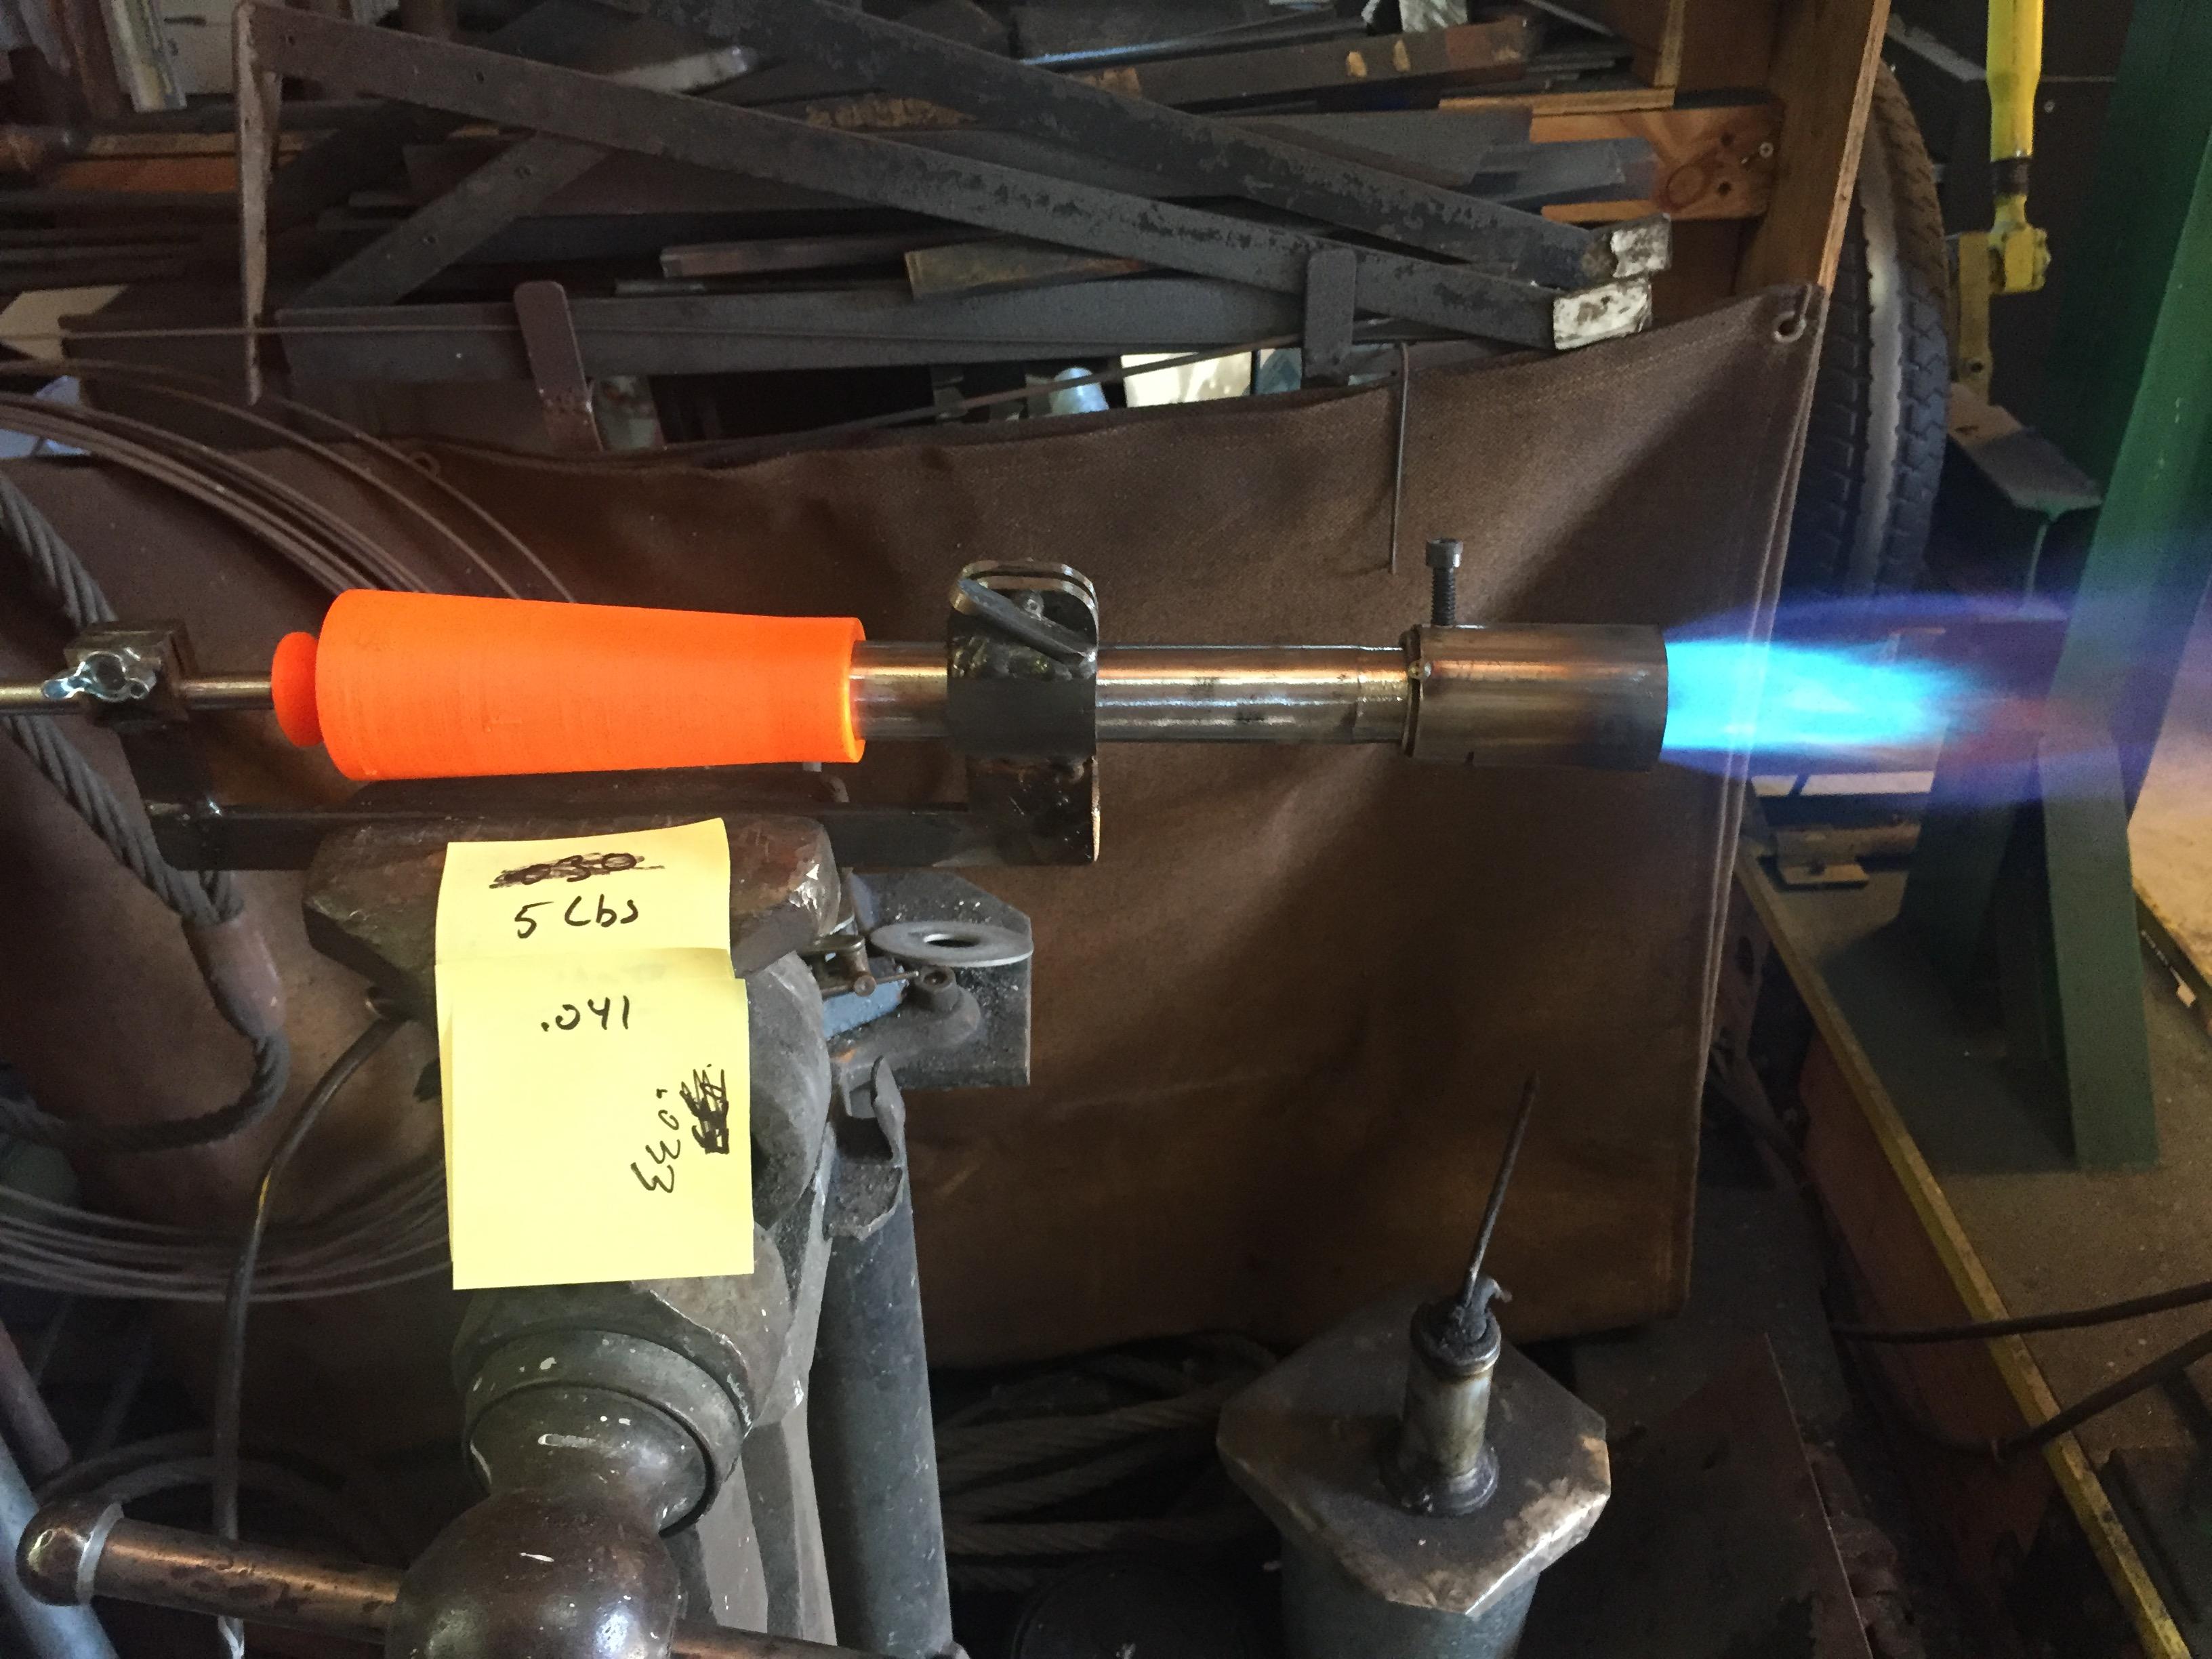
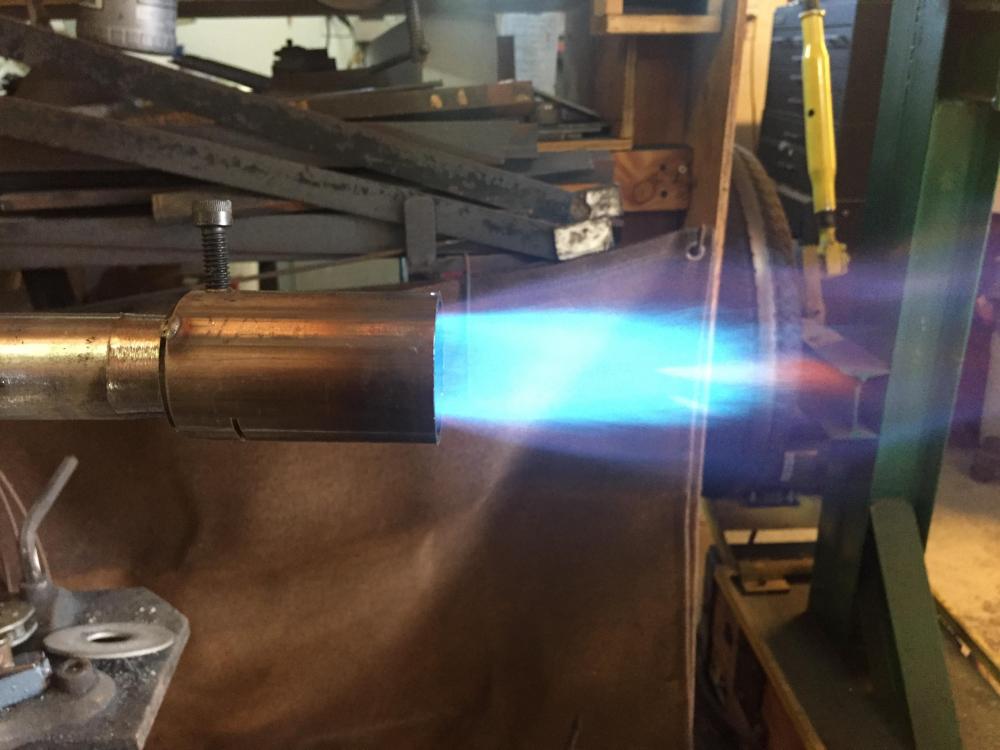
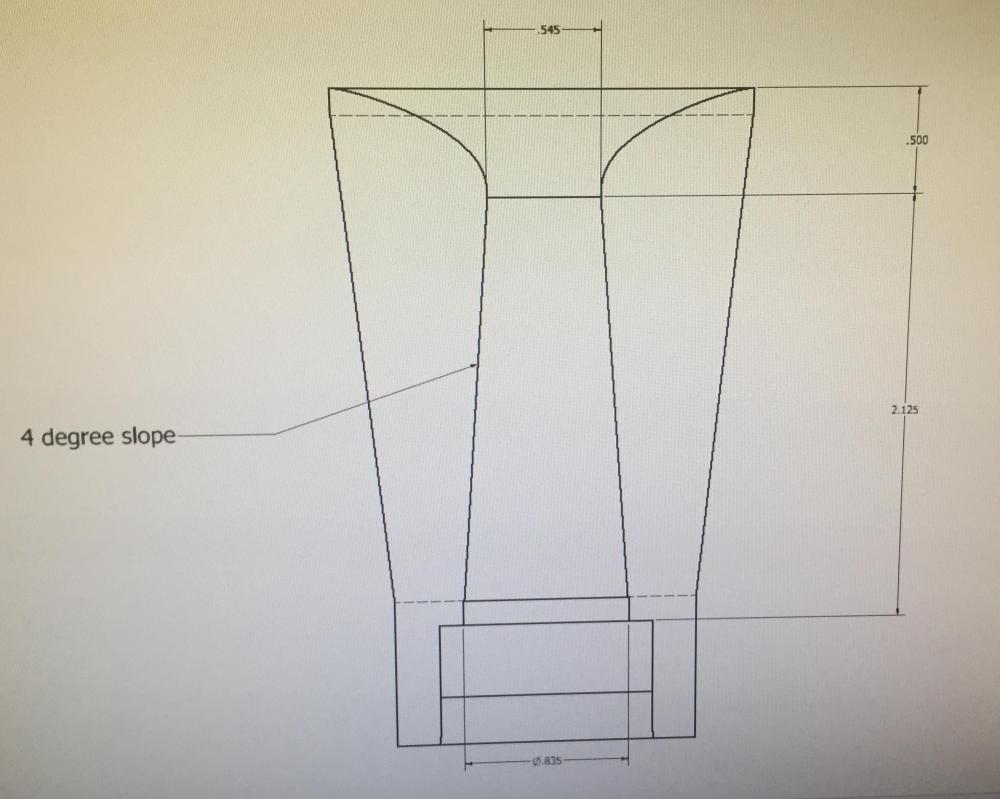
Update: Played around with some other burner designs, and looked at the last batch. All injectors were tried on an 8" x 3/4" pipe either ending in a nozzle or attached to the NARB. Correction on the last burner test: Turns out the 2 degree wasp was looking bad because the flame was so lean, this burner really pulls air. Moving up to a .041or .044 tip really made a difference, and it seemed better than the 4 degree wasp. This wasp burner has the biggest intake hole at .685". It definitely pulled the most draft. New injectors: I tried a longer burner at 2 degree slope. Basically I elongated the 2 degree section of the 2 degree wasp with the same intake funnel. Because it's twice as long, the intake hole is only .545" vs .685" diameter. This was a very stable injector and showed easy adjustment with the choke. On a single burner the 2 degree wasp performed the best. On the NARB I got good results with anything. Seems it is a much more stable platform for the flames. I ended up switching mig tips between .044, .041, .033, .030 until I got a neutral flame with maximum air allowed. The largest flame I got at 5 lbs was 5/8" with the 2 degree Wasp injector/.044 mig tip. The long 2 degree injector was happy with the .041 mig and had a 19/32" flame - a little smaller then the shorter 2 degree. Conclusions (at present): the shorter 2 degree wasp seems to work best, while the longer 2 degree wasp was also very stable. The shorter had a larger opening which allowed for more air and thus a larger mig tip and more BTU. The wasp shape definitely pulls more air then a simple funnel. A larger opening is better. This opening is limited by the ID of the 3/4" tube (.84" or so). Two questions come out of this: 1) is this the most efficient shape to maximize air flow, and 2) is there some way to cause a vortex, and would that help or hinder air flow - yes AFB, your spiral intake is genius, but I'm still wanting to see if this can be sand cast. Next up: Play with some short designs that have large intakes and wasp bodies. Short 2 degree Wasp injector @5 lbs, .044 mig tip: ___ Close up of flame: ___ Long 2 degree Wasp injector @5lbs with .041 mig tip: ___ Closeup of flame: ___ Long 2 degree Wasp Injector, @10lbs:


-
3D printed plastic burner experiments (photo heavy)
D.Rotblatt replied to Another FrankenBurner's topic in Gas Forges
I tried 6 different configurations. 3 funnels @ .5, .75 and 1.0" deep with a 2" OD on the funnel. Also using the same .75" funnel as the top, I made two with a wasp extension to the bottom. One with a 2 and one a 4 degree slope. I didn't think, and now realize that the 2 degree is the 1:12 and the 4 degree is steeper. All finish on a 3/4" x 8" pipe. I tried them on a plain single burner and my modified NARB with 1/8" holes. The most exciting thing about these injectors is the choke. It's simply a cone placed around the jet. The pipe for the jet is held in a clamp and can be moved forward or back, while the cone either allows or restricts the air intake. On some of the burners it was very finicky and short range of movement (maybe 1/4") caused a a huge change in the mixture, but on the 4 degree wasp (which I'll show below). On that one it seemed to be effected much further away, and had maybe a 1/2" of movement. This allowed for easy fine tuning of the mixture...something I consider important. The best of them was the Wasp waisted one with 4 degree sides. The actual inlet size is only .54" but it seems to draw more air then the others. On the NARB I had to use a .041 mig tip to get a neutral flame. The flames were very even. .048 was too large and produced greenish flames, while .035 produced sharp blue flames that pushed away from the burner. Pic below: 4 Degree Wasp with .041 mig tip at 5lbs pressure: Compare with a Real burner and #60 nozzle hole (which is about .040") in a pipe (standard setup): With a single burner the 4 degree wasp injector had the flame with the least central cone. This pic is with a .041 tip. The same injector as above with .030 mig tip: As above without choke: Conclusions: first, they all worked. The 4 degree wasp was the most stable with a single burner. I was able to run it with the burner nozzle furthest back. With the NARB the difference was most noticeable. The 4 degree wasp pulled the most air and had the most oxidizing flame. It required putting on a .041mig tip to bring the flame to a neutral mix. The choke worked great on all of them, and is a viable method to adjust the mix. I noticed very little difference between using a choke and not using a choke in the flame characteristics. 4 degree Wasp Injector: Back to the virtual drawing board....got some other thoughts to try! DanR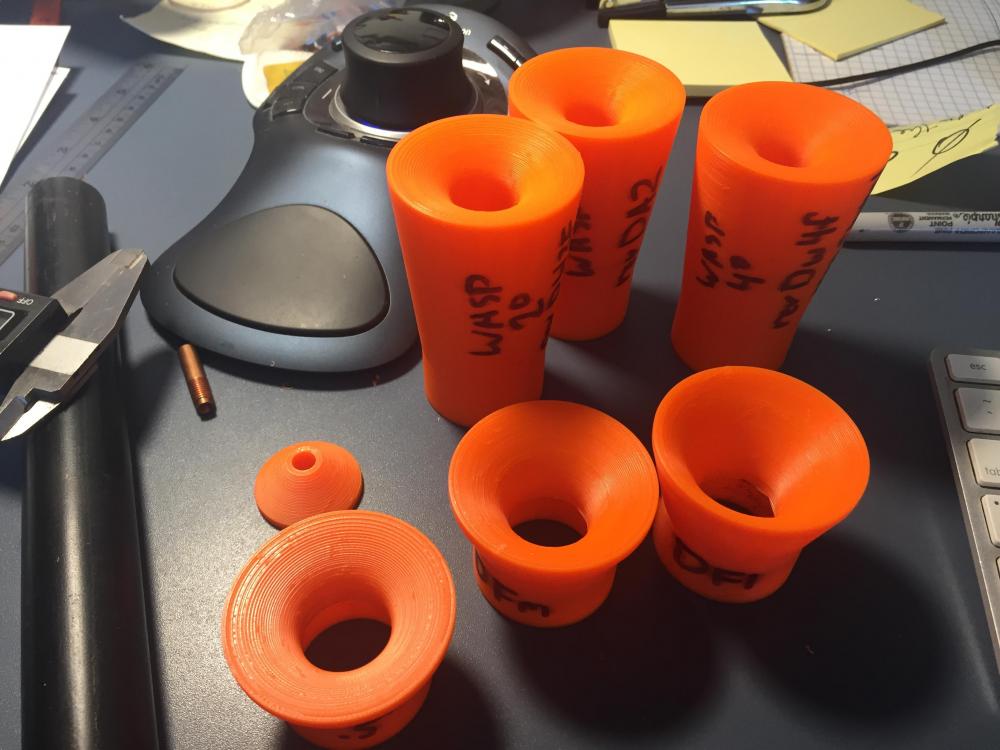


-
3D printed plastic burner experiments (photo heavy)
D.Rotblatt replied to Another FrankenBurner's topic in Gas Forges
I'll be doing some testing tomorrow. Both with single burner and with NARB - I'm wondering how they work differently. From looking at the article referenced by JWMelvin (thanks for that!), and examining the Amal burner, a 2 degree flare seems best for the injector. The 1:12 flare is actually about a 4 degree flare which is quite a difference. Of course a nozzle flare and an injector flare are different. I'm liking that! I wonder how that will work on a NARB - it would stay nice and cool.... Just some thoughts, real life experiments tomorrow! Dan R -
It's easy to make the burner removable for portability. On mine I make the nozzle extra long so it sticks out of the forge. A simple single thumb screw holds the burner tube in place. I put a hose clamp on the burner tube as a stop so it goes in the same amount each time. Also, another thought on my part. You might consider making a list of what you want from your forge in order of priority. Some things don't play well together. For example, as a forge becomes portable it becomes less multifunctional. It's difficult to make it very adjustable if you are making it portable. If you want to HT long knives, it will need several burners and it is also less portable and should have a wide even flame (ribbon burners are great for this), but if you like a localized heat it will not do this well. If you want a forge for forge welding, it will be more difficult to make it run it at low temperatures and you may want a vertical forge. Trade offs. We'll keep feeding you ideas, and all of them will sound good, but may not fit together. All good ideas up there! I'll look forward to see what you end up making! Dan R
-
Respectfully, here's something to think about. It's fun to play and design, we all do it and love it. Don't let it get in the way of playing/working/moving forward. As long as your old wood forge is still up and running go for it! If not, make something easy and quick to keep you working and tinker in the off time! I've been known to be guilty of over designing, and over the years I've found that designs made without experience tend to go awry...they generally work, but are not what I really needed or time and money spent on unnecessary features or..... Dan R