

D.Rotblatt
-
Posts
335 -
Joined
-
Last visited
Content Type
Profiles
Forums
Articles
Gallery
Downloads
Events
Everything posted by D.Rotblatt
-

3D printed plastic burner experiments (photo heavy)
D.Rotblatt replied to Another FrankenBurner's topic in Gas Forges
I'm interested to see how those cast! Looks good. The inducers on bottom and is that a feeder tube on top of each? I've got to say, casting straight off the 3d printer looks like a blast! I'm getting inspired! Take a look at my experiments with 1/8" holes on the ribbon burner (it's in the NARB thread). It's been really successful. Welded a billet with it the other day at 2350F, and got the temperature down to 1450 F for normalizing and heat treating. Besides it's bizarre singing for the first 2 minutes until it's hot, it's working up to my highest expectations. It will not backfire at any pressure. The inducer on that is just a Reil burner. Although on writing this, I'm wondering if the NARB defeats the purpose of this type of inducer. All the cyclic action is wasted once it goes into the ribbon burner. In my observations of my NARB, it's just about air and gas in the right ratios being pushed into the plenum. I'm noticing little difference between using a Reil burner, Mickey burner or my hybrid style burner with my NARB head. Just a little difference in the richness. Frosty or Mikey, correct me if my thinking is wrong...it's based only on a few of my own observations. -
Naturally Aspirated Ribbon Burner. Photo heavy.
D.Rotblatt replied to Frosty's topic in Ribbon Burners
I found the mix will not stick well to metal. I believe the expansion of the metal is different then the shell mixture, so it flakes off if it heats up much. Not an issue when it's on ceramic blanket which is a bit flexible (even when rigidizied). Actually not the horrible rap I read on most of the forums, but not great for you. People are really scared of any exposures, some with good reason, some with less. A fume extraction system is required to weld galvanized or in Brass Foundries to help prevent MFF. In a home shop working outside and upwind or with a fan behind you to keep you from breathing any fumes is best. Metal Fume Fever from zinc resolves in 24 or so hours without lasting effects. In the interests of knowledge, here's a good article: -
Yes!
-
U-P_Country; Please note the difference between Colloidal Silica and Adbond II. Both are called colloidal silica, but the Adbond II must have other binding agents in it which makes it unacceptable for a Rigidizer, but great to bond powders like zircon for a Hot Face. I might have found a source for pints (around $16) and quarts of colloidal silica binder, but I have to buy some and test it to see if it works. I'll report when I do.
-
If that top of the forge is steel that is red hot, it is a serious problem. It appears you have flame between the top of the brick and the forge shell. How far are the burners extending into the brick? They should extend about an inch into the brick, which means you will need a 1" hole in the brick, assuming those are 3/4" burners. The red hot shell will quickly warp, the metal will oxidize and soon become brittle and fall apart. A 3 burner will go through a lot of gas. You only need a 1 burner to work on up to 8" knives. You can put ball valves on the back two burners (if you got the economy model) and turn them off, but be sure to stuff ceramic blanket in the top of the burners to prevent chimineying and them getting too hot. That way you can use 1, 2 or 3 burners. You will use 1/3 of the gas. That's fine. Others will give more insight, I'm sure.
-
Adbond II only comes in 5 gallon amounts from Remet company - it's a colloidal silica used for ceramic shell molds. Pottery supplies have it for rigidizing, but I'm not sure that's the same stuff (since the adbond melted ceramic fiber in my tests). i'm looking into finding small amounts. I'll let you know if I find them.
-
Naturally Aspirated Ribbon Burner. Photo heavy.
D.Rotblatt replied to Frosty's topic in Ribbon Burners
Update on my 1/8" 123 hole NARB. I welded a billet of Damascus with it today, basically same pressure as I would use my Reil burner for welding, but I could get 9" of steel up to heat without moving it rather then 5". Once the forge was hot, (after about 1.5 hours welding and drawing the billet) I tested temperatures at different pressures. It went from 2400F at 12.5 lbs down to 1560 at so low a pressure that the burner didn't pull enough oxygen and the flame went to yellow reducing flames, I'd guess 1/4 lb or so. At the pressure just before the flames went yellow/reducing (maybe 1/2 lb), I was at 1630 F and the flame cones where about 1/8 or less long. No backfiring except when I turned it off. None. Perfect performance I got a bit of yellow dragons breath out of the forge at high pressures, but it did produce a small amount of scale on the metal in the forge. Must still be reducing, cause I welded the billet without flux at about 2350 F with the damper on the burner wide open (full air). 13 layers, 15n20 and 1095. Pic below. The organ tone is loud at startup, but if I make gate off the burner intake and make it a bit reducing it goes away. Based on the quench distance theory, and the other article listed, a reducing flame is more prone to quenching, so that supports the theory that these burner holes are at just over that edge. That also supports the fact that they do not backfire easily.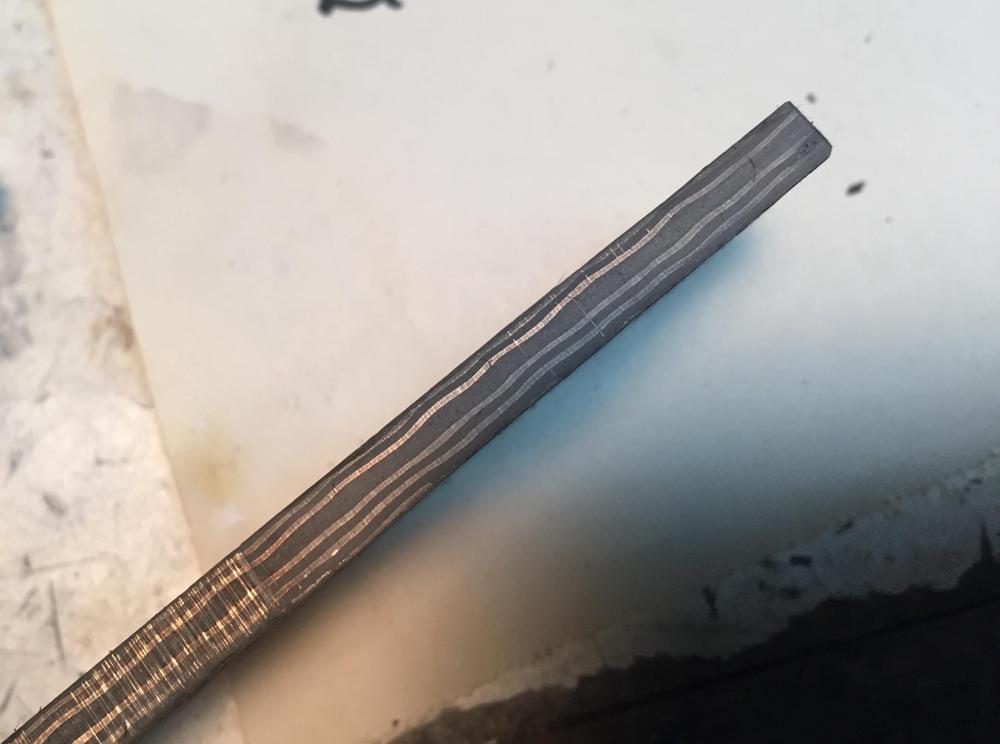
-
Naturally Aspirated Ribbon Burner. Photo heavy.
D.Rotblatt replied to Frosty's topic in Ribbon Burners
Wait....this is nerdy? -
I have another thought regarding the backfiring. You have cast nozzles, and it is that variable that is different from other 'T' burners. What are the sizes and shapes of them? What PSI are you running? The backfiring is happening when the forge gets hot, and sounds similar to what happens in my ribbon burner is the pressure is too low - it's fine until the burner head gets too hot, then it backfires and I have to turn the pressure up. Dan R
-
Mikey is the flame king, he'll have the best take. What pressure are you at in the video? I can say two things for sure; 1) they will act completely different inside the forge, do you have a video of them inside the forge? 2) The reducers you are using for the nozzles are not ideal. Those are Reil burners with the mig tip mod. As I recall, when you use mig tips he specifies a larger reducing coupling to allow for more air. I tried a few like that and never found them as good as the original Reil burner with the Bordeaux mod. I've used those for years. I can hear them huffing when you give them more oxygen in the end of the video. I think the flame is starting to backfire a bit. The nozzles might be the problem. You can get a piece of stainless tube from speedy metals dot com. 1" OD x .120 wall thickness. Sometimes takes a little filing to make it fit on 3/4 pipe. 12" of tube is only $12 plus shipping. In regards to the burners burning different, try cleaning the tip on the one not doing as well, make sure there is no obstruction (like a bit of teflon tape) in the orifice. It should behave the same if it's built the same. But I defer to Mikey in all of this.
-
3D printed plastic burner experiments (photo heavy)
D.Rotblatt replied to Another FrankenBurner's topic in Gas Forges
As a general rule, if possible you want all parts with a similar thickness. Barring that, you sprue into the thickest (if possible) and put the thinnest furthest away. Metal crystalizes as it solidifies, and the crystals are denser than the liquid (it shrinks), so needs to draw liquid metal from somewhere else. Thinner sections cool quicker than thicker sections. If an area doesn't have a place to draw metal from, you get porosity which is space between the crystals (though it can also come from dirt, trapped gas, or pieces of investment that have broken off). Ideally, you want to control the cooling of the metal to start furthest away from the button and to end closest to the button. The last place you want the metal molten is the button (or cup) where you pour the metal in, so it should be of large cross section. Sometimes you have to sprue into two places to get this to happen, or put a feeder next to a thick section of your casting. Remember, with aluminum you can remelt the sprue and button, so make the sprue short (though long enough to cut off easily) and the button large. -
3D printed plastic burner experiments (photo heavy)
D.Rotblatt replied to Another FrankenBurner's topic in Gas Forges
Possibly sprue size or too small a button. also looking at your casting, I'm betting you are sprueing into the end. The spiral "fins" may be freezing off before the downstream portion is solid causing porosity if the downstream section. I'm more familiar with bronze casting then aluminum though. Do you have closer pics showing the porosity problems and a description of how you sprue it? Maybe I can help. Dan R -
Naturally Aspirated Ribbon Burner. Photo heavy.
D.Rotblatt replied to Frosty's topic in Ribbon Burners
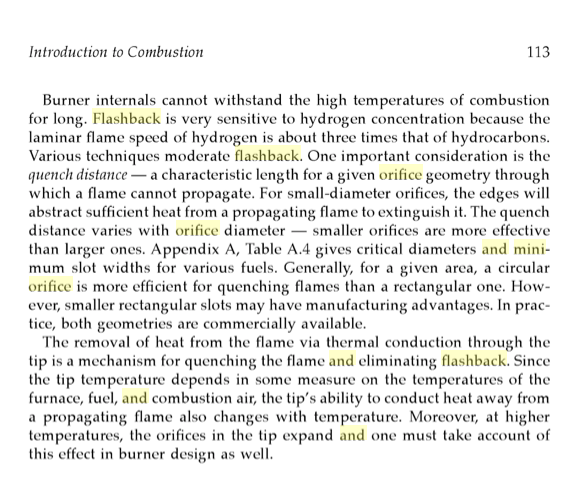
I added too much water purposely to try to get it to flow better. As you said, I wasn't worried about structural issues. I have some Kaolin clay, and some bentonite and a bag of zircopax....hmmmmm. I'll try some mixes. I did a bit of a internet search and found this in the eBook: Modeling of Combustion Systems: A Practical Approach. It is talking about Hydrogen rather then propane, but I bet the principle is the same. "One important consideration is the 'quench distance' - a characteristic length for a given orifice geometry through which a flame cannot propagate. For small-diameter orifices, the edges will abstract sufficient heat from a propagating flame to extinguish it. The quench distance varies with the orifice diameter - small orifices are more effective than larger ones." Theres an appendix that shows orifice size...but I'd have to pay $45 to see it. This also makes me think that that may be the answer to my Singing Forge sound! The flame is backfiring into the orifice, but looses heat and extinguishes, then starts burning back again setting up a vibration. Once the edges of the orifices heat up to ignition temps, the flame catches and doesn't burn back.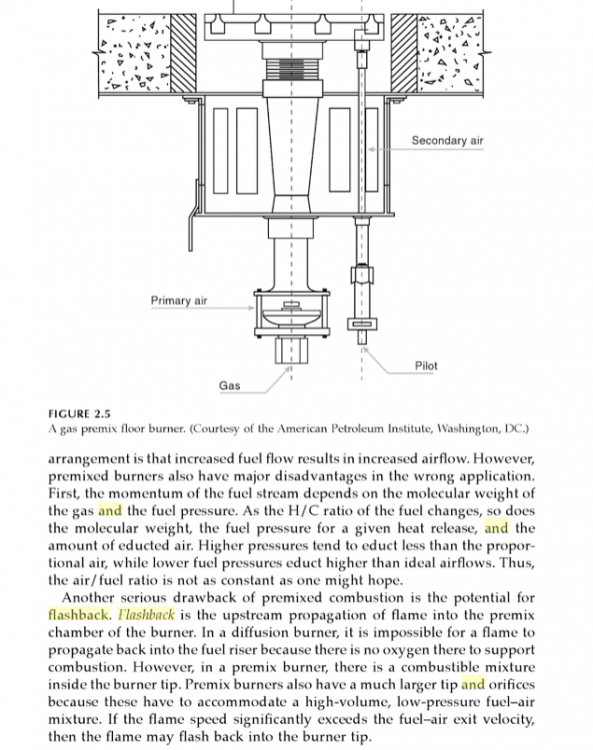
-
Naturally Aspirated Ribbon Burner. Photo heavy.
D.Rotblatt replied to Frosty's topic in Ribbon Burners
It was a pain, and it took a bit of time, but it ended up with a good solid face. I did a lot of vibrating to try to get the bubbles out and it worked. One thing I'm noticing is that the area with the nozzles is staying pretty cool, but I ran out of gas and haven't run it very long. I'm hoping this might be a cure for the low pressure backfire issues of multi-burners. Zircopax is a powder (or my zircon is) and I don't think it will perform the same function as an aggregate, though it might work as a filler. On the other hand, it seems the muddy liquid that bleeds out of the refractory when vibrated still sets up hard so I'm going to try just sifting the Mizzou through a screen and see if that works. If it does, I can try adding zircon to see if it extends it. I might also try a paste of zircon and colloidal silica binder. We'll see if I have the time to really play with this. I also saw a post here of a person using a mix of 95% calcined alumina and bentonite to make a burner nozzle. He seemed to just fire in a forge after baking it at 400 till dry. I'm trying to figure out what those white ceramic burner heads are made of - I think that would work well. The spacing of the burner tubes could even be closer. This is the only thing I've found online. Dan R -
Preferred Refractories for Chamber vs Ribbon Burner
D.Rotblatt replied to Daguy's topic in Insulation and Refractories
My bad. I misremembered some of the results from my eggshell experiments. What I said works works, and what didn't didn't, but it was a little different from what I remembered. First, the Colloidal Silica (Adbond II) used alone without zircon flour melted the ceramic blanket rather then acting as a rigidizer, so use fused silica as a rigidizer. This may not apply to what you bought, since the colloidal silica's I'm seeing sold at pottery supply houses are for rigidizing ceramic blankets for glass slumping and such. You'll have to try yours on a piece of scrap ceramic blanket. Second, the fused silica/zircon mix didn't melt the blanket, it just didn't bond and form a shell, but rather flaked right off. The colloidal silica (addend II)/zircon mix forms a hard shell as previously stated. My original description is on Page 35 of the Forges 101 thread. -
Naturally Aspirated Ribbon Burner. Photo heavy.
D.Rotblatt replied to Frosty's topic in Ribbon Burners
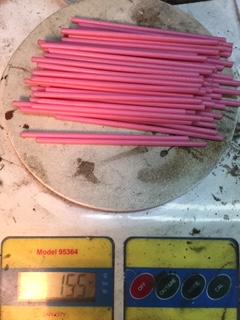
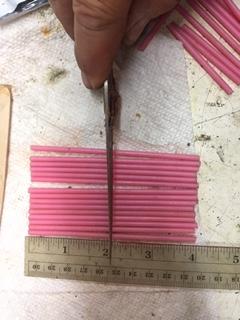
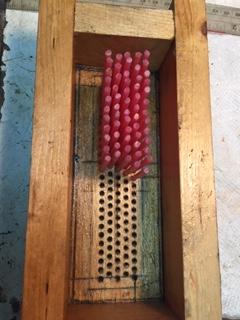
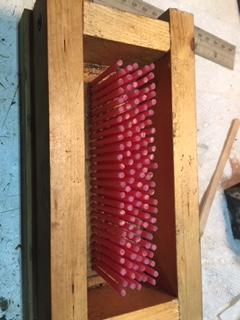
Since the burner is working so well, I thought I'd post some pics of the build. I used an ancient box of Kerr sprue wax, the rods measured 1/8" x 4" long. Can't find that brand anymore, the closest I see on amazon is 8 gauge which is 3.25mm or .128". I cut the 4" rods in half. 123 holes = 64 pieces cut in half. It came to 1.55 oz of wax. The wax on amazon is $25 for 8 oz. That's enough for 5 burners the size mine was, so purchased new it comes to about $5 of wax for the one burner. The main problem I had was that the aggregate in the Mizzou was too large to fit between the sprues. I had to use a thin knife blade to push the refractory between the rods in little bits. Took quite awhile and the Mizzou started to set up around the edges...then I had to dig up a groove to put the Plenum into...basically it was a bit of a cluster ****. But I got it together (no pics of that part of the build). I believe that Frosty has mentioned running the refractory through a strainer to remove the aggregate. I'll try that if I do this again (and I might for my longer forced air ribbon burner). I made a plate with matched holes thinking the wax would bend, but the 2" pieces kept pretty straight and I didn't use it.
-
Naturally Aspirated Ribbon Burner. Photo heavy.
D.Rotblatt replied to Frosty's topic in Ribbon Burners
Well I'm home from my trip, had an hour to play with the new burner! The sound: I found when I change the mix to reducing the whistle goes away. As the mix moves towards neutral the whistle comes back. I can make it get louder and softer by putting my hand over the intake on the Venturi (I'm using a standard Reil Bourdeaux modification). When I do this I can actually see the flames vibrating and then stop vibrating when I put my hand on the intake. After about 2 minutes the burner head heats up enough and the whistling dies down and goes away - takes about 10 seconds. The heat: Once warmed up I turned it down below what the gauge could read and the flame was stable. I then continued to turn it down so low it wasn't pulling any air and turned into straight propane flames - no backfire at all. But the burner head wasn't really hot yet, so we'll have to see once it's been running a bit longer. I then turned it up to 7.5 lbs and the forge stabilized at 2130-50 F. Before I modified this forge for the ribbon burner I used to forge at 5-7.5 lbs with this same Reil burner (haven't changed insulation or anything). It has a more even and wider heat area than with the single burner and 1" nozzle. I then turned it up to 10 lbs and the temp increase was slowing down at 2220, but then.... ...I ran out of gas. This may have also effected the 7.5 lb test, so I'll do it again once I fill my tanks. Next: I'll run it at 10 lbs, 12.5 and 15 lbs (12-15 was my welding temp with the single burner), and let it run for an hour til the burner is hot (probably weld up a billet). Then I'll see what kind of stability it has at low pressures of 1/2-1 lbs. and see if it will be stable at tempering temperatures. It's looking like it might be...but we'll see! Dan R -
Check out the table forge build at Flemmingknives dot com, look at his shop build, click on second pic for his tabletop forge. It's a good example. Haven't used one, but seems nice versatile forge for doing blacksmith work or smaller knives. Allows for different shells to be put on.
-
3D printed plastic burner experiments (photo heavy)
D.Rotblatt replied to Another FrankenBurner's topic in Gas Forges
I was thinking about this this morning. I think you would have to print two halves with keys on each half. Think of taking the cylinder and splitting it lengthwise, put two or more short posts (or 1/3 spheres or really any irregularity) on the edge of one side and matching holes on the other. When you pull the wax halves, the posts/holes would key the two halves together so they match and you fuse them together with a hot knife in a few places. Clean up the joints and spray with shellac. It's a little wax work, but I know how long it takes to print 3D. Don't know which is more efficient for you, since you don't have to be around when the 3D prints. I was taught to paint my waxes with shellac as a way to fill pinholes and allow for a surface that the investment will stick to (helping to prevent bubbles). No difference between shellac or no shellac except less bubbles. In short, it burns out fine. Sounds good. I'd just paint with shellac to make sure. That one may have no pinholes in it, but another one might. If investment gets inside the model...well, the casting will be full of bits of investment which will probably break off inside the mold during pouring leaving pits etc. You'll probably see a lot of bubbling from the model when you vacuum the investment if there is a pinhole to the inside cavity. Dan R -
3D printed plastic burner experiments (photo heavy)
D.Rotblatt replied to Another FrankenBurner's topic in Gas Forges
Been lurking in the background. I have a 3D printer and used to teach art Foundry(primarily shell molds and sand casting) and thought a Mold Making class. Just an FYI: they make printer wire for burnout. Here's one example. Never used it, just know it exists. https://www.machinablewax.com/product.php?product=52 Alternatively, have you thought about making a silicon mold of your successful "vortex injector?" and pulling waxes of it. Could save your expansion problem. Also, any foundry will cast a tree of waxes for not much money. If you where doing 30 or 40 of them it could be cost effective if you thought to sell them. Also, if you are sucking investment into the 3D print during vacuum investment, just spray the print with a couple of coats of shellac to seal any holes. It will make it smoother too. Really fun stuff you're doing! I've been enjoying following it! Dan R -
Preferred Refractories for Chamber vs Ribbon Burner
D.Rotblatt replied to Daguy's topic in Insulation and Refractories
I never thought to check ceramics supplies for colloidal silica! Good job! It also states that Marisol can be used as a Rigidizer for ceramic blanket for glass slumping molds. I imagine it would work for our forges as well. I’ll check pottery supply places here in the USA so I can pass on that info to local forge makers! Dan -
Looking for Ribbon Burner recommendations on size and placement.
D.Rotblatt replied to arctic_canoe's topic in Ribbon Burners
If you want to do blacksmithing as well you might consider a tabletop forge. It allows for lots of different sizes. Take a look at pages 39-40 of the Forges101 thread (start at middle of page 39) for an interesting build by Jungle671. On page 39 I posted a link to another similar build. Google FlemmingKnives dot com, shop tour. Haven’t built one but looks very versatile! My 12” deep has only 22 ports and I can weld with it. It’s only that long because I often make with 12-14” blades and swords (which I can still do on my 8” long forge - sword have a vertical kiln I use for hardening). I only have 1” ceramic fiber around the sides with K26 insulating brick on the bottom. I suggest you go with a shorter wider forge...maybe 8-10” deep and only 2” of ceramic fiber giving you a diameter of 9.5”. This gives you more room for wider blacksmith projects, while still being reasonable size for knives. That gives you between 400-500 cubic inches. A standard sized ribbon burner should work fine for that. Put sliding bricks or a door on the front to allow you to open it up for larger blacksmith projects. Dan -
Preferred Refractories for Chamber vs Ribbon Burner
D.Rotblatt replied to Daguy's topic in Insulation and Refractories
No problem! Your confusion means I didn't explain well Love to hear about your build! You're the first person besides myself to use this (I've been using it for 20 years). I'm curious, for the sake of others trying to do the same, where did you source the colloidal silica? Dan R -
Looking for Ribbon Burner recommendations on size and placement.
D.Rotblatt replied to arctic_canoe's topic in Ribbon Burners
Arctic, If I may chip in, there are reasons for a long forge and for a shorter forge. The one thing missing from this equation is: What are you intending to do with the forge? Knives? Swords? Long forge is used primarily for heat treating long objects (like swords). It takes a lot more gas, and so is more expensive to run. In such a forge you want a lower even temperature, so a ribbon burner is appropriate, but you want an oversized interior (to facilitate the lower temp). Ribbon burners also have difficulties running at low pressure, they tend to backfire - but if it's forced air, you can run them extremely reducing to cut down the temp. For forging regular knives and such, a 8-10" long forge is great (5 gal tank or paint bucket as Mickey said). More efficient on gas, higher temperatures. Put a small opening at the back so longer blades/swords can pass through and you forge them a section at a time. As to the length of the ribbon burner, leave a couple of inches on either side of the forge. For a 8" forge a 5" long burner works (since the holes start 1/2" from the edge of the burner that leaves about 2" on the front and back). For a 12" forge, a 9" burner is good. I've got a 12" interior long forge with a 7.5" diameter interior (with flat bottom). It works great with a 9" ribbon burner, forced air. Problem is that it freezes up my propane tank when I'm doing welding. I've modified the setup to allow two tanks to be pigtailed together so it runs on both. It's hard to get cool enough for heat treating. Dan R -
Preferred Refractories for Chamber vs Ribbon Burner
D.Rotblatt replied to Daguy's topic in Insulation and Refractories
I used the fused silica and powder for a rigidizer on several of my forge. Worked great, but I only heated it enough to dry and set it. Then I covered it with a high temp coating of the zircon and colloidal silica for slurry casting (Adbond II). That combination works great. In my first ribbon forge the burner points right at the wall which gets quite hot (I weld in it), but doesn't seem to be degrading at all. Because Adbond II type colloidal is hard to obtain in small amounts, I decided to try to test the fused silicon/water/zircon against the colloidal silica/zircon to see it it would work so other people could use this kind of coating. My test was as follows. I mixed up a batch of each and painted them on one side of a rigidizied 2" square of ceramic fiber (yes, Frosty, I buttered). Dried them with a torch then stuck them in the forge under the burner. Within a minute, the fused silica/zircon sample ate away at the ceramic fiber when at orange heat, while the adbond sample formed a hard shell and the rigidized blanket under remained pristine. It tried the test with varying ratios of fused silica : water : zircon and got the same result. I seem to recall that I removed the zircon and used just fused silica/water and got the same result (it was some months ago and as it was a total fail I didn't record the results). My conclusion is that the purchased fused silica works great as a rigidizer as long as it is covered, but when subjected to the full heat or atmosphere of the forge it melts the ceramic fibers. Reading discussions in this thread, I believe the way it rigidizes is by melting and holding the fibers together. My guess is that at higher temps it reacts with the fiber and just melts it away. The whole purpose of Colloidal Silica is to mix with either a silica or zircon powder to form a slurry. A wax mold is dipped in the slurry and then sprinkled with varying grits of powdered silica starting with layers of fine and going to layers of coarse to build up a shell mold. The mold can be used to cast anything from aluminum, bronze, iron, steel, to ultra high temp alloys. Obviously the Colloidal silica was developed to take very high temps and thermal shock without melting or fracturing. Dan

