D.Rotblatt
-
Posts
335 -
Joined
-
Last visited
Content Type
Profiles
Forums
Articles
Gallery
Downloads
Events
Everything posted by D.Rotblatt
-
Just my 2 cents. I'm using a NARB with 123 holes 1/8" in a small 225 cu inch forge. The burner is pointed straight down from the top about 6" from the floor. Burner is powered by a 3/4" NA burner of my own design, but I've used a Reil burner on it as well. I forge weld 4 lb billets in it running at 12-15 lbs with a .032 jet. It's no problem tuning, with the reil burner it just works fine. Look at page 21 of this thread for a video of my first experiments that worked. DanR
-

Naturally Aspirated Ribbon Burner. Photo heavy.
D.Rotblatt replied to Frosty's topic in Ribbon Burners
Sorry to disappear for a bit. It's easy to get that kind of colloidal silica, but it's not the same as the colloidal I'm using. I tested that kind, and it makes the ceramic fiber melt. What I'm using is a colloidal silica binder for ceramic shell casting. Look up "Remet colloidal silica" (Remet is a company that makes it). They don't have what I used to buy, Adbond II, but I think their Remasol is the same type of thing. I used to buy it in 5 gallon containers. Don't really see it sold in smaller lots. It's a completely different animal than the fused colloidal silica we use to rigidize wool - at least in how it works. I've moved the experiment to using ceramic fiber board that I found on Amazon: "BXI Ceramic Fiber Thermal Insulation Board (2732F) - Inorganic - Flame Retardant, Heat Resistant (12'' X 8'' X 0.8'')". My first couple of test blocks worked well. It holds up to the heat just fine - I'm going over my pyrometer which tops out at 2400F. I'm finding that rigidizing it with the colloidal/zircon mix first is working better for drilling, if I don't it rips out since the holes are so close. I'm playing with different amounts of holes. My last try used less holes and I got the dreaded organ harmonics that didn't want to go away. I'm playing with it as I have time, which is less than I'd like. I'll keep you all up to date as I get any successes. The unfortunate part is that while I can drill 500 holes with my CNC, not many people have that (it's still a 45 minute program run). We'll have to see if it is a working proposition for others to use. DanR Same problem. I think the first was cordierite as well. Playing with fiberboard... see post above. Easy to get... just not in small quantities. I used to buy it in 5 gal batches which is the smallest they normally sell. I stopped doing shell casting, but have a couple of gallons left over from literally a decade or so ago. The CNC is fun! If you were out here, I'd be happy to share -
Naturally Aspirated Ribbon Burner. Photo heavy.
D.Rotblatt replied to Frosty's topic in Ribbon Burners
Thanks Tink! Haven’t been pushing the ZS just cause finding the right colloidal in small quantities is nearly impossible here. The one person who was selling it doesn’t anymore. Already got the cordierite, it looks the same but we’ll see. BUT, I have another plan...it just requires drilling 500 holes LOL. But that’s what a CNC mill is for. I’ll spill more if it works. Dan -
Naturally Aspirated Ribbon Burner. Photo heavy.
D.Rotblatt replied to Frosty's topic in Ribbon Burners
I went ahead and bought a codierite one for $10. It looks a different color than this, so I might have gotten a 2000f one, not a high temp one. Hopefully I can remove the burnt up one and put this in its place. I hope it works! Dan -
Naturally Aspirated Ribbon Burner. Photo heavy.
D.Rotblatt replied to Frosty's topic in Ribbon Burners
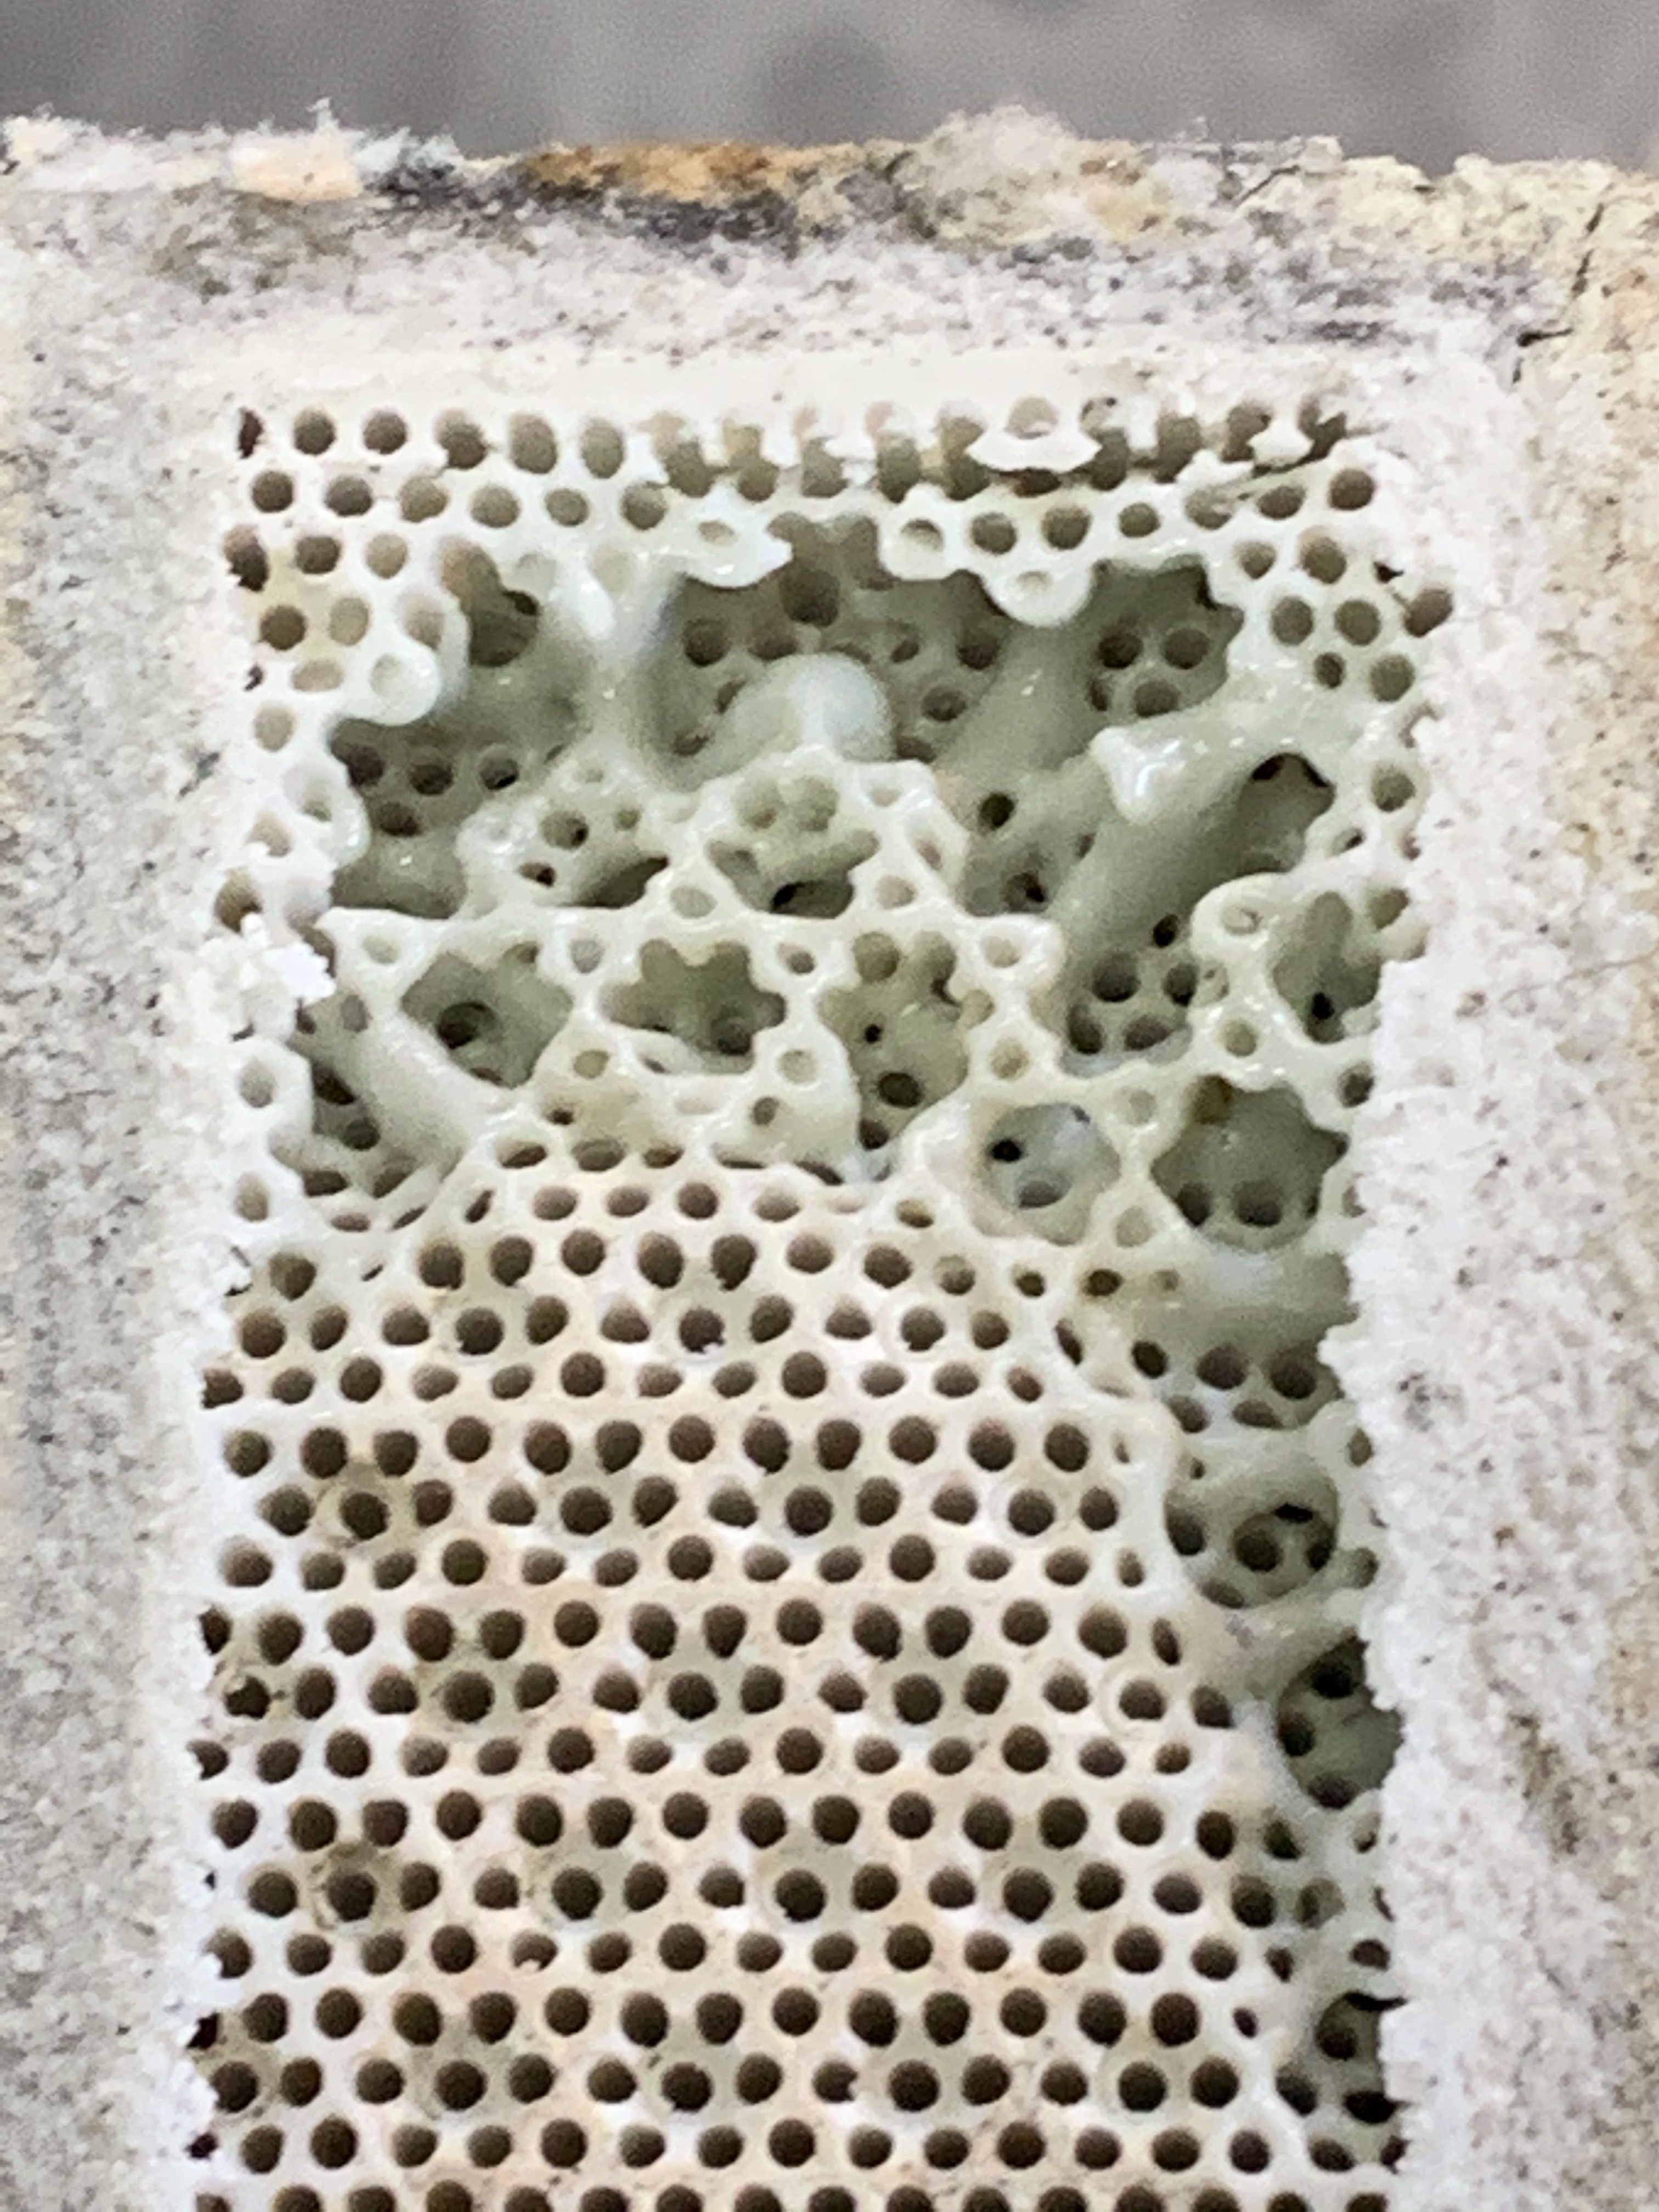
Good point, but I'm not sure. The flames looked pretty even throughout.... but there is definitely a relation to the gas flow and the melted part. If you look carefully at a zoomed pic, every center hole on the bottom of each dimple is starting to melt. It might be that on the edges the gas is flowing at an angle or more turbulence or something. I'm not willing to continue down the line with this material, it failed too quickly and I'm afraid it could fail catastrophically. It does confirm for me that the small hole concept is a winner, and I'm going to try some other approaches. Dan -
Naturally Aspirated Ribbon Burner. Photo heavy.
D.Rotblatt replied to Frosty's topic in Ribbon Burners
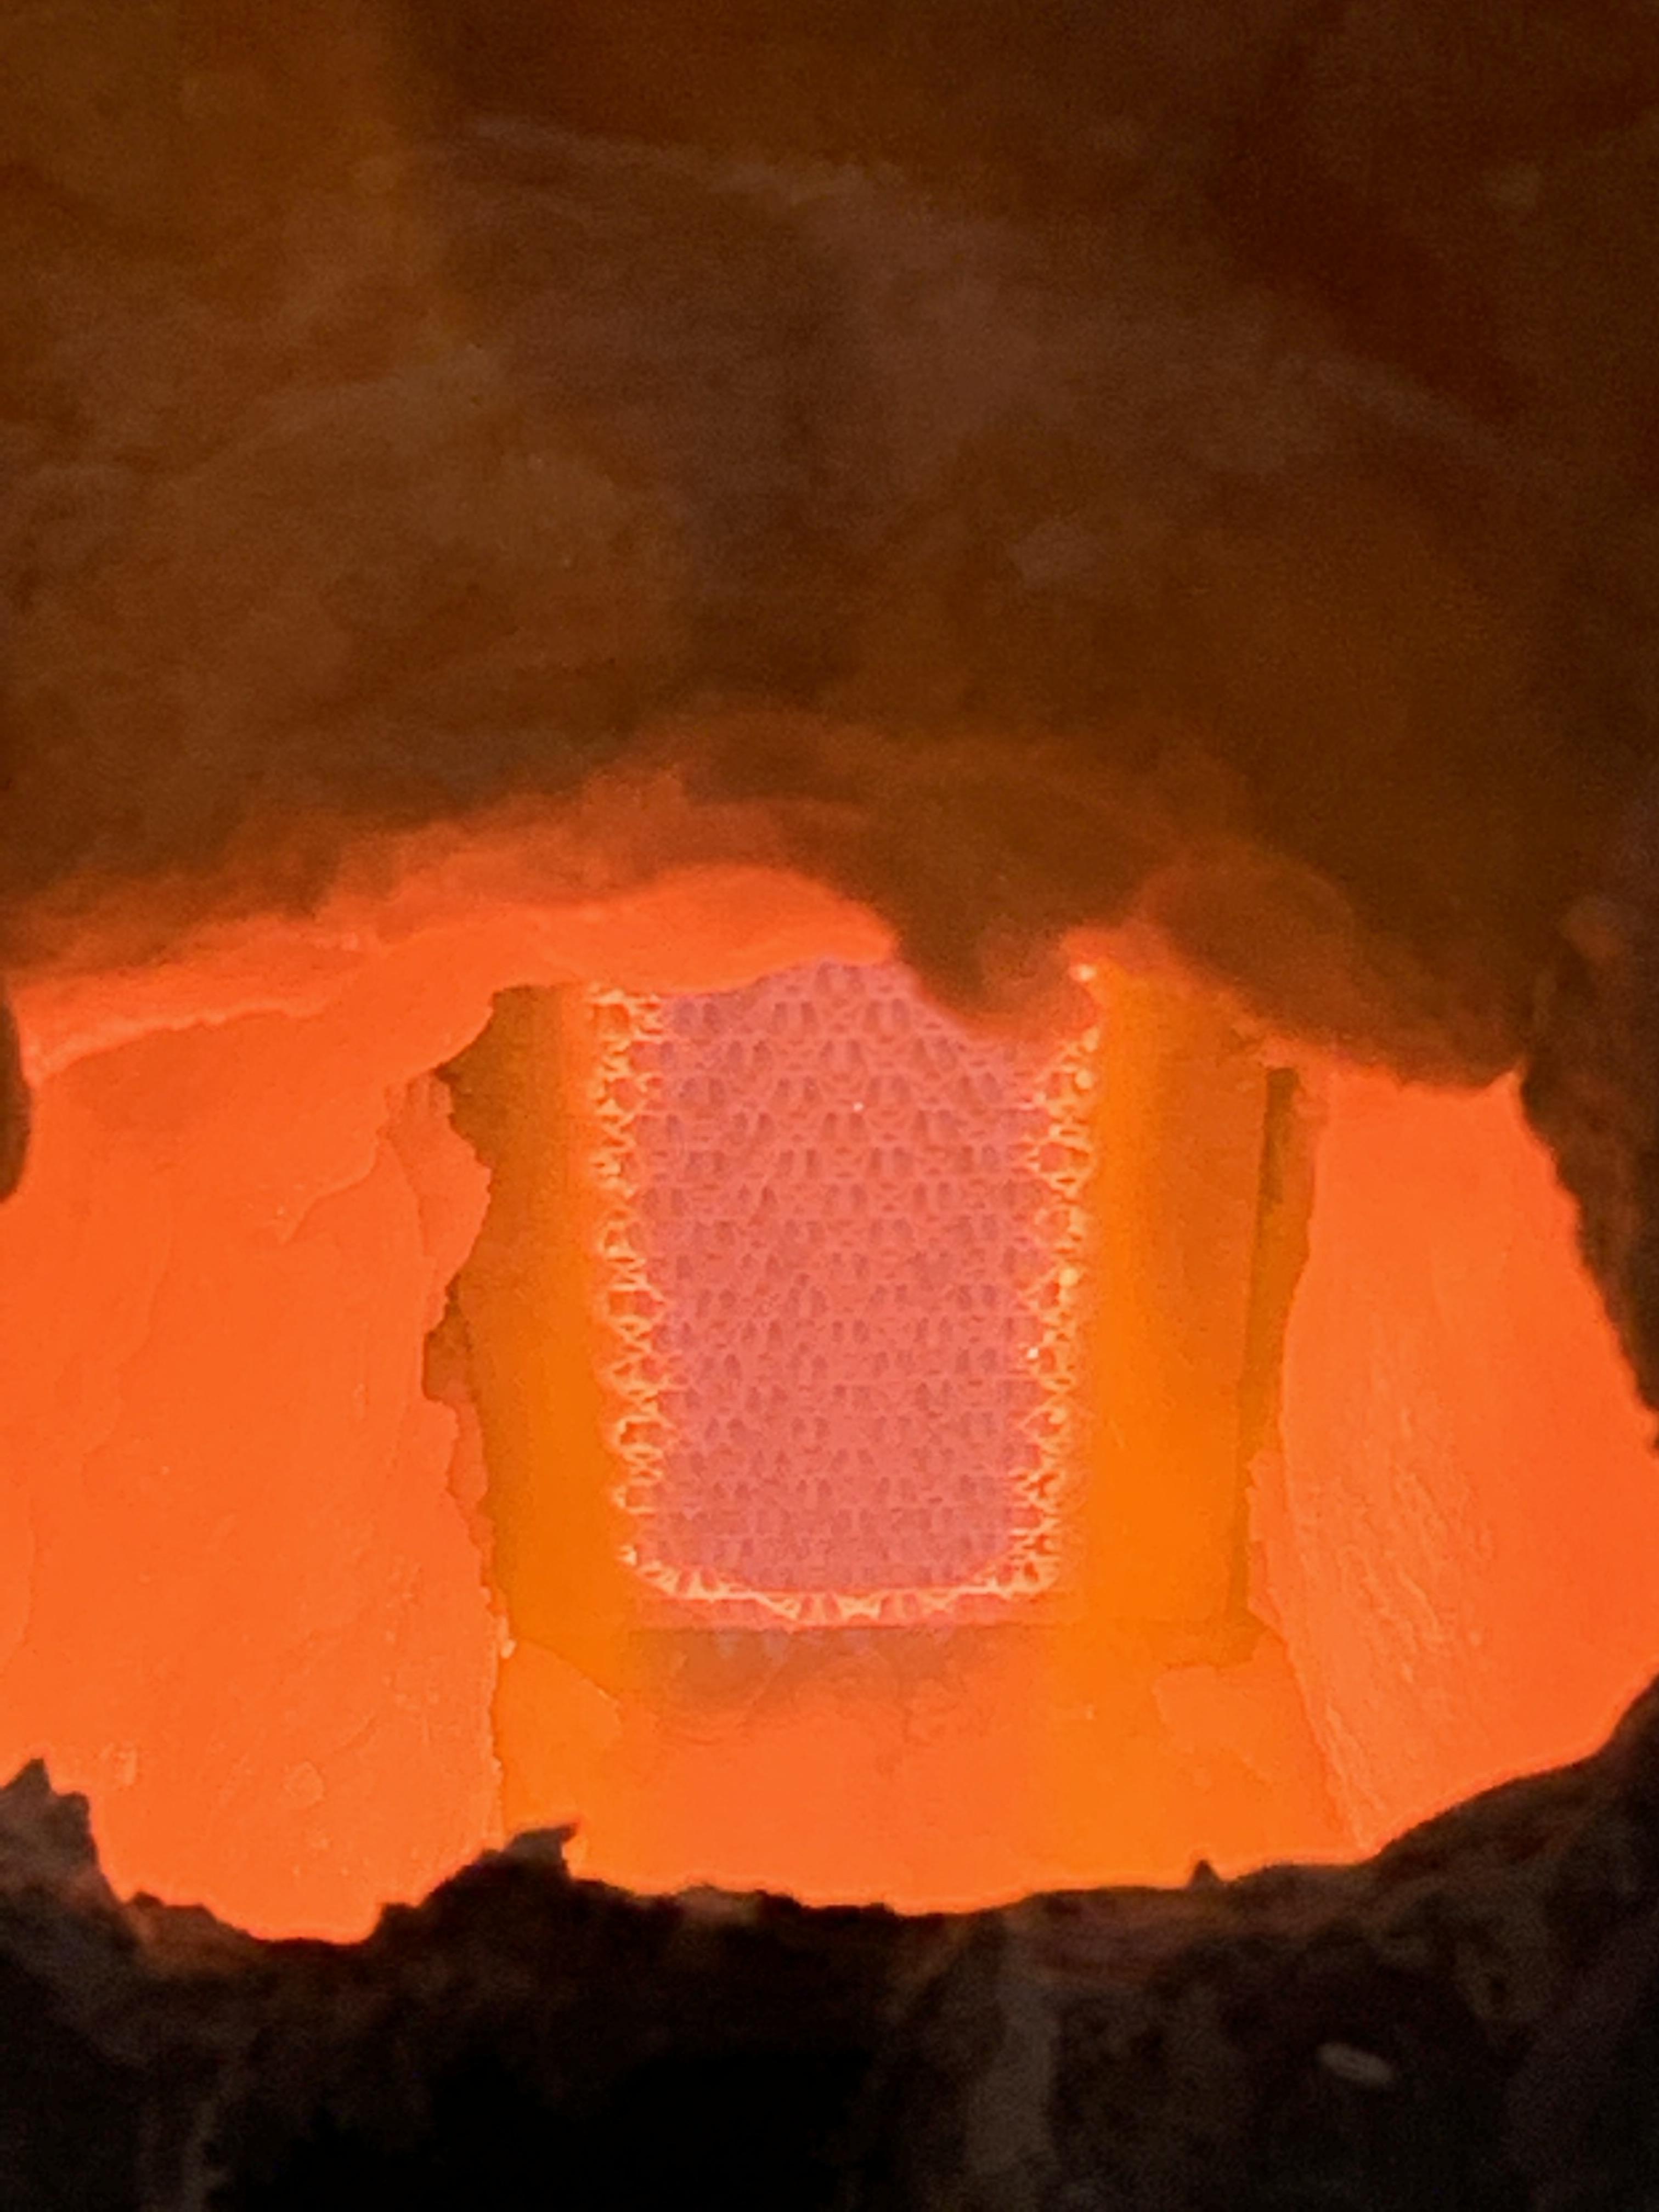
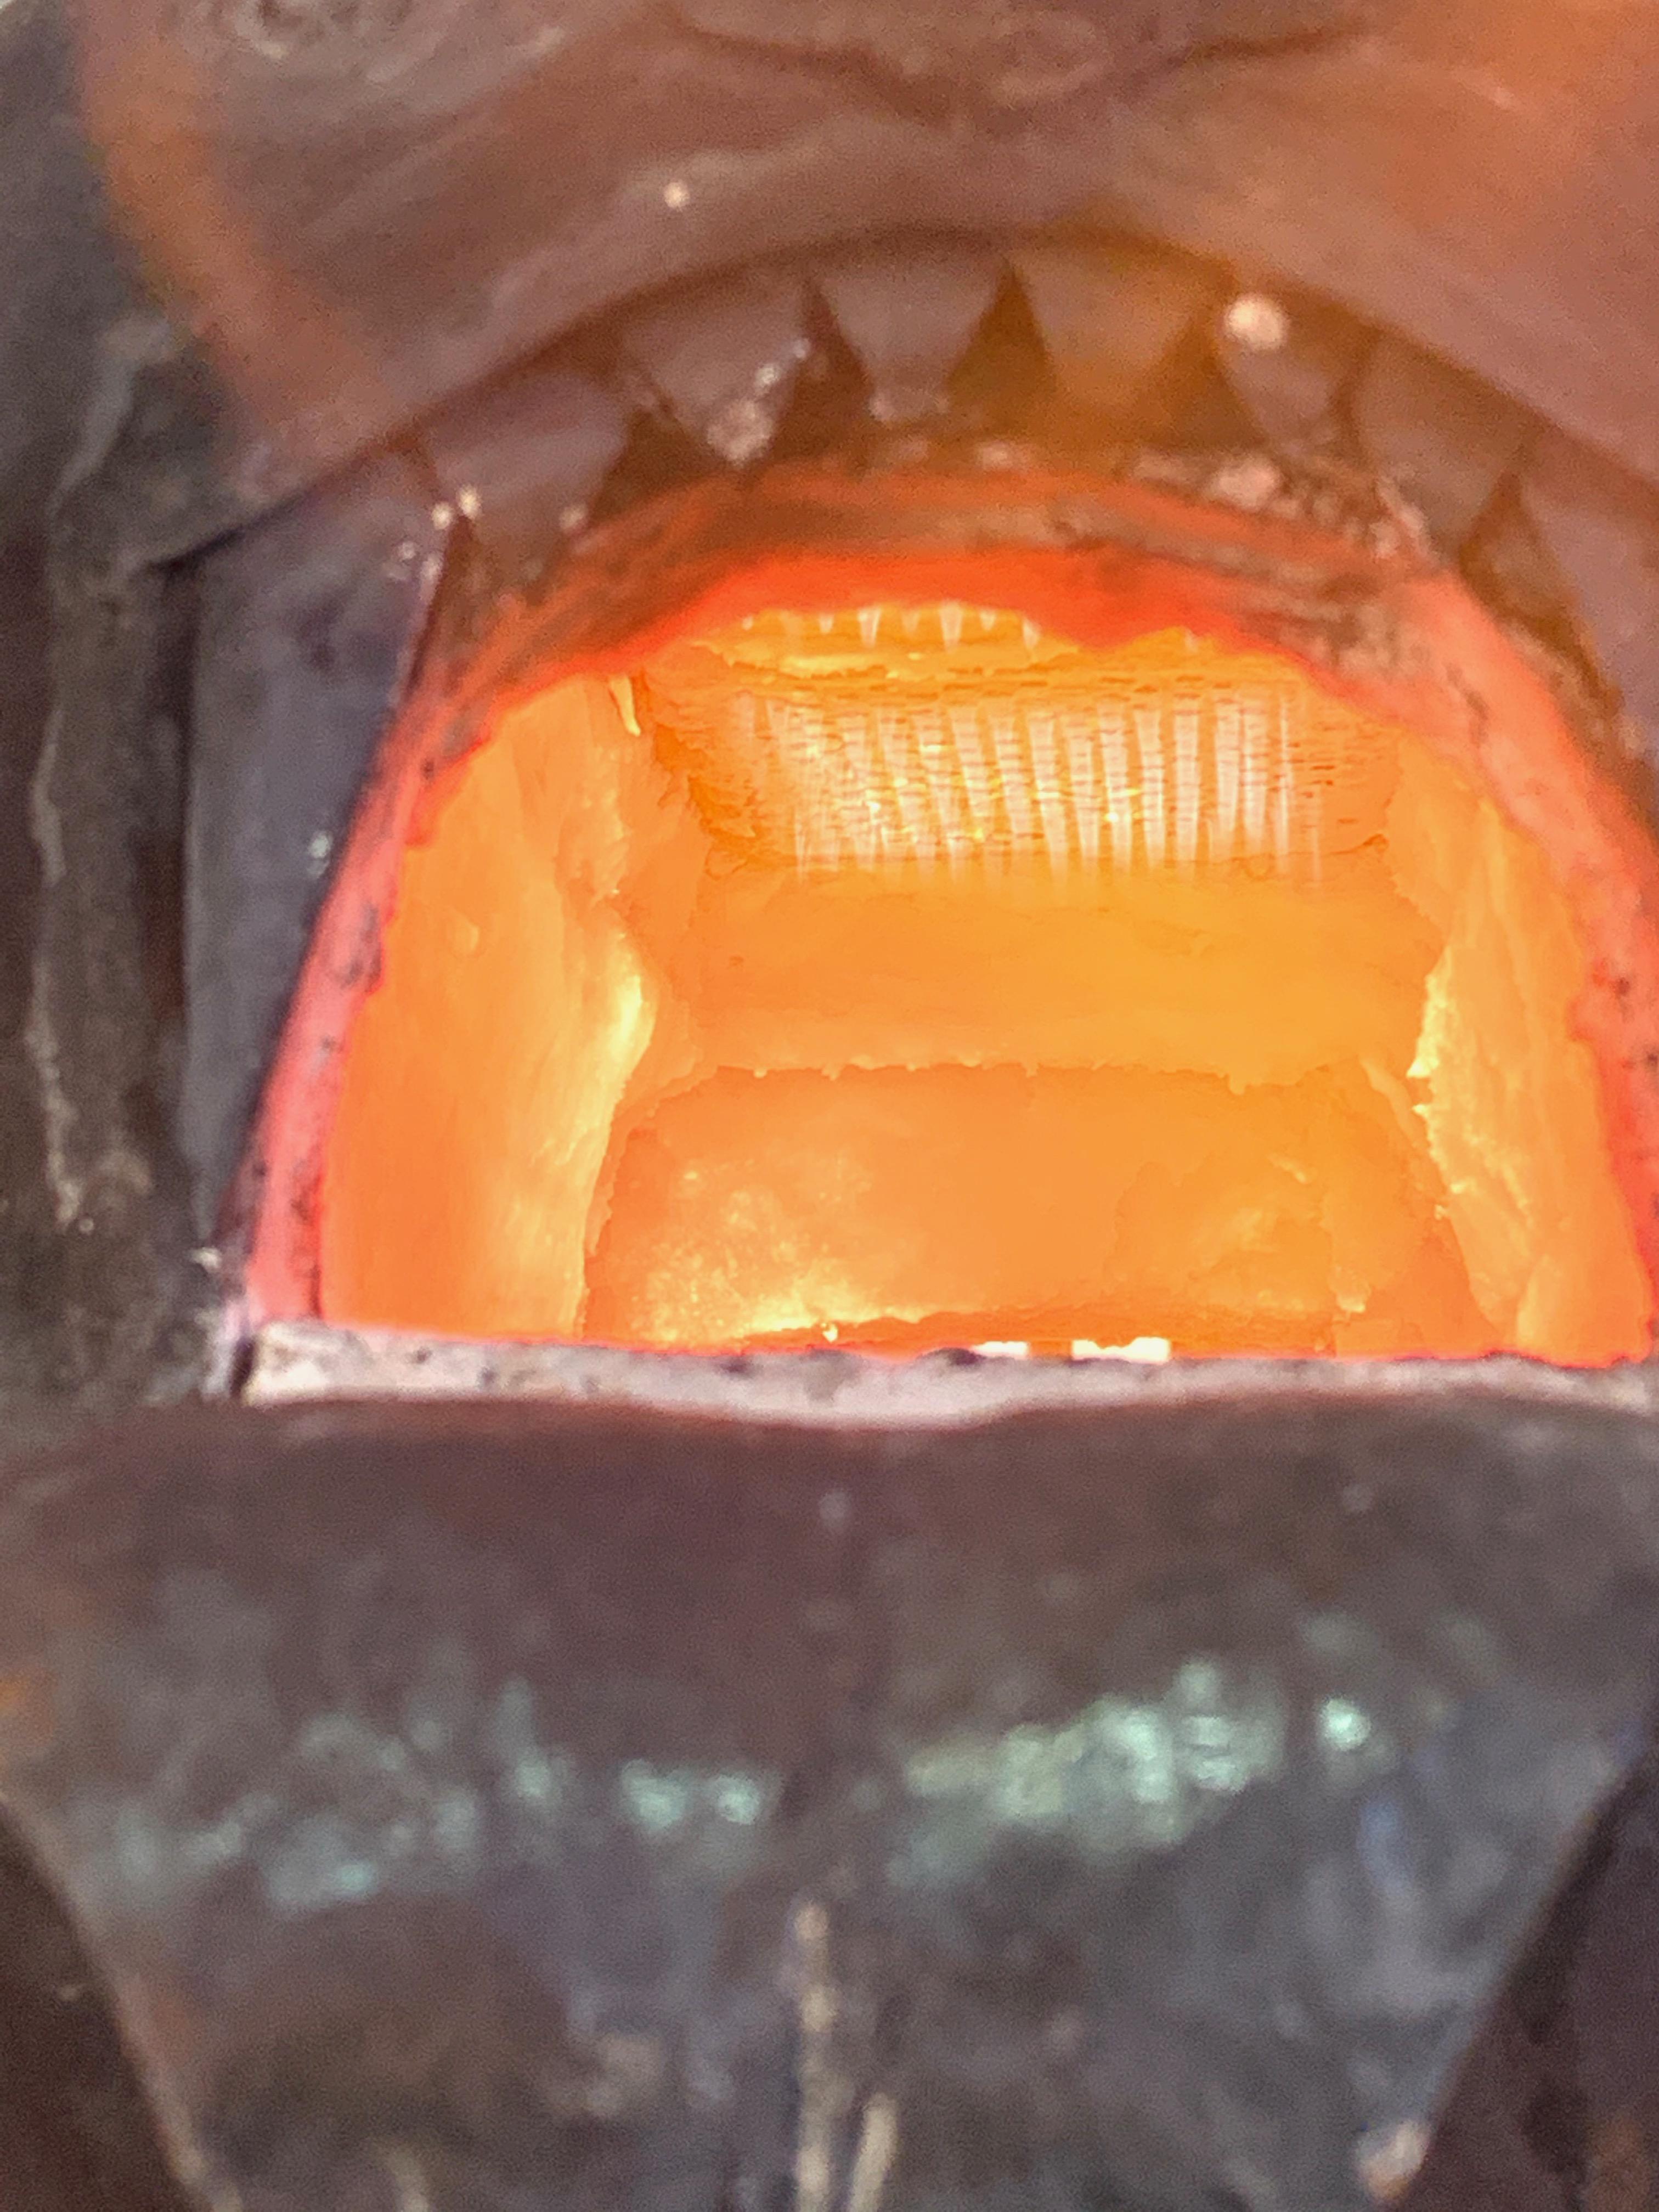
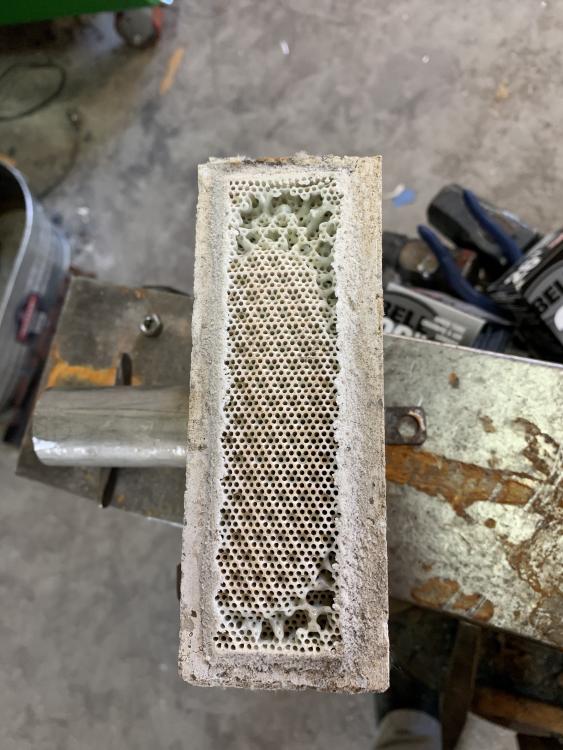
Failure... I got excited and posted too soon . The honeycomb melted at high temps... BUT... before it did, I got 130F extra out of it at 5 lbs compared to my NARB - same burner, same forge, etc. My NARB gets to 2170 at 5 lbs, the honeycomb was sitting at 2300. So lots of tiny holes work very efficiently. Analysis: First I preheated at 5 lbs for 20 minutes or so, everything looked fine. I turned it up to 12lbs, heating up a canister for welding. Failure happened only about 5 minutes in, the canister was just turning red. The a thin line along the edges of the honeycomb, where it was against the mortar, was a lot hotter than the surface - glowing brightly. The surface is not flat. It's got dimples with 6 holes in a hexagon around the edge and a center hole in the bottom of each dimple. It seemed to melt in the center of each hole. The burner was still working fine when I turned it off. The inside surface was obviously being kept cool by the moving gasses. The other thing about this honeycomb, is I'm not sure it was a cordierite ceramic. This one was not labeled as such but the company offered one other plate that was smaller that was labeled as cordierite - I got this because it was larger. I noticed that two kinds are sold, one commonly for soldering boards that is rated at 2000F, and the cordierite ceramic that's rated at 1300C (or 2350). It's sintered at 1400C (around 2550), so it should take quite a high temperature. Back to the drawing board... The fact that this worked so well (before it destructed) gives me some other ideas. I thought of drilling 1/16 holes in high density ceramic fiber board. There's some on amazon, .8" thick and 2750F max temp. That should be enough, and I know the back won't get too hot. Hey Tink! Hope all is going well! Don't buy any yet...looks like I have more experimenting to do.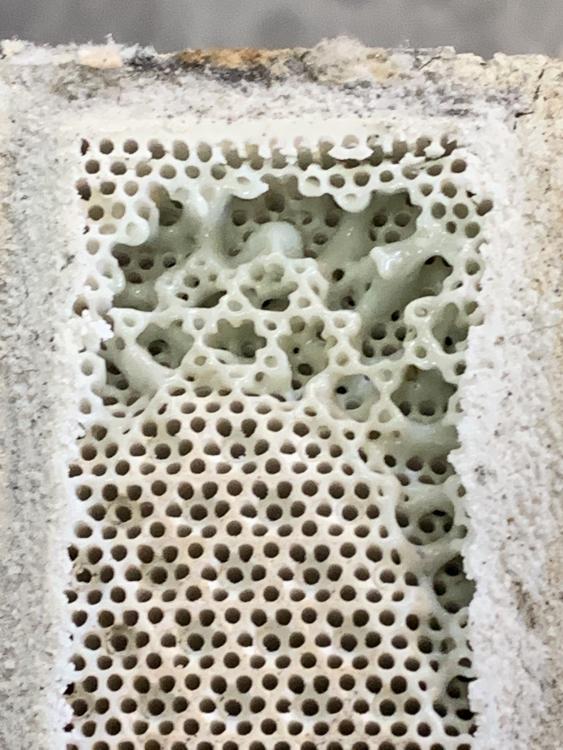
-
Naturally Aspirated Ribbon Burner. Photo heavy.
D.Rotblatt replied to Frosty's topic in Ribbon Burners
Should be. They are made to run at low temps like that. They are, after all, mostly used as infra red heater blocks. Some specs say 1000-1200C. I saw one video showing the burner in use, was red on one side and when he picked it up the other side was not red. In addition, the small holes will not allow the FAM to burn back into the block. At HT temps, which is 1450 to 1650 for normalizing that's in the range of it's normal specs. It should be fine at low temps. It's the high ones that I'm concerned about. First, I have no idea how to re-tune our burners to get a lower end. We've worked so hard to get the most out of them. It's a different burner design, (pic below). The jet has air intakes, and is far from the mixing tube. I could pull back the jet for more air entrapment. My burners have some adjustment there and a thumb screw, so that's easy. 1400 is great! I'm only looking at hardening (tempering goes in the oven or an oil bath for swords), so the minimum is 1450F and some alloys go up to 1550F. If I'm doing stainless I'll use the oven with stainless HT wrap, but that's a whole different beast with ramp schedules and all. Some people do sub-critical soak for grain refinement, down to 1300, but 1400 should be fine even for that. I didn't try the low temps with a reducing flame, so I might be able to get it lower. We'll see Yup. Basically I just made the largest opening I could for the sized plenum I had. If this works well, I have an 18" forge that I had two NARBs on, but just couldn't get them to work right, so I just reconverted it to a gun ribbon burner. I'll try these on that forge as well as it's primarily for HT of longer blades. Something about the back pressure caused that loud organ sound when I turned on the second NARB. Wouldn't go away, and it's loud as sin. I finally gave up, but these don't have any organ sound. Great bouncing around ideas with you, and great being on again, it's been too long .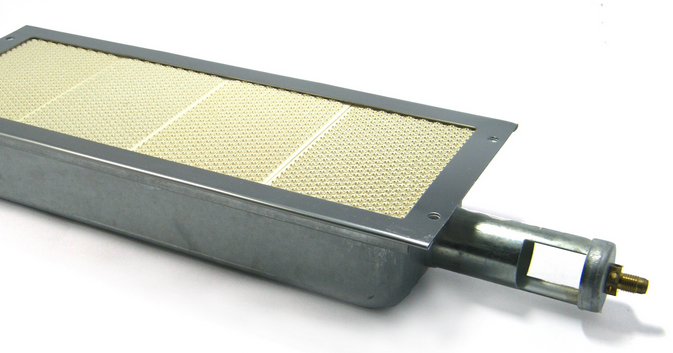
-
Naturally Aspirated Ribbon Burner. Photo heavy.
D.Rotblatt replied to Frosty's topic in Ribbon Burners
Correct, the refractory is just a way to hold the ceramic plate. It's also to allow the plate to extend 1" or so from the plenum so the plenum doesn't get hot. The shape of the plastic mold, i.e. the slope of the pieces is just so it will release from the refractory easily. When I cut the square tube (rectangular) for the plenum I left some lips, the metal extends over the refractory 1/2". It's the same way we always do ribbon burners. Yes, I think that was mentioned. Probably a better google search. Yea, it's pretty cool . Earlier in this thread we talked about the FAM not being able to burn back into small holes with examples of the screens on old kerosene mine lamps. That's why I'm only worried about the back of the plate getting hot. The other factor with NARBs in turning them down is the back pressure. The gas coming out of the jet is, I think, the main thing pulling air into the intake. At really low pressures if it meets any resistance air just doesn't get pulled in and you get orange pure propane flame. These perforated plates don't have much resistance which allows me to turn it down so there's barely any flames coming out. Just little nubs of blue if at all. I have to look at it again, but I don't think it does that glowing orange thing, went to orange propane flame first. Our burners are made to perform at high output, not low. Even so... 1400F and seemed stable. I'll play with it more later! I'll keep you posted and if it works post the Amazon site for getting the ceramic plate. -
My 2 cents. With a single burner you will always have a hot spot. The central area of the forge will be hotter. You need a ribbon burner or multiple burners to get a full forge even heat. This is not a catastrophe, in fact it's kind of nice to have a hot spot to work with so you can heat the section you are working on. On the other hand it is not so great for heat treating a blade. IMHO: In a forge of your shape, if you want to maximize the spread of the heat, I would aim the burner almost horizontal. The flame will curve down the side of the wall. At the spot where it hits the floor, put a bump that spreads the flame. The flame hitting the wall will also cause a lot of radiant heat that will help spread the heat. I did that on one of my older forges and it worked quite well. I've gone to ribbon burners since. Great looking forge and burner flame! You are good to go, I would say just play with it as it is for awhile and see what you want to do to tweak it once you have more experience with it.
-
Naturally Aspirated Ribbon Burner. Photo heavy.
D.Rotblatt replied to Frosty's topic in Ribbon Burners
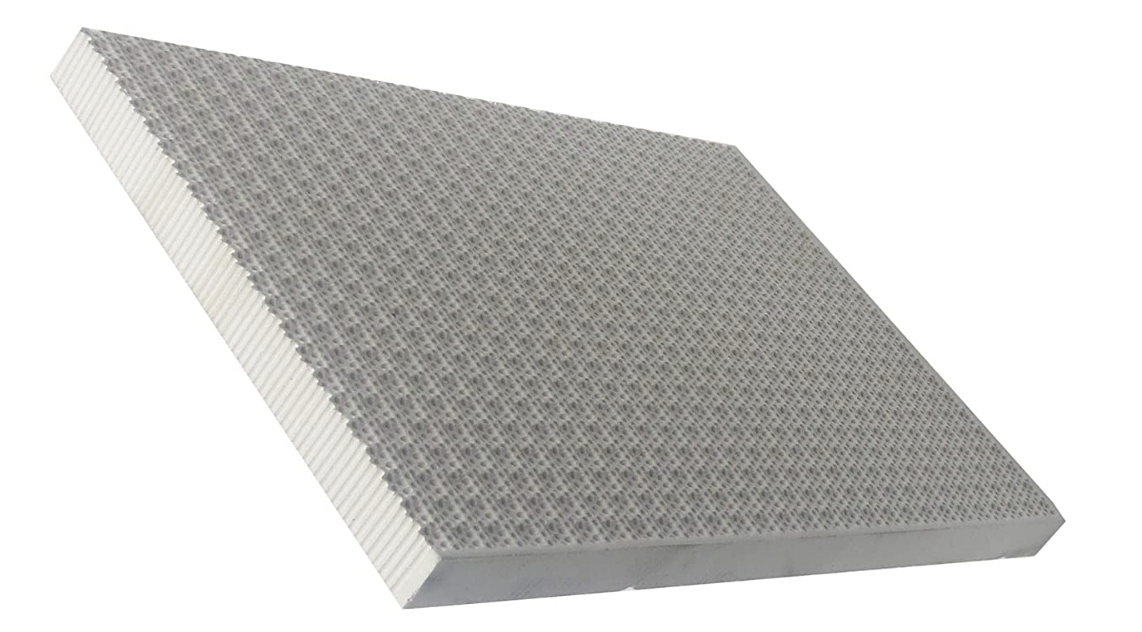
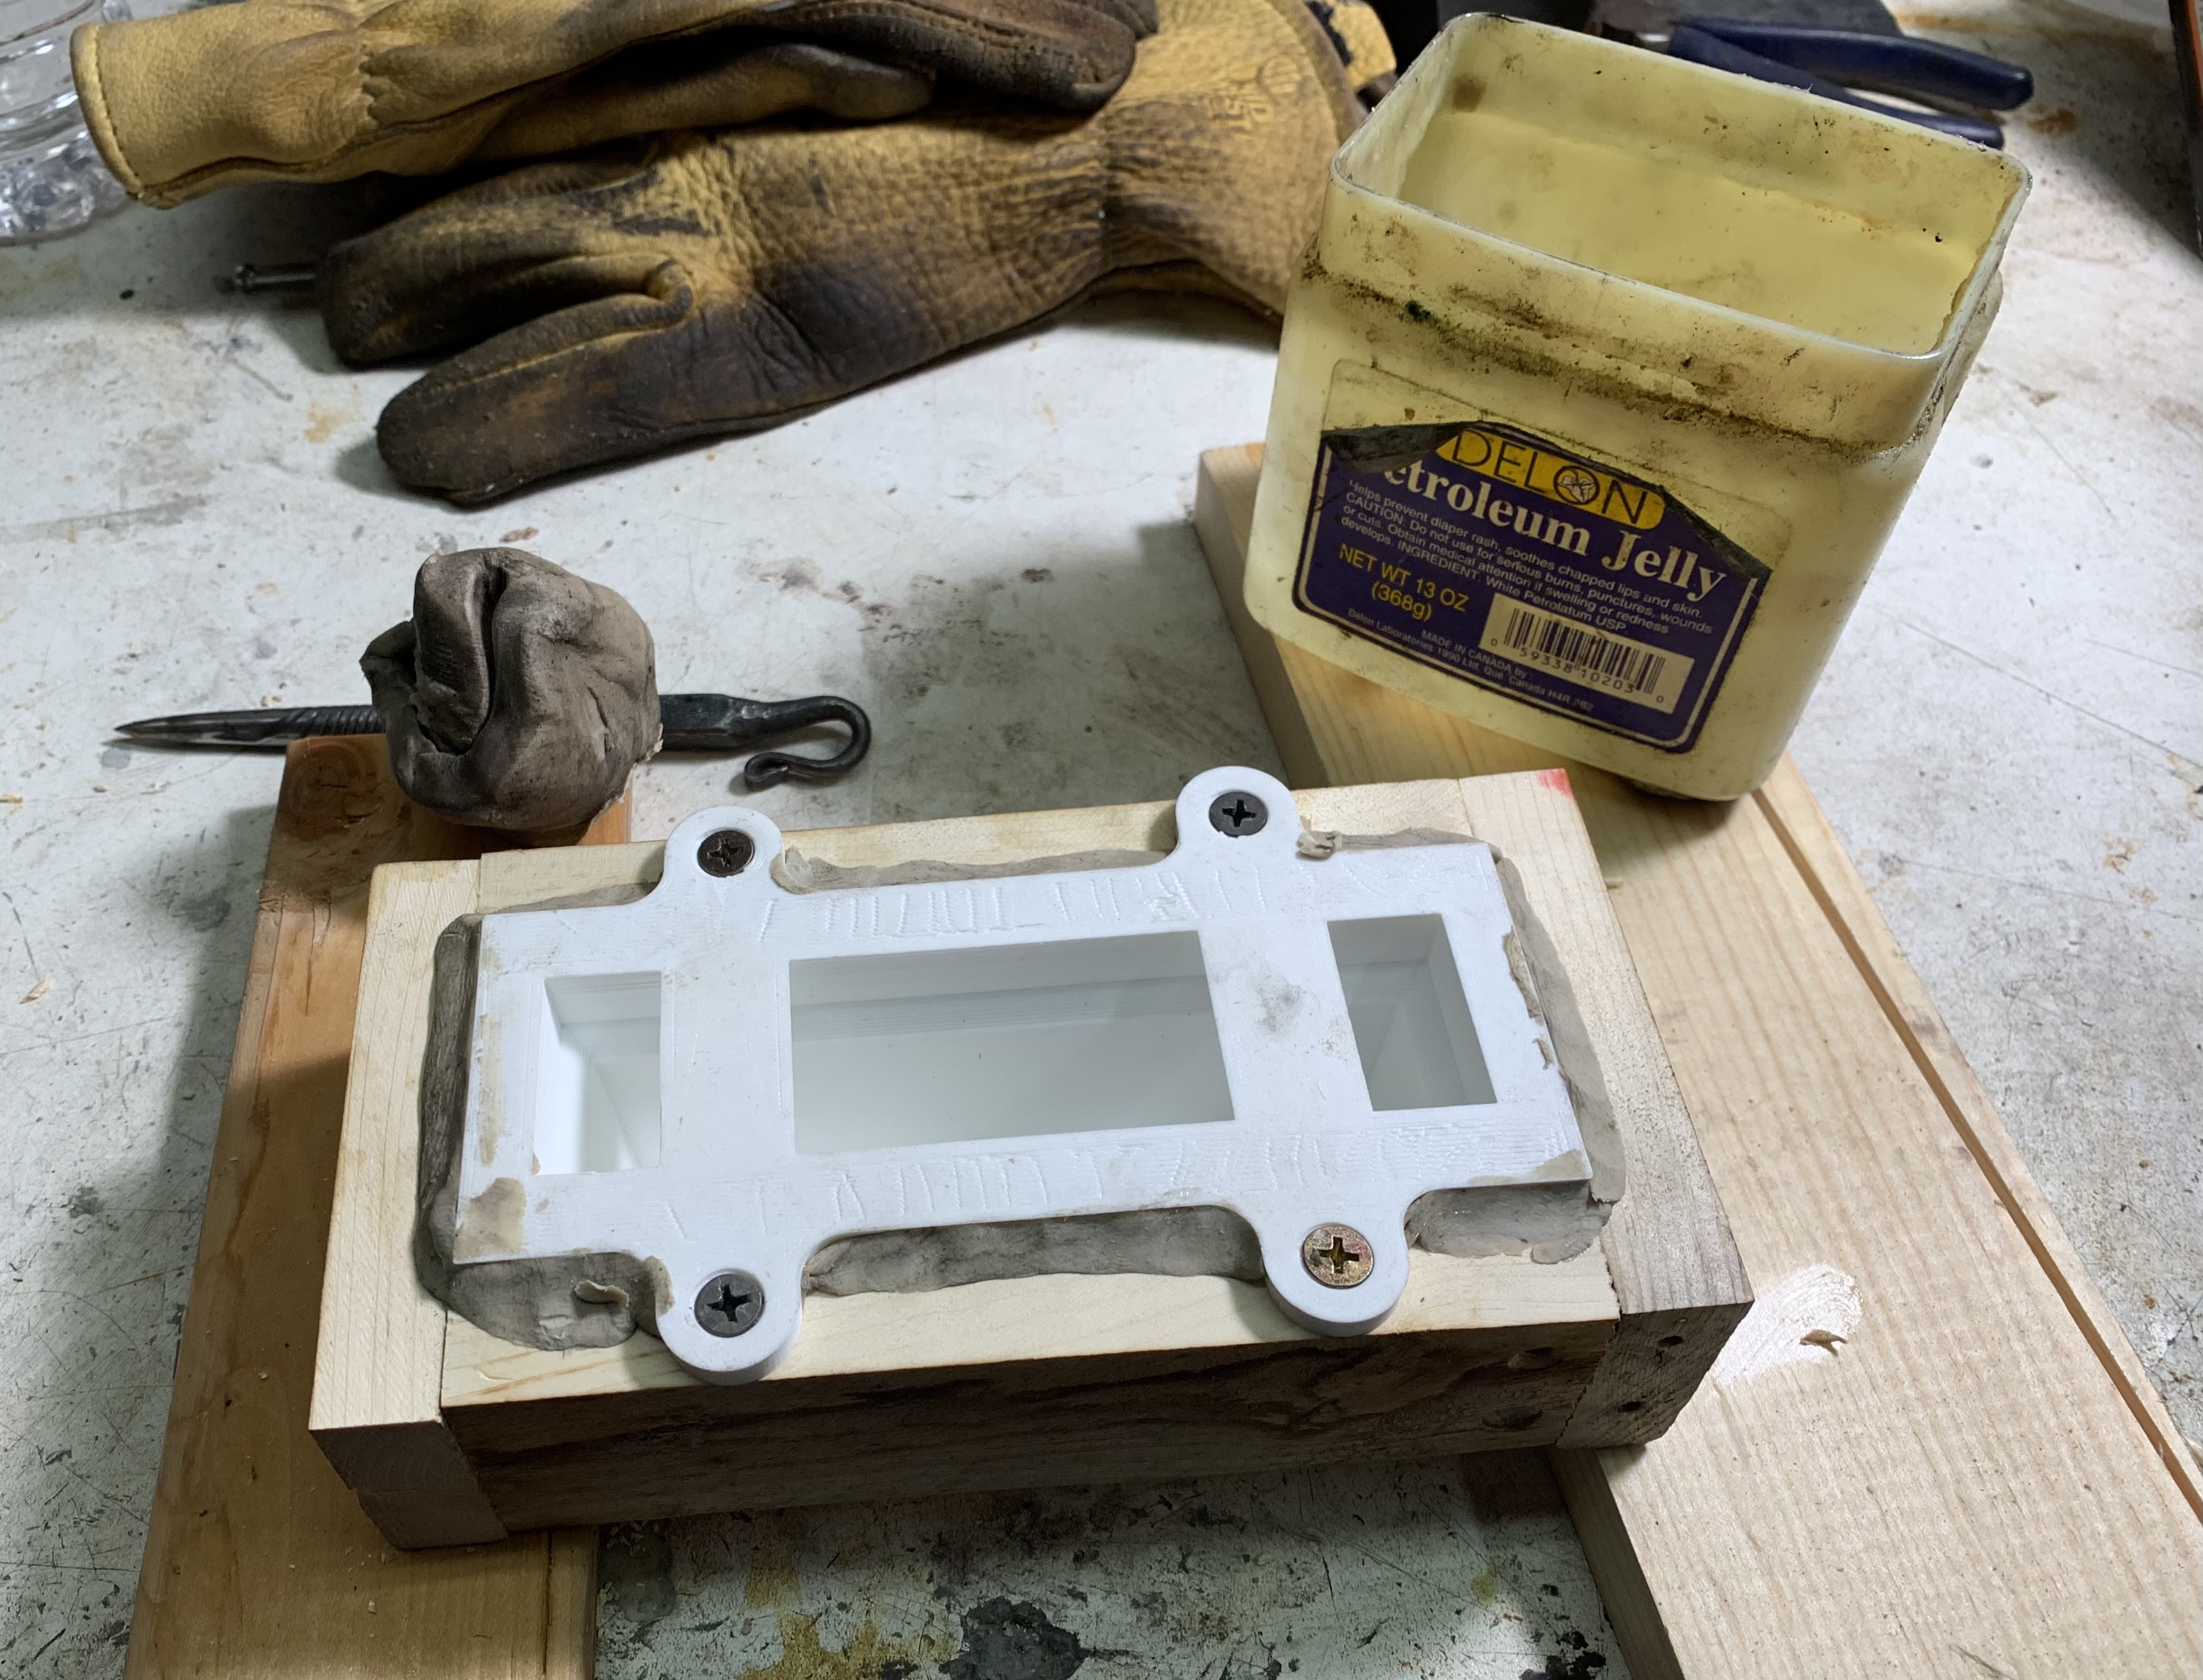
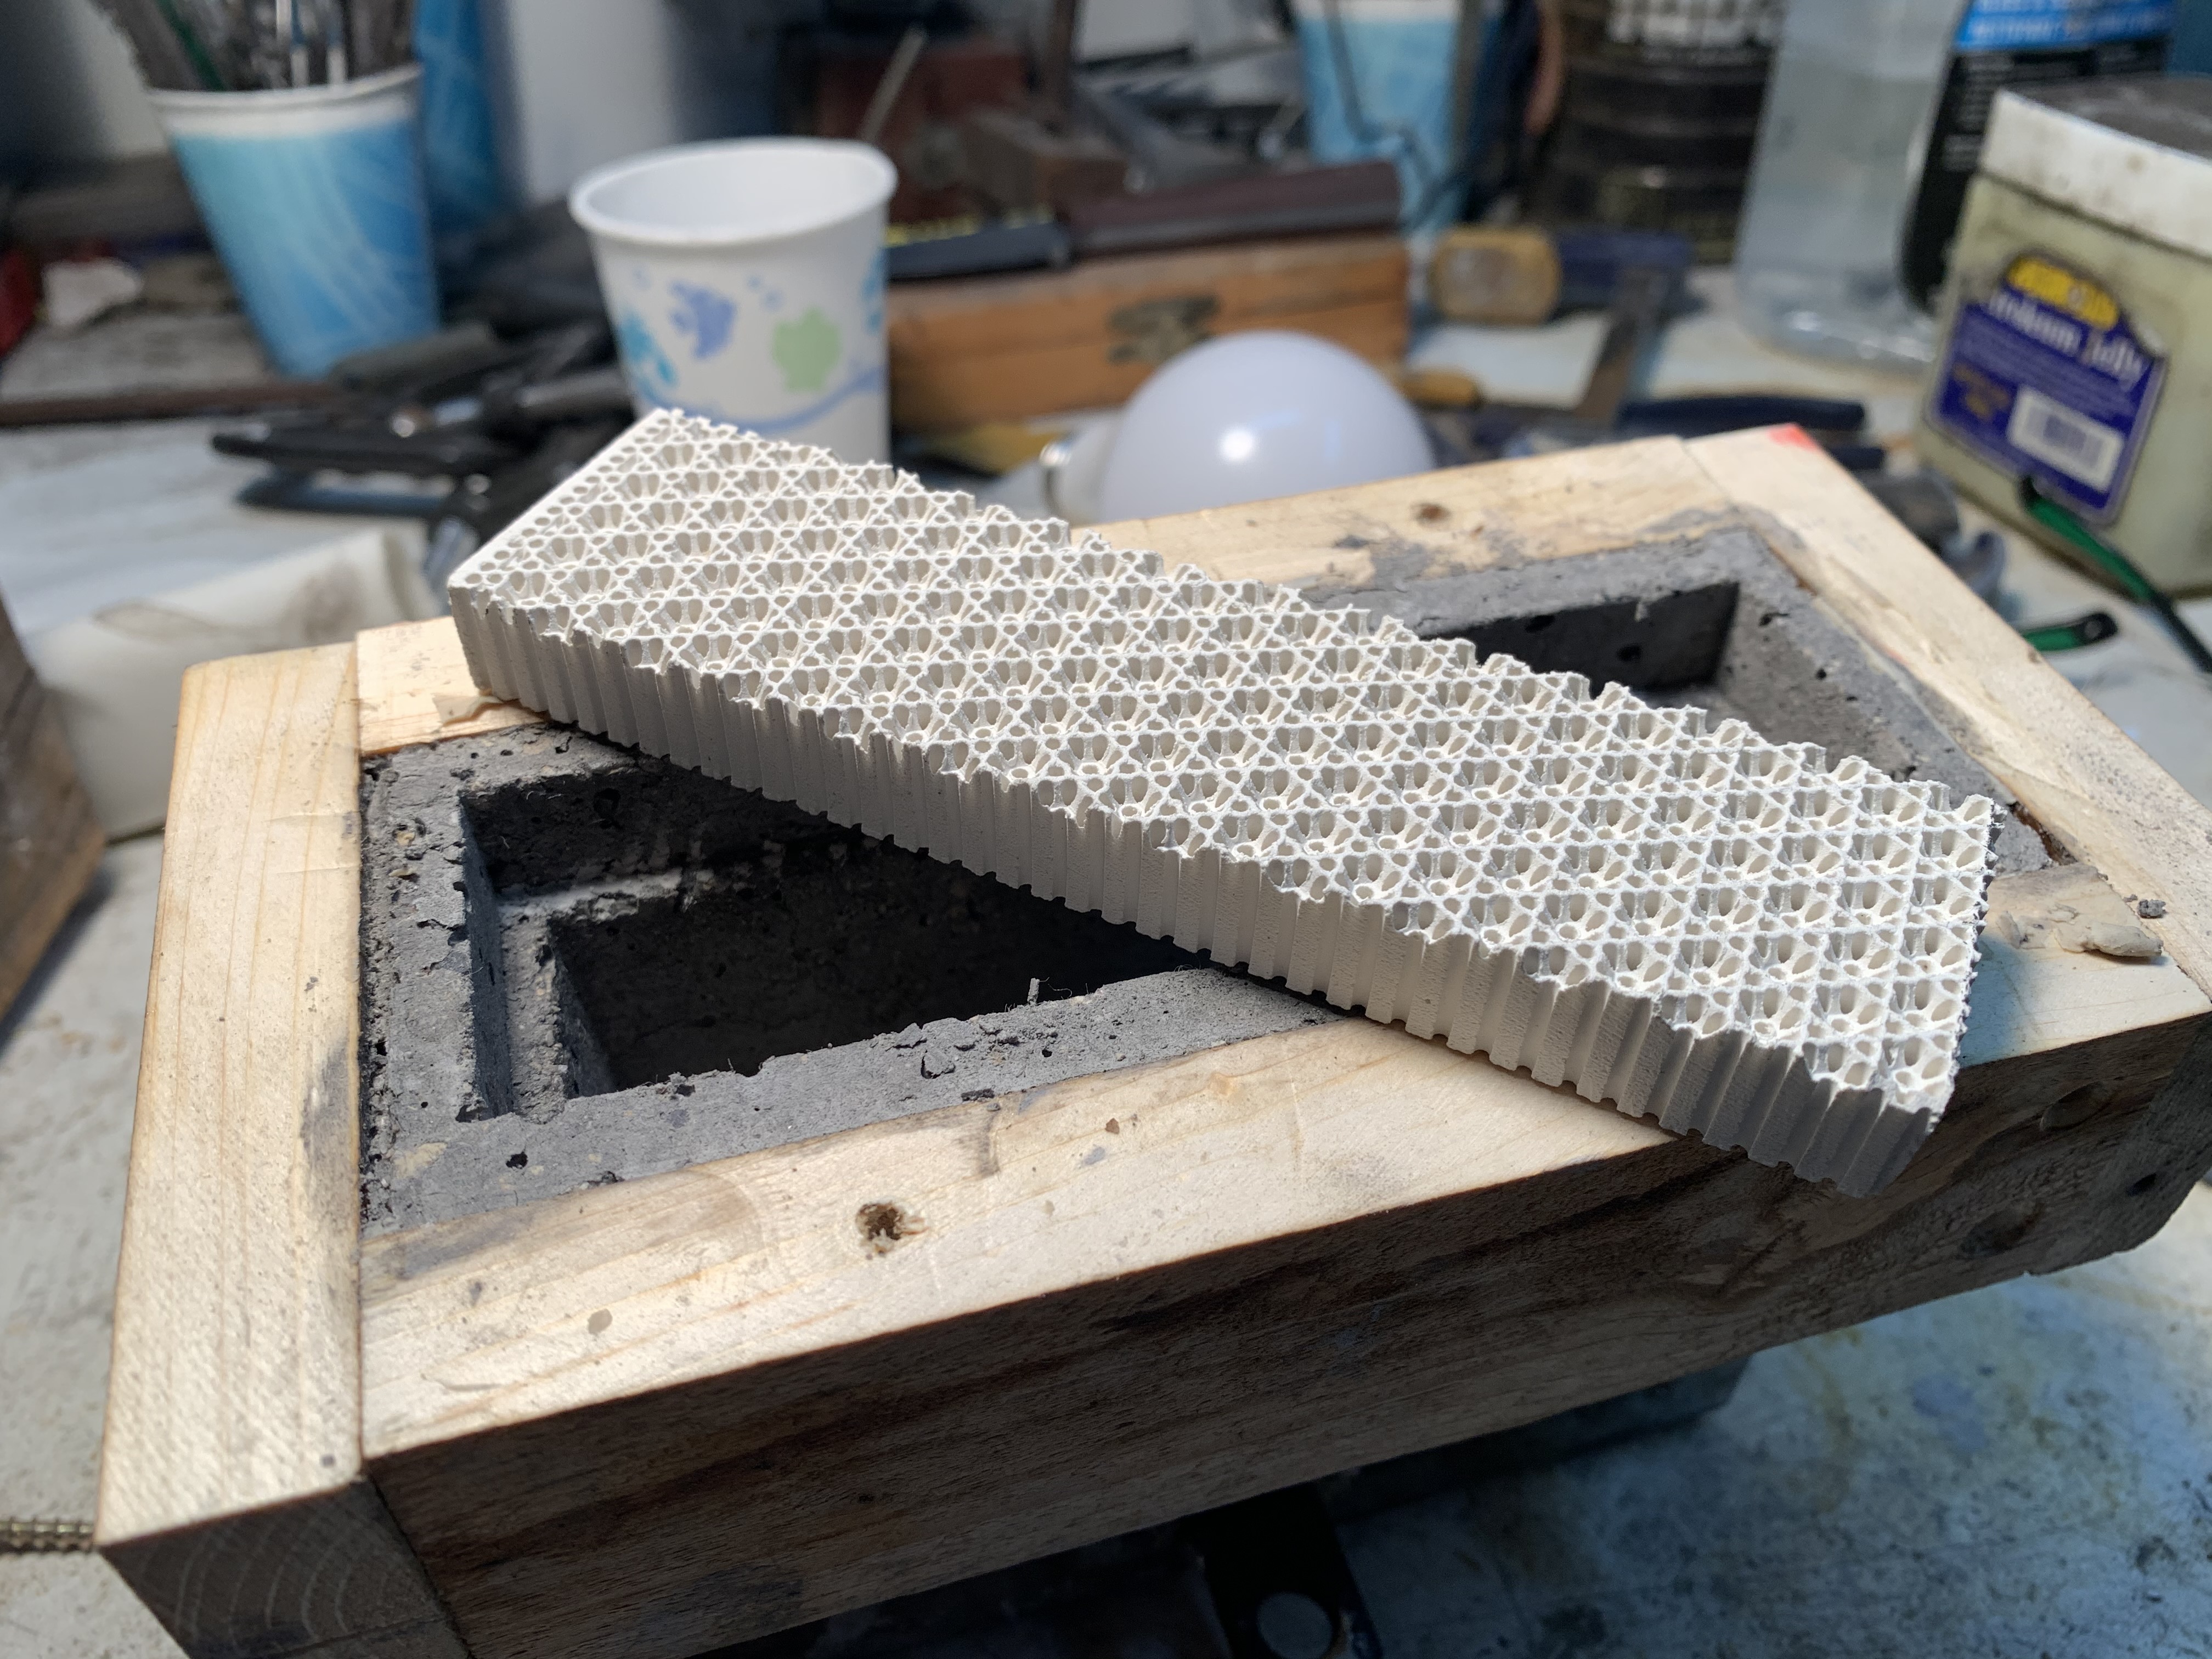
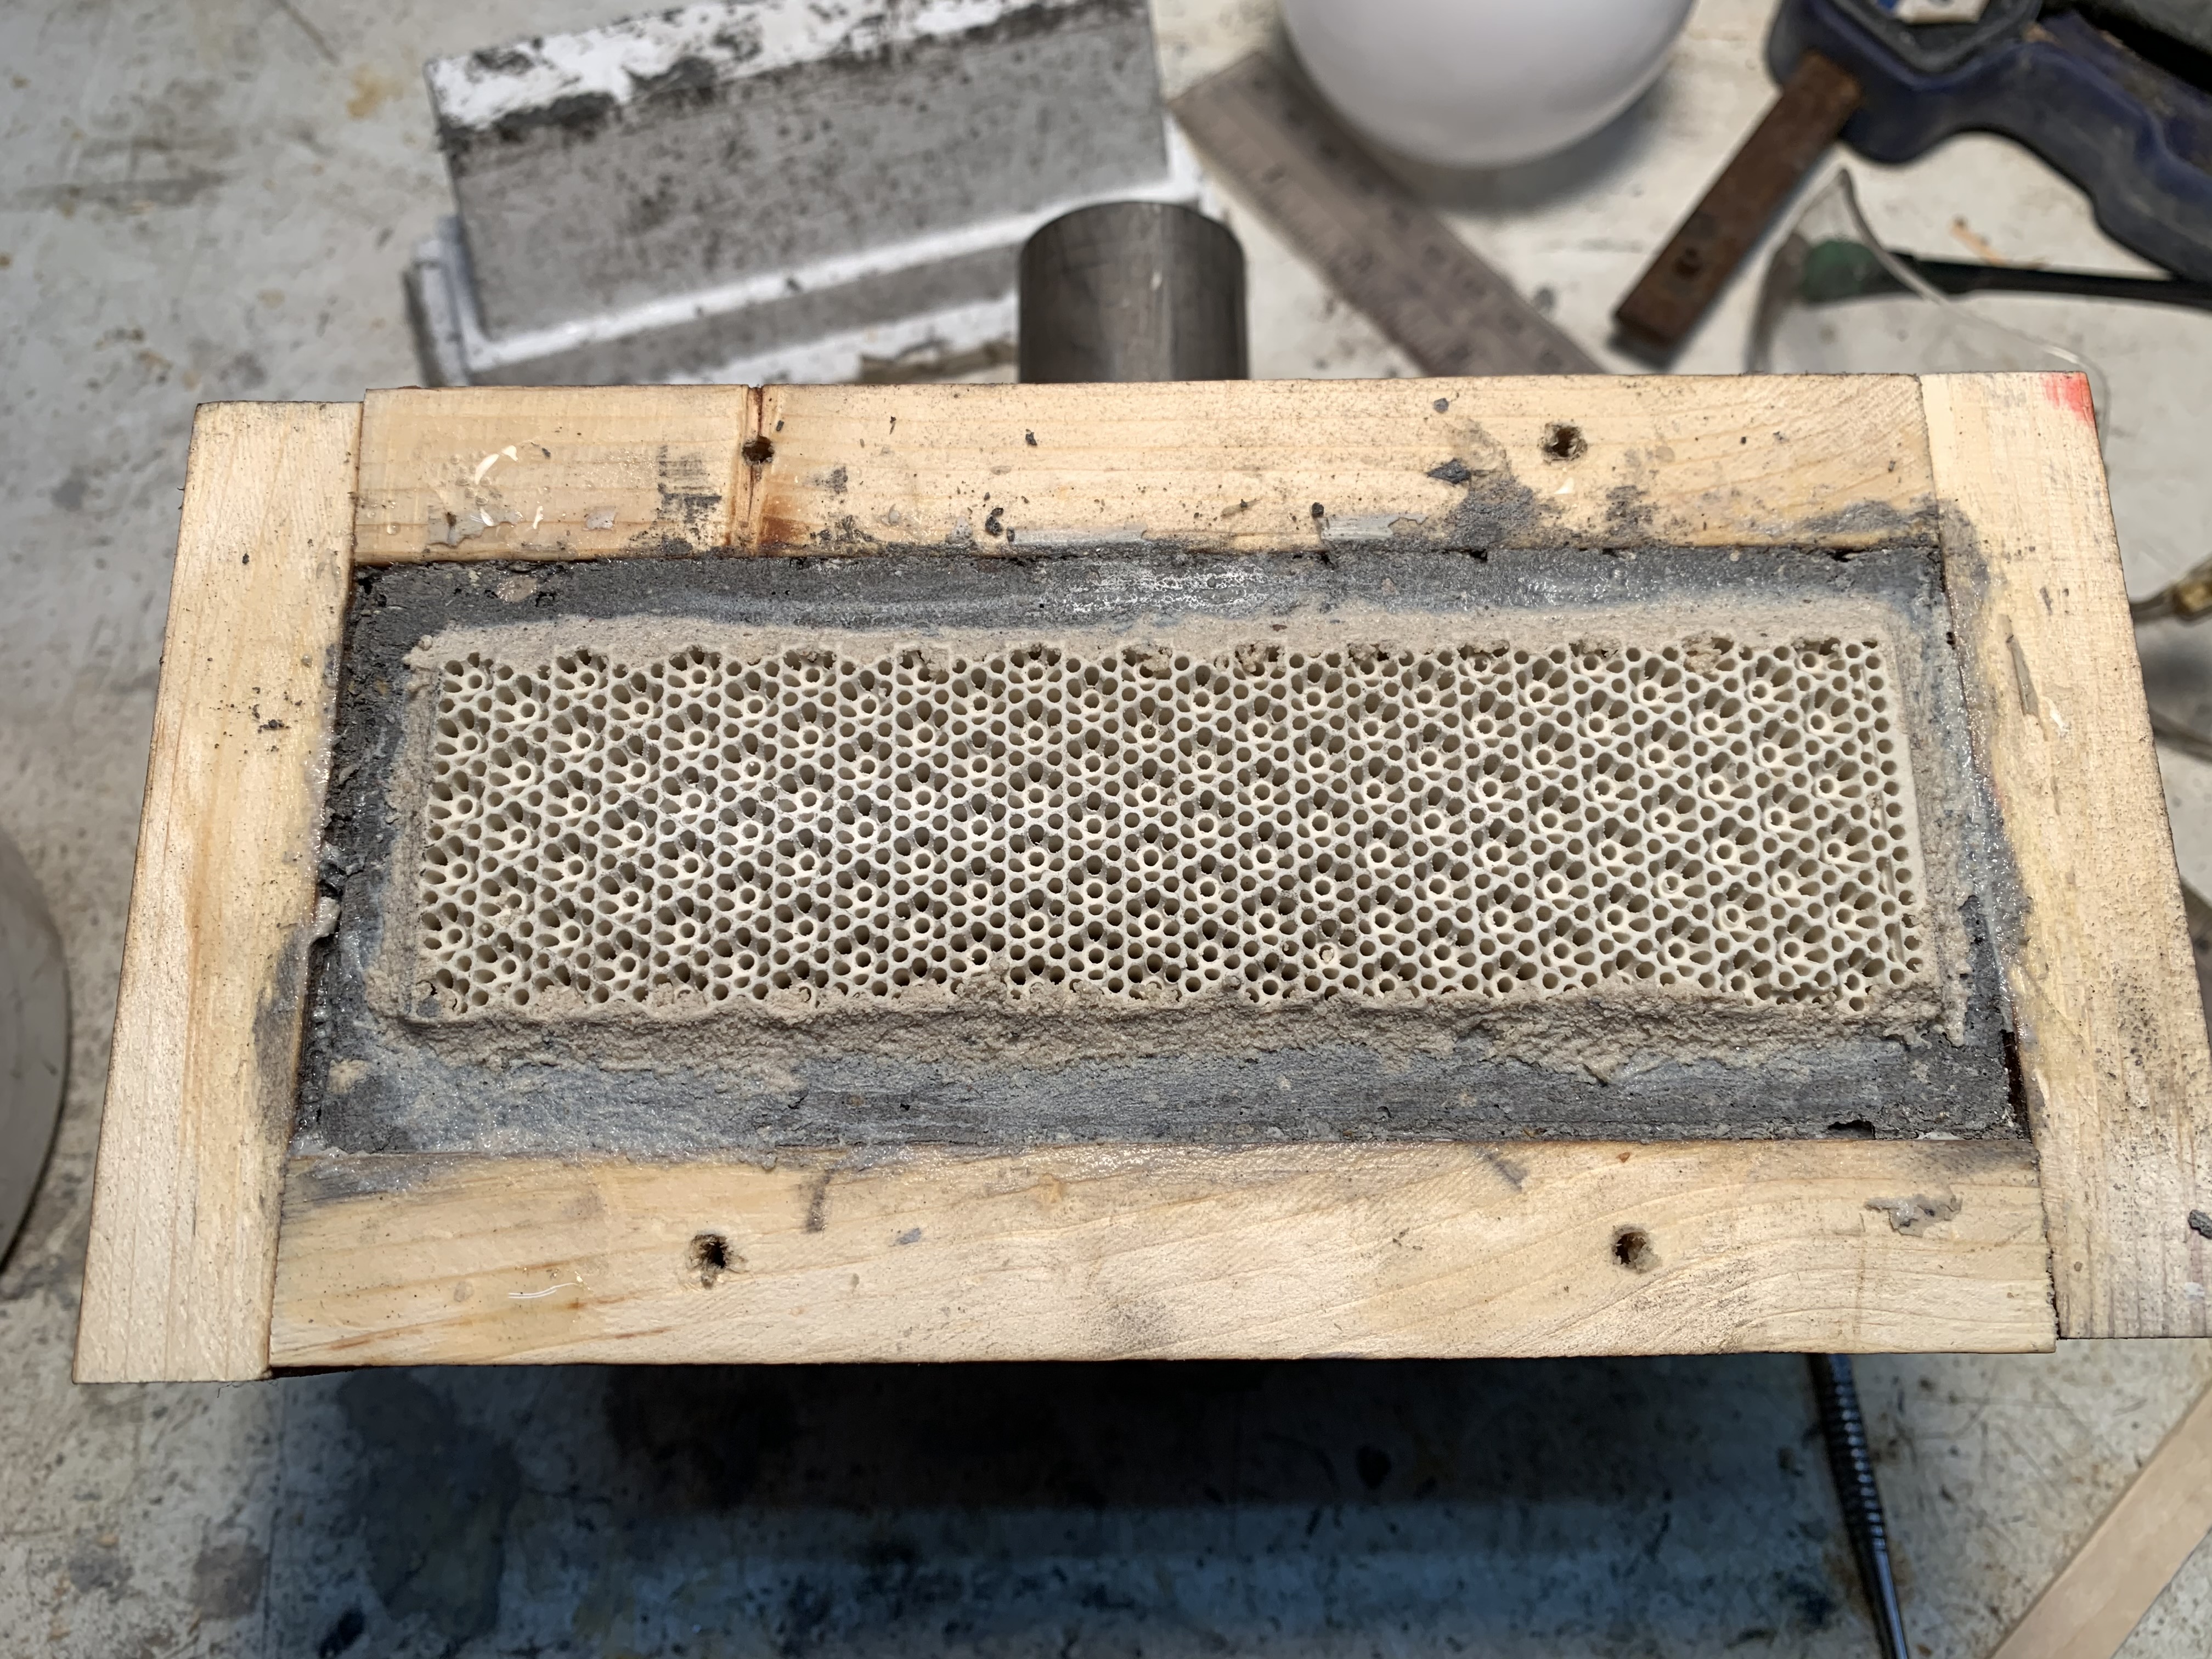
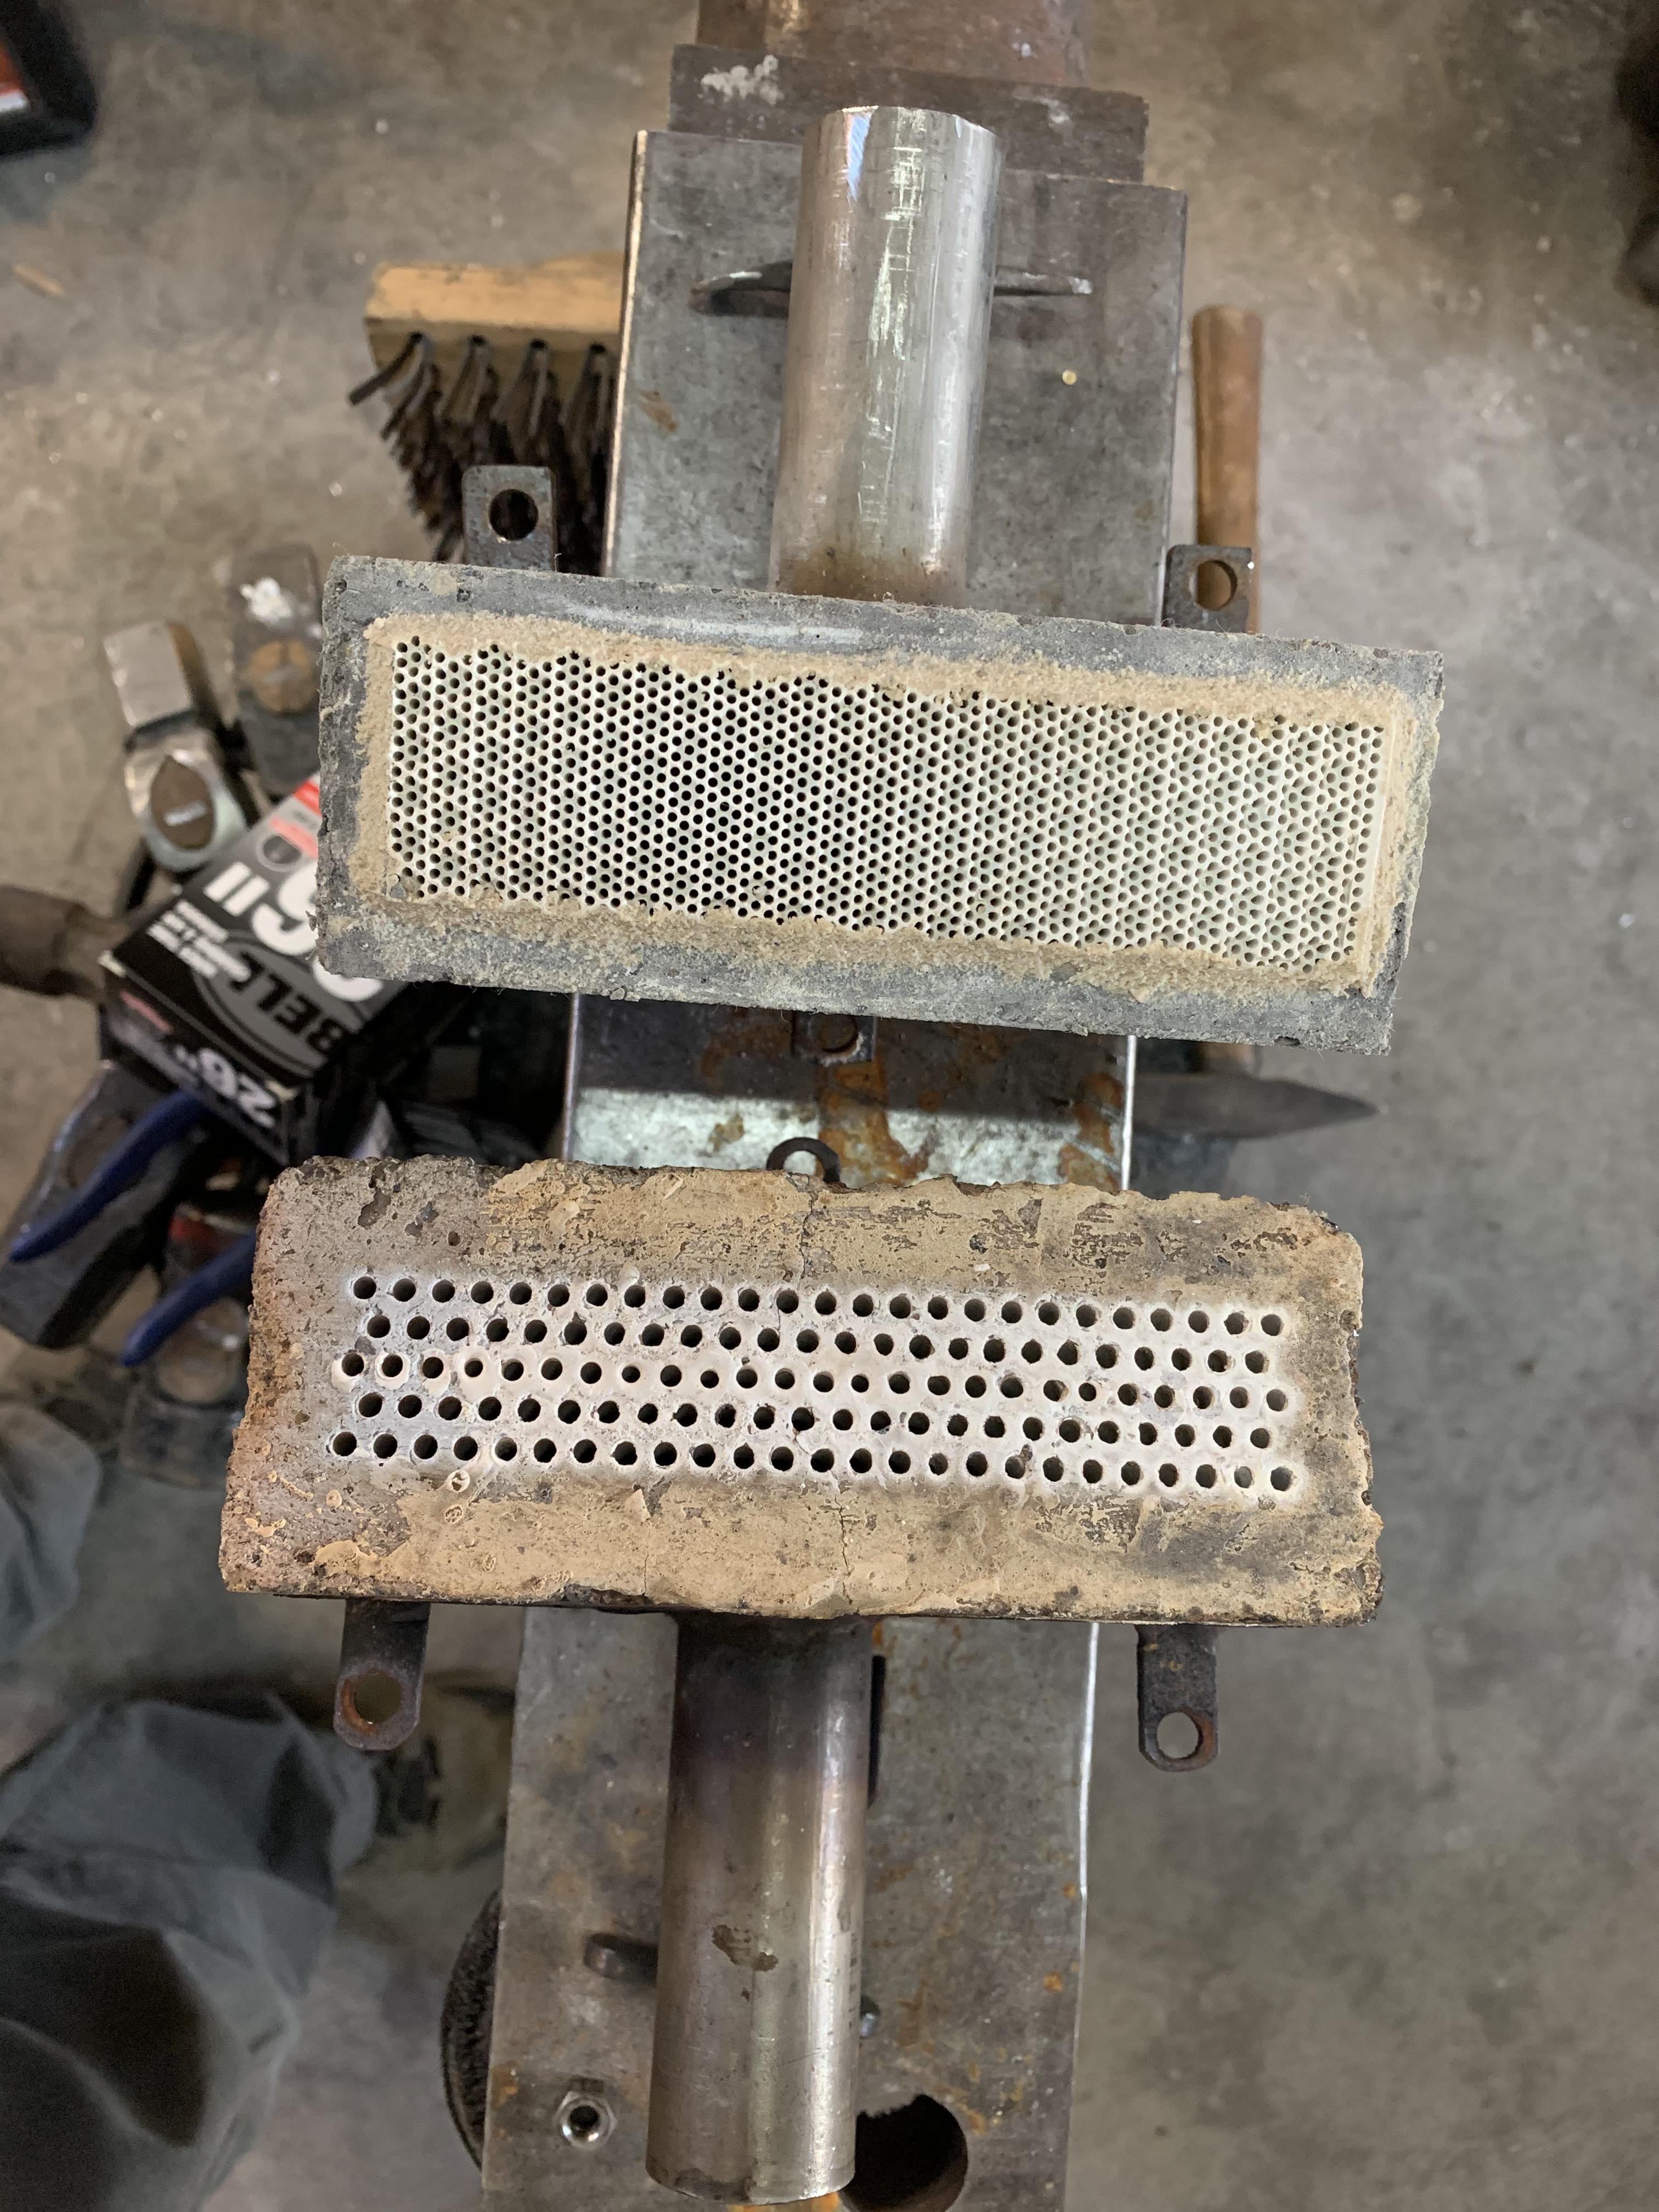
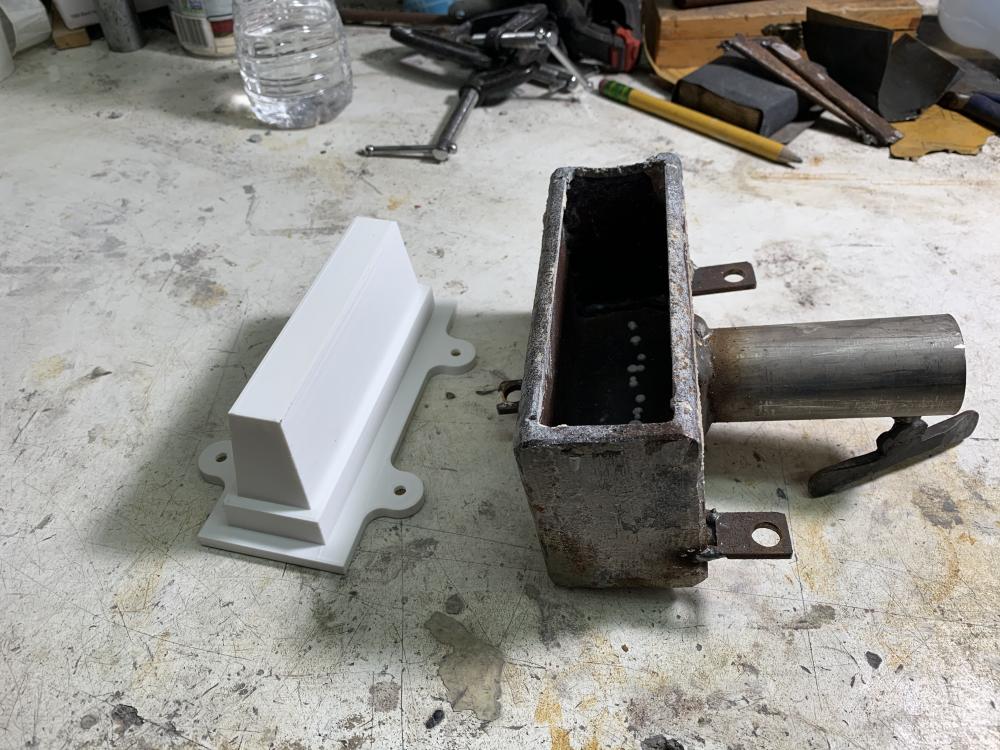
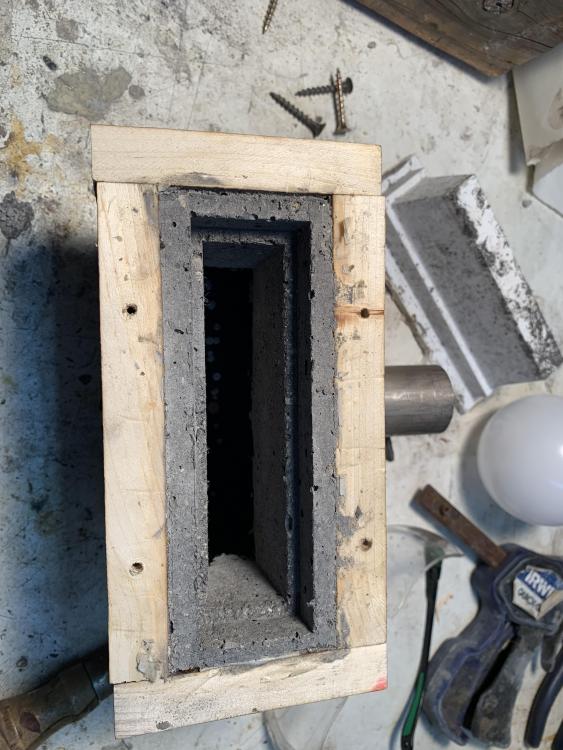
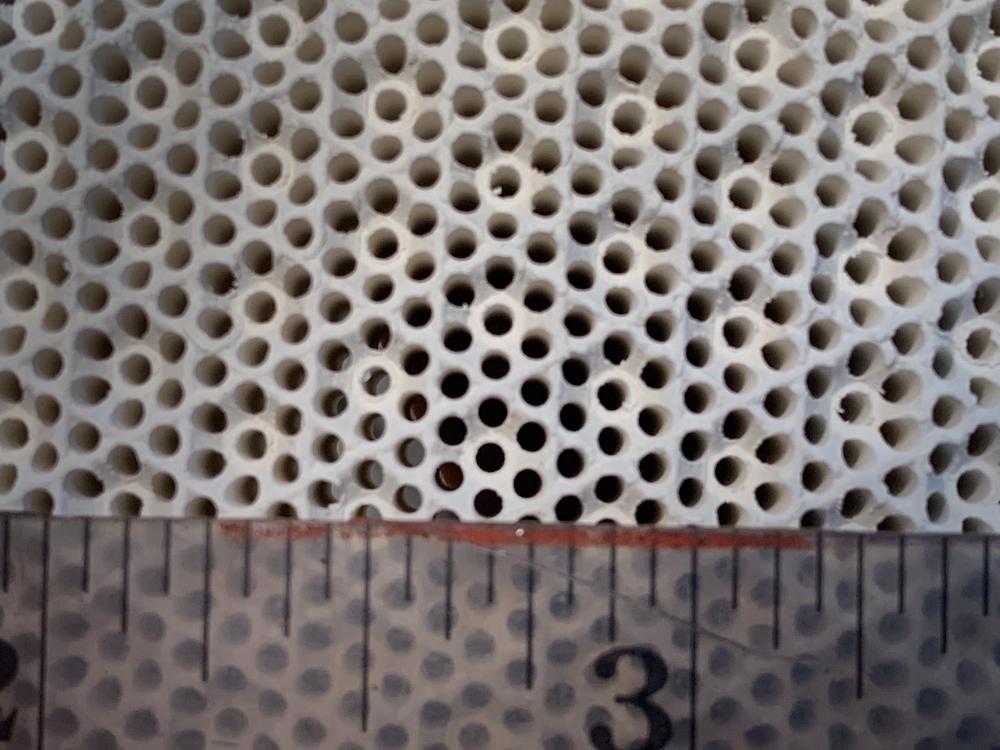
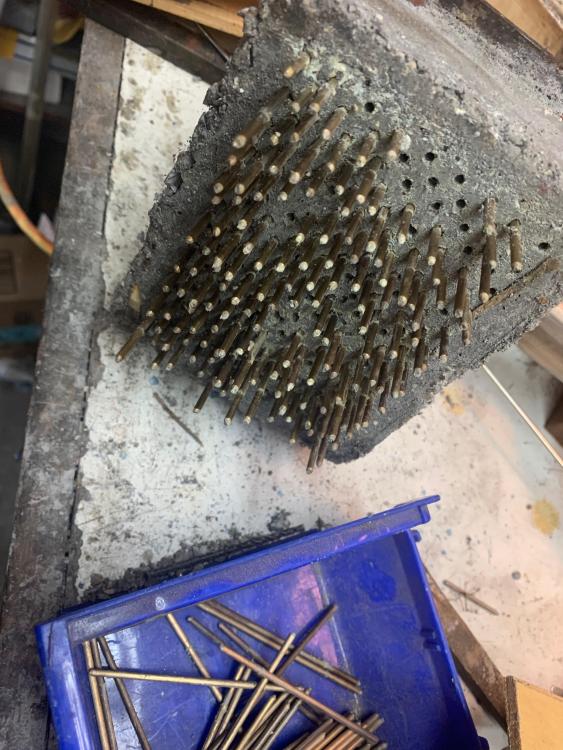
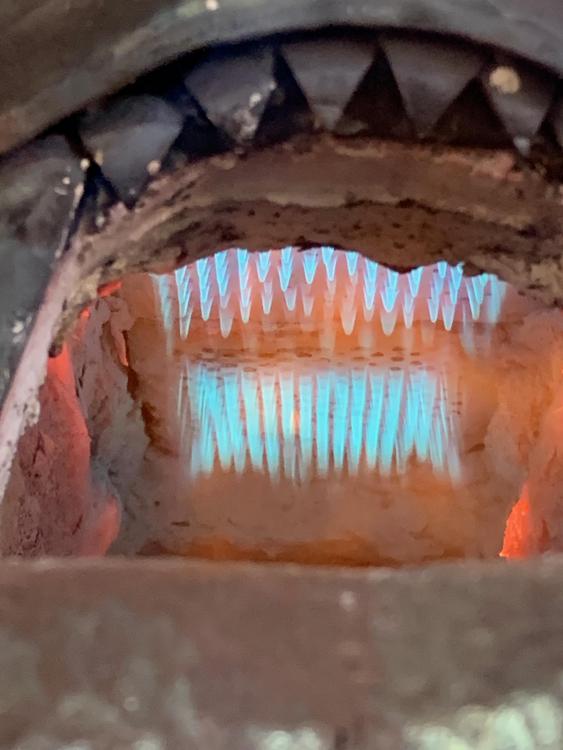
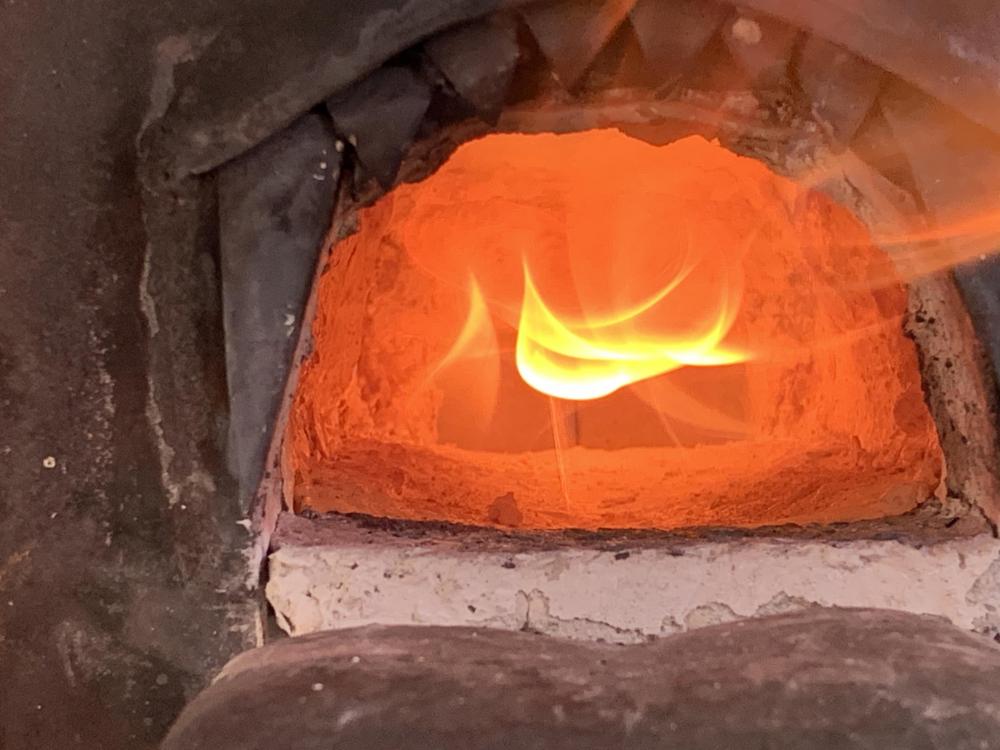
Hey guys! Still around, and still playing around . Was browsing Amazon and found a extruded honeycomb heat resistant ceramic plate for a gas BBQ oven, 7.8x5.5", about $20. Lots of tiny holes, refractory, made for a gas flame.... HMMMM. So I bought one. I had a test plenum sitting around, and I worked up a mold, and made a NARB. I've only test fired it once, but it looks really promising! My only concern is that it is only 1/2" thick. The flash point of propane is 1100F, so if the back gets up to that heat it'll backfire. Here's some pics, I'll do a 4lb Damascus billet this week and see how it works over a long hot 2350F+ run. After curing the burner, it seemed to be about 150F or so hotter at the same pressures I usually use on my 1/8" holed NARB. Quiet burning, no organ sound except for a little momentary note the moment it first ignited. Construction was really easy. The ceramic cut with an angle grinder and cutting disc like a hot knife on butter. Actually I felt no resistance at all when I cut, so easy to form. The mold worked great, and it only took a few minutes to mortar the honeycomb into the burner. I made the mold with my 3D printer, but it would be really easy to make out of wood, just have to cut some draft on the pieces so it will release from the refractory. The bottom temperature is phenomenal! After bringing up to heat and warming up the forge, I was able to turn it down to 1400F. Just barely holding a flame. Pure awesomeness! It'll be great for HT! Closeup of the extruded ceramic to get an idea of the hole size. The plenum and mold for the refractory. The mold in place. Ready for the refractory. I used Mizzou. A lot easier than trying to get it around all those little rods. The cast and the Ceramic Honeycomb cut and ready to be mortared into place. I used a 3000F refractory mortar (Meeco's Red Devil 610) that I got for doing hamons on blades. Mortared in place. Compared to my NARB with 120 @ 1/8" holes. The first burn, just curing. At 5 lbs (this is a NARB). At heat. The gas seems to keep the honeycomb cooler than the forge. We'll see if that's enough at 2350F.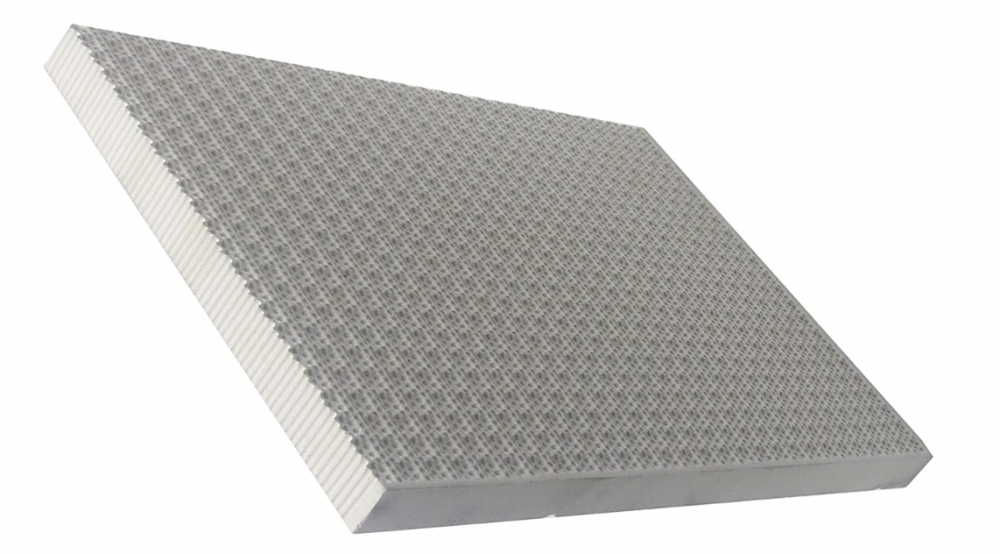


-
In the early days I used brazing flux. It worked great. Probably anhydrous borax as well. DanR
-
Naturally Aspirated Ribbon Burner. Photo heavy.
D.Rotblatt replied to Frosty's topic in Ribbon Burners
Thanks Frosty! -
Naturally Aspirated Ribbon Burner. Photo heavy.
D.Rotblatt replied to Frosty's topic in Ribbon Burners
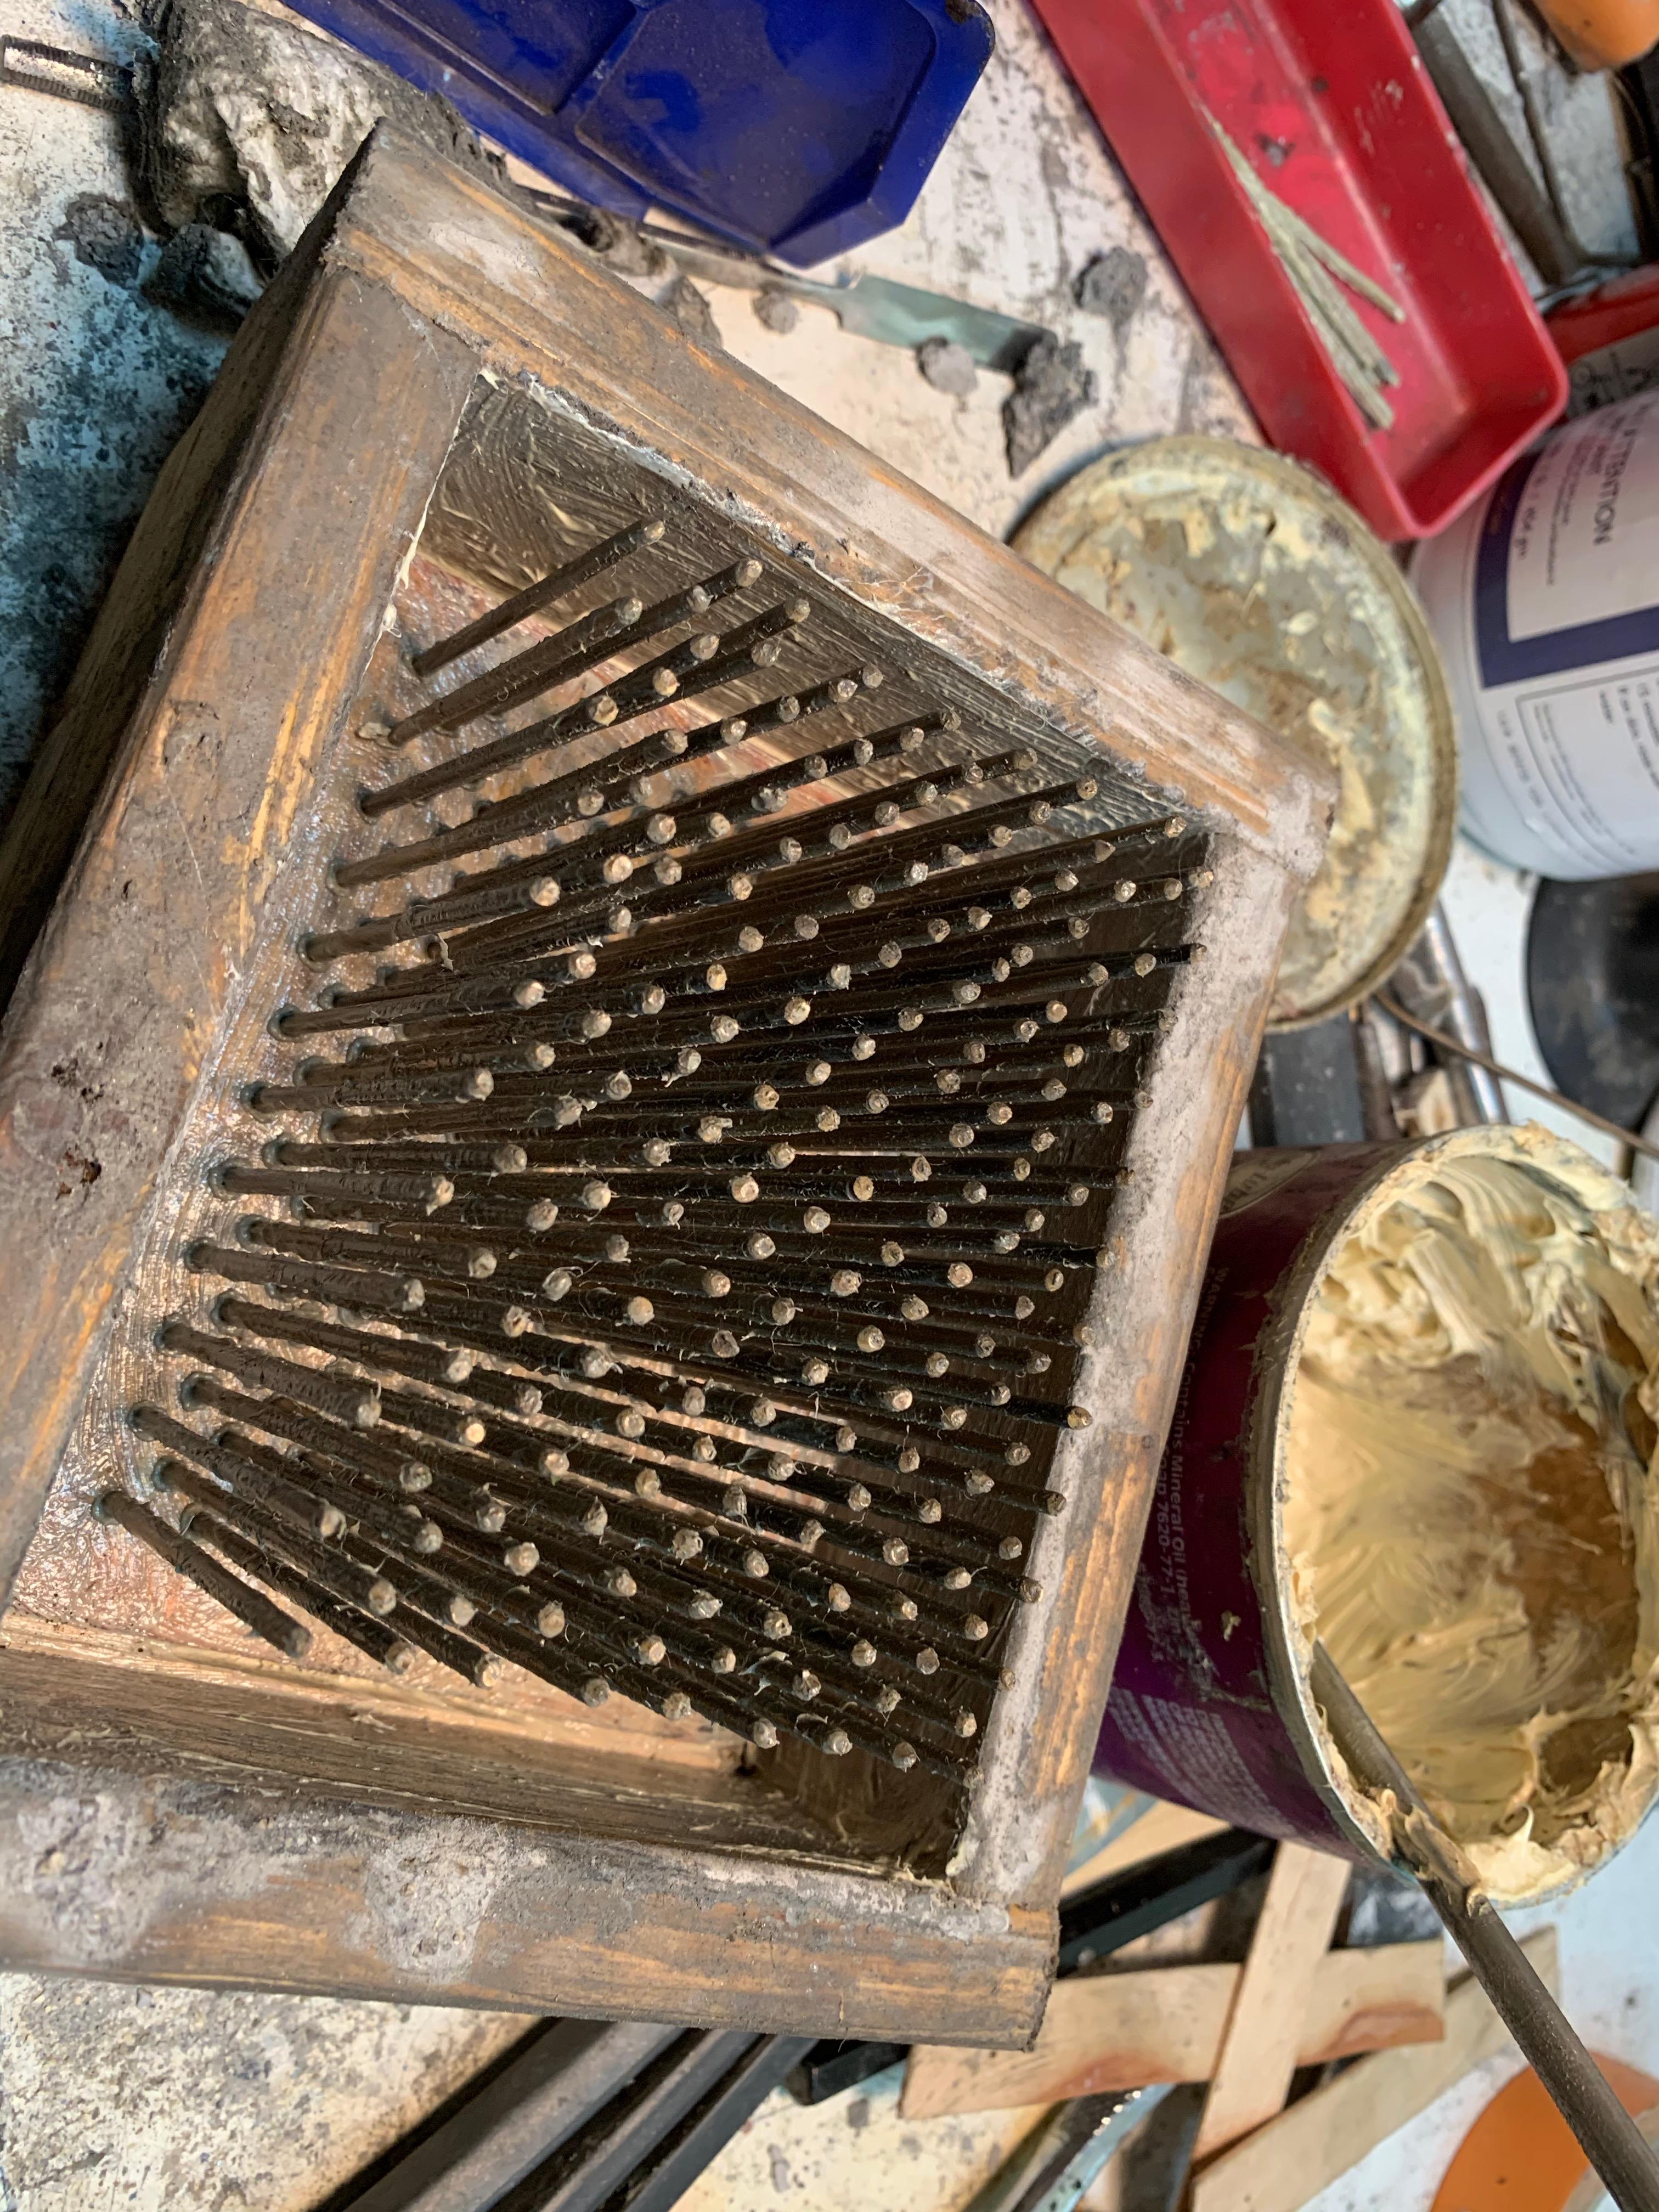
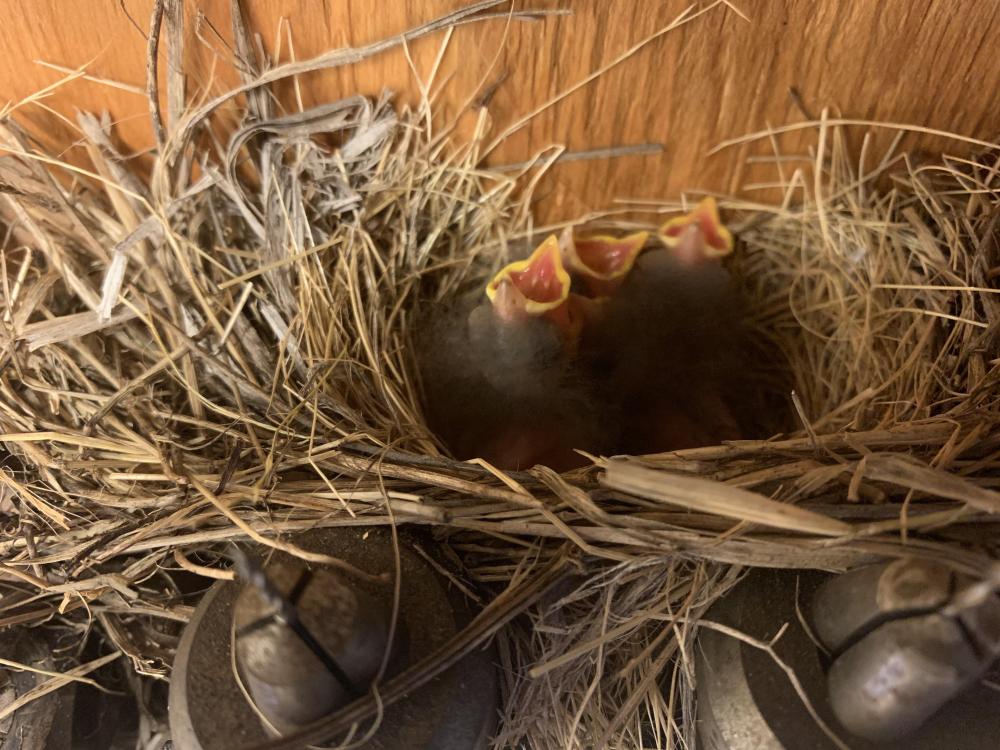
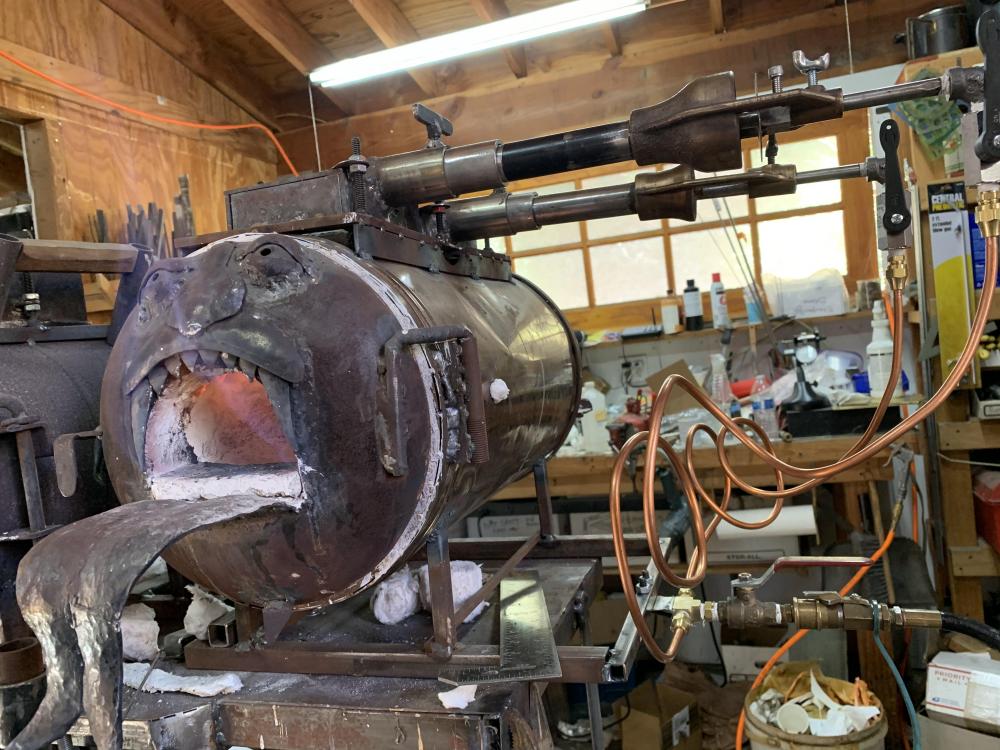
OK...I took a video of casting the burner head, but when I try to download it I'm getting a -200 error immediately. I know I can't put a youtube address, but you can look on my website listed in my profile in the "Studio Tour and Video" section. The new burners work like a charm. The front one has a large baffle, the rear one doesn't. I think on this design a small baffle would have been appropriate - I went the two extremes. Either way, they both work. I haven't run it for more then 30 minutes or so, do I don't know about backfiring when it gets hot. The plenums get a little hotter then expected, almost too hot to touch in 30 minutes. Less of the "organ" sound on these. Only happens when cold in a narrow pressure range. They seem much more adjustable to lower temperatures then my smaller 1/8" ribbon. Check out the video! Pics The mold with metal 3/32 rods. _______________________________ The head after demolding. I've already pulled some of the rods out. _______________________________ The Frankenschtein forge set up for a test run. The two burners are different, the closer one is my best cast burner so far, the rear is an earlier iteration that doesn't work as well. _______________________________ First burn. Not tuned. the rear burner is much more rich, but it's a reject burner. _______________________________ Low pressure test. Works perfectly down to under 1lb. Gets really rich at low pressures since it's not pulling in much air anymore. No backfire! _______________________________ After running for awhile. At 3 lbs pressure. Looking really nice. _______________________________ Left the window open....when I went to work on my mill I found a nest in my tooling rack. This is after about 3-5 days after hatching. _______________________________

-
Flux? 20 mile team borax at your market in the laundry section. DanR
-
Naturally Aspirated Ribbon Burner. Photo heavy.
D.Rotblatt replied to Frosty's topic in Ribbon Burners
Pics coming. Was working on the burner lines today. I used lithium grease first time, and A&D (a bottle of diaper ointment I found in the back of a cabinet...my son is 17yo now It’s basically Vaseline, wax, and lanolin). They pulled out easy like they were greased DanR -
Naturally Aspirated Ribbon Burner. Photo heavy.
D.Rotblatt replied to Frosty's topic in Ribbon Burners
Teaser: just completed a build of two NARBS (for double burner) with 200 holes at 3/32” using brazing rod as the cores. Filmed the whole process (a little boring during the three days the refractory is setting up). Simple technique to get the refractory between the cores, using Mizzou. Need to test more, but so far very stable at almost 0psi to 20psi+. Occasional organ sound, but not often. I just need a to cast two burners to run them, but I’ll scavenge a couple to test. -
Naturally Aspirated Ribbon Burner. Photo heavy.
D.Rotblatt replied to Frosty's topic in Ribbon Burners
Nice looking flame! If I counted correctly on the test block last page that's about 160 holes? What size are they? And hello all! It's been awhile, but Im still lurking around.... -
3D printed plastic burner experiments (photo heavy)
D.Rotblatt replied to Another FrankenBurner's topic in Gas Forges
It's a good point, commercial units do have a long mixing tube first. Just to add more variables, I also wanted to play with the nozzle size - basically on my singing NARB the 3/4" mixing tube fits into a 1" tube which is welded to the plenum. I found that it really made a difference how far the 3/4" tube was inserted into the 1" tube; it ran best with about a 2" length of 1" nozzle before the plenum. My thought in my next one is to weld a 1.25" tube onto the plenum, insert a 1" tube into that and the 3/4" mixing tube into that so I could play with the the nozzle length and ID by sliding the tubes in or out. It could either be a single step up from 3/4" to 1.25", or two steps up from 3/4" to 1" to 1.25" of varying lengths of up to around 1.5-2". Unfortunately I won't get to play with the burner until late February as I have a knife show coming up and need to make some new inventory. I've got the plenums and molds all ready for 100 holes @ 3/32". Sigh...so much to do. DanR Only way to find out is to try it! -
I hang my head....can of worms was not my intent Actually, I just brought up the NARB cause that's what I have - I was mainly thinking that a venturi burner would just be simpler then a forced air since there is less to control. Buzzkill is right though, an idle line set to as low as the burner will go, and a higher pressure line controlled by the PID is the way to go. A choke on the burner would allow control of atmosphere. With a forced air you have to control both the air and gas for the idle - seems hard to do, but I know that there are many people who use a PID control on a forced air. Just my thoughts, and I may be completely wrong - so I'll be interested to see how yours turns out! DanR
-
I've read about a number of forges that use PID control. Why don't you use a Naturally Aspirated (venturi) burner? With forced air, the air will be cooling off the forge when the gas is off creating more temperature fluctuation, and introducing oxygen to the forge - increasing scaling. With NA burner, it just shuts off and on - no air blowing in oxidizing the metal. I've looked into this for my forge, but haven't got around to it. Mine is a NARB and I can turn it down to a steady 1500F or less, so I haven't had much motivation to do this project. DanR
-
3D printed plastic burner experiments (photo heavy)
D.Rotblatt replied to Another FrankenBurner's topic in Gas Forges
I like that! Have you tried putting your injector on a ribbon burner? I'm (slowly) working on one with 3/32" holes instead of the 1/8" to replace my forced air ribbon burner (which broke - not a design flaw, cracked while modifying it). Hoping the 3/32 holes will not "sing" as much. It's kind of a hassle lighting up the forge. I'm also going to try using a shorter mixing tube, as it's going into a plenum which should allow for more mixing. Like that flame blade though! Out of the box thinking! DanR -
Ribbon burner forge doesn't come up to temperature
D.Rotblatt replied to Lasse Ballweg's topic in Ribbon Burners
First thing I see is no door. Maybe just open for the picture? If not, a couple of IFB (insulating fire bricks - the light soft kind, not the hard heavy ones). Huge amount of heat loss with open doors and ribbon burners, I even find that closing off the top half of the opening is very helpful (heat rises). What is the cubic inch (or metric) size of the interior of your forge? I assume from what you wrote and past posts you are using a blown system, not NA. If so you should be able to crank it up. A gas jet of 1mm (.039") is very small for a blown system, try drilling it out to 2mm or more and use a needle valve - if you are using propane it should still work at that size, you'll just have to crank the pressure up higher. Further, the 23 hole size is designed for a NA burner, and the original one by Wayne Coe is a 26 or 27 hole so it should work fine if you're forge isn't too big. Should do a 350 cubic inch (around 6000 cubic cm?) forge easily - and more if you can crank it up. The small jet might be limiting the amount you can turn up depending on your gas pressure. But it doesn't look excessively rich in the pic. If you're using propane, you should be able to crank that up to 20 lbs easy. If you're running on a gas line, I don't know the pressures there in Germany. 20mm refractory is about 3/4" - which is fine but may take 30 minutes or so to get up to heat depending on the type of refractory. I am a believer of very thin layer of refractory or eggshell layer, but that is not so common and needs more upkeep or care. First time may take a little longer as the last of that water is dried out. As I say, I don't use thick refractory layers, but others may chime in. You are going to get cold spots in your upper and lower left edges next to the burner. Is there any way to tilt the burner up or down about 20 degrees? Up and the ceiling will heat up and reflect onto the floor, and the flame will form a bit of vortex around the forge. Down and it will directly heat the floor and what you are forging. All the combustion with a ribbon burner takes place in the first few inches - in your pic you can see it's fully combusted about 1/3 of the way across the forge. One advantage of a ribbon burner. The burner right now is blowing exactly at the opposite wall, which then reflects back - another thing which might be adding to it burning out. Anyway, hope that helps. Try one thing at a time, and see if it helps or hurts. 1st start with a door (blocking the opening 3/4 closed). 2nd if the interior size is too big put some IFB in the right side and make it smaller and see if that helps. 3rd try playing with the jet size and see if that helps. Good luck, DanR -
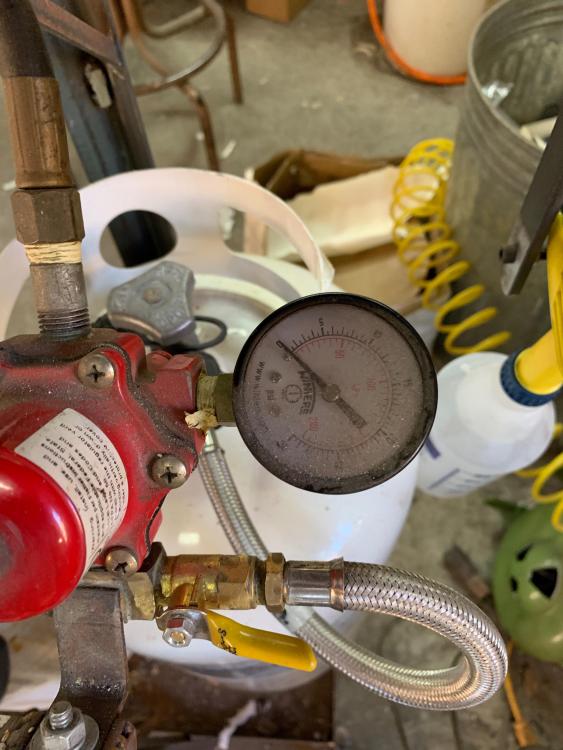
Your build looks great! Some suggestions on your setup. The pressure between the jet and the needle valve may be unreadable on the gauge depending on the size of your jets. I would put the gauge before the needle valve (actually before the ball valve shutoff) so you can see/set the maximum line pressure, and then adjust with the needle valve and air to fine tune. You have a very rich flame, and the regulator is showing nearly 0. Given the type of blower you have (Ive got one like that too), you should have excessive air. I'm guessing it's gated down in the pics. If not, I noticed the pipe after the jet is a much smaller diameter and may restrict the air flow. An HVAC guy one told me about the importance of larger vents...I carried that onto my build. I used one the same size as the exit on the blower.... 2.5" I think. Either way, looking really good, it will work completely differently in the forge anyway, and all this might be moot! And thanks for your service! DanR
-
Very nice! What did your friend think? DanR
-
6" OD and 1" of ceramic fiber will leave you with a 4" ID, 2" of fiber would leave you with 2" ID (not enough), so 1" then. Then line with 1/4" of refractory and you end up with 3.5" interior. You could easily cut off 8-10" or so, and make a little forge with that. A 8-10" forge with 3.5" diameter interior would make about a 75-100 cu inch forge. One 1/2" burner would do that fine. Would be good for small knives up to 6" -8" or so (max you could heat treat with it), or small projects. Answers above are spot on. DanR