

D.Rotblatt
-
Posts
335 -
Joined
-
Last visited
Content Type
Profiles
Forums
Articles
Gallery
Downloads
Events
Everything posted by D.Rotblatt
-
More then enough air, loud though. I'll be interested to see how yours works...when life lets you finish it! Dan
-
Two different beasts. The 122 is a NARB, while the 336 is a FARB. So the whole injector system is different. In the NARB I made the number of holes to fit the injector (standard 3/4” burner). With the FARB I figured as long as I put a large enough blower on it and the back pressure isn’t too much, it’ll work. Of course the number of holes is a big difference DanR
-

3D printed plastic burner experiments (photo heavy)
D.Rotblatt replied to Another FrankenBurner's topic in Gas Forges
That's about the size of my NARB forge, a little smaller. It's also running on a .036-.040 jet (depending on which burner I stick in it as an injector). But 2450 at 5lbs is awesome! Very efficient! I bought a bunch of 3D printer nozzles last week, along with some drills to make different sizes. It will be interesting to see how they work! They are M6 threads, which should work with the schedule 80 1/8" pipe. ID is .215 and max thread on M6 is .234...close but with some pipe dope it should seal (should use a .19 hole for m6, so it'll be loose). I hope so, it would make it easy to test different sizes. -
Don’t know. This is for thickening epoxy. You’d have to test it to see if it works. The colloidal silica I used is for making ceramic slurries for molds to cast metal. There are a lot of different types. I posted one that I’ve tested and comes in small batches on page 44 of forges 101. It’s called colloidal silica Nalco 1144. It comes in pints. Google it and see if they’ll ship to you. Otherwise you might google casting supplies in the UK. DanR
-
Large door openings mean lots of heat loss, plop a brick in front of them (use insulation firebricks - the light ones not the heavy ones). Leave only enough room for the stock to slip through. Also the doors look high, heat goes up. What are the cubic inches of the interior? Looks like you used a single layer of ceramic fiber (which is OK), but if so you have a lot of space inside, which is more to heat. It will take awhile to reach full heat since you have a refractory lining on the wool. I also notice your burners are pointed right at the corner rather then higher or lower causing a swirl/vortex. As such, one side of the forge is getting hotter then the other. Sometimes that's good, as you can put the metal where you want it to heat or not heat areas. I don't see lots of dragons breath, so it's not running really rich. Others can chime in on that. Overall, a good start. There's always futzing and adjustment before you get it right DanR
-
Take a piece of 18 gauge metal (or 20 or 16 or whatever you have), cut it to size and hammer it around a pipe the same size as your burner, throw on a hose clamp, a tac weld or 3 and you have a choke tube. If you don't have a torch to weld, you can use a propane torch and silver solder it (or braze it). If it's not perfect that's ok, it'll still work. DanR
-
I use a mix of zircopax and colloidal silica to face the ceramic fiber - I call it an eggshell face. Zircopax is a zirconium glaze opacifier and can be purchased at any ceramic supply online so it may be OK to ship to you. Colloidal silica can also be found online. I talk about where in Forges 101 on page 44: If you go back earlier a few pages in Forges 101 you will find me discussing my eggshell facing for ceramic fiber. It's thin, heats up really fast, reflects heat, and is easy and quick to put on. Negative is it is much more fragile, but if you bump and crack it you just paint on some more after it cools. It is resistant to flux, but if there is any crack the flux will eat through. You will need something like a kiln shelf for the bottom inside of the forge as eggshell is not strong enough to take much abuse. I guess it could work if you are careful, but not with any fluxes. Hopefully this might be a workable alternative. See if there is a ceramic supply on the island/internet, or a local ceramicist who might have some supplies (their kilns use the same technology). If you can purchase Insulating Firebricks you can make a forge with that as well. They might not be a problem to ship as they are in a stable form. Steel won't work for many reasons. Good luck, DanR
-
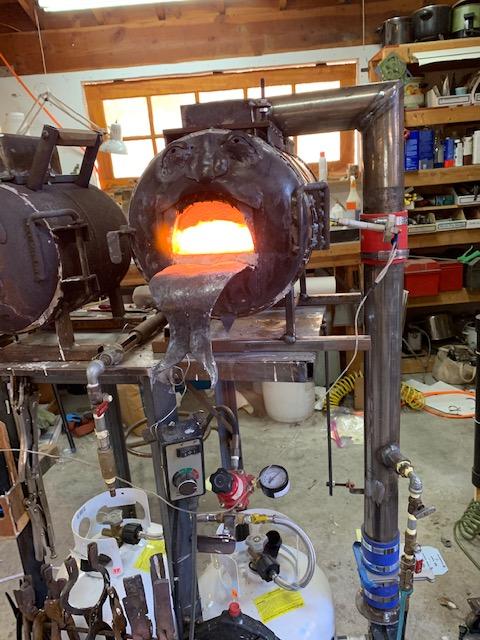
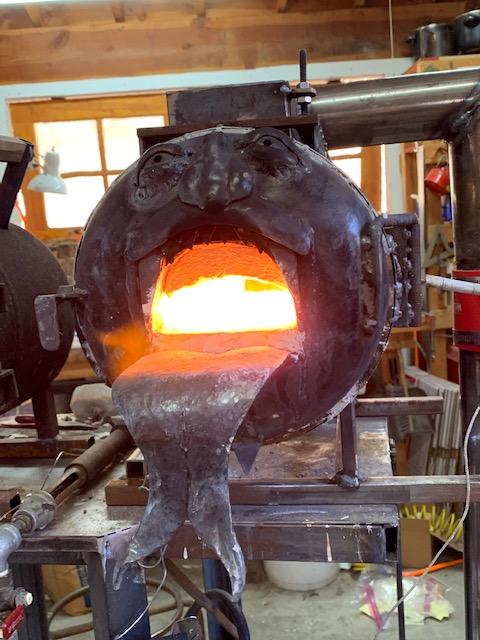
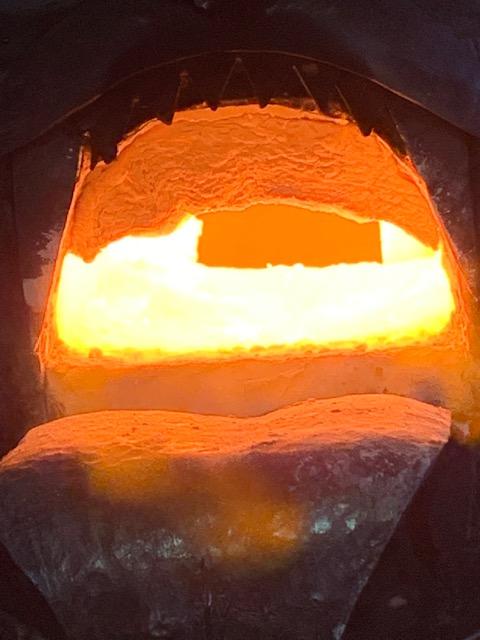
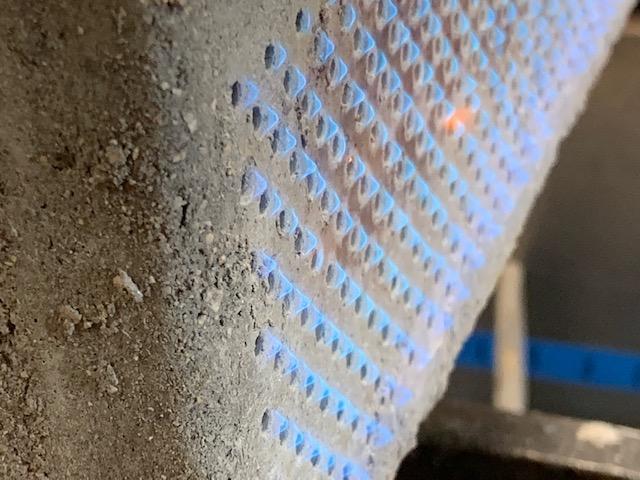
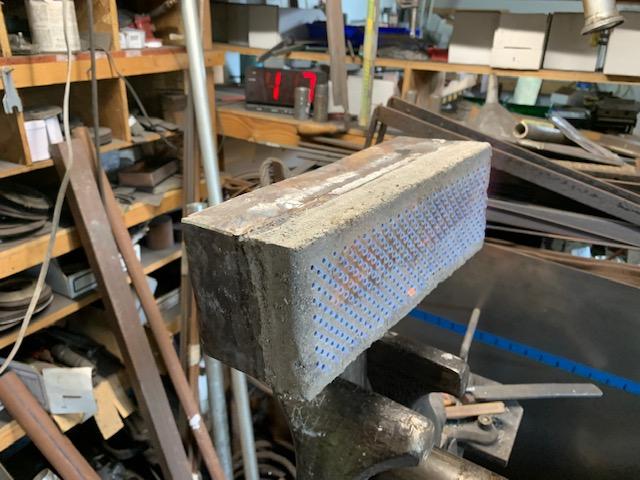
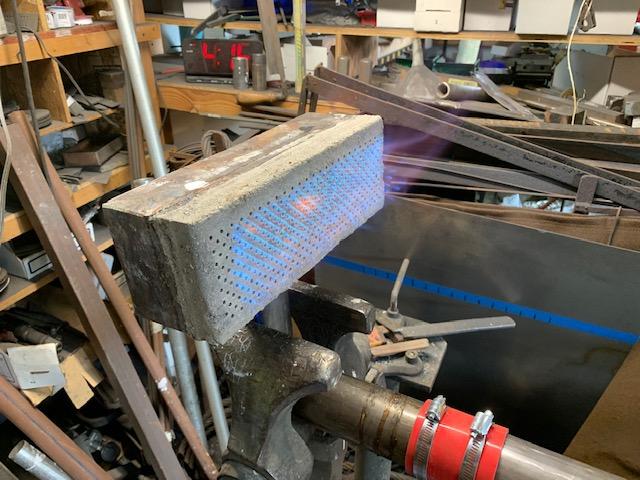
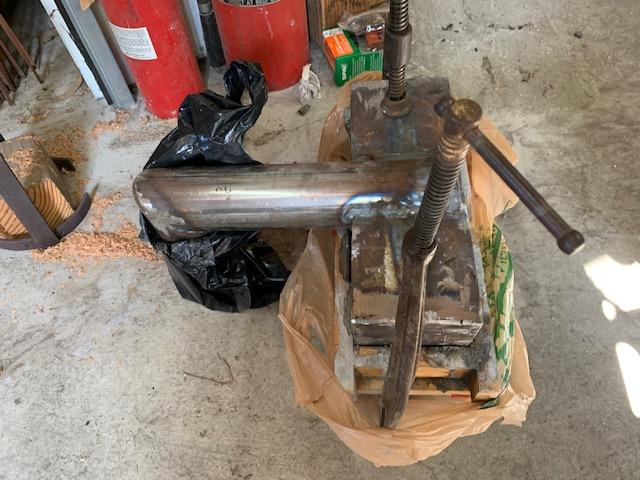
First Burn was successful with some caveats. Interesting results and pretty positive given that this is a first experiment with a 1/8" hole FARB. BEFORE STARTING: 1) I soldered the jets closed and redrilled them to two #60 (or .040) holes. That way, the gas used will be equivalent to 2 Reil burners at any given pressure and I have some point of comparison. i.e. this should compare in gas use to a 2 Reil burner forge at any given pressure which I am familiar with. 2) The new forge is about 350 cu inches. 2" of ceramic fiber coated with the eggshell zircon and an IFB covered with a 1/2" mizzou shelf on the bottom. 3) The interior of the forge is 14" long and the inside is a 'D' shape. The burner is 11" long, 4" wide. THE GOOD: After some time futzing (explained in next section), I was able to get it running quite well. -At 10 lbs it was 2200F. The temp was still slowly rising, but it was getting late towards dinner plans. -At 15 lbs it was 2375 and still slowly creeping up. Easy welding heat for carbon steels. -Quiet when running full on. THE BAD: -The sucker sings in two pitches...and really LOUD! I now know what is causing the 'singing' - it is backfiring. The plenum was getting warm after it was doing this for awhile, but not too warm to touch. Closing the fan damper, or giving it more propane richens up the mixture and it stops backfiring/singing. Like the NARB, this stops once the face of the burner gets hot enough to ignite the propane before it goes back burns. Unfortunately, the face of the burner seems to stay cool a long time, so this process is time consuming. -Poor low temperature. Couldn't get it down below 1700F, though I could get the propane pressure down to 3 lbs or so. AND THE UGLY: -Hard to get up to heat. If run at low pressures with a cool burner face, it needs to be pretty rich so it will stall at 1500-1800F. After some futzing, I worked out of procedure for getting it up to heat. I finally figured out it needed more pressure to keep it from backfiring so I started it at 15lbs propane pressure, damper 1/2 open, and gate 3/4 closed until it just stops singing (yes I have a damper and gate on it while I figure it out). As it heats up I open the gate a little at a time but keeping it from singing. When it reaches about 1900F it seems to stop singing, then I can open the gate all the way and back off the propane til I get a neutral flame which is around 8-9 lbs. After that, I can adjust as I want as long as the face of the burner stays hot it seems to be good. I haven't run it for a long period yet, so we'll have to see how it responds to that. POSSIBLE FIXES: -It seems that one problem is lack of pressure allowing the backfiring. It runs with the damper 100% closed. I just may have too many holes. I did this on purpose because it's so easy to plug holes, and so hard to add more. So Fix Experiment #1 is to block a couple rows of holes to see if this increases pressure and decreases backfiring. Little tiny wads of ceramic fiber.... -The face needs to heat up to prevent backfiring. This is the case with the NARB as well, though it is so small of a forge that it heats quickly. Fix Experiment #2 is to lower the burner down into the forge further so it will heat up more. I can drop it down 3/4 of an inch without any modifications, and with a small mod (moving 3 tabs), I can go deeper. DanR Pics: Here you can see the whole set-up (except the little Dayton blower down on the bottom). Running at 10lbs propane. _________ Running at 2200F at 10lbs propane. _____________ Closeup of the inside at 2375F. Really even heat, don't know if you can see it here, but there are no hot spots. For the gas of 2 real burners, the entire forge is an even 2375F from front to back. A two burner forge would have two hot spots, and cooler areas. This is the most even heat I've ever seen in a forge.
-
3D printed plastic burner experiments (photo heavy)
D.Rotblatt replied to Another FrankenBurner's topic in Gas Forges
Lookin awesome! How big is the interior of your forge? DanR -
Sigh...we do our best to raise them right, but it's as if they have a mind of their own
-
They don't usually explode....they generally just pop and a piece flys off. All safely enclosed in your forge....mostly
-
Chris, please note this, as I was under the impression (no assumption) that the aggregate is for strength. Though it may not be for strength, it is still an important ingredient. Thank you Frosty for giving some input on this! I did sift out the aggregate in this FARB, but added it back in in smaller amounts. I crushed some (that stuff is hard! had to use a hammer with a 1/2" steel plate). I added it back in so small aggregate was on the face where it would be easier to get between the sprues and then kept adding larger and larger as I got up higher and it was easier to push between. Worked in about 1 cup batches of refractory so it wouldn't set up. I did have some aggregate left over, so I used a smaller amount then originally was in it. I was afraid not to use any aggregate though I did on one of two thin layers, since I figured the Mizzou would not be strong enough. It was totally an instinctive thing, since i did no tests...hmmm...tests...tests?.....we don't need no tests, I don't have to do no stinkin' tests! Anyway, I've got a burner with mixed amounts of aggregate of different sizes. We'll see how it holds up, or if it explodes So far so good. DanR
-
First firing of the new burner. In prep, I put it in my kiln for a few hours at 190F to dry it, upped it to 250 to melt out the wax, then 350 to burn off the wax that had soaked into the refractory. Worked on the new forge it's to be installed in in the meantime. I was going to rebuild my other forge, but had found a nice piece of 10" stainless stove pipe on the side of the road and figured it was as much work to make a new one as it was to rebuild the old one. I figured I'll just use the door from my old one since it is removable. I also made it a few inches longer (14" interior length vs 12") and it will have a bit more insulation (being a little bigger diameter, and a smaller diameter interior planed). The flame was pretty good, didn't hold well to the block even at moderate pressures when lean, but ok when rich (meh when neutral). This will work totally fine in the forge though. I was using my little Dayton blower which is not very strong and there seemed to be very little back pressure. Larger flames (more pressure) would start lifting a lot from the block, especially around the edges and the bottom and when lean. The individual burners do keep their neighbors lit, so the ones around the edges are not surrounded and lift off. Also the flame goes up, so the bottom ones wouldn't get lit well. I think it will work much better in a vertical position and inside a forge. This pic is with the damper around 3/4 closed. __________________________ This is with the damper completely closed, and a gate I added almost completely closed. Closeup in the next shot. The flames are about 1/8" long. I'll be interested to see what temperature this will make the forge. My goal is a burner/forge that can be used for HT at 1450-1550, or welding up to 2400F. At this low pressure the NARB would not pull air and go completely to propane, but since this is a fan blown one there is not problem with it turned down. Closeup with it turned down as low as I can. I'd be excited if I wasn't so beat from building the forge body all day (almost ready to put in the inswool, bricks, etc.) _______________________________________________ Those propane cook stoves get hot...I mean the metal burner gets red hot when it's on and they do not backfire. I'd make a test one and give it a try, at worst it will backfire and you answered the question. Use the hole size on that propane stove as a guideline, since it runs on propane. A crapload of little tiny holes! DanR
-
Naturally Aspirated Ribbon Burner. Photo heavy.
D.Rotblatt replied to Frosty's topic in Ribbon Burners
agreed, plus slightly rounded aggregate may "flow" better into small spaces - the sharp stuff locks together (which is what it is supposed to do). Someone will just have to try it and see, this is all conjecture on our part... -
Refractory is like cement. It does not 'dry' it goes through a chemical reaction and hardens. If like portland cement, it forms crystals in a chemical reaction called hydration. The water mix initially is important, too much or too little water and it will weaken the cement. If too much in the mix, the particles are too far apart. Too little and there's not enough for hydration to fully occur. But my understanding, is that once set up, it is important to keep it wet so the hydration process continues and the refractory gets even harder. I always learned to hose down a new cement slab several times a day for the first few days while setting. Thus, I poured a quarter bottle of water in the intake pipe and turned the burner so it would keep the refractory wet. I may be wrong and that is adding too much water, but I figured that it would just sit on top, the particles were already set in place and the reaction occuring. Refractory also hardens when fired, so there area a couple of things going on. The burner is now sitting in my kiln at 190F drying out. When it seems pretty dry, I'll turn it up to 300 an melt the wax out and then as soon as the forge is ready I'll put it in and fire...Should be sometime this week! I have not experimented with thinner blocks so I can only hypothesize, so take these thoughts in that light. First, a few people are playing with perferated ceramic tiles (one a casting filter and the other is for BBQ's I think). Check the NA ribbon burner section or the ribbon burner section and see if you can find them. Maybe 6 months ago? Info that might help: I did read that a flame will not pass a screen with holes of a certain diameter or smaller (depending on the type of gas). For propane the size is about 1/8" or a little smaller. What happens is the heat of the flame cannot support itself in so small an area - the heat loss extinguishes the flame. Back in the 1800's they made a special lantern for use in coal mines that had explosive gasses. It used a screen to surround the flame with small mesh. This prevented the flame from passing through the screen. Google that and see what you can find. My feeling is that the inconel sheet will work, but may backfire when it gets hot - the metal being up close to ignition temperatures. You'd have to experiment to see how it works. Possibly with smaller holes then the 1/8". Love to hear the results! DanR
-
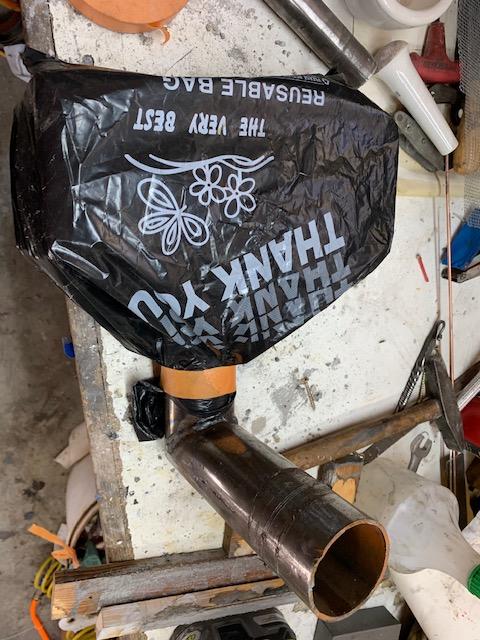
Update: Poured the refractory Sunday, and waited until Wednesday to allow the refractory to harden and pulled off the form (just couldn't wait longer ). Monday I had poured some water into the pipe and re-bagged the end of the pipe...stayed nice and wet until I pulled it open. The wood form with the sprues in it was nearly impossible to take off, all the sprues held into their holes like they were melted in there. Had to slip a thin steak knife between the refractory and the board to cut the sprues, but finally got it off. Bagged it up again, and I'll pull it out today (Friday) and dry and burn it out while I modify the forge to accept it. It's set up for a forced air system, but I'm considering trying a 1.25 or 1.5" Venturi burner as an injector to see if that works. I'll see how the forced air system works first. I'm suspecting I'll be able to get more stable low flames with the fan, since at low pressures (under 1/2 pounds) my little 3/4" NA ribbon burner won't pull air and goes to full propane. The forced air system wont have that problem if I can tune the fan that low (I have a gate and dampers on the fan), but we're talking so low pressures it may not have any practical difference. Next post I should have it up and running! DanR
.jpg.a0bd20868121b0b1ed532925154fef10.jpg)
-
Naturally Aspirated Ribbon Burner. Photo heavy.
D.Rotblatt replied to Frosty's topic in Ribbon Burners
Might work, but it might round the pieces, you want sharp corners for aggregate. I’ll look up the Seattle store. Thanks! -
3D printed plastic burner experiments (photo heavy)
D.Rotblatt replied to Another FrankenBurner's topic in Gas Forges
NA straight burner and NA constricting burner??? -
Naturally Aspirated Ribbon Burner. Photo heavy.
D.Rotblatt replied to Frosty's topic in Ribbon Burners
Where do you find coarse grained zircopax? It's generally used as a glaze opacifier, so I've only seen it as a flour. Took a quick look again, but no love from google Thank you Frosty! Very kind. I was able to get the mizzou between the sprues, just took patience. I sifted out the aggregate, smashed some of it up, and then added the smaller pieces back in in smaller amounts. Just mix it a cup at a time, sprinkle it in little bits over the sprues and push it down then mix some more. That way I was not sweating that it was all setting up. Next time the first layer will have no aggregate. Maybe it took an hour to cast the refractory in place, another hour to place all the sprues. Curious George is using 1/8" cocktail straws - they may work better since they are stiffer. He'll let us know I'm sure! Since a 3/4" burner works for 124 holes, I'm thinking making an adapter and putting on a 1" or 1.25" burner as an injector on this one as an injector. The advantage of he forced air injector is I can turn it really low (if the fan will do that), while the NA injectors stall out a 1/2 lb or so (they just don't pull any air anymore and the flame goes to all propane). DanR -
3D printed plastic burner experiments (photo heavy)
D.Rotblatt replied to Another FrankenBurner's topic in Gas Forges
Frosty has been using "Naturally aspirated burner" for his ribbon burners - that works for me. They're called that on Ron Reils old site too. I use that and Venturi interchangeably. DanR -
I tried a few wasp waisted 3/4” inlet with a 1:12 to 1” outlet the other day. Full write up is in the AFB’s 3D printed burner section. The burners required I use a larger mig tip .056 vs .046 with same inlet and straight pipe), and the flame was stable at pressures above 3lbs, was unstable at lower pressures and huffed or back burned. My thought is that the gas velocity slowed and couldn’t keep up with FAM. Not good for forge, great for furnace DanR
-
Naturally Aspirated Ribbon Burner. Photo heavy.
D.Rotblatt replied to Frosty's topic in Ribbon Burners
Is kastolite 30 similar to greenlite 30? Either way, I’ll try it next time I do this. Hopefully my burner will set fine and I won’t have to redo. Took about an hour to put all those sprues in place. DanR -
3D printed plastic burner experiments (photo heavy)
D.Rotblatt replied to Another FrankenBurner's topic in Gas Forges
You’re probably right. I guarantee it’s well studied. DanR -
That looks great! You will want to replace that reducer burner nozzle with something stainless - it will quickly deteriorate at those heats. I assume you are using 3/4" pipe. You can get 1" stainless steel pipe (schedule 40 pipe) at speedymetals dot com for about $8 plus shipping. It holds up well. You'll have to grind the seam out of the inside of the 1" and grind away a few thousandths around the end of the 3/4" pipe to allow for a slip fit, but it's not too hard. Happy forging! DanR
-
3D printed plastic burner experiments (photo heavy)
D.Rotblatt replied to Another FrankenBurner's topic in Gas Forges
Mixing? I found a discussion of the Venturi effect on the Inox-Fer Brine Mixers website (google that with the word Venturi and it will be the first hits). They use a Venturi tube for mixing liquids - the increase in the speed seems to mix the fluids. Or, slowing down the speed of the gas so it doesn't blow out from the nozzles? From what I've read, it doesn't have anything to do with Venturi, since it's not a constricted tube. It's Bernoulli all the way (of course so is a Venturi, which is a specific instance of Bernoulli's principle). But looking at it, I noticed it is like an inside out Venturi. The air is increasing in speed to rise around the outside rounded front of the tube, thus creating a low pressure area at the widest part of the tube and static pressure inside the tube. While in a Venturi, the air increases in speed to flow around the inside rounded area while the outside of the tube is static pressure. Inside out Venturi!