D.Rotblatt
-
Posts
335 -
Joined
-
Last visited
Content Type
Profiles
Forums
Articles
Gallery
Downloads
Events
Everything posted by D.Rotblatt
-
If it's the tanks getting cold, my larger ribbon burner freezes a 30# tank. I finally plumbed two tanks together and it solved that problem, and it lasts longer. My setup is like yours, the two tanks sit under the forge, but I plan to change that (after 40 years of doing it this way, I suddenly got an image of a faulty pressure release valve giving out in a plume of LP gas that would ignite under the forges...just a silly little thought I can't seem to shake ). If it's not the tanks freezing, read Frosty's question.... DanR
-

Naturally Aspirated Ribbon Burner. Photo heavy.
D.Rotblatt replied to Frosty's topic in Ribbon Burners
Frosty's territory for the 'T'. But yes, in general the gas/air mixture and performance of naturally aspirated burners is defined by a number of variables such as jet size, mixing tube size (both width and length), intake size, jet placement, Nozzle size and length. They all interact and, within some mysterious tolerance, all need to be right to get good performance. Generally, if you increase the size of the mixing tube, the jet size needs to increase, as well as the intake size. You are basically scaling up or down the whole burner. What is recommended is the result of lots of peoples experiments, and a lot of trial and error in the community. Listen to this advice! It is necessary when trouble shooting or, as A.F. said, designing a new burner type. Try one thing. If it gets better, keep it and try another or follow that lead. IF it gets worse, go back to the way it was (if possible) and try a new direction. For everybody else, I didn't mean to stomp on anyone else's suggestions, just felt I had some information that others didn't. DanR -
Naturally Aspirated Ribbon Burner. Photo heavy.
D.Rotblatt replied to Frosty's topic in Ribbon Burners
J.Gonzalez made his with 90 holes @.125" and messaged me the other day that it's working fine. You're 1" burner is just oversized for the number of holes you have. Switch to a 3/4" burner and it may work just fine. See my discussion with J.Gonzalez over the past page or two. I'd suggest a stock 3/4" Frosty 'T' burner as a starting point - that gives you access to the creator himself if you need help tuning it. I'm starting to think that my 124 holes are too many, thus the organ sound. But once up to heat it's working sweet. Forging at half the pressure I used to, welding easily (except I have a soft brick floor...) - but other mods have been made including a 3D printed inducer with slightly larger tip (using the 3D printer tip drilled out to .040), and a smaller interior forge size. Been fine tuning lots of variables one at a time. DanR -
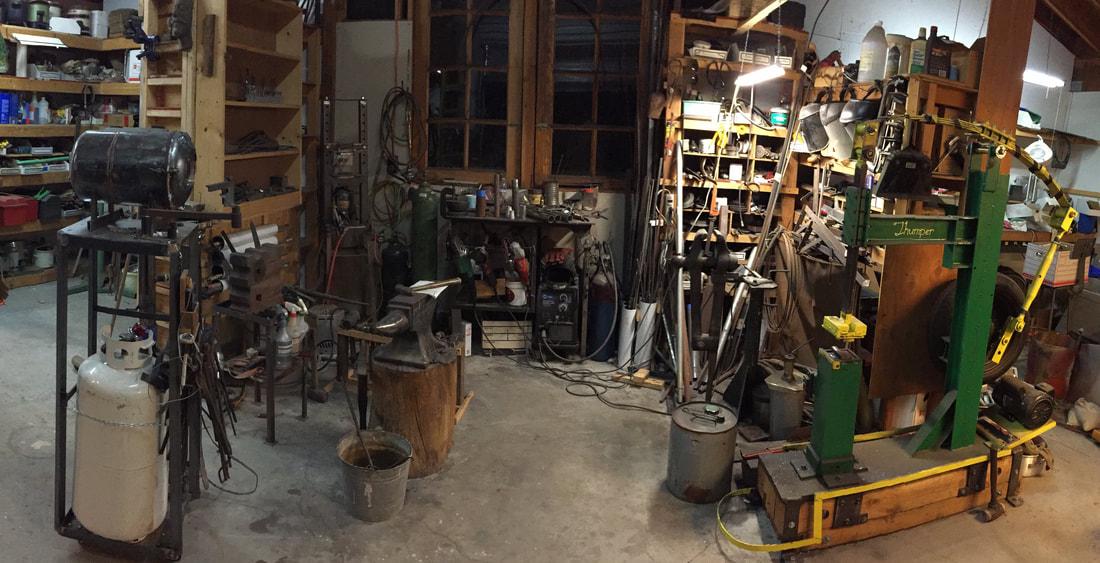
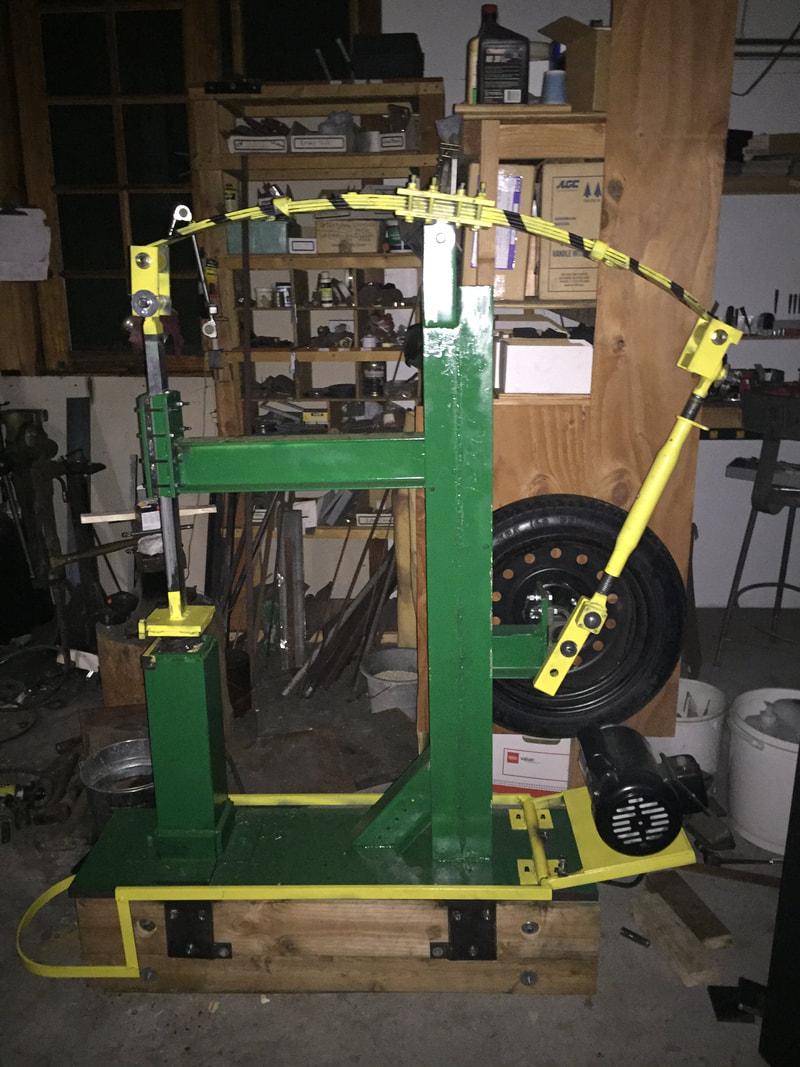
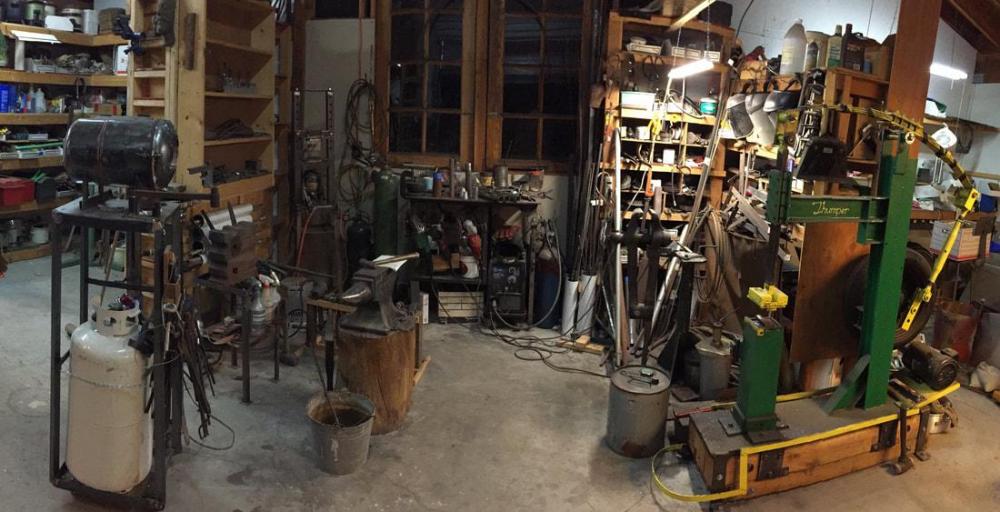
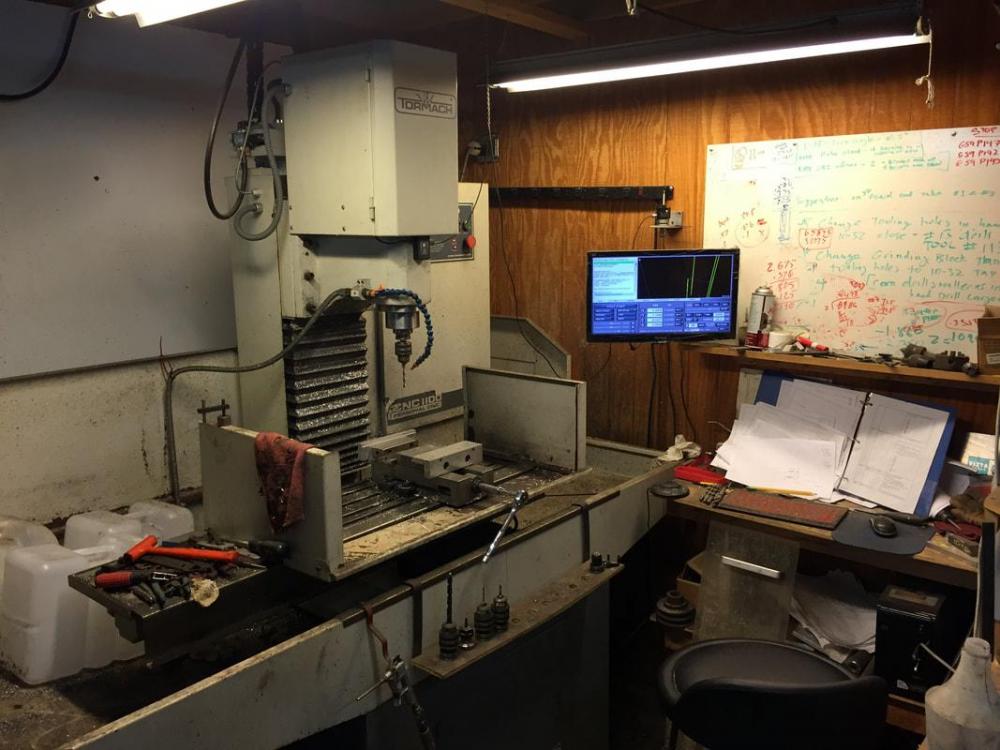
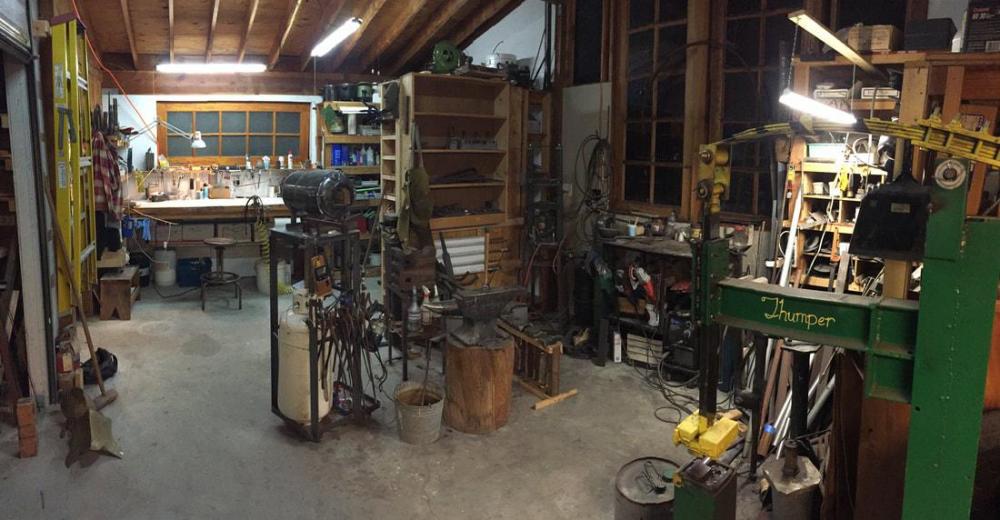
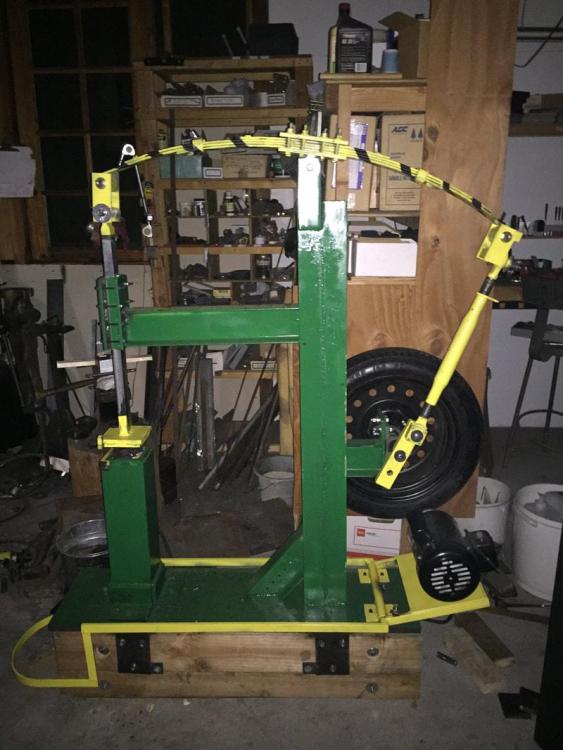
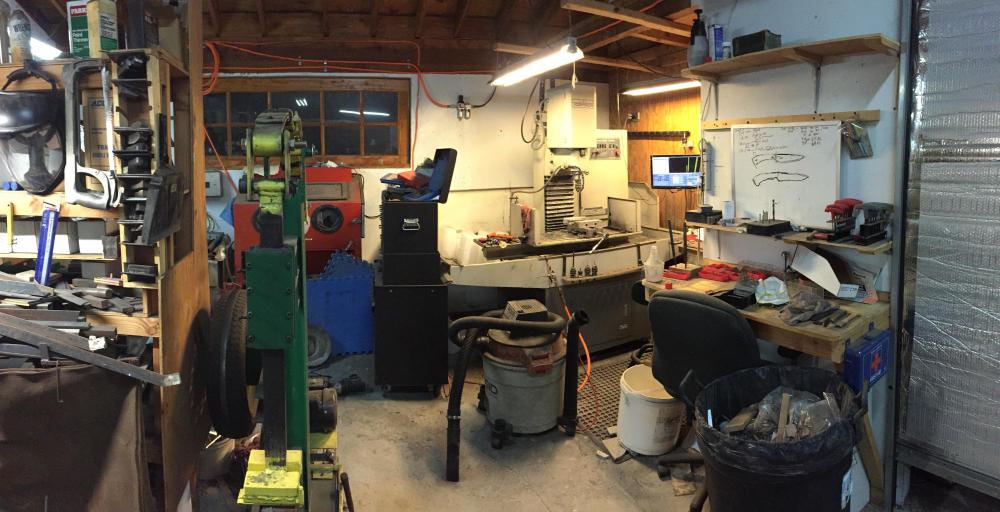
Great to see how people are working. Here's mine, pics are about 2 years old. It's never this neat, but I had just rearranged shelves, tables etc to make it more workable so it was clean...for about a month. The forge has had a baby since then. DanR ___________________ Back when I was building it in 2005: ______________________ Inside the main room, left to right. Table, hot work area, power hammer, CNC mill and another table behind the shelves. ___________ The Grinding room: __________ Li'l Thumper - my power hammer Tormach CNC Mill


-
Just an update: Coal Iron has a new 12 ton press. ~$2800 for the press and the "power pack". Looks fast, and easy. DanR
-
Unless you live with my family....
-
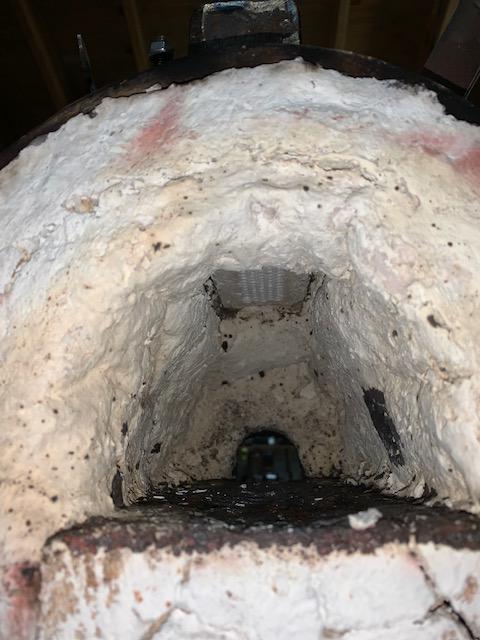
Hey! It's a furnace as well! DanR
-
Little bell went off in my head, hope I'm wrong...are you making sure the metal you are forging is not galvanized? It burns and leaves a white ash (zinc oxide). I assume it's something else, but....just to be careful I thought I'd mention it. Most of the crap that accumulates in my forge is black, melted and/or glass like. In a new forge sometimes if you have a IFB as the floor it will get scraped up and there will be tan powder. DanR
-
I agree! My .125" NARB lives up top of my little round forge. I decided to reduce the interior size, so I added wool on the sides making a kind of Isosceles Trapezoid (not a box, but easy to do with IFB). Not much need for swirl like with the tube burners. The burner could be a little further up (it's about 5" high), because when I have a high billet in there, or HTing a knife perpendicular to the floor the top looks like it's in a bit more oxidizing atmosphere. Upshot is that I agree this burner works really well in a box forge.
-
My solution. Includes removable burner. 6-7 pics near bottom of page: https://www.iforgeiron.com/topic/48001-naturally-aspirated-ribbon-burner-photo-heavy/page/29/
-
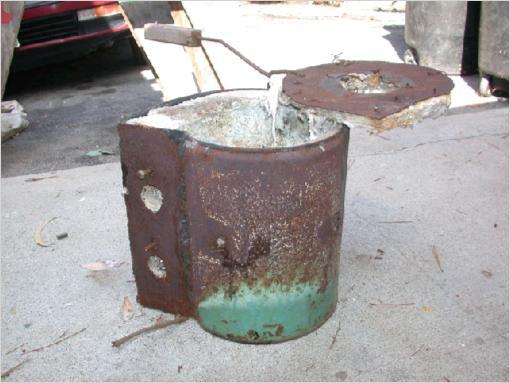
I here you there. I’m often the same way, but here’s a pic of my first furnace just before it was retired. Built from a can with screw top labeled “Freon”. i think it took me 4 hours to build . We didn’t worry about any stinkin’ silicosis back then! As for number of layers, 1” is ok, but you get some heat loss, a lot of my forges had that much and easily welded. Temperature is more about internal size vs burner output (ie make the forge smaller). 2” layer will save money in the long run. The forge is more efficient and gets a little hotter for the same gas. 3” is diminishing returns for the work and $$. Sometimes used to fill space in an over large forge body. Many opinions on this one. A mailbox would work fine. Rivets, screws, welded. Just not soft soldered. I would say anything that will withstand 4-500F, and most of it will never get near that hot. Figure what you want the internal size to be, modify the mailbox in needed. DanR
-
Naturally Aspirated Ribbon Burner. Photo heavy.
D.Rotblatt replied to Frosty's topic in Ribbon Burners
Fantastic that it's working well with 90 holes! Good additional data. Did it make the "Organ sound" for the first 10 minutes or until it heated up? I like it a little reducing - helps prevent scale. You can also change the jet size to change mix. DanR De nada my friend! Happy to do it. CNC mill, not a usual diy'er tool. Doesn't really matter that much from a practical way. DanR -
Naturally Aspirated Ribbon Burner. Photo heavy.
D.Rotblatt replied to Frosty's topic in Ribbon Burners
You're welcome Matt. It was a two-for! When I went down to take pics, I realized I had a knife tempering in the oven...oopppps! It got a good 5 hour temper! I went with 124 holes because it was a more stable flame out of the forge. Wasn't able to try it in the forge, so we'll see how J's works with 90. It might solve the magical organ tone at startup! Anything you can dig up works for a shell. From bending sheet metal into a tube, I made a road find of a stainless stove chimney which became my new forge, party helium tanks are great, stop by a HVAC shop (auto or home) and see if you can snag some of their empty disposable tanks. Anything around 9" in diameter. Doesn't have to be thick. DanR -
Do you want to forge, or like playing around with making forges? Im a knife maker. For a start, to get going quickly, I would go with something like Frosty is suggesting (listen the that man...he speaks with the wisdom of the north). The difference between the two (I have both) is that the ribbon burner makes the whole interior pretty evenly hot, while the tube burner creates a hot spot below it. Being able to heat the whole blade evenly is really good for heat treating. Having a hot spot is nice for localizing the heat when forging, but it's harder to HT as long a blade. A single burner coming in from the side of a 'D' shaped forge parallel to the ground so the flame will swirl will distribute the hot spot wider and is a good compromise. A ribbon burner is also a harder build. Frosty's 'T' is an easy build. I would say to start, there is no need for a ribbon burner at this point, and there are advantages to a spot heat that you get from a single tube burner. The single burner forge I made for portable demos turned out to be my regular daily forge for years. It was/is (it's been modified for a ribbon burner since) about 250 cu inches, made from a small helium tank, and had a single 3/4" Reil burner on it. It easily welded. I think the helium tank is the 8.9 cu ft tank, and the bottom internal dimensions where one IFB brick...4.5 x 9"?, and it had a single 1" layer of ceramic fiber. For knives, in a forge this size you can forge and HT a blade ~10" long. I used this forge to make swords, but had to HT in a different forge. Upshot is for starting out, make it small, simple and quick. After you use it awhile you will know what you need for the next one. The second one is easier, because you have not only the knowledge, but a lot of the parts still around. And in the meantime..you're making knives! DanR
-
In doing experiments on different burners, I tried a burner without any reducing bell like the atlas burners. It worked. Adding a reducer (I tried many types) always resulted in a better more stable flame. Given that, I did get a reasonably stable flame off a pipe and jet with no reducer, and that was in open air. In a forge it's a different animal. YMMV. DanR
-
Naturally Aspirated Ribbon Burner. Photo heavy.
D.Rotblatt replied to Frosty's topic in Ribbon Burners
My experiments in open air worked with ninety holes. It should work fine, looking forward to seeing the results! DanR -
Naturally Aspirated Ribbon Burner. Photo heavy.
D.Rotblatt replied to Frosty's topic in Ribbon Burners
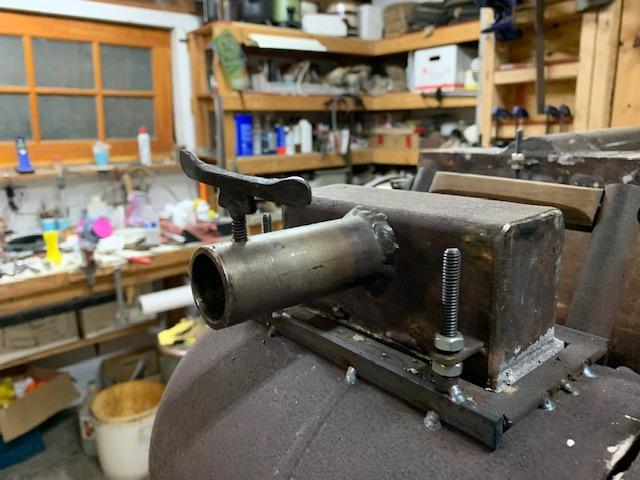
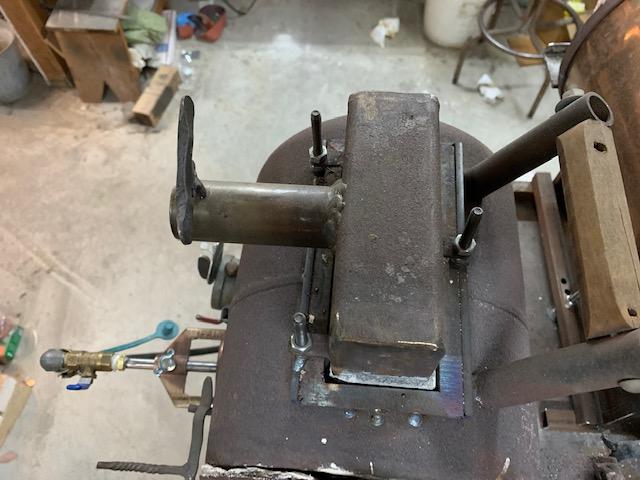
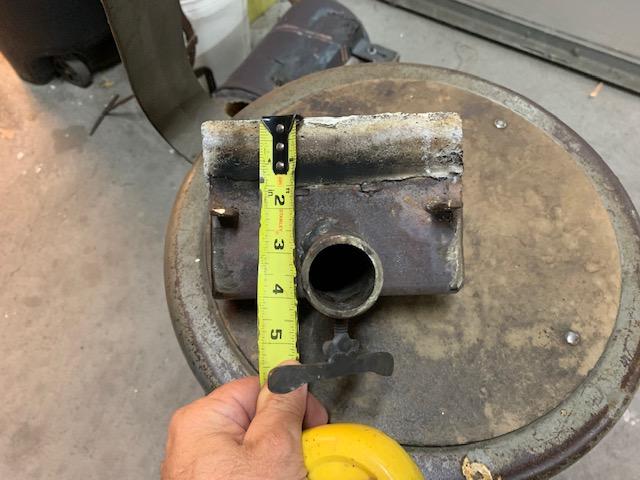
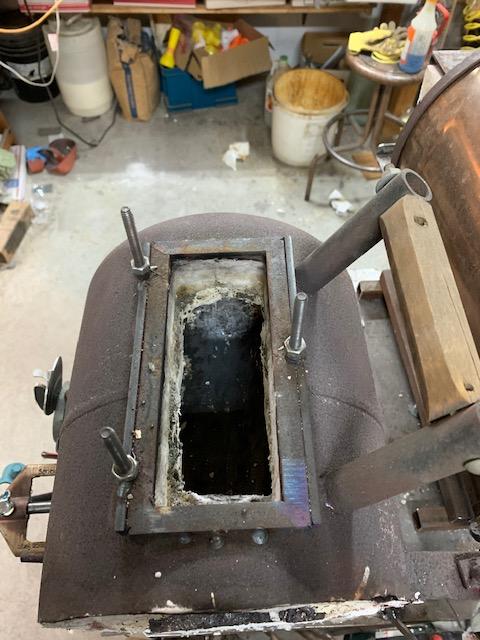
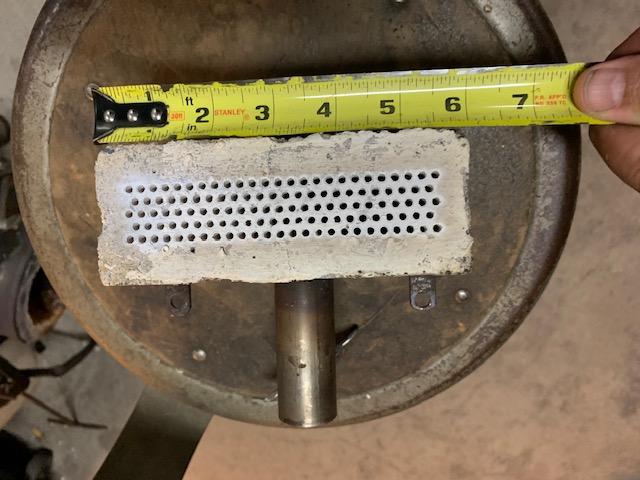
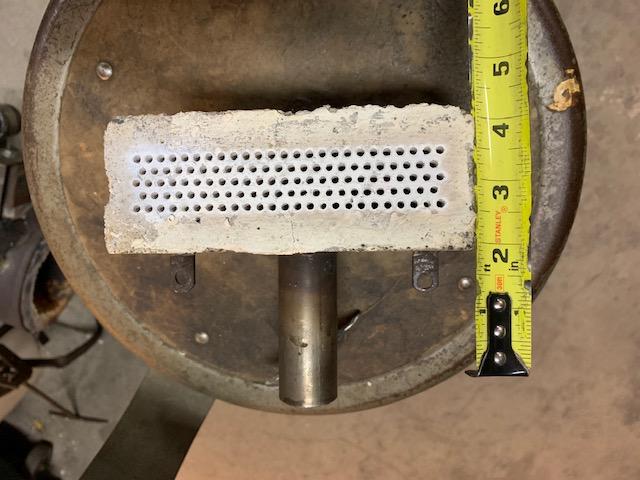
Refer to Frosty on this, he worked out how to make a NARB (THANKS FROSTY). I took his burner and changed it by making more and smaller holes. If you are using 1/8" holes, I find that kind of head is very forgiving on the type of burner that runs it. I've put in a Reil, a Mikey, an experimental hybrid, and my new cast burner and they all work just as well from the point of the burner head. The basic construction is just as Wayne Coe outlined. Same form made out of 1x2, etc. ***I don't think the dimensions matter so much. It can be wider and shorter, or a bit longer. That's the beauty of the ribbon burner! But as to the one I built here's the specs and pics. The plenum is a piece of 2" x 2.5" tubing. It's about 6" long. There are 124 holes (I think, you can count them if you want ). The refractory block is 1.5" thick, since I used 1x2 for the form. On the plenum, when you cut out the side that the refractory is on, leave an edge of about 1/8" so it will lock into the refractory. The plenum is sunk into the refractory around 1/4" - 1/2" - hard to tell when you are doing it. Don't know about making it thinner or thicker, this is what I did, and it worked. As you can see from the picture, the holes have a 1/2" border. So the area with holes is about 1" x 5". The burner is set up into the ceramic fiber about 1/4+". There's a pic below. The forge itself is very small, maybe 225 cu inches. I added a layer of ceramic fiber and changed the shape of the original forge to a kind of truncated triangle shape with the floor 5" wide. Since the burner has such small holes, the flames are only about 1" long, it's not like a 3/4" burner that the flame hits the floor. It would easily power a larger forge, but being small, its really efficient. I'm forging at 4 lbs (with .040 jet), when I used to forge at 7 lbs. ________ General pics: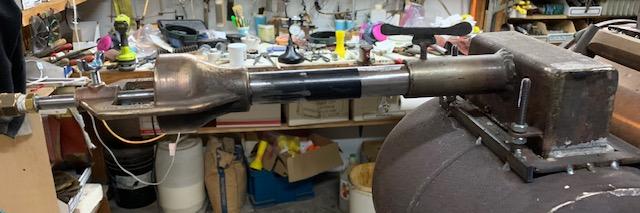

-
Naturally Aspirated Ribbon Burner. Photo heavy.
D.Rotblatt replied to Frosty's topic in Ribbon Burners
Odd...my figures show the opposite. How many holes are you planning to use? My burner head with 122 holes @.125" gives an area of 1.5" (.012 x 122), while a 1" burner pipe gives an area of .79". That's almost double the area of a 1" burner. Now, I'm using a 3/4" burner not a 1" burner, so its more like triple. The 122 holes worked well for any of my 3/4" burners. If you are going to use a 1" then you might need more holes. If you are using a 1" burner, try the Frosty test: Take a block of wood and drill 125 or so 1/8" holes in it, then tape it to the plenum and see how it works. You get about 15-30 seconds before it starts to burn. Keep adding holes until the flame looks good - ignore yellow flames, that's burning wood, but you can see the flame shape and whether it holds to the burner or not. It's an open air test, so it will work better in the forge, but it will give you an idea of how it'll work, and it's pretty easy to do if you have a drill press. DanR Look on page 22 of this thread for discussion on the theory. JWMelvin refers to an article about hole size and prevention of flame propagation that is interesting. Pro ribbon burners are the reason I tried the small holes. There was backfiring issue on the crayon sized burners when they heat up for a few hours - you have to turn the gas pressure up to keep it from happening. It seemed to me that many pro burners have small holes, and everybody seemed to be using the crayons just because that's what originally worked. My 1/8" is working like a champ, good even heat, low consumption, no backfire even at pressures too low for the gauge. -
I use it because I have a couple bags around. Can’t compare it to others because I haven’t iced them. It works well. It’s a high alumina refractory and is pretty flux resistant. My present shelf is between 1/2-1” thick and I’ve removed it without trouble. It’s very strong. you should get a lot more then 3-4 shelves out of a bag. DanR
-
Problem with a ribbon burner forge, flame lift-off?
D.Rotblatt replied to Tobias's topic in Gas Forges
Respectfully Mikey, I believe that 8mm is the size of a crayon, so that's the same as most that are made (it's what Wayne Coe used in his and has been copied many times). Looks to me that you have way too much air pressure. Do you have a gate after your blower? If not add one. I don't recommend a rheostat, since, in my case, whenever my compressor turns on the power drops and the fan changes speed... Too much pressure will also cause you to open up the propane to get a flame going, lower the pressure will lower the consumption. In my opinion, it should run on 20-30 holes fine. DanR
-
I looked at the site. It seems expensive to me, but I make my own. The whole thing would cost you about $150-200 US or so to build...if you have the tools, skills, desire, and time. Burner parts on it are basically stuff from hardware store - black pipe, fittings, etc. It's naturally aspirated with an interesting jet and mixing tube assembly made from a black pipe and large nut welded on sideways. It's a farriers forge with opening side - nice for working odd shapes if that's your desire. My issue is there is so little info on it. No dimensions are listed, so we don't know what the internal size or Cu In volume is. No info on the burner, which is of a type I've never seen. No info on the lining material, etc. To compare to other 3 burner forges on the market (a quick google lookup): a Majestic 3 burner is $450 US, Diamondback makes an equivalent one for $600, NC tool co knife maker 21 is around $800, and the Chili Forge Chili Grand 3 burner is $2000 US, and $500 for a Devil forge. So the price is up there with the well established NC Tool Co's forges. There are a number that cost less, and the Chili forge is amazingly expensive! Do you know anyone who owns this forge? Can you call the company to get some referrals to talk to some owners? YMMV DanR
-
I've use a DIY zircon/colloidal silica (the type used for shell casting) coat which does add some protection. But once there's flux on the shelf under it...well coatings don't last too well. You can put another layer of refractory on it (I use mizzou). If you have refractory around, you can make shelves with that if it's high alumina. I put some wet paper towels (or cardboard if you want a looser fit) on the floor of the forge (folded up a couple inches on either side), and trowel on a 1/2" or so layer of refractory. The paper towel burns out and the shelf doesn't stick, and can be pulled out. I also build up the edges so any flux will pool in the center rather then seeping around the edges and glueing it down. Cheap easy kiln shelf. DanR
-
Naturally Aspirated Ribbon Burner. Photo heavy.
D.Rotblatt replied to Frosty's topic in Ribbon Burners
Pretty close. Looks like .1675, but 3/16 is fine. Making them close together is really an issue of getting th refractory in between the sprues. I had lots of problems with the sprues bending. One person making them used steel rods dipped in crisco - said they pulled out easily and stayed straight. I'd suggest you try that. i'm actually considering trying one that uses smaller then 1/8" holes. We'll see when the muse hits...want to play with some actual pounding of hot steel now! BTW: NA or Forced air? DanR -
This may be a dumb comment and I'm sure this's what you meant, but you only need a wall with a small opening at the bottom for stock to pass through, you don't have to fill it in completely. DanR
-
LOL...Been there done that! I used to use roofing nails a lot for leather rivets. Although since you mentioned spangen helms, I see you are from a similar background. Only thing I can add to that is if you are riveting two thin sheets of sheet metal together, use a small washer that the rivet/nail will fit closely into on the side you peen. It's a surface to peen onto and the wider surface will hold the sheet metal together better. It'll work fine, or use rivets. As Thomas said, screws may oxidize solid over time...but so what? The forge body should not get over 3-400F - same as an oven and there are plenty of screws holding those together. There are a few places, like over the door that may get hotter. DanR