tomfromuk
-
Posts
53 -
Joined
-
Last visited
Content Type
Profiles
Forums
Articles
Gallery
Downloads
Events
Everything posted by tomfromuk
-
Wrought Iron?
tomfromuk replied to tomfromuk's topic in Blacksmiths and Metalworkers Association of the South West UK
At work we have both Interlink and TNT in every day so i'd rather just chuck it on with them. Would save me a journey -
Hi, I've found some metal lying around which I believe to be wrought iron. The pictures hopefully show if it is or isn't. The wrought iron is of no use to me but it seems a shame just to throw it in the scrap. If someone wants it then I will (provided you pay the postage) chop it up into 12"-18" sections and package it up. The postage would probably be around £10-£12. Hopefully this post is okay in this section, I would like to leave this up for a week or two to see if anyone wants it, if not its off to the scrapyard. Thanks, Tom
.thumb.jpg.921e39689ab11845fb99889209bac7b9.jpg)
.thumb.jpg.27abef798923d13fa7bcf1eaa3cf6c05.jpg)
.thumb.jpg.14f3e730e36b9636f52e29a7157dc295.jpg)
-
To be honest I probably wouldn't do anything to it just yet. I'd use it abit 1st and then decide what to do with it. Maybe run a fine flap disc over the very sharp edges to stop them from chipping. Tom
-
Wow, thats a very impressive start . I'm defiantly envious Tom
-
My anvil is uglier than yours!
tomfromuk replied to stuartthesmith2's topic in Anvils, Swage Blocks, and Mandrels
Seen this anvil on Ebay, has had some lovely work done to the heel To be fair its probably not too bad apart from that, and the starting price is okay. Tom.thumb.JPG.1f3f6276c071951040e77852ba60bc5f.JPG)
-
Sorry, there is a problem There are no posts to showError code: 2F173/L
-
So this is the advice i've seen on almost every other similar topic. Use the anvil like it is. You could take a wire brush to it and remove some of the rust but working hot steel on it will do exactly the same thing. The edges are fine, leave them alone until you've had some good use out of the anvil, If you need sharp edges then it shouldn't be too hard to make a hardie tool with good edges. Also keep an eye out for any markings on the sides of the anvil, under the horn, under the heel and on the feet. They might give you some more info on the anvil. Its looks to be a great anvil, all it needs is some work to do My $0.02 Tom
-
A brake drum isn't a terrible idea but they're not for everyone. Brake discs are likewise okay. If you have the ability to fabricate a steel fire pot then you may want to think about that. Alternatively you could put 2 inches or so of soil/ash/sand etc... ontop of the plate and then run a pipe in through the side to create a side blast forge. Also more information would be nice, what fuel you want to burn, can you weld or not, where you live, etc..... The devil really is in the detail. Tom
-
They say a picture tells a thousand words, but what about a video? Anyway, I recently fixed up a Alcosa Forge Blower. I took videos of the process on my phone, partly so I remembered what went where and also because I like doing abit of video editing now and then. So here's 3 short videos highlighting the steps I took to restore the blower. The videos wont be everyone's cup of tea, but nobody is forcing you to watch them. Tom Thanks
-
UK solid fuel choices
tomfromuk replied to Dee J's topic in Blacksmiths and Metalworkers Association of the South West UK
Seems reasonably priced for regular house coal, probably worth getting one 20kg bag 1st and trying it out, unless you burn alot of coal on house fires. Where abouts its scotland are you moving too? There is a company in the borders called pearsons of duns who do various types of bituminous and anthracite coal. -
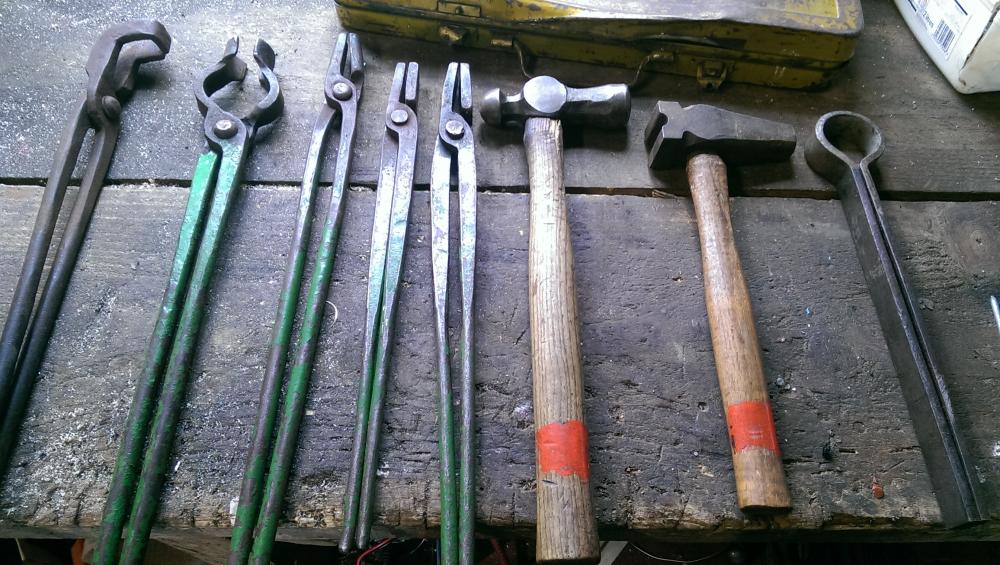
Picked up 5 sets of tongs, 1 hammer and 1 top swage(?) Not certain what the tool on the very right of the picture is used for. Paid £50 for the lot, which I thought was fair enough. Tom
-
Defiantly worth watching, really nice to actually not have any narration or voice over. Allows you to really pay attention to what is being done, and the knife you made was beautiful.
-
This link should work: http://www.bbc.co.uk/iplayer/episode/b05tpw1j/handmade-2-metal
-
Thats really cool, definatly beats the paper weight anvils I see on Ebay.
-
So I spent the afternoon trying it out, It was sort of working. However the pipe I used to connect it to the under side of my forge was well over a metre long, it was due to this that I think it failed at heating the 15mm square past a dull orange heat. (There could be other issues here, like using a brake disc thats too shallow, not building up enough coal/coke around the fire, etc etc). Im going to get another pipe and try again later this week. Thanks for the help guys, Tom
-
Just seen your post about Q max cutters ID, I can honestly say i have never heard of them before but they look really simple to use. I guess if i was cutting many holes this size I would invest in one of those or a hole saw. The weather looks good today so ill put a few drops of oil through the little oil channels and then see if it works, Fingers crossed Tom
-
I just did dot to dot with a few different sized drill bits until the centre piece fell out, a few mins with a half round file and the hole was finished. Found a pipe to connect it to my forge, so will duct tape it all up and give it a try tomorrow. Ill try grab a video on my phone. Also how much grease to the gears need? Is it possible to put too much on the gears, I do have some gear oil as well which my grandad gave me today. Tom
-
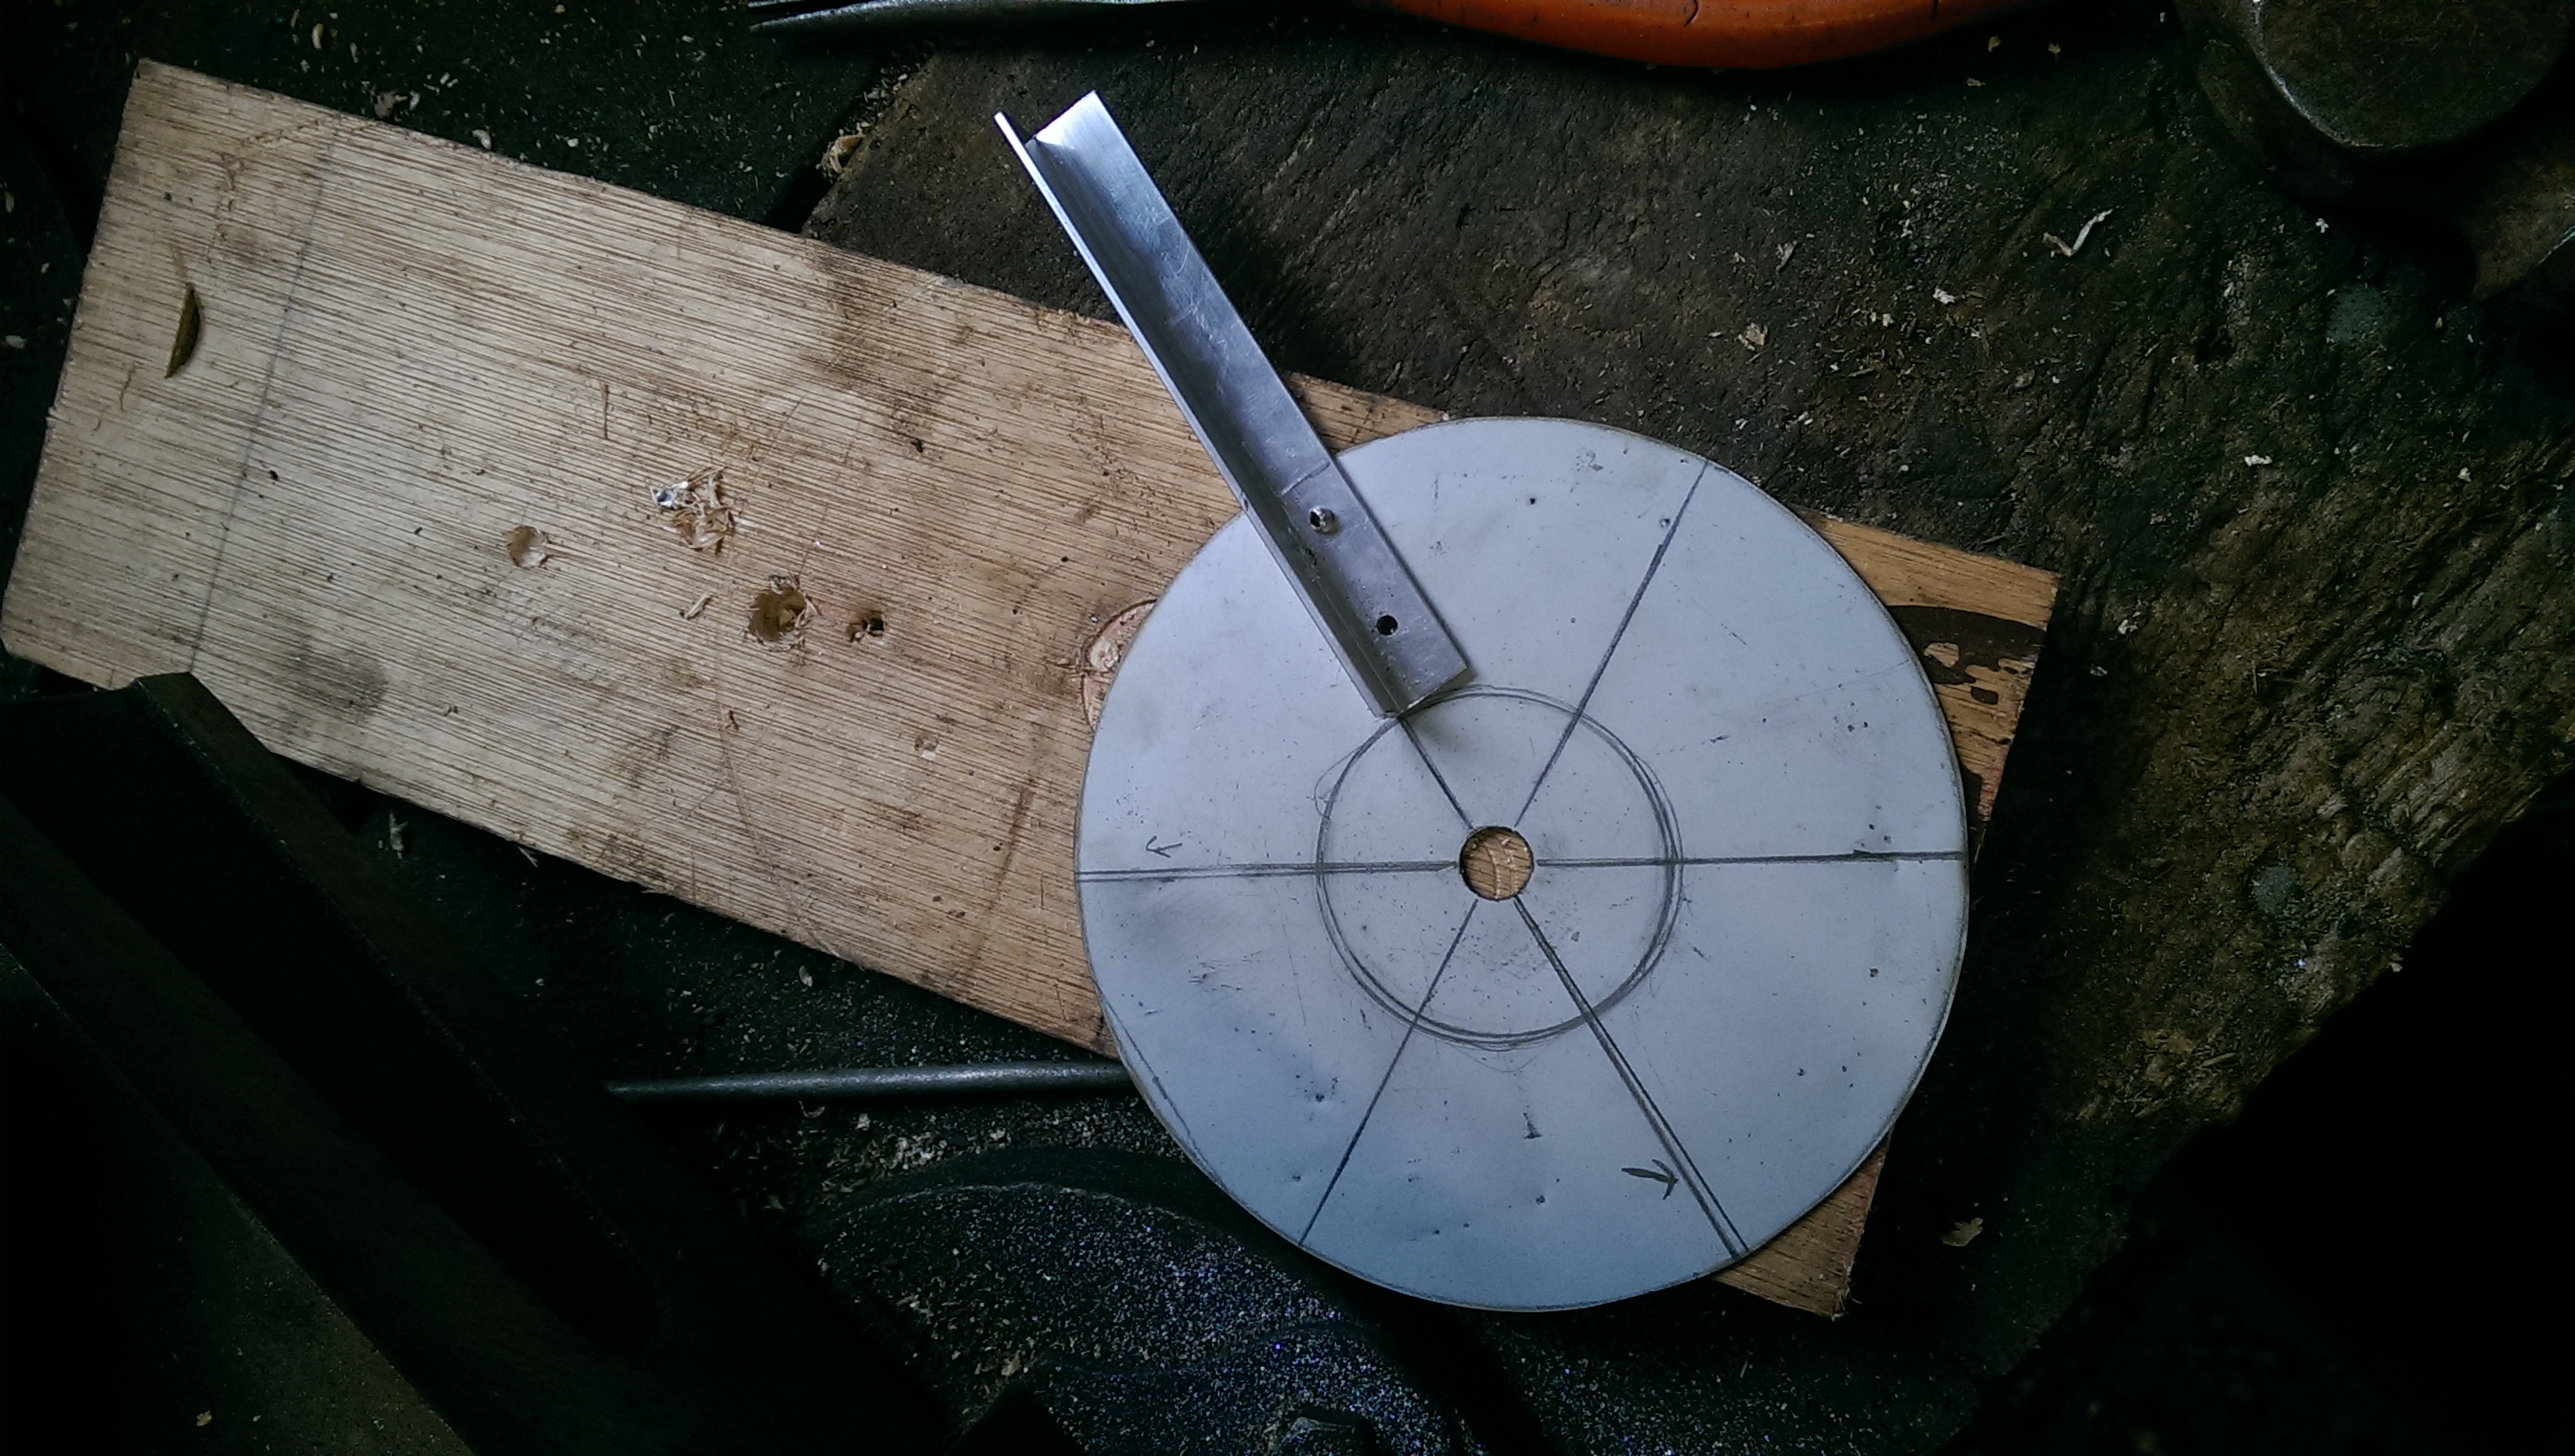
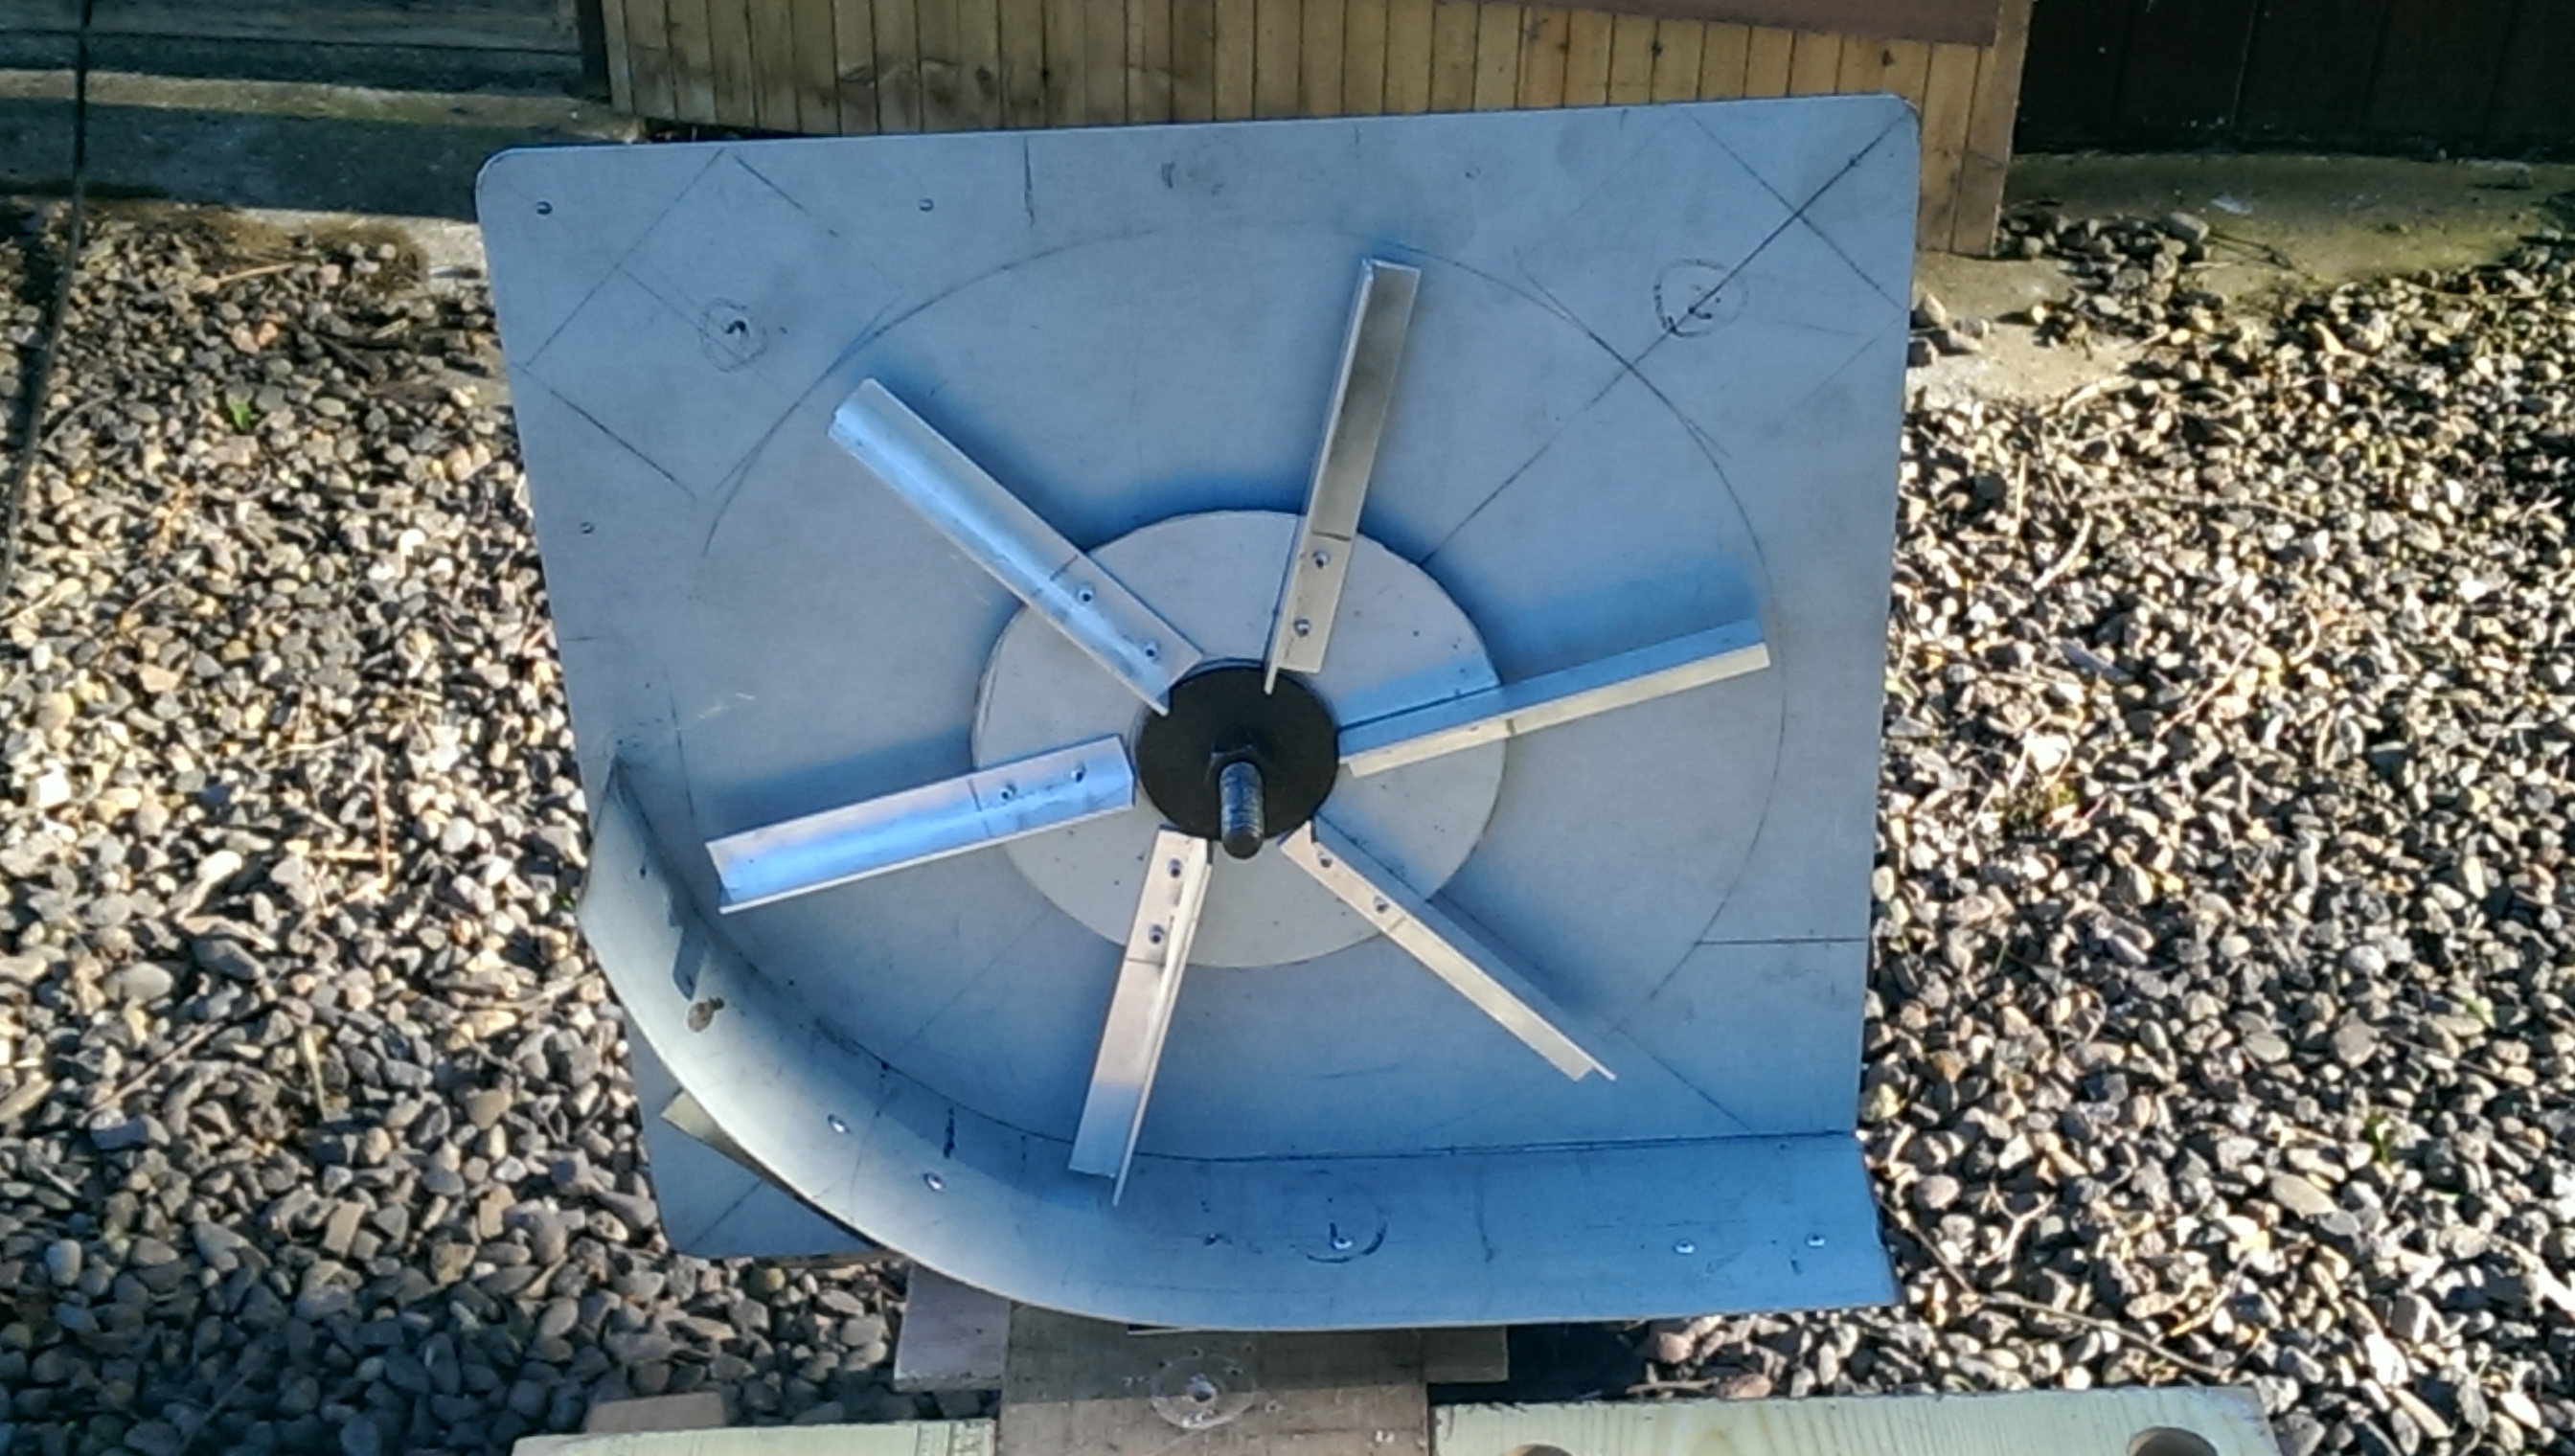
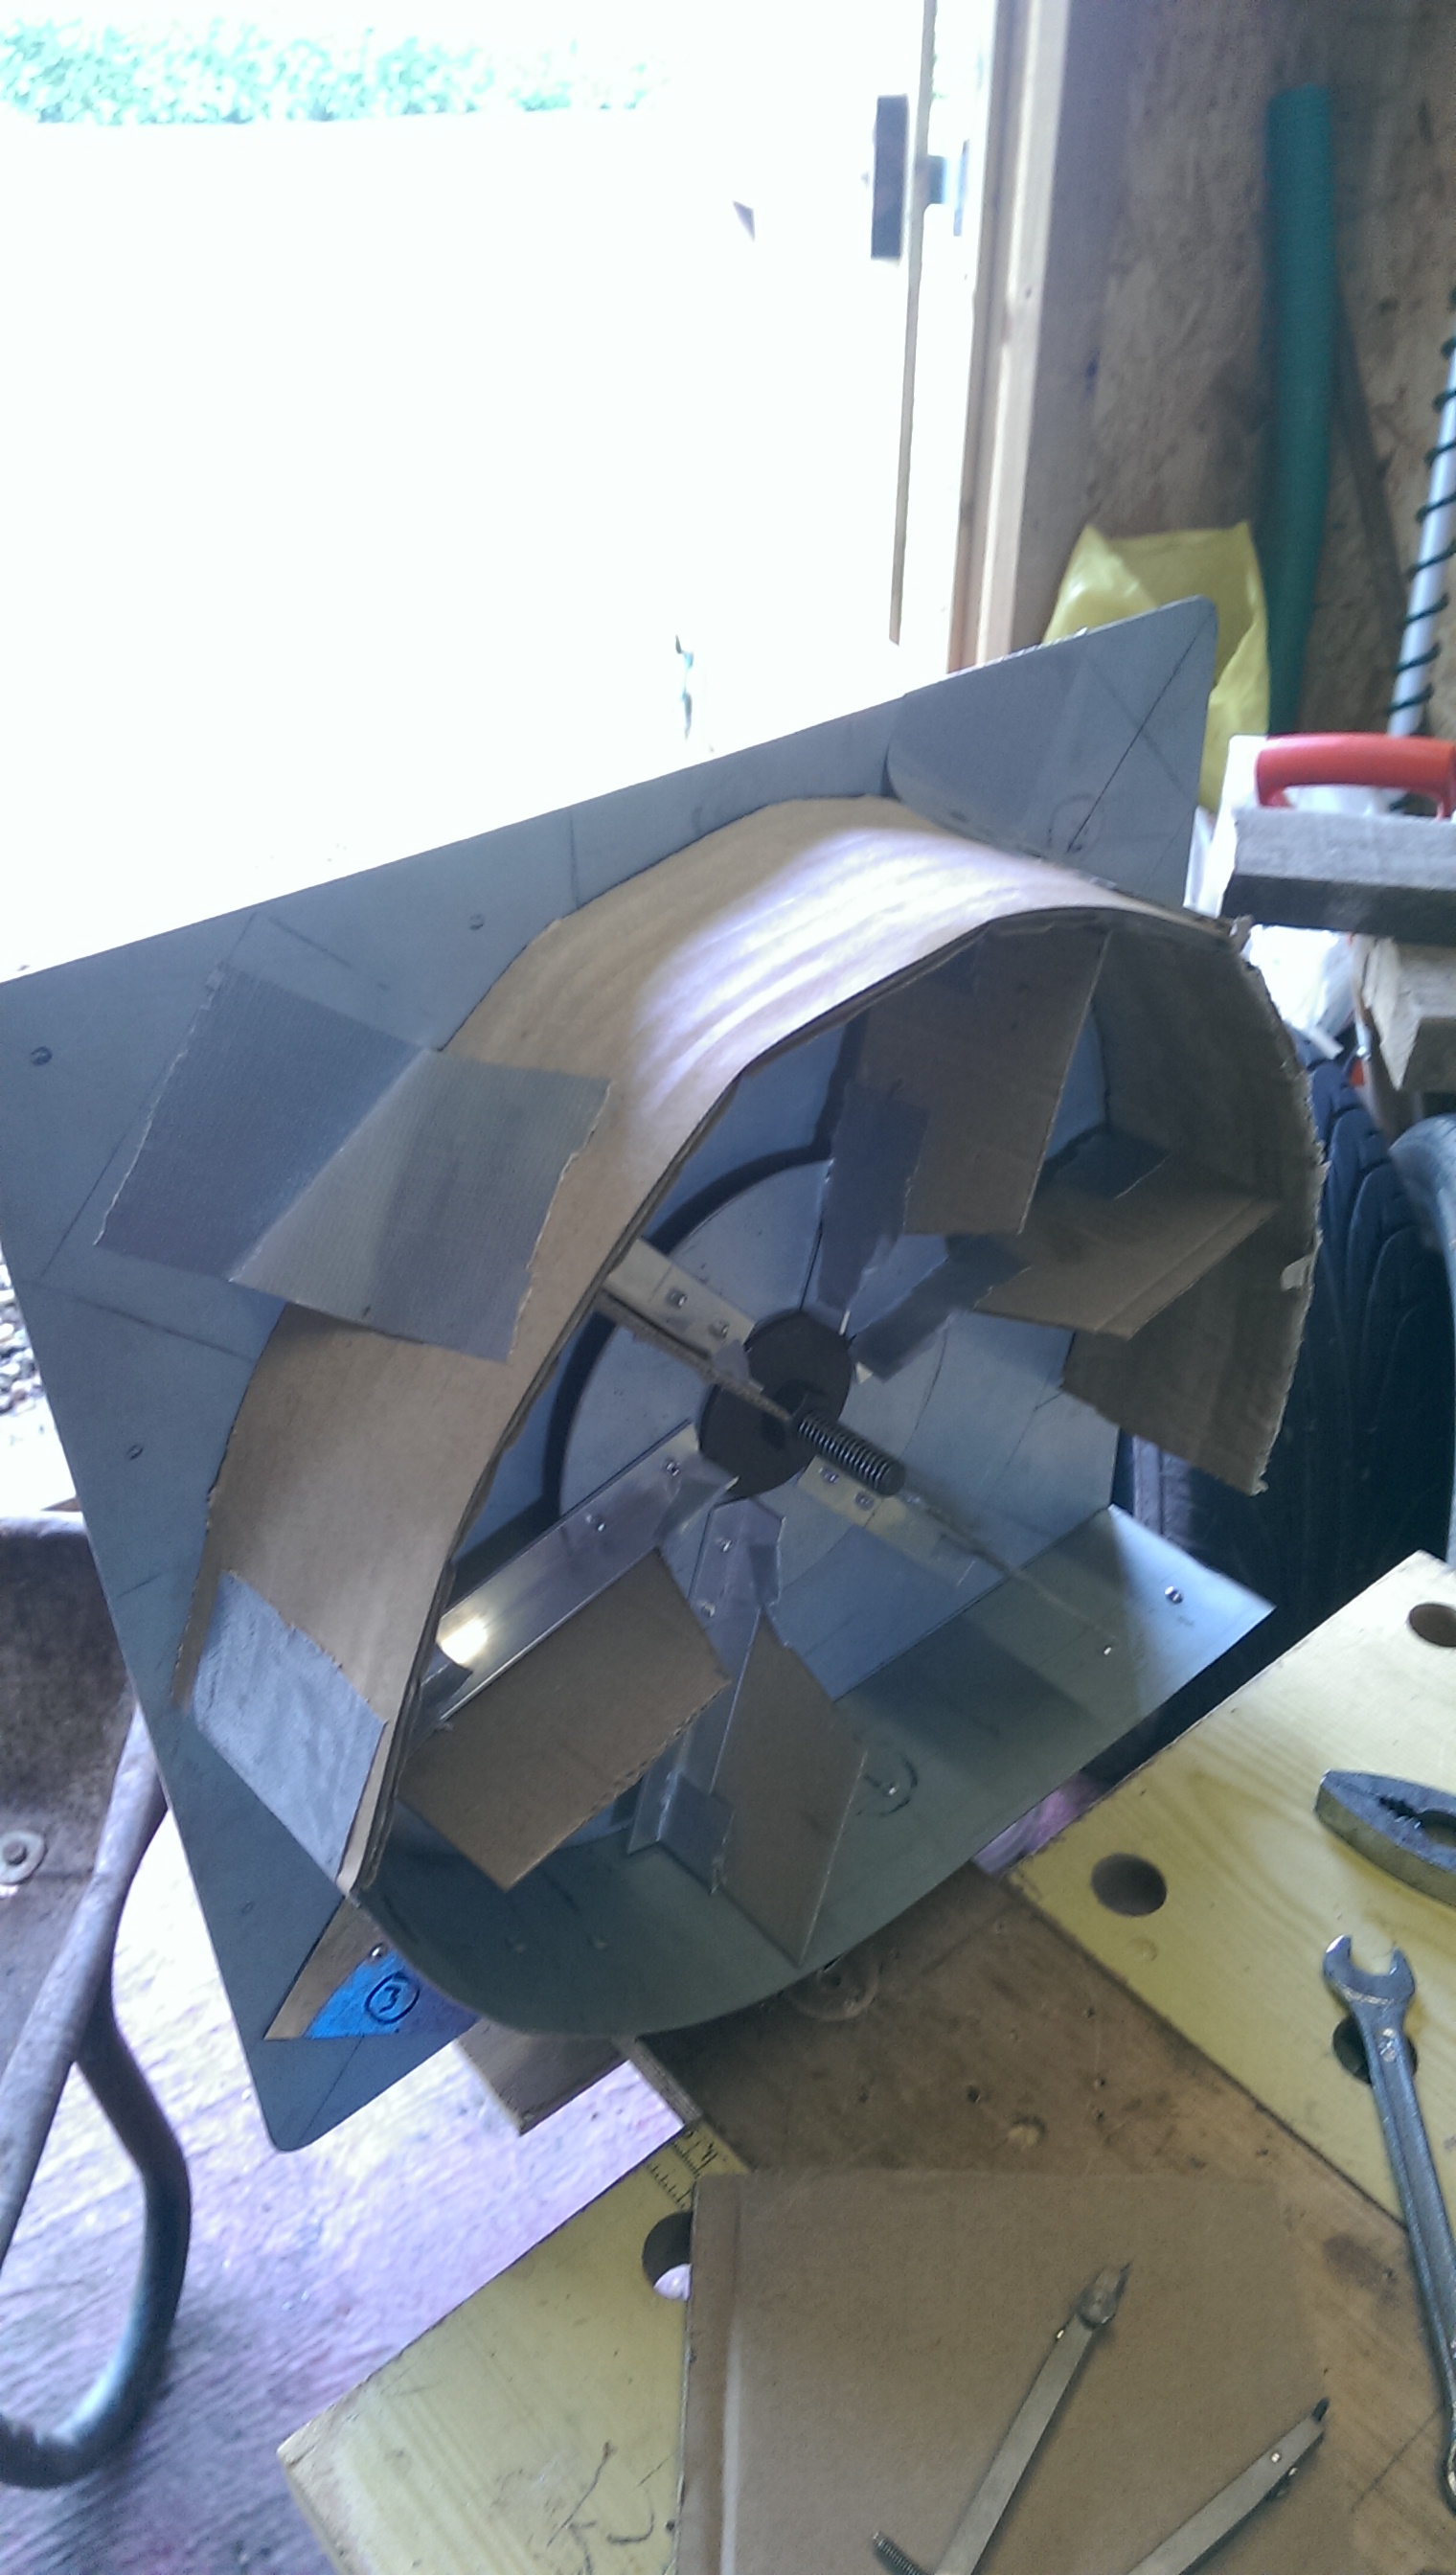
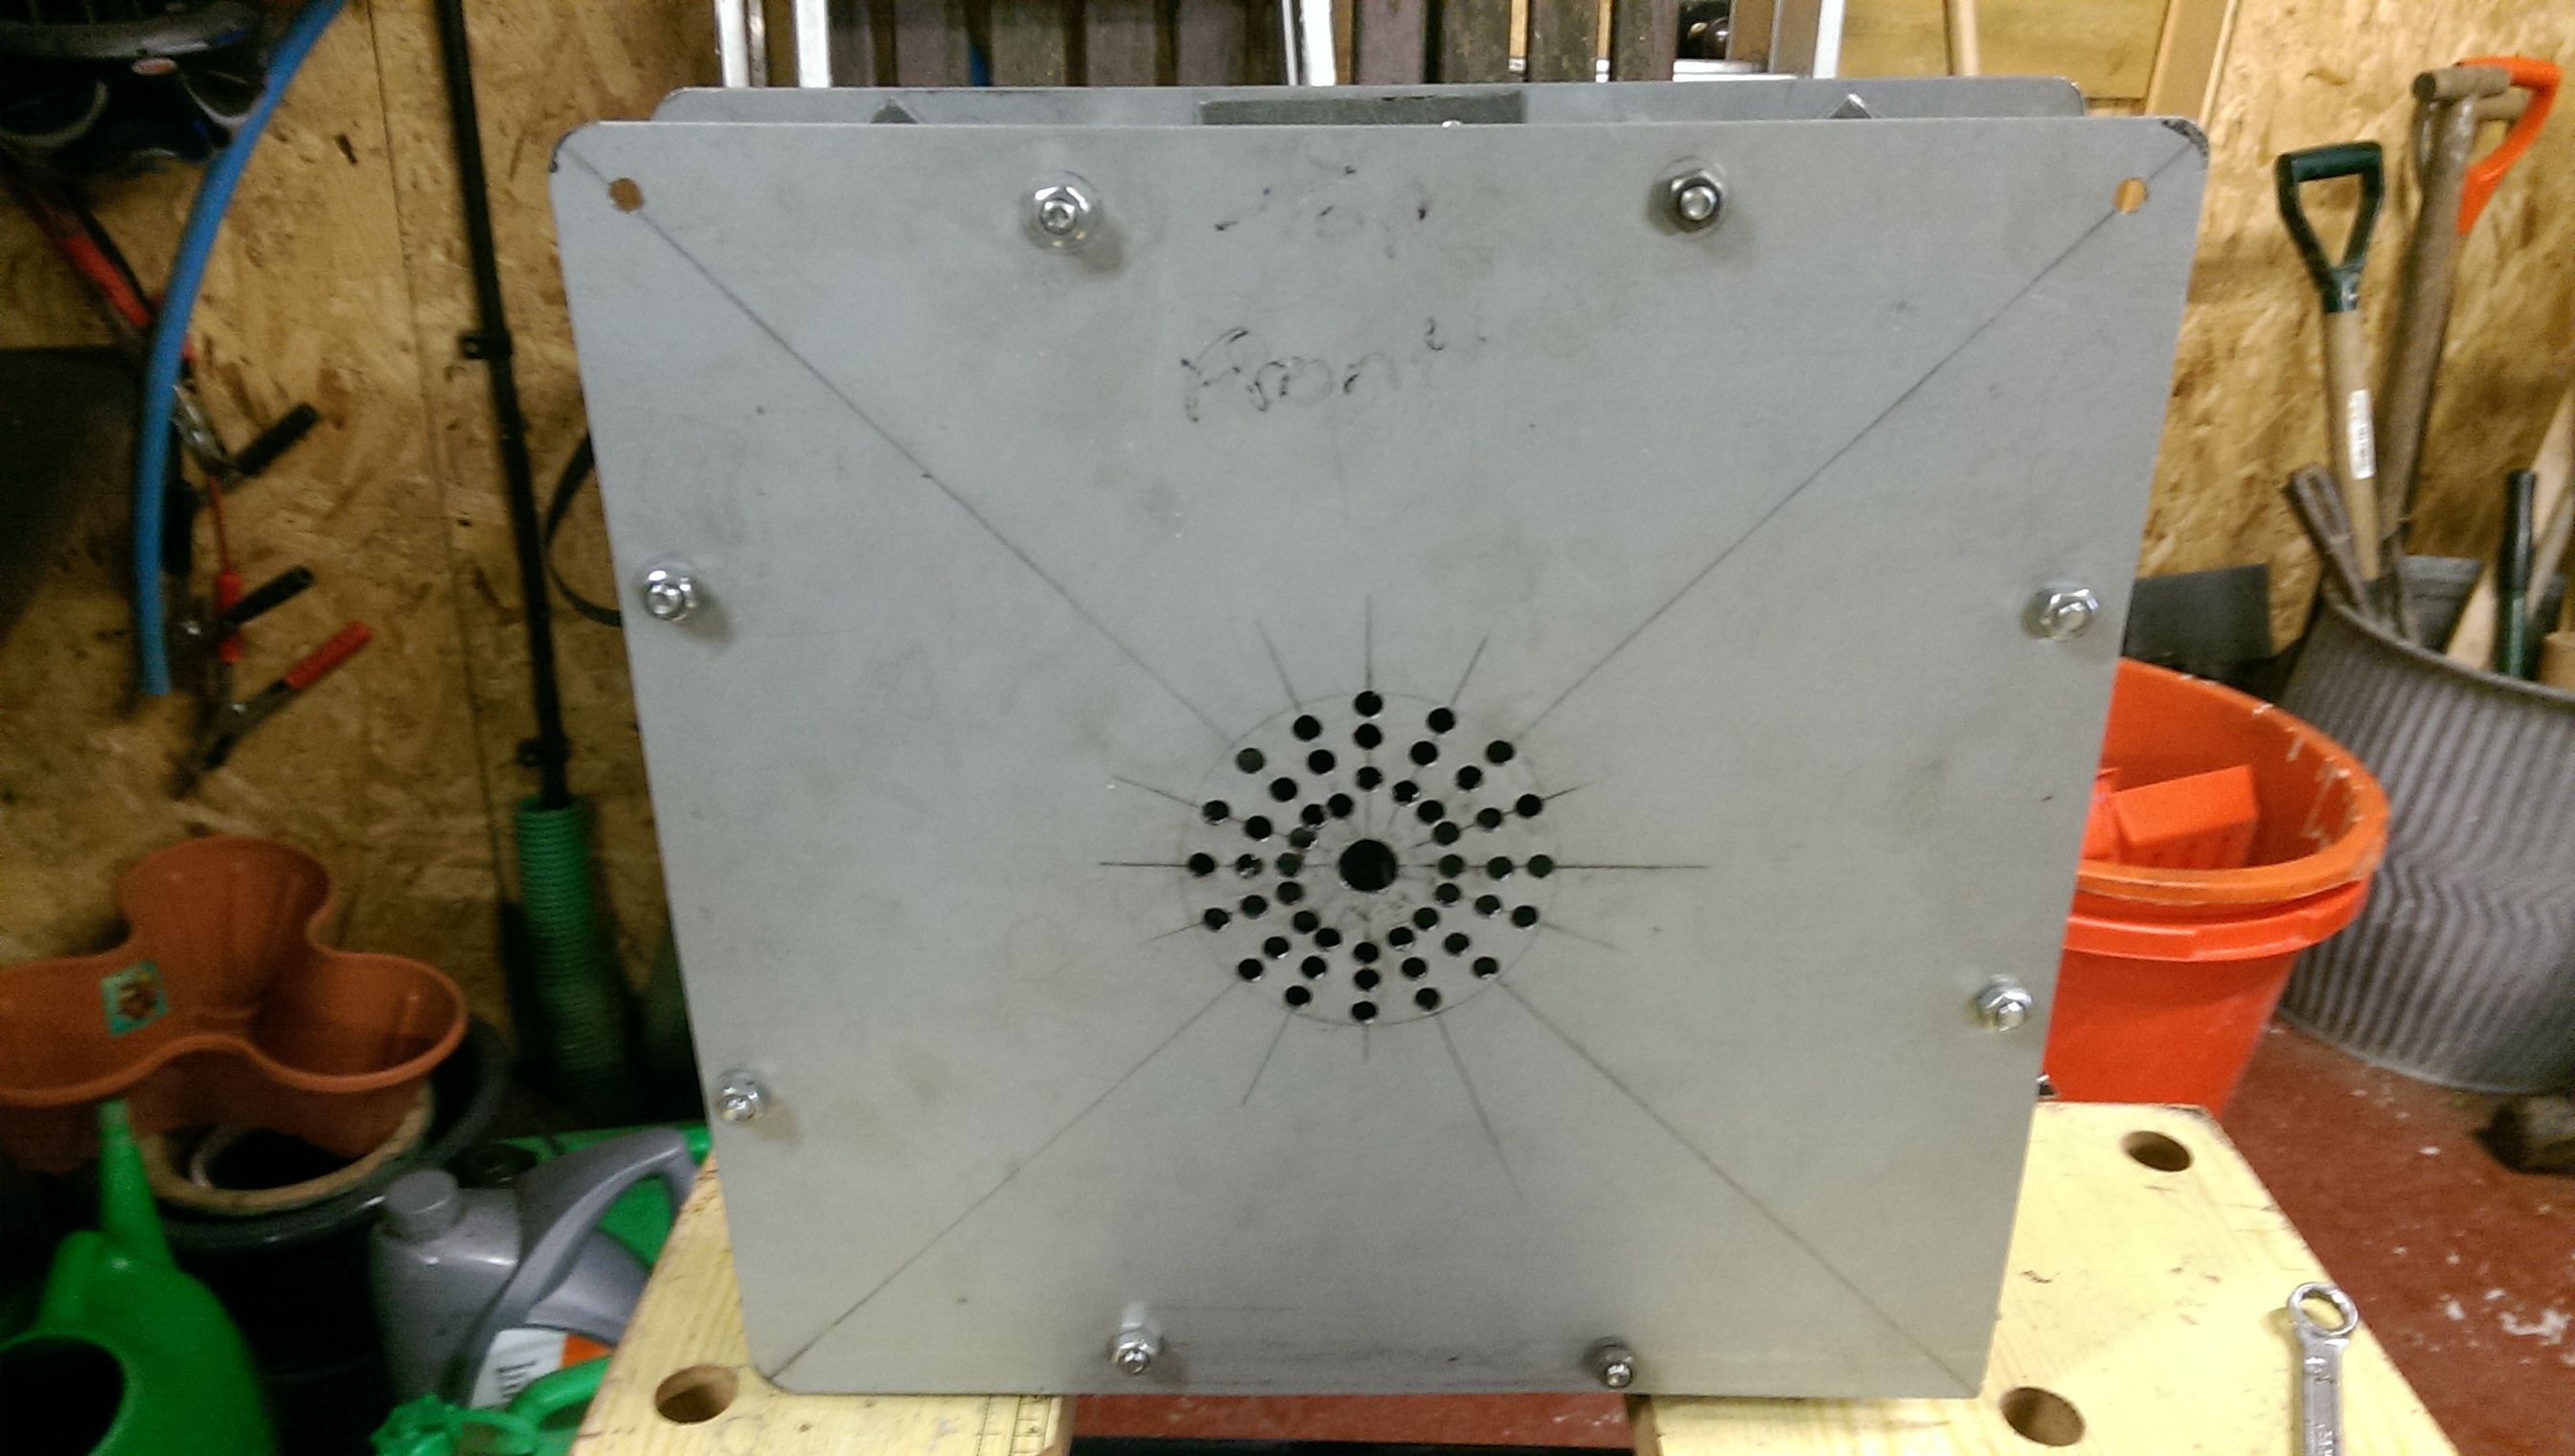
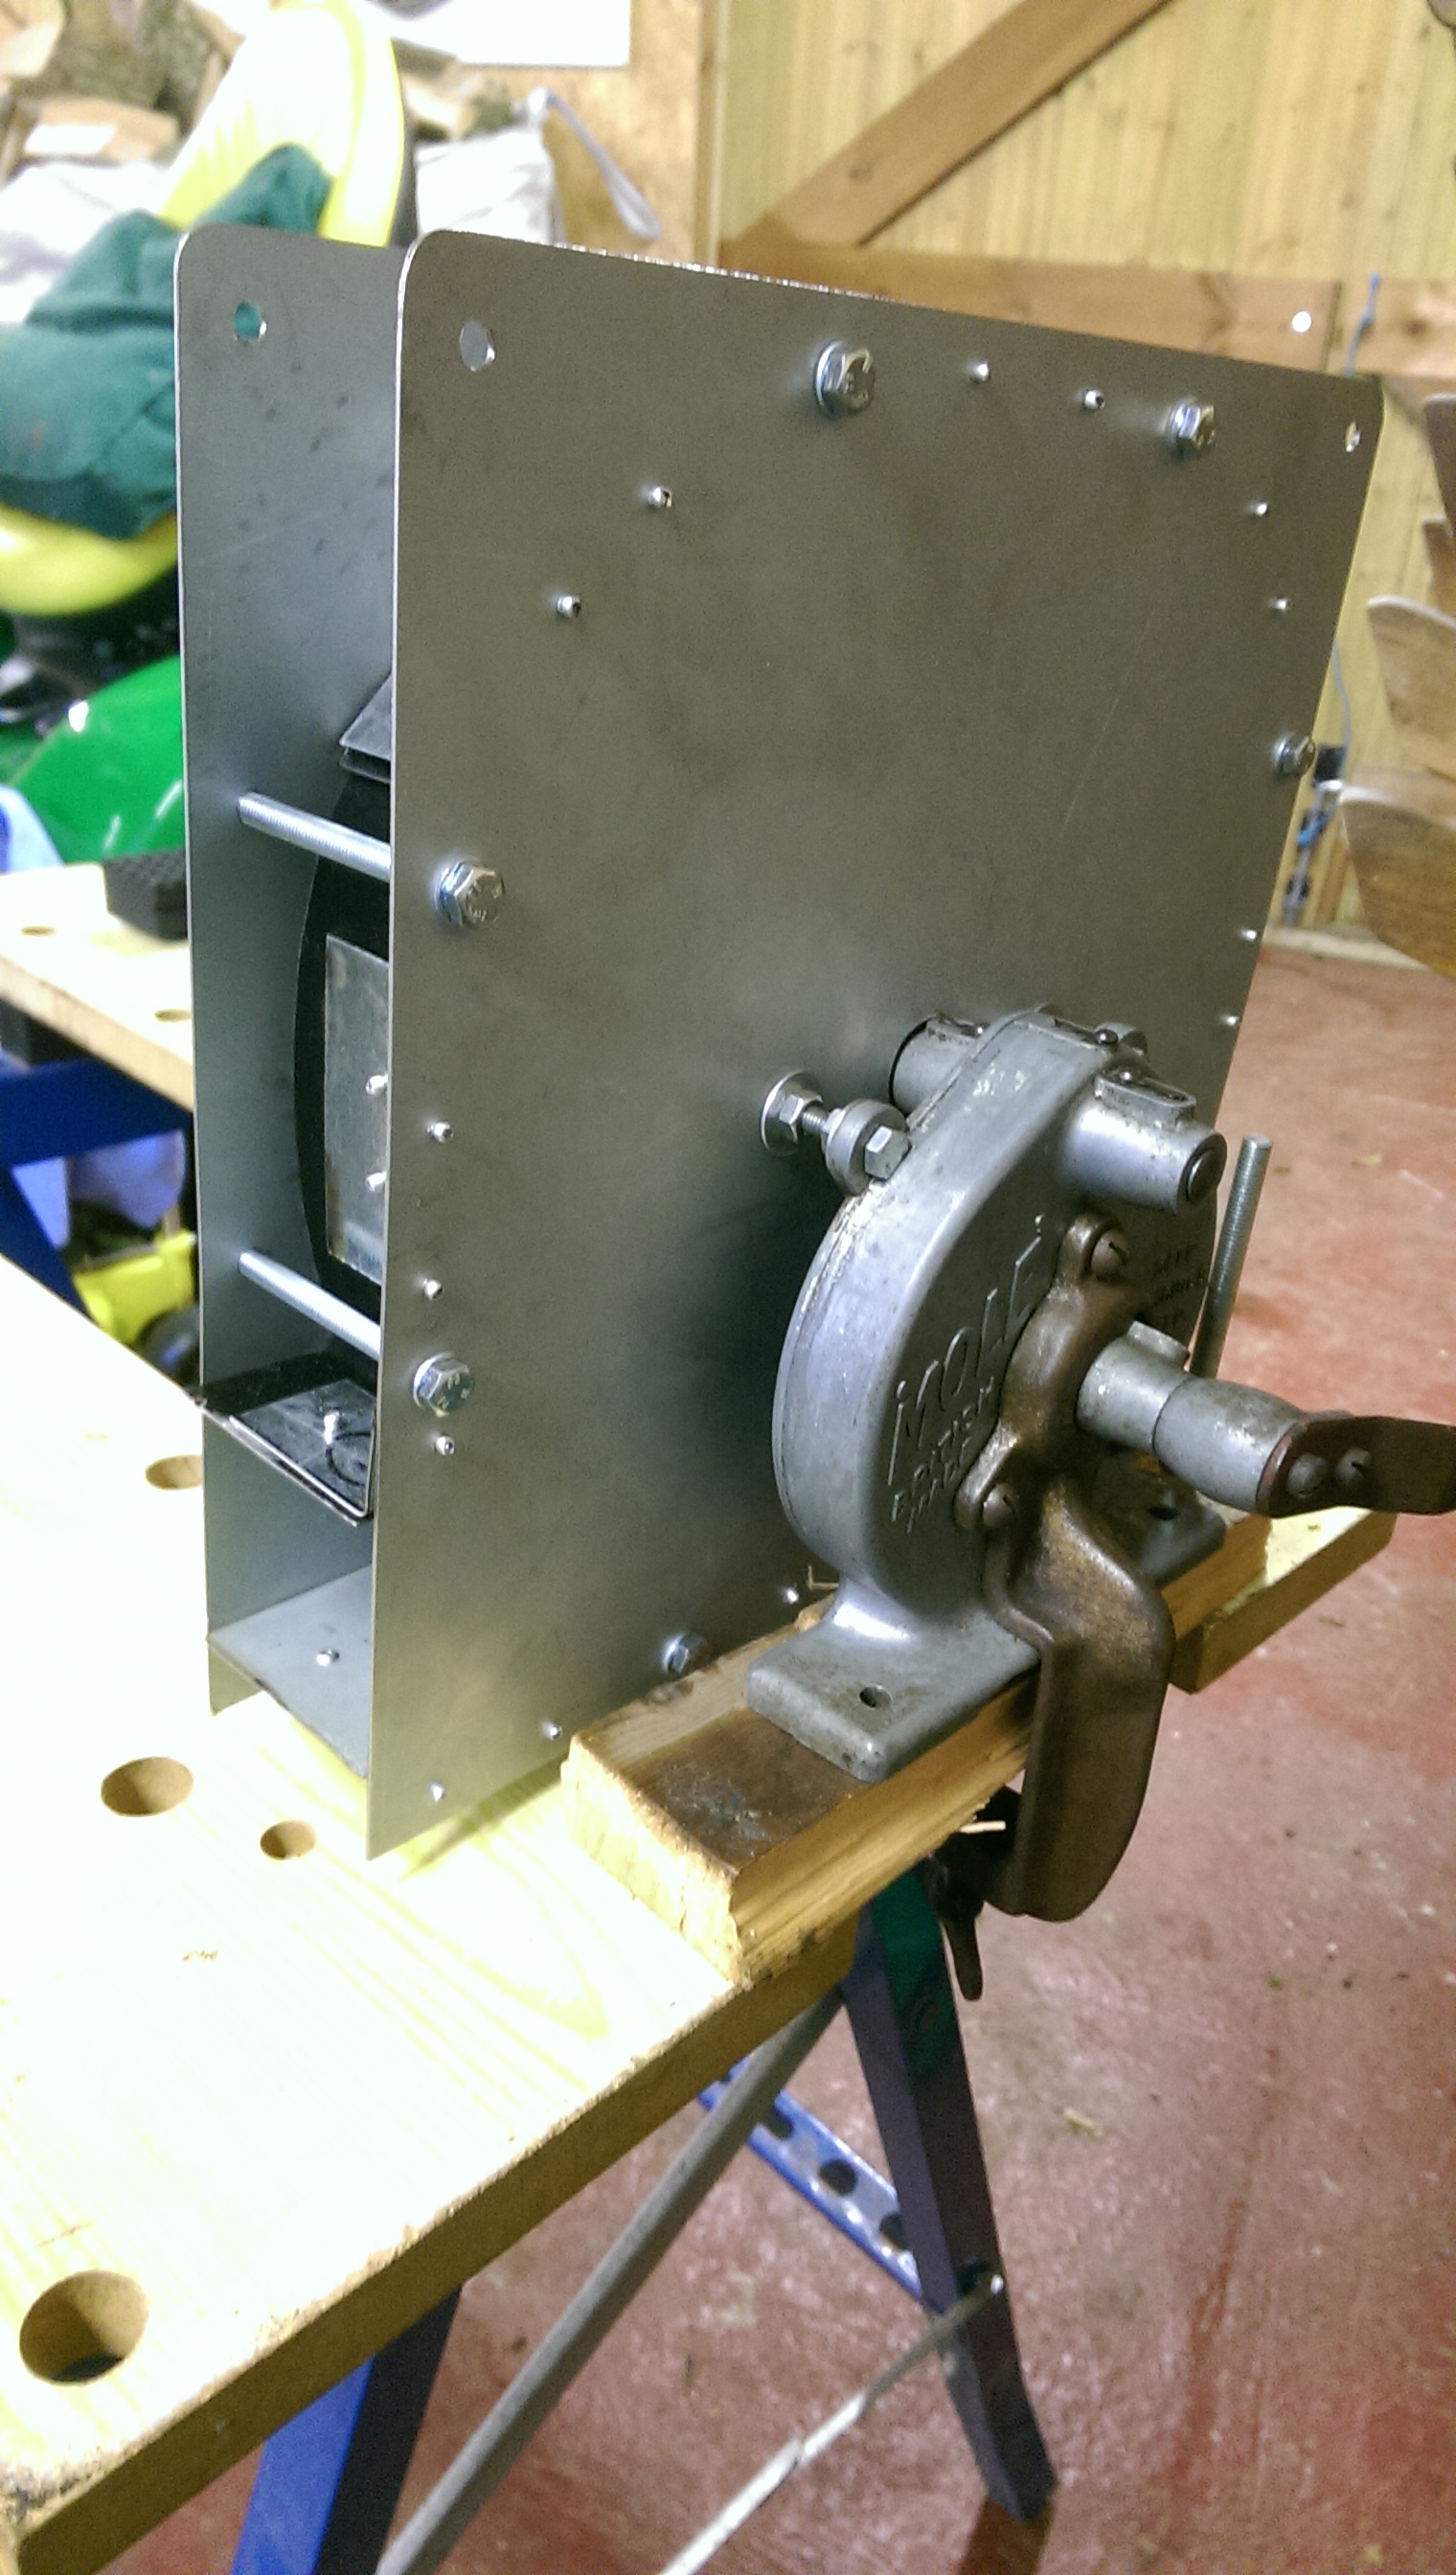
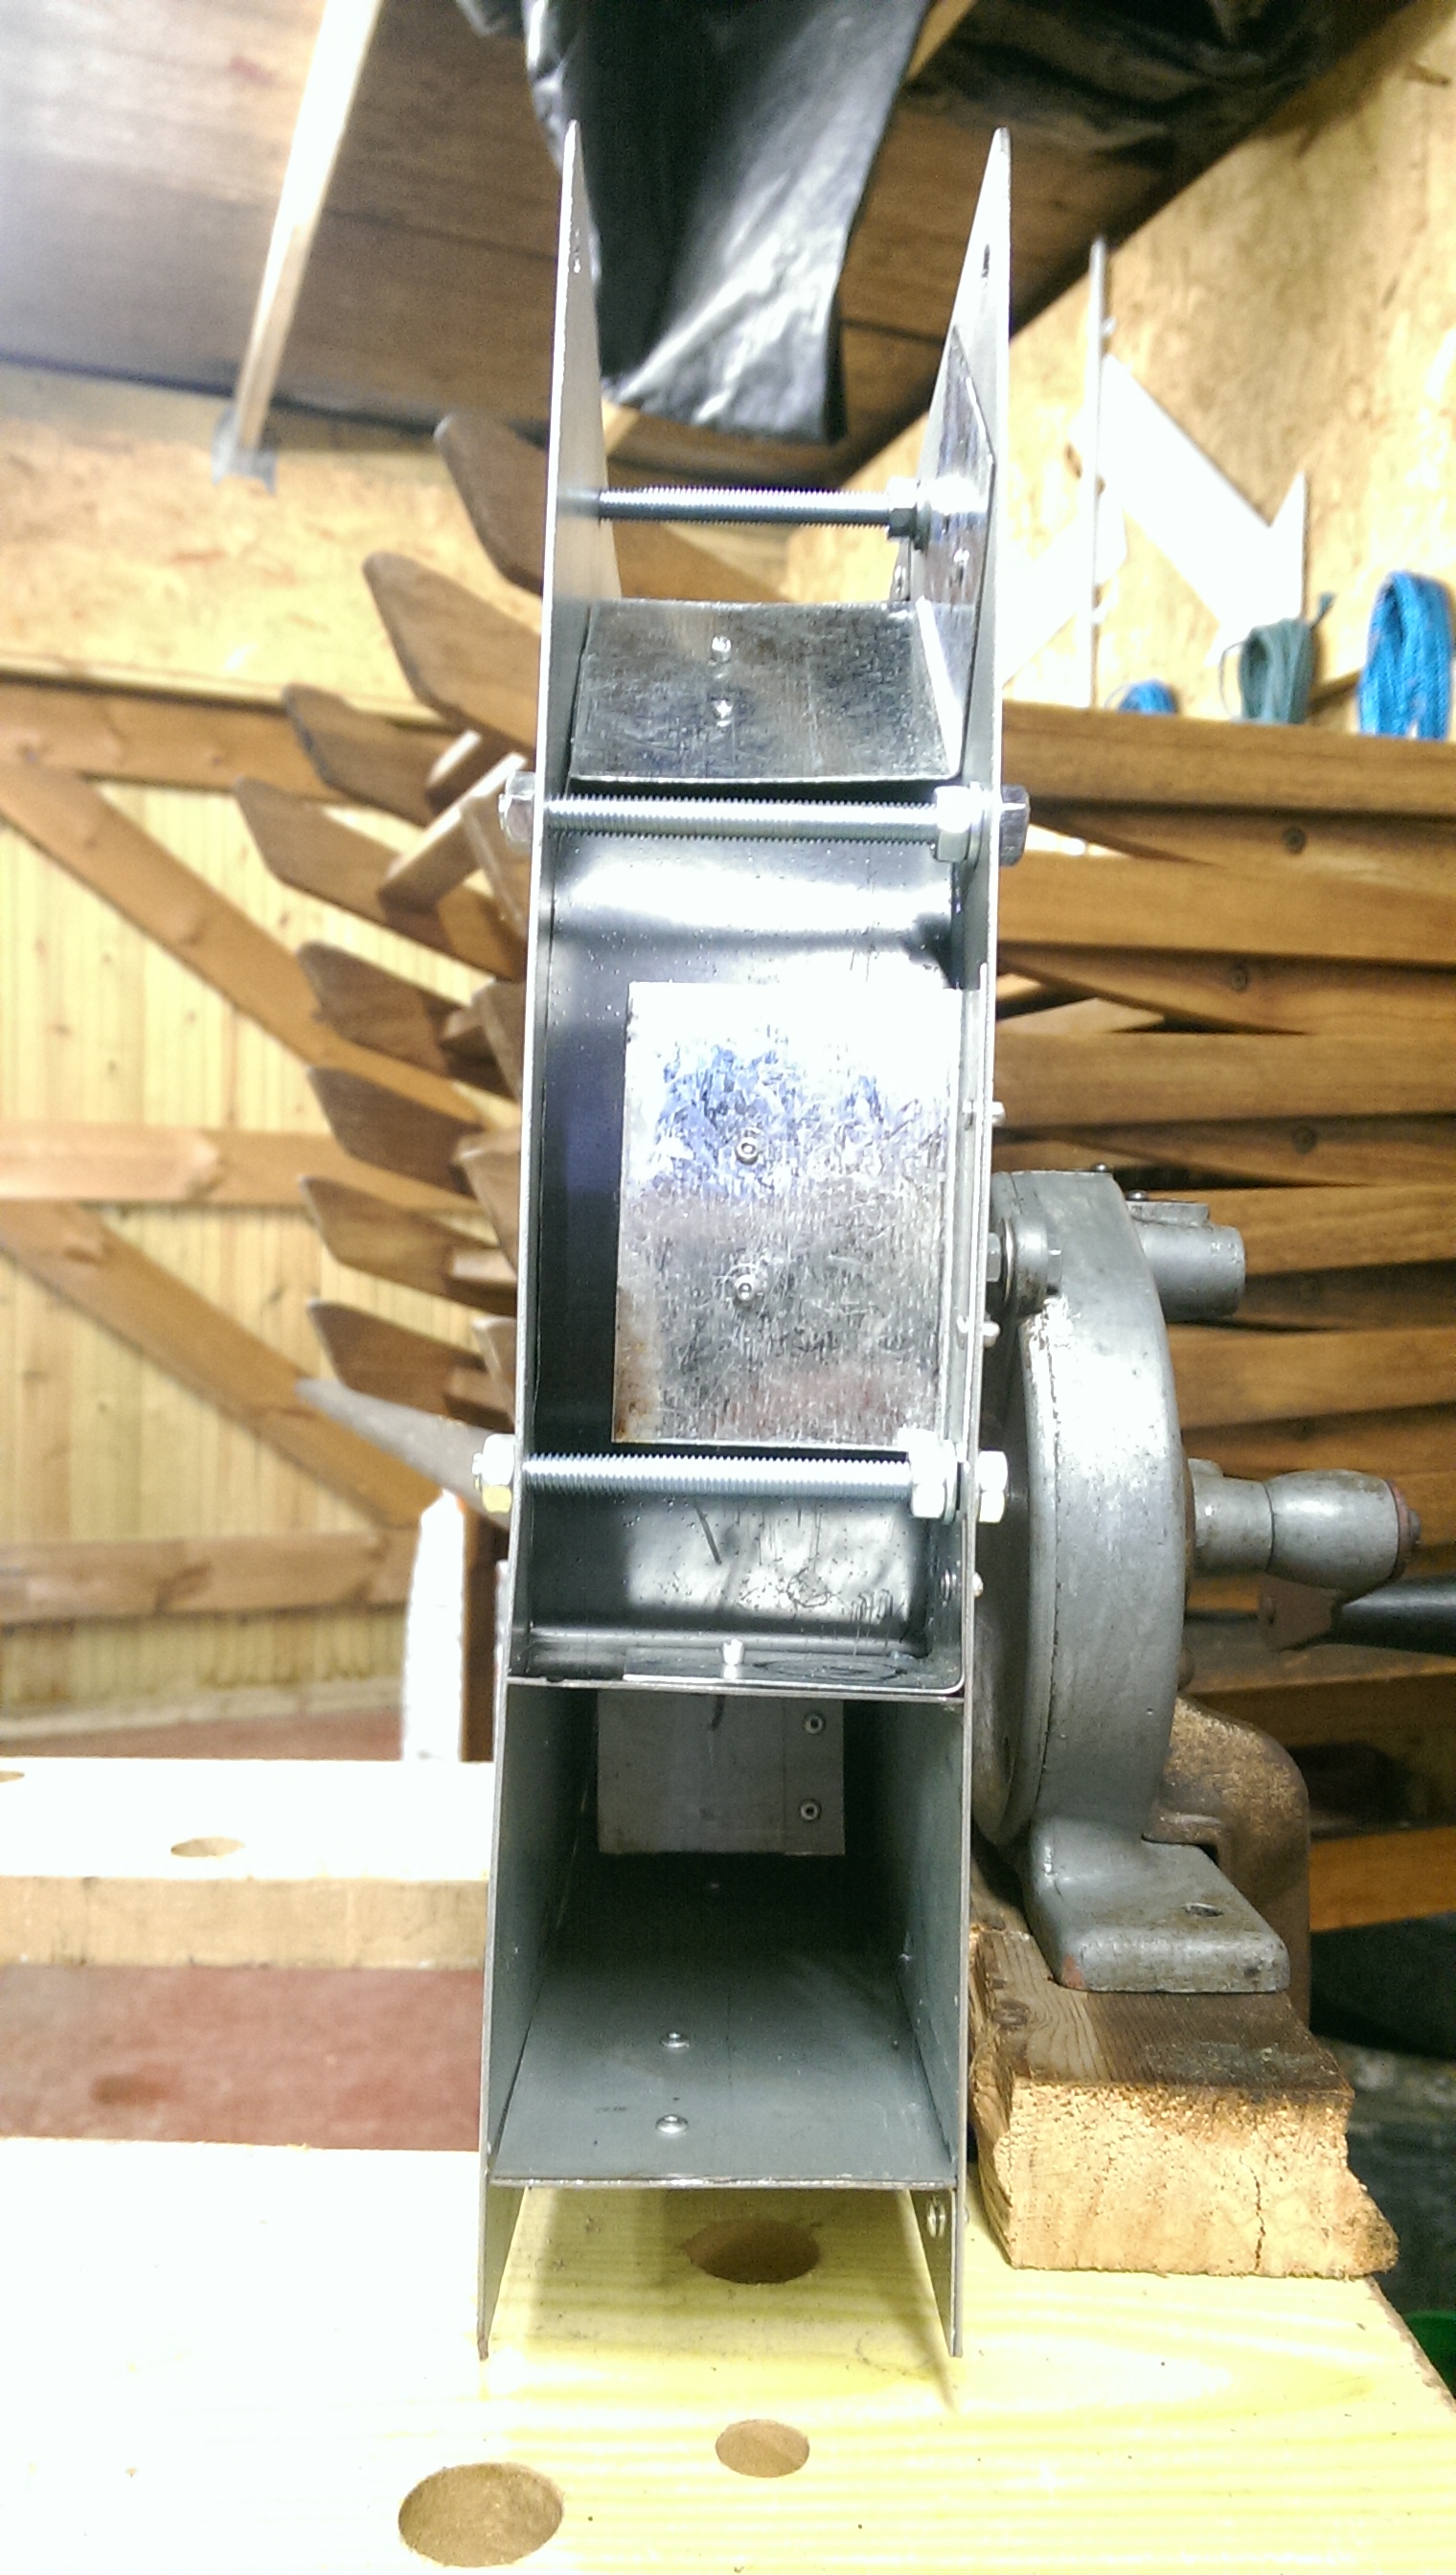
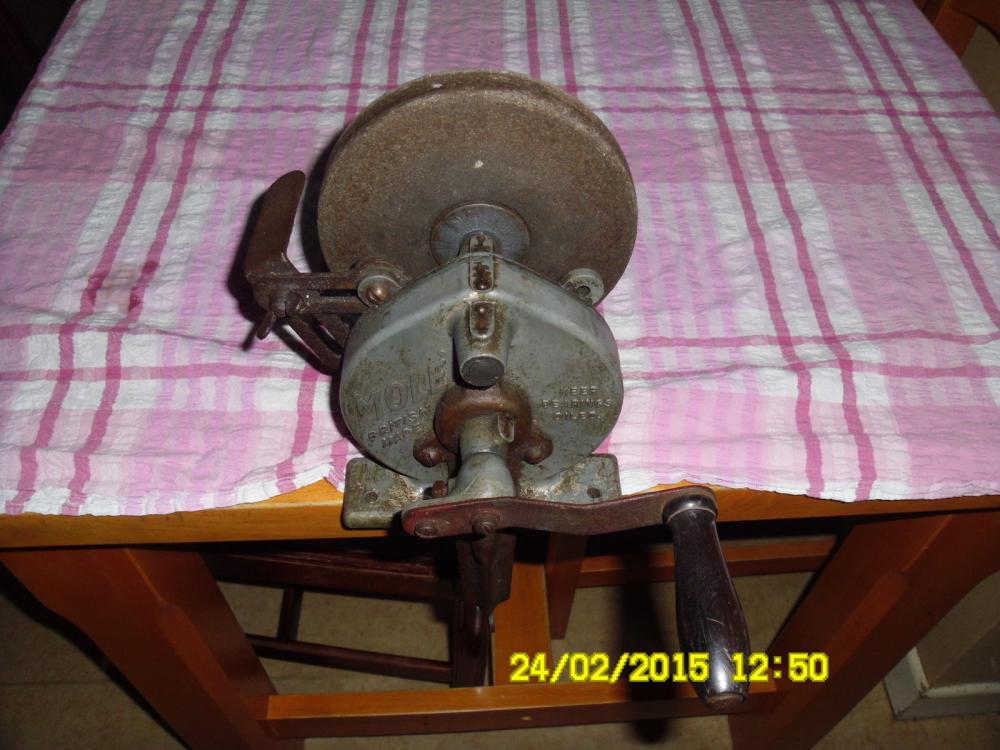
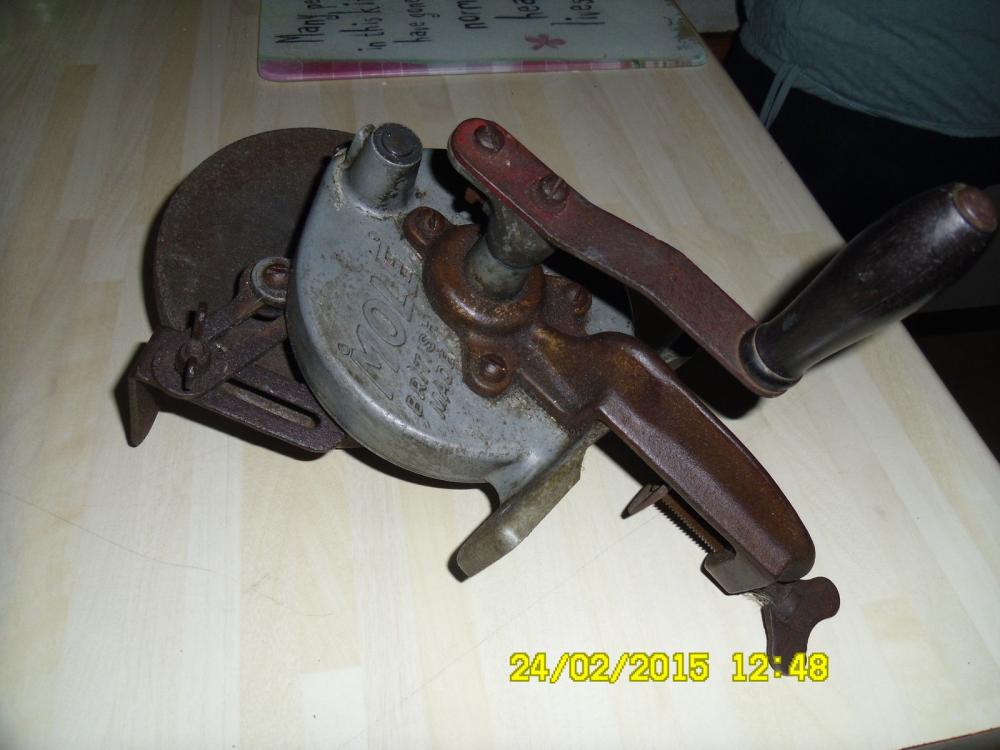
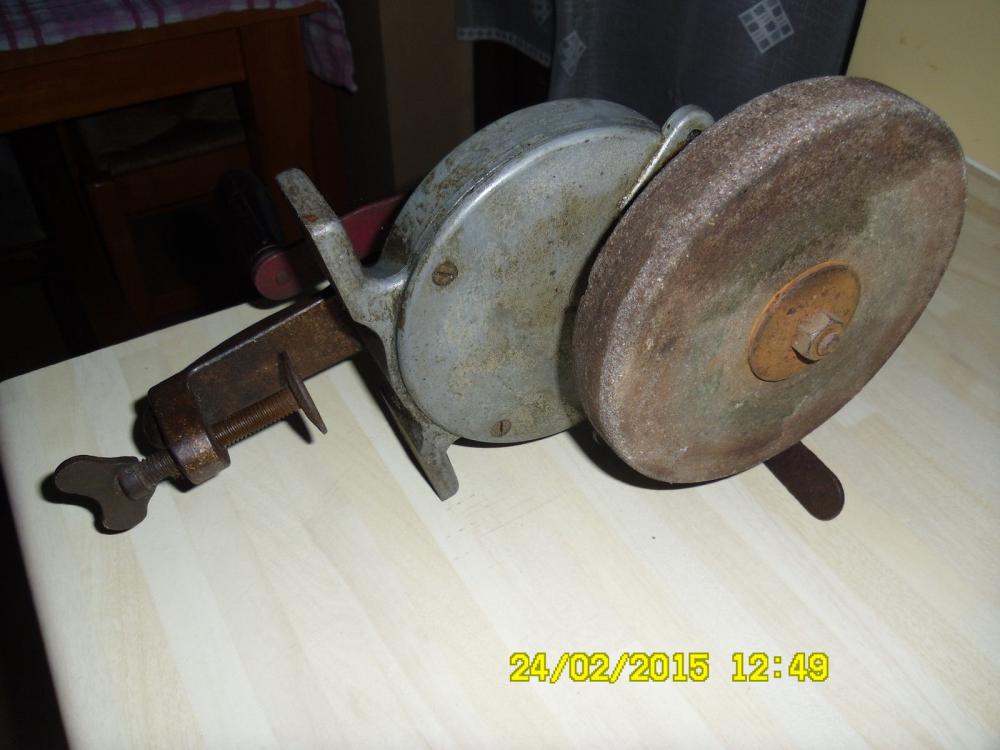
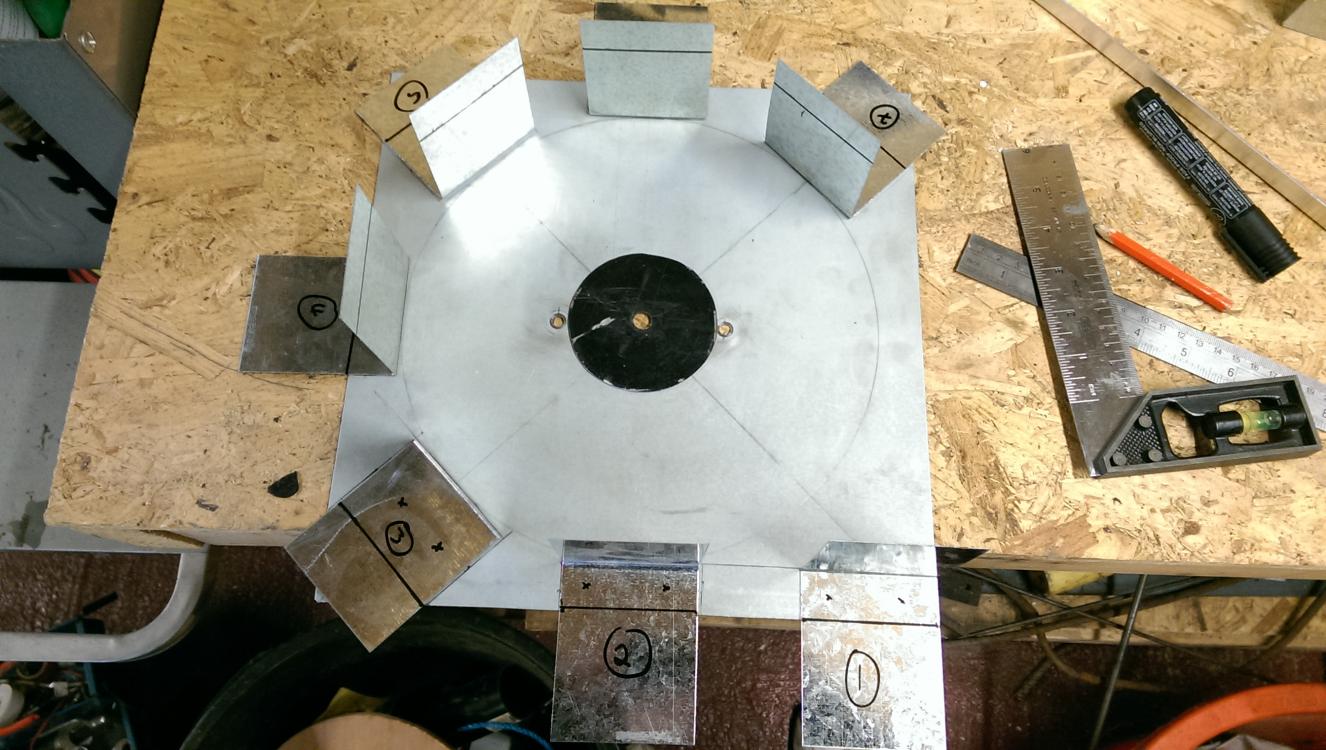
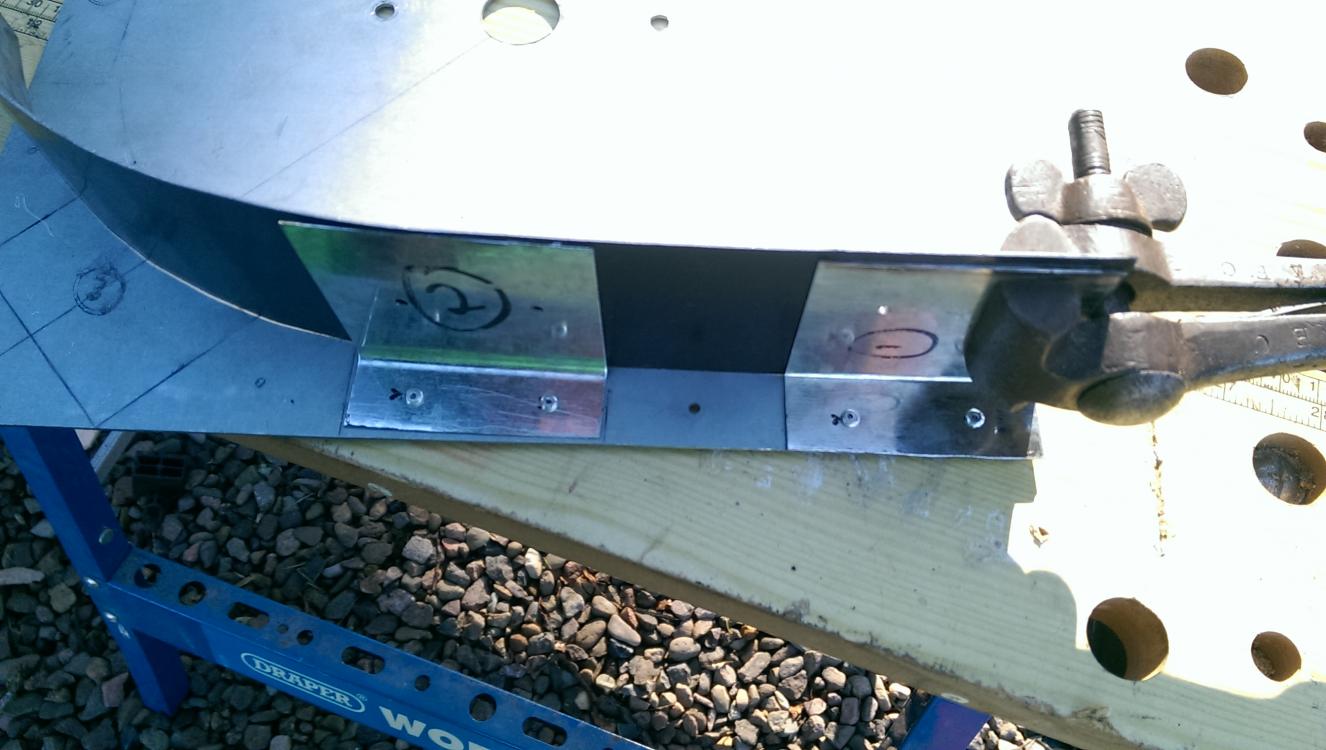
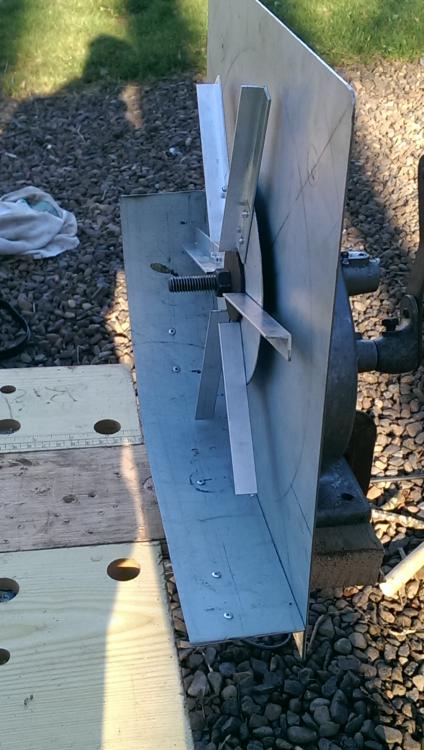
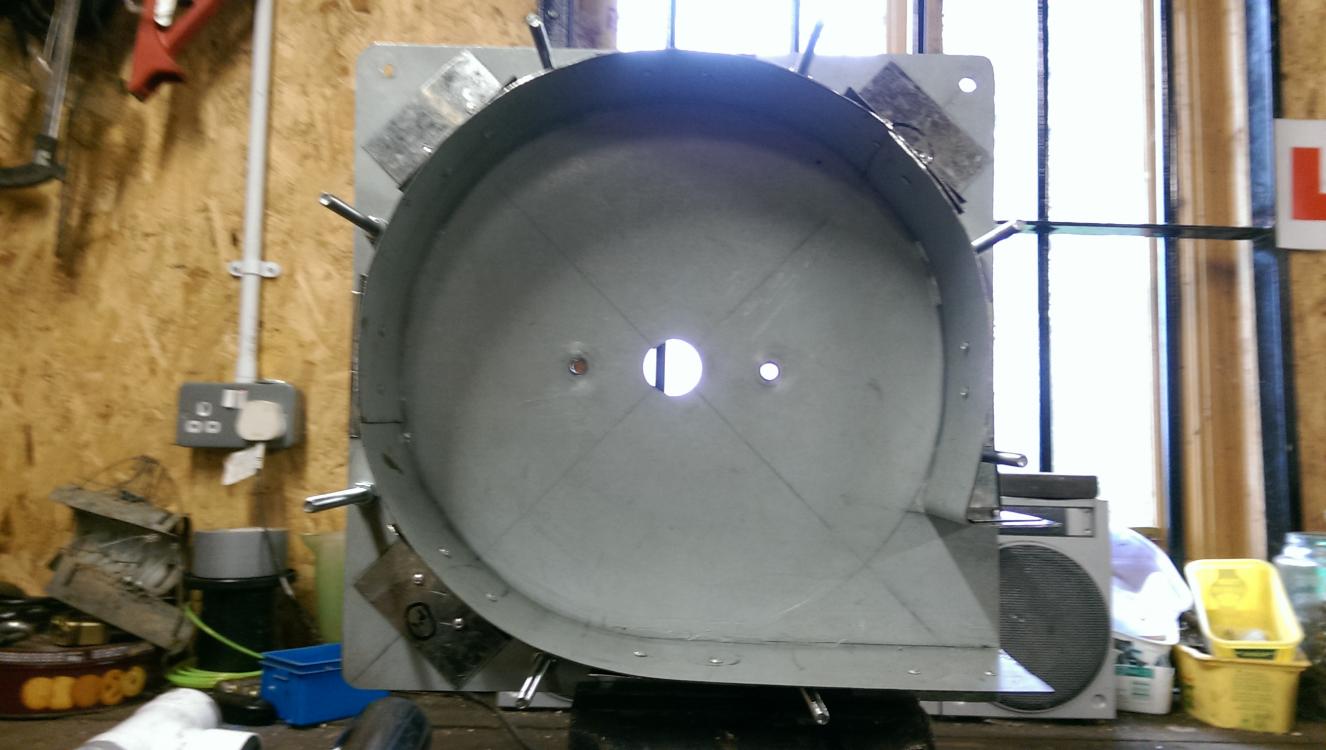
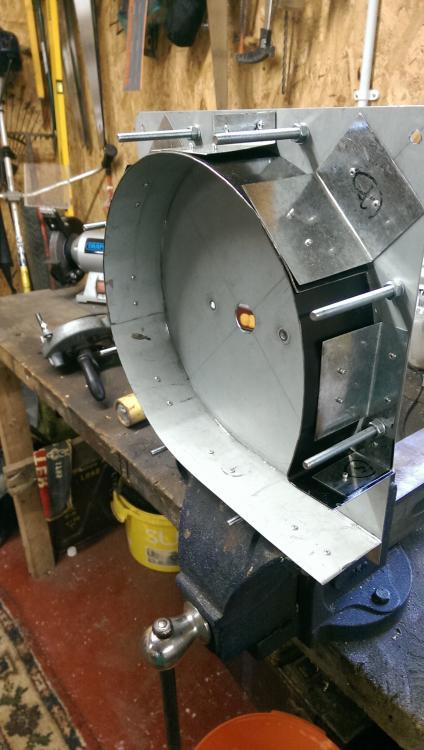
Hand Cranked Forge Blower Build Here are the pictures of my Hand Cranked Forge Blower Build, made using a Mole Hand Grinder found on the internet (which has a 1 to 10 gear ratio), some old side pannels off a PC, a few small rivets, some protective steel corners that came with a kitchen worktop and some 12mm Aluminium angle iron. Here are the picture's of the grinder on its own. The back piece with the right angled brackets. Starting to rivet together the fan blade using 12mm aluminium angle iron. Cutting the brackets to size and drilling the holes for the rivets. After riveting the first part of the fan case together. I then ran out of rivets but decided to continue using cardboard to check everything would work alright. The rivets I needed arrived and so the rest of the fan surround went on as well as the bolts to hold the front panel on. Here is the fan blades and mounting disk, its not perfectly balanced so does 'wobble' abit but it should be fine for the amount I will be using it. And here is the 'almost' finished blower. I ran a line of bathroom chalk around the joins on the inside of the case to cover any small gaps and the bolts hold the front on tight. I don't own a hole saw large enough to make the 80cm dia hole in the front so lots of small holes with have to do for now. All that remains is to find a piece of tubing to connect the blower to the forge and then try it out. The blower seems to be providing a reasonable amount of airflow although I think it isn't recieving enough airflow from the holes in the front. Ill try to take a video when its working and post a link to this thread. This blower has probably cost me between £40-£50 and around 30-40 hours of time, I'm a pretty slower worker but when your doing something you enjoy the time really doesn't matter. Buying a hand cranked blower in okay condition would have most likely cost £60+ but I wouldn't have learned anywhere near as much as I did by doing it myself. My original inspiration came from this thread here: http://www.iforgeiron.com/topic/22816-home-built-hand-blower/ If anyone has any suggestions or advice, or wants to ask any questions then by all means feel free. Thanks for reading and hopefully there isn't too many pictures, I know how much you guys enjoy them. Tom


-
Any update Failed Attempt? I'd like to know how well it works :)
-
Happy new year.
tomfromuk replied to basher's topic in Blacksmiths and Metalworkers Association of the South West UK
You too :) Happy New Year -
I hope you've got ear defenders on, thats quite a noisy blower you've got there :)
-
Show me your Bottle Openers!
tomfromuk replied to Arbalist's topic in Blacksmithing, General Discussion
So I sort of 'borrowed' Joel OF's design for my 1st bottle opener. Unfortunately I burnt the 1st one I tried making. The second one came out a lot better. I might add some wax/oil finish some time. Tom -
2014 Christmas presents, start now
tomfromuk replied to Glenn's topic in Blacksmithing, General Discussion
So here is one of my home made Christmas presents, not sure if its for my Dad or my brother yet. Its like the 3rd thing I've ever forged so its a little rough around the edges but that does give it some character. Tom -
So my 'shop' is more of just an outdoor space. Before starting forging. And during. Still a work in progress. Tom
-
So I got my Vice onto a post this afternoon, its mounted onto a bit of plate, so it can be un-bolted when not in use and taken back inside. Hopefully those 6mm bolts hold out, Ill just not have to be doing much hammering on the vice. Tom
.jpg.28faea2964edfdad824f0546d39e42af.jpg)
.jpg.3c23601e9453d6169dc578ebde5d268a.jpg)
.jpg.c7d70a21a9f991a8c8c5a44840c782dd.jpg)
.JPG.b7145b812fa149c9e6a9dbefb93a14c5.JPG)