Francis Trez Cole
-
Posts
2,236 -
Joined
-
Last visited
Content Type
Profiles
Forums
Articles
Gallery
Downloads
Events
Everything posted by Francis Trez Cole
-
Champion #1 Power Hammer
Francis Trez Cole replied to MRB's topic in Power Hammers, Treadle Hammers, Olivers
I to have a 65lb #1. Philip I wrote an whole page on the adjustment of the head distance as well as up keep. I have been using mine for 15 years. Love it. it may be the angle your are shooting from but it seems that your spring is off center. If not the spring could be the adjustments on the hammer guide. Info from other users The only place you should not oil is on the drive belt surface area. One main thing to do. Make sure the toggle arms. The four arms that conect the ram to the spring arm, are drawn up so they are almost level. Not level. About 3/4" slop. you can measure this by holding a straight edge across the pins holding the arms at the spring, and the main pin through the ram should be about 3/4" of an inch below the straight edge. Play with this to find the optimum stroke for your hammer. This will also be affected by how far down you set the whole ram and spring arm assembly. To start tunning I would set that halfway with the double set screw holding the main pin. Going back to the toggle arms. If they are too sloppy, the hammer will skip or double hit. When they are too tight you stand a good chance of snapping the toggle arm at the spring pin junction. One other member recomended not over driving the bottom die wedge. RIGHT ON! My hammer was repaired due to this long before I got it. It is much better to re tighten the wedges every so often than to crack that front piece out. When mine was repaired they set the cracked piece back in place, drilled and tapped for three 3/4" bolts, bolted the 3 bolts after that, then they ground a V all the way around the 3 outside planes and welded it. I have had no problems with it, but I baby it there. As for other suggestions make sure the arm pins fit well in the spring arm holes. Where the spring wraps around the pin. Those pins should be no more than a 1/16" smaller than the spring holes. If they are sloppy the hammer won't hit right. One of the #0's I tunned had like 1 1/4" pins in a 1 3/4" hole. WAY to sloppy. The dovetail ways should be a little looser than you might think. Very scientific sounding, I know. But the best thing to do with them is after you have the hammer up and running. Move them in and out with the set screws until they are snug but not so snug as to stop the ram mid way in its stroke. That Champion is in super shape. The guides are like new in the thing and with that overhead jackshaft it should give very nice control. One thing that was wonky on that hammer was the brake did not engage when the treadle was up, It might return back to where it should be one the motor is in place and under tension. What I would do with that hammer is carfully scribe the outline of the smaller die onto the bigger die and then take them into a machine shop that can mate them up and flatten them out. I would do a combination style die with the fuller at front. if you change the motor its pretty critical to get the speed right so take note of the pulley diameter on that 5 horse. I ran my last one with a 110V 1.5HP motor and it worked perfectly. If it was going to be in severe use I would step up to a 2HP Once you get it timed right, the brake engaging and the toggles adjusted that hammer should give you single blow capability. One thing that will help down the road is make your self up a set of wood blocks to set the working hight of the upper die. at rest you want that die to be about a 1/8 above the thickness your working for the best control and hardest hit. I kept mine adjusted so when you rolled the machine over by hand the upper die would come within about 1/4" of the lower die and I didnt move it up until I got over 3/4 stock unless I was going to do real fine work.. should clarify in the earlier post about setting the die position... that 1/4 clear between the die is with the crank on its lowest possible position on the flywheel and with the toggle arms pulled good and tight on the spring and a very well adjusted hammer... Most hammers with a little slop in them you would need more like 3/4 of a inch to get a solid wack but yet have a light touch... and thats if your forging 1/4 or 3/8 stock... if your forging 1" bar you would need more like 1 3/4 clear at idle and the lowest position... Thats one of those things that really impacts performance and you just need to play with your hammer to see what works best... start with half a dozen 5/8 or 3/4 square bars that are a foot long with a center punch mark at 8" ( if you dont want to hold it with tongs make them as long as you want I guess) get them all up to temp and consistently forge out as long of taper as you can in one heat from the center punch mark... make an adjustment and go to the next one.... listen to how and where in its stroke the hammer hits and how hard of blows it lands... and it it is double tapping or missing a beat (way out of tune) its surprising how drastic of change you can get... also it will show you directly what your adjustments do Also I said I would do combo dies on that hammer and the only reason for that is because unlike a little giant the center of the tup weight is centered in the skinny of the die so working on either end has much less of a negative effect on the hammer.. and since it sounds likely this will be your primary hammer and its relatively small ( but capable ... a 65lb Champion that is well tuned will almost do the work of a run of the mill 100lb little Giant though) its sure nice to have fullering dies to quickly break down material and blend transitions..... If you have any questions Id be happy to help... I have owned two #1's and done some pretty major work on them including pouring new bearings in one.... oiling use SAE 30 for all contact points After doing a lot of research the original dies had three round swedges in the die 1/4”-3/8”-1/2” one of my dies had been refaced with hard facing rod and the swedges were filled in so I opted to fill in the top die as well and make all my tools clamp on to the bottom die. Like Clay Spencers method. Makes changing out fast I use a C clamp with a piece of angle iron as the base to all my tools so far I am pleased with how it works, -
In the last few years I have seen Copper layered in to a knife blade. I get the principle. Has anyone ever used Brass? It has a lower melting point so in theory it should work. To that point you could use both in different layers . I am planning to play with it soon any tips would be appreciated.
-
Clean looking tongs
-
one of the best mental tricks I use set the shape first you can go back 2 or 3 times to get each area refined. Don't try to complete the Jaw boss and rein in one shot. Go a 1/3 of the way in each step. it helps refine the end shape.
-
The video is great, But you never hit the flat side of the boss with the hammer. The anvil will help make the boss flat. Second I would use a longer rivet to make a a bigger head. Helps keep them strong when twisting. Remember the forge to hold the metal is in you hand the longer the reins the more leverage you have.
-
there is a great chart that has the sizes of all the parts of the tongs. Glenn has posted it try not to recreate the wheel they work. I have made sets using the chart and like the way they feel. The only piece of advice I would give if you use a gas forge you might want the reins longer.
-
I would agree with Thomas. Leonardo De Vinci created a power hammer. There is time for being a purest But you are learning the more you do the better you will get.
-
there are so many great references out there. When making the Jaw,Boss,and rein transition keep your work so that you do not hammer on the side that was against the anvil. there is a fine line between hammered out and finished. check the edges of the anvil that you are using. Also while you are hammering the Boss out increase your angle from 45 to 60 that will round up that inside corner. I always clean up my boss with a file before final assembly.
-
Very nice first set of tongs I like to file the contact surfaces of my Boss's
-
Frosty thanks for the post and comments. Any one interested in Blacksmithing can Join FABA-SW We like to see What other are doing. We started doing the live meeting to keep people safe during these time. Sorry that its so early Here in Florida trying to beet the heat of the day. The graininess came from a poor wi-fi link we went to a hot spot and it cleared up. I always look forward to a comment from a wise sage like you Jerry
-
Joe always well thought out. I have had problems with rebar cracking over the years. mostly from students putting them in water to cool
-
your are headed in the right direction
-
Masonred you don't need an anvil a block of steel will work just fine until you find one you can afford. I started out with the back side of a machinist vice. Then got an anvil. When i teach i have a set of blocks with legs welded on for a lesser term a striking anvil. If a student dents it or chips an edge I can just clean it up with an angle grinder. Had a old Farrier show up to watch me teach at the end of the class he pulled me aside. he was skeptical at first but after the class he said"that's the only way to go" .Farriers use a thing called a Stall Jack small and efficient for shaping shoes. You can make one very inexpensively
-
chris C What type of welder do you have? That can effect the quality of your weld not brand but the type.
-
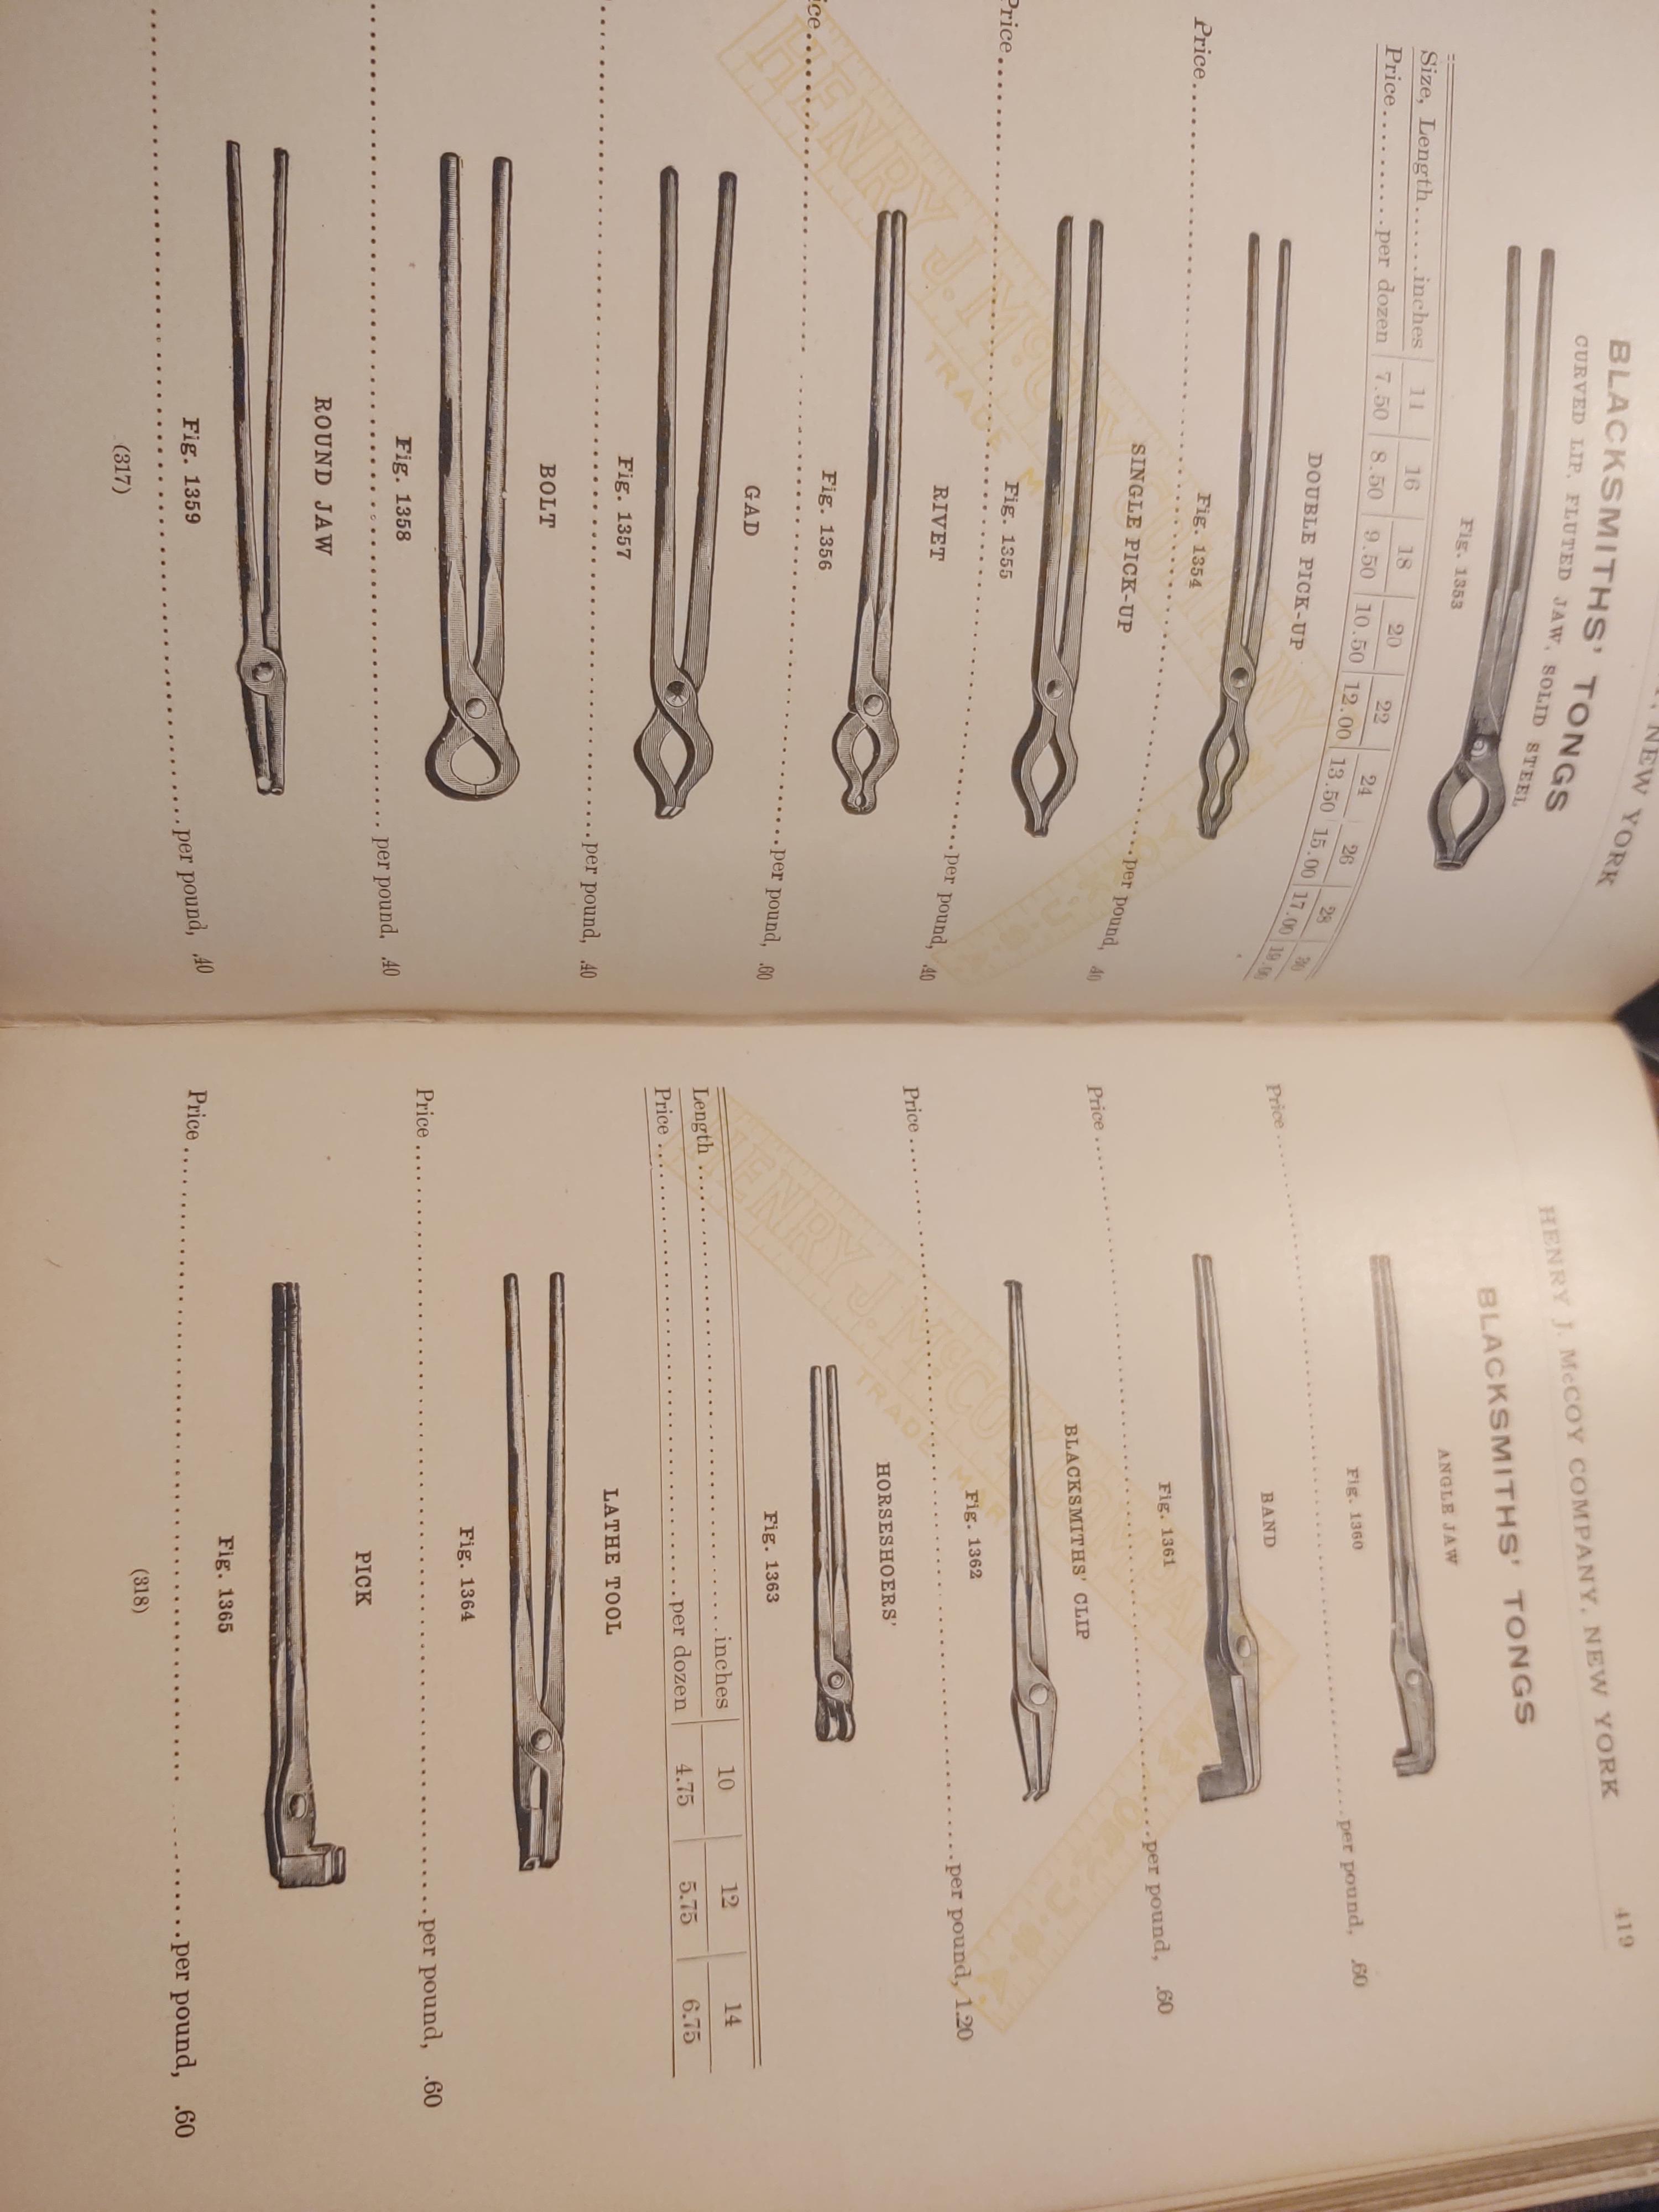
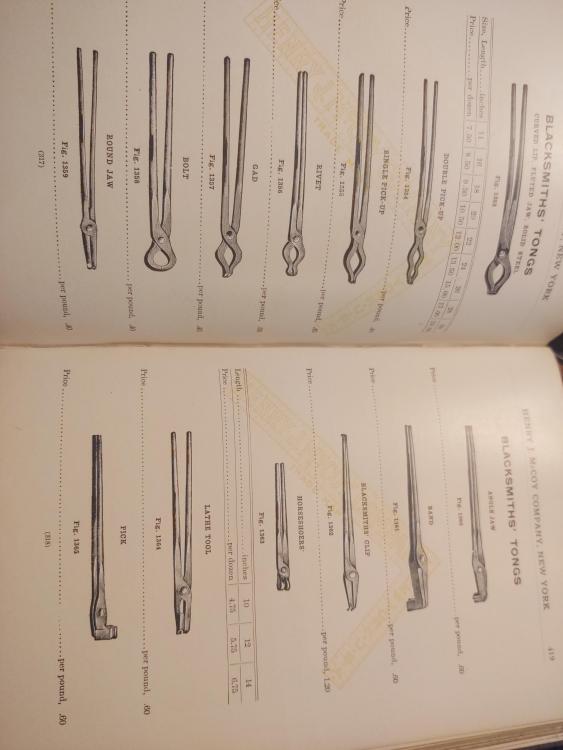
Dave in pa Here is a picture from a Railroad catalog that was printed between 1850 and 1860.I would think they would be a good guide for the time period
-
Video "How to Forge Chain Makers Tongs"
Francis Trez Cole replied to jlpservicesinc's topic in Tongs
Nice looking tongs. Why is it that now days people are doing the weld at the rounded end. If you look at the old videos they do it on the side not the rounded part of the link -
you should not use a water can with a cast fire pot. A mop is much safer. Hot cast iron and water = crack.
-
well Viking style tongs have been around longer than flat jaw tongs
-
Damascus with only hand hammers?
Francis Trez Cole replied to JonathonCrow's topic in Blacksmithing, General Discussion
turn that monster mall in to an oliver hammer. It can be built with a wooden frame Then you will have a helping hand -
maybe it was the available stock at the time the rolling mills all produced round stock. So the style was developed out of practicality.
-
now that's going in the right direction Dimensions for Standard Tongs.docx
-
that is a good way to start. Keep working at it. practice half face hammer blows and you will be making tongs in no time
-
nice tongs
-
rail road spikes make good tongs. I have several. One comment don't make your jaws to thin. I have posted the Machinist hand book measurements for tongs in the past it is a good guide to use when making tongs. It will help you make tongs that will last a long time Keep at it.
-
the biggest problem I have seen with people trying to forge weld is heat. You have to get a good saturating heat. That means you metal has to be the same heat and the right temperature. With out over heating.