
CurlyGeorge
-
Posts
2,546 -
Joined
-
Last visited
Content Type
Profiles
Forums
Articles
Gallery
Downloads
Events
Everything posted by CurlyGeorge
-
Is that an IFI t-shirt that I see? :)
-
Replacing My 1830's M&H Mousehole
CurlyGeorge replied to luke978's topic in Anvils, Swage Blocks, and Mandrels
Yeah. I agree with Jeremy. But don't get rid of the big one!! It still has life and use left in it. You may do a bigger project, someday and the bigger anvil will sure come in handy. I'd be real happy with the price of $100 for the lighter one. :) -
I always looked forward to Grants posts. He has helped me and many others that have had questions about something or another. Grant, you will be greatly missed. RIP. Prayers to his family.
-
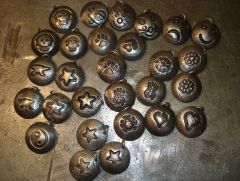 That is impressive work, Pascalou. What did you use for the blanks to stamp into? Thanks for sharing the pics. :)
 -
Yes you should mark it. Somebody might think it was made from some guy in Michigan. :D
-
Jeremy, I missed this post, earlier. WOW!! It looks GREAT!! I'm with Don A on "How did you punch and drift the tube without collapsing?" Did you fill it with sand? Really looks like solid, instead of tubing. You do great work. I'm looking forward to seeing the finished product, too. :)
-
I used 7018 welding rod to build up the edges of an old Vulcan, that I used to have. It worked OK, but after some time, I noticed that the "Fix" had started to get some hairline cracks along the edge of the weld and the anvil face. I think my mistake was that I didn't preheat the edges that I was repairing. It still worked OK. But I'd preheat it some, first. Also, you might do as mentioned above, by Eric. Talk with Larry, as that may be a better solution. :)
-
Grinding the jaws back would be the last option, for me. I had the same problem with my 6" vice, when I first got it. It took a little bit of work, but I took the hinge bolt out and heated the hinge plates in my coal forge. I then tweeked them to one side and it straightened out the jaws, when put back together. It was worth the trouble. I got to do the repair the "old way" and didn't need to do any grinding. The jaws now line up and work fine. Try that before you grind on it. :)
-
Question about charcoal
CurlyGeorge replied to Woodskevin's topic in Solid Fuels: Coal, Coke, Charcoal, Wood, etc
I believe that would be a very good idea. You won't have to worry about hot coals laying in the forge and hoping that they go out. Charcoal is a great heat source. Just be careful of the little fire fleas flying around, especially if you forge indoors. :) -
Question about charcoal
CurlyGeorge replied to Woodskevin's topic in Solid Fuels: Coal, Coke, Charcoal, Wood, etc
I, too, would start letting the fire get smaller toward the end of forgeing. If you put water on it, be careful not to crack your hot forge pot. :) -
My wife just mentioned, while setting up the nut tray, that I should make a nut cracker and pick. Thanks for the idea. You do good work. :)
-
Nice work, Bart. I, too, like the trivet. Nice design. Keep em coming. Thanks for sharing the pics. Happy New Year. :)
-
Happy New year, Ratel. Here's hoping that 2012 is a GREAT YEAR!!! And Happy New Year to ALL the folks on IFI. May it be our best year ever. :)
-
Help Identifying a Anvil
CurlyGeorge replied to gaalamosmithing's topic in Anvils, Swage Blocks, and Mandrels
LOL. The critter on the side is a mouse. The anvil is an Armitage Mouse Hole anvil. :D -
Welcome back home and to IFI. Yes, Thank you for your service. We look forward to seeing some of your work. Post lots of pics. We like pics. :)
-
Welcome to IFI, Brent. The idea of taking classes is a good one. It will answer some questions for you, even before you think of the question. Enjoy the craft/art. It is most definitely addicting. Good luck. :)
-
My first Anvil..... Finally!
CurlyGeorge replied to Altusjg's topic in Anvils, Swage Blocks, and Mandrels
You are correct about Trenton (Columbus Forge and Iron Co) making ACME anvils. Trenton serial # 111452 was born in 1912,according to Anvils in America. :) -
Dang, Tim. Should I put my boots on?!!! It's getting pretty deep 'round here. :wacko:
-
Not sure why, but photo #3 is at the bottom of the BP instead of where it should be. I tried to move it back up. But no success. :(
-
I have had several guys ask me, lately, for instructions on my pipe candle holder. Although it is in the IFI BPs somewhere, I'm not sure where. So I thought that I'd post it again on the forum. Here goes. (photo 1) I start with 9" of 3/4" black pipe. The die to make the lip on the cup can be made from the end of a tire iron. (photo 2&3) Heat one end of the pipe and place it over the flanging die. Tap the cold end of the pipe and roll the pipe on a slight angle all around until you have the amount of flange or lip that satisfies you. It may take more than one heat. (photo 4) I mark about 1 1/4" on top of my anvil, for easy reference. Mark down from the top 1 1/4" on the pipe. (photo 5) I use a guillotine tool with top and bottom fuller dies. Fuller the ring around the pipe at the 1 1/4" mark. This separates the candle cup from the body. Cool the pipe. Be VERY careful, if putting in quench to cool. Steam WILL shoot out the end of the pipe like the exhaust on a jet engine!! I hold the pipe from the side. (photo 6&7) Measure 6" up from the bottom and mark the pipe all the way around. Now, divide the bottom 6" into four equal width legs. Cut the four lines up to the 6" mark. I use a 4 1/2" angle grinder with a thin cutting disc, to make these cuts. I cut only one cut at a time, to prevent the pipe from pinching the blade. (photo 8) Now spread all four legs open over the tip of the anvil horn. (photo 9&10) File all of the flashing away from the cuts. This is also when I stamp my touchmark on one of the legs, as shown in photo 10. (photo 11) Heat and draw out the end of each leg. Try to keep them all the same length. (photo 12) When you have all of the legs drawn out to the same length, scroll the tip only TO THE INSIDE of the pipe. Don't scroll to the outside or it will be backwards when you scroll/roll the legs. (photo 13) I use a 1 3/4" OD pipe to roll the legs around. It's easier for me to use a small vice grip to clamp it to the pipe and then roll it around. After you have it rolled, look at it to see if you need to straighten it back in line with the body. (photo 14) After I get all four legs rolled, I set it on a steel plate and make sure that it sets straight, without rocking around. I usually have to take a board and use a hammer to "Tweek" the legs so that they are all setting on the plate straight and that the body of the candle holder is standing up straight. (photo 15) You can put what ever kind of finish on that suits you. I use burned on bee's wax. Watch out for the flames.(Voice of experience). But it makes a very nice finish. (photo 16) Finished product!! By the way. This IS NOT my original design. I saw it in the newsletter for the Illinois Valley Blacksmiths Association a few years back.
-
Michael, that is cool. I love it. Thanks for sharing the pics. :)
-
Mike, my shop is just about 40 feet from the back door of my house, and in the cold months it's still hard to get motivated to go out to the shop and do any forgeing. Sounds like the move gave you a lot more room. That could be a good thing, as in easier to keep organized. :)
-
Kathy and I also want to wish everyone a Merry Christmas and a Very Happy and prosperous New Year. I would also like to thank the folks on this site for the kind sharing of info and encouragement that they share. I have had the honor to meet quite a few of you in person, and I must say that I have enjoyed every visit. You really do feel like family. :)
-
That's a cool looking fish. Good job on the work. Thanks for sharing. :)
-
How do you make your mark?
CurlyGeorge replied to JimsShip's topic in Blacksmithing, General Discussion
Check with Grant, "nakedanvil" on here. He makes them. There are also several other companies that make them. I bought mine from Columbia Marking Tools, before I knew that Grant made them. Several of the folks have had Grant make them and are very pleased with the touch mark stamps that he has made. :)