

Stash
-
Posts
887 -
Joined
-
Last visited
Content Type
Profiles
Forums
Articles
Gallery
Downloads
Events
Everything posted by Stash
-
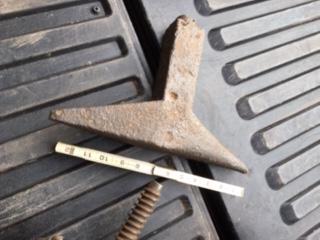
It has the flats on the feet like a Peter Wright.... The solid wrought stamp is also similar... Steve
-
I trace a handle that feels good to me, or a standard style onto heavy card stock/ posterboard to make a template. Trace onto the wood, cut it out on a bandsaw, leaving the line. Then I shape it with drawknife, spokeshave, rasp, 1/2 round file, sandpaper and scrape with a knife. Any one of those tools, some of them or all of them, depending on how goofy the grain is and what I feel like at the time. Sometimes I might also use a angle grinder with a flap disc or even my 2x 72. Whatever mood I'm in. Steve
-
Yeah, it seems ol' sol is in a pretty active phase right now, peaking June/July IIRC. Break out the foil hat and welder's mask. Steve
-
I was at the scrap yard a few years ago when a guy showed up with multiple barrels of plumbing scrap copper. It was this time of year, so I figure he was cashing in for Christmas time. Another source- I have a buddy who is a commercial electrician, and he has been feeding me old buss bars and other bits and pieces he comes across. I have some nice pieces of 1/4' x 4" stock now as well as very usable chunks of 3/8" thick by various widths. Steve
-
Hey Hobb- I've used copper for leaves, flowers, fold forming and other projects, all with re cycled copper. There are various thickness sizes in the flashing that roofers use, so make friends with a roofer or even a general contractor. I also see it sometimes new or used in the local online classifieds ( craigslist here in the US).It may be available in the local scrap yard. Another source is copper plumbing pipe- in the larger sizes (1" +) you can cut lengthwise with a hacksaw and open it up. These options have suited my needs. For larger or thicker, you will probably need to buy new. Steve
-
Looks pretty nice from where I'm sitting, and a killer deal to boot. The stamped weight 1-2-5 translates to 173# starting weight, give or take a bit. I never heard of the mfg, but there were a lot of them around in the 19th century. I wouldn't be concerned about the delam.I'm wondering if the pritchel hole is original (punched) or added later (drilled). Anyway, use it in good health. Steve
-
I was in Delco, and I would go down to Steel and Metal Liquidators in New Castle DE. Good prices, stock in full 20' sticks they would cut down for you, as well as 4-5' pre cuts in all ( and I mean all) stock sizes. Their parent company is Fazzio's, in Glassboro NJ, same deal there. Show up in a flatbed or a suv, they will sell you stuff. I've also bought small quantities from O'Rourke Steel in West Chester. I've since moved up to Bucks co, and am still checking out suppliers. I did find Moses Glick, in Fleetwood- awesome scrap yard. I'm sure there's more in Philly- jusy look. Steve
-
You will definitely want to clay it. Don't get too fancy- just dig it from the yard, get it damp enough to work and pound into place. What kind of fire pot is that? Does it seem to be original to the unit? Steve
-
One of the guys in our state group makes and sells 3/4" burners. Along with the burners comes a 1" flared fitting that fits over the end of the burner and is held in place with a setscrew. In demos he sets the whole thing up in a clamp stand he made, and does exactly what you are hoping to do. The flared fitting is adjustable with the set screw for dialing in your flame. I recall the flare is about 2" long. Steve
-
John- I think that might have been a Fisher. They made them for export to SA. I'd check to confirm bot I'm 200 miles from my copy of Josh's book. Steve
-
Yup. It's an aftermarket addition. Steve
-
Fisher anvils have a tool steel top surface on the horn and table, same as and applied the same way as the face. I would expect the horn is hardened at the same time the face is. Steve
-
What did you do in the shop today?
Stash replied to Mark Ling's topic in Blacksmithing, General Discussion
Looks to be an exciting project. Looking forward to updates. Congrats on 35 years. My bride and I just hit 38 last week. That is a current photo, isnt it? Steve -
You're getting there, Thomas. Good on ya. You'll be living large soon enough. Steve
-
I did a bloomery smelt last year under the direction of Lee Sauder (His website has lots of info, but you're too lazy, so....). It took a 4 man crew 3 days just getting everything ready- mixing clay, building the furnace, firing it, grading the charcoal, breaking the ore ( which was already roasted) into a usable size and assorted other bits of prep work. We actually smelted the 4th and 5th days. Ran the furnace ~ 6 hours each smelt, with an electric blower. Once the bloom was done ( 17 and 25 lbs) we split it into 1/4ths with a 3 or 4 man team striking crew wailing away at a splitting maul. Once we had workable sized chunks we then went into the forge to refine. And it wasnt really refined- we just used a power hammer and hyd press to beat the bloom into dimensional bars to be refined later. All that is to say that it is a heck of a lot of work and nowhere near any semblance of a finished product. We had the benefit of working under someone who has a lot of smelts under his belt. The interwebs won't give you that kind of support. As Frosty suggested, stick with a 6 page paper. Steve
-
Anvil stamped numbers and what they mean
Stash replied to Maro59's topic in Anvils, Swage Blocks, and Mandrels
I'm assuming both numbers are on the front foot below the horn. The w108 should be on the left and designates the weight- 108# as built. The other number on the right is the serial number. Someone should be by soon who has a copy of Anvils in America and they can look up the numbers to get you a date of manufacture. Steve -
It is refreshing to see a thread about smelting copper actually be about smelting copper! Thanks for the link. Steve
-
I love the smell of lilac when it is carved. It usually has some nice colors in it, too. Cherry and plum (no 'b') are both in the genus "Prunus" so wood characteristics should be pretty similar. Very nice handles. Steve (plant geek and retired horticulturist)(long time woodworker)
-
Unknown date of trenton anvil
Stash replied to J9644247's topic in Anvils, Swage Blocks, and Mandrels
We need more info than that photo. The right front foot under the horn should have a serial number that will lead to the info you desire. Steve -
Thomas pretty much covered things. With regard to#5- easy fix would be to unbolt the flap, file flat and re-install the flapper with a longer bolt, and a small compression spring. That will keep the flapper pressed firmly to the bottom of the tuyere. Make whatever kind of pull-it thing you want. Steve
-
Nice work Chris. Glad all went well. Steve
-
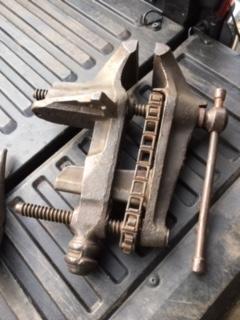
I hate setting the alarm unless I'm going fishing. I think today might be an exception. Scored me some cast iron. It's a #3 with 5 1/4" jaws, weighing in ~90 lbs. Works beautifully. The stake anvil I consider just a throw-in. Now I can go to my dental appt. with a big smile and come home with a big shiny smile. Steve
-
How big are they? Kinda looks like the old Good n Plenty candy. (or were the black ones Mike and Ikes? I forget now.) Steve
-
Chris- the fiber masonry blade George mentioned should do the trick for you. The issue with those blades is that they will wear down and you will be constantly be readjusting your depth of cut. They will work. tho. Be sure you get the one made for wet cutting- a lot of those blades are for dry cutting. I prefer the segmented diamond blades vs the solid rim- solid rim heats up quicker, even with the water spray but for 2 cuts it should work for you. I don't really have a recommendation for you- I bought in bulk from Diamond Warehouse ( I think that was the name), and I was getting 4 1/2", 7" and 10" all in one shot for my different machines. Steve
-
Hey Chris- I've cut hundreds of lineal feet with a similar rig. Worm drive skil saw, rigged a stepdown from garden hose to 1/4" flex tube with a small ball valve spraying on the blade. I used quality diamond blades, probably $60- 75 each, and I was able to do it in one pass, full depth, using a rip guide/ board clamped in place.You could easily make multiple passes with shallow cuts to do it. Make sure to support the cutoff side- it will break off before the cut is finished. Make sure you plug into a GFCI. The material is too thin to effectively use feather and wedges. I've also made these cuts with hammer and chisel. Angle grinder with a diamond disc will also work but you'll need to do it dry. Just get a helper with a shop vac. Steve