Stash
-
Posts
887 -
Joined
-
Last visited
Content Type
Profiles
Forums
Articles
Gallery
Downloads
Events
Everything posted by Stash
-
Hey FrontStreet- welcome aboard. Seems to be a bunch of us from BuxMont. I'm just up 313 in Q'Town near the Tractor Supply. I'm getting my second shot up in Bethlehem tomorrow AM, and will start feeling comfortable about opening up my shop. Gimmee a yell! Steve
-
I had a vise where both static and dynamic legs were bent in to each other to the point that the jaws were not touching. It also had an obvious replacement screw and box. I figure the shop gorilla tried to tighten the vise with about a 5' cheater bar, bent both legs and blew up the screw/box. I documented the repair, it is in the vise folder somewhere, but I don't know how to link to it. Anyway, I got it rill rilly hot in my coal forge, laid each section bow- up on the anvil set a flatter on it and whacked it straight with a sledge. EZPZ. If you want to give it a shot, give me a yell. Steve ***I found my post, from Oct 3, 2017. Sorry I can't link to it.
-
Hey Echo- welcome. If Laurel is still doing forgepots and fittings, you can't go wrong. I've been running one for a while now and love it. I've used a few different hand- crank blowers with it as I've acquired them, now I'm using a bathroom exhaust fan recycled from a renovation project. It's 110 cfm, and I moderate flow with a dump valve. Steve Steve
-
Please help ID vintage (English?) anvil
Stash replied to Messy Jesse's topic in Anvils, Swage Blocks, and Mandrels
Hey Jesse- welcome to the madness. You are correct re the stone weight stamped in the side. These old eyes aren't seeing anything else I recognize. I don't think it is a Wm Foster, as according to Postman, they had logo and date on the side with the horn facing right, and the weight on the other side. There is some pretty good stamping in your pix, but I'm not seeing it right now. I have a few anvils with obscured stamping that I've been looking at for years. Then suddenly, I'm at the right angle, the lights are at the right angle and I finally found enough info to date my Hay-Budden. You might also have one of the more obscure anvil maker's product in your posession. I'm curious how it was determined to be a 1840 Foster. Steve -
Like Frazer said, "In rust we trust". If it is plated, leave it be. Watch out for painted stuff, too. It could be lead. If it is rusty, you're good. But as Frosty mentioned, it may be a higher alloy and just not appropriate for forging. If you can identify where a piece came from/ what it's original use was, there are scrap metal charts that can let you know what it could be. For starting out, buy a stick of a known mild steel- you know what to expect of it. Other than that, junkyard rules apply. Steve
-
Looks kinda like the Wilkinson logo of the crossed hot dogs/ cannons/ whatever they are. Wilkinson was in Dudley, England and made anvils through out the 19th century. Possibly they made vises, too. Not sure what to make of the stamped letters above. Maybe an owners name? Mostly speculating here. Steve
-
Looks to be 1941- 1942 ish, Steve
-
What did you do in the shop today?
Stash replied to Mark Ling's topic in Blacksmithing, General Discussion
Well, Lee does sell bloomery iron and some objects he has made, so there you go. He is a great resource, and he is still offering classes around the country, obviously affected right now by covid. I did a week with him up at New England School of Metalwork. Worth the trip. Steve -
How did you convince it to stand next to the fire for so long? I thought it would baaaa-ck off pretty quickly. Steve, sheepishly posting this
-
I dunno- that crack really concerns me. That anvil is a 2 part construction- base and body welded at the waist, with the steel top added on. The waist as well as the face plate weld look good to me. The crack we're seeing seems to be a major delamination of the wrought iron body. Should be fixable with electric welding and a deep 'v' groove, but that is above my pay scale. Steve
-
Welcome aboard. The best crab cake I've ever had was in your fine city, way off the beaten path. The naval academy was an awesome visit, too. Don't be a stranger, and don't forget the pix. Steve
-
Didn't look at the vid, but generally if tapping with a hammer as you described yields a clear ring and good bounce, I consider it good in my book. The ball bearing test quantifies things a little better. Looks like a nice old girl, with a lot of life left. Steve
-
The Does and Don'ts of using an angle grinder...
Stash replied to Mod30's topic in Grinders, Sanders, etc
I have one of those chainsaw chain carvers, I don't think I have 15 mins total on it. It is hard to get past the pucker factor, so I pick it up, look at it a while and then put it away. I have other carving attachments that work well, aren't real aggressive and I can work safely. They are made with a kind of self-limiting construction, like the anti- kickback feature on the newer saw chains. You still need to pay attention and keep a firm grip with BOTH hands. Steve -
Looking good there, Whiskey, and congrats on the new GD. Mine was just baptized today, we watched on Youtube. The most important placement is the forge/anvil/ vise triangle, everything else is a bit more peripheral. I have my anvil set so I just step to the right with a side- step and I'm beating metal. You could set it 90 degrees from where it is, just around the corner from your blower so you just side step to the left. Try different positions and angles and figure what suits you. The other thing that has been a big help for me is to have a small rolly- cart near by but out of the way for holding any tools that will be immediately used- punches, chisels, etc. Mine is maybe 12 x 24 or so, but it is a nice landing spot. Good that your hammer rack is close. As you work you will figure this out. Have fun. Steve
-
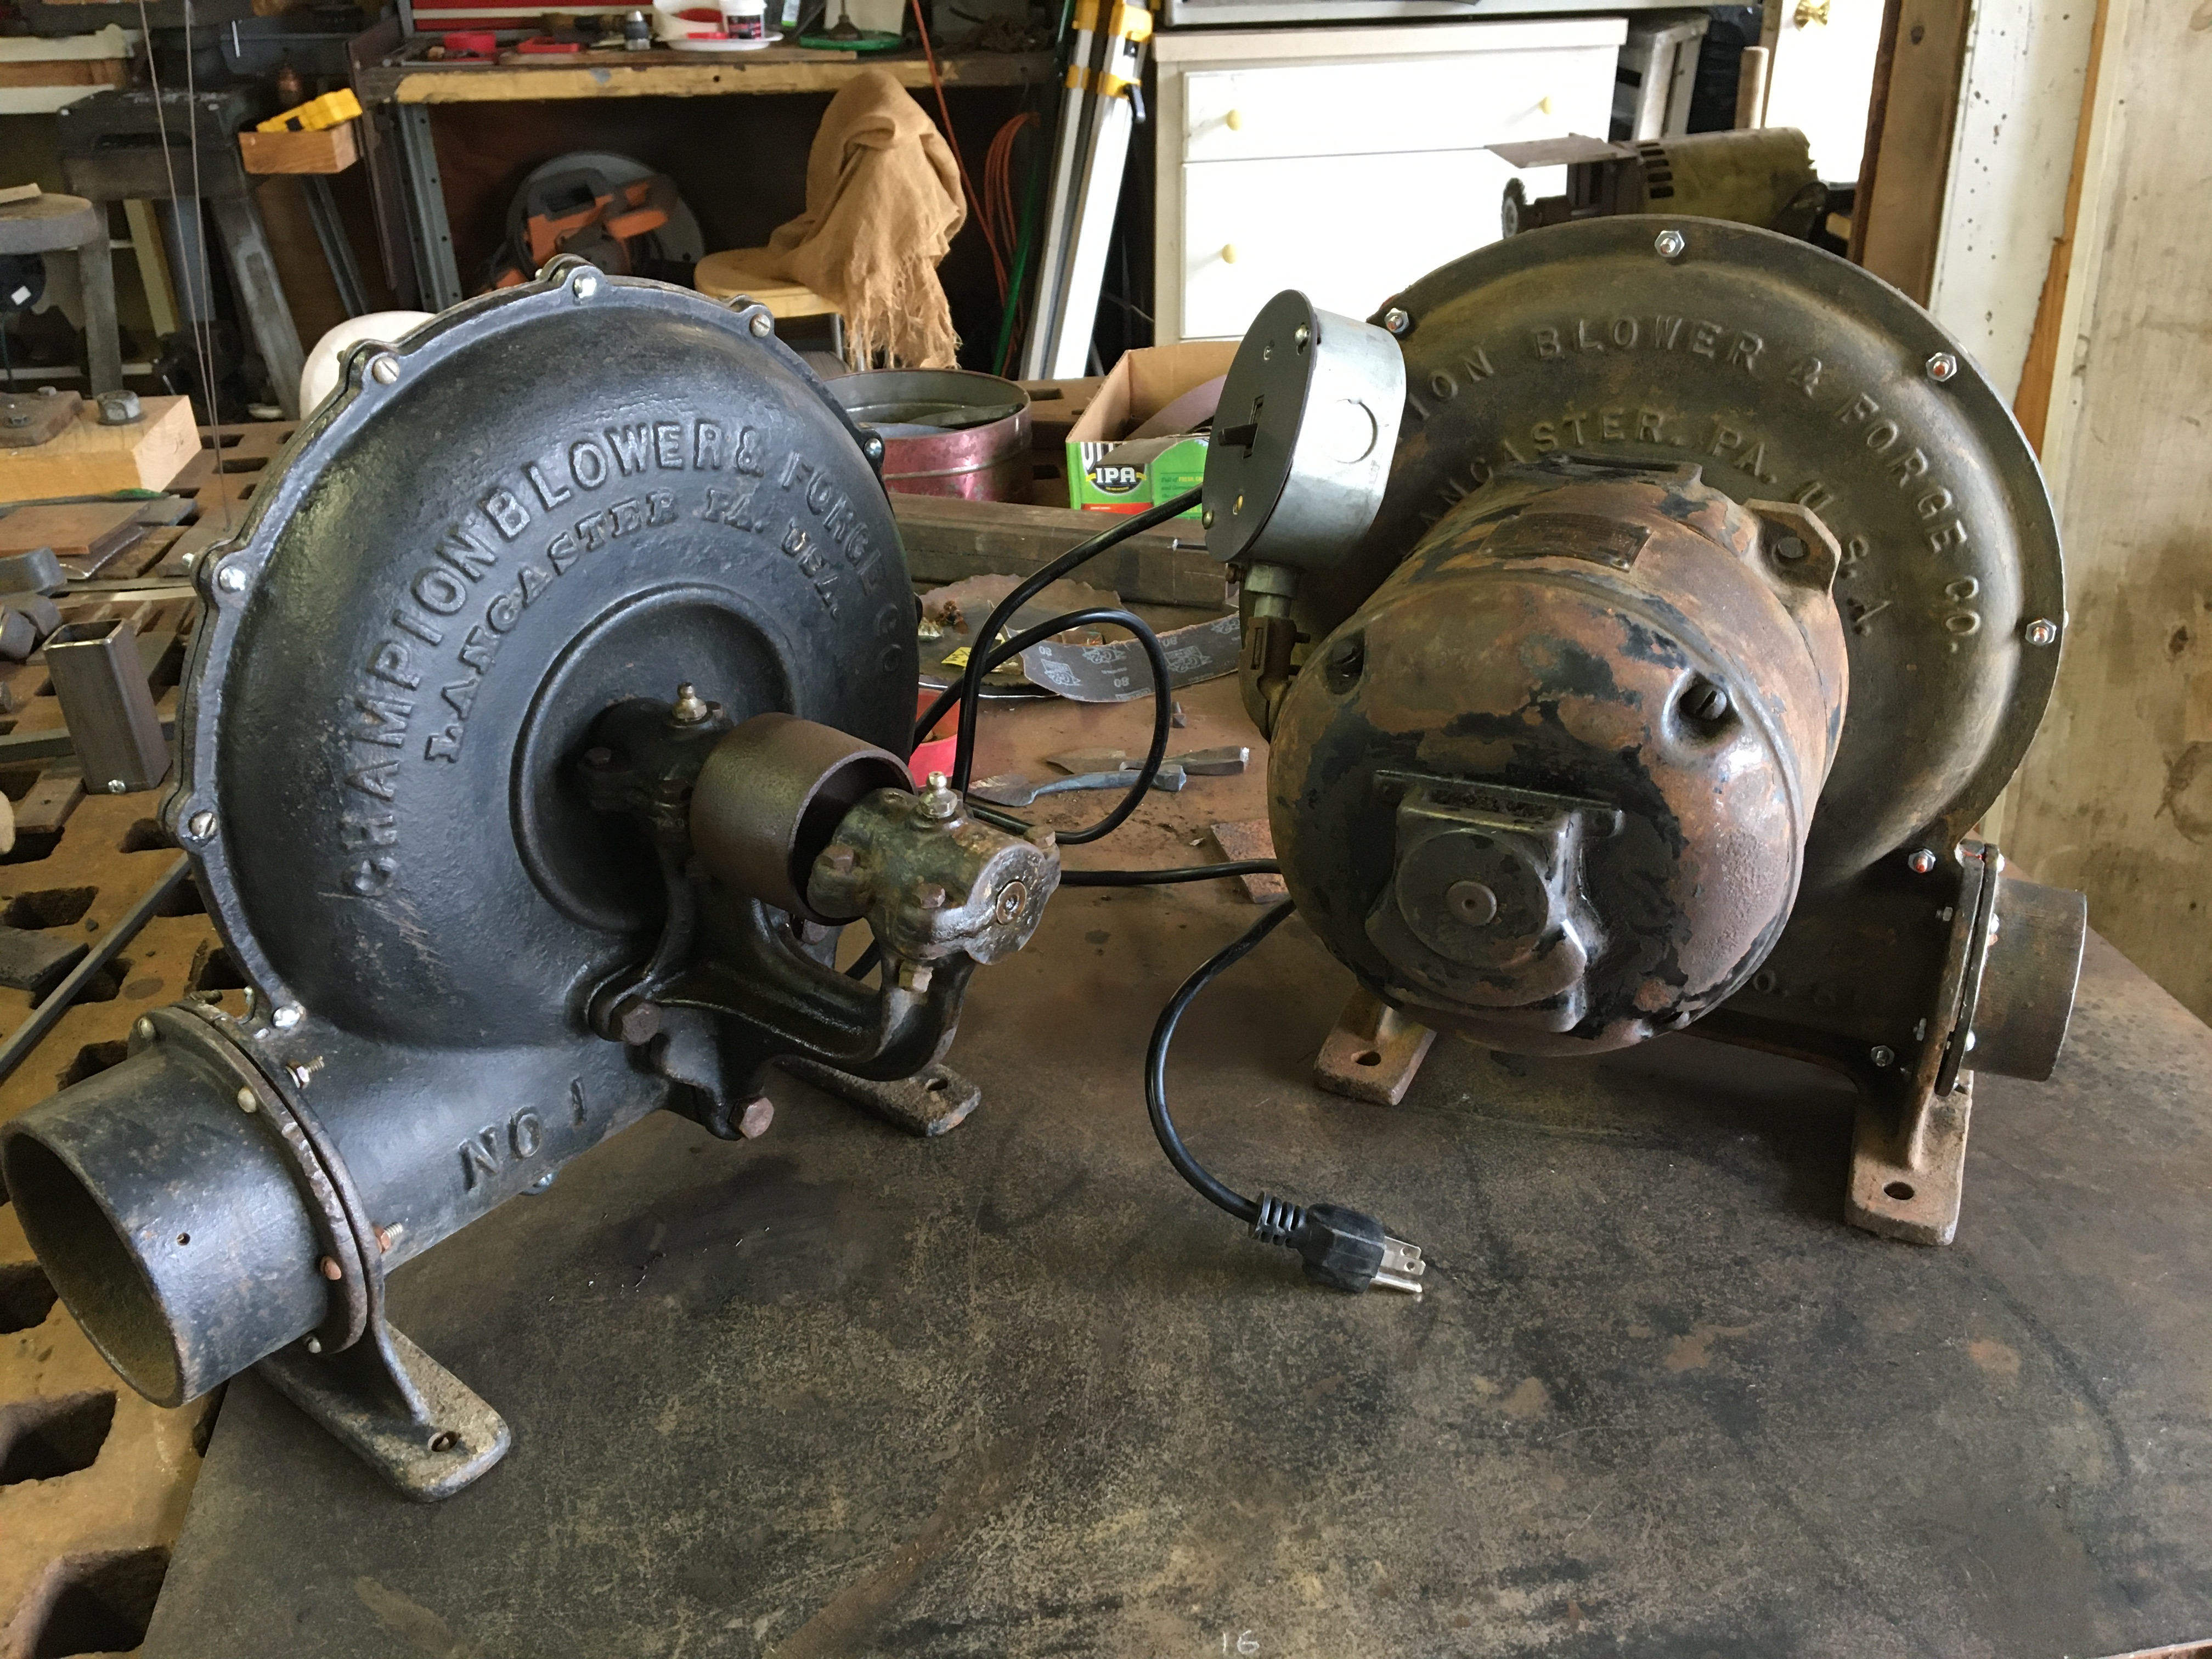
Well, they followed me home a while ago, and I’ve been working on them for a while, so here they are. A Champion #1 belt drive blower that now spins like a dream. I just needed to pull it apart, clean out the mouse debris and mud daubers and put in some new nuts and bolts. At some point in its life the oil caps were removed and replaced with grease zerks. I hope to fix that. Then just figure out how to hook it up to power. The other is a direct drive #51 with a 1/6 hp Emerson motor. Again, just minor cleanup, new cord and switch,and she spins like a top. This came with a complete fire pot, tuyere and 30x36 original steel table. I’ll fit these into the smithy somehow- I have a hard time saying no when deals come up.

-
I would suggest that you do your rebuild by setting the firepot into a steel table- maybe 3/16" or so, at least 24x 30". You can use thinner gauge for the table, but you will need support under neath- either angle or square tube. Then you can set all that in a wood box frame. As shown in your photo, you can just pack clay or dampened kitty litter between the pot and the wood box. If you want to stick with the wood box construction,, definitely make a box big enough so you have a reasonable sized table for the pot, your coal, and fire tools. Steve
-
Looks to be from 1906. Show us pictures, or it didn't happen. We like pictures. The old girl should ring like a bell. Fasten it tight and bed it in silicone, she'll quiet down. Steve
-
The Does and Don'ts of using an angle grinder...
Stash replied to Mod30's topic in Grinders, Sanders, etc
Ive been using diamond blades for cutting metal for 8+ years and for cutting masonry for over 20 years. Never had an issue 'torquing out' of a cut uncontrollably. I prefer paddle switches on the handle- sort of a built in deadman control so this could help. I've decided I don't care for blades shattering that close to me so I made the switch to the diamond blades. Never had a problem that caused a code brown moment, and I still have a pile of unused, un needed abrasive zip discs in my grinder boxes. YMMV Steve -
Anchoring shop to existing slab
Stash replied to Ridgeway Forge Studio's topic in Building, Designing a Shop
Upright 4x4s on 8'centers seem a little underbuilt for me.For the back and sides I would just do a stick framed 2x4 wall, maybe go on a 24" spacing. Bolt down as Will said above. For the open front, maybe some short 2' wing walls on either side with some diagonal bracing then run a double 2x10 or 2x12 across the opening. If you want the full 16' opening in the front, go with the doubled header with a 4x4 post in the center, set on and screwed to a post anchor bolted to the concrete. Steve -
For cutting with my angle grinder, I switched to diamond blades a while ago. They are a bit slower than the old kind, but you maintain a consistent diameter and they work a treat on SS. I think I got mine from Diamond Blade Warehouse. I used them for all my masonry diamond blades and when they offered them for metal, I jumped and never looked back. I agree with Irondragon- make the spatula blade from ss and rivet to the handle. Steve
-
I've never seen that style before but it certainly looks workable. My inclination would be to put clay in the firepot, and pack it pretty firm. Then create my ducks nest from the center part with the clinker breaker out over the rest of the table with the clay. Maybe put a perimeter of thin firebrick on the table and blend from the ducks nest up to the brick. You don't need to get real fancy with refractory clay or cement- just dig some clay from the back yard or local creek bank. Just get it damp and form it into place and pack it in with a mallet or chunk of 2x4. Un scented unused kitty litter is great for this if you don't have local clay. Again, don't get it too wet or it will crack as it dries. Hope this helps. Steve
-
Cool piece. Definitely needs to be saved and protected. The base is real nice. Steve
-
I'm currently on "The List". Got a message from my provider confirming my name on "The List". Woohoo. Steve
-
Mine gets used well in my forge. I've made a selection of dies for it and am at the point where I need some kind of organizing system for them. Real handy is the 3 point set I made for fullering/working pipe. I bought mine from Yesteryear forge, who is a member here. Steve
-
Peter Wright didn't use serial numbers. I recall that they used multiple piece tops until 1885 (I think) then switched to single piece tops. After 1910 ish, they had "England" stamped with the logo. The older ones were more blocky shaped, later ones a bit more refined looking. Generally with PW's you can date them within a range, but not a specific date. This based on weakening memory of a borrowed copy of AIA. I need my own copy. Steve