Peter R
Members
-
Joined
-
Last visited
-
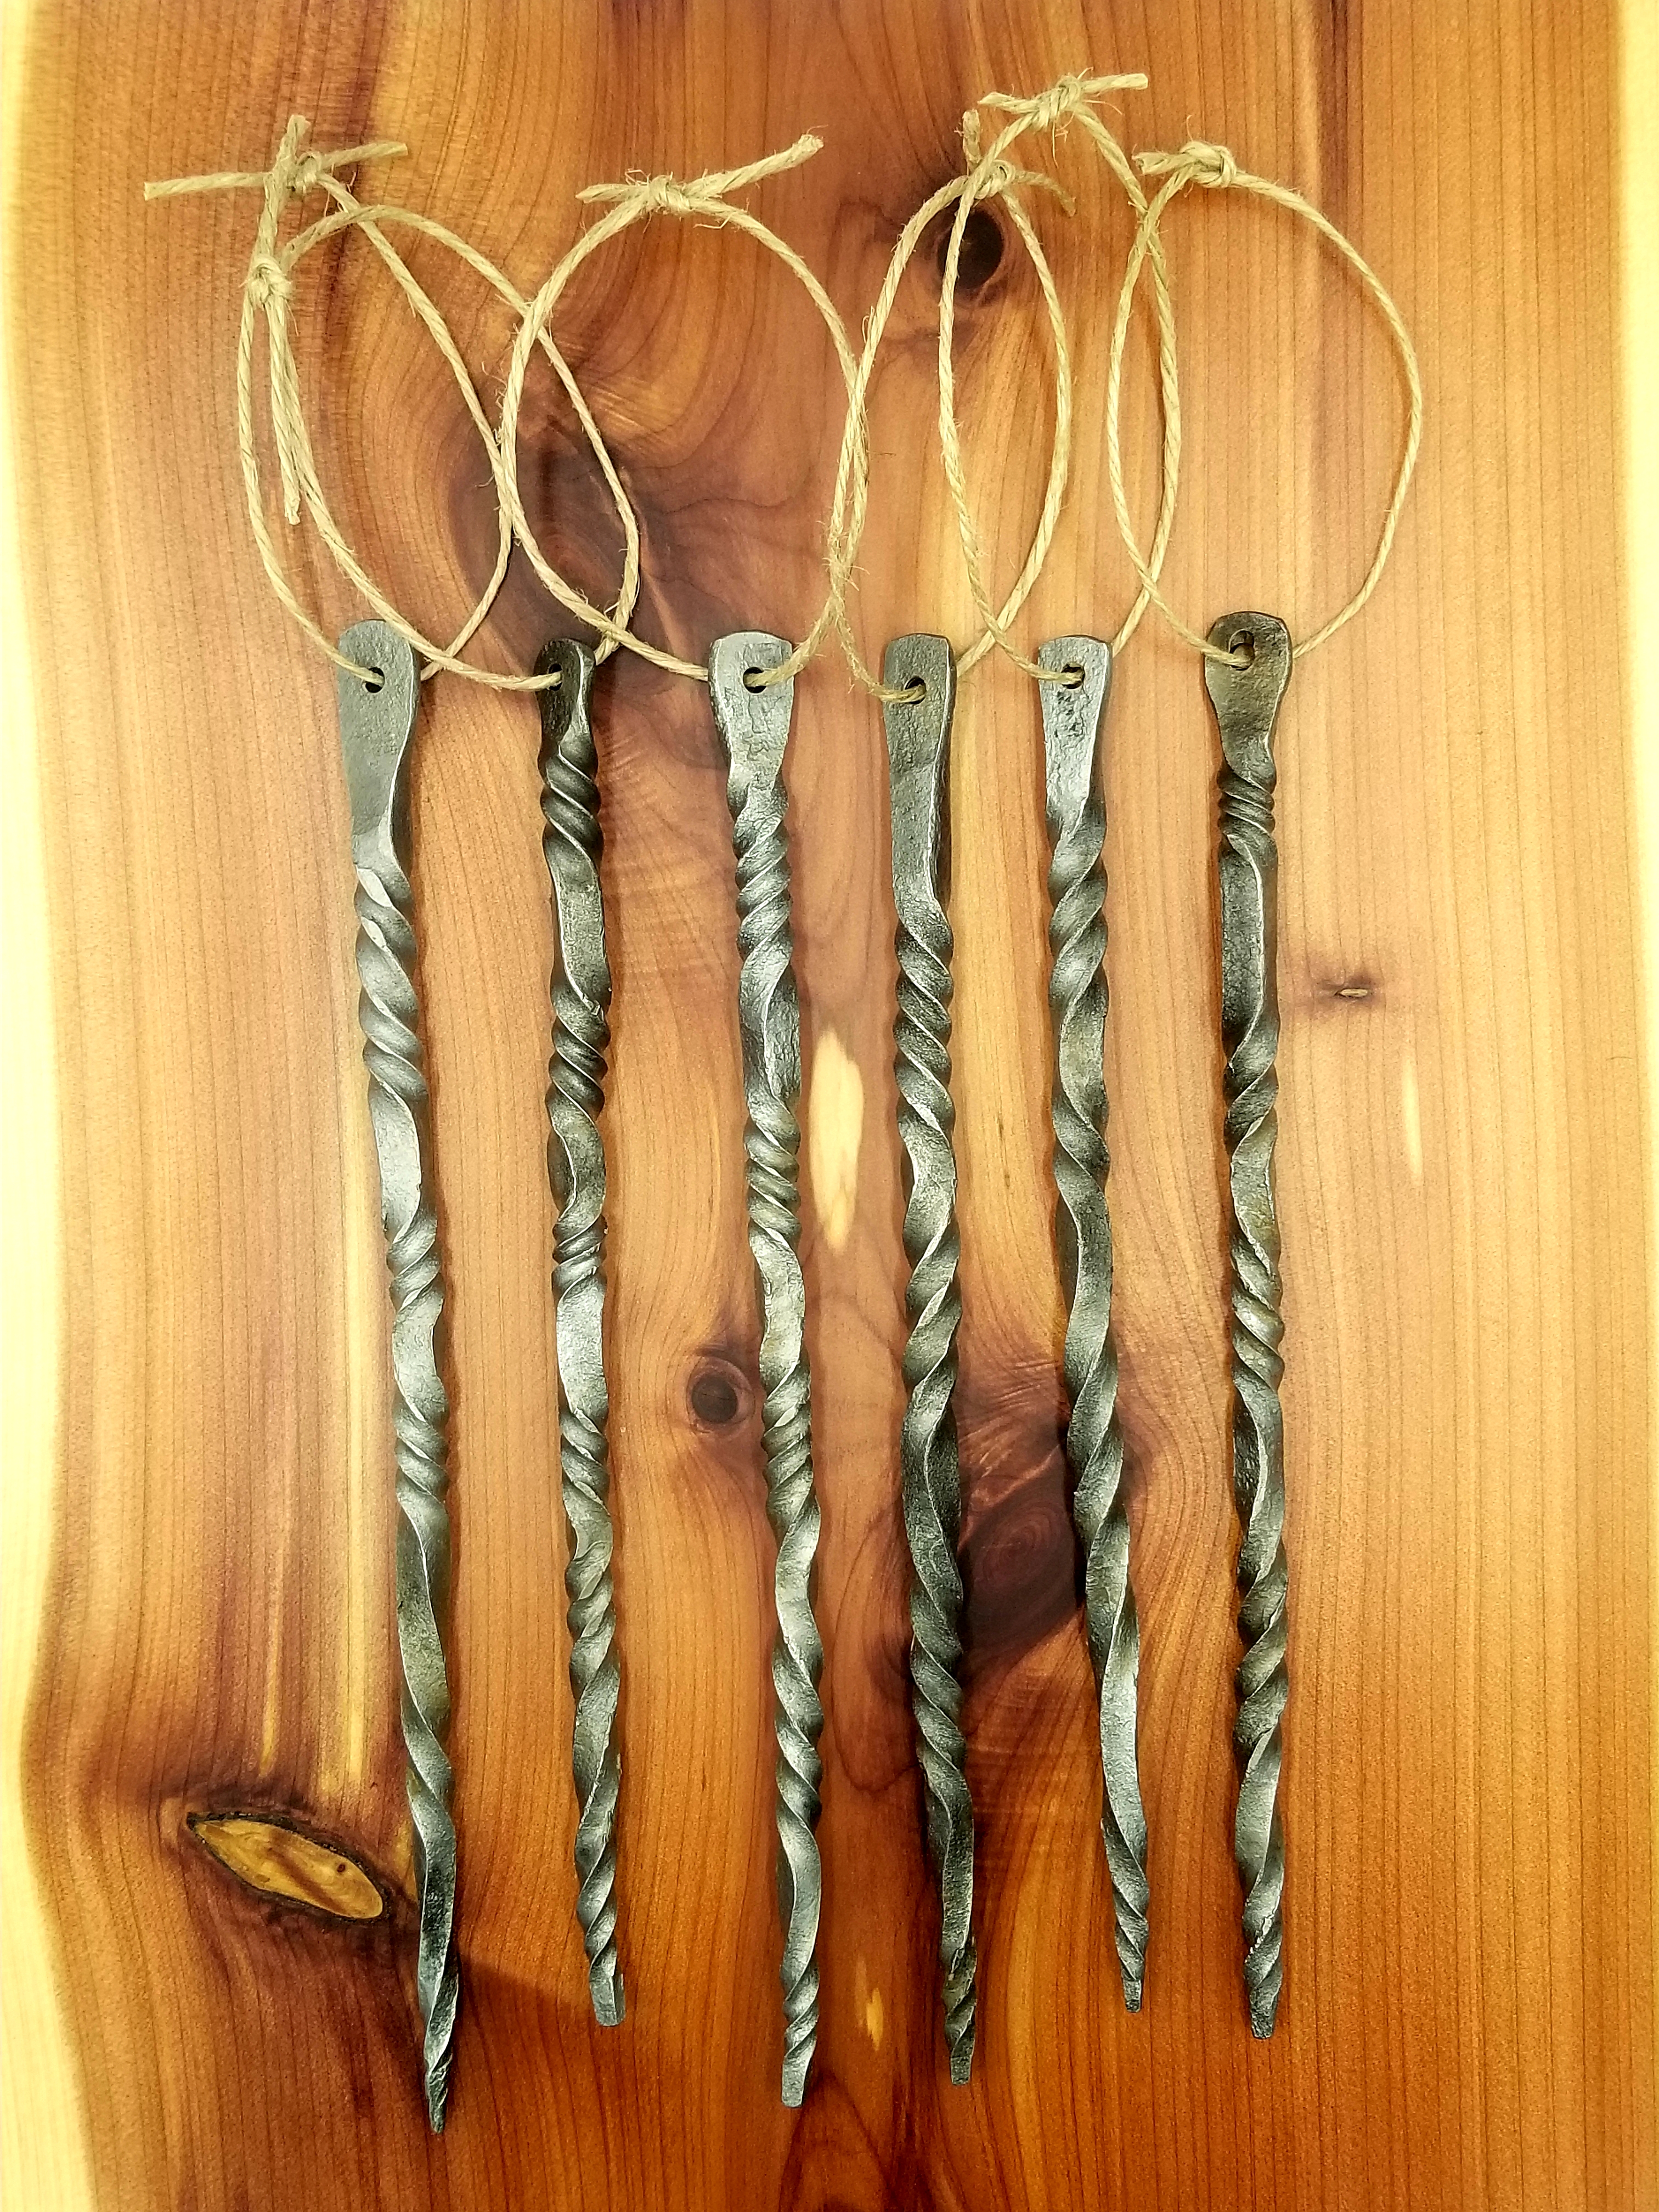
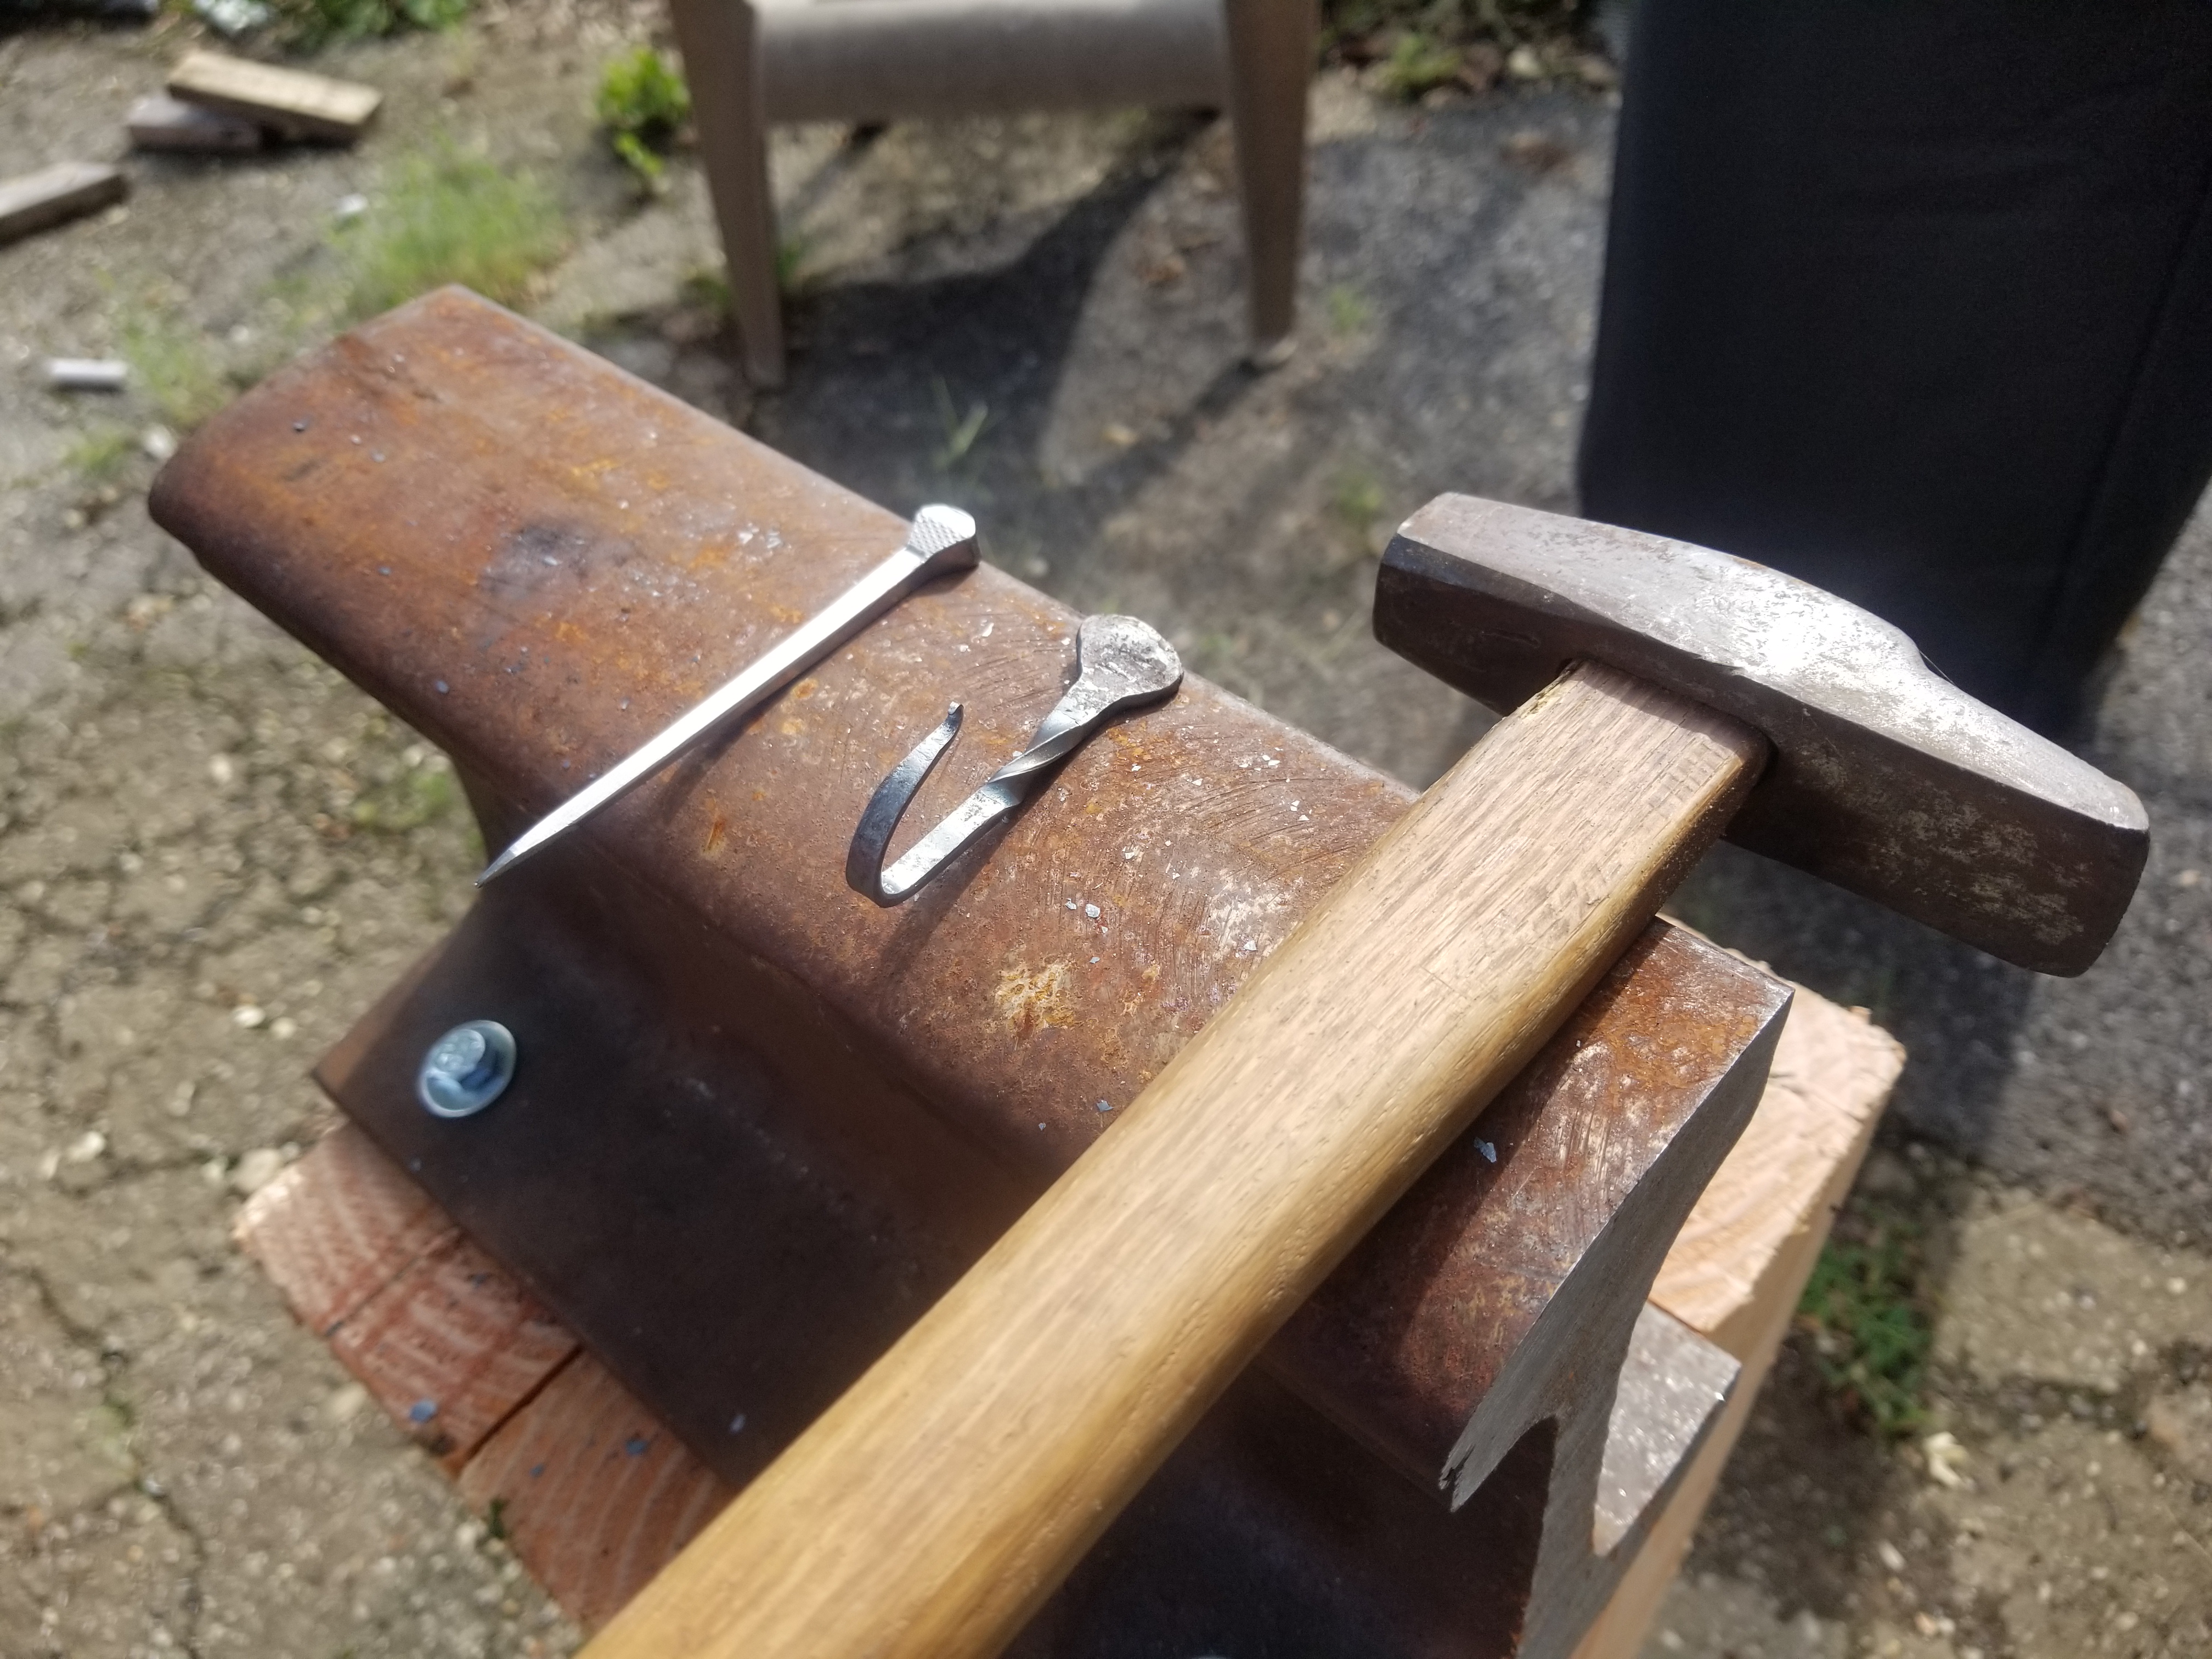
I've been busy not forging much since I last posted. These icicle ornaments were pretty fun to practice longer gentle tapers and play with temperatures for twists - really evident how some twists were at a high yellow and others at an orange. Twisting the skinny points is tricky, as is straightening after twists. I probably could use a good stump and wood mallet, maybe that'll be an upcoming project. Santa brought me no coal, but did bring a box of 50 railroad spikes. I think I'll need to find a good use for those.

-
Hi folks! I've recently been attempting to make some it-but bolt tongs from blanks, and am having a lot of difficulty chiseling the v-shape into the jaws. I've been trying to hold my tong blank in my approx 30lb antique leg vise, but as I hit my chisel, the blank slips down and pretty much out of the vise after just a few blows. This means that my force isn't translating into effective chiseling. I'm going to assume the old vise is probably just not up to holding as tight as needed and probably has been abused and may have some thread damage. It was a freebie thrown in with some tools I bought and works pretty good for twisting. So before I ruin my blanks trying something that might work poorly, I wanted to ask advise. Here's a few possible solutions and want your feedback: 1) get a heavier, better shape vise. I don't have a source for one yet nor can I financially justify it now. 2) have a partner hold the heated blank on the anvil while I chisel. The downside I see is that the curve of the blank is what contacts the anvil, not directly under the jaw, so I foresee some pretty bad bending while chiseling. I could probably bend it back to shape, but my beginner skills may let me down. 3) cut a slot with a hack saw or angle grinder. I assume this removes a lot more material than chiseling. The blanks are pretty light so I dont know if the kerf from a cut is too much. Are options 2 or 3 worth trying, or will it probably fail? Let me know if you have any smart suggestions, I'm sure slipping work pieces in vises is not an issue I'm alone in experiencing. Preemptive thank you!
-
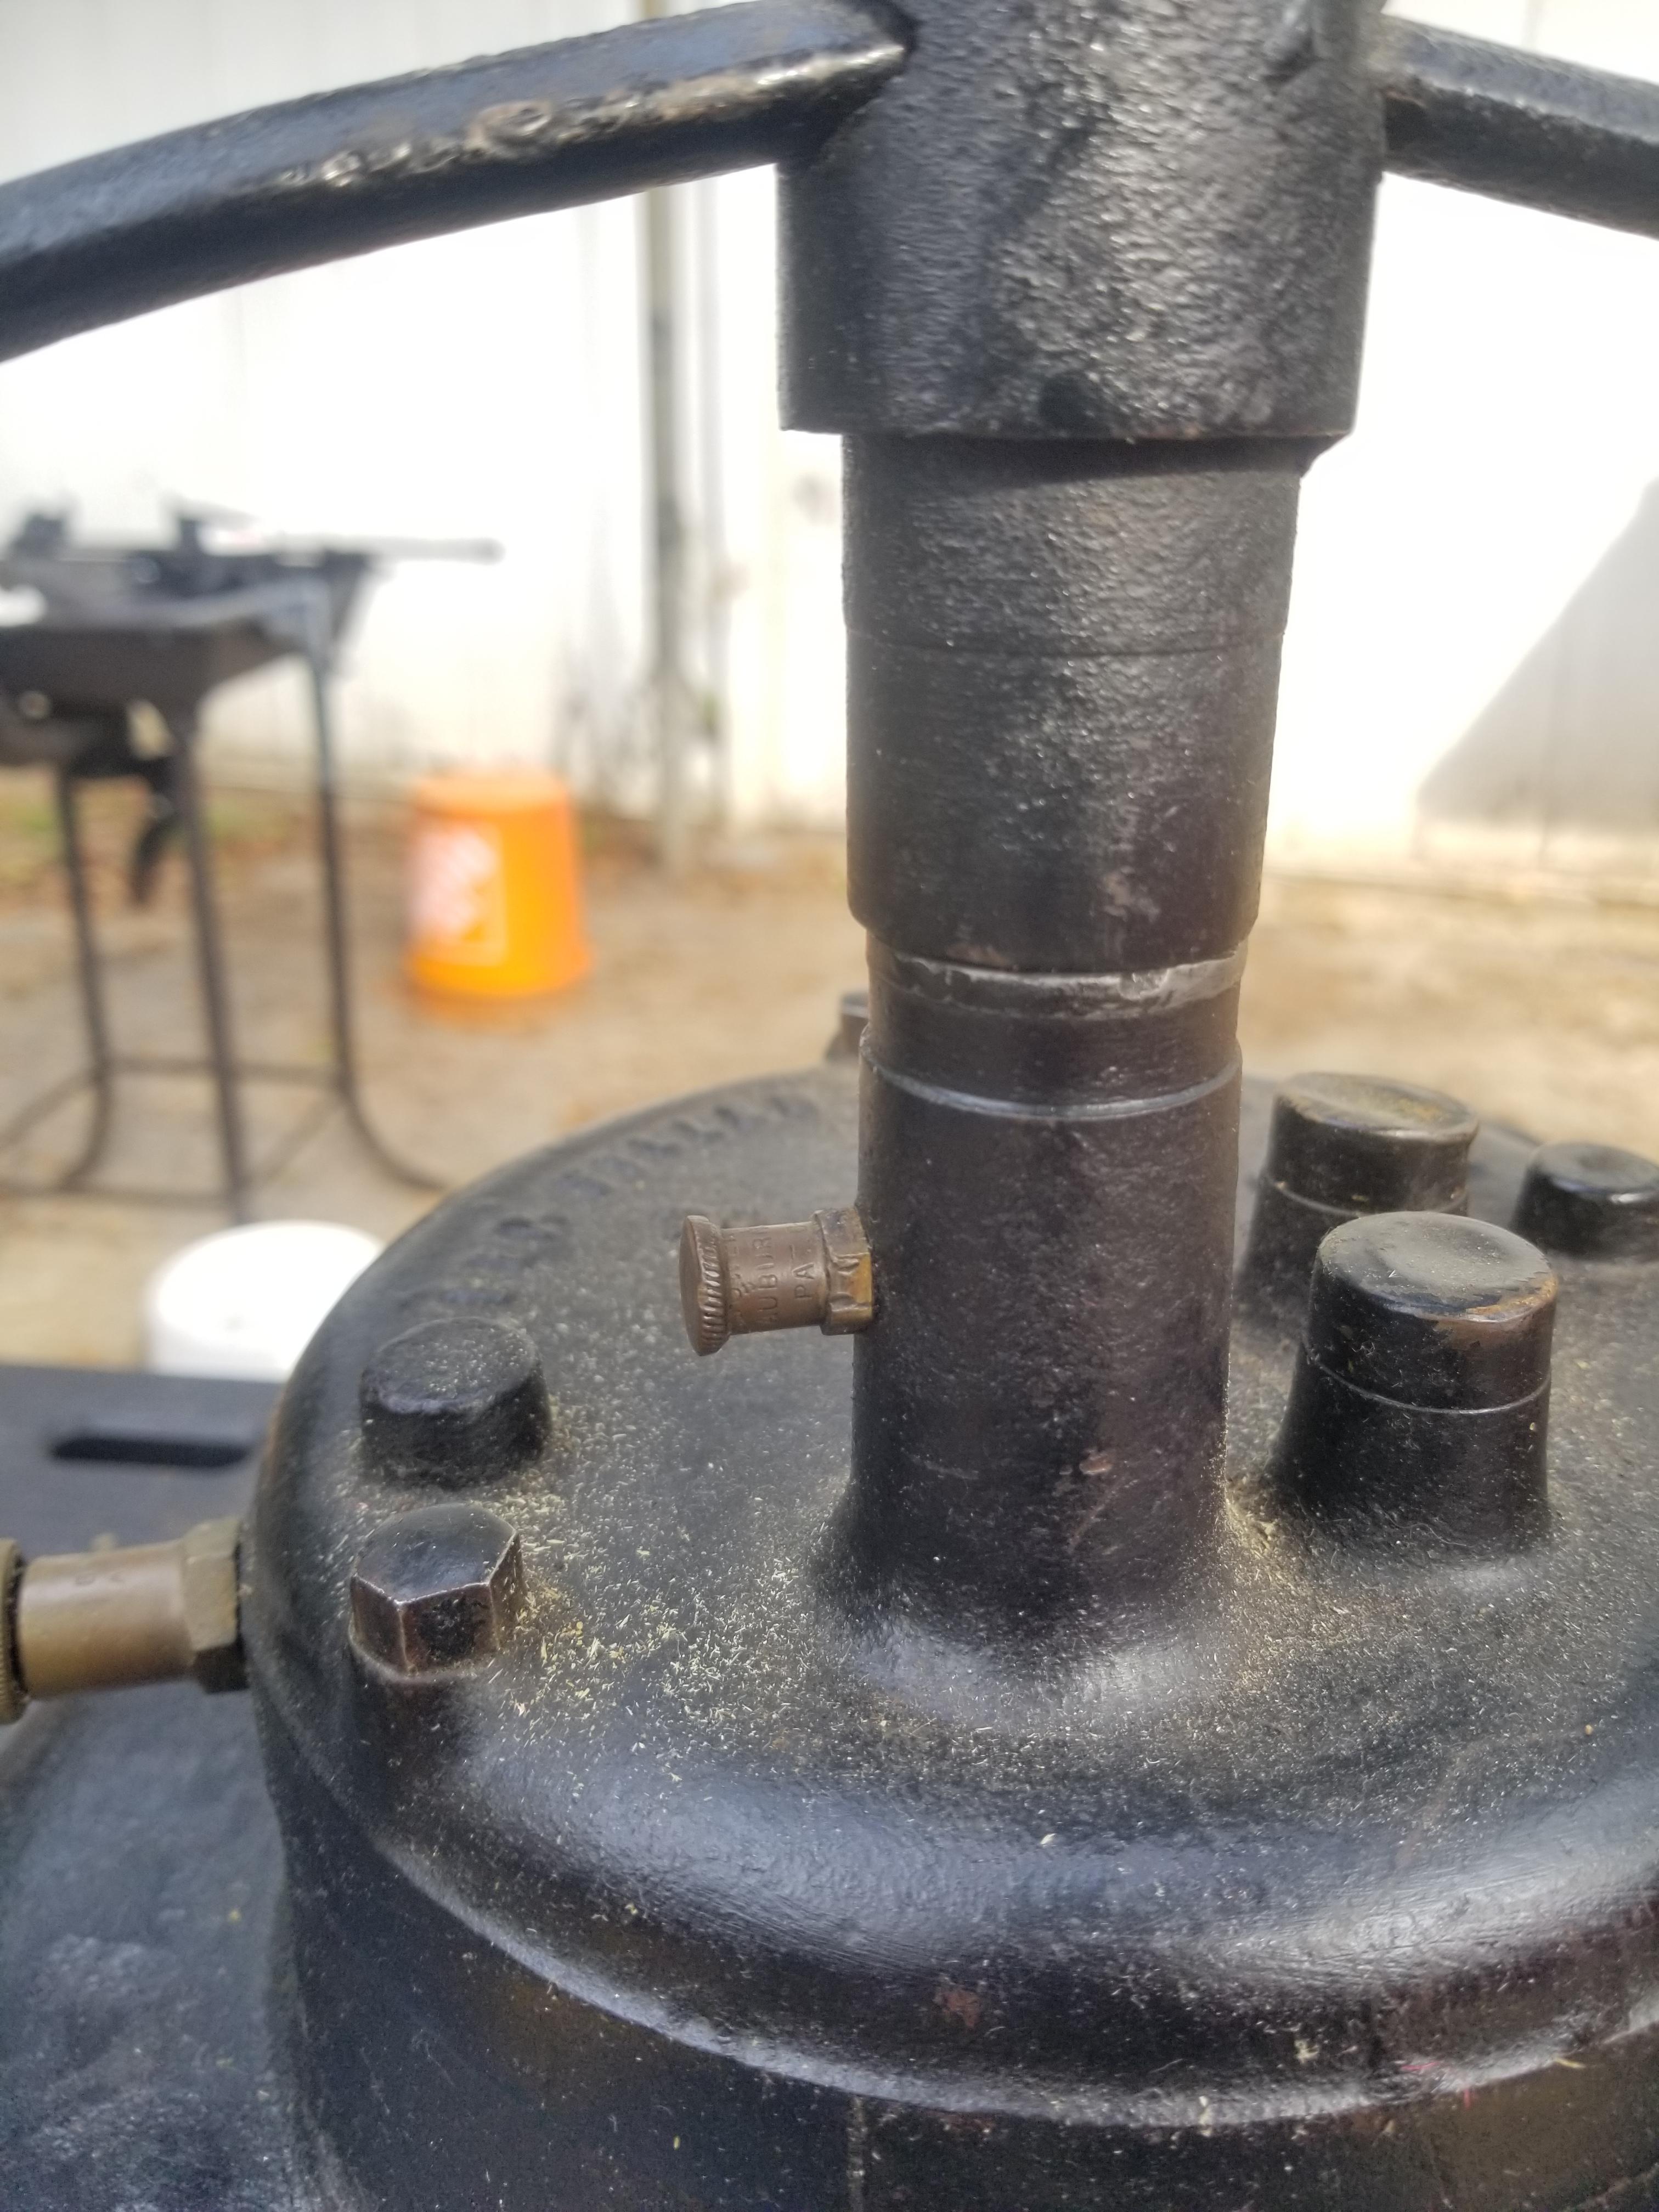
Thanks a ton everyone for the responses! I got around to making a stand for it. I'm no carpenter or engineer, but it works despite looking a little odd. Pics another day as it's dark out now. One dumb question I did have, I'll probably use one of the oil suggestions above, but.. is there a "least messy" way of adding oil to the blower? Trying to pour from the bottle into the tiny knob seems like the wrong way and asking for a mess. Thanks again, I hope to get a few pics of the setup soon.
-
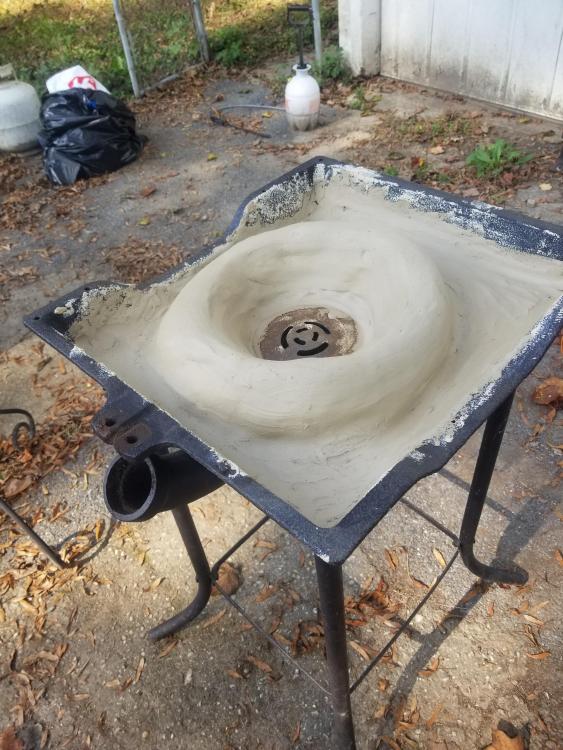
I think you're right, I'm going to clay up the whole pan. Problem with the cutouts is they are super shallow, the added height of the grate almost comes right up to them. While the cutouts are probably useful somehow, I think for now I'm going to add height over them.
-
A few weeks taking care of family put the forge stuff on hold. I picked up a bag of fire clay and below is the result from yesterday's work lining and creating a little bowl for the fire. Rim is a few inches high (hard to measure exactly, but probably 2.5-3 inches) inner diameter at the widest part at the top is about 8 inches, going down to a 5 inch diameter tuyere grate. I hope I've done it right "enough" to make it usable - with the pan as shallow as it is this was the shape that seemed to be close to what I'd pictured. We will see how it looks with a few days of drying. Does it look usable? I'm thinking I'll let it dry a good bit before use, but maybe in a few days light up a small wood or charcoal fire to speed up the process a little (unless that is a bad idea?)
-
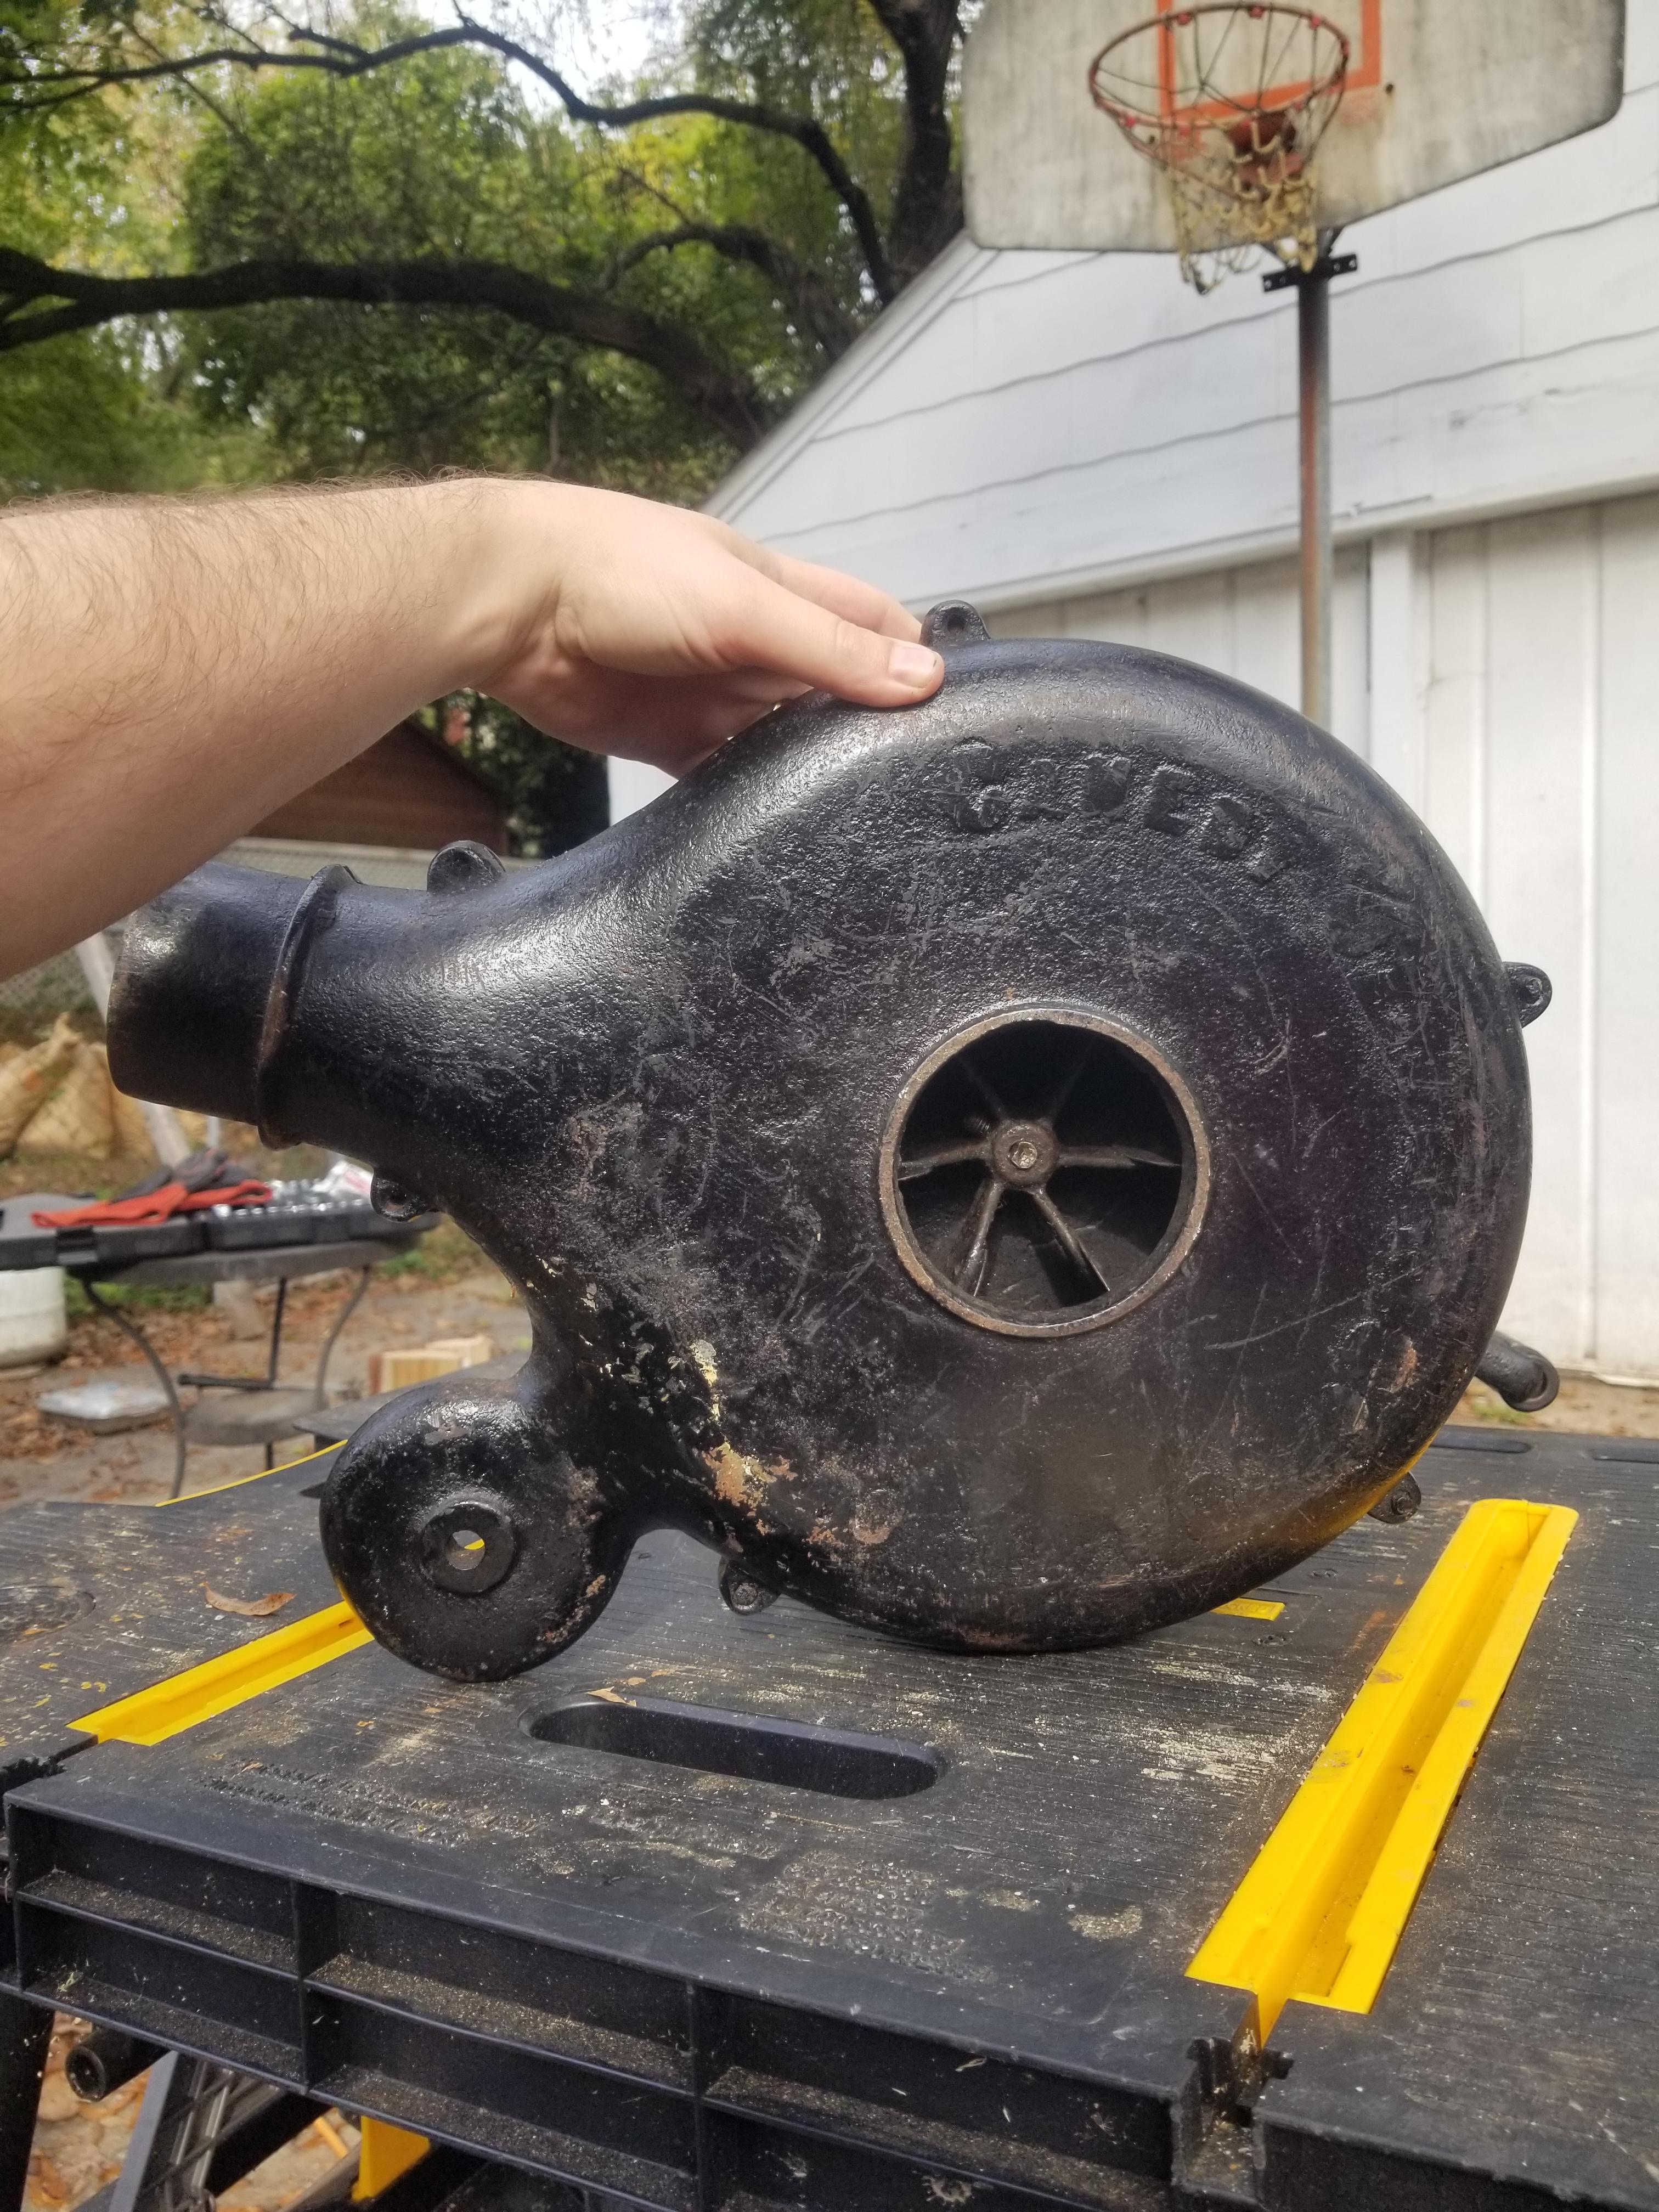
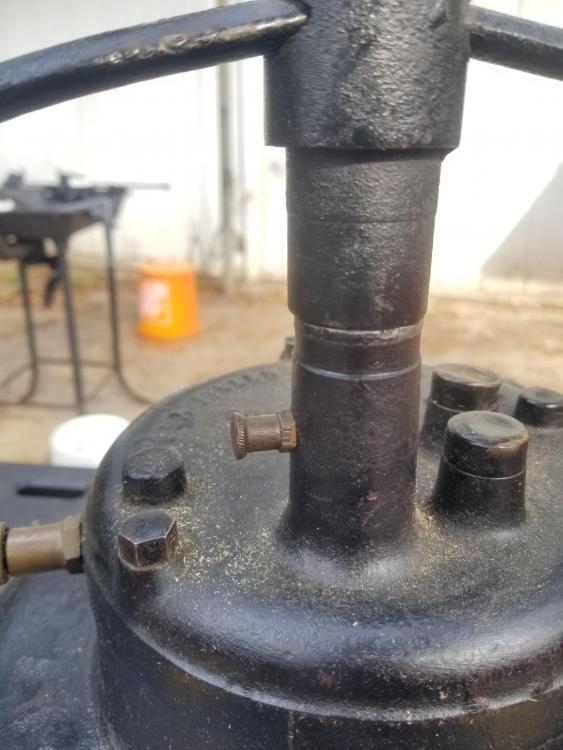
I picked up this hand crank blower from a guy in northern Virginia who acquired it but never got around to using it. Crank turns, air comes out. I can barely make out "Canedy" on one side with other words obscured. I'd like to use this one and have a few Qs! 1) I need a stand. Any tips on making one? No welding, so I'm hoping lumber, a miter saw, and a power drill can get me most of the way. All the pictures I can find of this brand of blower show metal stands. 2) Looks like two oil reservoirs. What kind of oil should I use and how much? 3) using it seems pretty straightforward, but if there are any "read this first" on hand crank blowers, I'm all ears. 4) Can I assume this is a good find as long as it produces air when the handle is turned? Hope you enjoy the pics.


-
Thanks for all the info so far everyone! Thomas as usual big thanks I think you've responded to me every time I've asked beginner Qs. Iron dragon that's a cool catalog. For claying the pan, what's the recommended product? Pottery clay? Thanks again!
-
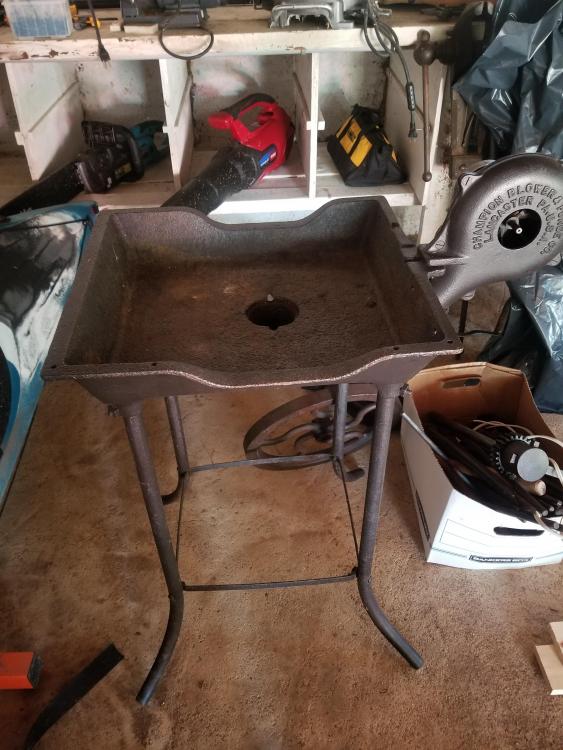
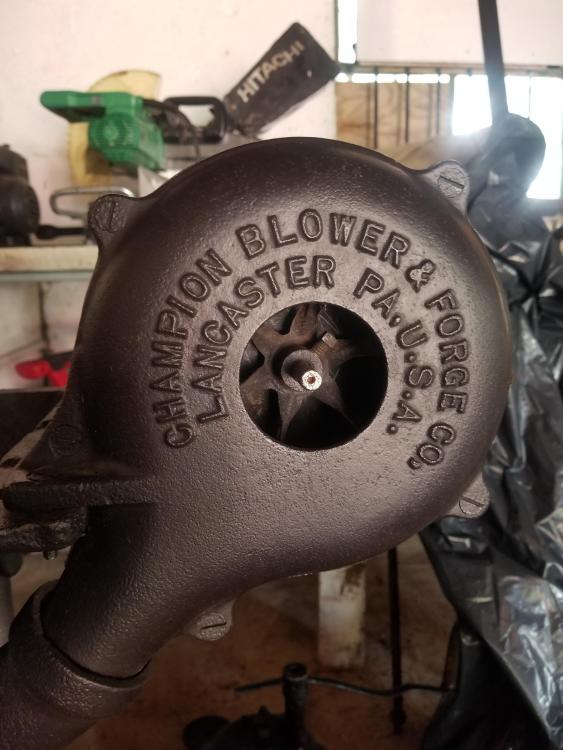
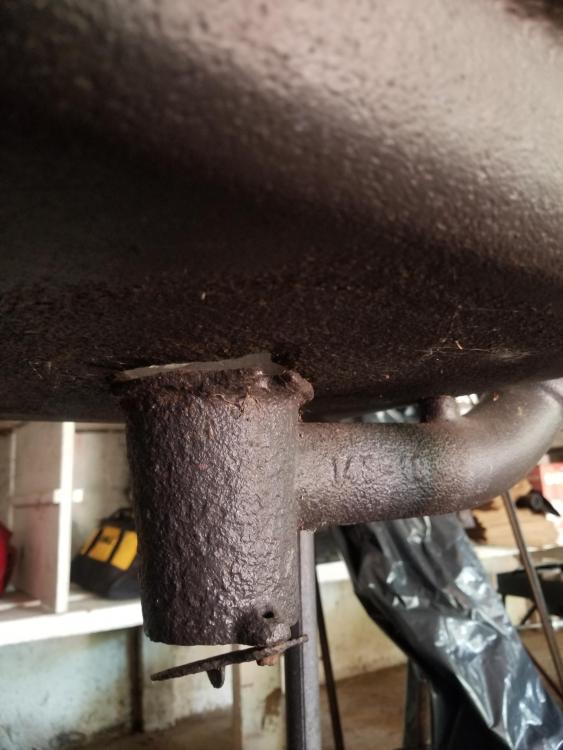
I've been sharing my beginnings in the hobby with friends and family, even had a few sales (yay!). My wife's cousin who lives nearby spotted some blacksmith stuff for sale and alerted me. Short story - I have an old forge and other goodies, but with this post I wanted to share the forge! Please see the pictures below and tell me what you think. It looks cast iron and has gone through an owner or two who have let it collect dust without use. A few Qs: 1) I don't see any labeling except on the blower. Is there a proper name for this forge (or a good guess?) 2) should I line the pan, or at least close to the tuyere? 3) there are a lot of gaps where the tuyere meets the pan. Are these areas where weld material has failed? Should I address that somehow? 4) since it's just a flat pan with no "fire pot", any basic recommendations for shaping a fire? I have both lump charcoal and bituminous coal and would like to play around with both. My first thought is using some fire bricks to shape as needed. 5) the sliding ash gate needs attention. I should just replace that with a weighted flap, right? 6) any further suggestions or thoughts to get it ready to fire up are greatly appreciated! Thanks in advance!
-
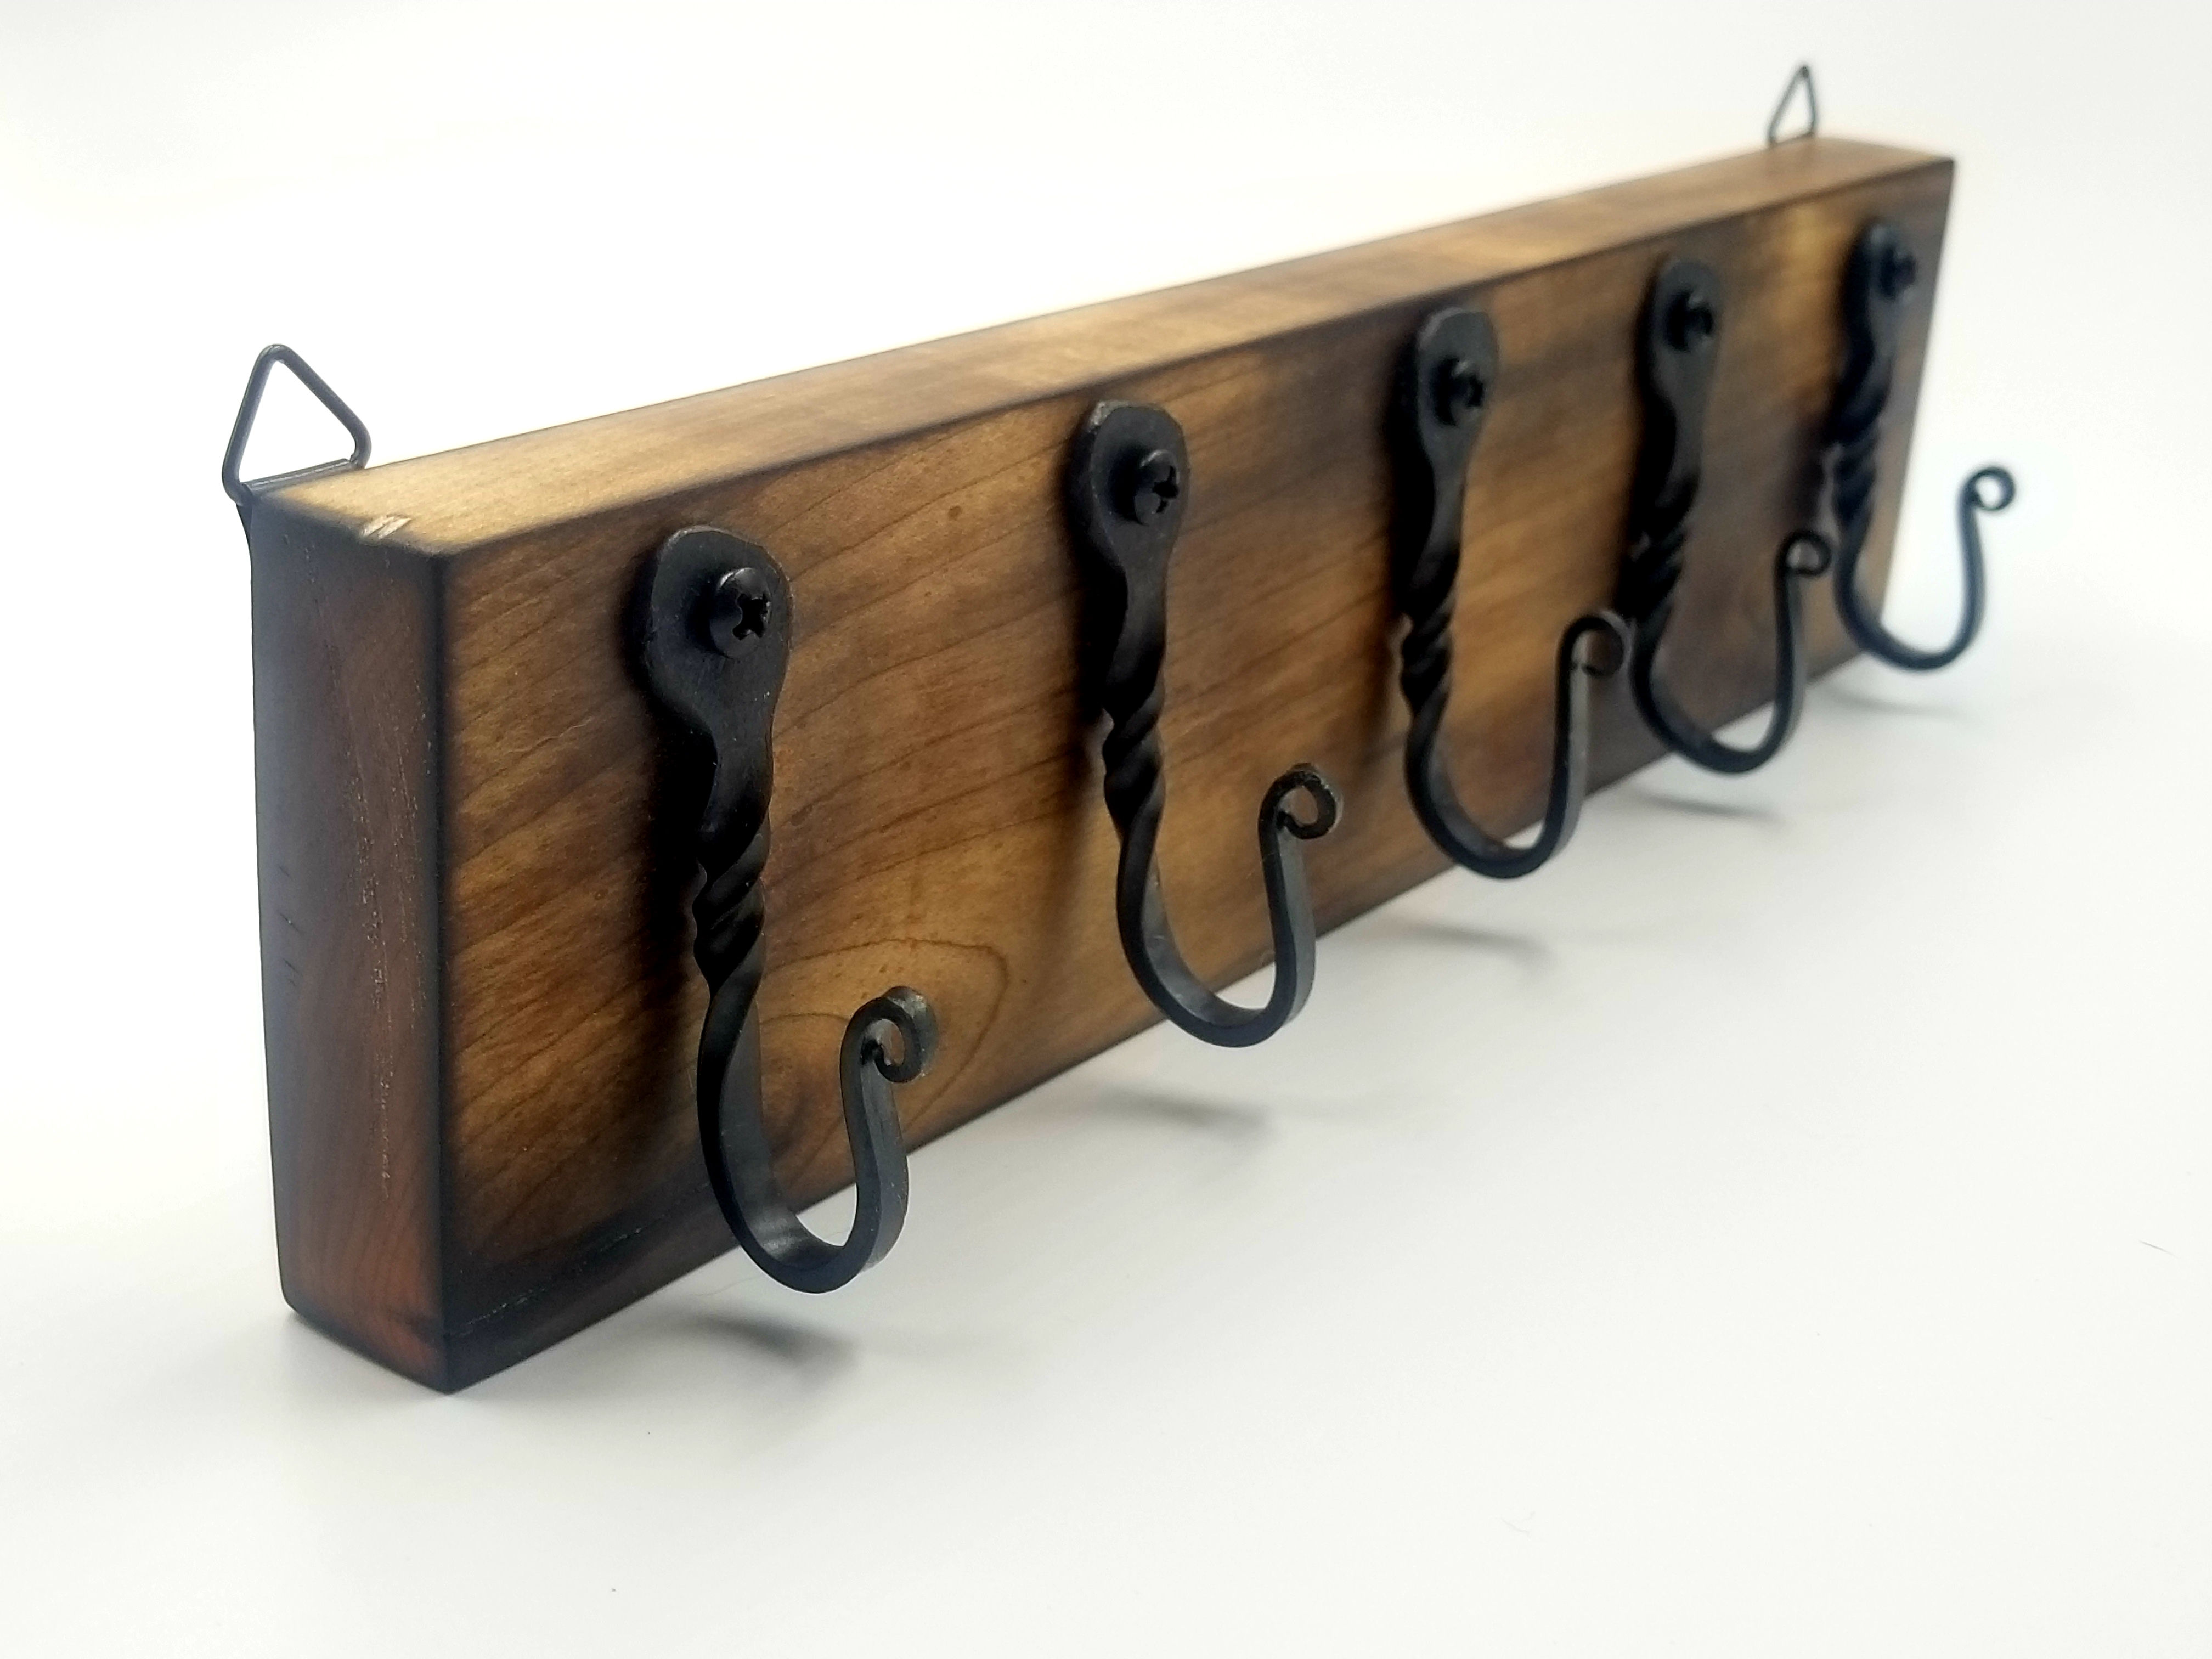
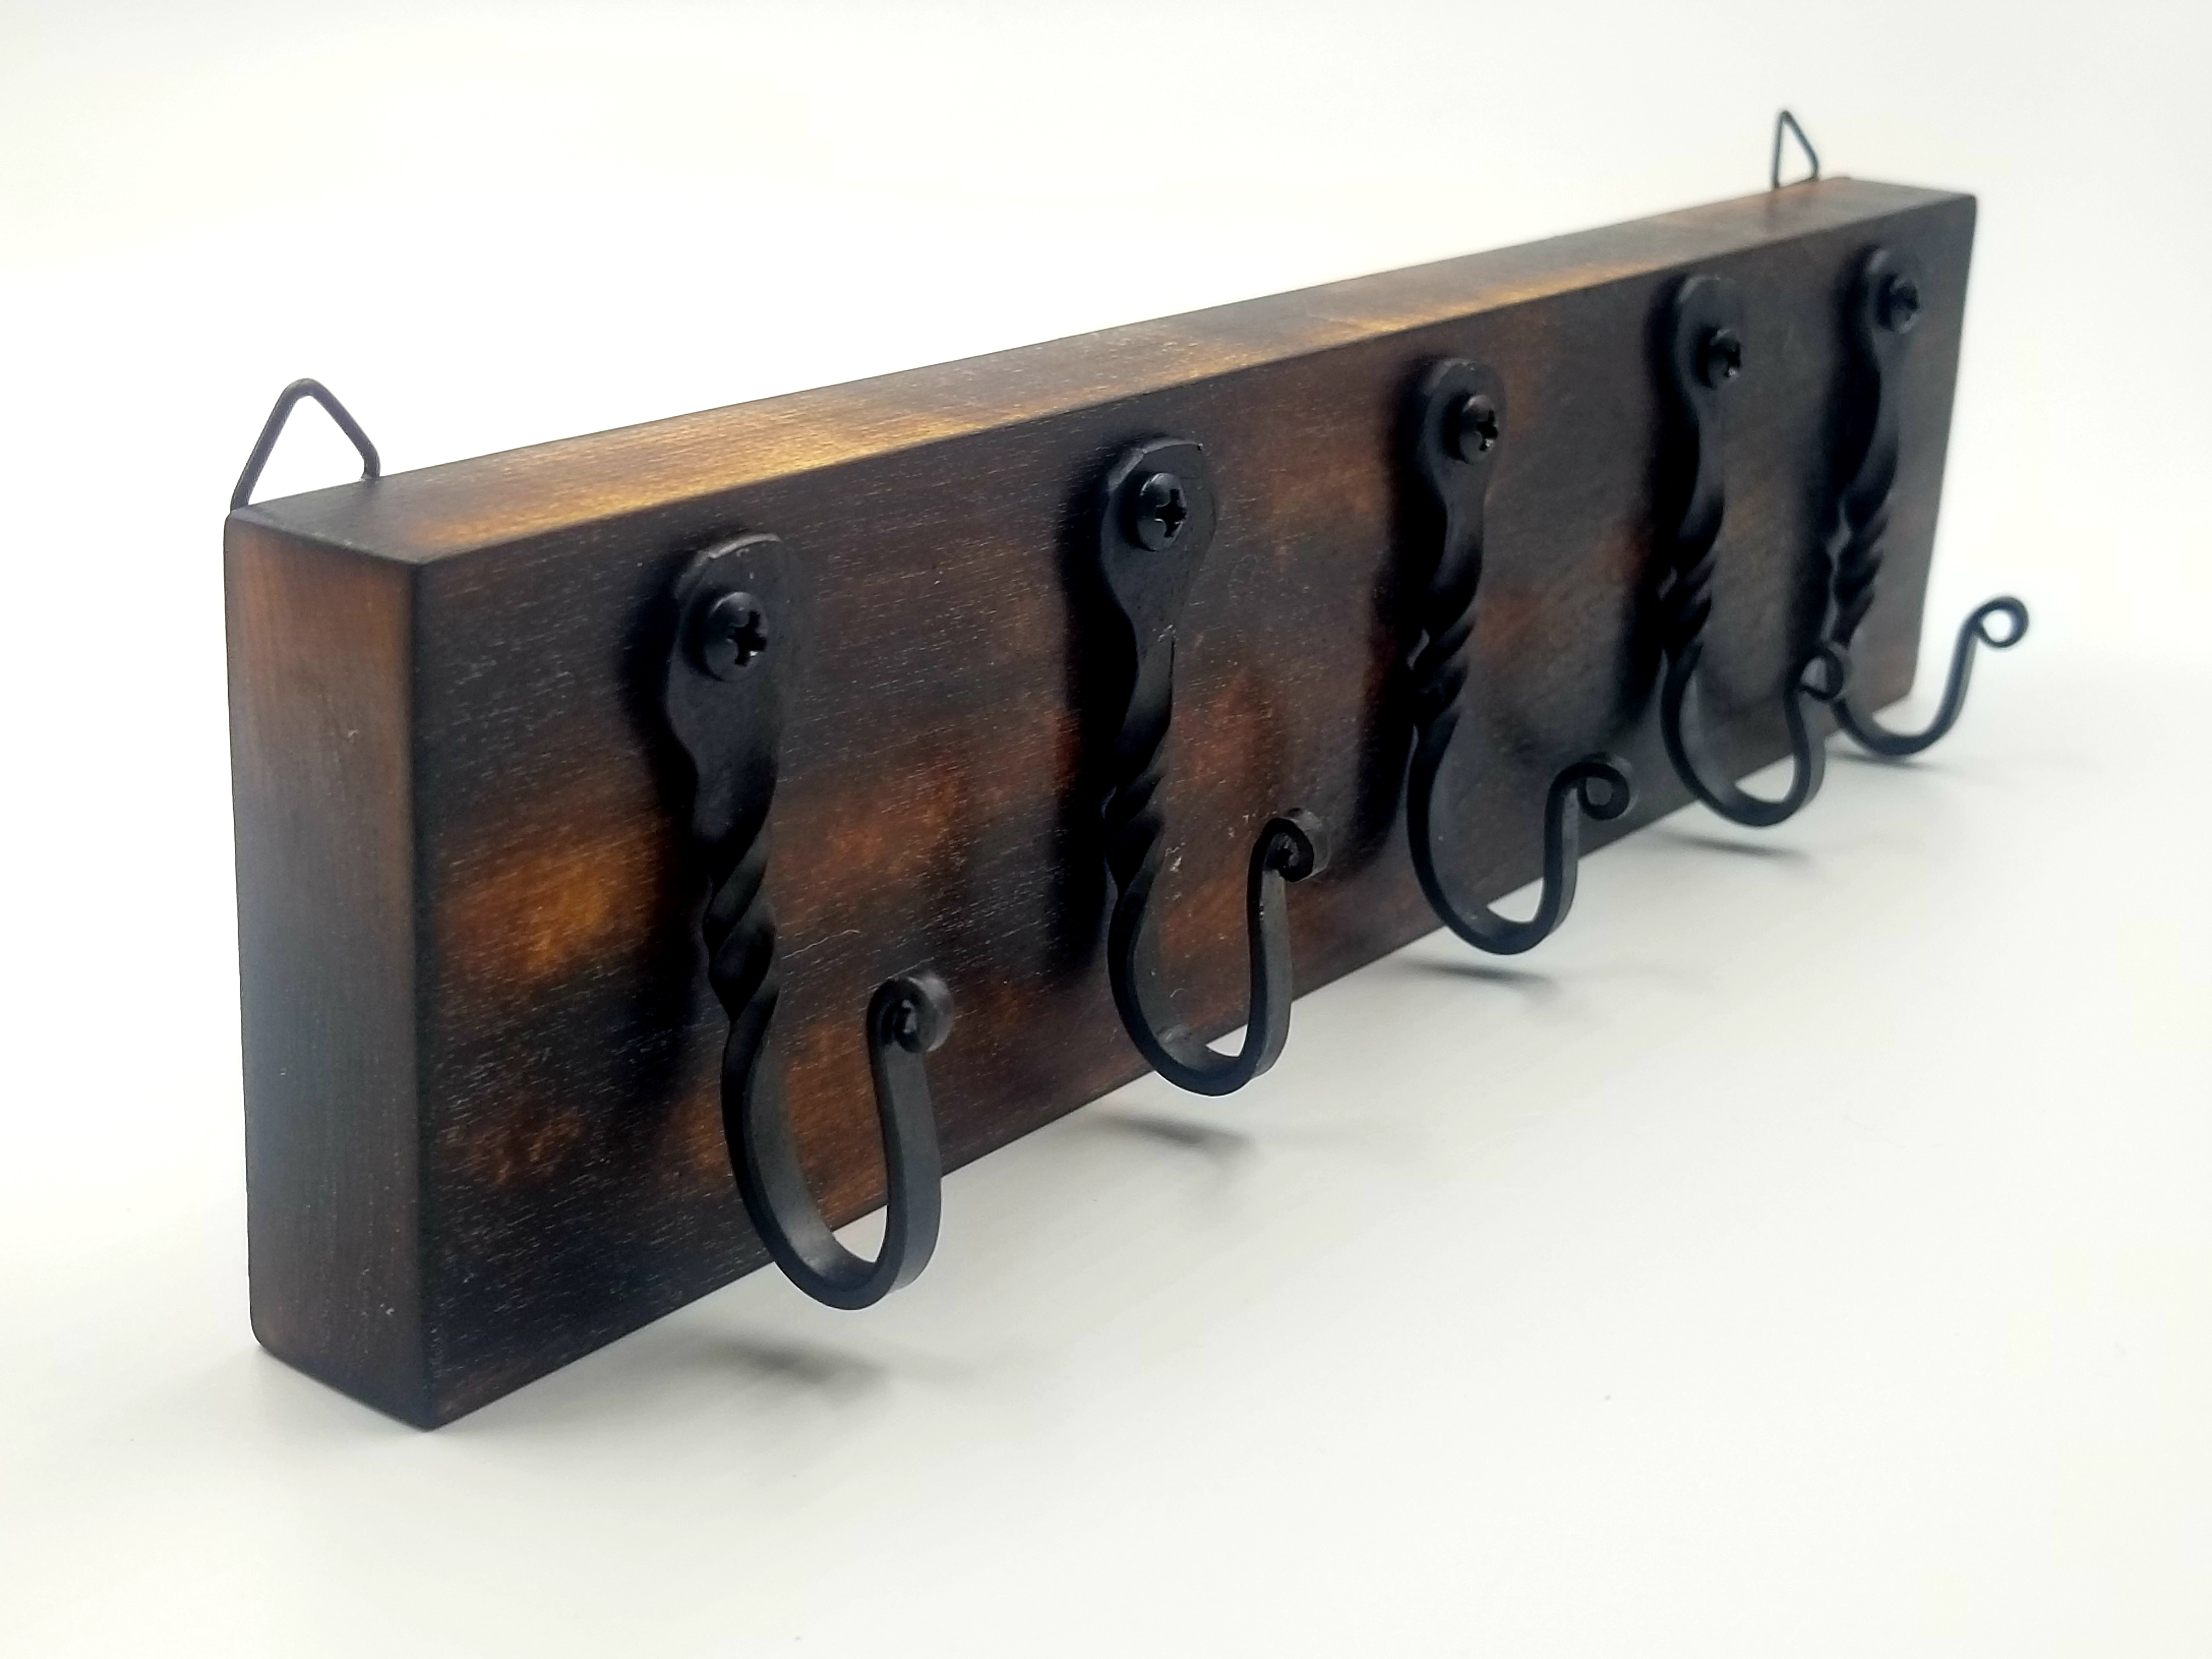
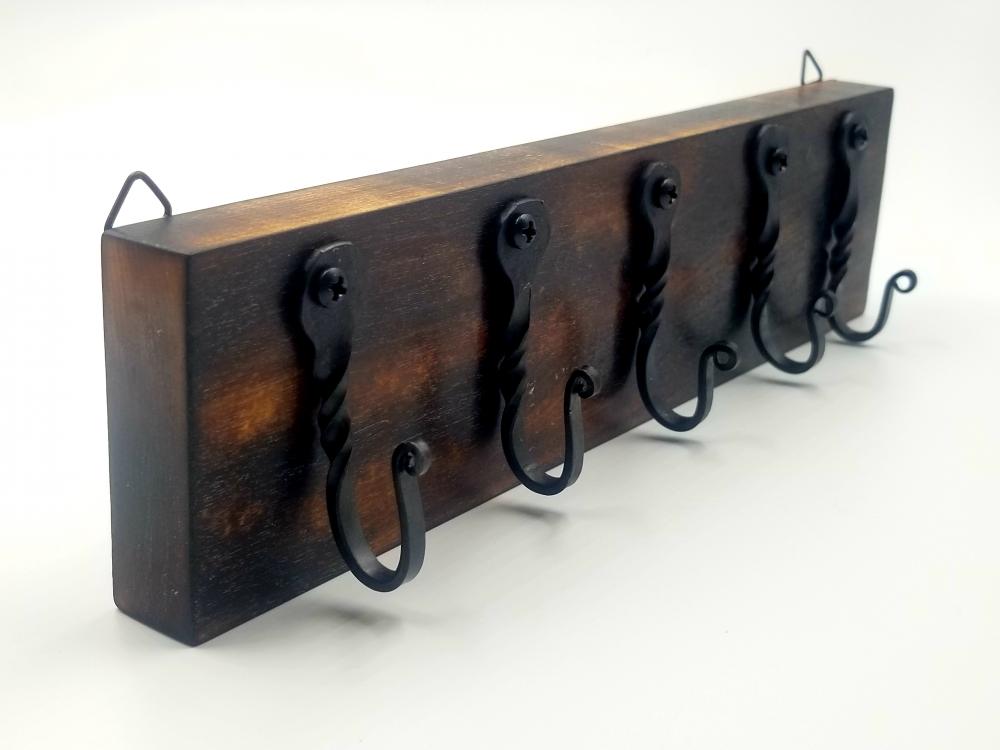
Keys are the intended use. I was inspired by a set of hooks on a key shaped board I got from my wife's great grandma's farmhouse. I've started keeping keys, COVID masks, earbuds, a pocket measuring tape (on a keychain), and a small card wallet hanging right by the door - most useful thing I've put on a wall ever, so I wanted to make something similar in use. The boards are 10 inches wide, close to 2.75 inches tall probably. What I love about the hooks is that small hooks by the door don't accumulate a bunch of junk (like tables near an entryway do) from the household's comings and goings. Flat surfaces are the enemy to organization!
-
A couple finished boards with hooks and wall hangers attached. I took a torch to some maple before top coating. Hope you guys like 'em!

-
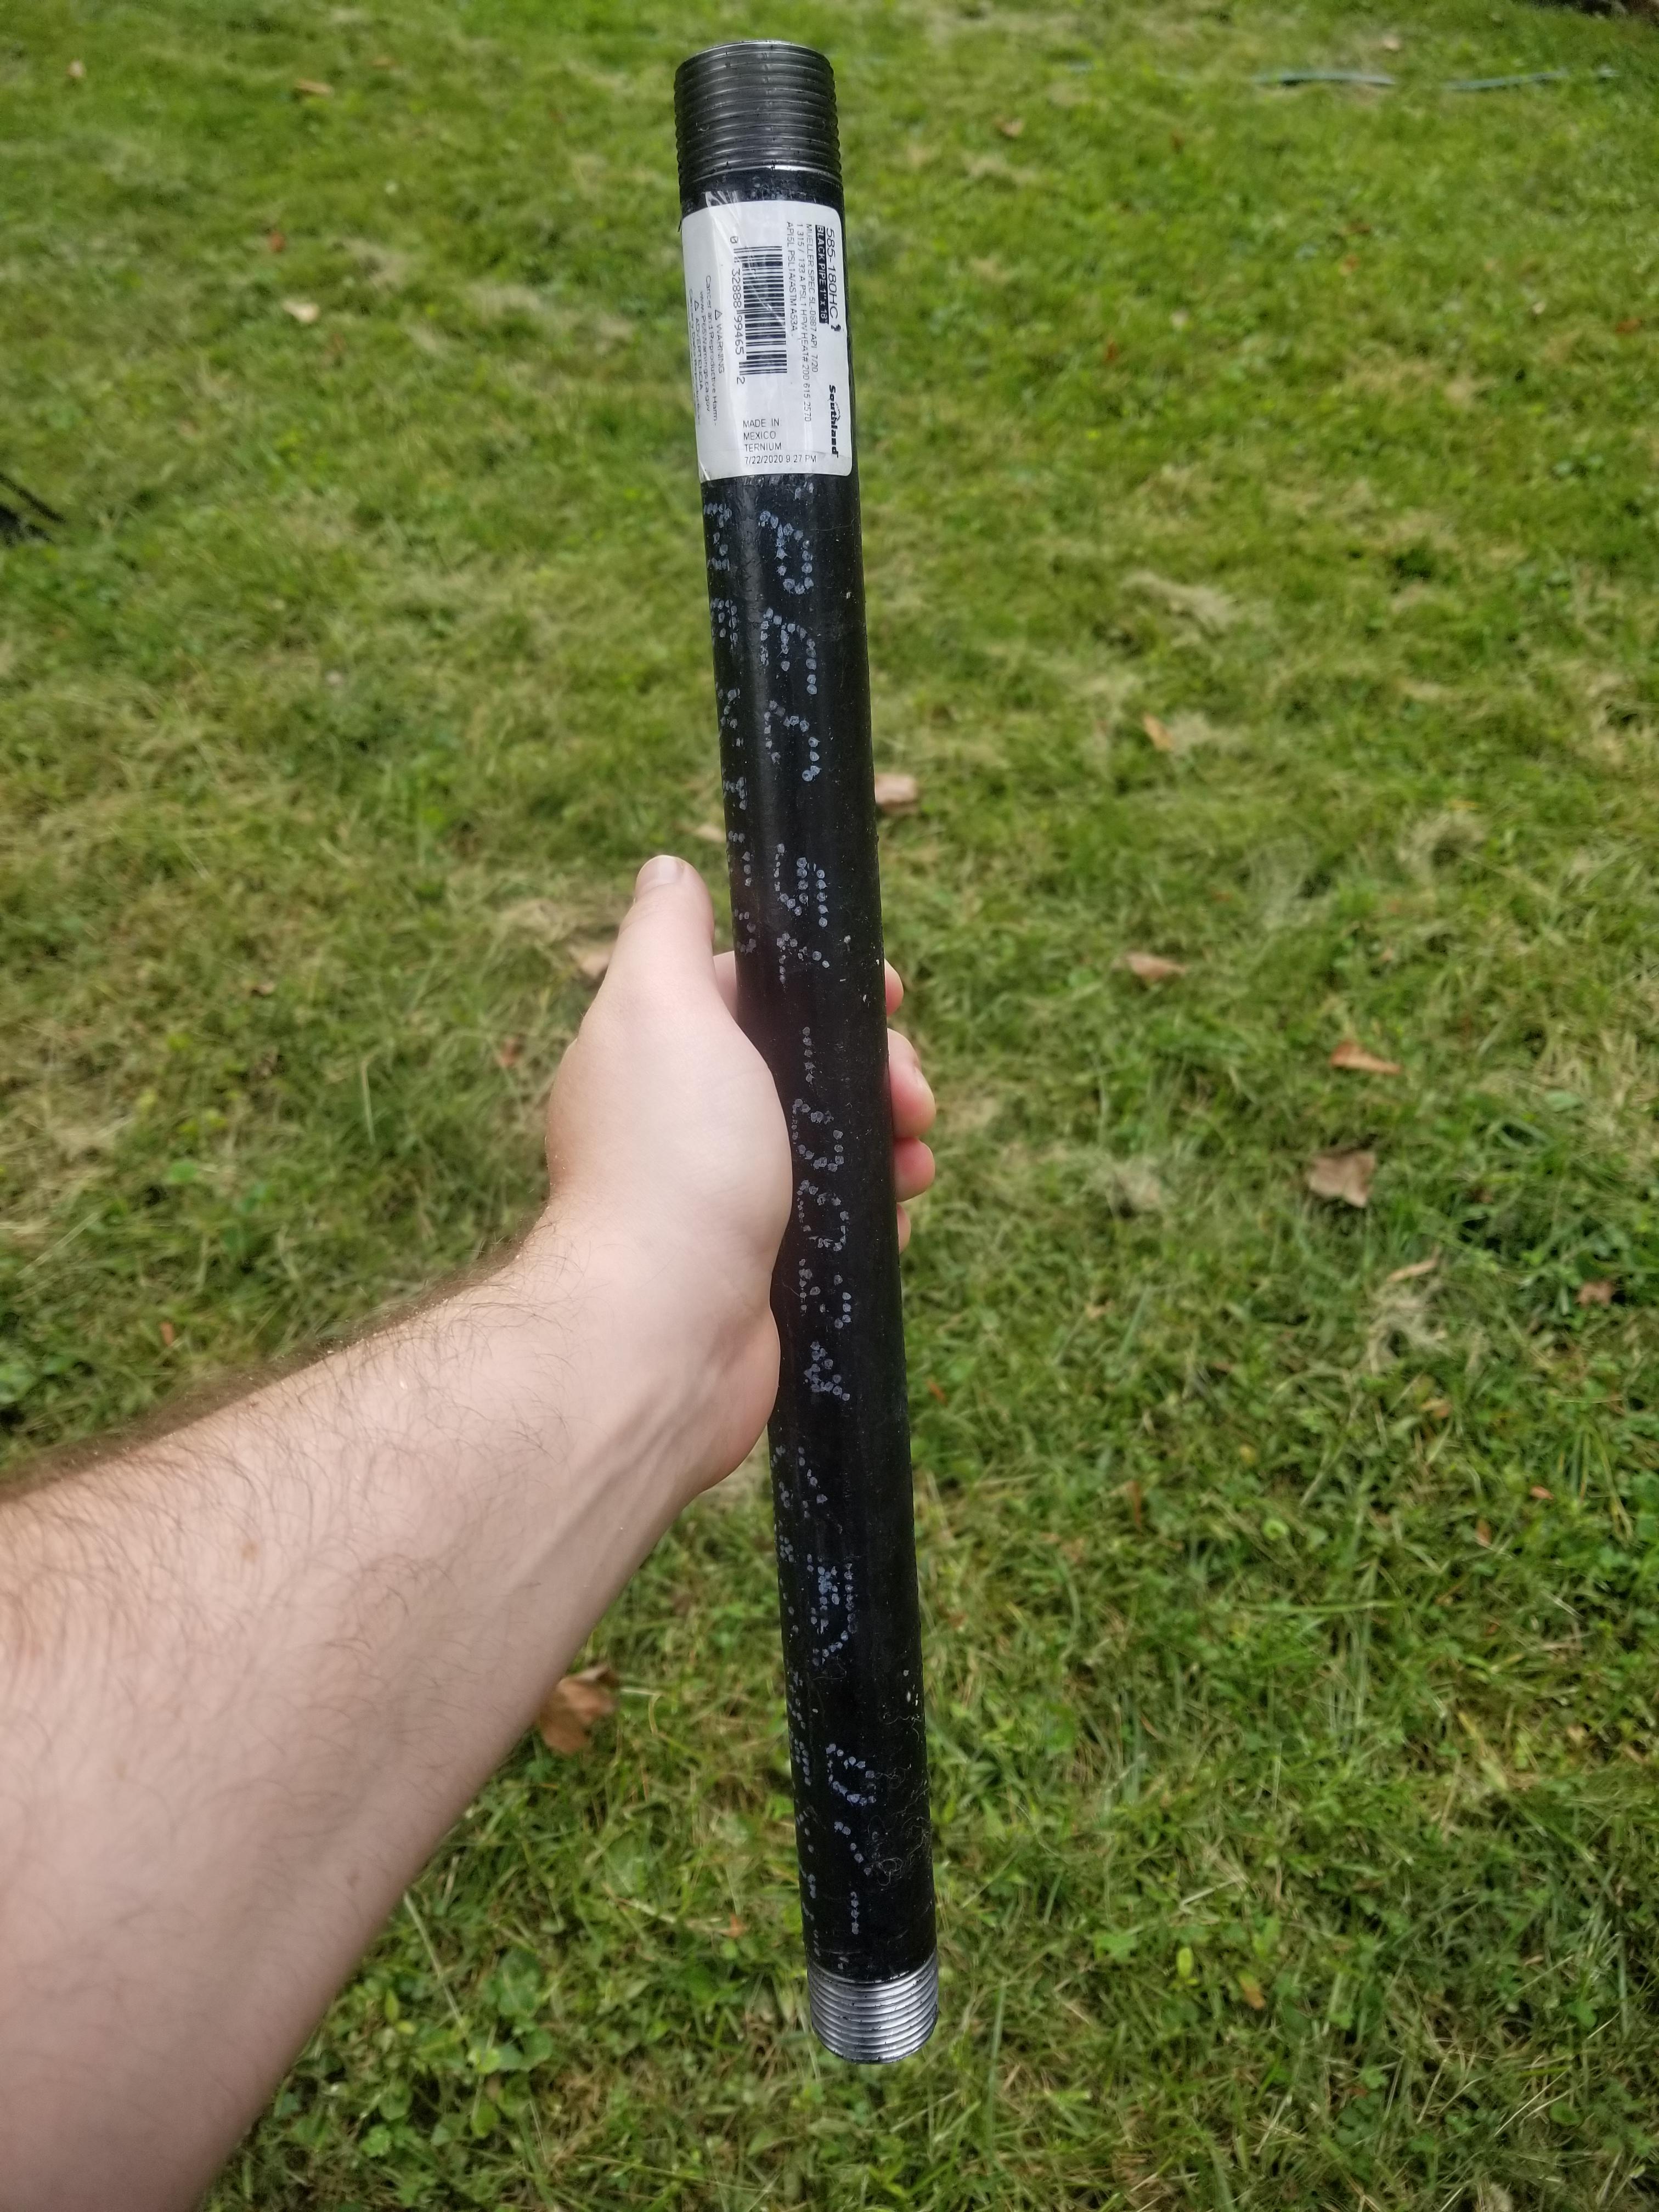
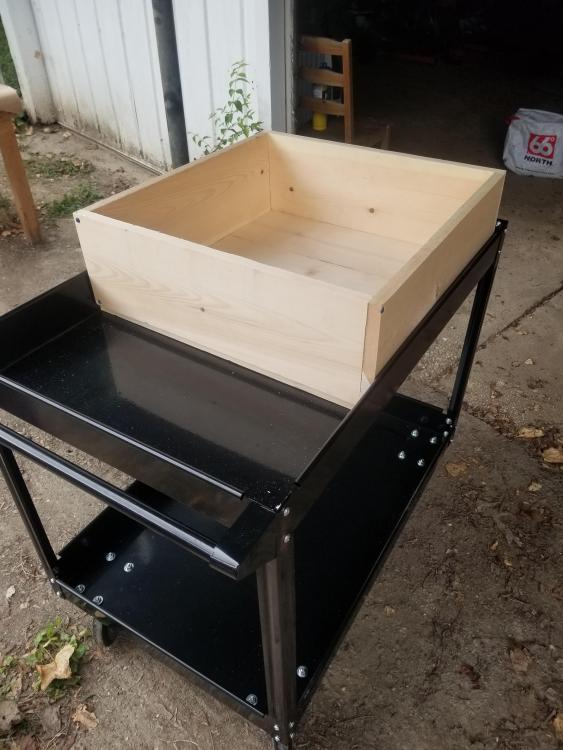
I might not light a fire in it super soon, but I had some spare time today and decided to at least get the box built. Not far along, but I'm happy to share my journey. I'm going to use my utility cart to wheel in and out of storage, seems useful for that so far. The box is about 7.5 inches deep. Maybe more than I need, but using excess I had on hand was nice. I'm going to try to source some bricks if I can find some free ones before drilling a hole for the tuyere. Still scratching my head on substrate. Digging a hole in my small yard might upset my spouse. Also checking for safety - when I hear about black steel pipe as a safe tuyere material, is the below picture correct? It comes with a protective black soft coating of some kind, I think I want to remove that before getting anywhere near heat, right? Thanks to everyone for this website as a resource. I would have been doing something much less fun while waiting for local classes to start up again (probably not until next year) to touch a hammer to hot steel if IFI didn't exist.


-
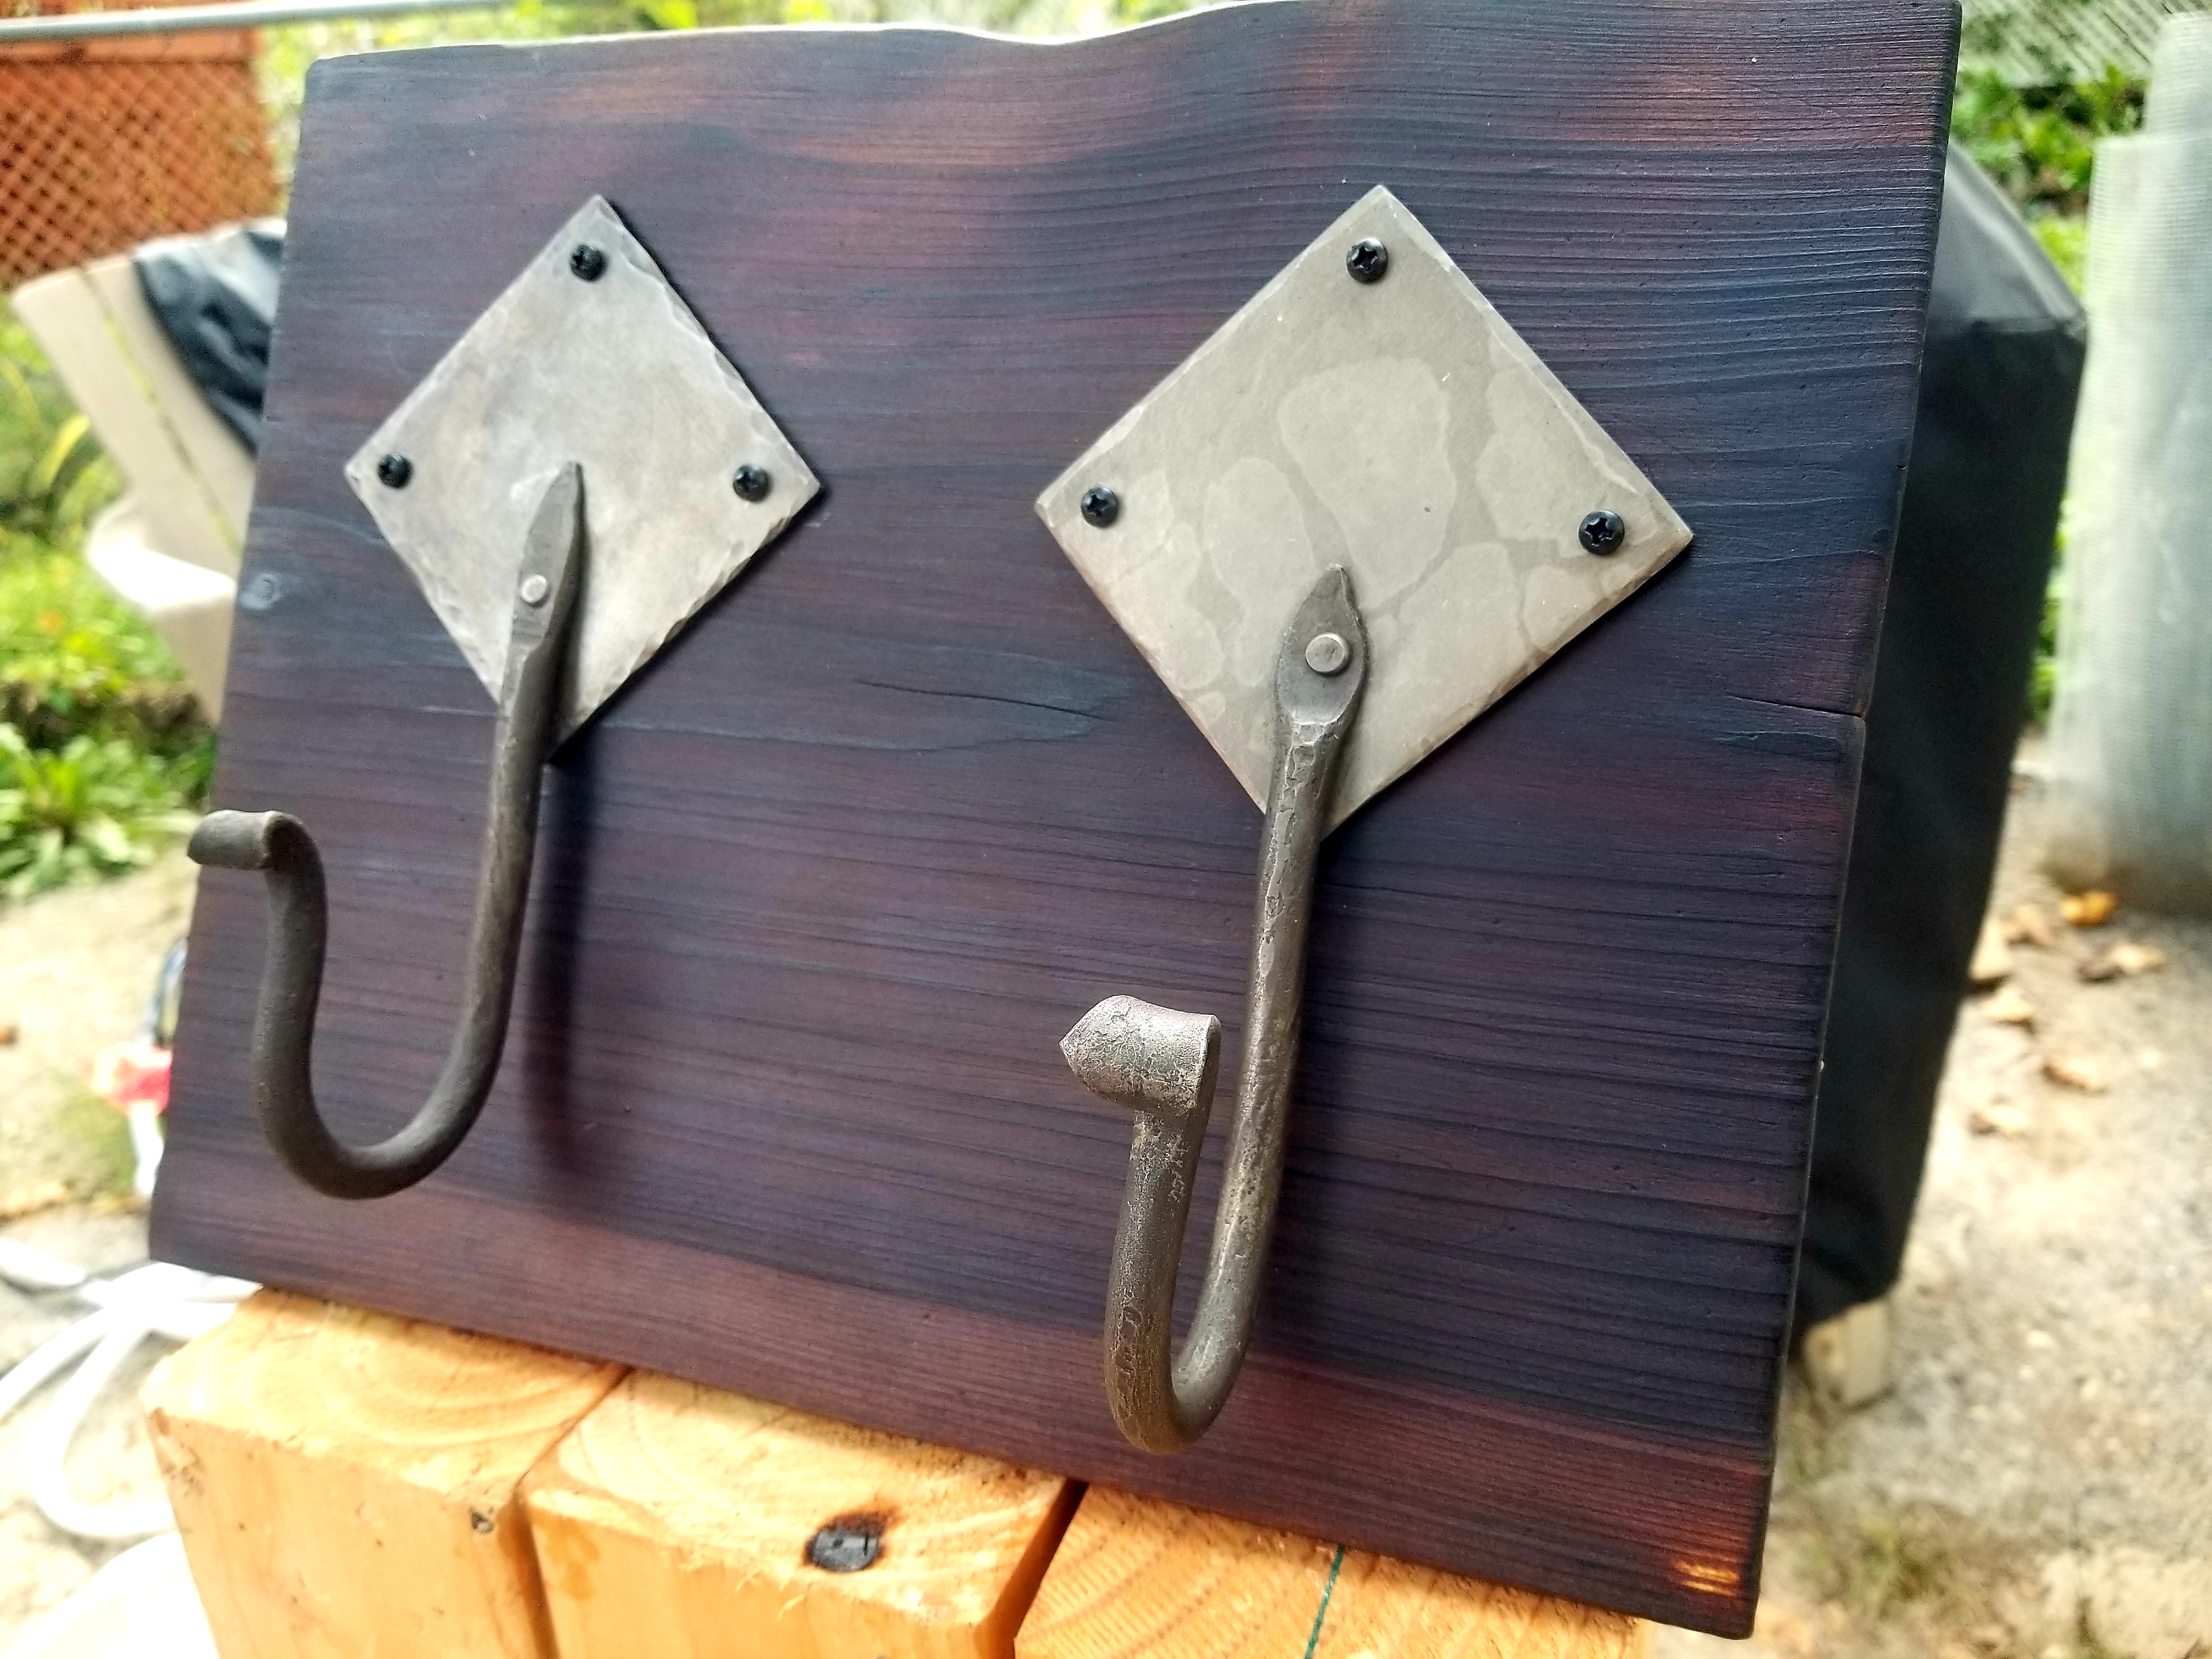
Thanks Thomas! The design was from the instructor (probably to keep class to the necessary length) and the hooks didnt swivel.. until I descaled them in vinegar (after riveting to the plate) and of course the joint was loose after losing that material. I had a scrap piece of steel rod that I beat and filed into something kind of shaped enough to set the rivets tighter. I'm glad to have a better solution for future hooks, thanks!
-
Finally got a piece of cedar that I liked enough to do a burn finish and mount this pair of hooks to. The hooks were done by me (right hook) and my wife (left hook)during a 2hr intro class in February before the pandemic put a stop to pursuing more. I've been making more nail hooks and hope to have some mounted on maple and take some pics this weekend.

-
Thanks guys! To answer a few Qs, yeah I think a JABOD is in my future, but free charcoal likely isn't - curse of living in cityburbs creates more challenges than that's worth for me at the moment. But I'm in Maryland and coal-land adjacent, so I'm hopeful there are other good inexpensive options nearby.
-
I just wanted to share that I have officially picked up smithing as a hobby today. I'm looking forward to having more to contribute. Bottle torch, an old hammer, old pliers, railroad track, and a bench vise. I forgot to take a pic after I drilled a hole. I'm avoiding jigs or round nose pliers for bending, I want to practice with just hammer, heat, and "anvil" surface. I'll try to post a follow up picture when I've made a lot more, I'm curious to see how I progress. Big thanks to the folks who run this site, and especially to those who take time to make free education available and answer questions.