March 13, 201313 yr Hi all, For a while now, my striker Bill and I have been talking about forging a sledge hammer. We've hemmed and hawed about how to make it the most efficiently and how to go about forging such large stock. As luck would have it, I was given a few "cut offs" from a factory. looking closely we saw them stamped as 1045-jackpot! So, we started with 3" Diameter round by around 7" tall if I recall correctly. took just under 10 minutes to heat from cold using my hand crank blower (coal forge) We punched the eye by hand with surprising ease. I was actually quite shocked at how smoothly this went. We upset the blank in my H frame fly press, using a cupping swage for the bottom. the finished faces are closer to 3 1/2" diameter now. We used a normal size hammer drift to get the drifting process started, then quickly made a larger one to finalize the size of the eye. The cheeks were worked on my 50#LG power hammer. It moved the material, but was not overly happy about the size stock being worked under it. We used 3" diameter fullers-top and bottom to draw out the cheeks. The shoulders were forged in with a matching set of 1" diameter fullers. Of note, we used 1" bars tock, but next time we will use a 1.5-2" diameter, but a cut "flat" sided fuller (3/4"-1" wide or so) as opposed to a full round or half round. The sides of the faces were then worked flat, and we re-fullered the necks to planish them. We had small fullering dies (1.5" in length) so we decided to make the shoulders round, as opposed to octagonal or square with broken corners. starting weight was right around 12#. After forging, we were down to 11.6#. I still have a bit of grinding to do, so I figure final weight after the handle should be right around 12# even. We have oodles of pictures-but still need to go through them-lots of action shots in these. expect final pics after heat treat, temper, and handling sometime next week. this has been an exceptionally fun project, and we plan to make many more sledges. Getting used to man-handling around that 12# HOT piece of steel was quite a chore. (need a longer drift) Used to 5# and under, but after I got used to it, it wasn't all bad. Aaron
March 13, 201313 yr DUDE!!!!! AWSOME!!!!!!!! AWSOME!! AWSOMEEE! :D Love it!! Super! Awsome! Cool! Sweet! *Insert 50 more adjectives that are synonymous with awesome* :D Looking forward to seeing the finished product! I bet those rounding hammer sledges are going to be real nice to use :D
March 13, 201313 yr Looks great! This is something I've been wanting to do for a while, but don't have the tooling or man-power to make it practical. I'd like to know how long it took ya if you don't mind sharing. I'm not crazy about the proportions and the rounded troughs but that's just my preference. Awesome piece. Can't wait to see the finished product!
March 13, 201313 yr That is an impressive piece of work! I wouldn't mind using one of those! The question remains: How does it move the metal?
March 13, 201313 yr Lovely, lovely. I'm insanely jealous. Heavier than I can swing for extended periods though. Last time I swung a 10# for long I was breaking up a concrete porch and had to stop every 15 minutes or so. 12# would kill me.
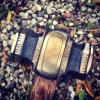
March 13, 201313 yr Author Thanks for the kind words all. Dave, I think it took roughly 4-4.5 hours of forging/heating. This time also included forging a new drift, and a new punch and die changing. Mr.Nobody-you'd be surprised at how quickly you get used to swinging a bigger hammer. our main striking hammer weighs in at 14# and if you're not used to it, you'll feel it quick. after a couple full days of striking you'll have it up over your head and on your tip toes swinging it like it was nothing. after that initial few days of hard striking, even after a short break from striking, you can come right back to it with ease. Its all just a matter of routine practice. Also,breaking up concrete is a bit lower than we are striking-striking height lets you get a full blow in without having to hit the ground-this saves your back! heres a picture showing what we're doing for the surface treatment for this hammer. A bit more polishing, and I have to sand the faces a bit more yet. My foot must be huge, because the hammer looks small next to it. :P let me assure you this hammer is bigger than it looks. More pics to come. aaron
March 13, 201313 yr Awesome! Thank you very much for sharing! That´s one big hammerhead. Nice shape and it came out perfect after polishing. In Germany the square headed sledge hammers are most common and i was searching a long while for a round shaped one. Now i guess i have to try one myself ;) How was the Heat treating? Rotating hammerhead or did you harden one side and then the other?
March 16, 201313 yr Author Howdy! We have decided to start getting all of hammers commercially heat treated. We've sold many hammers treated ourselves, but since we have been producing an awful lot more these days, and have a big order to fill, it seemed like the right thing to do. It assures not only quality control, but ensures that the most ideal hardness and toughness are present. We would rather spend our time focused on the forging and finishing aspects, the parts we enjoy the most, and let the heat treaters do what they do best. And to us, this decision meant better quality, and better longevity. Something that our blacksmith tools should stand for. However, if I was to heat treat this myself, I would do just like I do with smaller hammers; heat both faces (rotating it) to non magnetic-or just above. plunge in clean water (I'd wager a lot more water for this beast :) ) and agitate it to break past the steam jacket. Re-buff, and heat several drifts. put the hot drift in the eye and let the heat be drawn into the hammer, I'd imagine we'd go through...close to 10 hot drifts for this hammer. continue to swap a hot drift until you see the colors run on the faces. Watch them run until they're the desired color and quench again. We made a handle yesturday, came out real purty. we just had to take a few swings with it-feels good in the hand. looking forward to putting this one to the test. a couple more pics of working the sledge-note the smoking ove gloves. :P I also got a new striker, Maeve. I think she'll work out well, doesn't show up drunk, and doesn't argue. :) Aaron
March 16, 201313 yr So yesterday I show for work with 3/4 of an eye open and tell Aaron I can strike and probably hit most of what I aim at :blink: , we have a conversation and decide to make the handle for the sledge so that's done before heat treating. After we got it fit a few soft swings were in order but, Aaron tells me that with my "vision" we shouldn't take a chance of me swinging the sledge yet ??? Then I find out today he's hired my granddaughter to take my place :( , says she hits harder than me :o . Anyway here's couple of pics handle being fitted and the eye being sanded, where it meets the handle. A special hammer being made for a special "client"..........
March 17, 201313 yr Good looking hammer Aaron. You guys are doing a fine job. PS Ease up on Bill a little, Remember he has to put up with you :)
March 20, 201313 yr Author Picked her up from heat treat today, Finished pics coming tomorrow... I am looking forward to swinging this thing. Aaron
March 21, 201313 yr Author Some finished pics-better pics to come tomorrow. sorry for the blurry grainy pics, these were with my iPad and in the dark... final weight-12# on the spot with handle. Handle is hickory. Decided to blacken the sides, and leave a stripe in the middle natural. finished with linseed oil and paste wax. Wedge as always is black walnut. Worked with it for a bit today-swings like a dream. mainly used the rounded face for striking against top tools, hit nice and centered every time. Aaron
March 21, 201313 yr A few more pics of the finished sledge, hopefully these show off Aaron's hard work put in on the finishing of this piece. Almost toooo pretty to hit with, almost. As for striking with it I have to agree 100% with Aaron - it's a dream to hit with! Now on to the next one!
March 23, 201313 yr Author Thanks all, I'm glad you like it. here's a link to pics of us making it. I still have lots more photos to add, and some captions. This shows a pretty good storyboard of us making it, and all the trials and tribulations we went through making it. a few setbacks (punches getting stuck) and how we improvised to fix them. https://picasaweb.google.com/110237586412247118904/ForgingASledgeHammer Aaron
Join the conversation
You can post now and register later. If you have an account, sign in now to post with your account.