Der_Hannes
-
Posts
65 -
Joined
-
Last visited
Content Type
Profiles
Forums
Articles
Gallery
Downloads
Events
Everything posted by Der_Hannes
-
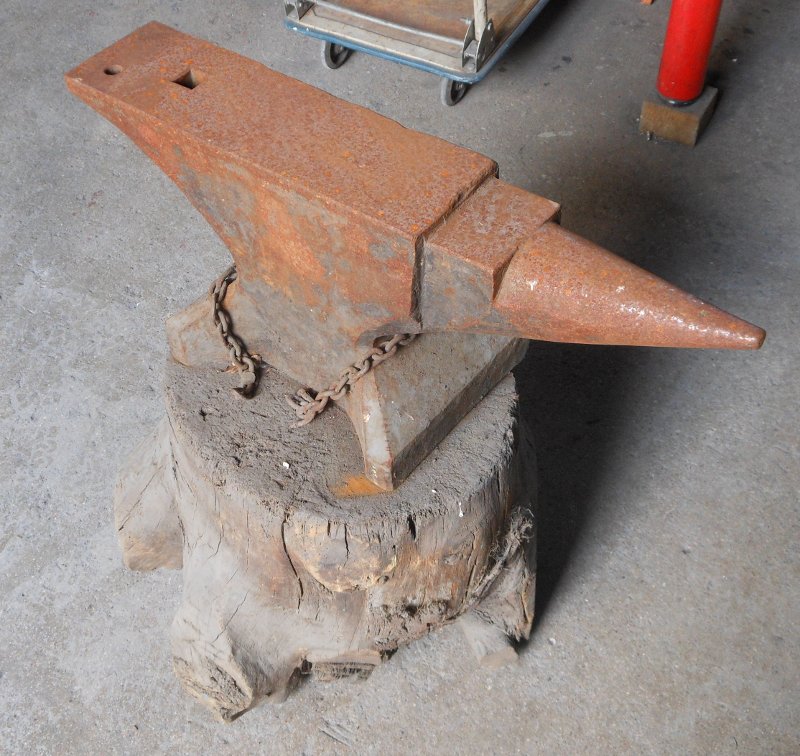
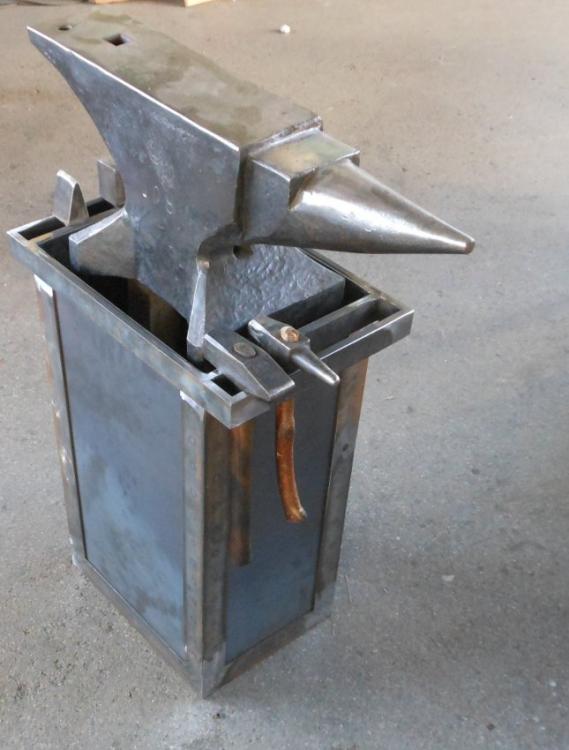
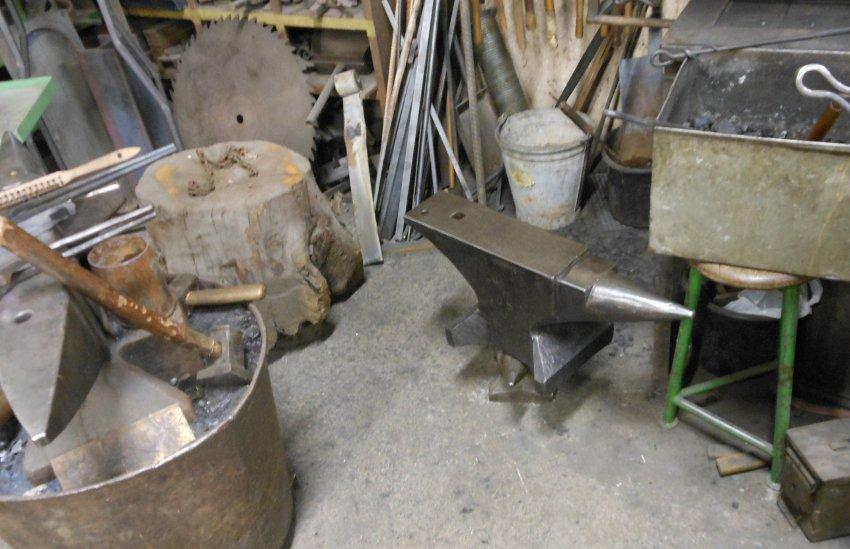
Finally got my anvil stand done. I did set the anvil on another already ash filled container to testforge and i am really happy with her. Now i only need to collect 80liters of fine ash. I'm not in a hurry as cold seasons are coming soon and i think in spring time it's done.
-
 well i say the dark side of the chocolate is still chocolate
 -
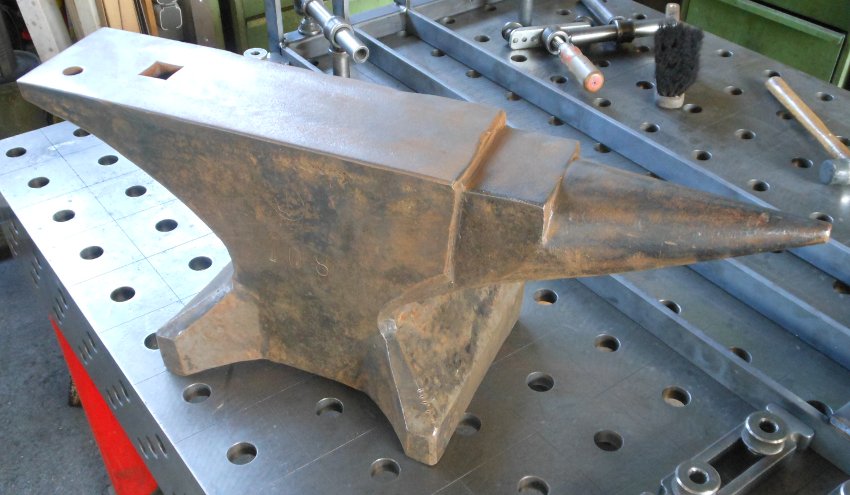
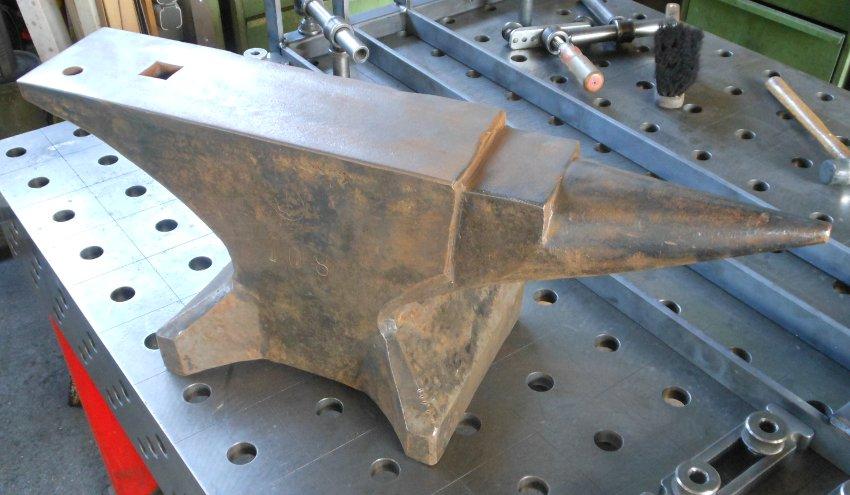
Hello! Crazy Ivan: Thanks for that. Thomas Powers: I tried my first ball bearing test now. I let a 10mm ( maybe little to small? ) Ball bearing fall from 400mm and it bounced back to 370mm. Frosty: Okay, i didn't use the heavy grinder on it so far. Just wire brushing and a little bit of smoothing it out with the rotex. For blackening i used a 50/50 mix of stove blacking and hard wax oil to get a matt finish. matei campan: Mix is more or less only oil and pigments. Hardy holes and the bottom of the foot got only a wax layer. George Geist: Thanks. Alright no more grinding. WL smith: I will as soon as i've made a nice stand for it. First of all: Here comes the dark side of the chocolate But lucky me that's all. I will get some days work with the anvil and then see if it needs some grinding or not. Here is the result after blackening process. It isn't that shiny in real. I like this method alot as it prevents further rust, it is not sticky that it attracts dirt and it's a smooth black tone. That's the surface as it is going to stay for a while. And as i'm forced to live without the anvil for three weeks now ( it's going to be a hard holiday for me), that is the rest for a while. I might contact one of the last anvil manufacturers in germany about some history of the anvil and company and i will let you know. Greetings, Hannes


-
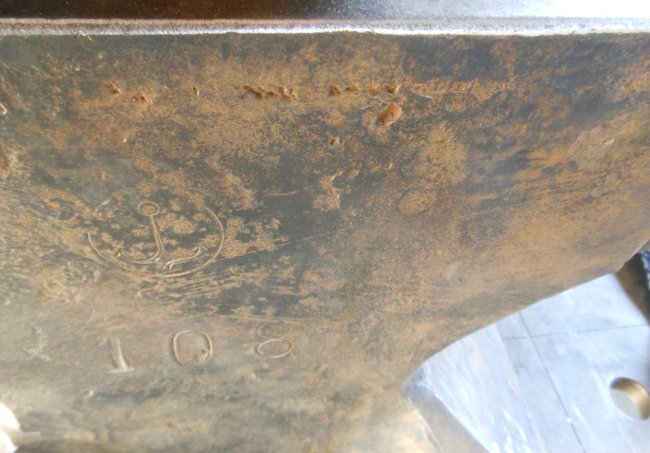
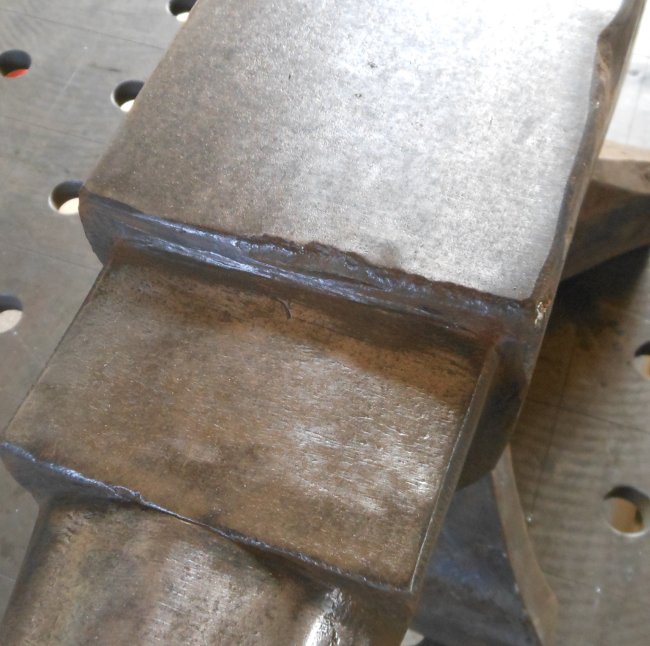
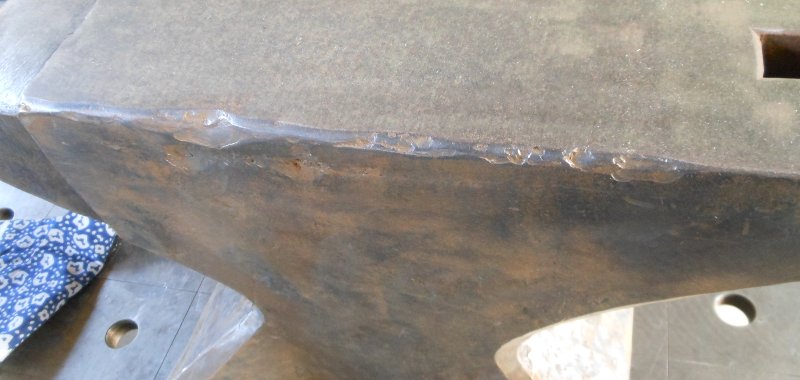
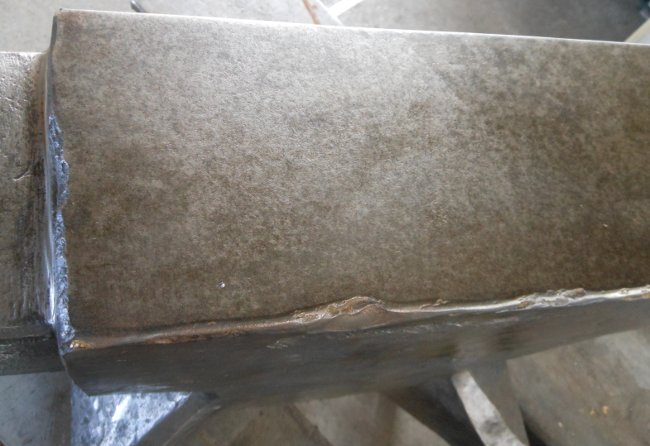
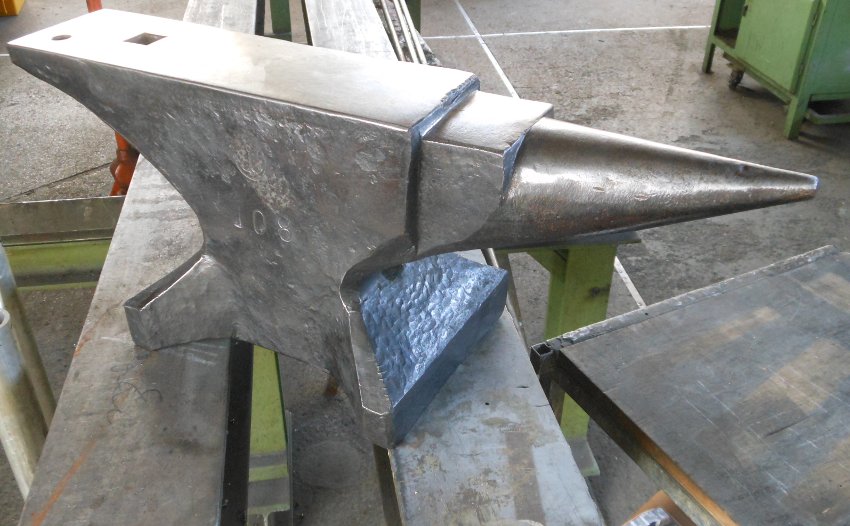
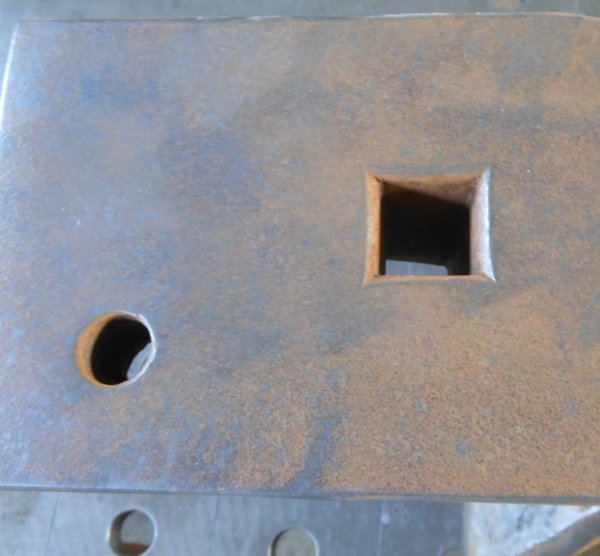
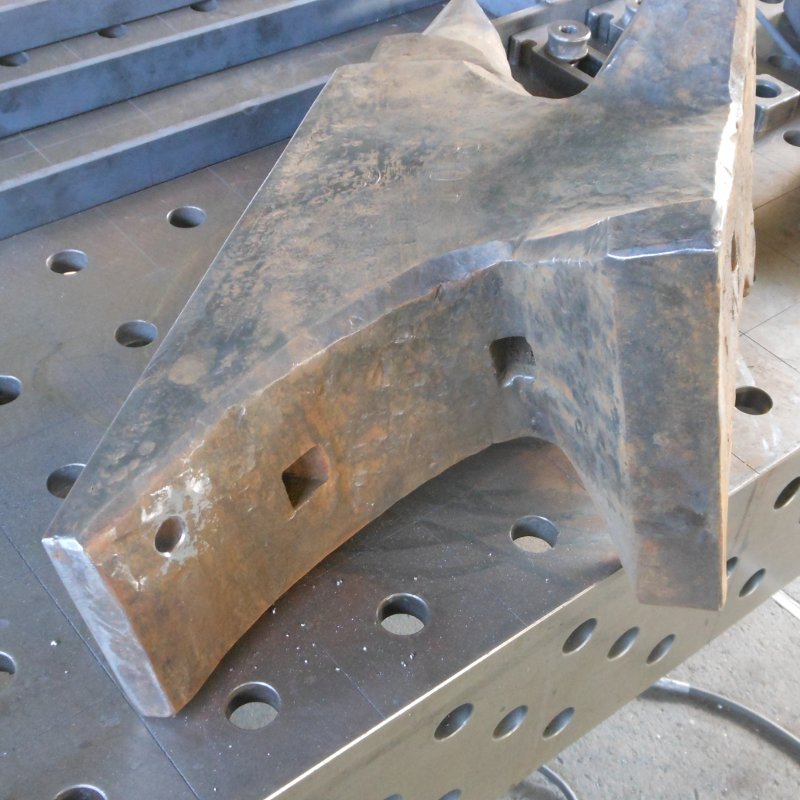
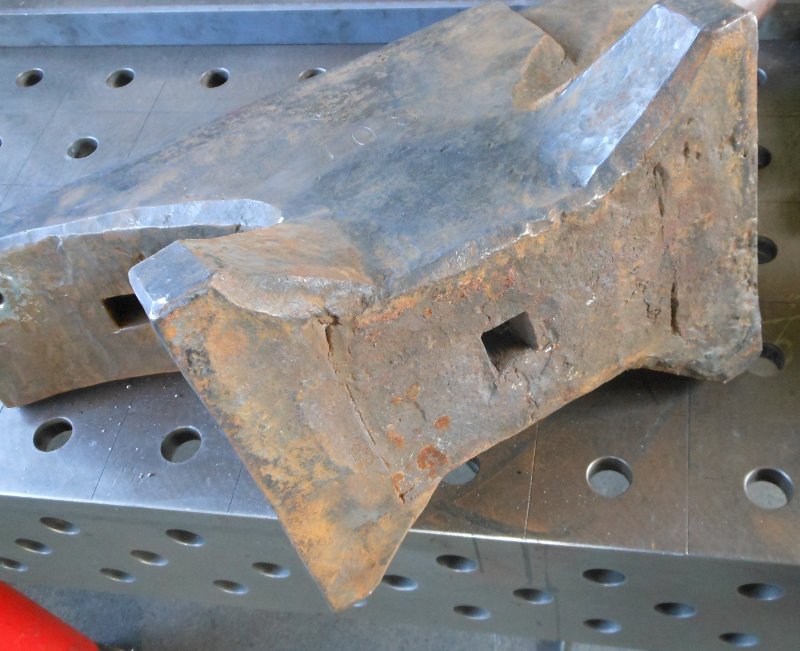
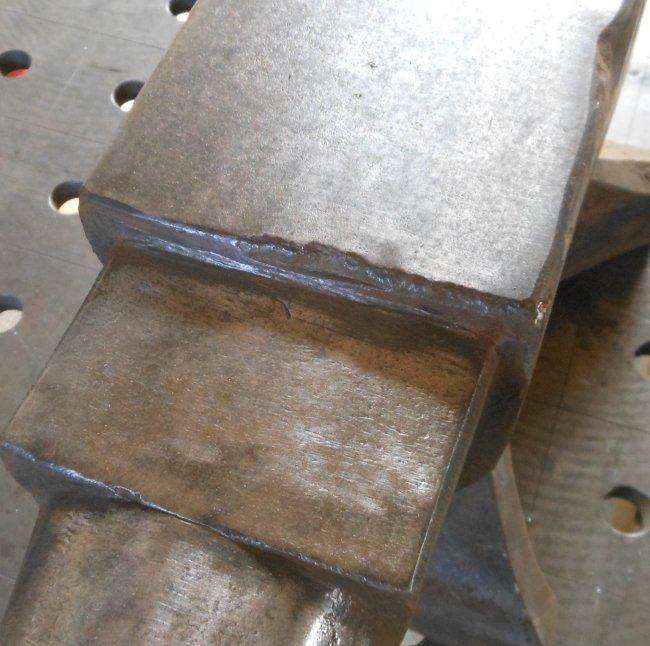
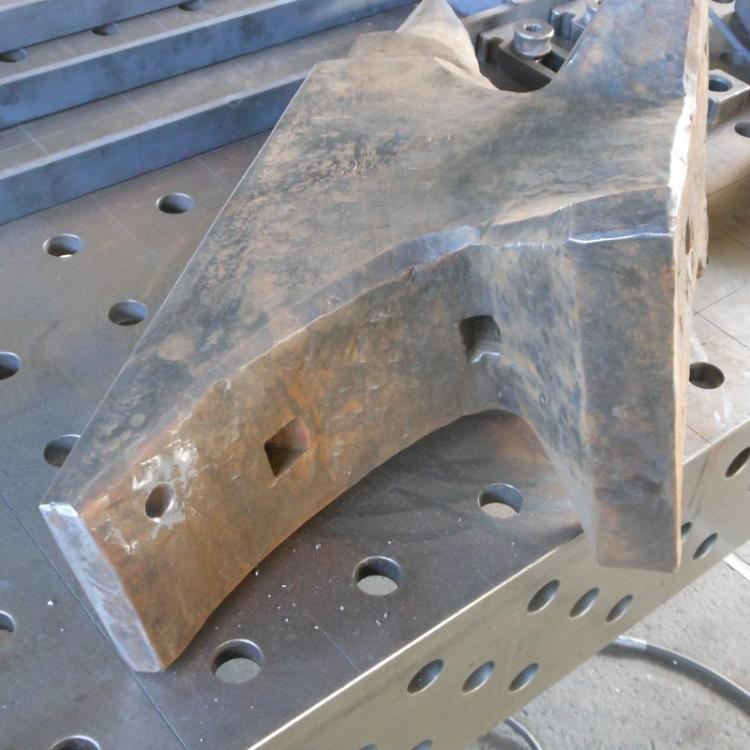
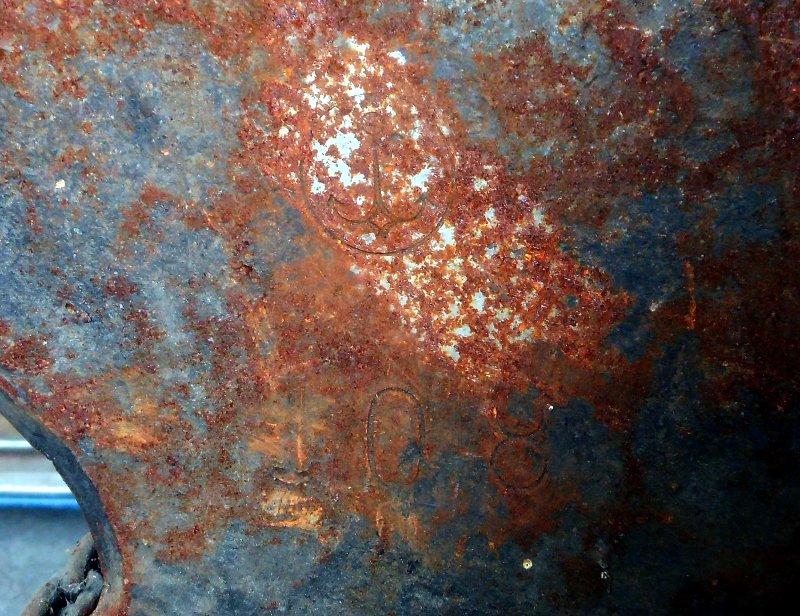
Hello! I always wanted a England/ London pattern Anvil but it's xxxx hard to find this shape in Germany. This year holiday will be in Sweden so i thought of buying a new one of Kohlswa as i've heard only good things about them. Then Tubbe was so friendly to help me out with a used one in Sweden which i could snatch. Then i got a very good offer for a monster of a south german pattern anvil... and i ended up with a 108 KG/ 238 lb London/England Pattern (actually i'm not sure about what exactly this pattern is called) Anvil. I got that one for 300€ inclusive shipping. I did some research for the brand. But the only things i found out are: - manufactured by Carl Schlasse in Milspe Germany ( by the emblem of the anchor) - Company is no longer existing, and i can't find to many more information about that. i couldn't find any information about the quality, manufacturing process, or anything. Things i know about the one i just purchased: - Nice sound, no cracks or something like that ( when i saw the picture i was afraid the top plate had already a crack) - Nice rebound - The foot isn't really flat ( so i need to lay it into lead) - Hardy hole looks like never been used... same for pritchel. Bottom of the Pritchel and Hardy holes is quite soft. - One side saw some work with some chipped corners. - Hammermarks all around and some holes for handles so maybe wrought. ( Only a guess) About the quality i can´ t say much as i only got some cleaning done. Now i'm going to blacken the anvil and grind some smooth corners on the chipped parts. When the anvil is finished i want to build a stand that the anvil can be ash stored ( starts with sand until i got enough ash). Here are some pictures: That's the way it came to me... The Emblem Short while after grinding with wire brush Hardy/ Pritchel Hole Hole for handle Bottom with welding. I will post update of the Process around the anvil. I hope someone could give me some Information or even has got an own one ( as prices were also nouned in usd so maybe it's quite spread) Greetings, Hannes


-
WOW! That is a nice vise restoration and the most awesome vise stand i have ever seen! Good idea and i like the table as a rest. Thanks for sharing the last picture! Greetings, Hannes
-
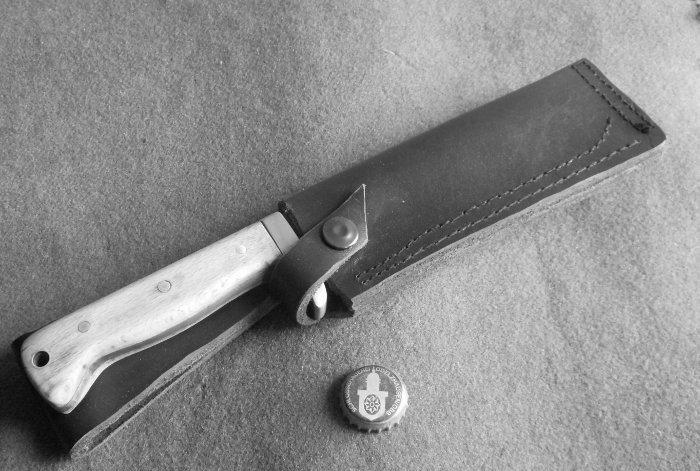
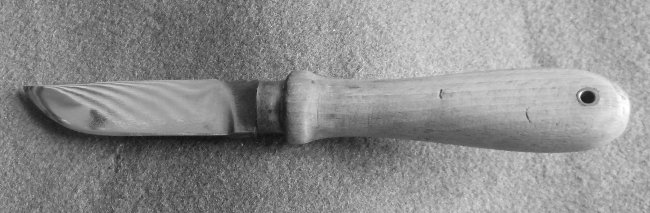
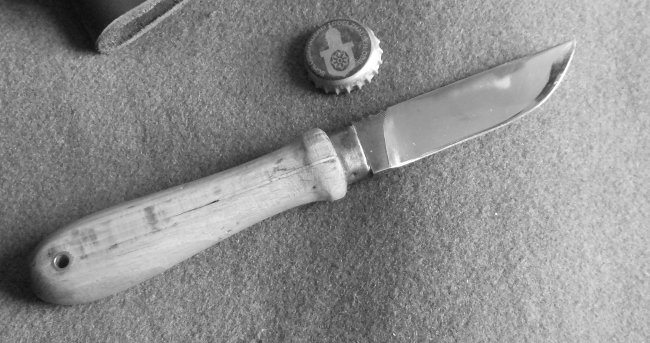
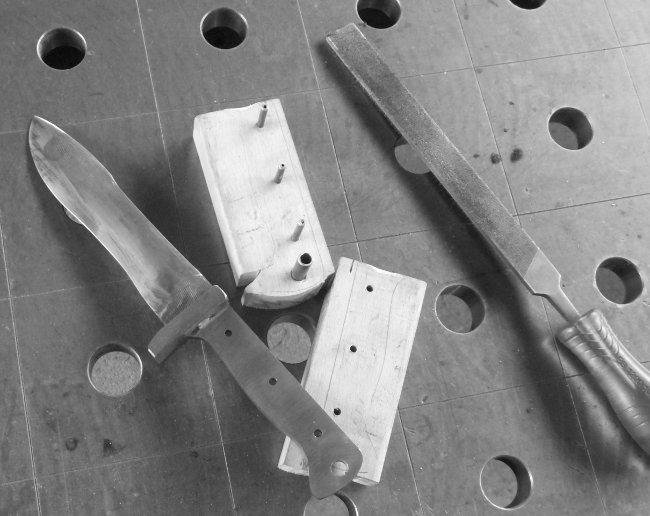
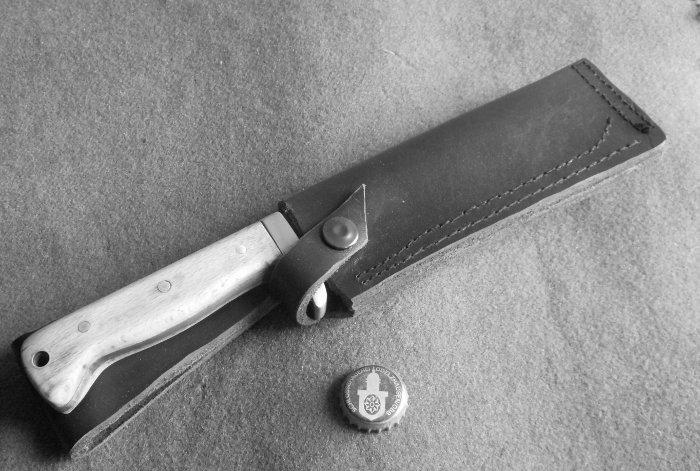
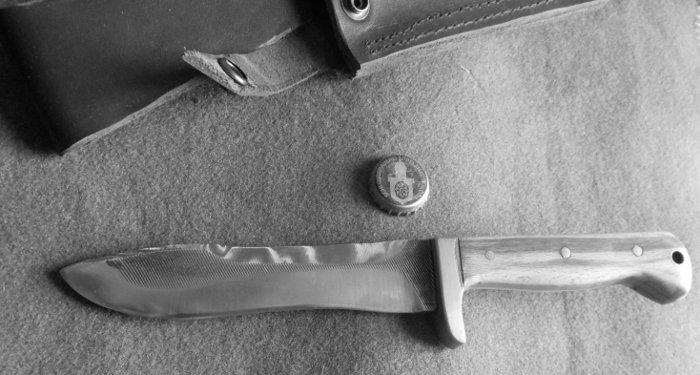
Hello! As my nephew had his first communion he had to get his first proper sized knife. It is kind of a family tradition, so i thought i could make one for him. I'm not so enthusiastic about knife making because i hate polishing and all that tiny stuff around. But now i had a reason to make one. So i made a testknife of an old file: Grinding was done by anglegrinder and paper-discs. Polishing started with 75mm Roloc Scoth disc and ended with unipol polish and a rag. As i made some mistakes on that one i gave attempt on the present itself. Design is more or less like the puma white hunter. Blade was a file rest is mild steel and a piece of wood which looks bit like beech tree. Well i hope not get more nephews or kids so i don't have to make more knifes It was kind of hard work doing leather pouch, grinding and polishing. But my nephew was very happy and proud of the present and did smuggle the knife into church service where the presents got sanctification. Greetings, Hannes p.s.: the stripes on the blades is the reflection of my heating.


-
A DeWalt DCD 795 Akku Drill and a DeWalt circular hand saw. Now i can start some forged iron and wood combination for furniture.
-
Thanks for sharing this video! May i ask what you take for blackening the candleshaper? Smooth finish! Greetings, Hannes
-
Thanks for posting! She came out very well!
-
Hi again Rick! Please don't paint her! Just use owatrol oil; it's transparent and works like paint but you still see the material itself! And after wire brushing and grinding her to perfect shape she will look just awesome, so there's no need for make up ;) Greetings, Hannes
-
Striker hammers...what's the best size/style? Pics appreciated!
Der_Hannes replied to Robert33usa's topic in Hand Hammers
Hi Robert33usa! This is my baby i use to work with as a striker. The head is 3kgs -> 6,61 lb; the handle to the head is 425mm -> 16,73inches. The parts i work with is mainly toolsteel for making hammers, hatchets, small anvil swages. i do have others ( 4, 5, 6 and 8 kgs) with different size of handles but i shorten the ones i use more often down. The head is quite soft so i get good power into the workpiece. Also the hammer is light enough to use it as a hand hammer for some situations. This is the hammer i take with me to every smithing job and i always took it to a friend of mine ( where i help with hatchets) who only had a 6kg hammer until i gave him a 3kg as a birthday present. First thing he did: Shorten the handle and grind the face as he also liked working with mine. I also like the head itself with the bulged eye. I got all of my striking hammers at flea markets in rural areas for cheap money. Sometimes you have to buy a new handle, but as most come with a long handle you can just cut the head of and set it lower. i've got a straight peen with 4kgs which managed to destroy a whole brick barn. The head looked quite bad ( but nothing which can't be reshaped) but he knew how to use a sledge, the wood didn't have any dent. I try to look for old ones or tradionaly made ones. I had a new one which was "machine hardened" and it sprung back like a rubber ball. After a short time my arms hurt and i never touched it again. But this also depends on your prefers, many like the bouncing hammers! By the way i do both cross armed and not. Greetings, Hannes -
Very nice first vise! So now grab your angle grinder with steelbrush wheel and some wd 40/ Ballistol and show the hidden beauty! Maybe you could heat up the leg and straighten it a bit. Add some propper grease and you have a wonderfull vise! Any thoughts about the stand? Or do you attach that one to your workbench?
-
Servus again! @DSW: Thanks and i will definately enjoy my forge. ( i've got some big plans to add and stuff) @Frosty the Lucky: Let's say it was a happy coincidence that the blacken fingernails appeared when i came back ;) @arkie: mhm surfboard- workbench combination, floating wind powered forge... i need to do some blue prints and then -> off the beach into the waves ;)
-
Servus again! After firing the forge for 5 days i'm glad to tell, that it works really propper now! Firepan didn't burn through. The part below didn' get too hot. The blower didn't start to burn.Kept being tight and the airblow was very strong. I fell in love with my forge again as i can't imagine any better Action-Shot: and pan after some days: Frosty: Thanks for the Info about Brazzing! arkie: Thanks! Yep the old one was almost not repairable. Sorry, that this was not an instruction how to repair one, just how to replace one. Greetings, Hannes
-
Guillotine tool, what would you do different?
Der_Hannes replied to Black Frog's topic in Tools, general discussion
Demonstration was shorter because of rain and storm so i quick took a photo of my guillotine: Even today it worked quite well... and now you see why i want it to be riveted. -
Hit Tubbe! Thanks for the Video! I 've never seen working with a kiss block... easy made but very effective! I also like the little details as your vice spacers. ( This idea might be looted soon ;) )
-
Hello again! @ arkie: Thanks for the Info i will post some pictures there because of strange acetylene welding with copper rod... which appeared when i rough cleaned the lower part) here is the condition of the pan itself: close up: So i welded a new pan out of mild steel and filled the gap between pan and lower part with oven rope seal. I cold tested it and i was impressed how much pressure such a small ventilator produces. Now i hope the pan won't combust because it's only mild steel. Tomorrow i will work with it for 5 days each 11 hours... if everything holds together. I really love its design... hold together by hope and ignorance of different fore owners and me ;) i will keep you informed how it worked. Greetings, Hannes
-
Guillotine tool, what would you do different?
Der_Hannes replied to Black Frog's topic in Tools, general discussion
Hi! Mine is at a demonstration for the next 5 days so i have just got a drawing of mine: Front plates are 5mm, The swages are 60mm x 15mm and the Blocks keeping them in position are 30x15mm. The whole baby is fixed on a 15mm thick sheet with different holes for punching ( multi Purpose item ;) ) It is my third guillotine and i can adjust the play of the swages with a contered screw. Works quite well for smaller material to 40x15mm. I like the open side, so i can make swages like long V shape with fitting top to get good angles for tongs or else) Had some hours on its shoulders and still works. Attaching 30mm round stock 8mm thick to the top swage is really necessary otherwise the swage shrooms alot and wont work that long. Only thing i will change for the next one is: Riveting the whole Guillotine that it looks proper. I love classic joint solutions. And the ground plate schould be an angle so you can fix it to the anvil with a clamp. I had one with a square stock to fit in my hardie, but it still jumps with every hit i do. If you want i can send you the evolution of my 3 tools ( but only next week) Greetings, Hannes -
Thank you for the replies so far! @the iron dwarf: I think casting a new one could even become more expensive than buying a whole new hearth as i don't know a friend which is casting. @Thomas Powers and IronWolf: I think i will give riveting or bolting a go for short term solution ( i need that one in a week again ) And weld a new one for long term. I would use 8mm/0,31" plate as sheet. Is this too much or less? Next week i 'm going to get it in the workshop and i try to disassemble it. Then sandblast or wirebrush. And trying to rivet something on that one. Greetings, Hannes
-
Hello! I did use the search engine but i did not find an illustrated topic with end result pictures or pictures of the problem itself. As i have a big crack in my firepan i wanted to know how to fix it. I hope someone did this before and could tell me what to look for, and what to avoid. Maybe a picture of a fixed one would be great. So here is the problem child: The crack is quite huge and the pan has been used very much, so i think welding isn't that fun or even impossible because of the burnt material. I 've heard something about riveting a plate: Won't this cause more tension, when the pan gets hot? And riveting an old rusty cast part!? Dangerous to turn it into rust and pieces? I thought about perparing a thick walled sheet with holes about 8mm for 6mm screws and cut threads in the pan. I really love that forge, and want to save the heart of it. Replacement of the pan is a bit difficult as i can't find a fitting equal one with 220x 250 mm and such large bolts. I hope someone can help me with the experience he made while repairing his own, best would be pictures or description. Greetings, Hannes
-
Normally i sharpen my chisels immediately when i'm at work (Beltgrinder is right next to the forge). Tools i don't use too much but got dents or heavy shrooming i lay aside and on the next day when the fire starts to burn, i care for them meanwhile. For handles i care for them when they get too rough. Then i rub them with steel wool and add a bit of furniture-wax. When i work at markets i make a tool care session when i'm forced to stop smithing because of concerts or else. Caring everything with Steelbrush, scotchbrite and ballistol oil. It's not that i want all my tools shiny and neat looking ( they definitive don't) but they shall work perfect when i need them.
-
Thanks for sharing your videos! Very well done and the tools have an outstanding quality. I like your eye-making tool for the power hammer. Low profile. And like the other helping tools also in a good shape and not like " just needs to work not to look good" And you have one nice workshop!!! The anvil: i was quite pleased with my two south german ones and was at that point " yes i do want more anvils, but i don't really need another one" but now i've got to have a london pattern... and the shape of your anvil is in such a perfect condition. How many kg's does that one have? What powerhammer do you use! Seems not to be that heavy but you've still got loads of way to work ( partly not enough for your 3lb hammer+ cupping bolster). regards Hannes
-
traditions for opening a new shop?
Der_Hannes replied to GottMitUns's topic in Blacksmithing, General Discussion
First work should be a cross, then hang it on the wall and let the cross and workshop be blessed. At least this is how it was/ is done in Germany -
I had one with just one piece. I thought i still had it so i just had to take a photo, but that vise might work somewhere else. Part looks like this: it was made of mild steel that is what happens to the crank: You lose a bit of material and get a bulge. But mine worked for many years to that point. You could improve that by adding a washer of brass or bronze as a sacrifice. and as an improvise before you get in contact with a turning shop that builds the one which works as spherical washers) you could built something like this. also with sacrifice washer. Just make the hole big enough that the thread has got enough space to move.
-
Hi! i don't know how it's called but it is very common with german vises. ( to be honest i have seen none without) It is kind of a bearing. Here are pictures of the parts missing: and how it looks complete. and some are even made of brass ( like my new baby's ;) ) Greetz and have fun with your very nice vise, Hannes