
trinculo
-
Posts
141 -
Joined
-
Last visited
Content Type
Profiles
Forums
Articles
Gallery
Downloads
Events
Everything posted by trinculo
-

Planning new anvil purchase, TFS, Peddinghaus...
trinculo replied to dntfxr's topic in Anvils, Swage Blocks, and Mandrels
When a i was buying a new anvil several years ago it was between the 250 Fontanini and the 275 Pedd. The Fontanini was less expensive than the pedd @ the time and that was what I got. I think it ended up around $1350 with shipping to NC. Shortly after I got a deal on a slightly used 200kg Old world haberman pattern and would recommend their anvils without hesitation. I saw the Blu anvil at the NCABANA gathering and it looks like a baby haberman. Josh at Big Blu told me they are made from 1045. No idea of hardness but they looked very nice. Here is a little sheet comparing prices at the time around 4 years ago. Anvils worksheet.xlsx.pdf -
So because you never run across it it can't be L-6? Seems about the same degree of certainty as the OP assuming it is L6 based on a Junkyard guide. It is a mystery steel until a spectrograph or specs from the manufacturer define it as otherwise and it should be treated as such.
-
Gorgeous knife. Please continue to make and share more.Sitting down or standing up you certainly have the eye and talent for it.
-
I think Hofi uses stuff called sikaflex to glue the handles.
-
Show me your Bottle Openers!
trinculo replied to Arbalist's topic in Blacksmithing, General Discussion
I like 'em Black frog. Very cool idea with the jet. No doubt it will mean alot to the lucky septuagenarian grease monkey. -
Nice Tools Curly. The possibilities are vast with what you can do. Bending and straightening are so easy with the fly press.
-
Home build induction heater
trinculo replied to Daniel.85's topic in Induction Heating, Oil forges, etc
I'd be up for an induction build session. Done my far share of soldering electronics. -
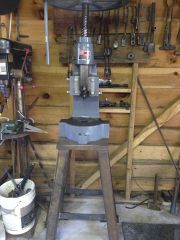
http://www.iforgeiron.com/gallery/image/38110-5-flypress/ Whatever size table you will want to bolt it down, there is a tremendous amount of lateral torsion.. Here is the one I made for a Karachi #5. Base plate is 1.75" plate drilled and tapped to bolt the press down. Legs are 3" x.25" wall square tubing @ 18 degrees. I'm going to add some diagonals as even with it bolted you can see the table twisting when using the press with gusto.
-
-
pm sent w/ contact info.
-
I can't see the taper of your drift from the thumbnail but that could be one thing. Upsetting with a flatter and cupping tool at least 4 times rotating 90 degrees each time usually shocks it loose. I'm not far from you if you want to come over one day and troubleshoot. Happy to help.
-
The Faggot Weld
trinculo replied to brianbrazealblacksmith's topic in Blacksmithing, General Discussion
Dan, i don't know you but if you think Brian has not been exposed to any real smiths . . . . Well then perhaps it is you who need to get out more. I've seen quite a few people forge, but very few have the chops Mr Brazeal has with a hammer and an Anvil. I would love to take a look at some of your work but your website appears to be offline. -
For a first hammer I would suggest a rounding hammer between 2.5 and 3.5 pounds. There are likely many people on here who could make you one. Do a search for a Brazeal style rounding hammer. That's a good place to start. A few people sell them on ebay. Aaron Cergol and Dave Custer that I know of make fine hammers and could make you whatever you want for less than hundreds of dollars. I think they sell in the $125-150 range for a nice forged hammer.
-
Welding H13 to Mild for flypress tooling.
trinculo replied to trinculo's topic in Welding/Fab General Discussion
Thanks Larry, what i'd always though. -
Welding H13 to Mild for flypress tooling.
trinculo replied to trinculo's topic in Welding/Fab General Discussion
I followed Andrew recommendations (except) I TIG'd them. They are seeming to be holding up well. I used a slight breeze of compressed air to harden a few of the shapes that didn't get hard the first time in still air to a file test. -
Welding H13 to Mild for flypress tooling.
trinculo replied to trinculo's topic in Welding/Fab General Discussion
These are the lowest grade non coated bolts. What do you recon they are made of? It sure feels and sparks like lo carbon. -
Welding H13 to Mild for flypress tooling.
trinculo replied to trinculo's topic in Welding/Fab General Discussion
http://www.iforgeiron.com/gallery/image/38098-dereks-flypress-tooling/ -
-
Welding H13 to Mild for flypress tooling.
trinculo replied to trinculo's topic in Welding/Fab General Discussion
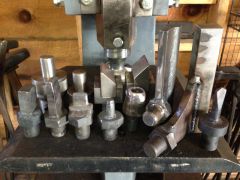
I have 1"& .75" round adaptors and 1" x2" rectangular adaptors, some from vapre mac. I also have a box of h13 drops that are various sizes that I've successfully welded to 1" hex bolts using the method Andrew T suggested above. Works great so far. I put those bolts with the welded bits in the tool holders. -
Power hammer vs. Striker comparrison
trinculo replied to Eddie Mullins's topic in Tools, general discussion
Depends on the process and what you are trying to accomplish. Mathematical equations of force would not be very useful in my estimation for determining which is a better tool for a given application.. For drawing lengths of stock a power hammer wins, for punching a >2" hammer eye a good striker with a 12lb sledge beats my 75lb pneumatic hammer every time. Now if i had a 300lb utility hammer that would be a different story, Also know that the stroke on most smaller power hammers will limit the amount of force applied and the tooling you are able to use. Upsetting a hammer into a cupping tool with a flatter is much easier with a striker than under a power hammer. I've tried. My seat of the pants estimation is that the amount of metal moved in one blow is greater with a seasoned striker with a full swing of a 10-12 lb hammer than with a single full force hit with a <100' mechanical or pneumatic hammer. Of course the striker can't do 240 bpm. -
THIS!! You can be very precise. The check nut is your friend. No need for a stop block in my experience.
-
Excellent video and photos tubbe. Your production values are very high both for your forgings and your documentation.What kind of power hammer is that? I've never quite seen a top die holding system like that on a power hammer. Also your wire wrap on you ball fuller I quite like. Where is the joint in the handle, It looks like one piece. Keep them coming.
-
For the tooling, buy some 1" hex head bolts (Not galvanized or cadmium coated). Cut the threads off 1/4" shorter than the depth of the receiver in the ram. You want the bearing surface to be on the back side of the bolt, not the bottom of the shaft. Then weld on what ever tooling you want to that.
-
I forged my first rounding hammer over the weekend
trinculo replied to feral's topic in Hand Hammers
You going to differentially temper with the drift? -
Very nice. IS the back ground added in PS?