timgunn1962
-
Posts
393 -
Joined
-
Last visited
Content Type
Profiles
Forums
Articles
Gallery
Downloads
Events
Everything posted by timgunn1962
-
I can't see the end of the burner where adjustments are made, so it's not clear whether it's a DFP or a DFPProf burner. I'm guessing it's a DFP? You have 2 adjustments with the DFP. The first is the amount of gas being burned and this is controlled by adjusting the gas pressure. The second is the flame temperature and this is adjusted by varying the choke position (the disc on the back of the burner that screws up and down to vary the air gap between the bellmouth and the disc). If you've run with the choke closed, that'll explain the sooting. I bought a DFP burner only off ebay, just to see whether they'd done a good job of it and I was impressed. It seems they've got the gas jet (which looks to be a drilled hole) about right, IMO. Mine seems to get hotter as the choke is opened while remaining on the fuel-rich side of stoichiometric even with the choke fully open. I only did my initial testing in a purpose-designed Heat-Treat forge, so I've not tried for maximum temperature yet. I still need to try it in a "normal" forge to see if it'll get to welding temperatures and it's something to get around to in the next few weeks: I prefer to do in the dark so that I can see what the flames are doing and it is best done in the the dark winter evenings. Operating pressures are likely to fall in the 0-0.2 MPa range (0-30 PSI). For a given gas jet, gas flow varies with the square root of pressure. If you burn X gas per hour at 30 PSI, you'll burn 0.707X at 15 PSI, 0.5X at 7.5 PSI, 0.25X at just under 2 PSI and about 0.18x at 1 PSI.
-
Effectively none. The thermocouple was a type S removed from a Landfill gas burner I decommissioned. Type S is generally considered stable and an uncalibrated type S is a lot more useful to me than no type S. The readout was the cheapest thing I could find which would take types K, N, R and S. I did check it against the "calibrator" at work, but even that does not have traceable calibration back to National standards. To be fair, I don't get the impression many of us on IFI are working to ISO9001 or similar and most of us understand that there is an uncertainty in any measurement. For example, the chamber dimensions I gave above are based on nominal 9" x 4.5" x 3" IFBs and I'd expect most smiths to be ok with that.
-
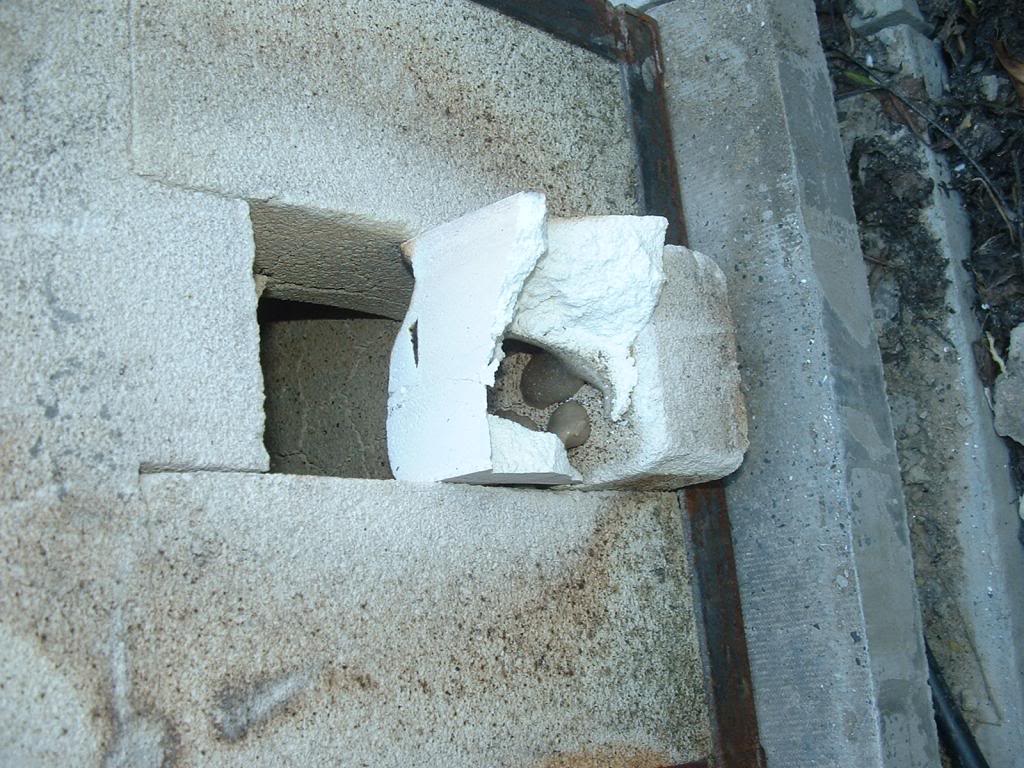
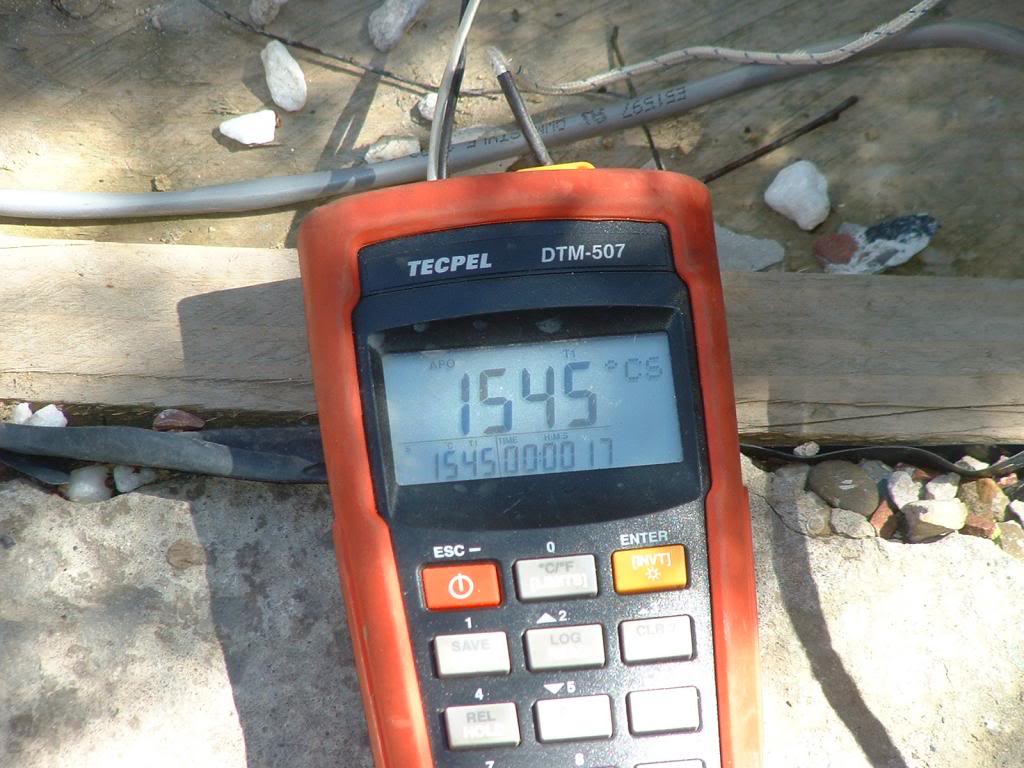
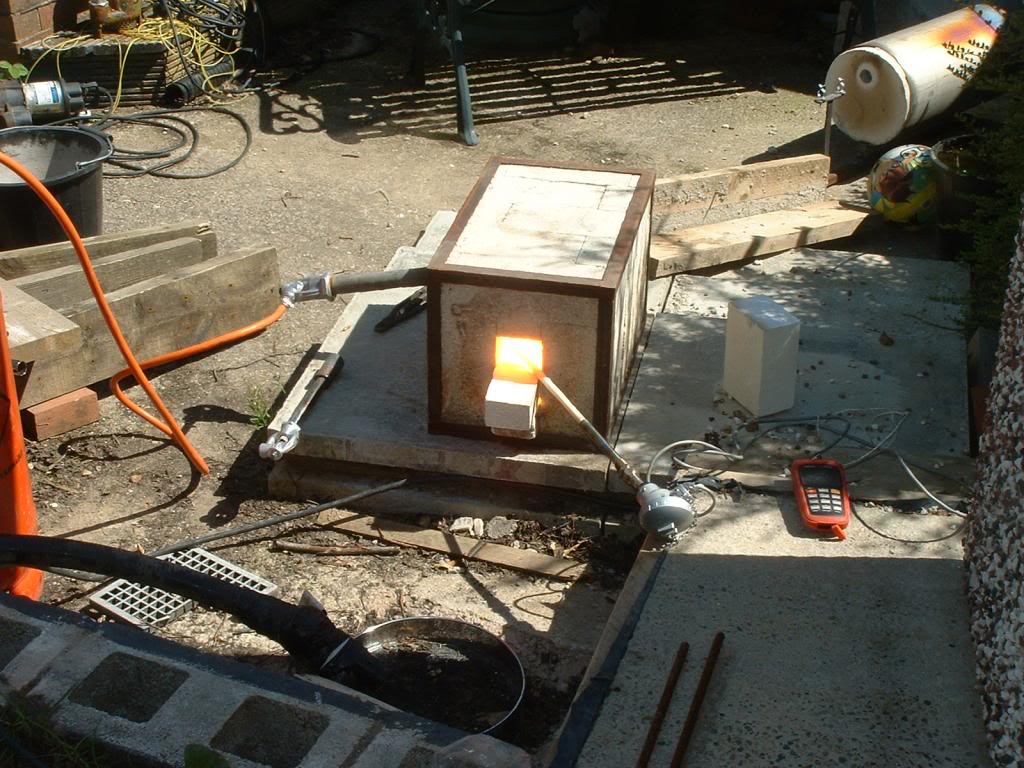
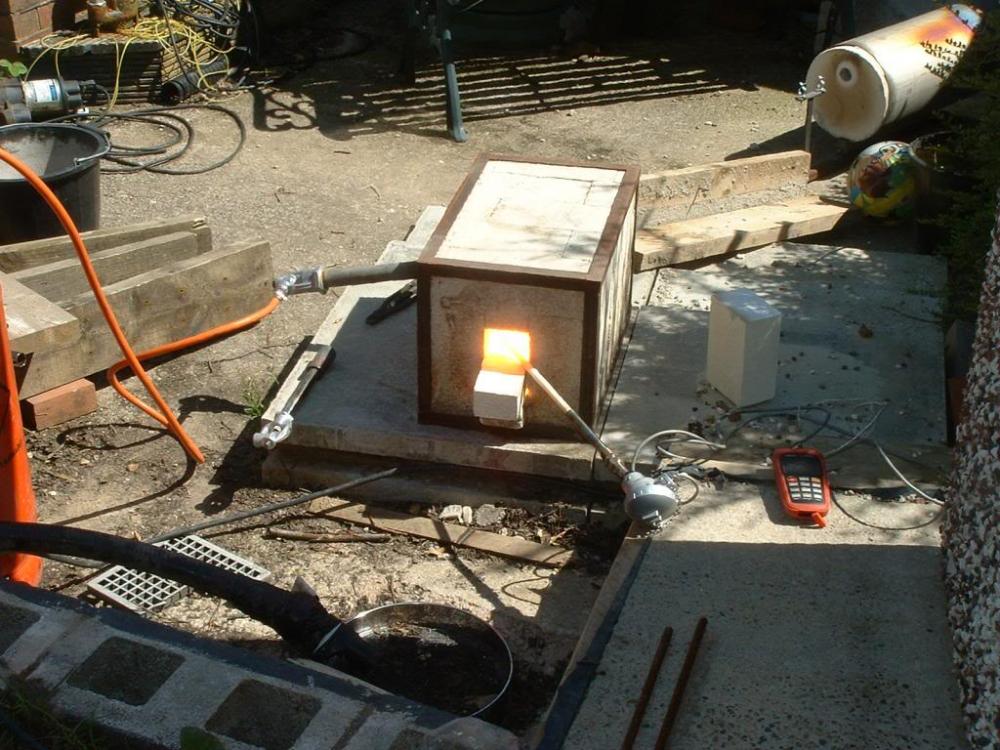
I've had a measured-with-photos 1545 degC, 2813 degF from a forge. The forge was a quick, dirty IFB construction made from some very cheap (probably Chinese) grade 23 bricks and a 1" burner based on an Amal atmospheric injector. I was experimenting with jet sizes and this was using a 0.6mm MIG tip (.024") with an actual ID between .029" and .031". A #69 drill would go but a #68 would not. Propane pressure would have been at maximum on a nominal 0-30 PSI regulator. No gauge. The chamber was 6" x 6" x 13.5" with the opening only about 3" x 3" at the time. It was built with a 5"H, 3"W front opening and a 3" x 3" rear opening and I'm pretty sure the rear opening was plugged with kaowool when the photo was taken. The front opening was reduced with a bit of JM23 IFB and the bottom pic shows how it melted. I have no doubt a forge temperature of 2900 degF is achievable, though I'd consider it unwise.. If the refractory hangs together at the temperature, the Kaowool behind it should survive ok. It doesn't actually melt until 3200 degF and only needs to retain enough strength and rigidity to keep the refractory in place. Always keep in mind that forge linings are consumable items. http://www.barteltinsulation.com/pdfs/CERAMICBLANKET.pdf


-
Assuming from the link that you are in the UK, I would not advise using a torch unless you have (or need to buy) one anyway. The Sievert stuff is quality, but it's worth checking whether the burner on that one is brass, steel or stainless steel. There's a pretty good chance that brass will become a dribbly mess when trying to get useful forge temperatures. You can buy a 1/2" long-Venturi Amal Atmospheric Injector (a commercial Venturi mixer) for around £50 delivered. Either the 354/12BLV (with a 60 jet) or 354/12PLV (with a 70 jet) will work. If you are mainly working hot, with welding the priority, the 60 jet is probably best. The 70 jet might be slightly better if precise temperature control down at Heat-Treating temperatures is important to you. You'll also want a 6" (or longer) 1/2" pipe nipple for the burner. The injector incorporates a 1-in-12 tapered section and you don't usually need anything else on the end in a forge. You'll need a regulator, hose and fittings to get you into the 1/4" BSPF port in the injector. A gauge is optional and will fit in the other 1/4" port in the injector if you want to use one. The regulator should be a 0-30PSI (0-2 bar: adequate) or 0-60 PSI (0-4 bar: overkill). Don't get a 0.5 bar-minimum (8 PSI) regulator, they are horrible to use in a forge. The Amal burners turn down well and provide for exceptionally fine adjustment of the mixture/temperature. Fire bricks come in 2 main types: "Hard" and "Soft" or "insulating Fire Bricks". You'll almost certainly want IFBs. Hard bricks do not insulate to any useful degree and you'll probably need to step up to a 3/4" burner if you use them. IFBs are not flux-resistant. Read the stickys for ways to protect them. Bricks are expensive to ship so we tend to get different ones over here to those in the US. My preferred IFBs for forges are marked LW23GRD. They don't seem to break up as badly with heat cycling as others I have used and, despite the 2300 degF rating, do not melt at temperatures I can readily obtain with the Amal burners. They also insulate better than anything else I have tried except the JM23s from Thermal Ceramics. I once used a JM23 to reduce the opening of a forge built from LW23GRD and the JM23 melted to a puddle. JM23s are my first choice for electric Heat-Treat ovens but I avoid them for forges. I weld up a frame from 1" angle, rather than a sheet metal box. I also take the burner in the side to reduce the chimney effect on the burner when the forge is shut down.
-
The Vids show a LOT of Dragons Breath. For a hotter flame, you'll want more air for the same gas. In a Naturally Aspirated burner, the speed of the gas out of the jet (your mig tip) is effectively what draws the gas in. If you make the jet smaller and the gas pressure higher, you'll have more speed out of the gas jet for the same gas flow and you'll draw more air in, giving a hotter flame. Try a .023" MIG tip and let us know what happens.
-
Need help first forge/burner build and trouble with burner
timgunn1962 replied to LiveWire's topic in Gas Forges
How dry is your rigidizer? It needs to be properly dry. If it is not, it can take so much (latent) heat out of the flame and produce so much water vapour that the burner struggles to stay lit. Make sure it's really dry and try again before you start messing with any other variables. If I've thoroughly soaked the blanket, I generally give it at least a couple of weeks to dry off in the shop before trying to run the burner. This is obviously climate and time of year dependent: I am in Lancashire, England. Mine is not generally considered a warm, dry climate. I don't normally heat the shop, but usually run a dehumidifier in there. Once I've got the rigidizer properly dry, I'll apply a coating and leave it at least another week or so before running the burner again. I've tried force-drying a few times. Taking it into the house speeds things up quite a lot, but does not exactly promote marital harmony. Apart from the spousal disgruntlement, this doesn't seem to cause a problem and it cuts the drying time from weeks to a couple of days or so. I have tried leaving small forges on top of an oil-filled electric radiator in the shop with less success. I think rigidizer should be fine at perhaps 20 degC (38 degF) above ambient, maybe more. For a surface coating, I have mostly used a 2:1 mix of Zirconium Silicate and Porcelain clay powder, made into a slip and painted on. Although not ideal even when dried slowly, this seems to crack much more when dried fast. If it is not fully dry when the burner is lit, it tends to flash off steam which lifts a paper-thin layer. This fires quickly and breaks up, then it seems to happen again. The result is a very fragile surface coat of varying thickness. I fully appreciate that nobody is going to wait weeks for their first forge to dry. However, it's a good idea to run your first forge for a few weeks, maybe even months, to work out how the next one can be built better, but to build the second before the first fails completely and ensure it has thoroughly dried before firing. If I really need to build and run a forge in a single weekend, I use IFBs and bypass the whole drying issue. I don't see any realistic way of building a long-lasting, flux-tolerant forge on such a tight timescale in my climate and using conventional materials. -
Which burner are you using and where is the choke set? A fireball suggests a very rich mixture and that suggests the choke is closed or nearly closed. If so, try opening it. The cheaper, DF, series of Devil Forge burners has a screw-adjustable choke. The more expensive, DFProf, series has a sliding choke 0.1 to 0.8 MPa is 15 to 116 PSI. I'd normally expect to see a burner like the DF running in the 3 PSI-30 PSI range or thereabouts. There are a number of different coatings that are recommended. Availability varies widely with location. Where in the world are you?
-
The choke can be used to change the temperature of the flame in conjunction with the composition of the flame and, when in a forge, the forge atmosphere. Whether or not this is something you will do frequently is primarily dependent on the sort of work you intend to do in the forge. In my experience, relatively few Naturally Aspirated forges are jetted to run lean (i.e. with excess air), even with the choke fully open: most seem to be jetted to run slightly rich, with the choke adjustment, where fitted, giving the facility to make the mixture even more rich and the flame temperature cooler. Dragons Breath is a pretty good indication that a forge is running rich, and by some margin. If you are bladesmithing, you may wish to run an extremely rich mixture (choke nearly closed) to provide a flame temperature around 800 degC (1472 degF) for Heat Treating, a somewhat leaner mixture to provide forging temperatures and a leaner mixture still (choke fully open, or nearly so) for welding temperatures. As Mikey says, changing the pressure changes the amount of flame present and therefore the heat input. For blacksmithing, you might simply find the choke setting that provides welding temperature without excessive scaling, leave the choke there and and just turn down the pressure when forging. I'd certainly be inclined to do this on a multi-burner forge, just to minimize adjustment time and maximize forging time.
-
Which bricks have you got, Mikey? Closest to the rating and density that I can find find specs for online are the K26, which I thought had been around a good while (since 2001-ish?). They look good for insulation value, but I've not seen anything on their tolerance of temperature cycling and they are a little pricy over here to just pick up a few to play with. I gather there's also a new JM23-400 ultra-lightweight IFB from Morgan that was announced in 2015, but I'm struggling to find any specs on it, so it may be that I've just not found the specs on the newer stuff. A possible source of powdered Bentonite clay in the small amounts needed to mix at 5% with a few pounds of Zirconium Silicate might be a home brewing supplier: Bentonite is often used as finings to clear wine.
-
My guess is that the analysis was done using an XRF gun, which will not (usually) detect Carbon. XRF is very quick and easy to use, so gets used a lot for identifying alloys in the scrap industry. There the value of the scrap is largely dependent on the alloying elements and tramp elements present. The analysis allows control of the inputs of the alloying and tramp elements to the remelt. The Carbon content is adjusted during the production process anyway, so there is little value in measuring the Carbon content of the input material and it is not cost-effective to add Carbon measurement capability to the instrument. Analysis of the heavier alloying elements will usually be enough to narrow down the range of alloys into which a particular sample might fall. In many applications outside the scrap industry, this is enough to be useful.
-
It's probably a type K, but maybe a type J. It is quite likely to have it marked somewhere on the gauge. The thickness of the "legs" on the thermocouple itself strongly suggests it's a base-metal type, not a Platinum-based type (R,S or B), but it's worth checking: in the (unlikely) event it is Pt-based, the scrap value of the thermocouple would certainly build (and perhaps even buy) you a new forge with temperature measurement. I don't recognize the colour coding on the wiring. There have been lots of different standards in different places though and I'm only familiar with one or two (I am also colourblind to the point where I sometimes need to ask someone else what colour things are when wiring up instrumentation at work). https://www.omega.co.uk/techref/colorcodes.html If you really need accuracy, I'd be a bit wary of using it as-is, unless you have some way to check the calibration. Ice/water is the usual check for zero degC, but it's not much use with a scale that starts at 20 degC. Human body temperature at 37 degC would give a readily available fixed point for checking at low temperature and boiling water at sea level provides a fixed point at 100 degC. It gets a bit more difficult finding usable fixed points at higher temperatures though, and it's less easy than it sounds to get reliable ice/water and boiling point fixed points. If your forge temperature is sufficiently adjustable, decalescence/recalescence might provide a reasonable check temperature. Using the forge as an oven for tempering does not sound easy. The thermocouple and readout would certainly work at Austenitizing temperatures (usually somewhere in the region of 800 degC), but getting a forge to run down in the 150-450 degC range which covers most tempering operations is definitely pushing the boundaries. I certainly cannot manage it with a forge that will reach forging temperature. I can get stable temperatures from about 750 degC to about 1500 degC from a forge, using a burner based on a commercial Venturi mixer. Going much below about 750 degC (1382 degF) is difficult with my setup. I am pretty confident I could build a purpose-designed gas oven that would do the job, but that's a whole different animal: certainly not a forge.
-
Frosty Burner - help tuning the burner
timgunn1962 replied to MatthewMachinist's topic in Gas Forges
Matt, are the problems occurring with the burner in the forge or are you still trying to run it with the burner in open air? Frosty, I was under the impression the T-burner was only really intended for use in a forge. I don't see any real application for one as a torch, but I could easily be missing something obvious. Have you done any development work with them outside a forge? -
Frosty Burner - help tuning the burner
timgunn1962 replied to MatthewMachinist's topic in Gas Forges
Unless you are intending to use it outside a forge, try it in a forge. The flame in the forge will be drawn into the mixture stream and stabilise the burn on the burner, much as keeping the torch there does outside a forge. -
Look up "normalising steel" on the smithing and bladesmithing forums. The grain will have grown at forging temperature and it sounds like you did nothing to get the grain size down before quenching it. Normalising involves heating to JUST above critical (look for decalescence), then air cooling to black. It starts new grain formation but doesn't allow the time at temperature for the new grains to grow big, thereby setting things up for the Austenitization and quenching with nice fine grain.
-
As others have said, more information is really needed. If it is running outside a forge, it's pretty much normal behaviour for a burner. The gas/air mixture emerging from the burner causes a low-pressure zone which draws additional air towards the burner. If the flame starts to lift, there is nothing to stop it and it may continue lifting until it goes out. In a forge though, rather than drawing fresh air, the low-pressure zone draws the forge atmosphere instead. As the forge atmosphere is basically a big flame, it tends to stabilize the burn on the end of the burner. If you hold a torch to the edge of the burner when running outside a forge, it will do the same thing In a cold forge, it can also happen. It's not usually a problem in a forge built well from well-insulating materials: the forge temperature rises quickly and the forge atmosphere reaches the temperature needed to stabilize the flame, but it can be an issue when trying to dry out a lining for example. In this case, the undried lining is a big heatsink and the evaporating water will also tend to cool the forge atmosphere. The result is that the stuff being drawn toward the burner is too cold to stabilize the flame. In a hot forge, it seems quite rare to have a problem with flame stability in still conditions, though it can still happen when the wind is sufficient to blow the flame away. In my (limited) experience, breezy conditions seem to affect NA burners with less highly-engineered mixing sections more than those with textbook or near-textbook Venturis. Blown burners seem to be even less affected and may be a better choice if your forging conditions are likely to be windy. If the intention is to run a burner outside a forge, or inside a forge that needs to run at an unusually low temperature (for Heat-Treating or similar), a flame retention cup can often be used to provide a "miniature forge" in which a toroidal (donut-shaped) ring of flame is established on the "shelf" of the retention cup and this will often stabilize the flame sufficiently. I tend to do this when building forges specifically for HT, but do not find is necessary for forges intended for forging or welding.
-
Realistically, probably not. It's a pipe-or ribbon-burner and works very well for things like heating fish kettles, barbecues, boilers etc where the hot zone being heated is not particularly hot and the tube does not get hot enough to become an ignition source. The narrow slots (or often small holes instead) are narrow enough that the flame-front is robbed of its heat as it tries to pass through the slot/hole and the flame therefore stays above the burner. Put it into a forge at HT temperature and the heat soaking into the tube is very likely to raise the temperature to the point at which the inside of the tube becomes hot enough to ignite the gas/air mixture in the tube. If Wikipedia is to be believed, the autoignition point of Propane is 455 degC, 851 degF. That is well below Austenitizing temperatures. A pipe burner might be ok for a tempering setup though. Ribbon burners as used in forges tend to use a big lump of insulating ceramic ("about" the size of a brick) with holes cast or drilled through it to stop the heat soaking back into the plenum, which is usually steel and outside the forge for cooling, to overcome this problem.
-
If you are sizing your gas jets to get the mixture you want, either by altering the hole diameter or by altering the length of the jet, you'll need consistency. In theory, if you have a leak that is repeatable so that every time you take the jet out to modify it and put it back in, the leak remains the same, there is no problem. As soon as the leak becomes a variable that affects the mixture ratio, it will play merry games with your burner tuning. In practice, ensuring your leak is consistent would be both onerous and pointless. Sensible folk just avoid creating leaks. The tape vs goop argument will go on forever. I made the move to anaerobic sealants about 30 years ago because I found it just did what I needed it to do with no fuss and, very importantly, no leaks. Something I've not seen mentioned much is that using tape needs care and some skill. Whilst it's a long way from brain surgery and can be covered in a 10-minute show-and-do, I'm guessing most of the guys asking the tape or dope? question are doing so because they genuinely have no idea. They won't have had the 10-minutes of one-to-one instruction from someone who knows and are therefore probably best advised to use an anaerobic sealant, just because there is less chance of getting it wrong.
-
The baffle reference was from post#2, made by John McPherson, so it doesn't seem to be a case of British and American English terms being different. It seemed like a perfectly adequate functional description of an adjustable choke so, when the discussion seemed to be going off in a different direction, it seemed reasonable to offer the accepted term (which is the same over here). It was intended to make it easier for the OP to follow John's advice: Diamondback offer chokes as an option. I tend to be quite impressed by the guys who have the brains to work out first-hand what is actually going on, and the decency to pass on that knowledge, without necessarily knowing the accepted terminology. Full marks to John. I guess I've spent far too much of my working life around the sort of lower-management pillocks who use jargon unnecessarily, solely in order to feel superior to those who don't.
-
I am surmising that your concern is over the Superwool's ability to handle the temperature it might see at the interface with the Kast-O-Lite, given its classification temperature of "only" 1200 degC/2192 degF and continuous use temperature of 1000 degC/1832 degF? It is entirely possible to calculate the theoretical interface temperature and make the Kast-O-Lite layer thick enough to bring the interface temperature down to whatever you decide is appropriate. I did something similar a long time ago for a waste gas burner we built at work and found it a PITA, involving some pretty daunting math, a lot of iterative calculation and many, many hours reading textbooks. The main reason I'd not do it for a forge though is that it needs real numbers that few of us have: I'd be pretty surprised to find that more than 10% of smiths could tell you their forge temperature within about 20 degrees, for example. Most of us basically just copy what others have done until we build up enough experience and understanding to work out how to improve things ourselves and, if we do a good enough copying job on a good enough initial design, improvement is not always needed. The Superwool does not melt at 1201 degC, or even close to it, so exceeding the classification temperature, even by some considerable margin, is not going to leave you with a dribbly mess and no working forge. In your shoes, I'd have no qualms at all about using an inch of Kast-O-Lite 30 over rigidized Superwool. In reality, I'm inclined to suspect that the biggest issue you'll have to contend with in respect of longevity is getting the forge properly dried out before first firing. Incomplete drying causes the water trapped in the refractory to flash off to steam causing cavities which greatly weaken the structure.These cavities seem to join up with temperature cycling. "Build it Saturday, use it Sunday" seems to be a recipe for a short-lived forge. "Build it June, use it August" seems rather closer to the mark, though climate is obviously a big factor. In some locations, it may even be necessary to take steps to slow the drying (though Astoria, OR probably isn't one of them). I'd build it, use it for six months, see what needs changing and build the next one as soon as possible so it can be dried fully before needing to use it. It's worth pointing out that the single biggest non-human factor in determining how well or badly a given forge works is the burner. Be prepared to spend at least as much time researching burners as you do researching the structural parts of the forge and do not make the mistake of costing the burner separately from the forge: A burner made from pipe fittings might look like a huge saving against the cost of a commercial item. However, once you factor in things like taps and tapping drills, the construction materials for the forge, any coating used, the regulator, hose and first fill of gas, the overall percentage saving tends to look at lot less impressive. If the pipe-fittings burner will do what you need it to do, great, that's the way to go. Mention of an HT oven and the size of forge given in the OP is suggestive of bladesmithing to me and I'd expect a burner with air:fuel ratio adjustment to be advantageous in that application.
-
"Intake baffles to tune the fuel/air mix to prevent scaling" sounds like adjustable chokes to me.
-
It looks to me like it's 1200 degC rated. http://store.armilcfs.com/high-temperature-insulations-refractories/boards.html http://store.armilcfs.com/pdf/Ceramic_Fiber_Board.pdf There are Low-Density boards rated for both 1200 and 1400 degC. I've not seen one rated for 3000 degF (1649 degC). http://www.unifrax.eu.com/web/Audit.nsf/ByUNID/D600A55D633ECF7685258128001AEAC0/$File/Fiberfrax Duraboard 120 EN.pdf http://www.unifrax.eu.com/web/Audit.nsf/ByUNID/0BDEDE9E3537A2F285258128001B037D/$File/Fiberfrax Duraboard 140 EN.pdf
-
When you take a look inside the burners, pay careful attention to the jet arrangement. It's worth having calipers and a thread gauge handy so you can measure the threads if the jets screw in. A set of number drills would also be useful to use as go/no-go gauges to measure the orifice size in the jets. Cheap import ones are fine and 50-80 should cover the range you are likely to want. They can be used by hand with a pin chuck to open out jets made from brass or Copper (MIG tips are copper. Most commercial gas jets are brass). Pretty much any Naturally Aspirated burner can be made to work if you are able to tune it by changing the jet size.
-
I am in the UK so can't answer for the "standard BBQ Propane tank" question, but I strongly suspect the answer is yes. Over here, most BBQs run on fixed low pressure (35 mbar, 14" WC) regulators and the cylinder fitting for these is different to that for the high-pressure regulator needed for most gas forges. The pics are not very clear: what is the discoloration on the pipe half-way between the open end and the nearest burner? It could be that the pipe has a welded blank in there. Easy way to check is to poke something down the end and see if it stops there. If it's not blanked already, it needs to be. I'd be inclined try to arrange some sort of support for the pipe or the burner feed lines to take the strain off the spiders in the burners. If there's any movement that shifts the gas jets out of alignment with the center of the intake bells, even slightly, it will change the air:fuel ratio and make tuning trickier than it needs to be.
-
What needs decoding? It seems pretty clear to me. It's a lightweight, insulating building block. No mention of it being a refractory, as far as I can tell. It's a (very) good insulator, but is not intended a refractory. If you want to build a house or similar structure and maintain the inside at a different temperature to the outside, it may be a good choice subject to the myriad of other variables to be considered when building a house or similar structure. It is not intended as a refractory. The thermal conductivity of many materials, particularly insulating materials, is variable with temperature. When looking at the spec sheets for refractory materials, they will usually give thermal conductivity at several different mean temperatures. The Ytong specs I can find do not give thermal conductivity at different temperatures. The material is clearly intended as a thermally efficient building material for the construction of dwellings and industrial/commercial buildings, not as a refractory. As a construction material for occupied buildings, the implied temperature range is perhaps -50 to +60 degC (ambient outdoor temperatures), roughly -60 to + 140 degF on the outside and somewhat less on the inside. Over this limited range, any change in thermal conductivity is likely to be small and quoting a single value for thermal conductivity seems valid. A example of a specification sheet for a range of Insulating Fire Bricks can be found at http://www.morganthermalceramics.com/media/4526/firebricks-structural-range-1200-1430-data-sheet-english.pdf Note that it includes data relating to the refractory properties of the products. The youtube link in post #2 took me to a forge build using Refractory Ceramic Fibre board: a "real" refractory, though the one that followed it ("gas concrete propan forge...") used Ytong. Nothing in the video suggested to me that the Ytong was likely to make a viable refractory and there does not seem to be a follow-up video showing the Ytong forge in use.
-
I think the Forgeburners burners are probably imported Aussie Gameco/Artisan Supplies burners. It's pretty easy to find pictures of the outside of them online, but it's what is going on inside that makes the difference to performance. I'd really love to see one taken apart.