

timgunn1962
-
Posts
393 -
Joined
-
Last visited
Content Type
Profiles
Forums
Articles
Gallery
Downloads
Events
Everything posted by timgunn1962
-
I get the impression from the spec sheets that something quite unusual is going on with ceramic fibre blanket. For some reason, the higher-density varieties seem to have reduced thermal conductivity (i.e. they are better insulators). http://www.unifrax.eu.com/web/Audit.nsf/ByUNID/D0B83D7C069DC6DB85258220006F5398/$File/Fiberfrax Durablanket S EN.pdf This is exactly opposite to the vast majority of insulating materials. I am pretty sure that compressing the blanket will not significantly reduce its insulating ability on a per-inch-installed basis and will most probably increase it.
-
Copesy, making forge burners can be very rewarding, but it can also be an exercise in frustration. It will not be helped at all by the fact that most of the well-documented designs are based on US pipe fittings and parts. There are some substitutions that can be made without effectively altering the design, but there's something of a Catch-22, in that you won't be able to identify which changes are significant and which are not unless you understand burners well. If you understood burners well, you would not need to build someone else's design. A 0.6mm mig tip is intended for 0.6mm diameter wire. The need for clearance to allow the wire to feed during welding means that the hole is usually about .007" bigger than the nominal wire diameter. In this case, nominal diameter is around .024" and the hole diameter will be around .031", equivalent to a number 68 drill. The biggest factor in burner performance is the Air:Fuel ratio. Using a bigger gas jet than the design calls for will (usually) cause a richer-than-optimum mixture and a reduced flame temperature. In the UK, arguably the best approach is to buy an "Amal atmospheric injector" (now made by "Burlen Fuel Systems") in the correct size for your application. For reasons I will not bore you with, the injectors jetted for Butane tend to work very well in forges: better than those jetted for Propane. Usual disclaimer: I have no affiliation with either Amal or Burlen other than as a very satisfied customer.
-
1/ Yes. 2/ Yes, but only because you are using Butane (I assume that's 0 degC, 32 degF?) 3/ Probably: it certainly won't help. 4/ Probably: it certainly won't help. Best to wait until you have the correct reducer though. The "this" link in your post seems to return to this thread. Butane regulators are, to the best of my knowledge, 28 mbar fixed-pressure in the UK. Clip-on, rather than screw-in. You NEED a Propane cylinder with a screw-in connection (there are also clip-on cylinders like the Butane ones. Again, these use a fixed-low-pressure regulator, 37 mbar for Propane, and are no use to us) and an adjustable regulator to suit. 0-2 bar is good. 0-4 bar is overkill, but works and may be easier to find. Do not buy a 0.5-4 bar regulator: the lack of control at the bottom end makes it truly horrible to use once lit and unnecessarily exciting to light. Make sure it goes down to zero. You need to build EXACTLY to a "known good" burner design. The majority of the documented designs are for US fittings, making sourcing them in the UK a minor nightmare. ANY deviation from the documented design, however trivial, means that you have redesigned the burner and that you will need to make your new design work: not a problem if you understand burners, but the learning curve is steep and tends to be expensive in either time, money or both. The best advice I can give is to google, and buy, a Long-Venturi "Amal atmospheric injector" (usual disclaimer: I have no affiliation to them other than as a satisfied customer). The range jetted for Butane actually seems to give the best results when running on Propane in forges (without a secondary air supply).
-
When testing burners and forges in expectation of things getting properly hot, I use a type S thermocouple, as I have picked one or two up over the years when decommissioning plant. Much too fragile/expensive to install permanently (They are Platinum-based and new replacements would cost around $500 each). They have recrystallized Alumina sheaths 10mm in diameter (about 3/8") and are 500mm, 20" long. The RA sheath is usually considered good to 1600 degC, 2912 degF, but the Type S tables go up to 1768 degC, 3214 degF. For more regular use, I reach for a handheld Mineral-Insulated type K thermocouple, 24" long and 1/4" diameter below the handle. My preferred one is an Omega KHXL-14U-RSC24, which has the proprietary Super Omegaclad XL sheath, but mostly I use 310-stainless-sheathed examples because I can get them cheaply enough to accept their limited life at welding temperatures. It may be worth mentioning that the failure mode I see most with the Mineral Insulated probes in forges is failure of the metallic sheath. When it gets hot, an Oxide layer forms. When it cools, the Oxide layer detaches. It does not take many cycles for the sheath to be lost and holes to appear. Oxygen can then get in, the thermocouple wires Oxidize and the thermocouple fails. Types 304 and 316 stainless steels tend to lose the Oxide layer when cycled through about 850 degC, 1562 degF. Type 310 is a 25% Cr, 20% Ni stainless. The extra Chromium helps it to form a stronger Oxide layer and the extra Nickel brings the thermal expansion coefficient of the metal closer to that of the Oxide. As a result, type 310 tends to hang on to its Oxide layer until it is cycled through around 1100 degC, 2012 degF. The Super Omegaclad is claimed to be good to 1335 degF, 2440 degF. In my limited experience, it certainly seems to last better at high temperatures than 310SS. I find the 310 sheaths seem to last somewhere in the region of 20 cycles to error reading (over-range for the type K, so 2500 degF-plus) before failing. A good bladesmithing welding temperature seems to be around 1300 degC, 2372 degF so it should be enough for most smiths to learn to recognize the correct temperature range. For electric HT ovens, I use type N thermocouples, which are "only" good to 1300 degC, 2372 degF (vs 1372 degC, 2500 degF for the type K), but were developed to be much more stable than type K when used at temperatures above 1000 degC, 1832 degF. Again, I use super Omegaclad when budget allows, 310SS when it doesn't. I tried InfraRed pyrometers in waste-gas burners at work and cannot say I had much success with them. The readings tended to be considerably higher than the Type S thermocouple readings and I felt the thermocouple was more trustworthy.
-
What temperature rating for ceramic blanket is needed?
timgunn1962 replied to Danjmath's topic in Insulation and Refractories
2200 degF rated is 1200 degC. I suspect that it will be the "Low Body Persistence" stuff. Most of the Refractory Ceramic Fiber blankets I have come across have ratings of either 2300 or 2600 degF, 1260 or 1427 degC. The higher-rated ones having a Zirconia content. The RCF blankets have stronger fibers and are physically stronger, as well as having the higher temperature ratings. The LBP stuff has fibers that are designed/formulated to break up more easily and to dissolve, albeit very slowly, in simulated body fluids. The idea being that they will eventually disappear from the human body, rather than remain forever. Over here in Europe, it's getting much harder to buy the Ceramic Fiber blanket, as the LBP products are assumed to be safer. I'd expect things to follow a similar path over your side of the pond. If you can find a source for the 2600-rated 8 lb blanket, and are comfortable using it, it might be a good idea to stock up on it now, while you still can. As far as I can tell, the main reason for the lower rating of the LBP product is shrinkage. It doesn't simply melt at one degree above the rated temperature and fail dramatically. As the temperature goes up, the shrinkage increases. Many industrial applications use "modules": blocks made from concertina-folded blanket with refractory metal supports that are attached to an outer casing when lining a furnace. Typically, the modules are around 12" square and between 4" and 10" thick. When they shrink, a gap opens up between the modules. The greater the shrinkage, the deeper the (V-shaped) gap gets. Where there is a gap, there is less insulation between the process and the casing. Eventually, there will not be enough insulation for the task. The modules can be slightly compressed on installation, which helps a bit, but does not eliminate the problem. I "think" the temperature that gives 4% shrinkage is used as the rating temperature for some LBP modules, though I don't know if this is an industry standard. For forges, we tend to use wrapped blanket and we tend to coat the hot face with a castable refractory layer. This would seem to largely eliminate the shrinkage failure mode. As far as I can tell, the LBP stuff should probably work fine in most forges. The biggest difficulty we tend to face is that everybody tends to do their own thing and the only way we get to find out what others have done is through personal contact or forums like this one. Very few of us work scientifically (change only one thing, make observations, then change one more thing, make more observations, and so on). Very few, if any, of us have equipment to allow us to take objective measurements at each stage. I'm not sure about Sodium Silicate as a rigidizer. I have used it pretty successfully on some forges and I've had failures on others. It certainly works as a rigidizer on my Heat-Treat forges but these are only intended to run to maybe 1000 degC, 1832 degF. The melting point of Sodium Silicate is given as 1088 degC, 1990 degF. I have had forges with largely Sodium Silicate-rigidized blanket running at welding temperatures >1300 degC, 2372 degF. These were treated by soaking the blanket with a thin suspension of Zirconium Silicate and Porcelain clay in a solution of Sodium Silicate in water. A further forge using the same ingredients but at higher concentrations seemed to result in the coating cracking up and moving on the blanket underneath. I have a feeling the higher concentration of Sodium Silicate solution was largely to blame, coupled with the thicker clay/Zircopax layer shrinking more on drying. However, the forge temperature was taken higher as well and there are too many variables to make an accurate diagnosis. For a forging forge, I'd be happy with Kast-O-Lite over Sodium Silicate rigidized blanket. I would not let the Sodium Silicate solution density exceed 1100 grams/liter, which was what I used on the "good" forges. Make sure things are allowed to dry fully before firing. For a welding forge, I'd spend the money on a commercial rigidizer, 2600 degF RCF blanket and Kast-O-Lite 30. Another variable is the burner. I use burners based on a commercial gas mixer ("Amal atmospheric injector"). This has a very finely-adjustable choke and allows the mixture and flame temperature to be easily adjusted. My forges therefore tend to have more even temperature distribution than most forges built using burners with no choke adjustment. If you have a small, screaming-hot, hotspot in your forge, that's where you are most likely to run into problems with the refractory materials. -
Has anyone reported any success with the Zircopax/VeeGum as an applied lining yet? If so, I think I've missed it. I do seem to recall someone (Maarten?) having some success with stand-alone tiles and thin surface coatings. I got the impression that they knew their way around ceramics a bit and had knowledge that those of us with no ceramics experience would need to acquire, probably the hard way. Making stand-alone sections would seem to eliminate many of the shrinkage issues that occur when different materials are used together. Shrinkage rates with the clay/Zircopax mixtures I've tried have been pretty severe. Once they get to about 1/8"/3mm thickness over rigidized kaowool, the shrinkage means they crack up quite badly on firing. Drying times are also tediously long. I've been using porcelain clay and Zircopax, not Veegum/Zircopax, so YMMV. The porcelain clay is primarily Kaolin/Alumina with added plasticisers, some of which are likely to be Bentonites. Bentonites really do not like letting go of water. I'm not saying it won't work. There may well be further mileage in the Zircopax/Veegum as a liner, if you are of an experimental persuasion. Unless there's a "this is how I did it and it worked really well for me" somewhere that you can follow, it WILL be experimental. If your main objective is to get on with forging stuff, a digression into forge development may not be for you. A thin (brushable) Zircopax/Veegum mix should be fine as a surface coating. I've had no problem with thin coatings of the Zircopax/China clay. I really don't see the shrinkage of Zircopax/Veegum being compatible with the huge cast block that is a ribbon burner though. Far better to use a commercial castable refractory formulated by experts to give minimal/zero shrinkage on (water-) setting and minimal thermal expansion (as this, coupled with temperature gradient, is primarily what causes cracking). Setting time for the castable will be hours and drying time will likely be realistic in many climates (cast it one weekend and run it the next). In cooler/wetter climates, it may need moving indoors to dry once the block is set and the messy bit is over.
-
OK. Knowing you are in the UK makes things relatively easy. No transformer needed. Brown Live, Blue Neutral, Green/Yellow Protective Earth. You can wire with a normal 13A plug and pretty much any mains-rated 3-core cable (0.75 to 1.5 square millimetre will be fine). You'll probably need to buy some receptacles (aka female spade connectors) to fit on the spade connections on the motor. Buy from somewhere that sells electrical stuff, rather than automotive bits. There are 4.8 mm and 6.4mm spade widths. Those look like 6.4mm/1/4". They are by far the most common size so if there's not an option, it's pretty safe to assume they'll be the right ones. The red-insulated ones fit wires up to 1.5mm sq and will be the ones you want. Use a purpose-designed crimping tool, the cheap ones are fine for occasional use. I'd fit a 3A fuse in the plug, as the fan is only rated 82W, so should only pull about a third of an Amp. Only run it from an RCD-protected socket. If you are in a property with old wiring that does not include RCD protection, Screwfix and Toolstation sell 13A RCD plugs and lots of places sell RCD adaptors. Use one; there's a decent chance it'll save a life, probably yours. It's a shaded-pole motor and they tend to run hot. You'll probably need to sort out the broken fan on the motor shaft if you are intending to run it for very long. I don't know what was on the front of the casing originally, but it's a pretty safe bet the inlet was a lot smaller than the big hole that's there now. You'll likely need to close it down to a smaller entry with a cover plate. The outer edge of the impeller is visible and it'll leak out lots of air as it is now.
-
Are they painted/laquered? If they are 150 lb-class fittings, it may be a steam temperature rating: saturated steam at 366 degF will have a pressure of 150 psig.
-
As I'm sure you are coming to expect by now, things are not as simple as they seemed back when you knew absolutely nothing. The blue flame outside the forge is, as you say, partially-burned fuel (more-or-less) finishing its burn as it encounter the additional Oxygen it needs. However, the "to no good purpose" is very wrong. Viewed solely from the standpoint of heat release, it does indeed serve no purpose. However, as smiths, we are not concerned solely with heat transfer. There are several other factors which we need to consider. The main one is the forge atmosphere. If the forge atmosphere is Oxidizing, the unburned Oxygen will combine with the steel and we will lose a significant amount of it to scale. We therefore want a reducing atmosphere: one in which there is a substantial concentration of Carbon Monoxide (CO). The CO "wants" to react with Oxygen to form Carbon Dioxide (CO2). It wants to do this so much that it will tend to remove the Oxygen atoms from Iron Oxide, reducing the Iron Oxide to Iron. It is generally true to say that we want to increase the level of CO in the forge to maximize the amount of steel retained. Against this, we need to achieve the forge temperature needed for the job in hand. The forge temperature depends on many things. Most of them are fixed during the design and construction of the forge and so are outside our control once we are actually using the forge. The 2 remaining factors are the flame temperature at which the gas burns and the amount of gas/air mixture being fed to the forge. The maximum flame temperature occurs near to the stoichiometric air:fuel ratio. This is the mixture at which all of the fuel gas burns with all of the Oxygen from the air, leaving no unburned fuel and no unburned Oxygen. in a (purely theoretical) perfectly insulated forge, this would give a flame temperature of around 1980 degC, 3596 degF. If we change the mixture, the flame temperature reduces. It does this either side of the stoichiometric ratio, with the flame temperature reducing as we get further from the stoichiometric ratio. We don't want to worry ourselves unduly over the temperature reduction on the "lean" side (fuel-lean: combustion with excess air) because this would give an Oxidizing atmosphere with the problems that entails and we're not going there. Instead, we want a "rich" mixture (fuel rich: combustion with excess fuel) to retain as much as possible of the workpiece. Unfortunately combustion Chemistry is quite a lot more complex than we'd like and there is not a simple point, just slightly richer than stoichiometric, at which the forge atmosphere stops attacking our steel. Instead, there is a sliding scale over which scaling becomes less pronounced AND over which the flame temperature reduces. We therefore need to find the sweet-spot where the flame temperature is high enough to get the job done, but the atmosphere is also sufficiently reducing to keep the workpiece sufficiently scale-free to get the job done. The sweet-spot can be quite wide and there are lots of other variables that will impact on this. They include the material being worked, the skill and speed of the smith, the nature of the task and many more. We also have control over the amount of gas/air mixture being burned. In Naturally-Aspirated burners, this is varied by adjusting the gas feed pressure, since the air:fuel ratio of a given burner is pretty much constant over a fairly wide range of gas pressures. We cannot get the forge temperature to exceed the theoretical flame temperature for the mixture, however much gas we put in, but at high gas flows, the forge temperature will get closer to the theoretical flame temperature than it will at low flows. If we have a Naturally-Aspirated burner with a choke, the choke provides a means of varying the air:fuel ratio on-the-fly. In most cases, choked burners are initially tuned with the choke fully open and they are treated just like unchoked N.A. burners during the tuning process. In broad terms, the gas jet is adjusted to get the richest mixture that provides a high enough temperature for the hottest task intended. The adjustment may be changing the jet diameter, changing the axial position of the jet, or a combination of the two. Once the hot setting has been established, running at lower temperature can be achieved by reducing the gas pressure. On choked burners, there is also the facility to richen the mixture by closing the choke to get a lower temperature in conjunction with a more reducing atmosphere. For many (most?) smiths, an unchoked NA burner seems to be quite sufficient. When tuned for welding temperature at high pressure, the pressure adjustment alone seems to allow forging temperatures to be achieved simply by reducing pressure. For knifemaking, the added complication of decarburization of the steel (Carbon Dioxide reacting with the Carbon from the steel at its surface to produce Carbon Monoxide) can make a choked burner sufficiently advantageous to justify the additional complexity. A very finely-adjustable choke can even allow operation with a flame temperature down in the Heat-Treating temperature range. This allows relatively long soak times and therefore allows steels like O1 and 52100 to be treated to more-or-less their full potential without an electric HT oven. Personally, I'd see what your current setup will do first. If you then find you need to go hotter, try a smaller jet. A smaller jet will get you closer to the maximum flame temperature. However, it will mean that there is less gas being burned. Whether or not it will get you a higher forge temperature will depend on whether it is the flame temperature or the heat input that is restricting your temperature at present. Looking at the amount of DB your forge has, my guess would be that the flame temperature is what is limiting the temperature, in which case a smaller jet should get things hotter. Note that some of the CO burns to CO2 in the DB, but not all of it. Adjusting the jet size/position to reduce gas consumption and CO production is certainly not a bad thing, but you cannot realistically expect to reach zero CO release and will always need to take safety precautions. Against the benefits of reducing gas consumption and CO production must be weighed the potential costs of running a less reducing forge atmosphere. This may well include increased time and materials for cleaning up more heavily-scaled work. Halving your gas costs in exchange for a doubling of clean-up costs might not be a bargain. Most apparently simple things turn out to be quite complex once you start to understand them.
-
It depends a lot on what the black coating is, and where. That may depend on where it came from. If it's just an enamel-type paint on the outside, it'll be fine. If it's an epoxy-tar internal (or internal/external) coating, and you have the means to remove it, I'd be inclined to do so. With 2 layers of 1", 8 lb/cu ft blanket inside and a homebrewed porcelain clay/Zircopax coating, I've not had a problem with leaving the original paint on compressor tanks, though the stick-on logos tend to get smelly and shrivel up. Compressor tanks are not treated inside, so I reasoned that I could just hit the outside with a flapdisk if the paint caused a problem down the line. Getting rid of an internal coating after the forge is built is a whole different ballgame.
-
Presumably Total Acid Number? I'm not aware of it being a major consideration for quenching oils. It's something I've tended to associate with engine oils used with Sulfur- and Halogen- containing fuels.
-
Given that the .023" Mig tip is the smallest available, the burn does look pretty rich (reducing). What it looks like out of a forge is fairly meaningless: there are plenty of rich-running burners doing precisely what they need to do (I don't recall this being specified in the video). With the caveat that digital cameras can really mess with color, that looks like a perfectly adequate forging temperature to me. The video on the other thread looks like a good forging temperature, but probably not a good welding temperature {though I could be wrong). If the forge does what it is intended to do, no changes are needed. There is a lot of Dragons Breath in the video, so if needed there should be scope for increasing the flame temperature with more air relative to the gas. A smaller gas jet would increase air, relative to gas, but is effectively ruled out by smaller mig tips being unavailable. The burner looks very much like a Frosty Tee with some, probably unhelpful, changes. It's not clear why the changes have been made: The build seems to require all the same tools as the Frosty Tee, but with the addition of a welder. It does not seem to offer improved performance in its current form. My guess would be that the hex end cap offers some obstruction to airflow, and that the depth of the hex end cap also causes the gas jet to be further into the throat than is optimum for air induction. If the burner will not achieve the required temperature as it is, there is some scope for trimming back the mig tip to try to increase induction. If this does not get it there, it seems likely that the hex cap will need to be re-welded with a reduced insertion depth to reduce the obstruction to airflow. Between about 12.35 and 12.50, the video tells us not to use Galvanized pipe because welding it is bad for ones health. This is a couple of seconds after welding on a PTFE tape-sealed joint. Scary. I'd suggest the video poster (Ezra?) do a little research into the thermal decomposition products of PTFE and their health effects, then post an appropriate warning with the Youtube video.
-
The Nalco 1144 data sheets give an SG of 1.29 and a 15 nm particle size. The concentration is higher than the commercial rigidizers that I have used, which had an SG of about 1.1, so you should have no problem diluting it with water to a similar concentration to the ones I've used. They've soaked in very well and have stiffened the blanket to the full penetration depth on drying. Full rigidizing requires heat and I've not yet felt the overpowering urge to disassemble a working forge to find out how deep the rigidizing has gone, though I'm pretty sure it won't have got hot enough to harden beyond an inch or so. Something to be aware of for those making their own rigidizer from "fumed silica" and water is that the particle size is very important for getting high-concentration suspensions. From reading as much as I can find online, about 15 nm seems to allow the highest concentration. Before I started researching it, I'd already tried Cab-O-Sil M5 fumed Silica and just could not get the SG of a clear suspension above about 1.03, even with the addition of Caustic Soda and every readily-available surfactant I could find. Mixing immediately before application to get a cloudy liquid with higher SG left most of the extra solids as a snowy surface layer that didn't help at all when it came to applying a hard-face coating on top. Multiple applications of the clear M5 suspension seemed to give similar results to a single application of the commercial stuff, but the drying time between each application was excessive. It might be ok for those in warmer, drier climes though. Here in North-West England, it's not something I'd recommend.
-
Flashback arresters are usually used in Acetylene lines because Acetylene can undergo explosive decomposition in the absence of Oxygen. Propane cannot, so flashback arresters are not needed. Flame arresters (a different thing) are usually used in lines that may carry a fuel/air mixture and are intended to stop a flame travelling along the line. This is usually because there is deliberate fuel/air mixing or because there is an identified fault condition that could cause a fuel/air mixture to be present. In many cases, it is because the line may sometimes be under suction. For a Propane-fuelled Naturally-Aspirated burner, there is not usually a mechanism by which the fuel line could be filled with a fuel/air mixture, so a flame arrester is unnecessary. Some blown burner designs may have failure modes that would allow a flammable mixture to fill a line: for example, if the blower fails. It is usually much cheaper and easier to design the fault mode out than it is to fit a flame arrester. A solenoid valve in the gas line that is powered open only when the blower is running, for example.
-
Rolling Mill Motor and gear reduction
timgunn1962 replied to ThomasPowers's topic in Machinery General Discussions
For speed reduction (i.e. any frequency below the rated frequency of the motor: 60 Hz or 50 Hz, depending on location), the motor gives constant torque. For increased speeds (above rated frequency), the motor runs at constant power. This means that there is no problem if the motor sizing is based on the torque requirement, but may be a problem if it is based on the power requirement. In Jspool's example, the VFD speed reduction to 22/29ths of the rated speed will maintain full Torque, but provide "only" 22/29ths of the rated power. -
Have you tried it in a forge yet? If it is going to work in open air, then trying to tune it in open air makes perfect sense. However, if it is going to be used in a forge, tuning it in a forge is the sensible course of action. The forge massively changes the conditions at the tip. With a forge full of flame, there is flame drawn to the edge of the burner nozzle and this keeps the main flame attached. Which thread was bad and leaking in the first one? If it was leaking gas that got drawn in to the burner, the extra (leaked) gas will have changed the mixture ratio. Might this explain why things were different once you stopped the leak?
-
I don't think I've denied that a photo is important or useful, particularly when trying to understand why a burner is not doing what it is intended to do. If you can show me a thread where I have done so, I'll gladly post a retraction. The point I am trying to make is that a video is basically just a large number of photos in rapid succession and that he has posted quite a lot of video showing these burners in use, achieving temperatures that pretty much any smith I know would consider adequately hot. To date, I have not seen any evidence to suggest that any conventional forge, however good, can provide a working temperature in excess of the flame temperature provided by the burner itself.* It therefore seems to me that achieving welding temperatures absolutely requires a "hot burning" burner. Yet it seems they are indeed hot-burning. It's fairly hard work going through his youtube videos, but it may prove instructive. Hint: I found that judicious use of the mute button helps, as does skipping through as much as possible of the face-to-camera stuff (old age and intolerance comes to us all). He does make the point (in a video where he builds a forge) that he had used the Gameco burners when he was in Australia and was so impressed by them that he brought them into the UK. Corinkayaker's youtube videos probably have a rather better signal-to-noise ratio when it comes to showing the capabilities of the Gameco burners, though I've not found one that shows the burner being used for welding. His "Heat Treating Blades at Home Accurately Aiming for Minimal Scale and Decarburization" video was about the only thing I could find online that demonstrated the relationship between mixture and temperature, back when I started building forges using very similar "Amal" mixers (I'd mistakenly thought all smiths would already know this stuff). The thing that really impressed me was the precision with which temperature can be controlled with a threaded choke adjuster. I'm not 100% certain, but I think the commercially-made burners with a classical Venturi (reduction, very short throat, 1-in-12 increasing taper) provide a much greater air pressure reduction at the throat than the fixed-diameter tube designs, allowing much smaller air intake areas. They certainly look different to any of the shop-built designs, all of which seem to be variations of the long-throat, fixed-diameter-tube design. * Caveat: The Sandia recuperative forges are the only forges that I am aware of that might be considered to do this. I'd not consider these "conventional" and I very much doubt that the burners used in them would be considered mediocre.
-
I'm struggling to understand your point, Mikey. The guy may not be your preferred youtube viewing. He is not mine either. Being irritating is not the same as being wrong (or, as you seem to be implying, dishonest). Why would he want to back up his claims with pictures? He seems to have a reasonably successful business posting youtube videos and there is quite a lot of that video showing him working with those burners, achieving welds which most of us would be entirely happy with. On that basis, he does seem to be backing up his claims. If you are seeing burners that you consider "unlikely to be hot burning", despite the considerable evidence to the contrary, it may be time to re-evaluate what you "know" about burners.
-
Many of the mini-migs take an M5-threaded tip (14K) and these are widely available. M5 is also a standard thread for pneumatic fittings. I used a 1/8" BSP to M5 hex reducing bush to fit these mig tips into Amal atmospheric injectors when I was experimenting with jet sizing a few years ago. I never came across a fitting that would make it easy to build a T-burner though. I wasn't specifically looking, but I'm pretty sure I'd have bought a handful if I'd seen anything. The MB360 MIG torches use an M8-threaded tip, available in 0.6mm (which surprised me), 0.8mm and 1.0mm There are also bigger sizes (1.2mm and 1.6mm, maybe others), but they are bigger than "we" are likely to use. There won't be enough meat in the 1/8" nipple to tap out to M8 (tapping drill size for 1/8" BSP is only 8.8mm), but you'd probably be able to find a 1/4" BSP fitting with enough wall thickness to tap M8.
-
Vanturi burner blowing out with to much air?
timgunn1962 replied to Jakob Bull's topic in Gas Forges
It's not really what I had in mind as a flame retention cup. I'm not entirely sure what the "flare" actually does in most of the burner designs I see out there. In the "classic" Venturi design, there is a reduction to a very short "throat", followed by a 1-in-12 tapered diffuser. As I understand it, this diffuser is intended to slow down the fluid flowing through the Venturi while the flow is still primarily laminar. In the designs where the "throat" is extended to become the full length of the burner tube, the laminar-to-turbulent transition occurs within the extended throat and there does not seem to be a mechanism by which the 1-in-12 taper can work as an effective diffuser. That is not to say that it does not provide some benefit, just that I don't understand the mechanism. When a burner discharges into a forge, the relatively fast-moving mixture causes a slight pressure reduction in the forge atmosphere immediately adjacent to the exiting mixture. This draws the surrounding atmosphere in, just like the fast-moving gas exiting the gas jet draws in air at the Venturi, albeit to a lesser extent because the mixture speed at the burner tip is much lower than the gas speed at the jet. Because the forge atmosphere is effectively all flame, this means that flame is being drawn to the emerging mixture and this stabilizes the flame on the burner nozzle. It makes a huge difference to flame stability and is why it is pretty pointless trying to tune a forge burner in open air. A flame retention cup is usually a sizeable step-change in diameter (typically to twice the diameter, 4 times the area) and, as I understand it, works rather like a miniature forge, setting up a toroidal (donut-shaped) ciculating flame on the step of the retention cup and stabilizing the flame. When a flame retention cup seems appropriate, the flame design I tend to use is more-or-less as shown in the Amal atmospheric injector leaflet. http://amalcarb.co.uk/downloadfiles/amal/amal_gas_injectors.pdf Though I don't use a burner port nozzle as shown in the Amal drawing and I tend to weld something up from whatever is to hand. For a 1/2" burner, I'll slip a 1" length of 3/4" pipe over the end and then slip a 2 1/2" length of 1" pipe over that to get a 1" id retention cup about 1 1/2" long. I've not found the dimensions to be critical, but I've always stuck to a cup of twice the burner ID. About the only time I use a retention cup in a forge is when I am aiming for very low temperatures for heat-treating (around 800 degC, 1572 degF or a little less). In this case, the flame is extremely rich and I want to give it all the help I can. For forging or welding temperatures, I don't use a cup. It's the only pic I have that shows the retention cup at all.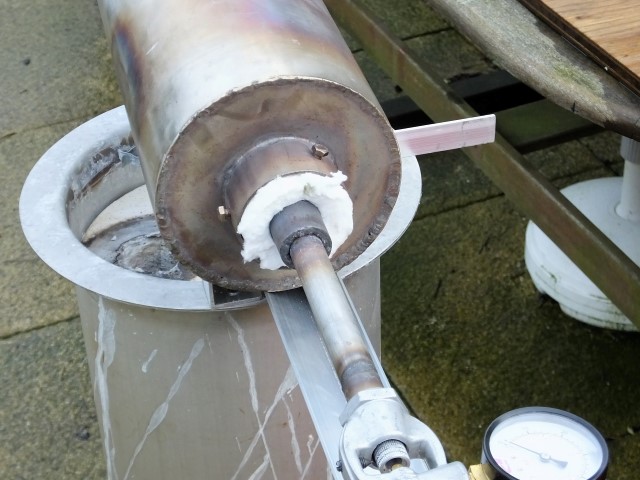
-
Vanturi burner blowing out with to much air?
timgunn1962 replied to Jakob Bull's topic in Gas Forges
I don't think there's a problem with that flame, unless you intend to use it as a torch. How does it fare in a forge? That's the only thing that matters with a forge burner. There are certainly things you can do to make a burner work "better" in open air (a flame retention cup, for example), but they tend to adversely affect performance in a forge. -
I think the correct spelling is Jay Hayes, for anyone else googling it.
-
To be fair, Mike, "solved that problem" is over-egging it a bit. I get the strong impression that most beginning smiths want to build the ultimate forge straight off, thinking that it'll allow them to do everything immediately. The reality is, of course, rather different. I'm in the UK where we don't have the Wayne Coes of this world selling small quantities of high-performance refractories at prices most hobbyists can justify to themselves or their significant other. If I want 1400 degC/2600 degF blanket, I have to buy a full roll. If I want Kast-O-Lite 30LI, I have to buy a 55 lb bag. The "cheap fire cement and a double wrap of blanket" approach is just the cheapest, easiest way I have been able to come up with that allows a beginner to get started with forging over here. It approaches the cheapness of the truly abysmal sand-and-plaster-of-Paris constructions seen on youtube, whilst actually working quite effectively (given an appropriate burner) and lasting beyond the second or third use (given reasonable care). Body-Soluble fibre blanket is available by the metre from ebay dot co dot uk and fire cement is available at every DIY store. I've played about with forges a bit and built versions that range from distinctly meh to pretty good (at specific things), though they have all been aimed primarily at various aspects of knifemaking. I've played with various other things too, including home-brew rigidizers using both fumed-Silica-in-water and Sodium Silicate solutions. I've tried porcelain clay-and-Zirconium Silicate surface coatings, IFB forges, modified-torch burners, a couple of homebuilt burner "designs", burners built around commercial Venturi mixers and electric Heat-Treat ovens. Results have been mixed, but interesting. I'm not good at write-ups and the few I have done have disappeared along with the British Blades forum. If I can dig out some of my notes and pictures, I'll try to get some of the more useful stuff on here over the next few weeks.
-
The sputtering is usually* caused by the flame speed through the mixture becoming faster than the flame speed along the burner tube. It is usually a sign that you need more gas pressure. The flame speed is a function of several things: the air:fuel ratio, the temperature and the pressure are the 3 main ones. With the burner design you have, the tuning is what determines the air:fuel ratio and you have no real way to adjust that once the burner is running. The pressure that affects the flame speed is the pressure of the mixture, not the feed pressure of the gas. It is not really something you have very much control over, as it'll be within one or two percent of atmospheric pressure whilst the forge is running normally. The temperature is the big variable. As the forge heats up, the temperature increase causes the flame speed to increase. At some point, the flame speed through the mixture may become faster than the mixture speed along the burner tube and the flame will travel down the tube. As the flame-front moves down the tube, it radiates heat ahead of it, heating the mixture ahead of the flamefront and increasing the flame speed. The accelerating flamefront causes a pressure wave, which moves ahead of the flamefront. The mixture just ahead of the flamefront is now hot and at higher pressure, so the flamefront accelerates down your burner tube until it runs out of mixture to burn and goes out. At this point the burner tube is full of burnt gases. Some of the heat released as the flame ran down the tube will have been absorbed by the burner tube, so it is now a little warmer. The gas is still being fed, still drawing in air, mixing with it and moving along the burner tube. When the mixture reaches the hot forge, it ignites and the whole thing happens again. It may be quicker this time because the burner tube is hotter. If the operator reacts quickly enough to turn up the gas feed pressure and thereby increase the mixture speed in the tube, the problem will usually go away. If the operator does not turn up the pressure before the burner tube has got hot enough to stabilize the flame at the inlet end of the burner tube, it's a case of shut down, let things cool and try again, preferably at higher gas pressure. Do you know what gas pressure you were running at the time? What is the range of your regulator? The mixture speed is proportional to the speed of the gas through the jet. The gas speed through the jet is proportional to the square root of the gas pressure, up to "around" 30 PSI where the flow becomes choked (it reaches the local speed of sound). Above the choked pressure, increasing pressure still increases the gas flow, it just doesn't follow the same relationship. If you have an idea of your gas pressure when the problem occurred, try again at higher pressure. I'd aim to double the pressure (which will give about 41% higher mixture speed) and if it works, maybe reduce the pressure in small steps with the forge at temperature until the problem starts to manifest itself again. That way you can establish the minimum running pressure for the hot forge. You are quite likely to find it difficult to light a cold forge at high pressure. If so, light it at lower pressure and increase the pressure as the forge heats up. * "Usually" is used here, essentially as a weasel word, to cover the possibility of your having done something really outlandish that I've not previously encountered.
-
Refractory coatings are not particularly easy to give good advice on, at least over here. I gather Kast-O-Lite 30 is very highly thought of, but it's not very easy to get hold of here, particularly in small quantities. The same tends to be true of Mizzou and most other hard castable refractories. The blanket is relatively easy to get in "our" quantities, though it's become difficult to find anything less than a full roll of the 1400 degC (2600 degF) stuff since the body-soluble fibre started to become popular. The body-soluble stuff is only rated to 1200 degC as a rule. My advice is to accept that you are not going to build a forge-for-life anytime soon. You'll need a fair bit of actual forging under your belt before you are in a position to decide exactly what sort of work you are going to need to build it for. From the OP, it doesn't sound like you'll need welding temperatures for a while yet ("does this seem adequate to heat and shape metal with?") I'd buy some extra blanket: enough for a couple of reline jobs on the forge you have. You'll want 25mm thick, 128 kg/m3 (1" thick, 8 lb/cu.ft). The body-soluble stuff can be found by the metre on ebay. I'd then go to the nearest Screwfix, Toolstation, B&Q, etc and buy 2 or 3 x 2 kg kg tubs of cheap fire cement. If you can find some that look like they've been on the shelf since Noah made landfall, get those and don't move them more than you need to. While you are there, get one of those long-handled, angle-head, cheap, nook-and-cranny paintbrushes. You'll need some containers to mix stuff in. I tend to use 1L yoghurt containers. Whatever you use needs to be sealable, disposable and you'll want a few of them. If you can find a really fine seive, it's useful too. You'll also need some stirring sticks, and something to apply a coating of fire cement with. I tend to use bits of 1" x 1/8" steel flat bar because it's what I have. Take that bit of hard fire brick out of the forge and put it to one side. I’m not sure what the spec is on the blanket Devil Forge use. If it’s better than the blanket you’ve bought, take it out and save it for a reline when you are likely to need welding temperatures. Whatever you get should be fine to forging temperatures.. I usually cut blanket with a knife on a sacrificial wooden board to minimize fibre release. I usually scarf the ends at 45 degrees where they join, though I’m not sure it really helps. I usually cut the burner hole through the blanket with a holesaw, turning fast and feeding slowly, outdoors and upwind of any fibre release. Open a tub (container 1) of the fire cement carefully. If you are lucky, there will be a layer of viscous liquid on top that has separated out while it has been on the shelf. Decant this into another container (container 2) and save it for later. Take about 1/3rd of the remaining contents of the tub (container 1) and transfer it to another container (container 3). Add tapwater, mixing to get a an even consistency until you have about 1/2-3/4 litre (1-1 1/2 US pints) of milky liquid. Let it settle for perhaps 30 seconds so the bigger (sand-sized) solids settle out. Decant off the milky liquid (through the sieve, if you have one) and add it to the viscous liquid in container 2 that you decanted off earlier. Keep mixing so it doesn’t settle out while you slosh it onto the blanket in the forge with your angled brush. You'll need to rotate the forge as you do so. The idea is to get the fine clay-like stuff and the resin-like binder soaked into the blanket to work as a rigidizer. Don't skimp; you want the blanket properly wet to a depth of 1/4-3/8" (6-10mm), but retain some for later if you can. Some of the solids will almost certainly stay on the surface. Return the sandy solids and any remaining milky liquid from container 3 to the reamaining 2/3rds of the fire cement in container 1 and mix. Add tapwater if needed until you have a spreadable consistency. Spread this onto the blanket to get as even a coating as you can manage. Aim for about 3-5mm (1/8” - 3/16”). Thicker is not a problem, but try to save some for later. Do not coat the end faces: you’ll need a route out for the water vapour. Put the lids on the 2 containers with stuff still in them and put the forge somewhere to dry. Where you put it will obviously depend on what’s available. I suspect an oven set on really low would be ideal: like you’d use for making jerky. I tend to leave things in my unheated shop and it takes weeks to dry there. I doubt Derbyshire is very much better than Lancashire in this regard, so indoors is obviously better. It’s a case of doing the best you can without causing undue domestic disharmony. You don’t want to get it hot enough to flash off steam in the fire cement, so a hairdryer is ok to help move things along, but a hot-air paint stripper probably isn’t. Once it seems pretty dry, you can set about reducing the openings. A 1” wide strip of 1” blanket, soaked in the runny stuff and coated with the thick stuff can be put inside the ends. You can also peel the blanket apart to get a further 1/2” layer if the type of work you intend to do will let you use a smaller opening. Don’t go smaller than your nook-and-cranny brush head, as there’s a good chance you’ll need to patch up the fire cement at some point. Most of the stuff you’ll see online talks about numbers of burners for forge volume. My experience suggests that the size of the openings has more effect on the amount of burner needed than the volume. Use the smallest openings you are sure will be big enough for your immediate needs. Put the forge back to dry. The reason for not reducing the openings earlier was that the reduced openings reduce the airflow through the forge and slow the drying. Once the interior seems dry, you can fire it up at the minimum pressure and choke opening it’ll run at for brief periods. The heat robbed by the drying liner and the water vapour produced will mean that you’ll need more pressure/choke opening than for a dry forge. You can increase the duration of the on periods as things progressively dry. You don’t want to flash off steam in the fire cement. It causes bubbles to form which dry quickly and break off, thinning the layer.. As the lining dries from the hot face, it’ll get to the stage where there’s no danger of damaging the lining and the water still in the blanket will be driven out through the unsealed faces. While the blanket is drying, you can turn up the burner pressure and open the choke until you have the temperature you’ll need for normal work. Don’t be tempted to give it the beans just to see what it’ll do. Make yourself a work support to go in front of the forge. The lining will last much better if it doesn’t have to take the weight of the workpiece. If you are doing stuff that doesn’t need a rear opening, it can be temporarily closed up with a piece of untreated blanket. Put your spare materials somewhere safe so that you can reline as and when necessary. Keep the blanket in a sealed bag. Separate marked, sealed bags if you saved the original blanket. This procedure and these materials will not give you a particularly good forge. What it will do is give you a forge that works well enough and lasts long enough for you to develop the skills and knowledge to decide what your next forge needs to be like. It is cheap/easy enough to reline that fear of damaging it to be unlikely to limit your activities.