

Goods
-
Posts
1,148 -
Joined
-
Last visited
Content Type
Profiles
Forums
Articles
Gallery
Downloads
Events
Everything posted by Goods
-

Next steps for my first axe
Goods replied to Will Brouwers's topic in Axes, Hatchets, Hawks, Choppers, etc
It took me a while to find any notes from making hatchets, but the way this is laid out is my typical approach to forging something I need to think through. Note: this doesn’t include any of the tweaking that needs done just to keep everything in alignment and clean. It’s just the major steps I tried to follow to get where I wanted to go… This plan was written with using my power hammer, and I’ve made several hatchet specific tools over the past couple years. At this point, I need to remake some of the tooling… I hope this proves useful. Keep it fun, David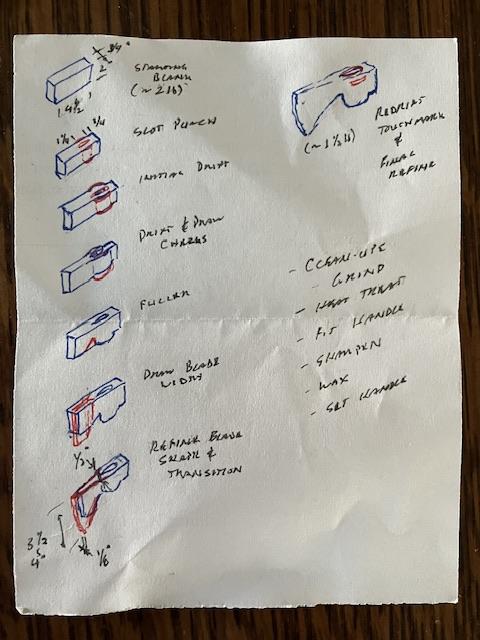
-
If you are wanting to make hammers from this stock, it is not very difficult to forge weld high carbon steel to the face… I’ve got some 2” round stock that I’ve been considering do that with. Keep it fun, David
-
Next steps for my first axe
Goods replied to Will Brouwers's topic in Axes, Hatchets, Hawks, Choppers, etc
Unfortunately, if you going for a typical elongated teardrop eye (especially with the cheeks drawn down into “lugs”) I don’t think there is a reliable way to forge that shape without a drift. They are not hard to make, but I broke down and ordered a new set (hand held & progressive segment set) from Holland Anvil. My 4140 drift didn’t hold up well to the power hammer drawing the lugs… I’m expecting the H13 will hold up considerably longer. I’ve got several blanks forged out, but haven’t had a chance to work on them yet. If I can find my notes from when I was planning my last hatchets, I’ll take a picture and post it here. (Most of the time I will plan my forging steps out on a quartered piece of paper in detail, then refer to those notes when forging. This provides me with target dimensions and keeps me from jumping ahead, but I generally use the notes as a guide, not a rule.) Keep it fun, David -
Next steps for my first axe
Goods replied to Will Brouwers's topic in Axes, Hatchets, Hawks, Choppers, etc
Will, do you have a good hatchet/axe drift. Drifting and drawing the cheeks is basically where I would go next. (I don’t start on the blade until after I’ve done at least the initial drifting.) The punched holes don’t look too big to me, but you may have a hard time straightening the one on the right. For the transition from the eye to the blade, just draw it down to where you want it and if the blade gets too long, just cut it back. Just my thoughts… Keep it fun, David -
To me it looked like the AI lost track of you when you moved to fast across and out of it’s field of view. I did like the effect/feel of the video while it was performing well. Also, the audio at the end (~5min) got pretty low and seemed to stop completely. I’m always impressed how you produce such clean forgings so quickly. Even breaking down/drawing out that 1-1/4” 4140 without even having to dress back any fish mouthing. Could really be miss leading to a new blacksmith, but I know how much work and skill that takes! Keep it fun, David
-
Generally, the three reasons for twisting when going from a square cross section to octagon are: 1) the work piece is not perfect vertical on the corners. 2) not hitting the work piece with the hammer face parallel to to anvil. 3) not hitting with the face of your hammer centered on the stock. (Not as big of an issue as the two above.) These errors will cause the stock to twist as you work the corners in. Just be aware of them and practice. As soon as you notice a twist starting, put it in the vise a straighten it. Things go wrong and correcting issues early will save many forgings. Keep it fun, David
-
JLP Blacksmith Teaching Center.
Goods replied to jlpservicesinc's topic in Building, Designing a Shop
Too bad in pretty far away to make it to justify a trip to an equipment sale… I’ve been watch this build and can’t wait for you to reach the finish line. I imagine it’s exciting! Keep it fun, David -
What did you do in the shop today?
Goods replied to Mark Ling's topic in Blacksmithing, General Discussion
My mother was very involved in the women’s group a church and did many different types of crafting for there fairs when I was a child. (I have fond memories of working on different crafts with them…) I can remember her putting cookie sheets full of marbles into the oven to get this same effect for various projects. (I don’t remember any ever breaking though.) I imagine the effect was caused just from the heat. I’ll have to talk to her about the actual process. Keep it fun. -
An interesting industrial drill press
Goods replied to JHCC's topic in Drills, Post drills, Mag drills, etc
I’ve looked at this multiple times (with envy), but didn’t notice the lube hose and nozzle until today… Keep it fun, David -
An interesting industrial drill press
Goods replied to JHCC's topic in Drills, Post drills, Mag drills, etc
I’d say you’re right Frosty. You can see the coolant output hose hang down around the column with the adjustable clamp stand for the nozzle (which is leaking coolant on the floor) lying on the edge base. I doubt it was designed to be used like this. It looks like heavy angle iron was welded to the top of the coolant tank with holes in the vertical leg. Hopefully, those bolts are clamping down on the table flange through more hole in the heavy angle. I would expect a drain hose to run to the coolant tank, that way the tank and pump are out of harms way with less “potential energy”. Keep it fun, David -
You could even place two holes from opposite sides of the bolt, starting at the taper, angled to the front center of the bolt. When to holes are aligned towards the ends of the forge, it may direct some of the FAM away from the doors to the center cool spot. Keep it fun, David
-
The first time I saw it, I saw a “minion” that took a hard left hook to the jaw. I can see the whale, but wouldn’t have seen it without your explanation. Keep it fun, David
-
Permenant magnet chuck for tacking and grinding
Goods replied to Daswulf's topic in Machinery General Discussions
We demag all the parts we surface grind with magnetic chucks. The parts always pick up some magnetism and that little bit of magnetism is really bad in stamping dies. I would be surprised if your parts don’t see at least a little, but I wouldn’t expect it to cause you any trouble. Keep it fun David -
Permenant magnet chuck for tacking and grinding
Goods replied to Daswulf's topic in Machinery General Discussions
Sheet metal will most likely block the magnetic field. I’d try a nonferrous material, but it would need to be as thin as possible. The strength of the magnetic field drops dramatically with distance. Anti-spatter spray may be the best option. Keep it fun, David -
Those coil spring tools should hold up just fine. I’ve made a couple small fullers just like that and they’ve been used pretty heavily with no issues. Keep it fun, David
-
What are your main concerns? Efficiency, just time and effort at the anvil, or pattern distortion? Works at the edge of the anvil or an aggressive crosspein, or even a spring swage would move material pretty quickly, but you may have issues distorting the layers. The distortion can be desirable but not always. Drawing on the horn working both sides evenly is probably the best way to avoid distortion, while maintaining some efficiency. You could also make a fairly large radius spring swage. Doing so may be more efficient than working on the horn, but you would still want to work from both sides equally. Keep it fun, David
-
What did you do in the shop today?
Goods replied to Mark Ling's topic in Blacksmithing, General Discussion
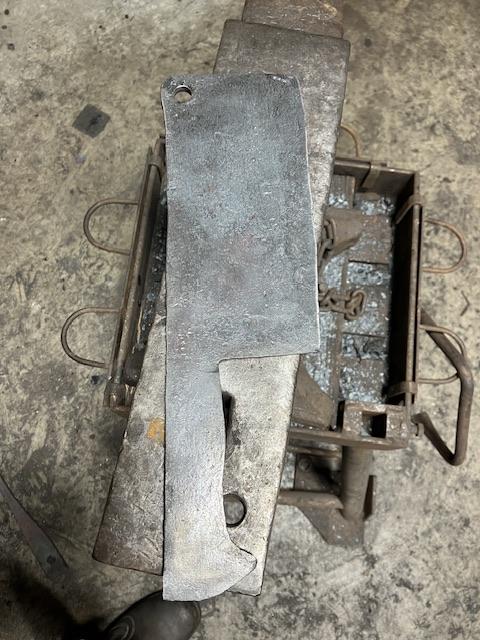
I had good luck in the forge today! I managed to get the 2nd Harley drive chain welded up: In the above picture it welded but not perfect. Drawn out to 1/2”x1”. Then I cut it into 6 pieces restacked it and went at it again. I drew that out to 3/8”x2”, then moved right to cleaning it up and stack it into a Gomai with the Sanmai I made previously. It welded up great and I should have stopped there, but went on to forging the cleaver. It didn’t come out to bad: It doesn’t have the shape I got in my test run, but I’ve got enough mass to get there with the grinder. (I’d be much happier if I got to the shape I wanted while forging…) Either way the weld looks really good and I’m pretty sure the 8670 is in the center of the edge. (I really should have stopped earlier though. 7hrs straight with no lunch, I’ll feel that tomorrow!) Keep it fun, David
-
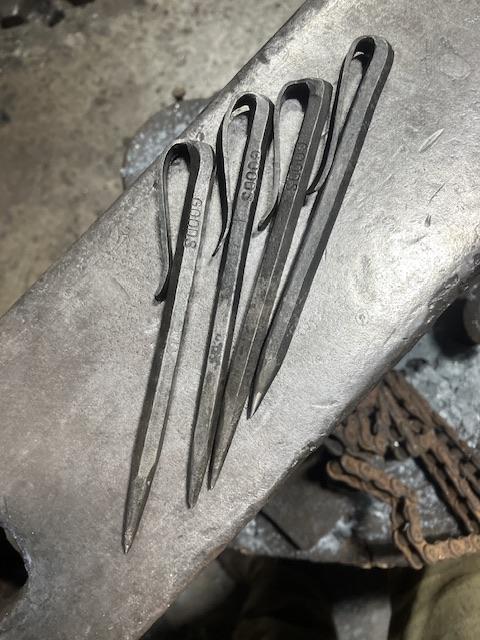
I made up a bunch of these scribes as giveaway items over the past couple years: The wire diameter of the spring was maybe 5/16” with the tip water quenched for max hardness. Just a couple coils straightened out went a long way… I’ve also welded bits into the cutting edge of chisels that were made out of larger diameter garage doors springs. Garage doors springs also make really strong S hooks. Basically, use it in place of mild steel whenever you want more strength, but a delicate look. Just remember to normalize (and not to quench the pig tale scrolls on the ends of a hook before bending like you would with mild steel). Keep it fun, David
-
As for me he exposed screw end, I would find that a fun project. I look for a heavy walled tube/pipe that is just large enough to fit over the end of the and forge a cover out of that. I can also see it in my head: neck the pipe down, cut it off, forge weld a collar one that end, forge the collar into a ball finial, then finally cut it off to length and braze it onto the nut. Of course, I tend to over do things… I can even see some details filed in… I’m come on it time at the anvil trying something new and developing more skills, that’s what it all about for most of us* right? (*Us meaning hobbyists blacksmith, not those of you who are professionals that need to be aware of profit levels. Greatest respect for those that can make a living at the anvil!) Keep it fun, David
-
What did you do in the shop today?
Goods replied to Mark Ling's topic in Blacksmithing, General Discussion
Arthur, I like those broaches. I’m going to have to make some at some point and you’re setting a good bar. John, you just keep getting better with that repousse. I like seeing your work! Tonight, I finished up a pair of tongs I started at IBA state hammer-in Saturday. I decided the reigns needed drawn out a bit more, so I ground the rivet off and cleaned them up a little more to my liking: Sized for 1/4” square. (I didn’t have any small stock tongs for my 12yr old to used while forging in the shop with me. I had to make that a priority!) Keep it fun, David
-
Bmoney3, don’t forget to normalize it first. Bring it up to non magnetic and let it air cool two or three times. At forging temperatures you get a lot of grain growth. The idea is to bring it just up to the temperature that new grains start to form and by doing this multiple times you end up with a very strong fine grain structure. Also even with an oven temper, you should draw the eye back more. Use a torch on the cheeks, or heat your drift in the forge and use the heat transfer from the drift to temper the eye more. Keep it fun, David
-
I’ve recently seen “white out” pens used for marks that are somewhat visible at forging temperature. I prefer a chisel mark or center punch mark… Keep it fun, David
-
Very good for a first hammer, especially with so little experience. The only thing I can see without closer inspection is the fuller marks on the cheeks, not a problem, just doesn’t fit with my personality. Have you heat treated it yet? If so what process did you follow? What’s the weight? Keep it fun, David
-
Asking for advice in selling my anvil
Goods replied to Tina wilder's topic in Anvils, Swage Blocks, and Mandrels
Some of the asking price out there are verging on predatory! At that type of price those anvils will sit for a long time or sell to someone with deep pockets who doesn’t know better. The highest quality new cast tool steel anvils, even with importing costs, are only priced at $14/pound. Less the 100yrs of age is not particularly significant for an anvil as will not justify that price. I personally would have difficulty asking for more that $8/pound for this anvil, but personally I would not sell it. (I would sell one of my others, after all it is top shelf quality) If only you were in my area, I would be very interested. Keep it fun, David -
Asking for advice in selling my anvil
Goods replied to Tina wilder's topic in Anvils, Swage Blocks, and Mandrels
Where are you located? General location is just fine. This is a top grade anvil in a good size and visually very good condition. If the ring and rebound it good, $600~800 would be a reasonable price point in my area (south central Indiana). (Those pictures may have Frosty drooling , he loves his Soderfors!) Keep it fun, David