

Goods
-
Posts
1,158 -
Joined
-
Last visited
Content Type
Profiles
Forums
Articles
Gallery
Downloads
Events
Everything posted by Goods
-

What did you do in the shop today?
Goods replied to Mark Ling's topic in Blacksmithing, General Discussion
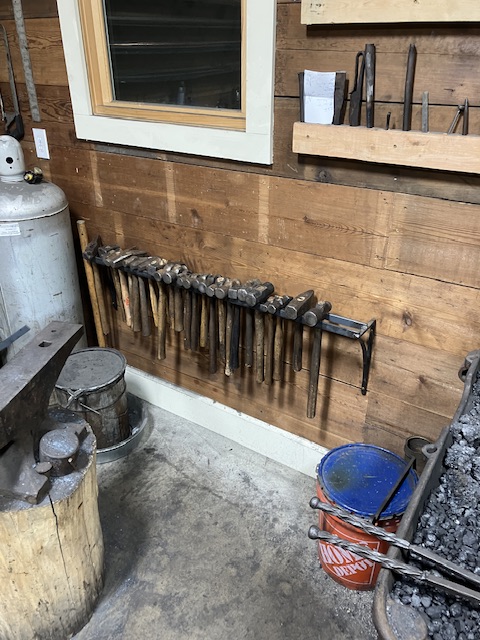
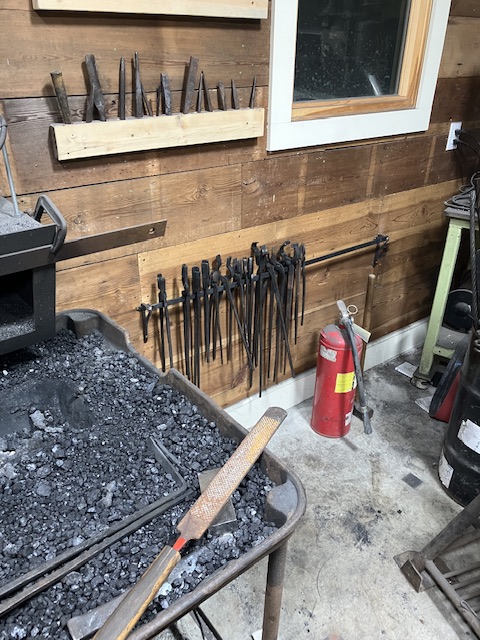
Thanks all. Gewoon, the rails were cut and notched to sit on top/between the brackets, then welded in place. The tong rack brackets are 3/8” square stock with 1/4” x 3/4” rail. The hammer rack brackets are 1/2” square stock with two rails of 3/8” x 1” spaced 2” apart. (I can get closer pictures if you want, but my welds aren’t really worth looking at.) Frosty, I have looped holders wedged in one the metal stand my Peter Wright anvil is on, but nothing setup for the wood stand that my Columbian anvil is on. I do most of my work on the Columbian and never developed a habit of using tool storage while forging. Often, my brush, tongs or hammer ends up 8ft away when changing operations. Then while re-heating I’m stumbling around try to find where I threw stuff. (I think some of the guys get quite a bit of entertainment just from that at our hammer-ins!) Stay warm, David -
What did you do in the shop today?
Goods replied to Mark Ling's topic in Blacksmithing, General Discussion
I got the hammer and tong racks finished up: I did realize I had almost as many ball peen hammers as tongs. Of course, tongs are on the ever growing list… Keep it fun, David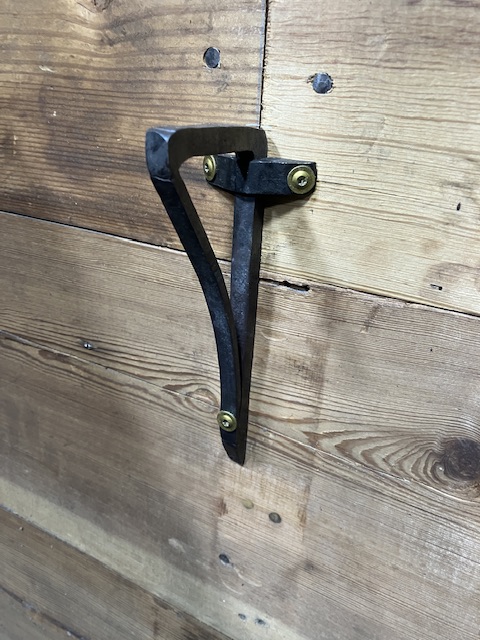
-
Any electricians in the house?
Goods replied to J.Gonzalez's topic in Power Hammers, Treadle Hammers, Olivers
Only 20K euros? The is a pole with three phase on it less the 50m from my shop, but I was quoted much higher for getting it into the building. Keep it fun, David -
What did you do in the shop today?
Goods replied to Mark Ling's topic in Blacksmithing, General Discussion
JHCC, I think your wife is going to be pretty happy with that. could bring myself to start the fabrication work, so I finished the next set of brackets: The larger set (12” tall out of 1/2”) are for a hammer rack to mount to the wall, set smaller set (6” tall out of 3/8”) is for tongs. (I really have to work on my upset corners!) I also realized I can’t get a mounting screw in the top section of the smaller brackets. So, I had to for a set of cross brackets to screw them tight with: Hopefully the angled faces will line up right to hit the studs. Now, I have no excuse but to do the fab work… Keep it fun, David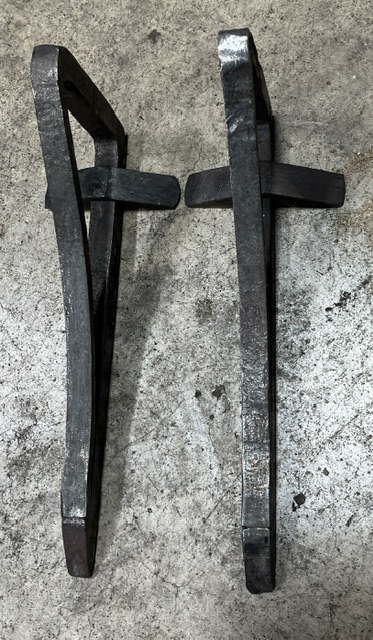
-
Copper water pipe strips in 2" steel cable non Japanese style
Goods replied to Pigsticker's topic in Metallurgy
With nickel it would probably be fine. There is a Bladesmith in our group who regularly forge welds billets of different steels with sheets of nickel mixed in. I’ve never asked him if there is any specific technique to it though. Keep it fun, David -
What did you do in the shop today?
Goods replied to Mark Ling's topic in Blacksmithing, General Discussion
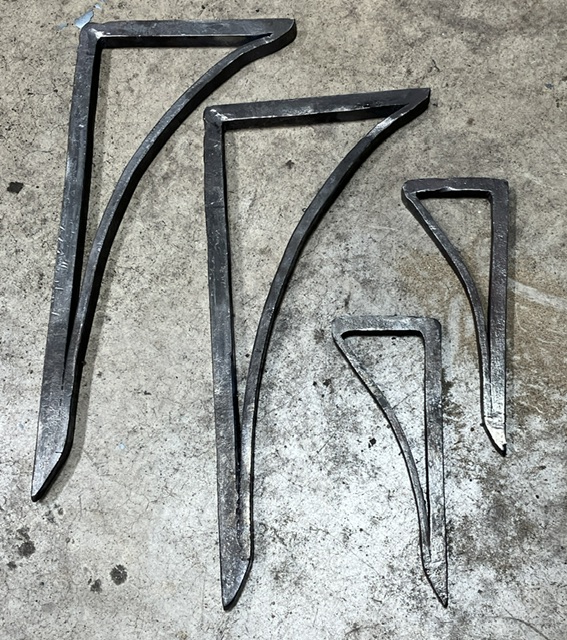
Got a couple more hours in the forge tonight and made two brackets as a start of a tong rack to go on the wall by the forge: Not quite as refined as I’d like, but there forged out, now the rest is fab work… Keep it fun, David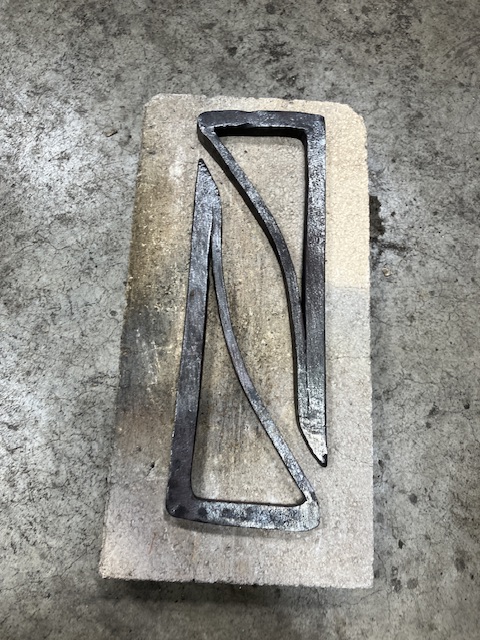
-
Copper water pipe strips in 2" steel cable non Japanese style
Goods replied to Pigsticker's topic in Metallurgy
If you try to weld up the cable with copper in it, the steel will not weld up. The cumai thing it real popular right now, but you have to weld the steel layers first. Otherwise the copper will melt before the steel it at weld temperature and stop it from welding. Best you could end up with is the strands braised together. (Pretty advanced stuff…) Keep it fun, David -
What did you do in the shop today?
Goods replied to Mark Ling's topic in Blacksmithing, General Discussion
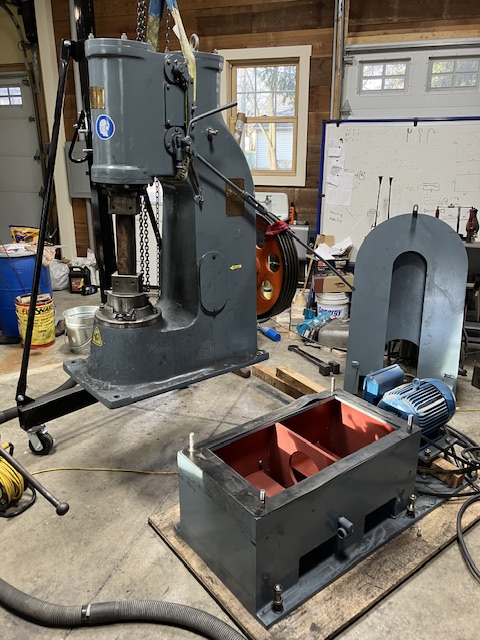
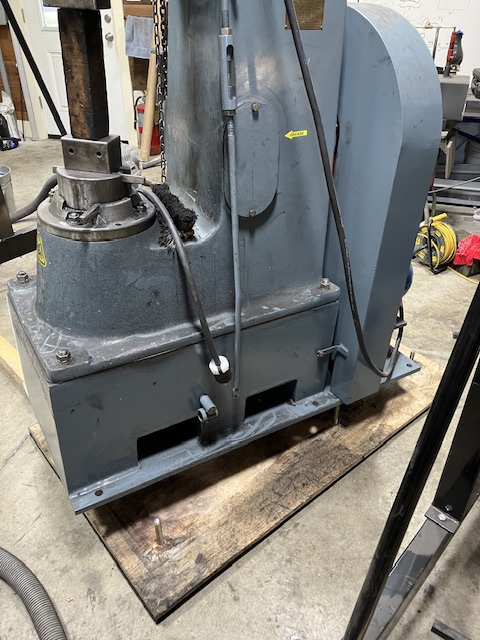
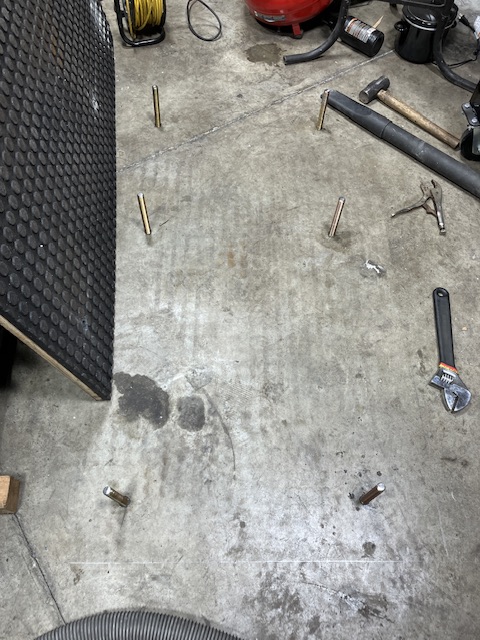
NoGood, no, the test piece is for a railing picket. On of the older smiths in the IBA is building a deck or porch and has handed out pieces of 1/2” square to the members of the IBA asking each blacksmith to make a picket and to put there touch mark on it. I find it to be a really cool thing and I want to do my best work for it, without over doing it. You can see the basic concept in the test piece. My plan is to make four petal florets to rivet to on both sides with a copper domed rivet and octagon the picket 2” in from the ends and 1” from the florets. Not sure if I’m going to twist it, but the main goal it to keep everything nice and crisp and with clean lines. Not sure how many test pieces I’m going to make, but this is going on the house of a smith I really respect, so it will take as many as it takes to get it right… I took a four day weekend and got my power hammer properly mounted.: Got the anchors in (and straightened). Hammer going in place. Disassembled from the base. Base filled with 400# of sand. (And rubber in the belt cover to deaden that as well, sorry not picture of that.) Hammer properly secured and ready for action. On the test run it was noticeable quieter (and it’s finally not bouncing around) but I think the rubber I put in the shroud was too dense. It still rings a bit with each hit. If I run it from the side with my hand on the shroud the ring is gone. I may try something else to help more, and I’m open to suggestions… Getting ready for the local group’s hammer in at my place in January. Still a lot to do! Keep it fun, David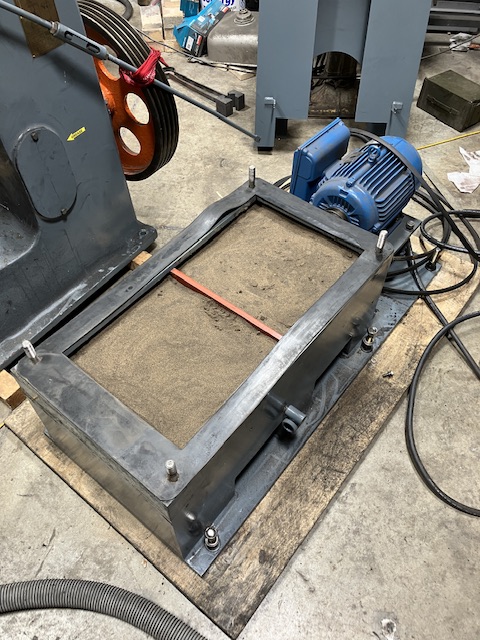

-
What did you do in the shop today?
Goods replied to Mark Ling's topic in Blacksmithing, General Discussion
Really nice work NoGood! I especially like the line of the plant hanger. Keep it fun, David -
What did you do in the shop today?
Goods replied to Mark Ling's topic in Blacksmithing, General Discussion
Started cleaning up the forge today. I also got the power hammer moved hole drilled in the plywood and rubber pad. Tomorrow I get the rent a big hammer drill and drill to holes for the anchors. Hopefully, by next weekend everything will be back in running condition. Keep it fun, David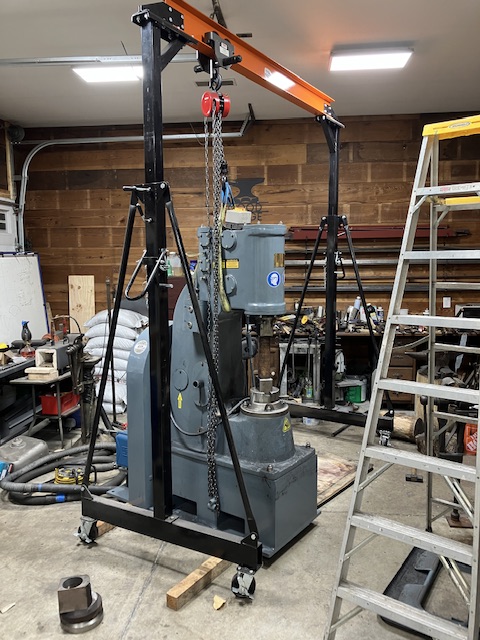
-
Steel burning looks like a traditional sparkler. Basically the carbon burning out of the steel. Then the rest just crumbles away.
-
What did you do in the shop today?
Goods replied to Mark Ling's topic in Blacksmithing, General Discussion
We had our hammer-in today, and I mostly just hung out with everyone. At the end of the day I worked on a test piece for a project: Not real symmetrical, but the pieces were just hammered out fast. I was worried about pulling off the weld and weld surviving the punching. Pretty happy with the results. Keep it fun, David
-
What did you do in the shop today?
Goods replied to Mark Ling's topic in Blacksmithing, General Discussion
Pat, the bookmarked I’ve made in the past (sorry no pictures of them available) were basically made like you would make a leaf. Just draw the stem out really long, flatten it perpendicular to the leaf (or other decoration) and bend it over 180degrees leaving about 1”~1-1/2” gap. That way the decoration is along the spine of the book with only one thickness of material inside the book. (I hope that’s understandable…) Keep it fun, David -
What did you do in the shop today?
Goods replied to Mark Ling's topic in Blacksmithing, General Discussion
DHarris, yes, my plan is/was to have it straight across the top of the hatchet and 3” blade width. It was right there when I cut in for the bit, and grew quite a bit when scarfing and welding. I’m hoping that the split at the top will get cut off when I do the shaping. I’m not sure about mig welding the depression, I usually end up with a lot of porosity when using my little flux core welder. I’m considering trying to forge weld a sliver of the same material over the depression, but I’m not use if I can pull that off and that is a lot of effort I can put into just starting over. I’ve got some more thinking to do before my next session. Keep it fun, David -
Vulcan anvils are cast iron with a high carbon steel face. If I understand correctly, the face is brought to forge welding temperature placed in the mold, mold is closed and the molten cast iron is pored into the mold. Keep it fun, David
-
What did you do in the shop today?
Goods replied to Mark Ling's topic in Blacksmithing, General Discussion
DHarris, I have a couple problems: After I split the end, I tried to draw out the edges so they would blend nicely. Unfortunately, the didn’t blend as nice as I would like. The two big issues are when drawing the scarf down, I tapered back up the hatchet too far. Do, there is a weird thins spot behind the bit. The other big issue came from the split basically getting cut at the base, which I didn’t notice till I was almost done blending in the weld. The bad thing is, I don’t think the weld is very good on the other side of that split. I don’t think mig welding everything up and grinding it back is a very good way to go… but that’s about the only way I can think of the make it work. I’m open to recovery ideas! Twisted, what’s the green tinge from? Christmas lights? Keep it fun, David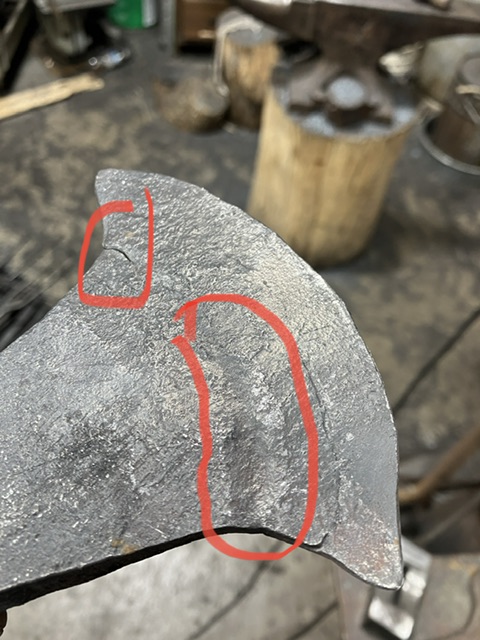
-
What did you do in the shop today?
Goods replied to Mark Ling's topic in Blacksmithing, General Discussion
I finally got to working on the hatchet today: It’s on it first round of normalizing, but I’m not real happy with it. It’s going to take a lot of clean up. I may decide to start over… Take it easy, David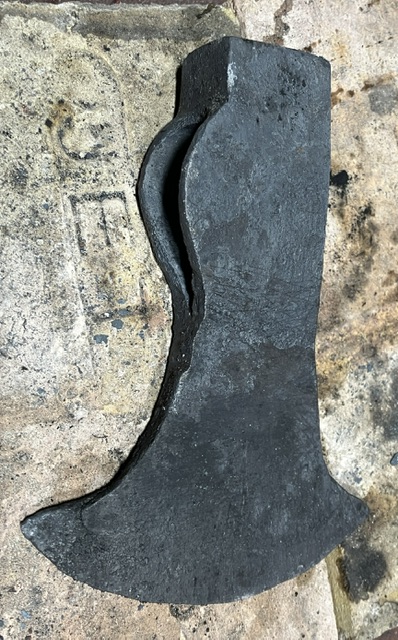
-
Roasting the turkey as I write this! Happy thanksgiving all! David
-
DHarris, for electronic blowers, you could check with a local heating and ventilation company. The combustion air blowers for furnaces work pretty well, and are often in perfect shape on furnaces that are removed for upgrades or replacement. That’s what I’m using and it works well with a cheap speed controller. You just have to get creative with your air connections. Keep it fun, David
-
Are you using a swage block to consolidate the cable? It makes a very big difference. Also, is the any chance that this is stainless steel wire rope? (I have some die lifting cable that were scraped at work, and they appear to be stainless steel, so have tried anything with them yet…) keep it fun, David
-
Reducing the holes on an Acciaio anvil
Goods replied to lary's topic in Repairing and Modification to Anvils
Sounds like you were careful. I’m quick to offer caution to others about welding on anvils. My Colombian had the edges welded up by the previous owner. It’s not really bad, but it’s not good either. In places it’s chipping away with some of the base material. in other areas it’s crumbling from what I expect is cold working. -
What did you do in the shop today?
Goods replied to Mark Ling's topic in Blacksmithing, General Discussion
Got a little more time in the shop tonight. Working larger stock again. I upset a 1-1/4 x 5” square bar down for use as a swage for drifting the eye on a hatchet. Then, realized my 2”diameter bar wasn’t quite big enough for the cheeks I’m looking for on the hatchet. So I ended up upsetting that down to 2-3/4” diameter: It worked out pretty good. I have some clean up to do on it and weld some bar stock to the bottom, so I can use it in the post vise. (Now if I could only find my touch mark…) Keep it fun, David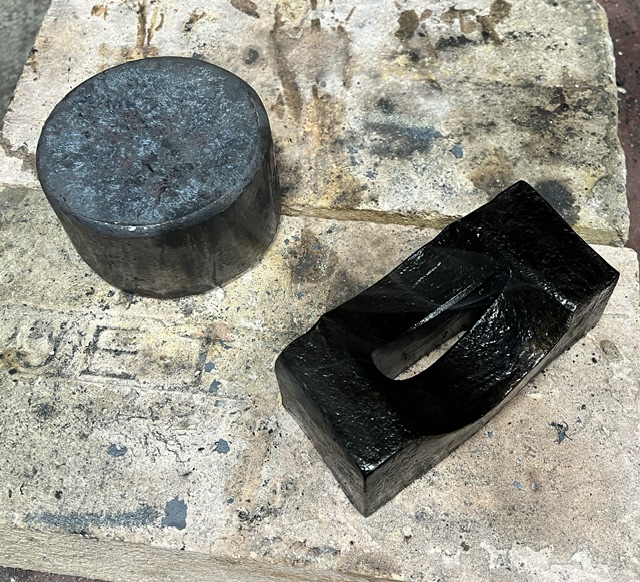
-
Uses of magnets in blacksmithing?
Goods replied to Shainarue's topic in Blacksmithing, General Discussion
Yeah, I use a cheap harbor freight pick up magnet. At one of our hammer-ins the smith had a magnet on a string hanging above the forge to check magnetism. If it didn’t swing when the steel got close you were good. When not in use, he just stuck it to a part of the hood out of his way and away from the heat. I may get around to stealing that idea at some point. Keep it fun, David -
Uses of magnets in blacksmithing?
Goods replied to Shainarue's topic in Blacksmithing, General Discussion
I most often use a magnet in the forge for judging critical temperature for heat treatment. When heating up for a quench, the part in question will lose magnetism right around critical (for most steels). I also will bring the part to the same temperature for normalization, but I’m not sure it that is the best practice. Keep it fun, David -
Reducing the holes on an Acciaio anvil
Goods replied to lary's topic in Repairing and Modification to Anvils
Lary, don’t take this the wrong way, but I’m concerned about how you welded your anvil up. (They are good improvements, and the manufacturer should take note!) Laying blocks of ice on the anvil while welding could increase the chances of HAZ (Heat Affected Zone) cracking. When welding hardenable material, normally you would preheat and post heat the material to prevent “auto-quenching” of the material around the weld and shrink cracks. Peening the weld is also important to prevent cracking. This is intended to help others who may have a need, not a criticism. Also, if I missed any steps, please let me know. Keep it fun, David