

Goods
-
Posts
1,159 -
Joined
-
Last visited
Content Type
Profiles
Forums
Articles
Gallery
Downloads
Events
Everything posted by Goods
-
It’s a horrible useless stake anvil. Just PM me and I’ll send you my address so you can send it to me for properly disposal . Keep it fun, David
-

What did you do in the shop today?
Goods replied to Mark Ling's topic in Blacksmithing, General Discussion
Went to our hammer in yesterday. I was just playing around a bit and tried something new to me: Made from about 24” of 3/8” round. I also spend some time running the host’s 50 little giant. He’s basically done rebuilding it and needed someone to check it out. I made a hack for him out of about 4” of maybe 1-1/2” diameter coil spring. (Sounds like it was an old car coupling spring.) I think he’s got a bit more tuning to do on the hammer… Keep it fun, David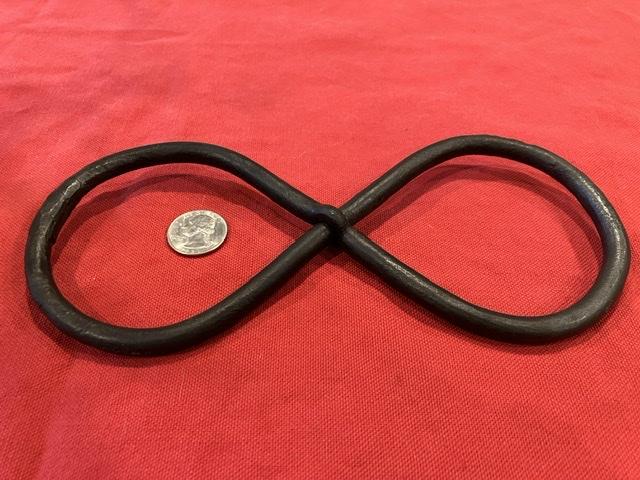
-
Chubby, I like the use of the cam down casters. Where did you find those? (No links, just key search terms will work. I don’t want to make you violate usage terms…) Keep it Fun, David
-
Great, we love pictures. Keep it fun, David
-
What did you do in the shop today?
Goods replied to Mark Ling's topic in Blacksmithing, General Discussion
The first attempt is not scrapped yet. I was thinking it could be made down into a smaller hammer, even though the eye would be strangely large. I never thought about forge welding material on. Not sure how easy forge welding the material is though. It fork lift tine. Crazy tough. Could be 4130, 4140, 4340, or even 8360(?)… Not I’ve got another thing to add to my list, forge welding trails? David -
What did you do in the shop today?
Goods replied to Mark Ling's topic in Blacksmithing, General Discussion
Daswulf, one of these days I’m going to try a throwing knife. I’ve had one on the list for a while now. You might have bumped it up in priority. I got a couple more hours in the forge tonight and got back to work on my carpenters hammer project. Way more material than I needed, but the steel moved more as I expected it to with the extra mass on the ends. A lot of work to do yet, but the major forging is done. Next step will probably be putting it on a cut of wheel diet. Probably a pound of steel to loose. Side question, how much of a radius do you like on a side set? I put about 1/8 radius on mine, but it would have worked out better on this project. Keep it fun, David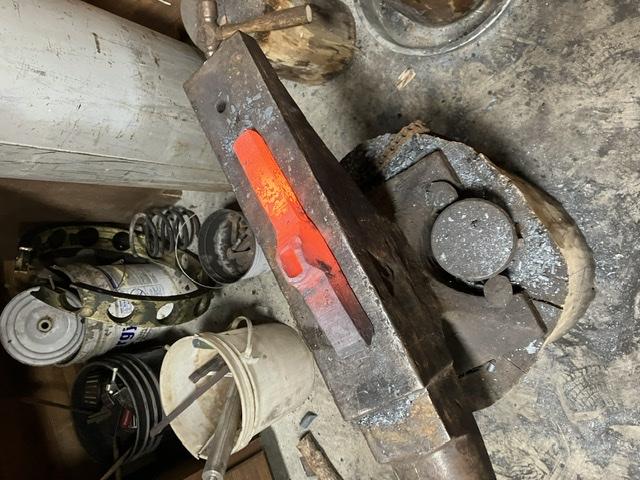
-
If you don’t want to remove the screw, cut the nut in half and set it up as a clamp on nut. Should work just as good as a jam nut when tightened, and would be easy to loosen and spin to the next position. Keep it fun, David
-
Passivating stainless steel exposes more chrome on the surface of the steel. The chrome reacts very quickly with oxygen in the air to form a protective layer preventing the iron from oxidation. You can polish it up after passivation, just don’t use any buffing material that was used on regular steel previously, it will basically negate the passivation process by depositing iron back on the surface. (All, if I’ve missed anything here, please add more information or corrections…) I personally have never neutralized a stainless steel part after passivation, just rinsed really well. I can’t see it hurting anything and could help… Keep it fun, David
-
What did you do in the shop today?
Goods replied to Mark Ling's topic in Blacksmithing, General Discussion
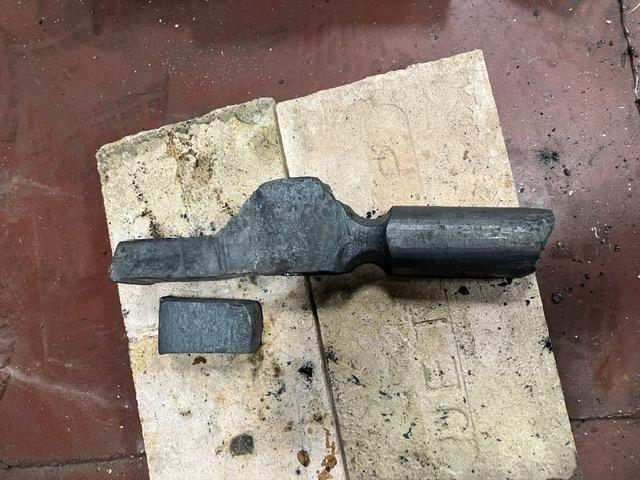
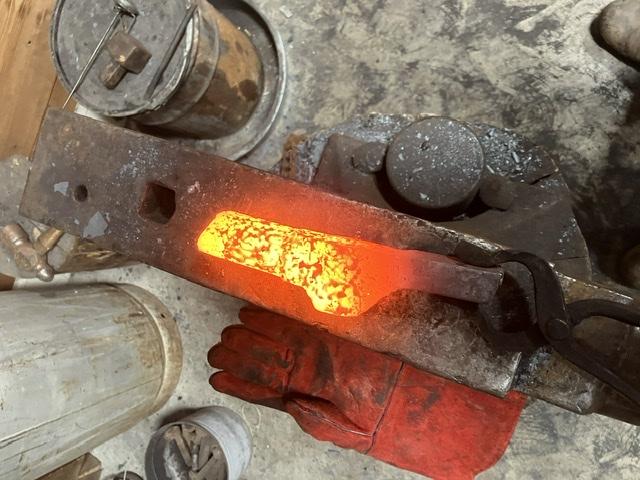
Well, I spent 6hrs in the forge today. I probably shouldn’t have. The heat/humidity is crazy. I guess I calculated my billet size wrong, because this won’t become the carpenter’s hammer I was aiming for: So, I started over and made a few hooks: The new billet is very much oversized (2”x1-1/8”x6”), but I can always cut the ends back if it works out. Hooks aren’t anything special, but I am pretty happy with the one on the bottom of the picture with the forge welded collar in the center. Keep it fun, and stay hydrated! David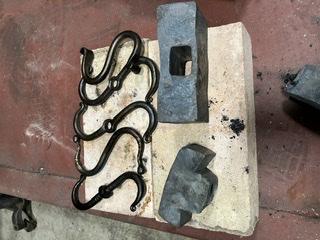
-
What did you do in the shop today?
Goods replied to Mark Ling's topic in Blacksmithing, General Discussion
John, is that going to speed up yarn bowl production? Looks good! David -
I started forging about 4yrs ago at the age of 44. I came home from work one day a found that my son, 15yrs old at the time, had built a forge and hammer head anvil. I supported his efforts and ran into an old friend who pointed us toward the local chapter of the Indiana Blacksmiths Association. After that I was hopelessly hooked and my son found other interests. At this point I can hold my own and I am throughly enjoying the hobby. Could I become a master, maybe if I quit my job and went full time, but I really don’t want to give up the comfortable life my family enjoys. I believe to become master you have to: have some natural talent, put the time in, never be satisfied with you work, and be willing to sacrifice. I’m not in the position to do that myself. I am having one heck of a good time though! Putting your location in your profile and we could be more helpful getting you setup with a local group. (You could be close by and I could help get you setup, right now, I can’t tell…) YouTube can help, but there’s a lot of bad/dangerous info out there. There is a page on here of good channels that will point you in the right direction, but in person in the best way to learn. Don’t try to setup in your basement. Spend some time digging around on here, there are several good examples of mobile setups. Up until my new shop was finished, that’s how I managed. Takes a bit more time setting up and tearing down each session, but it’s still worth it. Keep it fun, David
-
What did you do in the shop today?
Goods replied to Mark Ling's topic in Blacksmithing, General Discussion
So John, did you sell out of the custom forged yarn bowls while the creating artist made a special appearance at the store? Billybones, I’m with you on the social media thing. IFI is my only “habit” and that takes up enough time. (Did I ever mention that I’m very grateful of all who post here and the moderators who keep things straight!) I had a couple hours in the shop tonight. I cut the blank for my next significant project. Started drilling a eye, (unusual approach for me, but I’ve thought about a lot and I think it’s the best way forward on this forging) the drilling wasn’t going well, so threw it in the forge and vermiculite to anneal. During the down time of the multiple cuts with the power hacksaw for the blank, I started building inventory of s-hooks. Thought I’d get six done, only got 4 done: Starting stock was 8” of 3/8” round. (Almost forgot, I made a 7/16” slot punch for the drifted hook.) I haven’t done any hooks in a while and worked without a jig. Took me longer than I wanted, but they were a very good exercise. I’ve got a demo coming up and really need to get some inventory and work on some basics. Keep it fun, David
-
What did you do in the shop today?
Goods replied to Mark Ling's topic in Blacksmithing, General Discussion
I understand where you are coming from. I’m a little different, I kinda loose myself in the persona of the fair, if that makes sense. My wife has been going to renfairs since she was a young child and we’ve been attending since we got married. I hate to add up the cost of all out “gear” even with me making most of the kids outfits. Keep it fun, David -
What did you do in the shop today?
Goods replied to Mark Ling's topic in Blacksmithing, General Discussion
Lovely Work, as always Alexandr! Billybones, by the way which renfair are you stocking up for? And will you be running demos or just selling? David -
What did you do in the shop today?
Goods replied to Mark Ling's topic in Blacksmithing, General Discussion
Billybones, that is really nice. Keep it up and I’m sure you’ll be selling out of stock! David -
My wife told me about a nearby flea market that was holding a going out of business sale today. So we made a trip down there and picked up a few things: Not pictured is a mason jar of 1” cat’s eyes marbles and an “Animaniacs” cartoon DVD box set. Most of the file are old Nicholson or Heller. I know why they are going out of business, by the tag this load would have cost $443.25 before taxes! Did I mention they called themselves a “Flea Market”? Let’s just say I didn’t pay anything in that range… David

-
What did you do in the shop today?
Goods replied to Mark Ling's topic in Blacksmithing, General Discussion
I like how it turned out. I’ve been there with the 4” grinder, stones and sand paper. I’m glad you to the time to finish it up. David -
Wrought iron is not like “modern” steel. When we a talking about grain size is in modern steel we are taking about the actual crystalline grain structure. In wrought iron the grain comes from how it is “hammered” out of a “bloom.” The grain comes from the impurities (mostly silicates?) that get trapped in the iron (very low carbon content, so maybe not actually steel). As the wrought iron is draw out folded, welded and drawn, over and over, some of the impurities are forced out, but what left is draw out in a grain like structure. (There are probably plenty of errors, that others will hopefully correct, with this description, but it should get the idea across.) Yes, the grain of wrought iron affects how you forge with it. It needs to be worked at very high temperature to help prevent splitting along the grain and cracking across the grain. I have not done a lot of work with wrought iron, so maybe Thomas, Jennifer, or others could jump in and give better information. David
-
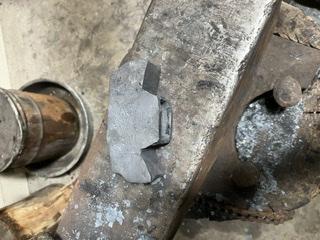
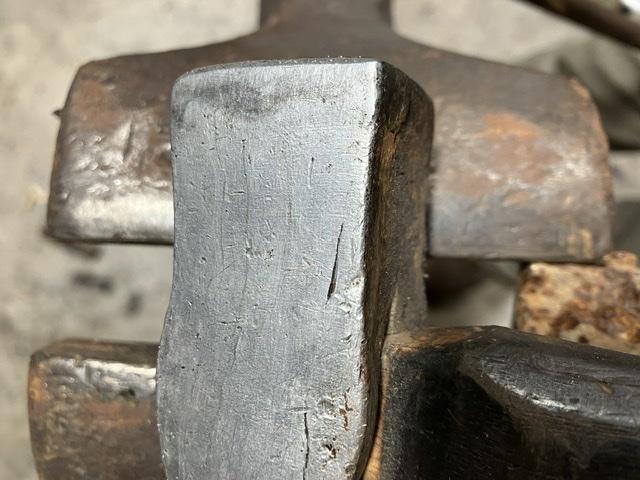
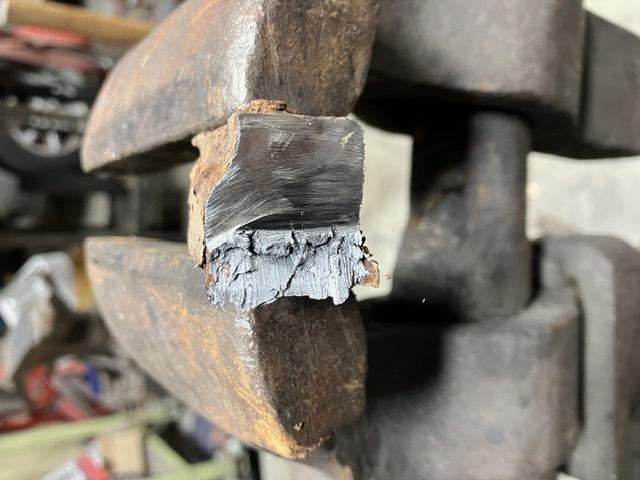
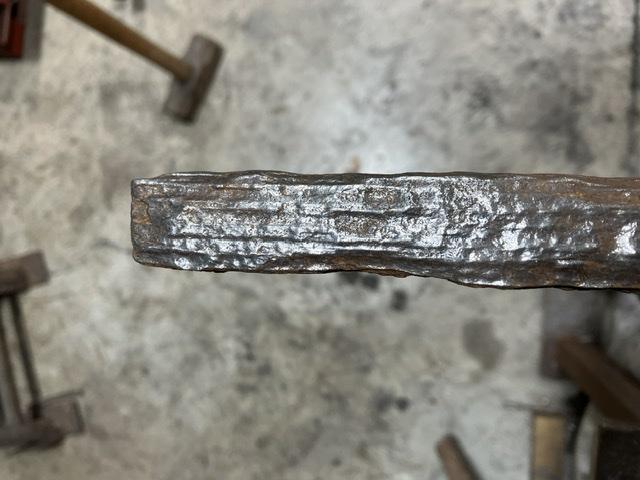
I recently ran across an automotive-quality standard for spark testing of steel. I was very surprised that it existed and also how many details were included. Length of spark, color of line, burst shape, burst quantity, branch quantity, arrow shaped termination (can’t remember exact term used), and others I can’t remember right now. They were distinguishing carbon steel grade, tool steels and stainless steels, by carbon, nickel, chrome, molybdenum, tungsten and vanadium content. I would like to get a copy of that standard for myself! (Of course, they recommend having sets of known steels, the same way we do here.) On the wrought iron note, here are some pics: surface corrosion showing grain: break test showing “green stick” break: Example of wrought iron body hammer with a steel face: Note, in the two pictures of the wrought iron, the bar is of very coarse wrought iron that was in the ground for at least 60 years on my property. I just wire wheeled the rust off for a better view. Keep it fun, David
-
A quick check for wrought iron is to cut 80% through the bar the bend it off. Wrought iron will have a fiberous(sp?) break like green wood. (There is highly refined wrought that may not break like that, but I have yet to run across any.) Also, if it’s pretty rusted you can sometimes see the “grain” of the wrought iron on the surface. (I wish I had all my pictures from my old phone on this one. If you need pics let me know and I’ll take some more.) Keep it fun, David
-
Honestly, for all of the work I’ve done, I’ve just used 3 instead of using 3.1415…. Note: all of this work has been basic “close enough” type items like quick estimate of material to get hang loop on the end of tools or the loops and rings for campfire tripods. If I ever get into larger or items needing more precise diameters, 22/7 or 3.14 will be the better method. David
-
What did you do in the shop today?
Goods replied to Mark Ling's topic in Blacksmithing, General Discussion
Rojo, basically mystery metal. It was a 30mm guide rod for a small 20ton press. Tested like medium carbon. I wanted to make it from H13 and thought I had a mold component made from H13, but after testing seemed to be 52100. 52100 would probably have been better, but didn’t want to put the effort into working down a 2” diameter down if it wasn’t going to have the benefits of H13. Keep it fun, David -
What did you do in the shop today?
Goods replied to Mark Ling's topic in Blacksmithing, General Discussion
Got the forge fire up for the first time in a month. Made a 1-1/16”x3/4” drift for an up coming project. Keep it fun, David
-
This might be a good place to start: https://www.iforgeiron.com/topic/15354-show-me-your-shop33/ Welcome aboard! Keep it fun, David
-
What did you do in the shop today?
Goods replied to Mark Ling's topic in Blacksmithing, General Discussion
I agree, that brooch looks good. You could put brass or copper rivets in the hole for and accent. David