Another FrankenBurner
-
Posts
616 -
Joined
-
Last visited
Content Type
Profiles
Forums
Articles
Gallery
Downloads
Events
Everything posted by Another FrankenBurner
-
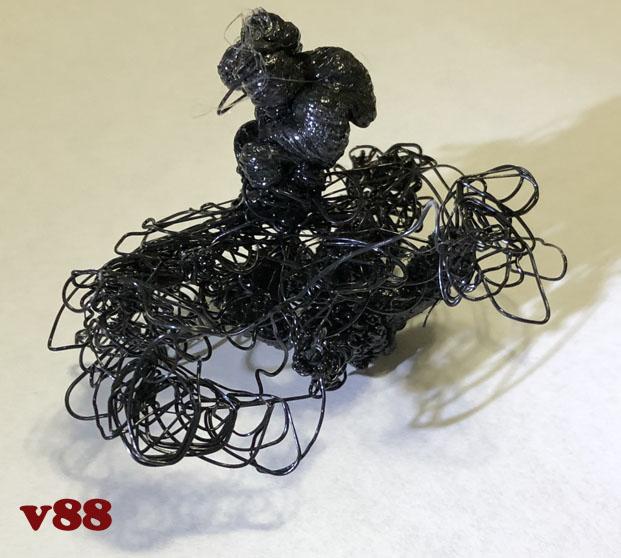
 That's top level secret stuff. I shouldn't have even posted a picture of v88. Prior art and all that.
 -
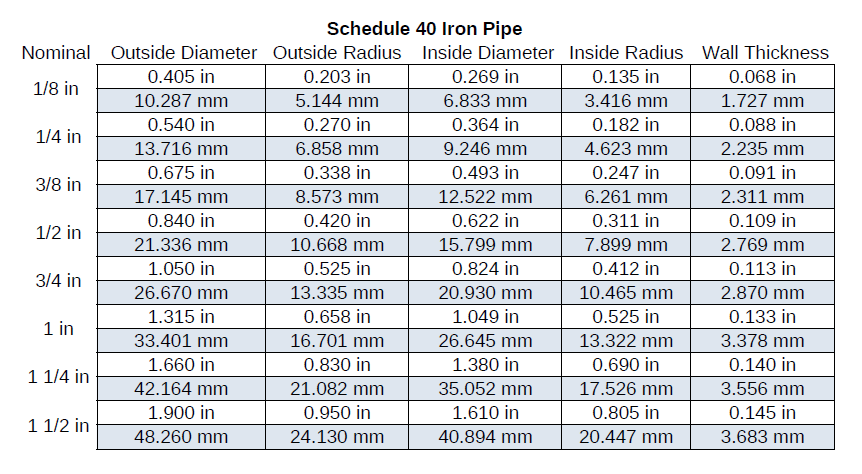
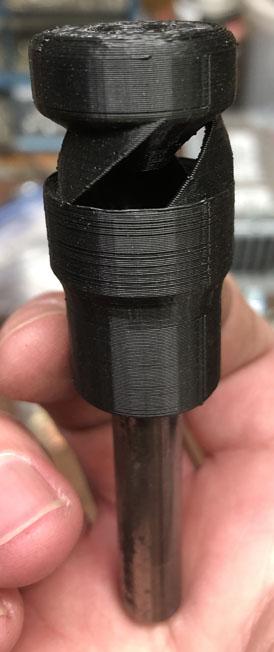
Thanks Frosty. I'm already playing with bits so small that if I drop them, they go into the abyss. Waldo work sounds like it requires a good deal of patience. By multiple orifice burner, are you talking about a micro NARB? If so, that had not entered my thoughts but now I am going to have to give it a try. 1/8th" schedule 40, yes. Though 0.405" is the OD. I got tired of looking up the chart, then cutting the diameter in half and then converting to metric so I made a spread sheet. The ID is 0.269" for 1/8" pipe. I got the calipers out and my pipe is at an actual of 0.264" so it is close. Anyway, I am running 6.7mm at the 0.4 - 0.5mm orifice but my burners tend to run with a larger orifice. If you are talking about a 10mm Mikey burner, the 0.4mm sounds like a good starting point. Wouldn't it be great if your 4% observation holds true? Every time I guess, I am wrong. I have a trial and error collection. Thanks for asking, my model was based on the chart not on actual so I have updated my model. Every little bit counts and 5 thousandths probably matter. As I was writing this, I heard my printer finish printing. It was printing another 1/8" inducer head with a change. Here is the new version: I trust my printer and this was a 1 hour print so I just clicked print and ignored it. I walked into this. Good for a laugh. I wonder what size orifice it needs.
-
I did not mean to imply all firebricks are bad. I think the general consensus is the k23 bricks are not great but several members report good things about the Morgan Thermal Ceramic K26 bricks. I destroy them with my forge, maybe because of how I thermally cycle them. I have made a tougher alternative which takes the abuse so I can abandon firebricks as baffle walls. Also, the heavier fire bricks, I never use them inside the forge but I have a whole pile of them for various tasks in the smithy. I have a forge at 3.5 inch diameter by 12 inch length powered by a tamed 3/4 burner originally. A Ron Reil Freon cylinder mini forge from back when. The burner doesn't like it very much but it works. It does the job. It would probably make a nice knife makers forge. It has a hot spot right in the middle and cools as you get nearer the front/rear. In order to heat anything in the hot spot, it has to have six inches or better in the forge. I would rather have your idea of 3 inch by 6 inch with a smaller burner. As to the diameter vs length, if we are talking about 1 central burner, I have notice that the closer the length matches the diameter, the happier the burner. The openings are cooler than the center so the length a bit longer than exact is better. I am into the oval/lozenge shape now but if I was trying to hit the magic 350 in³ with a cylinder forge, I would probably go with a 7 inch diameter by 9 inch length and see how that worked out. Going to 6.5 inch diameter would drop to 300 in³ which would make forge welding heat easier to obtain.
-
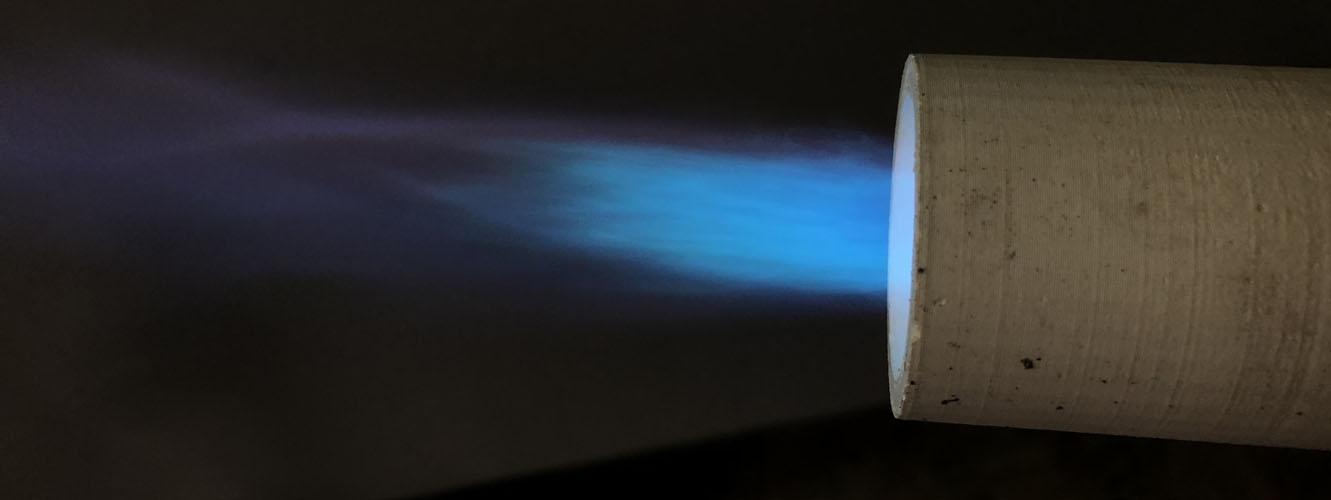
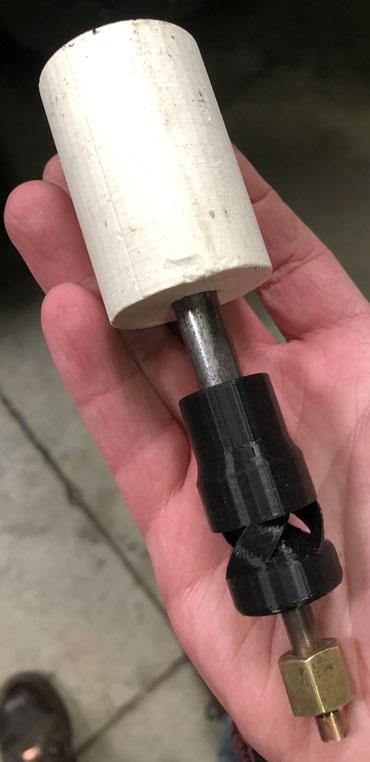
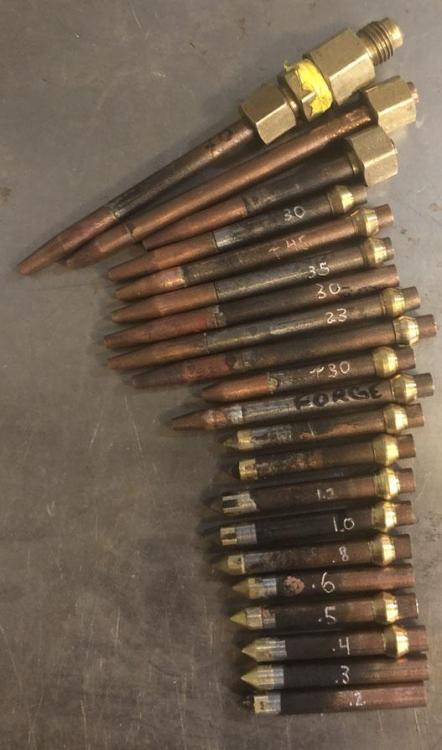
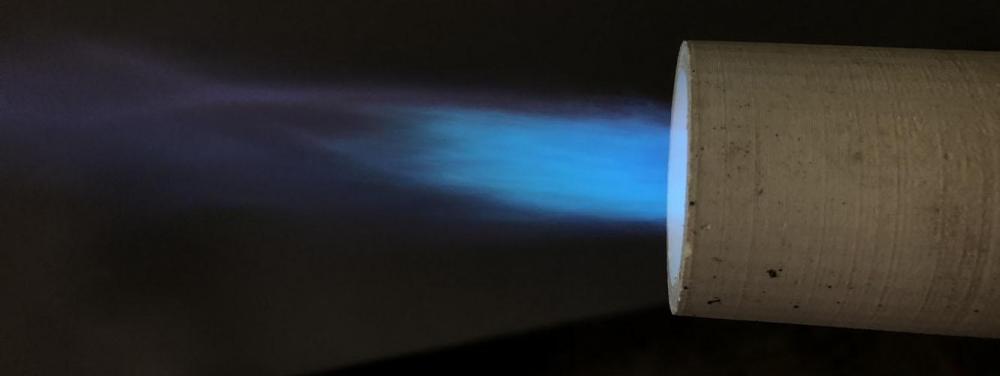
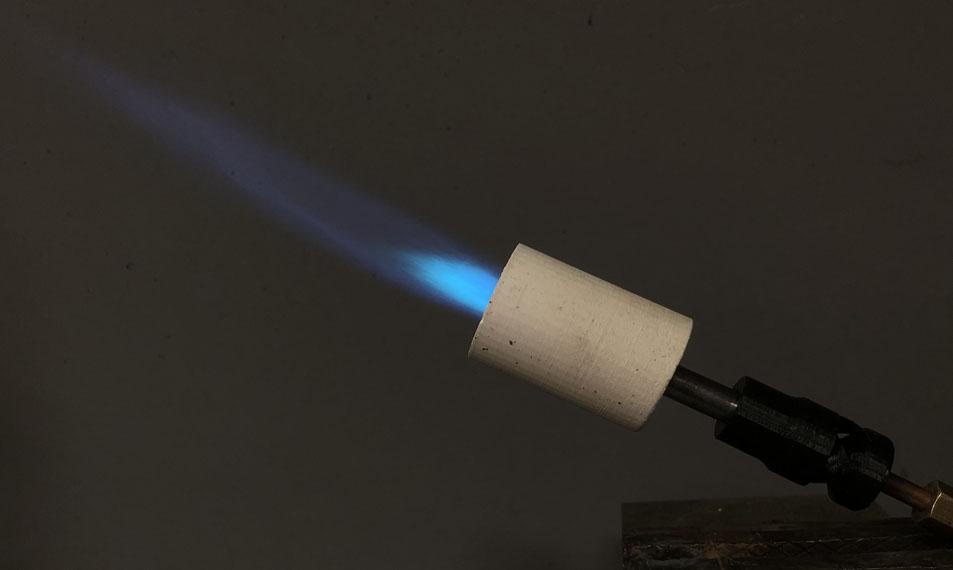
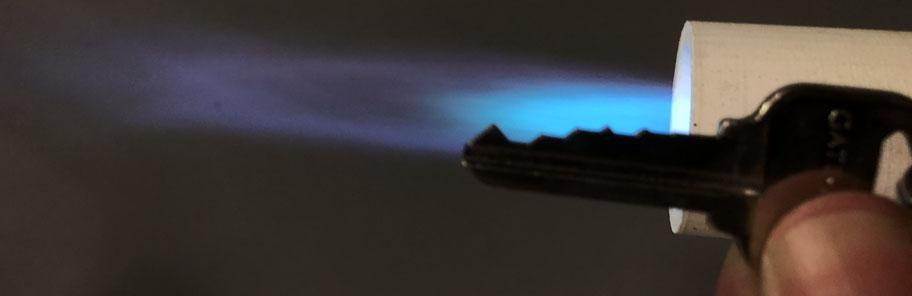
I finally dusted off the printer and have something to report here. I got distracted playing with ham radio again. Here is my latest flame: It's not perfect but it is tiny: It is coming out of an eighth inch(nominal) burner. I thought the quarter inch burner was small. Rocking a 2.25" long mix tube. Mikey and Frosty have mentioned the smaller the burner, the more critical the build. It is apparent with this little guy. Using printer nozzles as orifices, 0.4mm runs purple lean and 0.5mm runs a tad rich. If the nozzle overhang is changed a 1/16th of an inch either way, the flame lifts off or goes rich. It is picky but I got it to run stable in it's narrow range. It sounds like an angry little jet. I finished turning down all the 3D printer nozzles into burner orifices and thought I should attempt to use some of the smaller ones in a micro burner. Since this guy likes around 0.45mm orifice, imagine the burner that would use the 0.2mm orifice. I am already gilding the lily with this one, I probably won't attempt a more critical smaller build. Being so critical, I am going to be tinkering with this guy. I am experimenting with nozzle shape to see what I can learn and hopefully extrapolate improvements to the larger burners.

-
My oval mini forge quickly became the go to forge for anything that will fit. I like the gas mileage. I once built a single fire brick forge. I believe it was a 1.25" bore about 4 inches long. I fired it with a map gas torch. It worked well for a while but the k23 fire brick eventually turned to rubble. I have now abandoned the use of k23 and k26 fire bricks.
-
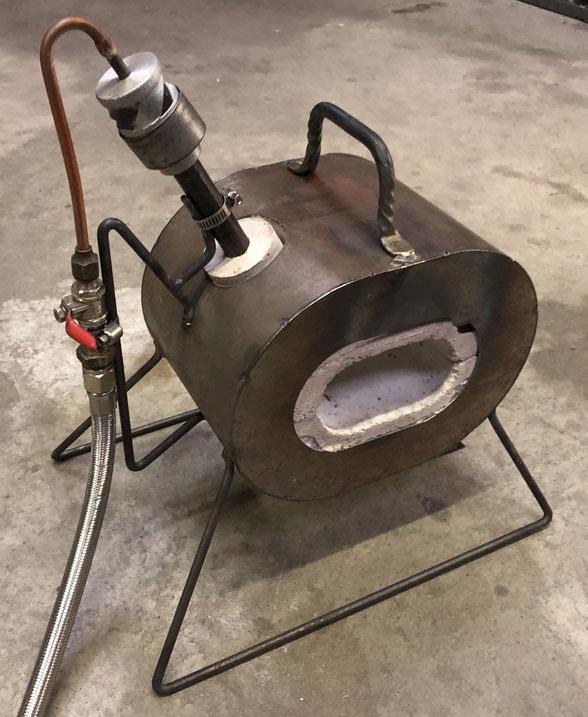
Alright, now that you have it figured out, I'll play devil's advocate to complicate things. The helium tank forge is a great forge. Especially for people new to the hobby. Mainly because of fuel consumption. Making nails, s hooks and leaves in a propane cylinder forge is like getting groceries with a big rig. Especially in the beginning when everything takes several heats to learn to move the metal. When I throw my little metal into the vast cavern of a large forge, I see the fuel being wasted. My first forge was a monster, like everyone else's. You know, so I could make any project I could ever imagine. One forge for everything. I very quickly realized that it was more cost effective to build a second smaller forge than to run the big one to make small things. I have since made an even smaller forge. I use the smallest forge which will accommodate the work. The only problem I have with the helium jug forge is the very small floor space. Making a larger split cross in one is challenging. This is why I have converted to the oval forge. Still round so the flames spiral. Smaller volume for less fuel requirement but with the wider floor of a bigger round forge. Some of my favorite forge work is striker cooperation with my father or brother.
-
I have built and used forges with both sizes of cylinders you are talking about. If you are doing 2 inches of blanket with 1/2 inch of kast o lite, remember you are subtracting 5 inches from the diameter of the shell. The smaller helium cylinder finishes at about 4 inch diameter by 12 inch length. The larger propane cylinder finishes about 7 inch diameter by 12 inch. While this doesn't sound like a significant difference, the volume of the latter is three times the former. Definitely different burner requirements. As a decent in between, the propane cylinder with extra blanket on top and bottom, gives an approximate oval. This drops your forge volume while having wider floor space. I am a convert to the oval forge. As to the rounding hammer project, if you are going down the Alec Steele 3.5# line, I would not attempt that in the helium cylinder forge. If you haven't tried a rounding hammer yet, I recommend trying one first. If you are new to the hobby, I also don't recommend starting with a 3.5 pounder. Heavier fatigues muscles quickly. Tired muscles cause bad form, miss hits, bad habits. After all that, some like bigger hammers. Brent Bailey swings 7lb cross pein. In the beginning, I bought a 4lb sledge from harbor freight and ground it into a rounding hammer. It's heavy. I later bought a 2.5lb drilling hammer and converted it. The head is closer to square than a sledge so it gives good corners for differing radiused sides for tilted fullering. I changed the handle as I prefer a longer handle. I have several now in different weights. I even have a "good" one and I generally go back to the 2.5lb drilling hammer cheapo.
-
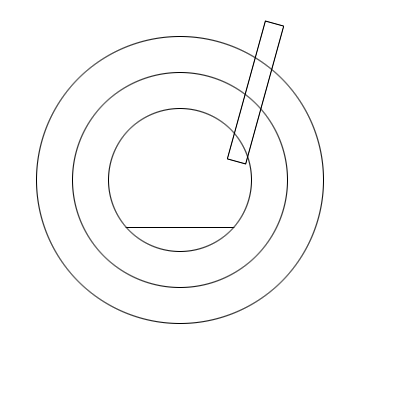
I believe he is meaning something like this. This prevents the back pressure Frosty was talking about while also not impinging directly on the wall.
-
Naturally Aspirated Ribbon Burner. Photo heavy.
Another FrankenBurner replied to Frosty's topic in Ribbon Burners
Is that the super high temperature duct tape? -
Thank you for the explanations. Mass in motion, check. I think I've got the big picture but I will have to chew on all that a bit for the little stuff to sink in. I am plotting some more manometer play as well. Trevor, nice tongs. Are those for rail spikes?
-
If we are talking about ambient pressure compressing air into the inspirator than I have to fall in line with the answer of nope. They work the opposite of that. I wasn't sure if that is what was asked or if compression within the mix tube was the subject. Thinking of the latter has entertained me. I need to play with the manometer a bit more. My mind is running circles with the idea of the mix tube being lower pressure than ambient at the flame end. How is it discharging if the pressure is lower than ambient? The soda straw analogy demonstrates pressure differential very well but with an inspirator, the low pressure zone is upstream of the delivery end. After which, we are moving to a push, I think. When I was playing with a venturi and manometer, I saw a pressure increase after the throat. Compression. I don't remember what that pressure was compared to ambient but I suspect it was greater as the device has to push against ambient or, worse, forge backpressure. Now that I have talked myself into overthought confusion again, any takers?
-
I am not sure I fully understand the question. If I did, there is a good chance I have no idea at the answer. When I decrease the inlet size and this results in increased induction, I suspect it is because the air is entering from a lower angle which contributes to vortical flow. The vortical flow, lowering the pressure, is more efficient at drawing in air and moving it along. The addition of the aerospike made this more obvious. (thank you for the term Frosty) With that addition and balanced inlet size, I can clearly see 3 separate vortices which gang up at the point where the jet meets the throat. At that point, there is a very tight vortex which immediately heads down the mix tube. This significantly increased air induction. In this post is a very poorly shot video which shows what I described.
-
This is not the case in Trevor's burner, but in general, if your flame is too lean, your orifice could be enlarged. By choking off air to match fuel requirements, you are reducing your burner output. By increasing your orifice size instead, you are increasing it's output. However, if you can partially choke off your air inlets and see no change, then you might start looking at smaller inlets. Which I am guessing is what you were actually meaning? Just to add to the fun, in a few cases, I have decreased the size of the air inlets and that resulted in an increase in air induction. I don't understand most of it so this usually gets me excited and I have to start playing with smoke streams to see what is going on in there.
-
I have seen several factory made flares leak. Take them apart and take a good look at the mating surfaces. Hopefully it doesn't scare you away from flare fittings though. Quarter inch copper tubing is my preferred way to plumb a forge.
-
The color of green in that video certainly says rich flames(if you see it with your eyes). Before you go cutting back the orifices, did you get the sputtering issue resolved? In all of your videos, I see a flame which tends to spin off center or topple around the perimeter of the nozzle. I have had this occur when my orifice was out of center or out of alignment and when my nozzle was out of alignment. If any of these conditions is true, it causes the air induction to drop drastically resulting in a rich flame. Do you still have the reducers as nozzles on the burners? How deep into the blanket do they penetrate? Did you just cut round holes in the blanket downstream of them? You went with two burners, are these 3/4" or 1/2" burners? Was it a breezy day when you shot the video? Even lightly. I believe that Frosty advises against having the burner air inlets in line with each other like that. You have flare fittings so you can easily rotate those burners 90° to see if it gains you anything.
-
Questions about building my forge
Another FrankenBurner replied to Roudyroddypipper's topic in Gas Forges
Rigidizer is different than refractory. I use something similar to what MCalvert suggested. I buy fumed silica and mix with water and a few drops of food coloring. This mixture is spritzed on the blanket until it is saturated. The blanket is then heated with a torch to drive off the water and fuse the silica and blanket. This causes the blanket to become stiff. A good foundation. If you skip the rigidizer, it is more difficult to apply the liner and for the life of that forge, the liner is always kind of floating on the soft under layers. Once the blanket is rigidized, the refractory is applied inside. The refractory prevents the blanket from being damaged by your metal work and the flames. You don't absolutely need refractory but you definitely want a top coat of some kind to prevent free fibers from flying into your lungs. This is where the Plistix/Matrikote can be used as a hot face. Or you can use the refractory and skip the hot face. I like my forges to be tough so they have both the refractory and the hot face. I can not find much on the uni-bond but what I did find is not encouraging. It is generally recommended to stay away from anything listed as cement or mortar. This product is intended to be used as mortar for firebricks. If you apply it and it doesn't work out, it may be very difficult to remove for replacement. I would do some coupon testing of the product before committing, just to be safe. How did you come across it? Did someone recommend it? Several members have advised against the oil burners. Mostly because of the nasty burn properties. -
Get some dish soap, mix somewhat thick with water, spread over your plumbing. This can be done while the burners are running with valves open. If you start making bubbles, you have verified a leak and located it. The second video you posted shows part of the plumbing very briefly and it looks like maybe the gas tape was put on backwards. I can't tell for sure but I figured I'd mention it so you can verify. If so, this can cause leaks.
-
Questions about building my forge
Another FrankenBurner replied to Roudyroddypipper's topic in Gas Forges
Before you go any further, have you rigidized that blanket? By mortar, what product do you mean? Zoeller Forge advises Plistix 900F, not ITC100HT, in the FAQ. The consensus amongst the wise elders here is that the ITC doesn't cure properly and just flakes off. This is what happened with my forge back when I was still trying it. Ron Reil's website from long ago is still up and advises the ITC. I have tried ITC, Plistix and Matrikote. I prefer the Plistix 900F as it actually sticks, is affordable and it has a higher temperature rating than Matrikote. If you are following Zoeller's FAQ page and using Kast-O-Lite 30, the gurus advise a different curing process. Instead of a few hours air dry and a low firing of the refractory, the refractory should be kept in a humid space for 1-7 days. Then slowly fired. I have done the rapid firing and the refractory ends up softer and more likely to crack or rubble. I now apply the refractory, put the whole thing in a bag or tub with a cup of water and leave it alone for a week. This results in a tough solid product. Frosty uses a magnetic block heater to heat the water to ensure humidity. If you want more details, Forges 101 is great for details. What is your purpose for the floor brick? Are you planning on forge welding with flux? -
I will typically forge A36 and 1018 with these dies. Thank you for mentioning that. I would not have thought about that. I do play with some spring steels and 4140. No S7 or h13.
-
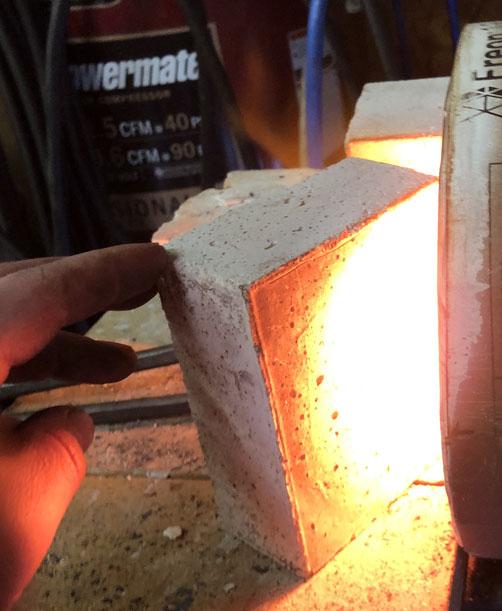
I did not sift out the aggregate. We made a form out of blue Styrofoam covered in packing tape. Then mixed up kastolite to ram into this form along the bottom and up the walls. This created a hollow inner which we put a piece of rigidized ceramic blanket. That was then top coated with more kastolite. This makes a hollow block with blanket inside.
-
You'll be just fine. The yellow tape is good stuff. Read the roll for the instructions. I think it was two wraps(in the correct direction) while being mindful to stay off the last thread to avoid having any tape make it's way into the plumbing. You do not need to spot tight any of these fittings. If you tighten iron pipes into brass fitting too tight, you can crack the brass. Do not tape the flare fittings. You also don't need to tape the mix tube threads. If you are concerned about leaks, you can pump the system up with air and use bubbles to check for leaks. If you are wanting less strain on burners, hard mount that manifold somewhere convenient to access the valves and then run from there to the burners with a longer copper line. The only fitting you would have to replace is that short flare connection. This would require a flaring tool though. This also makes it so you don't have to mount the burners in the forge in alignment with the rigidly secured gas jets.
-
I was out forging today and remembered your question. This is after the forge had been going for a few hours.
-
I am looking for advice on the dies of my new guillotine tool. They are 4140. I would like to harden them for durability. I don't want to go striking with a hardened hammer face. What heat treat is recommended? Should I leave them normalized and rely on the toughness of the metal or should I harden them and come up with a mild steel hammer to strike with?
-
Looks like a good start. If you are planning legs, it is easier before the blanket is rigidized in. If you can weld, you can use your burner(once it's built) to bend up some 1/4 inch round. It's minimal, cheap and it looks pretty good. If you can't weld, you can use nuts and bolts through the can to make the legs.
-
Regulators for BBQ grills are usually set to give 10-11 inches of water column(under 1/2 PSI). Most of these burners need 10 to 40 times that pressure. Most of us are using a 0-20 PSI regulator or a 0-30 PSI regulator. You can get 0-60 PSI on some of the blacksmithing sites but I have never pushed past 30. I usually run 5 for forging and 10 for welding but I have heard of several people who regularly use 20-30 PSI. If you amazon/ebay search for a turkey fryer regulator, a qcc regulator or just high pressure propane regulator, there are several low cost versions out there. Some with gauges and steel braided hoses. You have to verify the pressure range and fuel gas. I have one of the cheaper ones and they work. If you have the money, spend the money to buy a quality regulator(Something like a Bayou or Marshall). They aren't that much more expensive and they are worth the extra. I have my cheaper regulator for a mobile forge and as a loaner. I have good regulators for everything else.