Another FrankenBurner
-
Posts
616 -
Joined
-
Last visited
Content Type
Profiles
Forums
Articles
Gallery
Downloads
Events
Everything posted by Another FrankenBurner
-
Yes, that could be used. It could be better than drilling by hand if carefully setup. The goal is to make the hole as concentric and axially aligned with the mix tube as possible.
-
The way I understand it is inducers induce, injectors inject, ejectors eject. It's very complicated. Inducers are drawing something in. Ejectors and injectors are inducers. Ejectors are inducing something to spit it out of somewhere. Injectors are inducing something to push it into somewhere. I've also run into the term inspirator which was defined as a device which fuel pressure is used to draw in atmospheric air to mix it with the fuel at precise ratios for burning purposes. A Venturi is a cone shaped constriction in a fluid flow system to temporarily speed up the flow and lower it's pressure. The lower pressure can be used to draw things in. Carburetors use this restriction in the air flow to draw in fuel. Some burners, in part, use this to draw in air. In a Mikey burner, there is no constricting point.
-
Neutral is a fine line but anywhere close works well. Frosty has stated that he prefers the lightly reducing(rich) side of that line.
-
It sure does. That is your problem. It's coming out too fast without a volume increase at the end so it won't stay lit because the flame lifts away.
-

Naturally Aspirated Ribbon Burner. Photo heavy.
Another FrankenBurner replied to Frosty's topic in Ribbon Burners
Yeah, this forum and others like it are wonderful for getting all kinds of minds together. -
Naturally Aspirated Ribbon Burner. Photo heavy.
Another FrankenBurner replied to Frosty's topic in Ribbon Burners
That works just fine. I am always after more potential output and what I said was based on that. By enlarging the orifice instead of throttling the air, you increase burner output. Both ways work and you don't need to chase more to get the job done. I tend to forget that. -
Naturally Aspirated Ribbon Burner. Photo heavy.
Another FrankenBurner replied to Frosty's topic in Ribbon Burners
I am inexperienced with the NARBs. I was speaking about what I saw in the flames and extrapolating. I probably should have refrained. Now that you mentioned it, I recall someone else on the forum saying the same thing about orifice position not changing much on their NARB as well. Where the first burner is running lean outside of the forge, I wonder if forge back pressure will reduce enough induction to run nicely. -
Naturally Aspirated Ribbon Burner. Photo heavy.
Another FrankenBurner replied to Frosty's topic in Ribbon Burners
Both of the burners are not Frosty Ts. Unless a burner is built to the specs in Frosty's instructions, it is not a Frosty design. You have two of your own design which are Frosty T inspired. Nothing wrong with that, we all learn from new designs. You just have more of your own figuring to do. That said, your first picture of the first burner (if the orifice is the same) is showing a more powerful inducer. Your flames are lifting because they are lean. Look at the deep blue color of the flames. You are inducing more air. Lean flames are thinner and don't hold as well. If it were mine, I'd enlarge the orifice on the first burner to see if it would prevent lifting without going to greenish flames. Unless you have a positionable orifice, then I would try sliding it in and out first because it's easier. Either way, they are looking good. Nice job. -
When I first showed up on IFI, I spent a couple of weeks reading Forges 101, Burners 101, the t burner thread, and the NARB thread. Then I pestered Mikey and Frosty in private for a while. They both took the time to answer all of my questions. Since then, I have pestered several other people. I am grateful to have a place with such great people.
-
1 AM, you are a dedicated giver. Thank you again, your toolbox is filled with good ideas. I am thankful for the forum which allows us all to bounce ideas. I'm going to have to borrow your use of forged cam locks in my contraptions. It is such a simple action to produce and makes operation much smoother. I am surprised I never thought to forge my own. The expanded metal makes absolute sense. I first saw it used with Frosty's NARBs and I asked Frosty, back then, why expanded metal. He is also a dedicated giver, full of good ideas. My mind never linked that data with forge construction.
-
Thank you for all that. Frosty now has me wanting to see your forge all folded up. Any chance you have any pictures of that? Name is Curtis over here. If only I lived closer to the two of you. Have you had any issues with cracking where the metal and the refractory interface? Have you noticed any differential expansion issues? I like the cam lock idea. You said you have already forged several, any pictures of those? Thank you for the kind words. You have already helped out. I have been inspired to keep after the split forge. As you said, it adds some pain to the process but it seems something that will be worth the extra effort.
-
That last sentence was good for a laugh. So long as it's blatant, I think it will be alright. I may have borrowed the idea from Mikey's posts about mufflers for shells and such. A flat oval split forge is what I am after. I like your forge and stand build very much. Clever engineering. Thank you for the info. When you say you welded in screws, are they protruding inside the shell and cast into the refractory liner? Or do they trap the liner? Where are they mounted? How thick a layer of refractory? What locks the door position? So is the metal teeny or the guy? Or is it a metal guy?
-
If your charger is too smart, it may not output. I previously bought a cheapo Harbor Freight 10 amp charger for an electrolysis tank. I wanted a dumb charger but when it started, it would sense voltage and not output if there was none present, assuming no battery was connected. I ended up connecting 5 volts from an old phone charger to it's leads to back feed it so that it would kick on. Your experiments would work. Shorter is less resistance, more current, hotter, yep. If you start with small gauge wires, you will probably make and exceed a few fuses. I did this several times in the beginning when I was experimenting with copper wire strands. I did eventually make it work but the copper wire was longer than I wanted and it oxidized quickly enough to not survive long. I've seen people on the tube use guitar strings. I went right to nichrome 80 because it was cheap and consistent. Once you get it figured and plan a build, don't forget a light spring. The wire stretches when heated. Also, no soldered connections, that doesn't work for long. We used small bolts so the wire is mechanically fastened and the bolt can be adjusted to control wire tension. Now you are just teasing us. Any chance you can put up a picture or two? I have been thinking about the split forge for a while. I just haven't figured out suspension of the cast upper liner.
-
You sure can power one with that trickle charger. You just have to choose an appropriate wire to match the length of hot wire you want with the available power. Current is what heats the wire. The current required depends on the wire gauge, the ambient temperature, and desired wire temperature. As the wire gauge gets smaller, the required current lowers and the resistance per length increases. The right wire will require less amps than you have and have a high enough resistance, at the wire length you want, to throttle the current to the proper level. If you do want to experiment with any old wire, just make sure the resistance is high enough to not exceed the 3 amps available. If the trickle charger runs 13.5 volts, divide by 3 amps gives you 4.5 ohms, at a minimum. This is just to prevent charger overload. Three amps is probably under or over what you need. Far over is fun because the wire can melt down. The easy way, connect one lead to the end of the wire and clamp an alligator clip to the other end of an expected too high a resistance, then you can slide the alligator clip to shorter wire lengths until you get a wire temp you like. Nichrome wire is good because it resists oxidation and you can select the gauge and type that will work with what you have. Also, because it is used for heating applications, there are charts to help with the figuring.
-
Convertible as in split so the top can be raised? If the trickle charger puts out enough current, the cutter could be built to match it but it is much easier to build with a variable voltage supply. I have built a few hot cutters with a straight DC source but the length of wire has to be calculated for the desired current. It's easy to do. Variable supply allows you to change the current as needed so you can dial in the wire temperature to match feed speed and ambient temperature. Originally we had a dimmer switch driving a small step down transformer which was a little clunky but it did work. Now we use a variable dc power supply. They are inexpensive on amazon/ebay and make the hot wire smoother to operate. They are very easy to build. Ours is a piece of pvc pipe, a spring, and a board. It functions like a bandsaw. This one made me cringe. I have been required to waste many hours with my nose in these books. Absorb the few paragraphs of substance after distillation and remember several hundred pages of the other stuff just long enough to pass a test. I did not learn to despise reading or learning. I love both of these things. I learned to despise school. How am I supposed to avoid distraction when almost everything is so interesting?
-
Thank you for the input Laticcino. I always get the impression that you are the quiet guy in the room who actually knows about the things the rest of us speculate about. Thank you, as well, yotebuster. I hadn't thought about warping. PLA is cheap and burns out decently so we haven't ventured down the wax path yet.
-
Thanks Mikey. I know nothing about electronic books. I will look into it.
-
I agree that golf balls and burners are apples and oranges. I only brought up the golf ball as a demonstration of boundary layer turbulence being a good thing. It was something suggested by someone else. I have no idea about such things and kind of doubt it applies here. Induced air does not travel down that curve in the paths I once thought it did. The wobbly anvil stage is a great descriptor. The bigger reason I never went to ABS was because of the burnout. I had read that it leaves more ash, requires a higher temperature, and has a nice nasty black smoke. I had not heard about it not liking draft, what does it do with that?
-
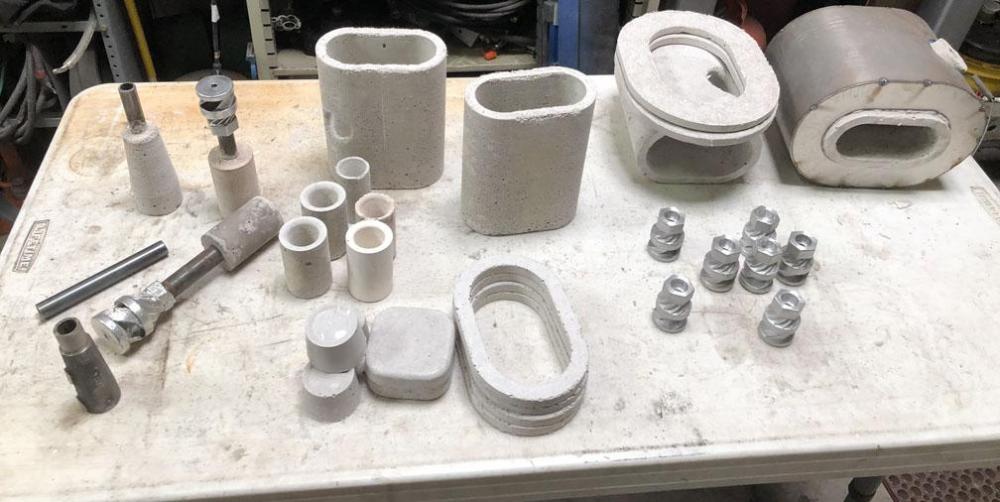
I like the idea of writing a book so that people can hold the information in their hands but there is a lot with that. First, would anyone buy it? Do people buy books anymore? I was recently asked why I still buy books. Second, I would want lots of color pictures to really explain everything in too much detail. Thirdly, with the ease of piracy, would it be worth the extra effort? I could skip the middle thief and put out a free PDF version without the extra effort of publishing. You are currently writing a book, aren't you? What keeps you motivated? The blue foam is great. We have a lot left over from lost foam casting which we don't usually do anymore. It can be cut with utility knives, into any shape. It's even easier to work with a hot wire cutter which can be built quite easily. It works well for forge molds. It doesn't steal water from the refractory and you don't have to worry about refractory sticking to it because it easily disappears with a small hand torch. I'm not pitching cast forge liners yet. Not until we have a better handle on Kast O Lite. We have used 120lbs in our experiments.
-
Originally our molds were hot wire cut blue foam. It makes a great mold that it is water proof and can be easily removed with a hand torch. We are currently using 3D printed molds for forge pieces and nozzles. This is very cool. I am picking larger and larger projects to see what I get away with in the mini forges. I plan on doing this. It's probably a bit premature at this point. We are still experimenting with forge design to prevent cracking.
-
I am using PLA as it prints easier and seems to burn out cleaner. The prints easier reason is also why I don't use the machineable wax filament which would burn out even easier. Vapor smoothing would be a nice thing to have but PLA requires some fun chemicals for that. I don't think the layer lines are causing issues and it has been suggested that they may aid in boundary layer turbulence like the dimples on a golf ball but I have no real idea on it all. I am going to shellac the inside of some, one of these days, to see if the smoothness makes any difference in performance. Something tells me acetone won't mix well with Kast O Lite or plaster. Either thing I am casting though, requires heat in the first place. The molded Kast O Lite has to be cooked to finish and the investments have to be preheated to pretty high temperatures so the metal won't cool upon contact or cause spalling. Thank you for the input. Especially with 3D printing, as I am still fairly new to it all.
-
I sure can. Anything in particular? I probably don't have anything new to add to the conversation. I am a fan of the flat wide floor. I've seen the shape called lozenge but I picture a rhombus with that description. I've also seen rounded rectangle or round end rectangle. Whatever it's called, I like it. I have been forging with a 50in³ forge lately. When we first made it, I thought it was a cute little guy. I decided to push it and I am amazed by some of the things I have managed to forge with it. Some stuff I would not have been able to pull of with my old 150 in³ freon cylinder forge. The propane seems to go on forever.
-
I hadn't thought of that. I went out and took a look at some broken refractory from an old forge and found it does not have the fibers sticking out of the break. It is missing through the full thickness.
-
My apologies. Nothing too juicy over here. We have turned the experimenting towards forge design and kast-o-lite handling. I am excited about it but I am excited by different kinds of mud.
-
You guys should have said something about this sooner. This is what I was playing with last night. I think I'm in trouble.