
Another FrankenBurner
-
Posts
616 -
Joined
-
Last visited
Content Type
Profiles
Forums
Articles
Gallery
Downloads
Events
Everything posted by Another FrankenBurner
-
Are you trying to demonstrate something? Does it require video? Can you describe it or take a picture? Pictures require less bandwidth and can show flames well. Any reason for cutting the mix tube shorter than the plans? Two inches of mix tube can change performance quite a bit.
-
Thank you, pnut, for that PDF recommendation. I will have to do some experimenting with that information. I have been using coil springs, fork lift tine and sucker rod for tooling.
-
I found a more resolute copy of the above image.
-
The short answer: 3/4" burner is the largest mix tube burner I have used 3D printer nozzles. The long answer: Mix tube diameter is not the only factor which determines the orifice diameter. I can list three different burner styles which use 3 different orifice sizes. I am now tinkering with a burner which has a 3/8"(nominal) throat which is happy with a 1.2 mm printer nozzle or the 045 mig tip. Finding the right orifice size requires experimentation if the burner is also an experiment. I purchased a 20 pack assortment of 3D printer nozzles for $6 which allows me to trial and error. My burners tend to like a larger orifice than some designs. Printer nozzles are easily available up to 1.2 mm which is too small for my 3/4" burner. I had to drill one to a larger diameter to work. In a burner which likes a smaller orifice, the 1.2 mm top cap may be good for larger mix tube burners. The mig tips and the printer nozzles can't be compared directly by their orifice size. The difference in channel length changes the output velocity and fuel volume per pressure. Even if you know what size mig tip your burner likes, you still have to experiment to switch over to a printer nozzle. In my burners, it is usually pretty close. The 1/2" burners liked the 030 mig tip at 0.039" actual. They now have the 1 mm printer nozzle at 0.0394" but they heat the forge to a higher temperature.
-
I am a fan of the 3D printer nozzles as orifices, over the mig tips. They are listed in exact size, they are brass, they are inexpensive and they have a shorter channel length which outputs a higher velocity stream per fuel pressure. I am curious what a 3/4 Mikey would do with a 0.8 to 1 mm printer nozzle.
-

Naturally Aspirated Ribbon Burner. Photo heavy.
Another FrankenBurner replied to Frosty's topic in Ribbon Burners
I wouldn't jump too fast. If you are talking about drilling out the 84 1/8 to 5/16, that would be too fast. If you deviate from the 1/8 inch, then you can get into flash back territory. This is a balancing act. Frosty's 3/4 has nineteen 5/16" holes. Something tells me 84 at 5/16" would be grossly too many for a one inch. Though, I don't recommend trying to drill cured kastolite. I think you will just break it. If you could successfully drill it, I would say in small steps. Go to 3/16 then 1/4. You can't go back so you can't bracket this. This is why Frosty advised using wood blocks before casting another one. Change one thing at a time. If you were to drill the block and change orifice sizes at the same time, the new running conditions would tell you nothing in relation to each change. I say all this because at this point, you are not building a burner, you are designing one. As you see, there is more to it than just pushing fuel down a pipe. I think the mad scientists tinkerer's club needs a patch. -
Naturally Aspirated Ribbon Burner. Photo heavy.
Another FrankenBurner replied to Frosty's topic in Ribbon Burners
As Mike started with 045 mig tip, 1 inch mix tube and he is from Texas , I am guessing he wants higher outputs. In spite of that, I am very curious what the 84 ports would do with a 1/2 inch Frosty T. It would be a much lower output burner, but it beats deep sixing the NARB block. Good for a second, smaller forge? -
Naturally Aspirated Ribbon Burner. Photo heavy.
Another FrankenBurner replied to Frosty's topic in Ribbon Burners
I don't think you have enough ports. Dan has 123 ports at 1/8th inch for his 3/4 inducer. You are attempting 84 with a 1 inch. That is why your flames are lifting from the block. -
Ron Reil gets a kick out of this thought too. He is into the history of things and has lots of treasures. He regularly presents me some tool/treasure with "What's this?" He told me his mentor Grandpa (Nahum Hersom) also enjoyed that game.
-
Beware of forge burners on amazon and ebay. You will find several different types generally copying the concept of some known to function burner. It is difficult to find them actually built to the specs of the burner they are copying. Several examples being very out of spec or built in ways the original maker advised against. It is easy to make a pipe with fire at one end that looks like a good burner if you don't know what you are looking at. With just a little effort, it is easy to build one which performs better than that. If you do not want to build a burner, research the type of burner you want so that you can buy one which is built correctly.
-
I have and use both. Make sure your valve(s) are the appropriate type. The newer valves have both. I prefer the acme fitting as it does not require tools to change out cylinders. One possible downside is that the acme connection is not as solid in terms of the regulator rotating vs a fitting which is wrenched on but I have never experienced any problems. I do not have a large manifold hanging off of the cylinder though. I have the connection fitting, the regulator, a 1/4 turn ball valve, and the hose. Speaking of wrenched on fittings, if you go with the pol fitting, do not over tighten it. A lot of people spot tight these and they do not need to be muscled tight. Doing so is not great on the sealing surfaces or the threads.
-
I think Mikey might be talking about Glen over at GS Tongs.
-
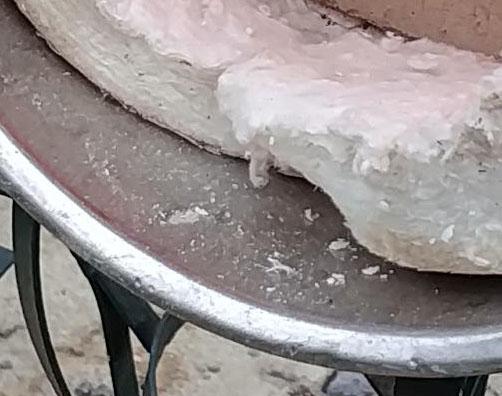
Irondragon Forge & Clay posted a thread on page 1 which goes into the danger of uncoated ceramic wool(kaowool). It is a good read. See all the broken down bits here. You don't want this. The smaller particles which go airborne and make it into your lungs are no good. I'm not a big safety guy but I want to do this for a while to come and I want my lungs, eyes and ears to still work at the end of it so I do what I can to protect them. I have hearing damage and a scarred eye from before I started wearing the ppe and I sure wish I had just worn it before the damage.
-
I could not remember so I weighed a couple of bricks. The k26 brick weighs 2 lbs 6 oz(I was way off) and the dense brick weighs 7 lbs. These are full size bricks though, measuring 9" x 4.5" x 2.5". Based on the pictures, I thought you had a full brick in there. A common split size is 1.25" thick, maybe you have one of those. I am not sure here but I don't think the rigidizer alone is enough to protect against free fibers. Pictures are easier to get, take up less bandwidth and for me at least, are easier to read than video. The pictures that Frosty recommended would give us a lot of information to go on. This is the right one. If all three sides were 3/4" or 1" it would be the wrong one.
-
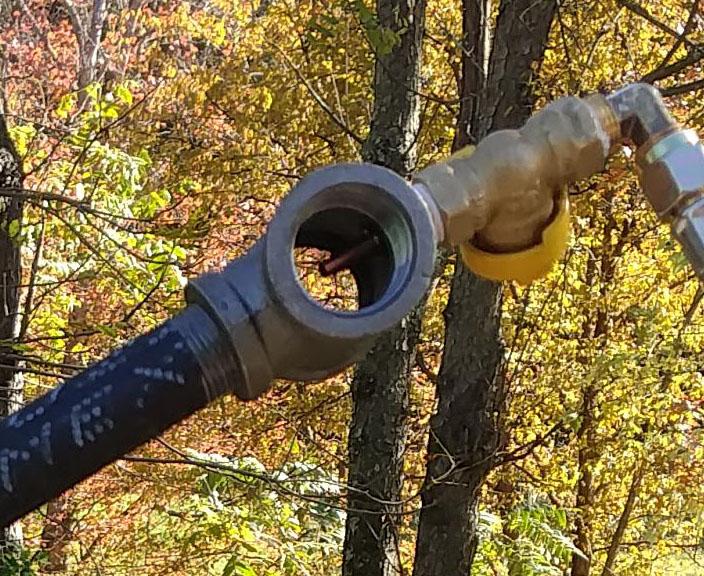
Just a little bit more tweaking and you could have a hotter forge if you want it. The 45 and extra nipple will add some resistance to the flow path but it will not change performance as drastically as an out of alignment mig tip. When a mig tip is out of axial alignment with the mix tube, even a little, it can reduce the air induction dramatically. The tip looks to be fairly out of alignment in this image. If you could get a picture of the flame inside the forge when the forge is first fired up before the walls are glowing, this would give us much more information to go on. If the burner were mine and the tip is actually out of alignment, I would get a new tee and try again. If you have access to a drill press, Frosty's advice in the pdf about using a floor flange to fasten the fitting to the drill press will help with this greatly. Measure carefully and center punch. After drilling, use the drill press to tap the hole. This will keep the tap in alignment. If you do this and you want to take the 45 out, do so before you tune the burner. You would gain some performance by removing it. Either way, have it setup the way you want it before you tune it. On the forge side of things, the blanket looks uncoated. As previously stated, this blanket can create a hazard if left uncoated. If you are not ham handed, you can get away with a thinner coating. I have used plistix which I got from Wayne Coe. In the beginning, I was pretty clumsy with hot pieces so I took the others advice and armored the blanket with a 3/8" layer of kast o lite 30. I like not worrying about poking the wall into the blanket so I still armor with kast o lite and then coat that in plistix. The full size brick that is in the forge looks to be the dense variety. The light bricks are in the 8 ounce range and the heavy ones are 7 pounds IIRC. If it is a heavy one, I would look for something else. This could be another significant area of improvement in forge temperatures. I used to use 3/8" high alumina kiln shelf in mine but now I just use the kast o lite. Don't just remove it and let the flame blast the raw blanket though, it will create the hazard and destroy the blanket. If you plan on forge welding with flux, your floor has to put up with flux as well. If you remove the 45 fitting, it would put the burner more over the top of the forge. This might draw in spent gas coming out of the forge. If you were to orient the tee openings perpendicular to the forge openings, it might help. Hopefully someone else has more experience with that..
-
I definitely agree with not bringing anger to the anvil. This was one of my early on learnings, right in there with tapers. Meditation is a great word to describe it. Finding Zen with hammer in hand. Now every strike I am going to hear it. Bink, Bink, Bink. Making tools is addictive. I always made tools before I found forging but forging gave me more reasons to make more, more tools to make more tools and a deeper understanding of all the tools I already owned. Got an idea, figure out what tools you need to make it happen, make the tools and make it happen. It is rewarding and fulfilling. The tools make the craftsman but the blacksmith makes the tools. I don't remember where I read that one. Probably on IFI somewhere.
-
I should have stated that differently. What I meant was that I am guilty of not balancing my time well. I fully intend on spending much more time on burners. I just have to fit forging in. For me, forging is therapeutic. If I start to get grouchy and life seems to not make sense, I need time at the anvil. Then all is well again. At least it's a manly binky.
-
Yeah, I too am guilty of spending too much time on burners/forges and too little on the fruits of that labor.
-
When I write the term nozzle, your "flame retention nozzle" is implied. At least in my head, which others don't have access to. I suppose I should write it out in full as well so that there is less possibility for confusion. I was more so meaning that the connecting tube which you are sliding the burner in and out of is responsible for the pressure changes. I am with you on the plenum being it's own monster as far as variables and what is happening to the stream once it exits the connecting tube into the plenum. I have a mental picture of what may be happening in there but it is speculation at best. It doesn't sound like it. My burners can go from lean to rich by changing the nozzle overhang alone. I am not sure if it is changing induction dramatically or if the fuel/air ratio has a small range of happy. More speculation, I wonder if you made dramatic changes here, if the burner wouldn't like it. To the point that you may need to increase/decrease the quantity of ports. Mikey's stepped flame retention nozzles are stepped to make a more dramatic expansion to slow down his high velocity FAM stream. To put on the brakes as he puts it. Your port quantity is balanced to your stream velocity and volume. If you slow it down too much, maybe you get to flashback territory. I am not sure how picky the NARB's are with this. Especially yours since it seems to be below the quench distance. I should probably get off my butt and start playing with ribbon burners a bit deeper. I once had my forge directly rained on for quite a while, which upset me greatly. I started it in bypass flame for a nice low heat. After the steam stopped billowing out and the forge got to a low red, I turned up the heat and all was good. Somewhere I read that the refractory is hygroscopic. If this is true, you heat the forge regularly which keeps it bone dry and when you shut it off, it absorbs moisture from it's surroundings. I have no idea if it's true but I start my forge with full heat and have not had any problems. If my forge has been off for weeks, I give it a few minutes in bypass before I kick on full heat. Not sure if it is needed but it only costs me a few minutes.
-
I understand. If you are looking to justify the build, one thing I can say is about the time savings. I like both solid fuel and gas forges. In terms of not having much time but wanting to smite some steel, the gas forge is a time saver. I can forge more often because of the simplicity and ease of the gas forge. It's an unfair comparison but liken it to cooking dinner over a camp fire vs a gas stove. No time spent building or managing the fire, no clinkers, no shoveling fuel, no smoke. Light it, let it preheat, do your work, shut it down. I have done it several times in one day. And it looks good. Nice job. As to the step flare talk, I like the term nozzle which I think I picked up from Mike's book. Flare makes me picture an expanding taper on the end of a cylinder. Like bell bottoms, the flare with flair. Now we have 3D printer nozzles to add to the confusion. I suspect you are tinkering with plenum pressure. The definition of Venturi effect that I find most often is a decrease in fluid pressure as a result of passing through a constricted section. This would apply to any burner using a reducer as the inlet and it is part of why so many use a reducer. The outlet taper from the throat of a Venturi tube is for the opposite effect, pressure recovery. Converge to drop pressure and diverge to recover as much as possible. This is where the 1:12 angle comes from, it is the fastest expansion possible that does not cause turbulence which would hinder this recovery. While you are stepping, which is a faster expansion, it is still better than the huge immediate expansion at the plenum. More plenum pressure, more push, more induction. Leaning out the flames a bit. This is what I suspect but I could easily see the opposite being true instead. Your flames being too lean, you increase nozzle length, which increases drag and decreases induction. Either way, as Frosty stated, it is a final tuning by making small changes to the fuel/air ratio. One reason Mikey controls the overhang on his sliding stepped nozzles.
-
Thank you. I originally started this thread to list my feats and failures in the hopes that some could learn from it and others could educate me. I have been educated, inspired, encouraged, and motivated here. I am still tinkering. It has slowed as I am studying for an exam for work. After reading code for several hours a day, my mind is too melted to think burners. Hopefully I will be done with that soon. With the straight burners, I have not improved beyond v46. Lots of experiments(up to v80) but not a lot of change. I am playing with inlet shape in the hopes of reducing the size of the inspirator. I have also been playing with straight ribs to eliminate the helix vanes. They reduce air induction some and they require investment casting, at least so far. They are doing something special though, I can't seem to get away from them. I am also playing with 3/4" burners. I don't see myself using them for forges. These things put out way too much heat. We are using one in the foundry furnace. I like smaller forges though. We have a 450 in3 forge running two 1/2" burners and it seems like a cavern. The 185 in3 forge demands much less fuel and accommodates most of the things we are doing over here. I interpreted this as meaning that building a forge is a monumental task. If it is correct and it is causing hesitation, I did the same on my first one. Once I got started, it finished quickly, I wondered what all the fuss was about and moved on to thinking about the next forge. I hesitated longer than it took to build the forge. Plot what you want and get started. Building a forge the easy part.
-
It is possible. I took a 3/4"(0.824" actual ID) burner which used a mig tip and increased it's performance by going to a 3D printer nozzle. If you are over it and just want to forge, try your burner as is. Post pictures of the flame in the forge and we can try to help tune it the best it can be. If you need/want to go to new build, try a recipe burner. The easiest is the Frosty T. This will reduce the tinkering required so you can get to smiting your metal. If you are playing with a gas forge, learning to interpret flame is helpful. The difference between a tuned burner and an out of tune burner can be dramatic. A difference in forge/flame temperature, dragons breath, fuel consumption and carbon monoxide production.
-
We made a 4x4x2" mold which we line the bottom and sides with 1/2" of Kast o Lite, we pushed a piece of rigidized ceramic wool into the middle, and cap the top with 1/2" of the refractory. They have held up well as our doors.
-
That last photo you posted, it may just be the photo but that orifice/jet looks very out of alignment. If so, that is a problem. Out of alignment, even a little, can cause major problems. If you can disconnect the burner from the fuel line and connect it to a water line, this will tell you immediately.
-
No need to apologise. Since there are no set terms, it is hard to talk about. I understand now. One concern with doing that is that it would take away the ability for the orifice position to be adjusted. I like adjustability so that the burner can be tuned when it in it's final position. I suspect the best jet position may be different depending on the intended use (small forge, big forge, ribbon burner, hand torch). Not that I don't think it wouldn't work. I think it would work just fine with the best average orifice position.