tinkertim
Members
-
Joined
-
Last visited
Everything posted by tinkertim
-
Well it was a 750 caliber Mop! Tink!
-
I used a mop bucket for my latest forge, and with a NA ribbon burner and the option of a raised floor, it works really well for me! Tink!
-
Hi Travis, The bell reducer (or Flare as it is commonly known as on iforgeiron) is a widened section of piping, fitted after the mixing tube, to allow the Fuel/Air Mix (FAM) to slow down and burn, without having the flame blow off the end of the burner. Outside of a forge, the metal Flare can get plenty orange when the burner is turned up, but can radiate some of that heat away, so that the Flare doesn't actually melt under normal circumstances. Inside a forge, the heat builds up and is reflected back into the forge, where it can reach temperatures that will melt a metal Flare, as it cannot radiate its heat away. The normal solution to this is to remove the Flare from the end of the mixing tube, move the end of the tube further back into the refractory/insulation region, and shape a wider Flare region in your refractory coating. This wider Flare region will allow the FAM to slow down and burn stably in this region, without over-heating and melting. I hope this info helps. Tink!
-
Are you sure they're not photoshopped?
-
Cheers Matey, I like to explain the reasons behind suggestions and advice, and not assume knowledge too much. I've spent too many years explaining techy designs to non-technical managers and new-starters, that I automatically give the full name for things and show the abbreviation, before then using that abbreviation in the rest of the text. Nerdy habits from an old design engineer. Tink!
-
Hi Hotplot, Did you remember to "butter" (that is dampen down with a spray of water) the rigidised blanket before you applied the refractory? If not, then the dry blanket will suck out too much moisture from the refractory, and prevent it from binding properly to the blanket. Tink!
-
Hiya Miki, The fumed Silica, when you mix a spoonful into a squirty bottle half full of water and a few drops of food colouring, gives you your blanket rigidiser. It worked really well for me. If you have already already coated your blanket with Castolite/Refractory then you don't need the rigidiser any more. As far as the Zircopax coating on the inside of your forge, if there is no binding agent mixed in with it, then it will flake off, and anything you paint over the top will come off as well. The best thing to do is sand or wire-brush the inside of your forge to remove as much of the flakey layer as possible. Vacuum out the forge, to remove as much dust/flakes as possible. When you are ready with your Zircopax/Colloidal-Silica (ZCS) mix, dampen the inside of the forge (known as "buttering"), before applying the ZCS mix, so that the Castolite doesn't suck out too much of the moisture from the ZCS mix and stop it from binding to the surface. Once a thin coating is applied, you can dry it out with repeated short bursts of a burner. Once the moisture has slowly been driven off you can then ramp up the temp. I put 4 initial coats over my rigidised blanket to give it some physical protection. As you have used Castolite, 1 or 2 layers should be fine. Give it a try and see. If you mix the ZCS too thick, and it forms thick layers, then it can curl away from the surface as it dries. I'd suggest doing more layers with a thinner mix. Take your time with the drying out and firing, so that it will bond well. Good luck. Tink!
-
Go get some sleep Mikey! I thought I was a bad insomniac! Tink!
-
Hi Miki, As I posted on page 2 above (and page1), you need the Zircopax for the IR flame face and the Morisol X30 (Colloidal Silica) as the binder, so that it sticks to the lining and minimises flake-off. Without the Colloidal Silica or some other binding agent, the Zircopax will flake away with the slightest touch or breath of flame. The Morisol X30 I got from Ulster Ceramics, so should be easy for you. Give it a try. Tink!
-
Hi Mabaile, Welcome to the forum. There are things you need to do to help us help you. 1. Put your world-location in your Profile, as there may be Smiths local to you who could help, and some suggestions/solutions may vary depending on the Country you live in, etc. 2. You will be asked by Frosty and others to post up more detailed pictures of the following. a. A photo through the air openings of the burner, so that the size/length of the MIG tip/gas orifice can be seen. b. A photo into the opening of the forge, so they can see where and how the burner tip is fitted into the forge roof. c. Photos of it burning outside the forge, where you say it performs fine. 3. Details of burner you have built, ie. the size & length of pipe you've used, jet size, position inside the Tee, etc. Normally a burner behaves differently when inside and outside a forge, usually due to back-pressure. Frosty usually advocates that you tune his burners in the forge, as that's where you are going to use them. My initial comment would be that you normally need to start a forge at low gas pressure just to get it so stay lit. As the forge interior heats up, you can then gradually increase the gas pressure, as once the lining gets above a certain temperature it will spontaneously ignite any gas that hits it. It looks to me as though your gas pressure is turned up too high for initial lighting, and that your T-burner needs to be tuned to get the correct air-fuel mix to work inside the forge. Frosty will be along soon to help with tuning, but if you can post up those photos & info I mentioned above, it will make his job much easier. Tink!
-
I've found that coating the porous, granular flame-facing surface of Insulating Fire Bricks (IFBs) definitely increases their life-span. They are going to crack sooner or later anyway. That is the nature of IFBs. But a protective coating (in my case a Zircopax/Colloidal-Silica wash) seemed to fill in the tiny openings in the porous surface and made it weather the direct flame better. The surface seemed less crumbly after repeated high-heat direct-flame contact. I don't use uncoated IFBs in direct-flame contact any more, for this reason. Just my £0.02 worth, Hope it helps. Tink!
-
You might also have issues with the air intakes on your two burners being in-line with each other, so that they may fight for the same air in between them and not give an even burn. Try rotating both your burners 90-degrees along their long axis, so the air intakes are more vertical than horizontal. They shouldn't then risk interacting with each other. Just a thought. Tink!
-
That would make sense Thomas. Tink!
-
Hi Spronez, Your statement about ribbon burners having large orifices at low pressures is ONLY applicable to blown ribbon burners. Normally Aspirated Ribbon Burners (NARBs) run a smaller orifice at higher pressures, as they need to induce air into the gas flow in exactly the same way as a single-port Normally Aspirated (NA) burner does. I know this for a fact as I used exactly the same 3/4" AMAL propane injector and orifice for an NA and a NARB setup in the same forge with the same regulator, etc. The only difference was Single-Port Vs. Multi-Port. This is why I can say that the NARB was more efficient (lower PSI and therefore less Gas used) for the same number of heating cycles to the same high-orange temperature. These are the facts based on my observations with my near-identical setups. Others may have observed other behaviours with their setups, but I won't be going back to a single-port forge any time soon, as it costs me more money to run. YMMV. Tink!
-
Hi MRB, The efficiency of the ribbon burner comes from having lots of small slow flames, rather than having one large fast flame. The slow flames spend longer in the forge, completing their combustion, and transferring their heat to the forge lining, to be re-radiated to heat your steel. The faster flame can be leaving your forge before it has completed its combustion, wasting it's energy as dragon's breath, outside your forge. I've used both a single-port Normally Aspirated (NA) burner and a Normally Aspirated Ribbon Burner (NARB), using the same 3/4" AMAL propane injector and orifice, and I've found the NARB to give a more even heat to the entire inside of my forge. It doesn't have a hot-spot, which some might find useful for their kind of forging, but I've found I use a lower PSI and less gas for the same amount of heating cycles. I'm only a part-time hobbyist smith, but I'm also a full-time engineer, and I appreciate efficiency. For the way I work, the NARB is more efficient for me. Other's mileage may vary, but I hope you find my observations of use. Some of my NARB investigations & development can be found in other threads if you are interested. Tink!
-
Hi Mikey, The OP mentions having 2 venturi burners fitted. Also that floor looks like Kaowool rather than brick, as do all the sides, etc. It also doesn't look like rigidised or coated Kaowool either. Tink!
-
Hi Rich, As a fellow Brit, you're going to find it tough to get Kast-o-lite30 over here. Having read the complete Forges-101 and Burners-101 threads (yes it takes ages, but there is so much invaluable information from very experienced people, it would almost be crazy not to) I came across an alternative Flame face coating method. A forum member called D.Rotblatt had been doing slipcasting of metals, and had been making and using a high-temperature slurry to coat the inside of his ceramic blanket for decades. Unlike Kast-o-lite, which sets to a rigid, concrete-like finish, this slurry is mixed up in a pot and painted on over the rigidised blanket and then heated to set. You need to paint and set a good few layers to build up a protective crust of Flame face. This slurry is a mix of Zircopax(Zirconium Silicate powder) and a Colloidal Silica liquid. When it dries and is heated, the Zircopax acts like an Infra-Red re-emitter, and radiates heat back into your forge. It is not as strong a coating as Kast-o-lite30, but it heats up very fast (so is cheaper on gas), is easy to patch, will protect the surface of ceramic blanket and soft fire bricks (which are damaged over time with too much direct flame impact), and it is pretty cheap. Ideal for a hobbyist! Here's a link to a thread where I built a forge and used and tested this Zircopax slurry with great success. The searches for coating materials: GOOGLE: mbfg fumed silica (Can be mixed with water & food colouring to make your own ridgidiser) The searches below get you to places you can buy the Zirconium Silicate powder (Zircopax) and the Colloidal Silica solution (Morisol x30). GOOGLE: scarva en gb zircopax GOOGLE: ulster ceramics morisol x30 If you want to know more, then let me know. All the best, Tink!
-
For a hand-held 1/2" burner, I was thinking of printing a design based on some of Another Frankenburner's (AFB's) spiral-vaned designs. With the 3 vanes it will be more rigid, and I can build a small handle into it. As with his designs, I will just print the spiral inducer part initially in PLA, I'll try and get some stainless tubing for the mixing tube, as it conducts heat less that the maleable iron pipe, so for occasional use I might not need to cast the inducer in Aluminium. As for the flare, for occasional use I would probably get away with a stepped stainless sleeve, but if it wasn't up to the heat, then as AFB has done, I might cast a refactory flare. It is all for Tinkering sake, and just a bit of fun. I could buy a basic LPG burner head from a plumbing suppliers for less time and money, but then it wouldn't be tinkering. Tink!
-
Interesting 3D printed inspirator. How well did the pipe thread at the end of the mixing tube work out? I thought 3D print threads are always a weak spot unless they are enormous threads. Also gut-feel is that the choke should be fitted the opposite way round, to guide the flow of air into the neck of the inspirator, rather than acting as an edge that might cause turbulence behind the jet. I guess a problem could be that you might not be able to slide the choke all the way shut, without it coming off the jet pipe, as the design currently stands. Nice idea though. I'm planning on printing an inspirator for a hand-held 1/2" burner for occasional DIY use, where I cannot justify my 3/4" heat monster. Good luck with the tinkering. Tink!
-
I know its an old thread but: I had something similar in my Design & Technology classes at secondary school (shop classes at high school?). They had to teach a rigid design methodology, which included coming up with and documenting multiple design alternatives to a solution, then documenting all of the reasons why all-but-one of them was sub-optimal, before arriving at the final design! As I did all of my designing, optimising and winnowing in my head automatically (always have, maybe its a dyslexic thing), I had to resort to producing my optimum design, and then making up stupid alternatives and then back-filling all those documents just to be able to say I'd followed the method. In the end I said I cannot use your stupid method, as it just panders to the lowest-common-denominator in a class, and I refused to follow it. They said I'd fail that class if I didn't follow the method, but my Father supported me in the decision. At the end of the year, I received the lowest mark for design method, failed the class, but got the highest marks in the class for all of my final designs and construction! Afterwards, the tutors allowed me to come in at any free time during the day, to work on my own designs. I designed in fibreglass, laminates, hot-molding acrylic sheet, metal, wood, etc. and combinations of all of them, where they only officially taught in the last two materials. Forcing me to try and think and create/problem-solve in a rigid and narrow way just felt alien to me, but having my Father support my decision over this was priceless to me. So now I design and troubleshoot electronic and mechanical systems for a living. I still struggle with documentation, but my boss understands that letting people play-to their-strengths gets the best out of them. Took decades to find a boss like this. Such is life. Sorry for the ramble 671Jungle, just the Nicola Tesla comment struck a cord. All the best, Tink!
-
Hi NoGood..., The Rigidizer I used was colloidal Silica powder mixed into water, with some food dye added, so you can see where you've sprayed. Once the blanket is coated you have to evaporate off the water by gentle heating with a hand-held burner. Once steam stops coming off the blanket, you are left with microscopic clumps of Silica particles at the points where the ceramic fibres in your blanket touch each other. Air-drying will not rigidise the blanket, it needs to be "fired", so you now want to heat the blanket to melt these clumps of Silica particles so they fuse your ceramic fibres together and give the rigidising effect you want. I manually moved my burner slowly over the whole inner surface of the blanket until every point had reached a dull orange at some point, and I then let it cool. It also helped that the areas that were heated fully then lost their food colour and went off-white. After this, you could touch the inner surface of the blanket and it felt stiff, and resisted light pressure. This is now a rigidised blanket, and ready for your refractory coating, etc. Hope this helps, Tink!
-
Yup. Mentioned ~7 posts earlier. Tink!
-
Have you been spritzing the rigidised ceramic blanket with water (buttering it), before you apply your KOL? If not, then the blanket will wick-away moisture from the KOL where it meets the blanket, leaving a dry and not-well-attached interface between the two materials. Hope this helps. Tink!
-
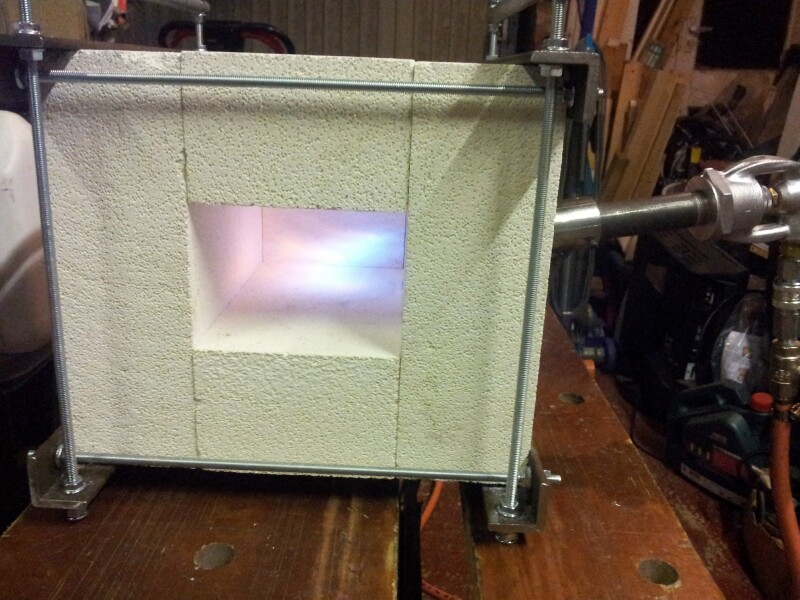
Hi Deimos, The angle-iron and threaded rods generally keep enough tension on the soft fire bricks, so that it will still hold together and be usable if it cracks. It is more the granular nature of the surface of the soft fire bricks that suffer most after heat/cool cycles. Filling this open surface with a protective "Flame Face" coating makes it tougher, and less likely to crumble with the high heat of forging. Be aware that all forge lining materials are "disposable" items, and will need to be replaced over time. The more expensive refractory coatings, such as Kast-o-lite30 have a much, much longer lifetime that Insulating Fire Bricks (IFBs), but a beginners forge made out of IFBs will allow you to learn a lot. If you cannot get Matrikote or Plistex easily in NL, then you could try the DIY flame-face mix I use. It works well on IFB's (which I have on the floor of my second forge design). I have to go for now, but will post up some more info later if you are interested. You could check out my posts in the "Problem with Forge. Welding Temps" thread if you like. Tink!
-
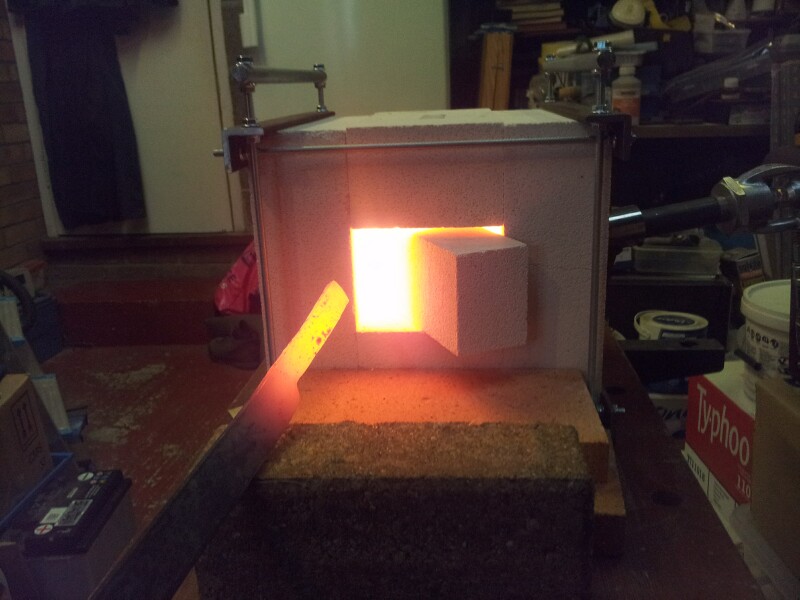
My first Insulating Fire Brick (IFB) forge was built with angle-iron and threaded rods, as it's one of the simplest designs for beginners. I fitted an angled side-mounted burner, rather than a top-mounted one, to avoid the burner pipework over-heating when the forge was turned off. If you block-off some of the end openings with spare IFB's, then the forge can get plenty hot enough for a beginner. Insulating Fire Bricks are easy to cut with an old saw (which will then be blunt!), and you can recess the end of your burner into the inner wall of an IFB, so that your burner tip doesn't melt. IFB's are fragile, and will crack after a number of heat/cool cycles. Coating the inner surface with a suitable "Flame Face" coating will make them last longer. I believe the recommended coatings are Matricote or Plistex, but I used a DIY mix, as it was easier to get the materials in the UK. Good luck with your build. Tink! Tink!