tinkertim
Members
-
Joined
-
Last visited
Everything posted by tinkertim
-
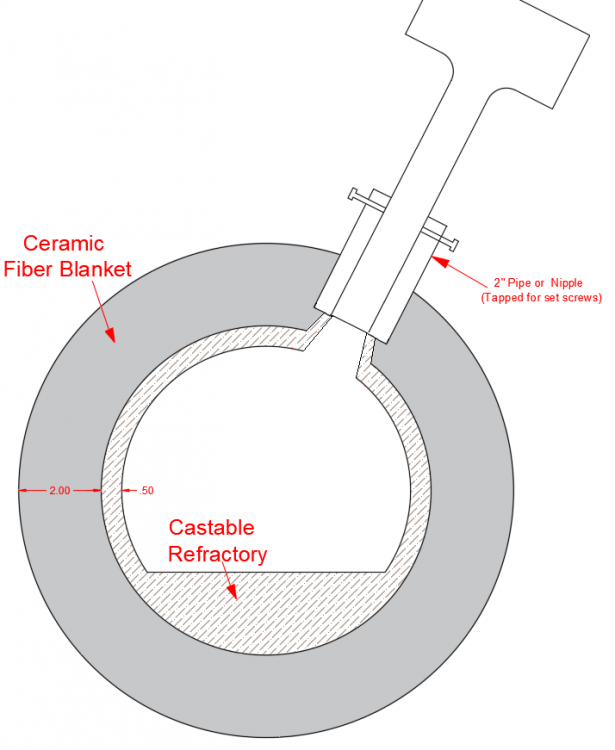
Hi Tooln, Here is a picture of someone elses design that I edited, to show them where they could recess the burner outlet within the insulation layer, and where they would form a cone shape within the ceramic blanket, which they would then line with the castable refractory to make a flared opening, to allow the fuel/air mixture to decelerate and burn, without melting the end off the burner. This is what Frosty is describing above (ignore the rest of the picture, as it was someone's specific design that they wanted advice about). Hope this helps. Tink!
-
Hiya MikeTheMike, Totally agree with Timgunn1962. The AMAL propane injectors are an excellent way to get a really adjustable burner setup. You can also easily adjust for rich or lean, to suit the type of forge environment you need. I followed Tim's advice when ordering mine, and got 2 jet sizes to help with setup. FYI, Owen Bush ("basher" on this website) runs a Forging school in South London, and uses AMAL injectors for all his forges. They are not the cheapest, but as you are not in the USA you don't have to worry about horrendous postage costs. If you get one (or more) you will need to get lengths of appropriate threaded Malleable Iron pipe to fit the AMAL injectors to. These short lengths, threaded at either end, are often referred to as pipe nipple when you search for them. Don't buy the galvanised pipe, as this can emit zinc vapour when heated, which is harmful. The recommended length of pipe nipple depends on the size of burner you are using. For my 3/4" AMAL burner, I believe the recommended length was ~8 inches. Frosty should have some advice on the lengths of pipe nipple recommended for each size of burner. PS. I live over the bridge near Thornbury, so not a million miles from Newport (more like 25). You might want to put your location in you profile info, so others can see which side of the pond you're on, and whether they might be near enough to help. Good luck. Tink!
-
Hi Mike, If you GOOGLE: mbfg fumed silica and chose the first link after the adverts, you'll get the Fumed Silica powder I used to mix up my rigidizer. It's a UK supplier so the postage should be reasonable. Hope this helps. Tink!
-
I put two 3/4" pipe fittings on a long and short side of my plenum, to allow me to fit it in two different orientations in two different forges. The unused fitting was just plugged with an end-stop. But I found that having two opening in the back of the plenum made it much easier to clean out crumbled bits of the Insulated Fire Brick that I'd built my NARB out of. Thinking ahead can often save you pain later. Tink!
-
I did the same as Buzz, With my first IFB forge I used a 3/4" AMAL injector as a single burner into the side of the forge. Later I built a Ribbon burner based on half an IFB, and connected it to the same 3/4" AMAL injector and fed it in through the roof of the IFB forge. I agree with Buzz's results. The single burner was louder and fiercer to reach the same colour temperature. It seemed to blow more heat and dragons breath out of the door, compared to the Ribbon burner, which had lots of softer flames and brought the inside of the forge to a more even colour. I also noticed that once up to the same colour temp, the Ribbon burner used a lower PSI than the single burner at the same heat. And it is so much quieter to work with. You loose the high frequency scream. I use the 3/4" AMAL burner as a single for localised heating as a hand torch, and just put it back into the Ribbon burner plenum port when I want to forge. These are just my observations, but as a engineer and a hobby-smith, I save money on gas with a Ribbon burner, so I'm never going back to a single burner in my forge. Just my £0.02 worth. Tink!
-
Regarding Gas-grade Teflon tape Vs. normal plumbing-grade Teflon tape: The differences are in the manufacture. Plumbing-grade tape is mechanically stretched during production, so giving you a longer length of thinner tape for the same volume of Teflon. The stretching process causes thousands of micro-tears to open up in the Teflon, which isn't a problem for water-based use, as the H2O molecule is too big to get through these micro-tears, but gas molecules are smaller and CAN get through these micro-tears. Gas-grade Teflon tape is un-stretched, so is much thicker and doesn't contain micro-tears. This extra thickness makes it much better at filling the threads of a gas-pipe fitting, and why, in the UK at least, it is specified that you only need 1 & 1/4 turns of Gas-grade tape on a tapered gas fitting to seal it correctly. Sorry for the little essay, but I wanted to know the real difference between the two tape types so spent quite a while investigating it, but finally found manufacturing details as well as tests of the tapes, including micrographs showing the micro-tearing on the plumbing-grade tape. Quite interesting (and sad) for a Tech Nerd like me! Tink!
-
I was trying to decide whether to drill some holes in the stump and make up some Hardy-like tools, when the opportunity to pick up a light-weight (56kg) Farriers training anvil came along, and it was too good an opportunity to miss. He also let me have ~30 full-sized used farriers rasps to play with for free! He also had a 5 foot high mound of old shoes, waiting to be recycled, which looked crazy! I liked the idea that I could add any radius I liked to the edge with an angle grinder, to suit particular jobs, and just rotate the cylinder to suit. JHCC, I didn't like to think how long it would take to grind, bore & chisel out a half-cylinder's-worth of wood from the top of that stump, as it was really hard. I then wouldn't be able to use the cylinder on the stump in its current orientation. Currently that lump of steel is a semi-doorstop, waiting for its next suitable project. Tink!
-
UPDATE: Added to the Improvised Anvils thread. https://www.iforgeiron.com/topic/52308-a-collection-of-improvised-anvils/?do=findComment&comment=741896 Tink!
-
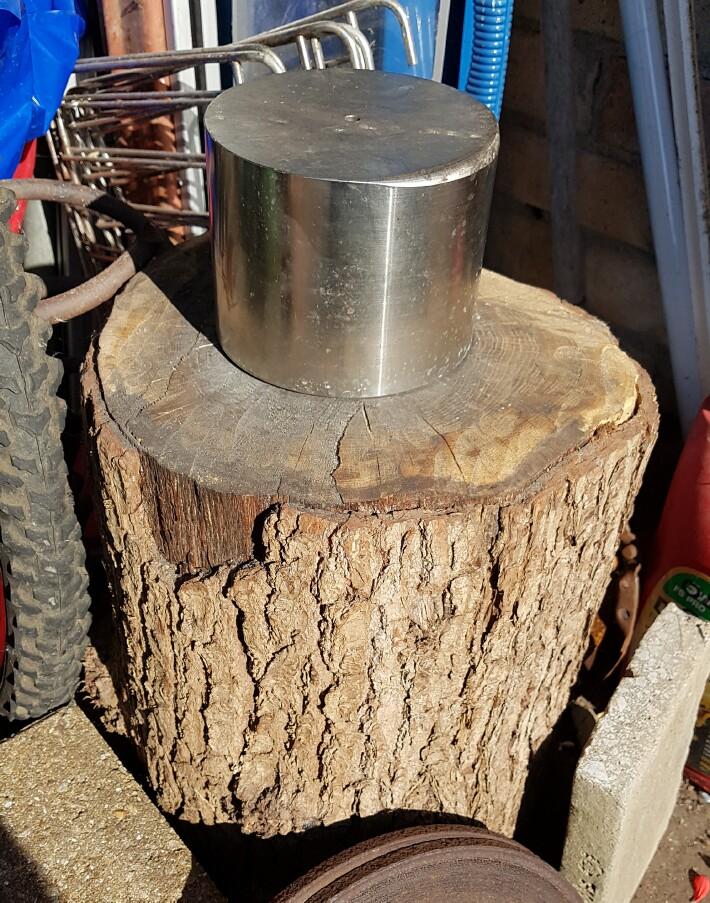
As suggested by JHCC, here is a pic of my first Improvised Anvil: A billet offcut of Stainless Steel with a radius of 5" and a height of 4". It had a 3/4" hole bored up most of the way through the bottom, so I embedded a big bolt in a stump, and ground the head down until my cylinder of steel would sit snuggly over it. Not much to look at, but for a beginner it was plenty good enough, and I made a good few tools on this. Tink!
-
Will do JHCC.
-
Thanks for the correction Thomas. What I started with was an offcut billet of stainless steel, 5" diameter and 4" tall, with a 3/4" hole bored most of the way through the center of the base. It weighs around 10kg, and I drilled and screwed in a large bolt into the top of a tree-stump-sized log, and ground the head of the bolt down until my Improvised Anvil was a snug fit over it. As the edge of this billet cylinder was pretty sharp, I ground a varying radius along part of the top edge, so that I could choose my desired curvature for striking my hot steel. It wasn't perfect, but for a beginner it was fine, and I made a number of tools on it. Tink!
-
Hiya Apple, As other have said, welcome to the forum. The main LPG supplier in the UK is Calor, but there are other independent suppliers around who will supply Calor refills for less than a main Calor distributor will, so you need to find who is local to you. Regarding cost, the Calor site lists their Bottle + Gas and Refill-only prices. GOOGLE: calor lpg prices On their site they post prices up to 13kg size (which is what I use) but for 19kg and 47kg you have to contact them. For a 13kg size, they say that Bottle+Gas is £78.49, while a refill is £38.50. I think my last refill cost £35 inc delivery from a local independent distributor. Back to the real question. You say you want to get into Blacksmithing. We need to know if you mean as a hobby or as a business. We also need to know how much money and resources you have available to put into this endeavour. Depending on your answers, we will be able to advise you better. For example: I'm a hobby smith. I went on a one-day Blade-making course near London and got hooked. I make my own first forge out of Insulating Fire Bricks and a bought AMAL burner, hose, regulator and 13kg LPG bottle. I started with a 10kg block of steel as an Anvil-Shaped-Object (ASO) and made a few tools to start with. I then found an old anvil that a local Farrier didn't want any more, at a good price. Then I decided I wanted to make a more efficient and flexible forge that heats up quickly, to save money as a Hobbyist, but it wouldn't have a tough enough lining for everyday business use. If you are going to be starting Blacksmithing as a business, then you would want a forge that has a heavier-duty lining. It would take longer to heat-up, but the lining would hold that heat better, so it would transfer that heat to your steel stock quicker. At the end of the day, the biggest thing to impact LPG cost and usage is the size of your forge, the thermal efficiency of its lining, and the efficiency of your burner. As has been said 100's of times previously on this site, go for the smallest forge that will do the job. It is not uncommon for Smiths to have various sizes of forge, to handle the various types of job they are working on. The most common request from new Smiths is advice about a huge forge that they have bought/built that can fit anything from spoons to Sabres in it, but that gets through a ton of LPG to heat up. Sorry to ramble, but in conclusion, tell us a bit more about what you want to do, what your level of experience is, and what resources you already have available, and we can then make a start on advising you. Hope this helps, Tink!
-
That's a really cool story Frosty! Thanks for sharing. Tink!
-
Hi Tom, I don't think you can compare PSI for a Venturi setup and a Forced-Air setup, as you will have different sized Gas orifices, so Apples Vs Oranges. It is more down to the Fuel/Air ratio in your Fuel/Air Mix (FAM) and the volume of FAM you can combust within your forge per unit time (eg. per Second). The more volume of FAM you have combusting per second, the more heat you will generate (within the limits of Propane combustion parameters). Tink!
-
B works for me! Tink!
-
I have to agree with Buzz. I converted my single-port burner to a Naturally Aspirated Ribbon Burner (NARB), and used it in the same forge with the same jet size, etc. so comparing like with like. I found I could maintain the same heat at a lower PSI, and with a much more even heat throughout the forge and less dragon's breath. The many smaller flames are aimed across the roof of my forge and swirl round onto the floor, making the whole of the inside an even hot temperature. The burner is also much quieter in use and uses less gas. With all the positives for me, I'll never go back to a single-port burner in a forge. I will make a mini single-port for a hand-held burner though. Localsmith, with your reference to a Ribbon burner with many high-speed flames, and mention of a large gas orifice, are you sure you are not referring to a Forced-Air Ribbon Burner? Tink!
-
It's Funny Dan, It's pretty easy to get Colloidal Silica in the UK, but a pain to have to import Kastolite30 from the States, yet you have the problem the other way round! Ho-Hum! It's a weird world we live in, and people just have to find out what works for them. Re. a CNC mill. This has been on my Tinks-Toys list for so long now! Very jealous! Tink!
-
Good to hear from you Dan. Hope all is well with you. Re. The honeycomb. That's a real shame, but you've got some pre-failure info which is good. I remember these sorts of honeycomb on portable gas heaters, where it seemed that the front face would glow orange and appeared to radiate as much as the flame (you could turn off the flame and feel how much heat was still coming off the honeycomb). I agree that if we could find high-temp honeycomb it would be the "Holy Grail" of NARB development! I'll keep watching your experiments with keen interest. On another note, I've been getting a few people in the UK trying out your Zircopax/Silica (ZS) slurry for flame-coating of rigidised Ceramic blanket or board. They have reported very positive results, so we have a few more converts to the ZS slurry approach. All the best, Tink!
-
This looks really cool Dan! I'm keen to see how well it works at max-heat. If it will comfortably reach welding heat, then I may modify my NARB setup as well. I've just done some hunting, and using Ceramic Honeycomb search keywords, managed to find the same ceramic elements as you on Amazon.uk for around £12, so cheap enough to play with. Good to see you posting again. All the best matey, Tink!
-
Hi Quiteman, Your pictures are all soft focus, so it is very hard to see much detail in them, to enable us to help much. ie. I cannot tell if the surface of your wool is coated or not! Also they are enormous in size, which will raise comments, as many people who use this site do so over very limited bandwidth, and enormous photos and videos are heavily frowned-upon. If you post up sharper, but smaller photos, with maybe a few close-ups, so we can see the details of your forge setup, then we are likely to be able to offer you better advice. So some further questions for you: 1. Does the end of your burner pipe protrude into the forge, past the wool lining? Normal Forge temperatures will melt/scale the end of a burner pipe in a very short time. Best practice is to recess the end of your burner in the insulation layer (wool in your case), widen the area of the recess to make a flare (a region where the fuel/air mixture slows down so it can burn without blowing off the flame) and coat the inner surface of the flare and your forge with a refractory flame face such as Kast-o-lite30, for protection from the heat and dangerous particles of ceramic wool. 2. When you say it it is getting too hot, is this while running the forge, or after it is shut-down? You can issues after you finish with your forge, where the burner pipe acts like a chimney, and all the heat from the forge rises up into your burner pipe, as it looks for a way out. Some people with top-mounted burners close off the choke (air control valve/plate, etc.) after use to stop this from happening. Give us some sharper, smaller piccys and we'll see how we can help. Tink! PS. Hiya Frank!
-
Don't worry about it AFB, you don't need the pry-bar matey! But what you know about is hot NA burners! Your burner designs and mini-forges are epic!!! I still want to make a 1/2" hand-held one for local heating. I'm going to try and CAD up something along the lines of your V46, just to see if I can handle the merging of complex compound curves in the free CAD package I use. It will only be for short-time-use, so I'll probably print it in PLA and use 1/2" stainless for the mixer as it is less conductive than malleable iron. Funnily enough, I recently moved to the department that designs and builds Metal-Powder-Bed 3D Laser Printers, so one day I might be able to scrounge a metal print on a test run. Fingers-crossed! Tink!
-
Hi AFB, These dimensions don't feel like a long and narrow forge, which is what I thought Greebe was concerned about. Maybe Frosty can confirm what his intended meaning was, when he pops by. Tink!
-
Hi Greebe, I think it's a slight punctuation hiccup that is making it confusing. Breaking it down into: "That shape should be fine" because your dimensions are quite sensible. "It's long and narrow that makes even heat difficult" which is a separate statement that doesn't apply to your dimensions. Does that help? Tink!
-
Hi Big Fudge, Welcome to IFI. Your going to have to help us help you. For a start, we need way more info: 1. Where are you in the world? (add your location in your profile, as the advice you are given can be dependant on the laws, materials, etc. where you live). 2. As getting a Forge and Burner to work in harmony is about the right balance of so many variables, we need detailed descriptions of your Forge construction. eg. internal dimensions, insulation materials, lining materials, size of openings, etc. We also need detailed info about your burner. eg. size and length of mixing tube, size of gas jet, etc. 3. We absolutely need pictures of the burner, running in and out of the forge, as well as pictures of inside the forge, looking at the burner exit, just after it has been lit, as well as a short, small-sized video clip that shows the flame behaviour inside the forge just after having been lit. There are very experienced guys on the forum who can help to diagnose your issue, but they haven't a chance without you posting up the info I've suggested. So get that info posted and we can start to get you sorted. Cheers, Tink!
-
Hi Eridanus21, I would suggest that you remove the metal flare fitting at the end of your burner, and shape a flare in the castable refractory, as show below in a modified diagram. This will stop your metal flare from melting off the end of your burner under high-heat conditions. Sorry for the hack in "paint" but it was the best I could do. Hope it helps. Tink!