
tinkertim
Members
-
Joined
-
Last visited
Everything posted by tinkertim
-
It would be sensible to add your location to your profile, as there are people on this site from all over the world, and their suggestions for supplies to use, might be fine in the USA but not in the UK. It looks like you're from the UK due to the UK mains socket on the wall and the VITCAS supplies, but it will help us help you, if you put where in the UK in your profile, as you might find you are close to an experienced member. Tink!
-
Here's some AMAL info from a 2019 post of mine: I bought both jet sizes when I ordered my AMAL. Hope this helps. Tink!
-
Might also want to check the size of nozzle fitted to the AMAL injector. I got a couple of different sizes when I bought my 3/4" AMAL injector, following an experienced members advice. One worked better in my Firebrick forge, but my later Oval blanket-lined forge ran better with the different different size. Amal size their nozzles in a flow-rate rather than a hole-size way. Bit odd!
-
Wow! That was a shock! Such a generous and interesting man. I had great fun building my forges over the years, with his inputs and suggestions of materials and techniques to try, along the way. It's going to be a much quieter IFI without him. He will be greatly missed! RIP my friend.
-
I heard from a posting by Owen Bush (Basher) on Facebook this morning. I only knew Tim on the internet (on both sides of the Pond) but felt a close association over the years. I felt I should mention it on here, as he was a member for over 16 years. RIP Tim.
-
Sad news. Just heard that long-time member and contributor Tim Gunn passed away from a Brain Aneurysm on Friday. He was such a knowledgeable and genuinely helpful guy, helping me as I built burners and forges over the years, as well as offering help to many others. It came as a bit of a shock to hear that he had passed. At least he can rest easy, knowing that he will be missed. RIP Tim.
-
Drunken Iron Dwarf (DID), as you are based in Blighty, you have access to the UK-made AMAL propane injectors, without having to pay for exorbitant shipping across the Pond. I used a 3/4" AMAL injector with about 9" of malleable iron pipe, threaded at the ends (usually referred to as "Nipple") and have used it successfully as a single-port burner, and as the feed into a multi-port burner (NARB - Normally Aspirated Ribbon Burner) that I made out of a soft firebrick. I found the NARB was much quieter, and required much less gas for the same amount of Yellow heat in my forge, due to it almost eliminating the "Dragon's Breath" (wasted heat) I was getting with the high-velocity single-port burner. Having used a NARB I'm never going back to single-port burner. I started my NARB development journey half-way down Page19 of the "Naturally Aspirated Ribbon Burner. Photo heavy" thread, if you are interested. Also I've been using alternative solutions to refractory coatings for my forges, as it is a pain to get Kastolite30 high-alumina insulating refractory, this side of the Pond. Good luck with your build. Tink!
-
Hi Olly. By the choice of Amal burner, I'm assuming that you are UK-based. If not, then I'd recommend updating your profile, as people from all over the world chat on here. I use a 3/4" Amal burner with a multi-port flame head made out of an IFB. The multi-port designs are often referred to as Normally Aspirated Ribbon Burners, or NARBs for short. I've used it in a home-made IFB forge and a home-made Ceramic Fibre forge with great success. My observations from using the IFBs in a forge is that you don't want to encase them in a solid 4mm metal box. IFBs have a limited life when in direct flame contact, so you will want to be able to replace them from time to time. The most common IFB forges use angle-iron and threaded rod to assemble a frame that holds and pushes all the IFBs together. It makes it easy to replace a broken or worn IFB, and allows you to change the layout of the IFBs if you find you want a different size or layout. Frosty has posted pictures of IFB-based forges with angle-iron frames many times in the past, and were what I based my first forge on. My later Ceramic-fibre forge was more efficient, having an ovel cross-section, to allow for flame swirl. Hope this helps. Tink!
-
Hiya Frosty, It is one of my all-time favourite thread for just those reasons. It was a fun time, and still makes me grin. While suggesting links to someone, I ended-up reading it all through again from about page 18 to 43 just for the fun of it. My other favourite thread was AFB's 3d Printed Plastic Burner Experiments, as it was great to see the testing of ideas and the evolution of a great burner technology. Ahh the good old days!!! Tink!
-
Hiya Frosty, I learnt a lot during that thread, and then added my own learning back into it, to help others. I think its a great resource, and the one I'd always point people at, to learn about NARBs, etc. Tink!
-
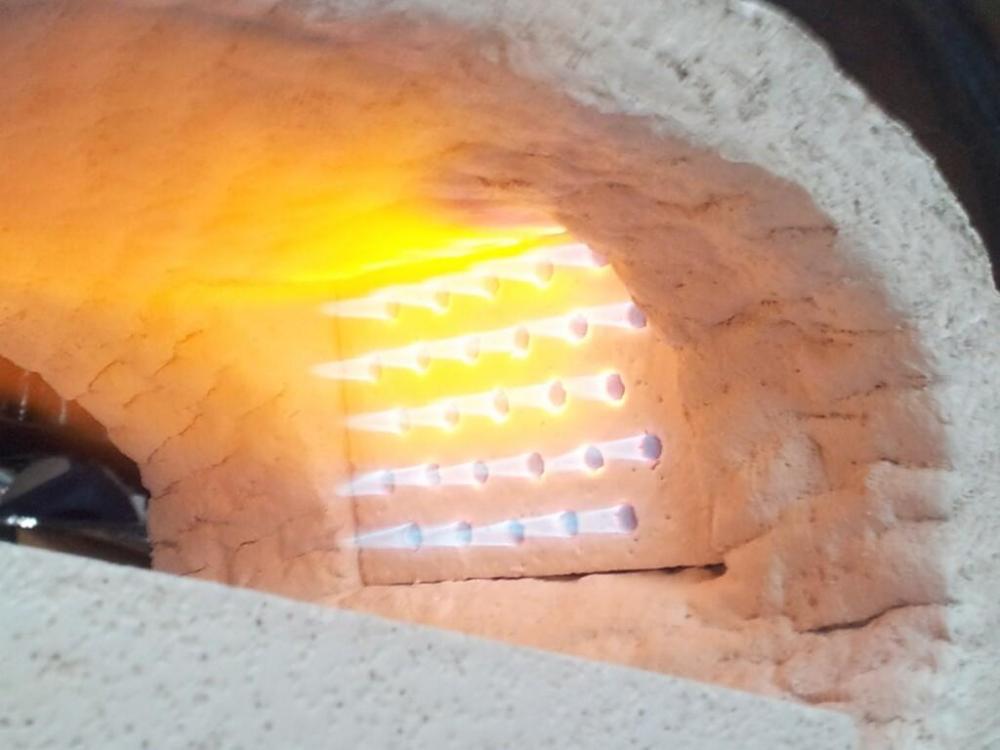
Hi Simian, My first NARB had fewer holes with bigger diameters, and the flame would burn back into the Plenum and burn there, producing a nice orangey glowy spot!! The second one had many more holes with a smaller diameter, and spread apart more widely, and that has worked perfectly for me and my 3/4" AMAL propane injector ever since. Here is a link to that thread that shows the two designs. The second link is earlier on the same thread, that shows the glowing Plenum! This is what the Flame look like now. Hope this helps. Tink!
-
Have to agree with Buzz. With such a long and narrow usable volume, I think you would also have issues with back-pressure on the middle burners if you had all 5 burners going at the same time. Also with less than 4" top to bottom (once lined) it might be difficult for the Fuel/Air Mix (FAM) to fully combust before it reaches the surface of the stock you place in the forge. You might be able to use it for heat-treating if you had small enough burners. Was there any particular reason why you picked these particular dimensions for your forge, or was it based on the materials you had to hand?
-
Search on Amazon for "2732 pyrometer" and you will find a number of infra-red digital pyrometers that can measure up to 2732 degrees Fahrenheit, at a good price, and can measure from a good distance away, so that you don't have to get too close to the forge. I got one a few years ago and it has worked well for tweaking rough heat-treat temps, etc. For the price, I thought I'd take a chance, and it has worked out well, and doesn't get overloaded at high forge temps. Hope this helps. Tink!
-
Hi RichT, Another thing to allow for when using 2 or more T-Burners in-line is turning the air intakes so that they do not face each other and potentially affect each other's air intake flow. You currently have them both set East-to-West. Try turning them both North-to-South to minimise unwanted interactions. Hope this helps. Tink!
-
Looks a pretty even flame pattern, but it looks like the burner is fully choked down. Maybe it's just the angle of the camera.
-
Hi LandRaven, I think you will find Vermiculite Fire Bricks (VFBs) might not stand up to the temperatures you can experience in a forge (1700*c+), as it states they are intended for fireplaces or stoves. In forges you usually use either hard Fire Bricks (FBs) or Insulating Fire Bricks (IFBs). FBs are heavy and hard wearing, but take a lot of energy to get up to temperature, while IFBs are light, porous and soft bricks that are easy to cut and shape and have good insulating properties, so keep the heat in the forge. The down side is that they need a protective "Flame Face" coating as they easily crack and crumble without one, as the forge thermally cycles. Regarding you links above, did you do the searches I suggested in that link? GOOGLE: mbfg fumed silica GOOGLE: scarva en gb zircopax GOOGLE: ulster ceramics morisol x30 The Morisol x30 is still available on the results page of that search. The reason I posted up the Google search terms rather than the direct links is that Direct Advert links are not allowed on this forum and could be deleted by the Mods. Regarding your question about quantities: Fumed Silica. It is very light, and very fine, so 45g should be plenty to rigidise the ceramic blanket in your forge. Zircopax. You could probably get away with 500g, but the problem is once you have mixed up some slurry, done one coat, waited for it to dry a bit and then hardened it with your burner on low, the Zircopax can have settled out of the slurry or may have even hardened at the bottom. I had this issue with my first attempt, so you might want to consider getting 1kg, to allow for wastage. Also it gives you enough spare to put extra coats where you might dink the blanket, or build-up coats on an IFB you might use as a sacrificial floor for you forge. As I expect the postage will probably be similar for 500g as for 1kg it is up to you. Morisol x30. I bought 1 litre of this and still have half left, as you use it sparingly when you mix up your slurry. If you use too much Morisol, then you will have to put a load of Zircopax in, to get the right consistency, potentially making more slurry than you can use in one session, potentially wasting the unused Zircopax. Hope this helps, Tink!
-
Hi Frosty. I'll probably wait until I get flux damage before I go down that route. Haven't done any forge welding yet, so haven't needed it so far. I also have Zirconia-slurry coated IFBs at the bottom of my forge, so I will see how fast the Borax goes through the Zirconium layer into the IFB, before I decide on alternative coatings. Tink!
-
Read down from this link, where you will see my conversation with Dan Rotblatt, who has been making his own Zirconium and Colloidal Silica "slurry" to line his Forges for the last 20Years+. I took his advice and bought some, made my own "Slurry" and coated the inside of my ceramic-fibre lined & rigidised forge with it. The results gave me a very hot and economic forge, with a lining that is effective, if a little fragile, but is easy to patch if you do ding it. Have a read from there, down to the pictures of my Forge, and then decide what you would like to do, as getting Kasto-Lite 30 Refractory in the UK for a hobbyist is an expensive option. Enjoy! Tink!
-
Greetings Mr. Raven. You might want to add your location in the UK to your Profile, so that other Brits might be able to offer you more specific UK-based advice. This is a mixed forum with people from all over the world, so it really helps us to help you, if you put some specific location info in your Profile. Also there are alternatives to High Alumina Refractory for Forge lining, for us this side of the Pond, depending on how roughly you are going to treat your Forge. I'll post a link later, Tink!
-
Isopropyl Alcohol was what was specified for cleaning the large rubber rollers in our broadcast reel-to-reel video recorders, back in the day. It is the most rubber-safe solvent I know of, and removed the build-up of iron-oxide from the videotape without damaging the rubber rollers. The wrong solvents would cause the roller surfaces to crack and go brittle. I always keep some for delicate cleaning (as well as a little Toluene for brutal cleaning!!!)
-
The silica particles in the rigidizer will have clumped together at the points where the ceramic blanket fibres touch, as the water in the rigidizer evaporates. When the fibres are heated to orangey/red with a burner, the silica particles melt and flow between the fibres at the points when they touch. When the Ceramic blanket then cools, the melted silica hardens and locks all the fibres together, "Rigidizing" the blanket, so it can then be coated with Kastolite or some other flame-facing coating. The rigidizer won't work correctly unless it is heated to the melting point of the silica particles. Hope this helps. Tink!
-
This is how I got my IFB NARB tuned.
-
Hi Duncan, The pipe length is a ratio related to the internal diameter of the pipe. I believe this ratio is to do with having enough length to give complete mixing of the gas and air before it reaches the flame at the end. It makes quite a difference with single-jet burners, but no difference if you are feeding into the plenum chamber of a multi-jet burner (NARB). It is something like 12:1. Here's a link to some values from a previous chat. As far as the size of the burner and diameter of the pipe, there is a rule-of-thumb that suggests a good 3/4" burner will bring a good 350cubic inch forge up to forge-welding temperature. This is what I based my choice on. I have used my AMAL 3/4" burner with ~8" pipe for single-jet use and multi-jet (NARB) use very successfully. The turn-down range on my AMAL is pretty good, so I'm glad I went for a single 3/4" rather than 2 x 1/2" burners. On the AMALCARB website, they sell propane injectors with a short-choke or long-venturi. The short-choke is really intended to feed a multi-jet burner and so doesn't really need to worry about mixing the gas and air so much. If you are going to use a single-jet burner, then chose the long-venturi version, as it has a correct-ratio expanding cone on it, that fits inside your length of malleable steel pipe nipple. As the long-venturi version will wok with single-jet and multi-jet, I went with that option. I also followed TimGunn's advice and got 2 sizes of jet for my 3/4" AMAL injector when ordering. From memory it was a 90 and a 110 sized jet, but it is cheaper to order an extra jet when you order your burner. I have played around with both jets, and one worked better in a single-jet and the other size was better with my multi-jet setup. You really need to work through the Burners-101 and Forges-101 threads to glean this info. It will take a while, but you will learn a lot from it. Hope this helps. Tink!
-
If you're based in the UK, then the AMAL burners are a no-brainer! Super adjustable and really hot.
-
Hi Aquamo, Welcome to I Forge Iron (IFI). You might want to put your location and Country in your Profile info, as you might find members close to you, and many answers to questions are often Country-specific. I think you're assuming that all countries have the same types of bottle, which might not be the case. In the UK there are small bottles intended for Patio use that have flow-limited valves, but there are many other sizes that have no flow-limiting. They seem to have different fittings on the tanks to help identify which is which. Also you don't make any mention of using a gas regulator to control the fuel pressure to the burner, and what you would do with that as you shut down a forge. I think you're also assuming that everyone has a gas valve at their burner which is frequently not the case, as having a 90-degree shut-off valve at the tank end allows you to cut off the fuel away from the flame source in an emergency, and also allows you to depressurise the hose when you are turning off your forge. Also, in many cases, minimising the amount of metal pipework at the burner end reduces the amount of mechanical stress put through the burner mounts as well as the burner jets, as it is possible to mis-align a burner jet with too much pipework hanging off it. Why not tell us a bit about yourself and what your plans are and then everyone can chip in. Tinker Tim