twigg
Members
-
Joined
-
Last visited
-
Thanks for the info! I see what you mean now. Might have to try one
-
Mikey, I'm having a hard time picturing the butt-welded fitting you're describing. Is there any chance you have a picture or a link to these? Thanks! Also, using a canning supplies in a burner build? That sounds like a one-way ticket to the doghouse if I ever heard one
-
I'm with nodebt on this. The ultimate "color code" is what color they glow when you stick one in the circuit
-
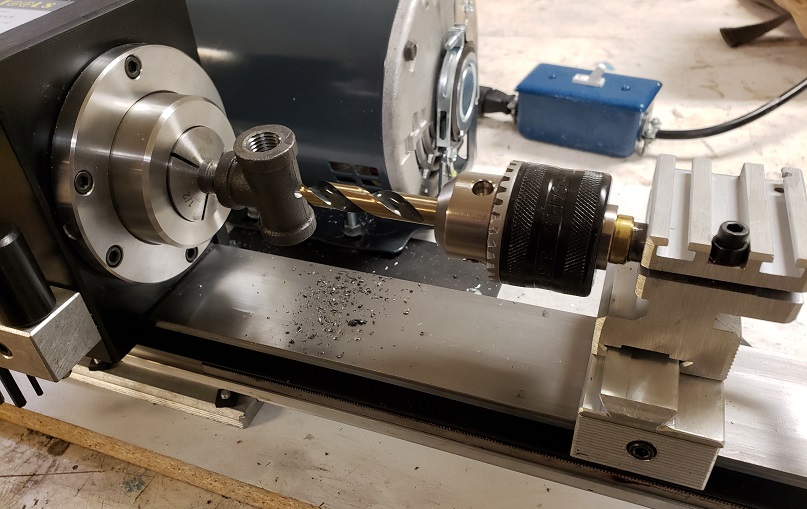
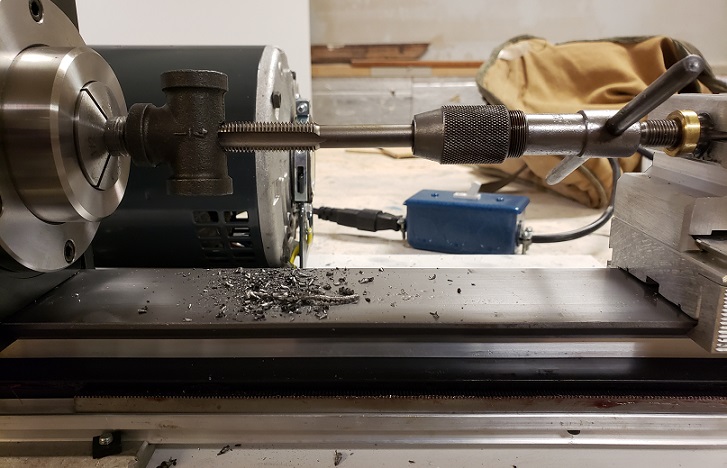
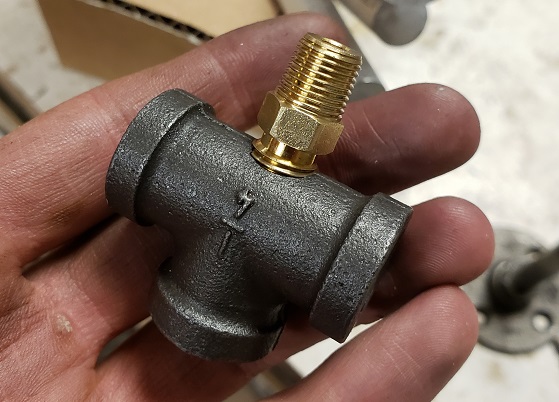
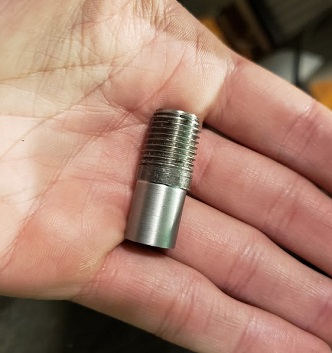
Fixed the carriage from binding up on the tailstock-end of the ways by lapping with way oil and bon ami powder cleaner, per suggestions from cartertools' taig page. It was surprisingly easy to do. Just ran the carriage up and down a few times with the slurry, cleaned it off, and it ran smoothly. Much better than before. I successfully drilled and tapped a 1/4" x 1/4" plumbing tee (only to remember I meant to use a 1/4" x 3/8", d'oh!) using the arbor I made earlier. I forgot to only partially tap the whole, so now the 3d printer nozzle goes too deep into the tee. I'm going to buy or make some 7/16-20 nuts to make the position of the brass fitting adjustable. Just putting this here to confirm that this machine definitely has the capability to do what I want with 1/4" burner parts.
-
Rockstar, universities should pay you to give talks to first year graduate students. I can't begin to express how badly so many of my peers need to hear this (including myself several years ago). Students give too much credit to bad teachers and worse advisors who treat their students like trash. When I chose my advisor, half the decision came down to politics and different researcher's reputations. I recall being warned about a certain research professor who people quipped would've "spilled the blood of a young graduate student over his experiment as an offering if it got results." And how did this researcher's teaching/advising philosophy end up so twisted? Simple! They were treated the same way by their doctoral advisor! Sorry for the rant, this stuff really gets me.
-
Mikey, just to clarify, am I reading this right: to tune the burner, you'd screw the lamp-threaded pipe nipple in or out to move the mig tip back and forth? Then a screw added into the side of the saddle inlet to lock it in place once it's tuned? Also, is there an obvious way to mount a 3/4" NPT nipple to the 1" BSP outlet that I'm not aware of, or is this one of those "get crafty" moments?
-
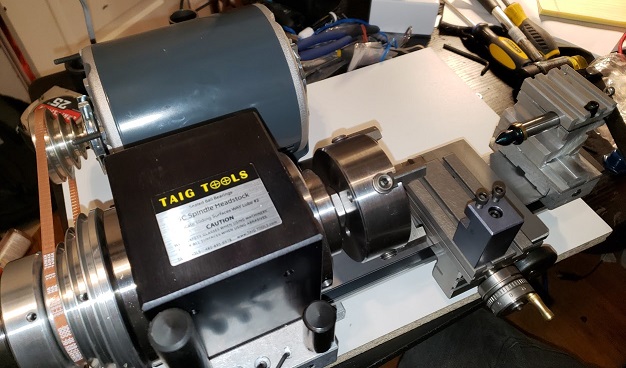
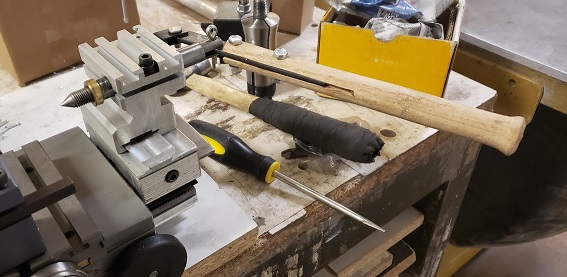
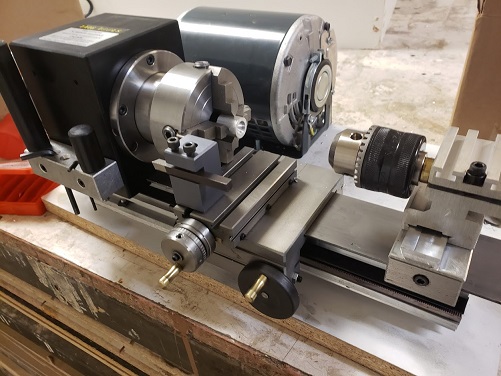
The chucks do unscrew from the ram. Taig's jacobs chucks weren't expensive, so I already ordered some and they arrived yesterday. My only complete drill sets are hand-me-downs from my grandfather, so I wound up ordering a stub set for a decent price. Until those show up, I have some spotting drills that are nice and short. Not ideal, because of the different angle, but oh well. I'm going to make the final ID with a boring bar anyways. I did make myself a little wooden handle for the lever that drives the ram (no idea what to call it). Before the handle, it was just a thin piece of flatbar, like the handles on those cheap cable crimpers that give you arthritis. Not very pretty, but it didn't take long and gets the job done. One day when I have access to a proper bandsaw, I'll make something prettier. Here's a good picture with the new larger chuck Lastly, I played around with the carriage gib. There are two grub screws compressing the gib. I played around tightening and loosening them, making one side tighter/looser than the other side. No matter what I try, the carriage is tighter on the tailstock end of the way than it is on the headstock end. If I adjust the gib so the carriage moves nicely on the tailstock end, the carriage wobbles on the headstock end. If I adust the carriage to be firm on the headstock end, it binds on the tailstock end. I'm going to reach out to taig and see what they recommend. Luckily, I don't need to do turning operations that span the entire length of the bed.
-
That second burner looks really hot. Nice work! I'd love to see what's on the end of that 1/8" pipe nipple if you get a chance. Also, are those galvanized fittings? You may want to replace those for your lungs' sake. Zinc does not a fine seasoning make.
-
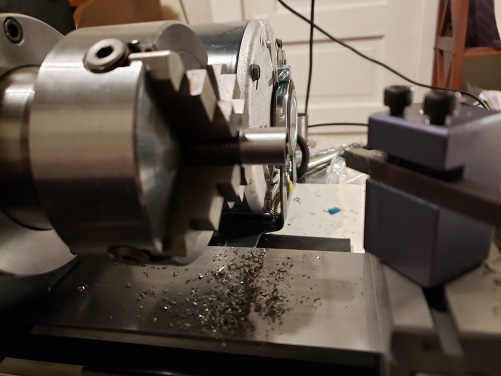
There are 4 pulleys (6 on the standard headstock) but no reverse gear (without rewiring the motor). The tensioning jig doesn't have enough play to twist the belt. One thing they definitely goofed on was putting the motor's air intake right where the chips fly off the part. I'm going to put in a chip shield. Aligned the tailstock tonight, by center-drilling a MIG tip (didn't have any other non-ferrous stock laying around), loosening the tail-stock grub screw, and pressing the center into the 60deg taper of the center-hole and letting the tail-stock settle in the center. On an unrelated note, I found that only the way of the lathe is magnetic, so I got my dial indicator set up nicely tonight. Sure enough, was able to get the mig tip runout down to 0.001" on the 4-jaw. Then tried to drill and bore a black iron tee for a 1/4" burner. I center-drilled it just fine, then realized that a jobber-length bit is just too long and floppy for this setup. Found a set of metric 90deg drill bits, and used those. Then I realized they shipped me two of the same size tailstock chucks, so I couldn't drill to size large enough to fit a boring bar. Curses! Foiled again! Had good fun though Another improvement I'm going to make is putting a longer, more comfortable handle on the tailstock ram lever. It just hurts the hands.
-
Understood, nodebt. If there's anything I did or said that sounded dangerous, please let me know! I appreciate the feedback. It's a 4 jaw independent, because that's what I was trained on. I did center it using a dial indicator that's not in the pictures. I hit a wall where I couldn't do better at 0.008" of runout because there was no steel to magnetically clamp the indicator holder, so the dial would jiggle when I spun the part. I suspect that some of that "runout" was just surface roughness, but I couldn't prove it while my setup was so flaky. I hear you on getting rid of the mdf. The only thing is I'd like to keep the weight down so I can carry it safely up and down stairs. If it had to be steel, I wouldn't want it any thicker than 1/8". What about 16 gauge sheet screwed onto a stiff wooden frame? Thanks for pointing out the jibs! I remember reading about that and should have checked that first. And sorry to the mods and everyone for posting so much about this lathe yesterday, this was a big investment for me and it was the most fun I had in a good long while. Thanks for bearing with my antics. I'll cool my jets.
-
I hear you rustyanchor. I've been spending a while shopping around figuring stuff out, and figuring my own needs out. For me the total worked out to about $1200 for everything. There are ways to cut back that I didn't do. If you supply your own motor and base + mounting hardware, that would make it about $1060. I also went with the most expensive headstock+spindle, because I wanted to mess around with collets and liked the added beefiness and spindle bore. With this lathe's standard headstock, and supplying your own motor+base, you'd pay about $550. It all depends on your needs, but I don't remember seeing any new mini-lathes for less than $550. The manufacturer I bought from is Taig. They have some kits for sale on their website to give you an idea on price. If you do go shopping, sherline also makes a good lathe in this size with different features but pricier. One thing to keep an eye on is that the Taig lathe can't do any single-point threading without modifications. There's no leadscrew, it's a "lead-rack and pinion". You can still use reasonably-sized dies just fine though. Sorry to talk your ear off, there's a lot of options, and I've been marinating in the deep end
-
Just saw this after responding on the other thread lol It performed really well, considering my lack of experience. I'm pretty thrilled. The sketchiest thing about it is the carriage binding on the way. I did a google search and some people have this issue on the headstock side. That would've been seriously depressing.
-
The manufacturer sells everything separately or in kits. I picked out a list of what I wanted and ordered it all together. It all came from the same vendor and arrived in one parcel. The motor isn't my favorite part of the setup. $120 for a 1/3 HP AC motor hurt my soul a little bit, especially considering it's not even totally enclosed, and extra especially considering how much this machine could benefit from a DC motor. I paid up because I didn't want to stress over it.
-
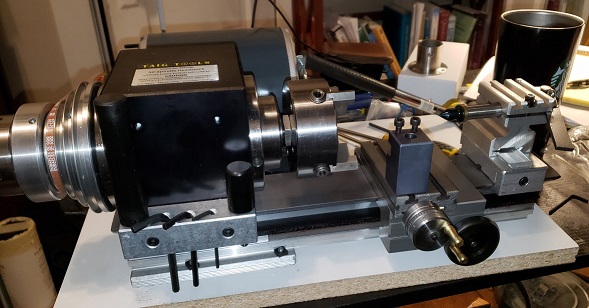
Today marks 0 days since new shiny tool for me. New lathe day! Got it assembled and running, and made a quick part out of malleable iron (from a black iron pipe nipple). Just to get to know the machine. This part will be an arbor to let me work 1/4" tees in a 1/2" collet, for 1/4" frosty burners. NPT thread on one end, 5" shank (I got it 3 thou over Edit: 5 tenths over, cause I can't read apparently) on the other end. I'm a pretty happy guy! There a couple of areas the lathe needs modification methinks. First off, there's no steel anywhere to clamp a dial holder to. Even the headstock enclosure is aluminum (I know that's why I can afford this machine, but doesn't mean I won't grumble about it.) Going to screw a piece of steel plate to the mdf base as a temporary fix. Second, the motor mount is terrible. And third, the carriage binds on the last 2.5" of the way. It probably needs to be lapped, but the tailstock moves fine and I don't need the carriage out there anytime soon. I'll put that one off.
-
I am way too excited right now!!! And I don't have to teach today because of the snow. The stars are aligning!