
tinkertim
Members
-
Joined
-
Last visited
-
It would be sensible to add your location to your profile, as there are people on this site from all over the world, and their suggestions for supplies to use, might be fine in the USA but not in the UK. It looks like you're from the UK due to the UK mains socket on the wall and the VITCAS supplies, but it will help us help you, if you put where in the UK in your profile, as you might find you are close to an experienced member. Tink!
-
Here's some AMAL info from a 2019 post of mine: I bought both jet sizes when I ordered my AMAL. Hope this helps. Tink!
-
Might also want to check the size of nozzle fitted to the AMAL injector. I got a couple of different sizes when I bought my 3/4" AMAL injector, following an experienced members advice. One worked better in my Firebrick forge, but my later Oval blanket-lined forge ran better with the different different size. Amal size their nozzles in a flow-rate rather than a hole-size way. Bit odd!
-
Wow! That was a shock! Such a generous and interesting man. I had great fun building my forges over the years, with his inputs and suggestions of materials and techniques to try, along the way. It's going to be a much quieter IFI without him. He will be greatly missed! RIP my friend.
-
I heard from a posting by Owen Bush (Basher) on Facebook this morning. I only knew Tim on the internet (on both sides of the Pond) but felt a close association over the years. I felt I should mention it on here, as he was a member for over 16 years. RIP Tim.
-
Sad news. Just heard that long-time member and contributor Tim Gunn passed away from a Brain Aneurysm on Friday. He was such a knowledgeable and genuinely helpful guy, helping me as I built burners and forges over the years, as well as offering help to many others. It came as a bit of a shock to hear that he had passed. At least he can rest easy, knowing that he will be missed. RIP Tim.
-
Drunken Iron Dwarf (DID), as you are based in Blighty, you have access to the UK-made AMAL propane injectors, without having to pay for exorbitant shipping across the Pond. I used a 3/4" AMAL injector with about 9" of malleable iron pipe, threaded at the ends (usually referred to as "Nipple") and have used it successfully as a single-port burner, and as the feed into a multi-port burner (NARB - Normally Aspirated Ribbon Burner) that I made out of a soft firebrick. I found the NARB was much quieter, and required much less gas for the same amount of Yellow heat in my forge, due to it almost eliminating the "Dragon's Breath" (wasted heat) I was getting with the high-velocity single-port burner. Having used a NARB I'm never going back to single-port burner. I started my NARB development journey half-way down Page19 of the "Naturally Aspirated Ribbon Burner. Photo heavy" thread, if you are interested. Also I've been using alternative solutions to refractory coatings for my forges, as it is a pain to get Kastolite30 high-alumina insulating refractory, this side of the Pond. Good luck with your build. Tink!
-
Hi Olly. By the choice of Amal burner, I'm assuming that you are UK-based. If not, then I'd recommend updating your profile, as people from all over the world chat on here. I use a 3/4" Amal burner with a multi-port flame head made out of an IFB. The multi-port designs are often referred to as Normally Aspirated Ribbon Burners, or NARBs for short. I've used it in a home-made IFB forge and a home-made Ceramic Fibre forge with great success. My observations from using the IFBs in a forge is that you don't want to encase them in a solid 4mm metal box. IFBs have a limited life when in direct flame contact, so you will want to be able to replace them from time to time. The most common IFB forges use angle-iron and threaded rod to assemble a frame that holds and pushes all the IFBs together. It makes it easy to replace a broken or worn IFB, and allows you to change the layout of the IFBs if you find you want a different size or layout. Frosty has posted pictures of IFB-based forges with angle-iron frames many times in the past, and were what I based my first forge on. My later Ceramic-fibre forge was more efficient, having an ovel cross-section, to allow for flame swirl. Hope this helps. Tink!
-
Hiya Frosty, It is one of my all-time favourite thread for just those reasons. It was a fun time, and still makes me grin. While suggesting links to someone, I ended-up reading it all through again from about page 18 to 43 just for the fun of it. My other favourite thread was AFB's 3d Printed Plastic Burner Experiments, as it was great to see the testing of ideas and the evolution of a great burner technology. Ahh the good old days!!! Tink!
-
Hiya Frosty, I learnt a lot during that thread, and then added my own learning back into it, to help others. I think its a great resource, and the one I'd always point people at, to learn about NARBs, etc. Tink!
-
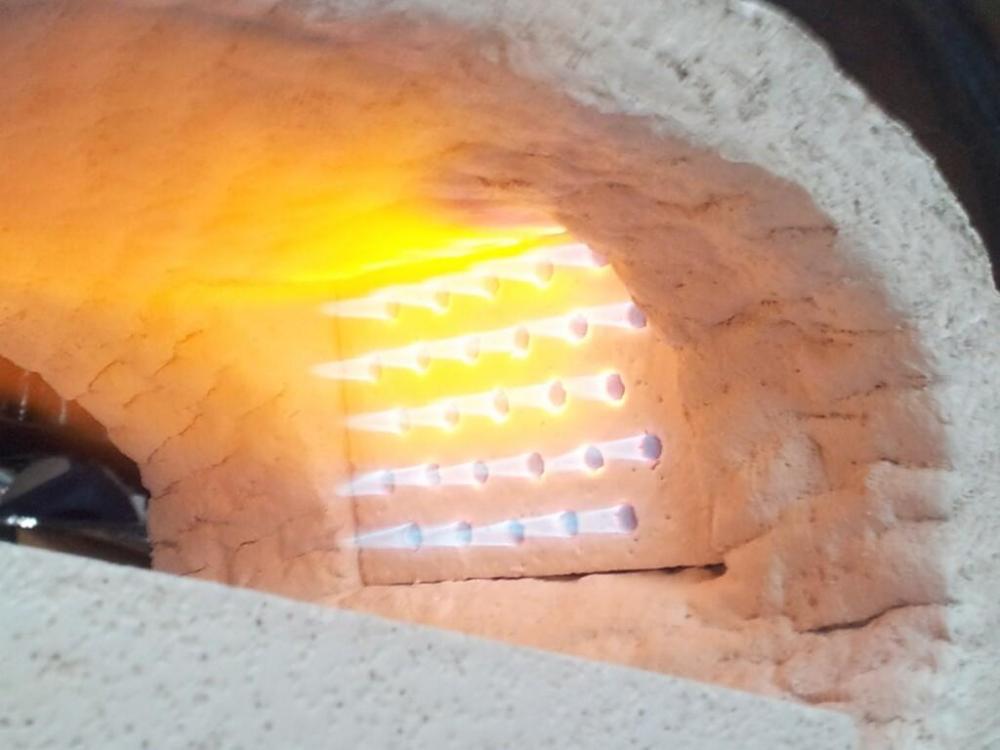
Hi Simian, My first NARB had fewer holes with bigger diameters, and the flame would burn back into the Plenum and burn there, producing a nice orangey glowy spot!! The second one had many more holes with a smaller diameter, and spread apart more widely, and that has worked perfectly for me and my 3/4" AMAL propane injector ever since. Here is a link to that thread that shows the two designs. The second link is earlier on the same thread, that shows the glowing Plenum! This is what the Flame look like now. Hope this helps. Tink!
-
Have to agree with Buzz. With such a long and narrow usable volume, I think you would also have issues with back-pressure on the middle burners if you had all 5 burners going at the same time. Also with less than 4" top to bottom (once lined) it might be difficult for the Fuel/Air Mix (FAM) to fully combust before it reaches the surface of the stock you place in the forge. You might be able to use it for heat-treating if you had small enough burners. Was there any particular reason why you picked these particular dimensions for your forge, or was it based on the materials you had to hand?
-
Search on Amazon for "2732 pyrometer" and you will find a number of infra-red digital pyrometers that can measure up to 2732 degrees Fahrenheit, at a good price, and can measure from a good distance away, so that you don't have to get too close to the forge. I got one a few years ago and it has worked well for tweaking rough heat-treat temps, etc. For the price, I thought I'd take a chance, and it has worked out well, and doesn't get overloaded at high forge temps. Hope this helps. Tink!
-
Hi RichT, Another thing to allow for when using 2 or more T-Burners in-line is turning the air intakes so that they do not face each other and potentially affect each other's air intake flow. You currently have them both set East-to-West. Try turning them both North-to-South to minimise unwanted interactions. Hope this helps. Tink!
-
Looks a pretty even flame pattern, but it looks like the burner is fully choked down. Maybe it's just the angle of the camera.