John in Oly, WA
-
Posts
932 -
Joined
-
Last visited
Content Type
Profiles
Forums
Articles
Gallery
Downloads
Events
Everything posted by John in Oly, WA
-
Can't answer your question, but I found this interesting bit while looking it up - "In powder form, zirconium is highly flammable, but the solid form is much less prone to ignition." So, be careful if you're putting it in a forge.
-
Horizontal/Vert or Porta Bandsaw
John in Oly, WA replied to Danjmath's topic in Saws, bandsaws, hack saws, etc
Can't advise on which to get - that's personal, and dependent on what and where you're cutting, but if anyone gets the cheap HF type of horiz/vert 4" x 6" bandsaw, I highly recommend going over it with a fine-tooth comb while assembling. Especially look into the gearbox. I bought one and opened the gearbox - the steel worm gear had a burr on the outer corners of the tooth. It would have chewed the brass/bronze gear it meshes with to bits in short order if I hadn't cleaned the burr off. -
What did you do in the shop today?
John in Oly, WA replied to Mark Ling's topic in Blacksmithing, General Discussion
Don't know how far along you are, and it would certainly shift it to a non-traditional look, but you could make the bottom a "glider" style of rocker and solve all those problems - even the toes and cat tails. Of course, then it'd probably weigh 200 lbs. -
MasterFabPro a.k.a "Chip" - That would be one forge per day, EVERY day, including Christmas and Thanksgiving without break for over 13 years. I seriously doubt your statement. And that puts everything else you've claimed in doubt as well. Frankly, if someone is promoting and selling dangerous products, I will be MORE than happy to destroy his livelihood and not even think twice about it.
-
How will you spin it? Isn't it powered by the exhaust gases?
-
I’m ready for serious casting?
John in Oly, WA replied to Hans Richter's topic in Smelting, Melting, Foundry, and Casting
Ah, maybe my comment doesn't apply to your set up. I was just thinking of easy adjustment for different melting temps of different metals. But if you're controlling air and gas separately, it sounds like it might be a complicated addition to end up with "easy" adjustment. -
I’m ready for serious casting?
John in Oly, WA replied to Hans Richter's topic in Smelting, Melting, Foundry, and Casting
Now if you get yourself a PID controller and a solenoid gas valve, connect those in with your thermocouple, you could set different temps for your foundry or forge. -
It would be pretty crispy rigid. If it's not rigidized, you can push your finger into it like stiff cotton and it gives and flexes back a bit. Rigidized, ya poke it, the fibers are gonna break and not bounce back.
-
Suggestions? More pictures - showing the inside when it's not lit, and the burner flames when it is lit. Then we could see what you have and if it needs anything done. From just looking at the one pic, I'd say get a couple of bricks to put on that front porch (maybe extend the sides of the porch or add angle iron to help hold the bricks) to slide side to side to cover that big opening. If that's ceramic blanket I'm seeing inside, make sure it's rigidized. Then I'd add another 1" of ceramic blanket, rigidize that, slather a 1/2" of kastolite 30 over that, then paint on some matrikote. But that's just guessing from the view of the one pic.
-
9 year old granson at the anvil
John in Oly, WA replied to MotoMike's topic in Blacksmithing, General Discussion
Very nice! Nothing like teaching hands on skills. That stuff he can carry with him the rest of his life. -
My aunt told a story about the first time she traveled to England to visit relatives. She was checking in to an inn, the owner carried her bags to her room and then asked her when she'd like to be knocked up. She didn't know quite how to respond, but told him she was married. They had a good laugh after they got the meaning sorted out.
-
And we need pics! Too much text, not enough pics! LOL It's like listening to the soundtrack of a movie without the picture.
-
NWBA Conference May 2018
John in Oly, WA replied to Glenn's topic in Northwest Blacksmith Association
It was a fun experience last year. I'll be going again this year. Looking forward to it. -
So, what are you waiting for exactly? A lot of people giving you good advice, but you've only posted one picture of charcoal briquettes burning. No pic of your air set up. No pic of trying to get your coal burning. Hard to help in any detailed way if we can't see what you're doing. You don't need to weld to get the air pipe set up - plumbing fittings screw together. And you don't want to weld galvanized pipe. I've never burned coal - I have a propane forge, but I know, one way or another, I'd get coal burning, if I were inclined to go that direction, even if I had to stick it in my propane forge to get it lit. LOL! Don't know what corner of Thurston County you're in, and I'd offer to help - I have tools, welders, etc., - but you'd have to take a more determined attitude to get it done than you've shown so far. If you have a truck and can haul your set up and coal over, I'm sure we could figure it out and get it going. And a small thing you should've already figured out - ear muffs or plugs for loud noises like shop vacs.
-
Well, it looks like you have the start of a good fire going there, but where's the coal? You must only be a half-fledged pyro. A full-fledged pyro woulda stuck it out til it was burning coal.
-
A good place for steel beams, plate and other assorted scrap is a guy in Buckley. His name is Richard, a member of the NW Blacksmiths Assoc. Get on CL and look up - steel beams buckley That's where I got the beams for my forge press.
-
I was just poking fun at the common response, about what something exotic tastes like, i.e. rattlesnake, frogs legs, etc. is "tastes just like chicken". Wonder what's in them that makes some people dizzy.
-
or eating a pomegranate while making a pommel of granite with which to pummel pomelos.
-
Very impressive Theo! Nice work, as usual. Pummel with the pommel? A pommel pummeling?
-
I'll just stick with the chicken they probably taste just like.
-
Kast o lite layering or joints
John in Oly, WA replied to Ztugdriver's topic in Insulation and Refractories
Buzzkill's advice is good you don't need a bond there at all. But if you do have a need for a bond with Kastolite 30, I've used water and an old toothbrush to wet down the area and rough it up a bit, then cast the new onto it. As long as it hasn't dried too much and, of course, hasn't been fired, it'll bond pretty well. Kind of like making a slurry with clay. Once it's fired, it won't bond to new. -
Sorry to hear you and your wife haven't been feeling well. Hope you're both on the quick road to recovery. I'm just going through the processes of building and trying to find the easiest ways to do it. The SST and concentric reducer are showing their difficulties. The wine funnel with the newer perpendicular large opening cut may be the easiest way to go. Of course, if I bought a smaller diameter fan, I wouldn't have to enlarge the big opening on the concentric reducer to fit the fan I have. But sometimes I just get stuck trying to make something work, and in my determination to achieve a set goal, I stop thinking sideways.
-
I may be misinterpreting your intent, but you don't want steel (or any metal) as the interior lining of the forge. And if you cast refractory between two pipes, you'll have a heckuva time getting the inner pipe removed to end up with a refractory inner liner. Better to cast refractory between an outer pipe and an inner cardboard tube. Then the cardboard can be burned out.
-
I may stand corrected, but I think all the different refractories will soak up heat to some extent. The hard firebrick is about the worst for soaking up the heat, the soft firebrick is nicely insulating and reflects it back well but doesn't stand up to the thermal cycling and will crumble on you, the castables, like kastolite 30, do a good job of not soaking up too much while reflecting it back in to the forge chamber. But a real good way to go is a couple of inches of rigidized ceramic blanket coated with about a 1/2" of kastolite 30, that then has a good wash of matrikote on it. The matrikote will really reflect the heat back into the chamber.
-
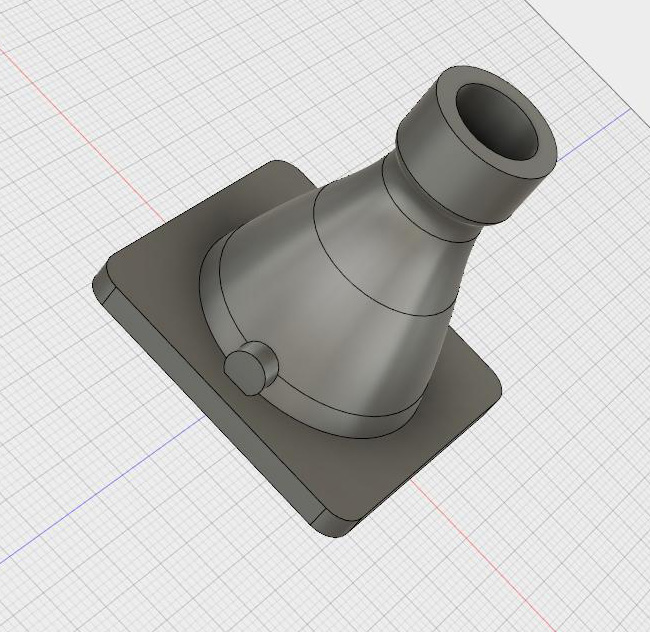
I made some progress on the vortex burner build this weekend. I'm making one with the SST and one with the concentric reducer. Both are taking quite a bit of work to get the ends to fit the mixing tube and the fan. I think I need to put the aluminum spacer block (3 pieces of 1/2" stacked up between the fan and the SST) for the SST build on a metal lathe to get a nice smooth transition. The concentric reducer will take some hot forging to get the larger opening to the right size for the fan. At the same time, I'm going to print this on my 3D printer in wax and set it up to cast in aluminum. If I can get the dimensions dialed in, it should be a whole lot easier than the SST or the concentric reducer. Just bolt the fan on one end and the 3/4" pipe mixer tube on the other. Fit the gas inlet tube and away you go.