

John in Oly, WA
-
Posts
932 -
Joined
-
Last visited
Content Type
Profiles
Forums
Articles
Gallery
Downloads
Events
Everything posted by John in Oly, WA
-
Material suggestion for different Mokume
John in Oly, WA replied to Aion27's topic in General Metal Specific Discussion
My reply is a little late to this party, but in the linked thread are pics of my "stack of quarters" mokume - -
So, you get two new 1/8" pipe nipples and drill new orifices in them with a #60 drill bit, dead center on the pipe, and replace the existing pipe nipples with these new ones. Make sure the orifices are dead center inside the reducer fitting, pointing straight down the mixing tubes (if you can connect a garden hose to your gas intake, you can shoot a jet of water out of the orifices and use that to align them properly). If you use the water jet method of aligning the orifices, once done, blast out the water with an air compressor, then connect the propane hose. Leave the choke plates off the burners. Fire it up and see how it burns. Take pics and let us see how it burns. Simple, cheap fix. After your burners are working, you can think about how they're mounted in the forge.
-
I need help identifying my new anvil
John in Oly, WA replied to Dalday's topic in Anvils, Swage Blocks, and Mandrels
My guess on the serial number would be A, a poorly struck 9, 587, and either another 8 or 3. And on the anvil, a Trenton. -
Nothing wrong with the forge at this point. Burners at an angle are good. A few minor mods to your burners to get them in a functional range and you're good. Even making a couple of T burners from scratch is...what? $30? Definitely not $200 or $450. Slow down, fix the burners. Replace the two pipe nipples with the orifices in them. Drill smaller holes for the orifices and take the chokes off completely until you get a decent flame. Then a little tuning and you're good.
-
Nothing like that first one and having the layers all stick together like they should. Way to go awrkiron!
-
You're welcome Spanky, I just couldn't resist (thinking of being helpful, that is). Charles, I've always heard "Safety is job #1," and I'm always prepared to jump in and do my job. I could be wrong, but I just can't imagine a lady being anything but most appreciative for looking out for her safety and well being. LOL
-
You're right, I've never given that topic much (any) thought, but now that you brought it up, if I was ever near a situation like that, I would definitely practice fire safety and help her put it out. I'm just helpful that way. Just for the sake of safety, of course.
-
Grinding and shaping, putting in the bevels, I like the ceramic belts.
-
At least the chicken wasn't crossing the road.
-
Pictish Anvil Picture
John in Oly, WA replied to ThomasPowers's topic in Anvils, Swage Blocks, and Mandrels
Could be. Or perhaps he was just resting his hand on Domingo's anvil while he haggled over the price of the sword he'd had him make. -
Pictish Anvil Picture
John in Oly, WA replied to ThomasPowers's topic in Anvils, Swage Blocks, and Mandrels
Yes, but would he lower himself to such a sooty, begriming task as making his own sword? Inconceivable! -
Pictish Anvil Picture
John in Oly, WA replied to ThomasPowers's topic in Anvils, Swage Blocks, and Mandrels
Could be an alien smithy - I'm seeing five fingers and a thumb in the print. -
I guess that's one way to open a fridge. Very nice chopper, but is it a bush sword or an appliance sword now?
-
A beauty, for sure!
-
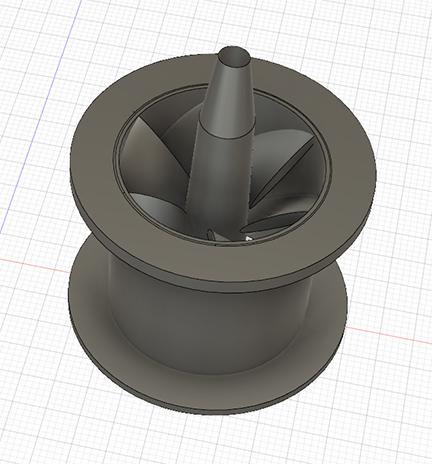
A pic of the CAD drawing of the white plastic cylinder (vortex generator).
-
AnotherCurtis, you've got it. The white plastic cylinder is just six vanes distributed around the inside of a cylinder. The vanes each span 120 degrees of the 360 of the cylinder. Fourth video a very short cylinder. Fifth video the same cylinder stretched. I'll post a pic of the white plastic piece. Frosty, the third video is the squirrel cage fan blowing into a spiral tunnel shaped piece of plastic. It has what I think is the best flame. But I think it falls into the category of blown burner. Not that that matters necessarily. Certainly a lot of tuning and tweaking could be done to arrive at a better flame.
-
Mikey, while the fan's hub doesn't appear to interfere with vortex formation, it does just generally block airflow - makes the opening smaller - which to my untrained eye made the flame look much richer (a lot of secondary flame). So I should have listened to your statement of using a 70mm fan. But I'd already purchased the parts for the 60mm fan, so I went down that road for a bit. Then switched horses mid stream. Ted, I liked the flame of the squirrel cage burner more than the others, but I only put one of them to use one time. I put the squirrel cage burner into a large foundry and melted a crucible (maybe B20 or 30, about 8-9" top diameter) of aluminum - that took 40 minutes from cold foundry to pouring aluminum. But it was a big foundry. Mikey, do you know what size crucible is in Bill's foundry? Mostly this was just a run through of preliminary tests. Other than the last one - the long passive vortex - I didn't try changing mig tips or tuning any other aspect. I also didn't build in any adjustable speed control on the fans, or chokes on the air supply. So it was like riding a one speed bicycle - no way to change the flame from rich to lean. And the squirrel cage version probably falls into the blown burner category, rather than the NA, so that was a bit of a departure from the parameters of the experimenting. The thing I most liked was the change in flame shape when the fan was turned on. It looked like the flame was thrown to the outside of the stream changing it from a cone to more of a crown and looked like it slowed down a bit, or maybe the speed stayed the same, but the air flow changed from straight line to rotational. Next I need to set up some adjustability and put them in a forge.
-
I'm back from my adventures with vortex burners... Fun with Vortex Burners I’ll preface this with saying I’m not a videographer or video maker of any kind, well maybe the most novice kind. So, the sound is bad, the focus of the video is sometimes out of frame, wobble, etc. etc. The first video, it was raining so hard, it just sounds like static in the background. Also, I'm no expert at building or designing propane burners. Just following Mikey's instructions (mostly) and then going off on tangents. For what it’s worth, here are my builds and my odd experimenting. Right off the bat, I started this process on the wrong foot. My simple calculation regarding the ratio between the fan opening in the funnel and the mixing tube diameter of 3:1 didn’t take into account the large hub in the middle of the fan blocking a good portion of the opening. So, the first two burners I made, one using the stainless steel plumbing reducer and the other, the sausage stuffer tube didn’t work so well. If I'd have listened to the 70mm part... And the fact that I couldn’t find a reducer with a larger diameter, something close to 70mm, at the big end, pretty much ruled that out as a build method. Same with the sausage stuffer tube. Couldn’t find one with a large diameter at the big end that didn’t require several layers of 1/2” thick aluminum plate and tapered holes through each one to get to the 70mm fan diameter. I gave up on that method before I arrived at a finished burner. So, the wine funnel method may be the way to go. Although, I didn’t try that method. I jumped to my 3D printer and printed a funnel. First of a size for a 60mm fan, because I was still stuck on that path. And then a 70mm 3D printed funnel. To me, that was the easiest build method. The printing took between 22 and 26 hours on my printer, but that was the printer working, not me. The first video is my results with the stainless steel plumbing reducer and the 60mm 3D printed funnel. Not successful at all, so I didn’t bother to show the build process. The second video is the 70mm printed funnel. Works a little better, but I didn’t spend any time tuning the burner - changing mig tips might have helped. I didn’t think at this point to show the flame from the front. In the first video, I went back and relit the stainless steel reducer burner and videoed the front of the flame. The third video, I took a left turn because I wanted more air in the mix (and more power arr, arr, arr- one of those guy things) and I like the gas input tube to go straight down the middle from the back, rather than coming in from the side - easier to adjust. I drew up a vortex generator for the 70mm funnel to fit a squirrel cage fan and 3d printed that. My CAD skills are lacking, so it looks terrible (and took 36 hours to print), but the inside is generally the shape I wanted - not knowing anything about angles and air flow. And the swirl looking back into the front of the flame is beautiful, I could watch that for hours. The fourth and fifth videos are of a burner with a passive vortex generator. I wanted to get away from the dependence on electricity. The simple is better theory. The fourth video, the vortex generator is very short with a heavy twist to it (my lacking ability in CAD). The fifth, I managed to figure out how to stretch the spiral vanes in the CAD program without them changing into odd shapes. The last segment of the fifth video, with the longer vortex generator, is using a .023 mig tip. All the other burner variations in all the videos used a .030 mig tip. View at your own risk. LOL Vortex burner part 1 Vortex burner part 2 Vortex burner part 3 Vortex burner part 4 Vortex burner part 5
-
Just amazingly beautiful! You and your crew have some serious skill.
-
What did you do in the shop today?
John in Oly, WA replied to Mark Ling's topic in Blacksmithing, General Discussion
Beautiful chandeliers Alexandr! Nice hammer stand JHCC. Wish I had enough hammers to justify something like that. 58er, dragon looks real good. I'm in the shop playing with my new 12" contact wheel on my belt grinder. Finding that hollow grind bevels are a bear to get looking right, but the blade rest I just made is helping a lot. -
veterinary pliers (That's what I've heard them called) Das, look a bit different.
-
Looking good. Nothing like a belt grinder for material removal. It's the most used tool in my shop.
-
What scrap metal should I lookout for.
John in Oly, WA replied to Robotick's topic in Blacksmithing, General Discussion
Definitely the chain and sprocket. Any mild steel you see and is that pallet strapping or bandsaw blade in there? Might grab that too. -
DFPROF2 + 1D 2 no reading on regulator
John in Oly, WA replied to Luis Vernabe's topic in Gas Forges
If it's plastic and blocking the tube going into the regulator, then my guess would be, no it shouldn't be there. May be just shipping cover to keep debris out. Although, if it was, I don't know how you'd have got it all connected to the tank without it getting in the way. A pic at a slight angle to see how it's fitting into the assembly might be helpful though. -
DFPROF2 + 1D 2 no reading on regulator
John in Oly, WA replied to Luis Vernabe's topic in Gas Forges
So the tank isn't the problem. Hook up the forge regulator to the tank and follow Thomas' recommendation - back out the regulator adjuster screw (flow OFF), open the main valve on the tank slowly, and slowly screw the regulator adjuster screw in.