
GoodThing Factory
Members
-
Joined
-
Last visited
Everything posted by GoodThing Factory
-
I was reading another forum and someone claimed they've used Acetylene for their forge. My understanding of the post was this guy wasn't talking about using a cutting torch to heat steel but building a forge that used Acetylene rather than propane. I've never seen plans for such a thing and on it's face it seems less than safe and expensive since you'd need a huge or manifolded tanks for anything other than a tiny forge. Just curious if anyone has run across this design.
-
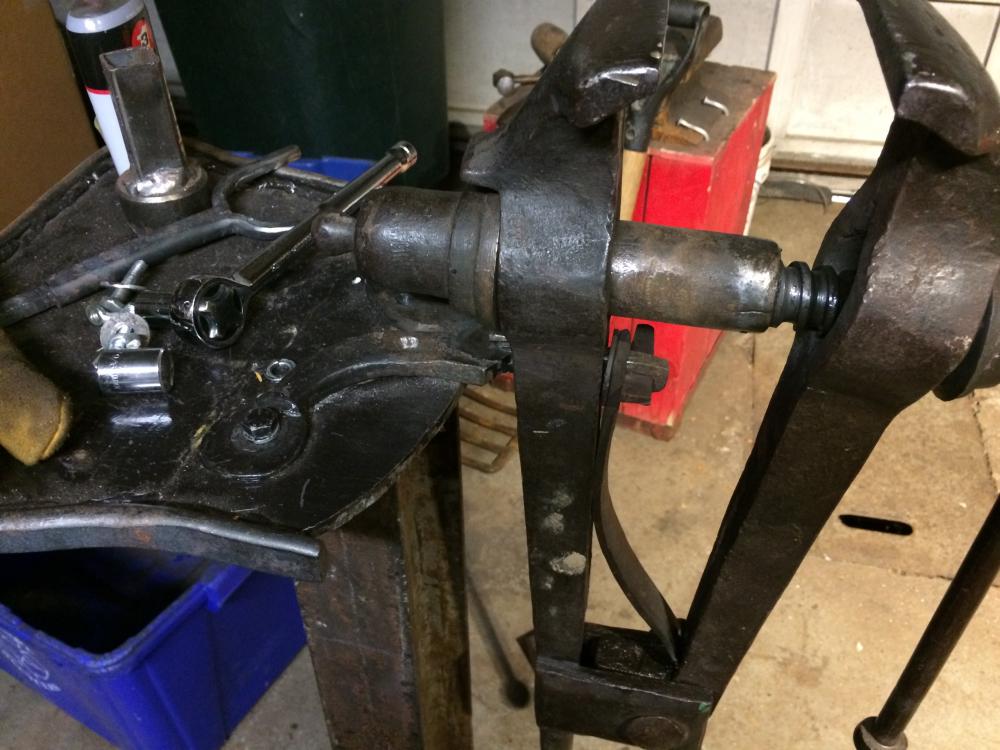
interesting ... it def looks like the screw box was replaced or repaired and brazed onto the interior threads. the box itself is in pretty rough shape - could be age or maybe not the best job to begin with but it's solid and functioning fine. from the way it fits into the shank it seems like there should be a flange on the box to prevent it from slipping in the hole when the screw rotates - maybe there was a shim / wedge which is long gone. you're spot on about the repairs ... having taken it completely apart you can see it's been fixed quite a bit. but with exception of the tenon on the mounting plate which wasn't welded very well all the parts seem to be consistent with the tool's age - no modern bolts or washers & aside from the spring it's all spark testing like wrought iron. never ceases to amaze me how i'll get a 5 yrs out of a modern, "decent" quality power tool but something made prob 100 yrs ago will last another 100 with a little maintenance. btw, any downside to replacing the tenon mount with a collar and bracket? and ... the spring is also a bit rough, can it be replace with a piece of truck spring forged into a flat bar? thx
-
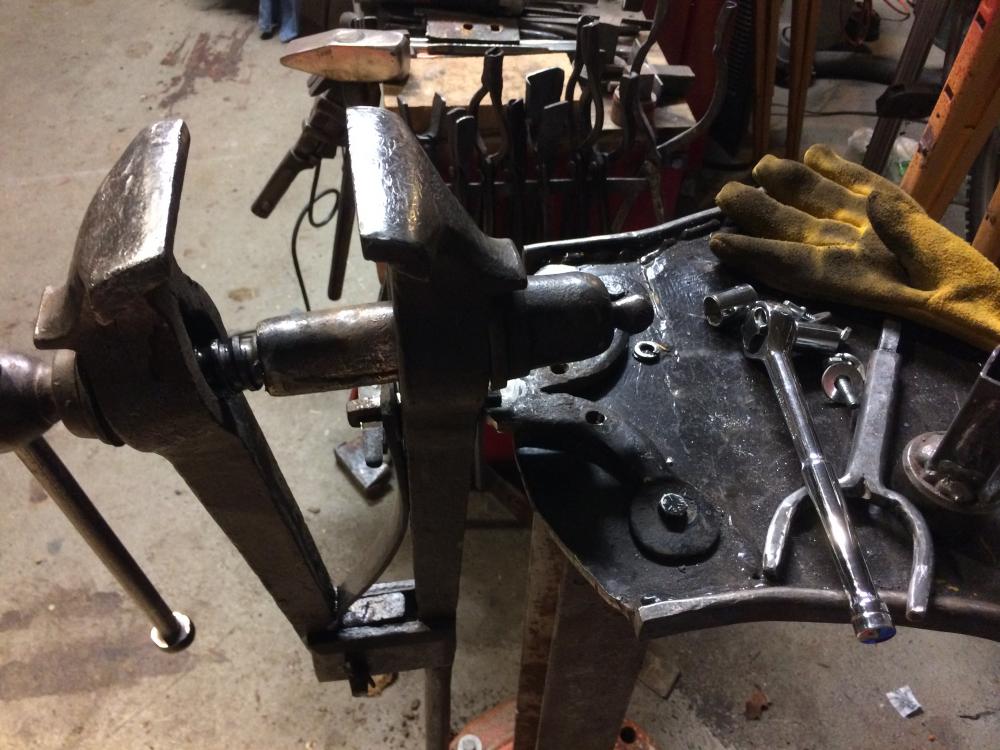
yup, that's my plan. the tenon and wedge doesn't seem as sturdy. thanks
-
thanks guys ... just curious if anyone happened to know the make. mine is ready for a rebuild ... the tenon snapped on me and when i took apart i found some pretty half baked welds where it's been repaired at least once. i'm thinking the way to go is forge a new mounting bracket assembly and collar from some wrought iron i've got
-
find the circumference of one coil (pi x diameter) and then multiply by the number of coils + leftover to get the length of the whole spring. the diameter of the stock should be constant
-
amen to that! after wrestling with several springs to straighten out 8 - 10ft length now i just a cut a curl or two and straighten that. much easier and safer
-
thanks .. yea, thats it. couldn't find another image of one like it. any idea who the mfg is?
-
Wondering if anyone can tell me whether the way the mounting plate on this vise is original or the product of repair who knows how long ago? i've looked at a ton of images and can't seem to find another example of the mounting plate being secured to the shank via a wedge and hole in the shank and spring. Also, curious if anyone knows manufacturer and approx date. Thanks
-
really appreciate the the advice and input from all of you - thanks!
-
I'm not 100% sure what you're asking since I haven't ground in a bevel yet but to create the downward curve i forged the top wth a rounding hammer and the used the horn to shape the point. also, worth noting - prob obvious - i did some grinding as well.
-
thanks .. i took a look and yea what i'm making is definitely looks like a pruner - not something i'll get much use form - even thought i like the shape it's prob time to rework it back into more of a tradition hunting knife Frosty to the rescue! That's where I've seen this shaped blade before. Not what I was going for but thats what I've got.
-
I've started what I was planning on being a hunting knife but the shape I've got doesn't look much like any hunting knives I've seen. In fact, I haven't seen any images online of knives with this shape with - point curved downward. My question ... am I just making an upside down knife or does this blade fit into a "category"? Thanks in advance.

-
welcome ... no offense but "way easier than it looks"? not exactly. if you've been watching YouTube videos of guys with decades of experience who move metal as if it were clay then you've got a surprise coming your way. they make it look "easy" but to get the metal to move the way you envision takes quite a bit of effort and practice that said, it's not all that hard to get started ... a barebones smith set up is pretty easy to create if you you want to get a feel for whats involved. a piece of rail track, a hammer, some vice grips and home made forge and you're ready to go. watch out though ... if you like forging then there's no getting out:) have fun!
-
without some kind of coating mild steel is going to rust - no way around it. beeswax, linseed oil, getting to orange heat and cooling in oil are all common ways to prevent rusting. however, if you're going make items that touch food you'll want to leave it uncoated and then rinse and give a wipe down with cooking oil after using.
-
according to smith ... http://www.smithequipment.com/files/pdf/resources/FAQ_GasRegulation.pdf
-
as a guy with a couple of years of experience i'll confirm what folks with decades under their belts have already said ... build it yourself. i've found there's no better way to learn than building your own tools. think of it as the table stakes for executing your creative vision ... making the tools you need will teach you the skills to make other objects. i bought one pair of tongs and a hammer to get started but i've made every other tool since ... tongs, drifts, punches, bottom tools, bending jigs, a guillotine & dies and now hammers. i've learned more making tools than had i made 100 candle holders or bottle openers ... plus i've saved a lot of money along the way. that said, i didn't learn in a vacuum ... theres a lot of great video, the ABANA curiculum is a great guide and i've taken a few classes w local smiths. have fun
-
thanks for the reply - i didn't but will now.
-
a bit off the mark in terms of your question but this guy does amazing things with nuts and a welder ... http://martimoreno.blogspot.com/
-
I read in a previous discussion someone suggested using graphite powder to prevent punches and drifts from getting stuck in hammer eyes. I was wondering if anyone can comment on their experience using graphite powder / provide advice re usage. The products I've looked at have an upper temp limit of 850f which is well below forging temp for punching a hole in 2" 1045 so not sure if I'm seeing the right product. Also, it's pretty pricey stuff - like 30 - 40 bucks for a small amount. I've seen people use coal dust but I don't run a coal forge and charcoal dust doesn't seem to do much good. So ... any thoughts on graphite specifically or other methods to prevent locking up would be appreciated.
-
coundnt agree more abt snug fitting tongs in general ... seems like you can't have too many pairs properly fitted to the stick you're using. it's a real time sink to be working with metal that's flopping around or sliding out of the bit because the work piece isnt properly secured. i started out using gloves on both hands the way i would for welding but pretty quickly gave up the glove on my hammer hand ... seems like there's less strain on my hand and elbow w/o and my hammer control is much better ... maybe there's some cause and effect ... better hammer control = less strain. i do like usiing a glove on the other hand if i'm holding stock since i provides some protection from the heat
-
hadnt really thought of that but it makes sense ... what do you to alleviate the gripping issue?
-
i've had tendinitis on my elbow since before i took up forging ... in my experience proper anvil height makes a huge difference. i've found an anvil that's mounted too high puts a lot of strain on my elbow, hand and wrist. as thomas notes ... building anvil stand is fairly easy - i've built 3 already from 4x4's bolted together. another thing to watch out for as a beginner is to make sure you wrap your thumb around the hammer handle - don't place your thumb on the handle pointing up.
-
these days mild steel is pretty cheap - a full length of 3/4" square 1018 goes for about $20 here in NY - plus they'll even throw in a few cuts at no charge to make it more manageable to transport. as a beginner that much stock should keep you busy for a while so need to need to settle for mystery metal. for higher carbon steels which can be more expensive and harder to come by a nice coil of spring will do the trick and for the most part you know what you're getting. that said, just picking through a pile to find steel for a blade, striking tool or hammer is not a great idea - at least in my experience.
-
Yes, I'm pretty happy w it. I picked it up since it was less than an hour from me. I tink it was comparatively cheap because there was one crappy picture on the site and no info other than measurements - no maker not even the weight and i'm telling you the pic was a blurry rusted blob. I assumed the weight pretty close from the dimensions, even though it was rusted it the edges were in good shape and the shape looked a classic HB so took a shot. you can throw in a pet rock w every order
-
yes, nothing brings an anvil back to life like using it ... my PW had a really pitted face when i got it about a year ago and even after a good wire brushing the rust was really in the pits. after steady use the face is shiny and a lot of the pitting is smoothed over so there's really good smooth spots.