

arkie
-
Posts
2,679 -
Joined
-
Last visited
Content Type
Profiles
Forums
Articles
Gallery
Downloads
Events
Everything posted by arkie
-

55 gallon drums. What can you make from them?
arkie replied to Glenn's topic in Blacksmithing, General Discussion
Hey, I've seen a couple of those! Whatever works, works! Drums are stronger than most of the fenders on the new trailers by a long shot. You can barely prop a cold beer on the skimpy things without bending them. -
Frosty, very good points on turning the bars on the diagonal! Thanks. I gave it a brief thought when welding, but thought the corners facing up into the fire might burn up faster. I like your idea. When (not if) the middle bars burn up, I'll probably weld the replacements in on the diagonal since they get the most heat. I might even make another, on the diagonal, and start using it. The angle of the diagonals might even enhance air flow, not hitting the bars square-on but sorta funneling the air flow better between the bars.
-
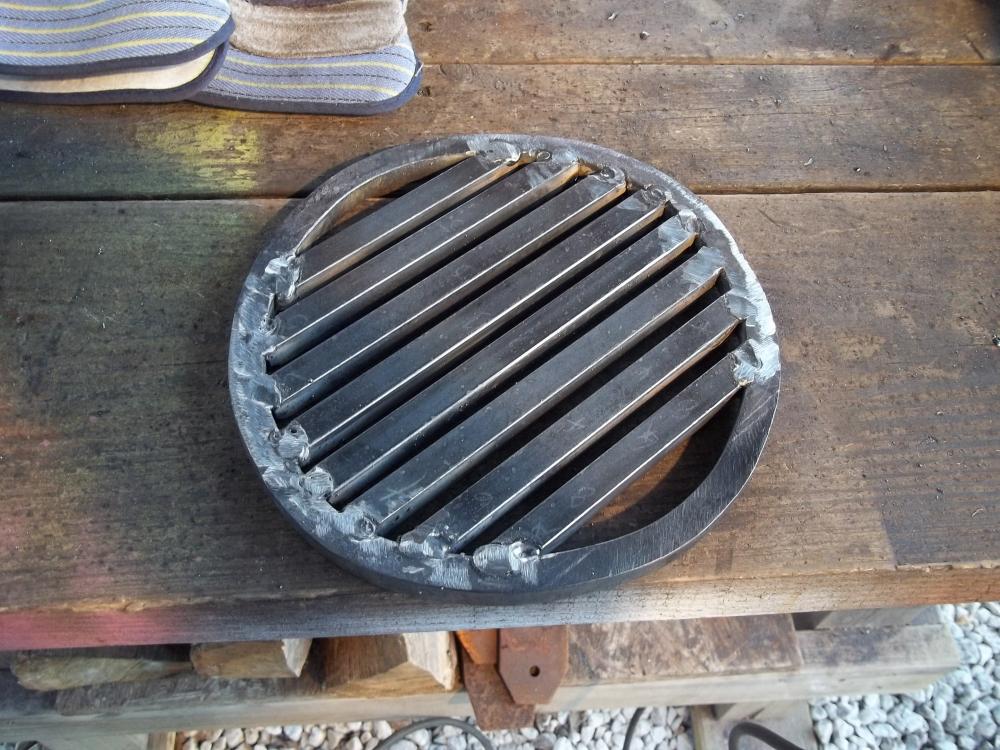
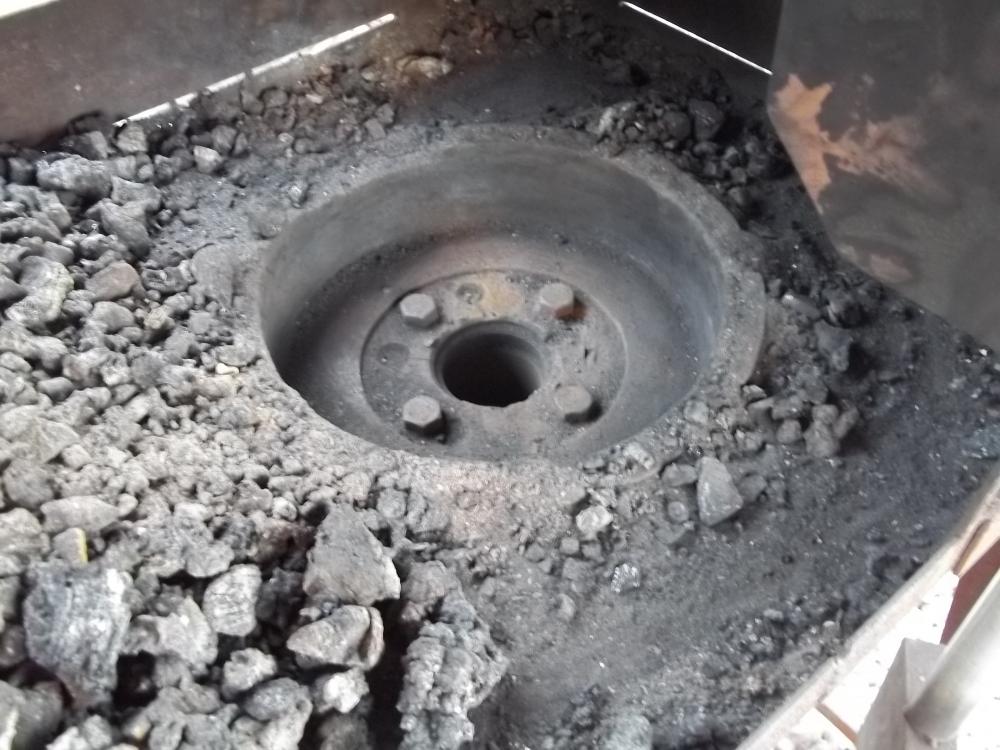
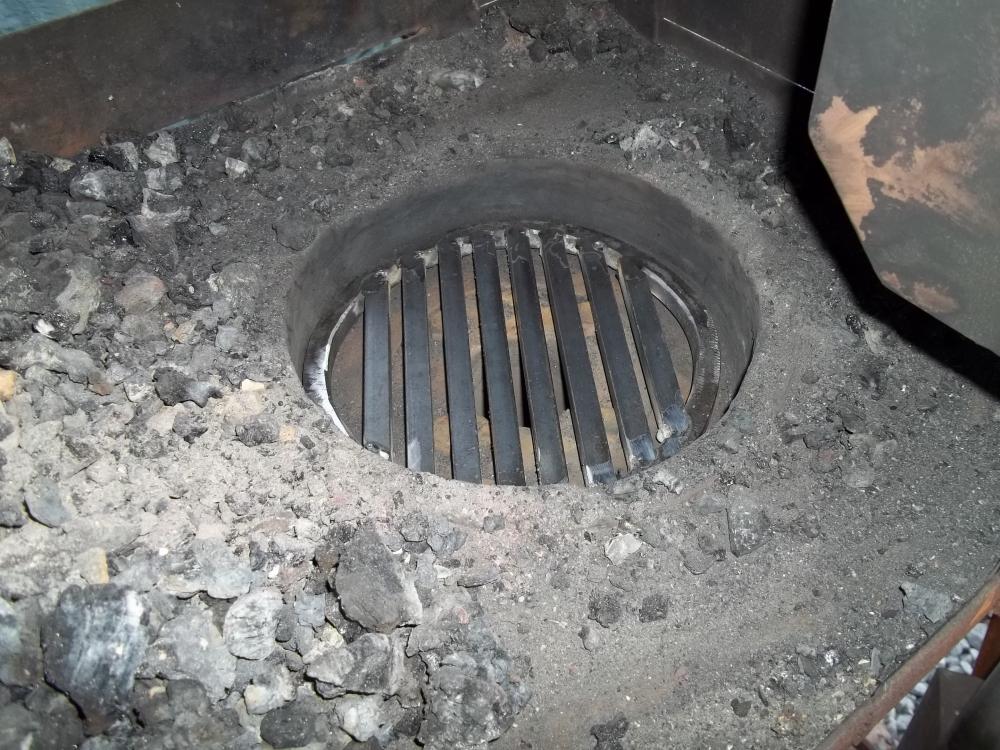
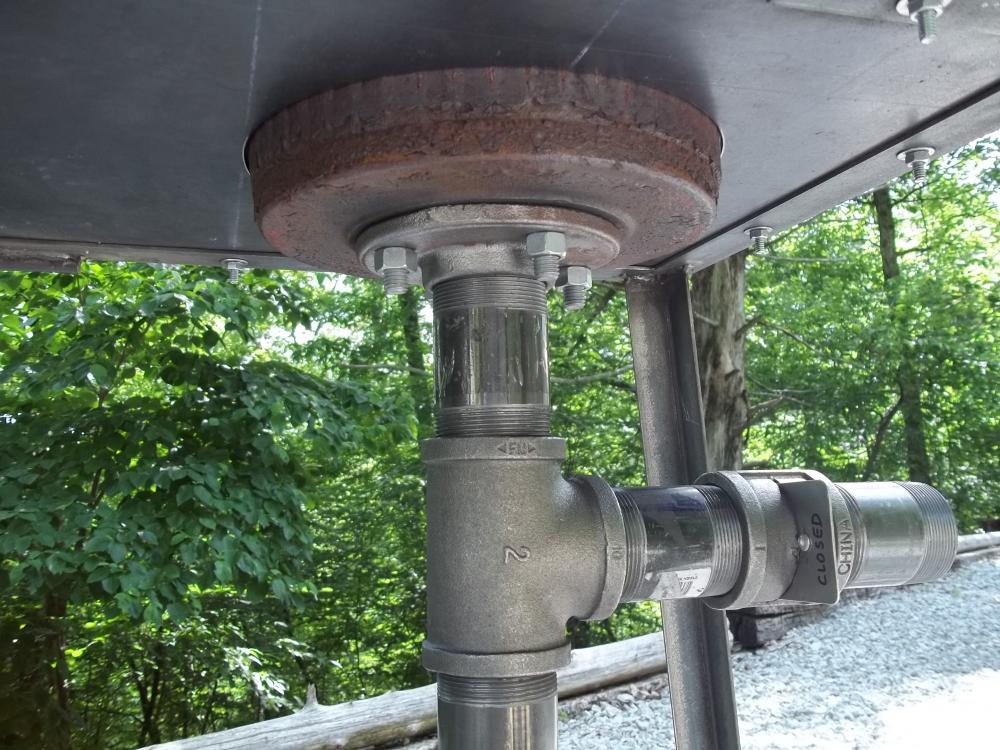
Shamus, here are a few early pictures when I was making my brake drum forge. I simply bolted a floor flange to the bottom of the drum. I built an ash dump similar to Frosty's. I cutout and welded it from scraps. The screw on caps are, as Frosty eluded to, a PIA! I'm using a xxxx fan from HD for air, a blast gate (air gate) for air control. I only open the gate 1/4 to 1/2 for most forging. I've since added a hood which I wish I had done from day one. As for the grating on the tuyere, everyone has a different type. I started out with some 3/8" rod welded across the drum hole, spaced about 1/4" to 3/8". They burned through pretty quick, plus welds on cast iron are not strong in this application. Next, I tried some cast iron drain grates. They also burned through pretty soon. Finally, I made a grill out of 1/2" bar stock. Forged a circle same as the I.D. of the drum, welded the 1/2" bar stock to it, and dropped it in. Nice snug fit and so far it shows no sign of burning. If it does, I'll just weld in some replacement bars where it burns out. Some folks weld their plumbing together, but that's sort of semi-permanent. I just screwed all my black pipe together and it will come apart very easily if I need to remove it for some reason.
-
The guys on this site are good!
arkie replied to MAD MAX's topic in Blacksmithing, General Discussion
Touche' -
Great find, Shamus...you're gettin' into the groove! When you get to where you can use the 3 pound cross peen (that's what it looks like) safely, you can if you want, reduce the sharpness of the peen end to provide for smoother drawing-out or fullering of the metal. Simply grind a larger radius, as mentioned above, slowly and with care to preserve the temper. Sometimes the stock hammers' peen radius is a bit sharp for most drawing-out or fullering of flat stock. Frosty had some great ideas and advice for you. The "twisty" tongs he mentioned are sometimes called a Dempsey Twist. I've made several and they serve me well. They are good for a beginner to cut his/her teeth on.
-
The guys on this site are good!
arkie replied to MAD MAX's topic in Blacksmithing, General Discussion
BUSTED!!!!!!! -
Shamus, you mentioned finding a drilling hammer, sometimes called a engineer's hammer. I had an old one, which of course has two flat faces. I had a 1 1/2# and 2# rounding hammer, but needed one a bit heavier. I will work well for you. Glenn had a good point, don't get too carried away with a heavy hammer at first. I made mine after a few months of forging and realized I needed a slightly heavier hammer. The old 3# drilling hammer fit the bill. It was cheap; a friend gave me one. Over a couple of hours, I ground one face, very slowly, keeping the temp where it was comfortable to touch, to a good round curve. I put a smooth finish on it with a very fine belt sander. You can approximate the curve by looking at some pictures of good rounding hammers; Brazeal, Cergol, etc. and many others to name a few. Just don't get the face you're grinding hot; it will remove the temper. Be patient doing it. For a cheap cut off hardie, I got an old chipped 3" mason's chisel at the junk store for a couple of bucks. They are good steel. I reshaped the cutting edge, slowly as with the hammer. As luck would have it, the 1" handle on the chisel fit my hardie hole perfectly.
-
Really nice gates! Bet you went batty after making all those scrolls....
-
Peddinghaus, the drop forged steel anvil
arkie replied to TechnicusJoe's topic in Anvil Reviews by brand
Neither photo is clear enough to see...try re-taking the photos. -
Stan, I am not familiar with the BK anvils (no surprise being here in the states...). Are they cast steel, cast iron, forged steel, ??? How do they compare with the higher quality anvils made in the US and UK, such as Hay Budden, Fisher, Peter Wright, etc.?
-
That must have been a joke. Apparently, whomever sold it is the one who got the bargain! At nearly $10/pound, that is not a bargain by any stretch of the imagination...
-
Just soak the bolt/nut in vinegar for a few hours. The zinc will disappear and you are good to go! Don't try to burn it off. Quicker in muriatic acid, but messier, more expensive and more care has to be taken with the acid.
-
That's a neat tip Alan. Most of my problems with punching have been keeping them dead center. Thanks for posting it.
-
You would be surprised at the prices you might pay. The members in our organization sell their wares to other members at greatly reduced prices compared to what you would pay elsewhere like antique shops, ebay, some regional gatherings, etc. My anvil and post vice were about 1/2 to 1/3 less than the going rate. It's not a business for most of them, just a courtesy to fellow members.
-
New steel anvil stand with removable wheels
arkie replied to tdriack's topic in Stands for Anvils, Swage Blocks, etc
That's a nice looking roll around stand, should serve you well. Good looking anvil, too. I think you did well on the purchase. As a side note, looks like the shaft on that handle is pretty short. A longer handle might keep you from having to bend over or lean forward to move it around, plus a round handle would be easier on the hands. That Hay Budden will get mucho heavy moving around. -
Michael, Check around to see if you have a blacksmithing organization or club in your area. That may be your best place for anvils or leads on purchasing one. Often members have more than one anvil and some even buy up anvils to sell to new members if they need one. I joined our local blacksmith organization, but didn't have an anvil yet. One of our members had two for sale at a very fair price and I bought a 168# Hay Budden in very good condition from him as well as some other tools over the years. You might have to drive a little bit to attend meetings, but that is worth the experience you will gain. Some of our members drive over 100 miles to attend some meetings which are held once a month.
-
If you search the Blueprints, particularly those by Hofi, I believe he shows how he punches and drifts round rod.
-
Homemade Coal Forge on a budget
arkie replied to John on Fishhook's topic in Alaska Blacksmith Association
Sounds like your coal mountains are like Samuel Taylor Coleridge's poem (I think it was The Rime of the Ancient Mariner") which said, "...water, water everywhere, nor any drop to drink", or something to that effect. Looks like John has a gold mine in the coal!! -
Thomas, I agree fully. The reason mine are horizontal is that my anvil is outside, on gravel and even though under cover, is susceptible to water being more readily absorbed if the end grain is down. I originally started to run the wood vertical but did it this way for that reason. What one can't see is that all the 4x4's are lag bolted together inside. That puppy is like a big brick!
-
Slightly off topic, but...since we are talking food and wood here...... My dad used to say the best way to eat mackerel was to nail it to a wet pine board. Then you baste it liberally with salt, pepper, lemon and butter and grill it over a hot fire. You then remove the mackerel and eat the board.
-
Homemade Coal Forge on a budget
arkie replied to John on Fishhook's topic in Alaska Blacksmith Association
Many places have exposed coal seams on the surface. -
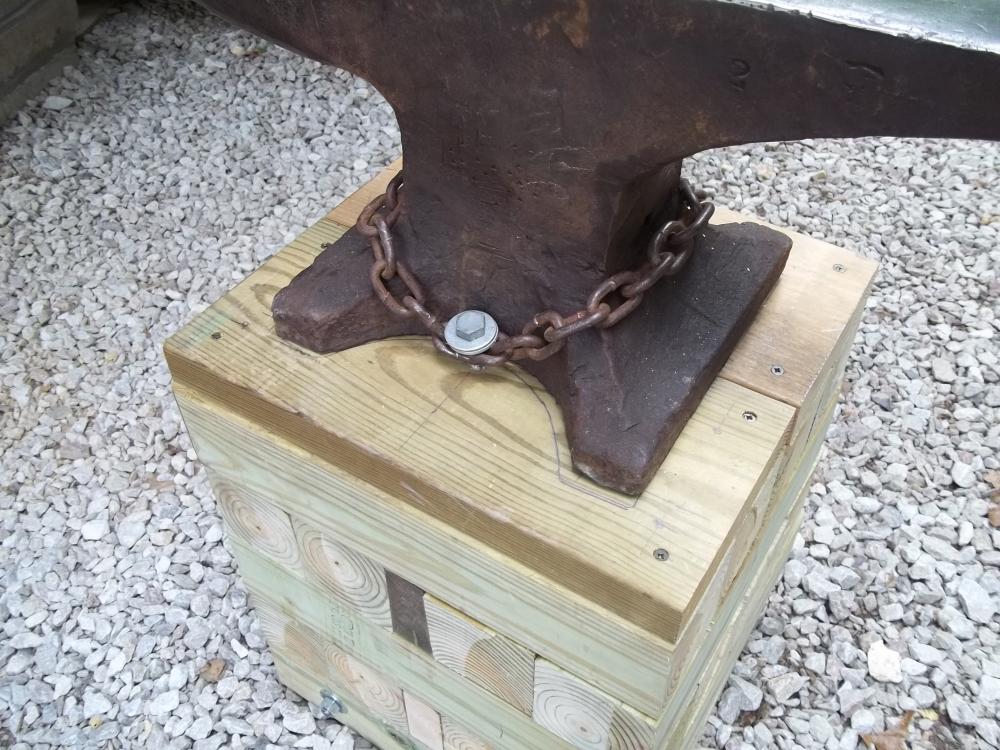
Have fun with your new anvil! There are COUNTLESS ways to secure your anvil to stabilize it and reduce ringing. Here is a photo of how I secured my 168# Hay Budden. I made a block-type base so I could slide a two-wheel dolly under it without it rolling off to the side and make it semi-portable. I used a piece of heavy chain bolted down tight with big washers and 6" lag bolts on both sides. Simple yet effective, solid as a rock, no ringing. Stumps work great, too. I'm sure others will post their tie-down system for you to consider. Some folks stick large magnets to the anvil side to reduce ringing.
-
I save all my old cotton socks for applying finishes. If I am using one of the linseed oil, turpentine, beeswax, and/or thinner finishes they won't hurt your skin so I just slip the sock over my hand, rub in the finish, throw away the sock (per Glenn's method to prevent combustion), clean hand.
-
Homemade Coal Forge on a budget
arkie replied to John on Fishhook's topic in Alaska Blacksmith Association
X2 on the rim to retain coal. I'd make it 3-4" high so you can pile up plenty and keep it on the table. My forge originally had a 1 1/2" angle iron frame, but I very quickly added some 3" sides. MUCH better. You mentioned you get your own coal. That's fantastic. Do you have bituminous or anthracite? -
Snowflakes and the hammer
arkie replied to rockstar.esq's topic in The Business Side of Blacksmithing
Those numbnuts wouldn't understand a bit of it.


