
kubiack
-
Posts
323 -
Joined
-
Last visited
Content Type
Profiles
Forums
Articles
Gallery
Downloads
Events
Everything posted by kubiack
-
Peddinghaus, the drop forged steel anvil
kubiack replied to TechnicusJoe's topic in Anvil Reviews by brand
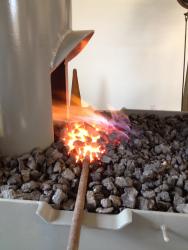
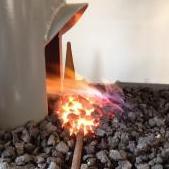
Here are a few pics of some of the other shop items I have built and some other the other anvils I have had. The picture are the forge in operation, my 6" Columbian leg vise, a welding/layout table, 250lb Fisher, and a 175lb Columbian. I build the forge, leg vise stand, and welding table. I sold all of my anvils besides the Trenton to buy the buy the Peddinghaus. The Trenton was my first anvil and belonged to my father in law, when he retired from farming he made a gift of it to me. A very good friend of mine bought the Fisher and a Peter Wright from me so I still get to use them on a regular basis. I also have first right of refusal if he ever wants to sell the Fisher. -
Peddinghaus, the drop forged steel anvil
kubiack replied to TechnicusJoe's topic in Anvil Reviews by brand
I read back through this thread and realized I mostly spoke about what I did not like about my anvil. TechnicusJoe took the time to post about his anvil including pictures and then I start in straight away with what I did not like about mine. I though TechnicusJoe did an excellent job covering all of the good things about the these anvils and their construction there was not much more for me to add that he had not already covered. My intention was not degrade these anvils I merely wanted to point out somethings about them that are not apparent if you have not scene a brand spanking new one in person. If I had know this about mine I still would have ordered it as I think it is one of the best values in a new anvil. For me the features, construction, price, and freight all fell into a sweet spot. I don't know if other anvils are any better or worse but I think you get a lot of value for your dollar with these. I do want to say that I have a full time job that is not blacksmithing and only use my anvil a few nights a week and most every weekend. So with that being said what do I like about the anvil, a lot. My anvil is the 275 lb #12 with the upsetting block. Probably my favorite thing about this anvil is how much mass they put in the center of the anvil. There is much more that in a London pattern anvil which makes the sweet spot larger. It is pretty much a sawyers anvil with horns stuck on the sides. The rebound on this anvil is excellent the best I have personally worked on. I also like having the two horn shapes. It can be really handy to have the one inch end of the flat horn attached to 275 lbs of steel. I also like the conical horn as it gives me a different shape than the horn on my London pattern. I think they nailed it on the placement of the hardy hole. It is supported by about 5 inches of steel, you are not going to break it off forging hardies with a heavy sledge. I still don't like to leave a cutoff hardy in while forging but if it gets forgotten I think it is much safer on my tong hand side than on my hammer side. I think the upsetting block is a feature worth seeking out in an anvil. I'm glad this one has one and I have come to use it quite a bit. I also like the weight and size. I have the 275 lb anvil and it is about all I can safely move around without getting out the engine hoist. I also like the fact that it is drop forged. I'm not going to argue with anyone over the merits of cast vs forged but I like knowing how well this anvil was built. It was expensive and a life long purchase and I like the extra peace of mind it gives me knowing it will last that long. TechnicusJoe, I think the use of the term fake may just be a cultural difference. You are calling it a fake and I call it a copy. What I see is a company who makes anvils and found a very popular anvil with a proven history and copied its shape, is making it using less expensive methods, and selling it for a lower price. I do think they are trying to make money selling the same shape. To call it a fake in the US would imply that they are selling it and telling people it is a genuine Peddinghaus and that something fraudulent is taking place. The anvil would have to look the same and be marked Ridged/Peddinghaus. I'm not going to comment further on this as I have clearly stated why I would not call it a fake. As far as the chamfer, I gave this some more though as to why this bothers me. If I'm making a scarf to do a lap weld I start by setting a shoulder over the edge of the anvil. When working in smaller stock I can not get as small of a radius as I would like and have to get out a block shaped hardy with a tighter shoulder. This is a minor issue but I would prefer if they left it some room on the anvil to do this. I'm not going to say more on this either other than I would have like the anvil to be left buyer to dress. Since you asked I have included a few pictures of my anvil and also my forge. These pictures where several years ago was when the anvil was brand new and I had just finished building the stand for it but had not yet bolted it down. The makers mark is hard to see because of the black paint but it says Ridged/Peddinghaus. I can take a close up of it if you like. I also built the forge and leg vise stand. My current project is rebuilding the 50# trip hammer. I'm about half way done working on it and hope to be done soon after the first of the year. I just got in all of the babbiting supplies and am working on pouring new bearings. -
Peddinghaus, the drop forged steel anvil
kubiack replied to TechnicusJoe's topic in Anvil Reviews by brand
Sure buyer be ware but it not the same as buying a car. There are probably 15 car dealerships in my town each with a few hundred cars. I can go test drive and kick the tires on any new car I want. There is not a single retailer within 300 miles that stocks new anvils. There are only a few in the country who have Peddinghaus and one that has Refflinghaus. If I want to see one in person I would more than likely have to take a plane ride. I don't know of any other manufacures who chamfers the edges in the same manner that Peddinghaus does. I think it is relevant since this is the review thread for Peddinghaus anvils. As far as my hardies are concered I have several anvils with 1" hardy holes and share my hardies among them. If I fix them for the Ped they will be crooked in the others. TechnicusJoe, Thanks for getting the ball rolling on this thread. I also have watched your videos and really appreciate the time you have put into them for the rest of us to enjoy. Jeremy, I'm glad to hear such a good report on the Chech anvil and that you are happy with yours. I have also watch some of your build threads and appreciate them. -
Peddinghaus, the drop forged steel anvil
kubiack replied to TechnicusJoe's topic in Anvil Reviews by brand
I would not call it a fake because I don't think they are taking business for anyone who want's an actual Peddinghaus. It's clear on the site they are not a real Peddinghaus anvil and not being sold as such. I think anyone wanting the genuine article and is willing to shell out for one either new or used won't really see the other as a viable alternative. All of the fake Rolex's I have scene actually said Rolex on them and were trying to be passed of as a real Rolexs, the sellers were being dishonest about it. However if you are knowingly buying a fake Rolex for cheap you were never going to spend what the real one cost anyway. -
Peddinghaus, the drop forged steel anvil
kubiack replied to TechnicusJoe's topic in Anvil Reviews by brand
I think you are misinterpreting what I was trying to say or perhaps I was not clear. I do love my Peddinghaus anvil and use it regularly. I think it is one of the best anvils you can buy and that they are an excellent value for what they cost. I was not intending to make a complaint against the anvil however this the spot for a review and so I thought I would post what I have scene with mine so other would not be surprised when their new anvil arrives at the shipping depot. I understand the reason for having the chamfer and I was able make almost all of the radius to my liking. However occasional I would like a tighter radius than what is allowed by the chamfer or a sharp edge when working on a decorative piece and this would keep from having to use a hardy or a chisel. Not a major issue but I would rather have been able to dress it to my liking. The reason I mention it is a lot of threads posted on this site by people looking for an anvil mention the condition of the edges and wanting to find a good anvil with good edges. Either that or they want build up the edges with weld. If someone ordered an new anvil and it showed up with a chamfer instead of sharp edges they might be disappointed. I have had Fisher, Trenton, Acme, Columbian, Peter Wright, and Peddinghaus anvils and the hardy hole on the Peddinghaus is out of square noticeably more than he others. This was the only anvil I have bought new and cost more than the rest of them combined so I was a bit disappointed in how far off it was. Like I said it does not affect the use but if you have the right type of personality it will bother you every time you pit in a hardy tool. -
Peddinghaus, the drop forged steel anvil
kubiack replied to TechnicusJoe's topic in Anvil Reviews by brand
Unless their is some international patten of that particular shape that Peddinghaus holds than anyone is free to make their own mold and copy it. If that is the case Peddinghaus should be enforcing the patent and not allowing OWA to make that one. Unless it is being sold as a Peddinghaus anvil I would still not call it a fake. I'm not saying is is a high quality anvil or in any way compares to a Peddinghaus I just don't think they are selling it and telling people the are buying a genuine Peddinghaus anvil. What is the difference in the Peddinghaus shape and the North German patter? I really like that South German pattern Refflinghaus anvil you have and almost bought one instead of the Peddinghaus. I have not worked on a South German pattern so If you would humor me, which do you like better and why? What are some uses where one pattern is better than the other? -
Peddinghaus, the drop forged steel anvil
kubiack replied to TechnicusJoe's topic in Anvil Reviews by brand
I have a Peddinghaus anvil I bought new a few years ago which has the round hold around the hardy hole. It is an excellent anvil and I have been very pleased with it, I would recommend one to anyone looking for a new anvil. However there are two things I don't like about it. The first is that they ground a chamfer around the entire edge of the face, there are no sharp corners. I have ground a radius on most of the face but could not get as small of a radius as I would have like because of the chamfer. I would also like to have a section of the face with a sharp corner for some operations but have to use a hardy block instead. I'm sure the chamfer was to keep for having chips and dings in new edges but this is a professional grade tool so let the end user dress it as they please. The second thing does not change the functionality of the anvil but is annoying if you have a detail oriented personality. The hard hole was punched or broached a few degrees from square. It's not really noticeable with the round chamfer around the hole but when you put in a square hard you can see that it's not parallel with the sides. -
Peddinghaus, the drop forged steel anvil
kubiack replied to TechnicusJoe's topic in Anvil Reviews by brand
I'm not sure I would call that one a fake. It is the picture from Old World Anvils web site. I don't see anywhere that they say it is an actual Peddinghaus anvil, it is just their version of a North German style anvil. I have not used any of their anvils but most all high quality anvils in current production are cast. -
BECMA Anvil - anyone tried one.
kubiack replied to natedogg56's topic in Anvils, Swage Blocks, and Mandrels
If you use Google Chrome for your web browser is will translate the text for you. It does a passable job and usually can at least make the page readable. -
I have a few Atha sledges and they are very good hammers. I like the older pattern hammers better than what is made today. There something of a collectors market of Atha hammers so it might be worth more to sell than to use.
-
Is your LG painted?
kubiack replied to Black Frog's topic in Power Hammers, Treadle Hammers, Olivers
I have some picture of a break setup that Sid built for a Transitional 25 pound hammer. It uses the same arrangement of a pivot mounted to the ram guide. The connection to the treadle seems a lot simpler than being run through the fork pivot pin. As best I can tell it does not use any extra holes in the frame either. Let me know if you want me to post some picks of it. One thing that I don't like about the way you have it drawn up is you are going to a bit of lag as the play in all the clevis is taken up when you let of the treadle. There is a clevis on each end of the treadle rod, any sideways movement in the pivot pin, and another set of clevis between the pivot pin and the ram guide. I think a more direct connection to the treadle itself would be better. -
Is your LG painted?
kubiack replied to Black Frog's topic in Power Hammers, Treadle Hammers, Olivers
It is looking good. I'm enjoying watching your progress so keep posting. -
Jim's design is very nice, I do like it. However I have found the best thing to use on my Dutch oven lids is a heavy pair for 3/8" bolt tongs. If you make them with a square opening through the side of the jaws so that you can hold stock perpendicular to the handle then they will hold the loop on the Dutch oven lid very securely. They don't look nearly as pretty as Jim's do but if you already have them in your tong collection and don't want to take the time to make a dedicated lid lifter then they are an excellent alternative. As a bonus there always seems to be something hot around the campfire that needs picked, cooking grates, coffee pots, the bail on the Dutch oven, coal and the tongs work good for these items as well.
-
100# Little Giant diagnosis
kubiack replied to Adair's topic in Power Hammers, Treadle Hammers, Olivers
Perhaps the 100lb hammers were different but those arms look like they are from a Transitional hammer not an Old Style. Is it possible you have the wrong arms? -
Is your LG painted?
kubiack replied to Black Frog's topic in Power Hammers, Treadle Hammers, Olivers
Looking good. It looks like you pitman is steel, mine is bronze. It is interesting to see the differences in our hammers. Both are Transitional models and of course different sizes but there are a lot of differences. What are the tabs on the toggle arms for. I got a call this morning from Little Giant and they have started work on my parts! -
Is your LG painted?
kubiack replied to Black Frog's topic in Power Hammers, Treadle Hammers, Olivers
I was thinking of the exact same thing with the trough in the center of the pin for grease flow. I have a lathe, mill, and shaper so I will be making some of the easier parts from my hammer. What I don't have is enough tooling and especially the time so I sent some parts got sent into LG and I will be buying some new parts from them as well. When I'm done it will have all new connections through the toggle linkage. I was hoping to just bore the holes oversize and turn new pins but the previous owner had used bolts instead of pins in several location and the threads chewed pretty deeply in several spots. The holes were already over sizes when they put the bolts in so I was not comfortable with the amount that would renaming after boring out the chewed up areas. My hammer has the old style ram with the T-toggle links instead of the bronze bushings and pins. My main bearing only have one thin shim left so I think I am going to go a head and re-pour them while I have the hammer apart. -
I like drawing the pien out into a point on those.
-
Is your LG painted?
kubiack replied to Black Frog's topic in Power Hammers, Treadle Hammers, Olivers
Black Frog, Nice looking pins. Did you just use a hand reamer for the pivot holes? I'm planning on doing the same for mine but don't have a hand reamer the right size and they are a little pricy for a one time operation. I think I will just use a break cylinder hone I to clean up the holes. I just sent in a few parts of my hammer to Little Giant to have them rebuilt. The price for them to rebuild the arms and cross heads is less than what I would have in them by the time I bought the right sized reamers and put any value on my labor. If you are going to buy new dies you may want to look into the quick change die system they offer. It consists of a base with dovetails to mount in the frame/ram and with flat tops and bolt holes. Then there are interchangeable dies that bolt onto the bases. It is slightly more expensive than a set of standard dies but once you have the base the bolt one dies are about half the price of the ones with dovetails. I have talked to Sid and some others who are pretty knowledgeable about these specific hammers and have been told that one problem they have is that the frame casting is a bit thin at the back dovetail of the anvil and that hammering the key in can cause it to break. The problem happens when there is ware in the die, key, or dovetail and the die wont stay tight then the user tries hammering the key in progressively harder and it eventually breaks the dovetail. I think this was more of a problem with the old style hammers and does not apply quite as much to our transitional style and the new style hammers with sow blocks. One advantage of the quick change system is that you only set the base in once and then it is bolt on and off so the risk of breaking a dovetail is lessened. My hammer needs new dies and I have not deiced if I'm going to get the quick change or build some euro dies. How are the condition of the holes in your cross head, toggle arms, and toggle links? I talked to Sid recently and he said that a lot of issues he saw with these hammers is when the connections at these spots get worn and sloppy the hammers lose fine control and power. He was pretty adamant about these needing redone in order to have a really good hammer. Does your clutch flywheel have Babbitt bearings or bronze bushings. I lucked out in that my hammer has bronze busing and they are still in good shape. The are within spec for clearance and there is virtually no play when mounted on the spider and grease applied. I'm looking forward to seeing your hammer coming together so keep posting. -
Need Hood for forge, ideas?
kubiack replied to ray.whittington50's topic in Chimneys, Hoods, and Stacks
If you can go through the roof instead of the wall you should look at how Brian Brazeal has his setup. It is simply a piece duct suspended above the forge. It should be simple and cheap to install in a metal building. This thread has a description and some pictures. '?do=embed' frameborder='0' data-embedContent>> I found a picture of it in the above mentioned thread. -
I built a slid gate to use with mine and just leave the blower running on full power. Functional this setup works very well and allows excellent control over the blast. I also installed a switch on forge so I can turn the blower off in between heats. The fire does not loose much heat while I'm at the anvil. This saves a bit of fuel and I don't have to listen to the blower running constantly. I can comment on the use of a rheostat but if the motor is overheating a slid gate would be a good alternative.
-
I have the large blower and use it in my side blast forge with coke for fuel. It has more than enough blast, I normally keep the slide gate 3/4 of the way closed. I think for the price it is one of the best options around.
-
Is your LG painted?
kubiack replied to Black Frog's topic in Power Hammers, Treadle Hammers, Olivers
In Sid's Little Giant Hammer rebuilding video he shows adding a grease zerk to the lower pivot hole in the frame. If I remember correctly he said something to the effect that the new grease would push out any grit that worked its way in. I don't remember if he put one in the top pivot or not. He also add some washers on the pins next to the outside of the frame to act as a cover to help keep grit from getting in between the pin and the frame and wearing the hole. A couple of other thing he showed in rebuilding the treadle linkage was to replace the main rod with a thin wall tube to increase stiffness and also to build an adjustable tensioner for the return spring. -
My propane setup is the heavy duty Smith Outfit. At the time I bought it Smith had the largest propane rosebud, was made in the USA, and had a lifetime grantee. I have used the equipment quite a bit for flame straightening and spot heating for bending. I have the smaller of the rosebuds and it will easily melt the end of 1/2 inch bar stock. The Smith equipment is very high quality. I don't know where they are made now that Miller bought them out. If you are going to use the rosebud much you will need a very large or multiple large oxygen cylinders. If I remember correctly burning propane take 3 times the amount of oxygen as does acetylene.
-
Shaw & Justice dead stroke power hammer
kubiack replied to Happy Hammerer's topic in Power Hammers, Treadle Hammers, Olivers
Perhaps it is a piece of wood but I'm not sure why you would bolt on a piece of wood and then paint it the same color as the frame. Looking a the second picture if looks like it is part of the frame to me. -
Shaw & Justice dead stroke power hammer
kubiack replied to Happy Hammerer's topic in Power Hammers, Treadle Hammers, Olivers
It looks like part of the left side ram guide is broken. Its hard to tell from the picture but it looks like it is part of the frame. If that is the case I would look for a different hammer in better condition as a starting point. This hammer could still be made to work but for the time and expense it would take I would not do it.