
kubiack
-
Posts
323 -
Joined
-
Last visited
Content Type
Profiles
Forums
Articles
Gallery
Downloads
Events
Everything posted by kubiack
-
Noise from an Anyang 88 or similar hammer
kubiack replied to Daniel.85's topic in Power Hammers, Treadle Hammers, Olivers
My shop is 20x30 and it became full pretty quickly. I really want to expand it but its going to be cost prohibitive to do so now. If it were me and I was going to live there long I would spend the 10 thousand an 88 is going to cost you and build a bigger shop. I would also suggest at least one window or door on the opposite side of the overhead door. It sure is nice to get some cross ventilation going when it gets hot, or when welding, or spot heating with a torch. As far as the noise goes I will let someone with more power hammer experience answer. -
Miller Dialarc 250 --> TIG Setup?
kubiack replied to Pulsepushthepopulace's topic in Welding Equipment
I’m not convinced that you can set up the Dialarc to function the same as a true TIG welder. If you talk to Miller technical support you should be able to find out for sure. I have been down this path before, setting up a stick welder for TIG, and anything more than scratch start with a gas cooled torch is a false economy. Unless you get a smoking deal you will end up spending as much or more than you would have on a used TIG machine. With what you have now you still need a HF box, torch, cord kit, pedal, regulator, and gas bottle. If you include the cost of the Dialarc you are going to be well over what you can by a complete used TIG setup for. -
Miller Dialarc 250 --> TIG Setup?
kubiack replied to Pulsepushthepopulace's topic in Welding Equipment
I’m still a little confused as to how this will all work. The RFC-23A pedal with the rheostat has two cords one for the amp adjustment and one for the contactor. The one with the amp adjustment will have to connect to the welder. The other will have to connect to the HF box to control the gas and HF. How does the contactor then connect to the welder to start the flow of electricity? Also what HF box can you connect the old style contactor to? I suppose you could change the plug over to the 14 pin since it’s just for the contactor. Where does the kit you mentioned fit in? I have looked at this before and came to the conclusion that by the time you buy the welder, HF box, pedal, torch, and regulator it was just more economical to buy a complete used TIG setup. If Aluminum welding is not required you can find a new 200 amp inverter Stick/TIG machine for close to the same money. I’m of the opinion if you need more than scratch start with a gas cooled torch buy a TIG and sell the Dialarc. -
Miller Dialarc 250 --> TIG Setup?
kubiack replied to Pulsepushthepopulace's topic in Welding Equipment
None of the add on high frequency boxes I have scene will allow remote control of a Dialarc. The Dialarc uses the RFCS-23A remote control and is not compatible with the 14 pin connector. I don’t think there is any way to connect a Dialarc to a high frequency box and have it function like a normal TIG machine. The advantage of a wet torch is they are smaller for the same amperage and usually have a higher duty cycle. I uses the gas cooled TL26V from CK Worldwide for my dry setup. It is a little smaller then most other gas cooled torches and has 100% duty cycle at 200 amps. http://www.ckworldwide.com/trim-line.htm -
Where to Find Coal in TX Panhandle.
kubiack replied to xd45nut's topic in Solid Fuels: Coal, Coke, Charcoal, Wood, etc
The only places to get good coal in bulk out here are from the Salt Fork Craftsman group in OK and Robb Gunter in NM. Anything else will have to be shipped in by the bag/pallet. I have used Robb's coal and it is very good. -
Victor rosebuds are backburning
kubiack replied to territorialmillworks's topic in Welding/Fab General Discussion
Is the burn back happening after you light the torch or during use? If you are heating something in a confined space, such as a corner where two plates meet, it can heat the tip enough for a burn back even with proper flow. The same can happen if you are heating in the open and hold the tip to close to what you are heating. If it is happening after you have the torch lit and properly adjusted I would have the regulators checked out as they may not be flowing the correct amount. As far was the withdraw rate is concerned. I personally have found it to be worth the expense to switch to propane for my rosebud and cutting use. It is cheaper to heat with than acetylene, there is not an issue with withdraw rates, and you can get a refill at the home store or gas station when the welding supply is closed. -
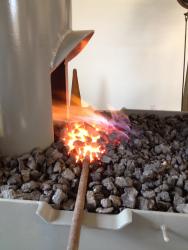
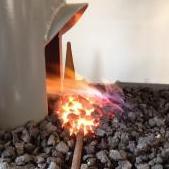
The pan is mostly filled with dirt. The dirt comes within an inch or two of the top and the fuel is sitting on top of that waiting to be fed into the fire. There is a hole dug out around the air nozzle which is filled with fuel. See http://www.iforgeiron.com/topic/29191-side-blast-forge/?hl=%2Bside+%2Bblast+%2Bforge post 18 by DanP for a pic. The hole can be shaped to suite the work being done. A small one like Dan shows can be used for an isolated heat or something much larger can be made. This is the basic setup, shown is an image taken from Mark Asprey's Side Blast Forge PDF:
-
After several long delays my forge is finally finished. I fired it up for the first time this weekend and am very pleased with the way it turned out. The forge gets nice and hot and the chimney draws very well. I am using an electric fan and a sliding air gate. Any doubts I had about using a side draft hood with a side blast forge are gone, the combo seems to work very well.
-
Thanks for the replies. I’m just trying to determine the best use of my resources. This one seems like it might be a good one to free up a little space and cash which I could put towards something I would use more. I also have a pedestal grinder/buffer combo that I user for a wire wheel and buffer. The specialty wheels seem the most promising but I think that the proper sized ones for this large of a grinder are going to be cost prohibitive.
-
I have had a 2x48 belt grinder for a few years and am in the processes of upgrading to a 2x72. I also have a large Baldor 2x12 pedestal grinder with stone wheels. Since getting the belt grinder I have not used the pedestal grinder. Room is my shop is limited and I am thinking about selling the grinder since it has not been used in over year. Can anyone think of an operation where a stone wheel would be preferred to an abrasive belt? I hate to sell it if I’m going to need it again.
-
Source for L coke
kubiack replied to HWooldridge's topic in Solid Fuels: Coal, Coke, Charcoal, Wood, etc
The LBrand from TFS was in a plain white woven plastic bags with no markings. -
Source for L coke
kubiack replied to HWooldridge's topic in Solid Fuels: Coal, Coke, Charcoal, Wood, etc
That price seems pretty good to me considering it would cost $720 for you to drive to TFS and pick it up yourself. -
Source for L coke
kubiack replied to HWooldridge's topic in Solid Fuels: Coal, Coke, Charcoal, Wood, etc
Wow $30 a bag for shipping is quite high. I wanted a few bags to try before buying and the minimum was 500lb. I'm about 320 miles from TFS and with the shipping included it was $28.20 a bag which worked out to $8.20 a bag for shipping. If I were to order a ton or two the shipping was pretty reasonable, I think it got it down to a few dollars a bag. I was in Dallas for other business and got several bags while I was there. -
Source for L coke
kubiack replied to HWooldridge's topic in Solid Fuels: Coal, Coke, Charcoal, Wood, etc
When I was looking for it I email the L-Brand company and the closest spot they had any was at Texas Farrier Supply. I was going to have some shipped to me out here in West Texas and L-Brand quoted me the prices but it was going to be shipped from TFS. I bet that will be the closest for you but you could always email L-Brand and see. -
I’m about done building one based on Mark Asprey’s plans. I used his design for the blast pipe/tank and chimney. I talked to Mark before I started to get some more details on the rest of the forge and its use. You can see the details here http://www.iforgeiron.com/topic/26716-side-blast-forge/. I just have to finish the tong and fire tool holders and put a coat of paint on it. Ill be posting some pictures once its finished. Dan P, thanks for the detail on the fire bed. I did something similar when testing my forge but had no ash and had to use dirt instead. How well does the bed build of ash and dust keep its shape through a days worth of forging?
-
The frame looks square and strong, I like it. My only suggestion would be to buy some large machinery leveling pads for the legs. The ones on my table are rated for 16,000lb each and have a rubber pad on the bottom. Nothing annoys me more than a table that wobbles because of an uneven floor. With the rubber pad the table does not slide when bending something that is clamped to the table. It also makes it very easy to get the table perfectly level. I found the best prices at for mine at Reid Supply.
-
I hope you get the welder. If you do I don't think you will regret the extra $225 for the Dialarc instead of the Thunderbolt. The Thunderbolt is a good welder but you will run into duty cycle issues if you start welding much. For me its was not a deal breaker but it can get annoying and I would gladly have spent the extra if I could have found one used.
-
The burner in my forge is based on the ones in Michael Proter's book and looks very similar to the ones on the Chile Forges. It is plenty hot and seems pretty adjustable but it produces slightly more scale than a coal file, perhaps I have been running it just a bit too lean. My comment was mostly made on what Frosty said about a propane torch passing through lots of unburned oxygen because it would not mix with the propane and assuming the same would reasonably hold try for a forge burner. I can see that burning the mix inside a semi-closed container would allow more of the oxygen to be consumed in the reaction but some of it would have a change to react with the steel and cause scale. Could you explain how the torch and forge burner are different?
-
Hey Frosty, That is good information on the mixing of propane and air and something I was not aware of. I have a big propane rosebud for a Smith Equipment torch and it can really suck down a bottle of oxygen. I suppose this is one of the reasons a gas forge creates more fire scale than coal, there extra oxygen that will not mix with the propane. How well does natural gas mix with oxygen. I have a pretty large service run to the shop and am planning on going with a blown system so it would not be any trouble to use natural gas for the fuel. It would really be more convenient as I would not have to fill bottles. Would you get less fire scale using natural gas as the fuel instead of propane? I have done some research in the past but did not find much on natural as forges. About the only thing I saw was Johnson forges but nothing homemade.
-
Hi Thomas, Yes you got the idea. I agree the exhaust gasses would be the best place to reclaim any heat. I like the Sandia forge design but it involves a lot of cutting and bending sheet metal to make the shell. Without the tools and little sheet metal experience I think it would be more work than what I had in mind. Plus I already have the pipe cutoffs. The tube in the Sandia forge where the air and propane are heated only passes through the exhaust gases for maybe 1.5 or 2 inches so it does not have much time to heat up. The ignition temp for propane is about 900 degF so it is not getting the mix any hotter than that or it would ignite inside the burner and eventual destroy it. I would be curious to know the temperature of the mix after it passes through the heated portion of the tube. I recently watched a demo where the demonstrator had one of the Pieh Victory forges. The forge had an open front and back which were closed off with firebricks as needed. While watching him work through his project I came to like the size and versatility of the forge. The forge had only one layer of 8# kaowool and hard firebricks for the ends and he was able to weld in it. I would like to use this configuration but it does not lend itself well to capturing the heat from the exhaust gasses.
-
Well Frosty I thought I was being pretty specific. I said the forge I am using now is an atmospheric burner and the one I am thinking building will use a blower. The forge will consist of two pipes one mounted inside the other with an inch gap between the two. Air will be feed in from the blower through a hole in the bottom on the outer pipe and forced around the hot inner pipe to another hole in the top side of the outer pipe where it will exit the shell and enter the burner. Other than the second outer pipe it will be pretty much like any other blown forge with a steel outer shell and two inches of ceramic blanket on the inside I have used one of the Sandia Recuperative forges but was looking for an easier way to accomplish the same thing. My original question was about the temperate of peoples forge shell who use ceramic blanket for the insulation and I was asked to give more details as to what I was trying to accomplish.
-
I’m just pondering new ways to skin the cat. I would like to build a larger gas forge than what I have now. My current forge I built with light weight firebricks contained in a steel frame and an atmospheric burner. It works very well but the size is just to limiting for most of my work. My idea was to try and capture some of the lost energy by heating the incoming air by passing it around the forge shell. I have two pipe cutoffs in the scrap pile and an extra blower. The idea is to mount a 10” pipe inside a 12” pipe and enclose the gap at the ends. The air would enter at the bottom of the forge and travel up between the pipes to the top, while being heated by the inner pipe, where it would exit into the burner. I don’t spend enough time in the shop for it to make any real impact on fuel savings it is mostly an exercise in the process of design and testing. I already have the materials and the construction would not be much more work than a single shell. A few questions to ponder: How hot does the forge shell get? Would the air have enough time in the shell to get hot? Would cooling the forge shell rob heat from the forge which could be used in heating steel? Will the transfer of heat from the interior of the forge to the shell keep up with the amount of heat removed by the air?
-
I’m working a new design for my gas forge and have a question. Once your forge is up to temp how hot does the shell get with 2” of ceramic wool insulation?
-
I spaced the gaps in the top for a specific clamp that I wanted to use on the table. Some for the larger C-Clamps have a pretty wide pad. I had thought about the T-nuts and am planning on machining a set to use with a large hold down set but I have not had a project yet where I needed them.
-
I recently bought a 200 amp Thermal Arc inverter thinking I would use it for both TIG and stick and sell my old Hobart Stickmate. It seems to be a good TIG machine but I don't like the way it stick welds. I experimented with a few different rods and settings per the manual but I never could get the weld bead to look very nice. I don't weld a lot so I don't know if it is me or the machine, but I had gotten pretty happy the results on the Stickmate.