kubiack
-
Posts
323 -
Joined
-
Last visited
Content Type
Profiles
Forums
Articles
Gallery
Downloads
Events
Everything posted by kubiack
-
Are you working off of the Asprey plans or just making it up as you go? Will the blower be hand crank or electric? If hand crank the inner tube should be larger than the hole in the end of the doughnut so it has less frictional loss. My tank hold 15 gallons and I'm pretty happy with that amount. I have not run it for a full 8 hour shift but after 4-5 hours it will get to simmering pretty good but quite to full boil.
-
I did the same thing on my forge and have been very happy with the way it works. If I were going to build another I would build the second one the same way.
-
No experience with the Woodward anvil but if I were looking for an anvil in this price range I would strongly consider an Emerson Traditional anvil. They are made from a good grade of steel, properly hardened, and in about the same price range. http://emersonhorseshoe.net/21-anvils
-
Keep the videos coming. I really enjoy seeing your work. Oh, nice axe.
-
How thick bar stock can you cut with the smaller handle. My #5 is rate to cut 3/4" round and square but the handle is about 6' long. I may make up a smaller handle if it will cut say up to 1/2"
-
Thumbs Up, Thumbs Down
kubiack replied to stuarthesmith's topic in Blacksmithing, General Discussion
I was reading through Donald Streeter’s book Professional Smithing and he has an excellent section on thumb placement and hammer control. It is one of the best that I have read on the subject. It is nothing that anyone who has been Smithing for a while has not already come to learn through trial and error but I think it is one of the best explanations for someone who is inexperienced. In summary he says that in fine forge work the thumb is placed on top of the handle to control the angle of the hammer face and varying the placement one can easily and repeatable control the angle of the hammer blows. Furthermore he does go on to say that this control is not necessary when rough forging and breaking down stock and to put the thumb where is most comfortable. Here is another professional who has made hand forging a career and promotes thumb on top. His book is excellent and I would encourage anyone looking for a new read to check it out. -
To give the ones made from round stock a little more interest you can upset the stock in the middle of the bar and the flatten it out and twist it. The flattened area in the middle should be kind of an oval shape tapering back to the round parent stock. It makes a really nice looking ball shaped twist.
-
Show Me Your Candle Holders
kubiack replied to Forging Carver's topic in Blacksmithing, General Discussion
I sure like the Advent wreath with the guilded finish and had saved the image the first time you posted it. I has planned on making one from myself before this past Advent season but sadly did not get it done. It will get done before the next one though. -
I think that finish is fine for work that is kept indoors. However If it is going to be kept outdoors that finish will have to be reapplied more frequently. How frequently depends on your climate. If it needs to be kept outdoors with less maintenance you will need to switch to paint or powder coat. For the ultimate in low maintenance outdoor finish have it galvanized before painting.
-
The guy I bought me #5 Edwards from bought new blades from manufacturer just a few years ago.
-
Can you tell me anything about this drill press?
kubiack replied to tonyw's topic in Drills, Post drills, Mag drills, etc
I would make sure you check the bearings. I don't think the flywheel with the belt groove is original. When these are used with an electric motor they wear out much faster. All of the ones I have scene which were converted to use a motor had worn out quill bearings to be of much use. -
I’m planning to order a new fly press after the first of the year. Help me decide on the size P5 or P6. Intended uses will be cold veining and fullering lines, bending, and straighten stock. I would also like to use it for punching holes for mortise and tenon jointery. I mostly make home accents with 1” or under stock but sometime use a little larger. If possible I’d also like to use it for punching or slitting larger stock for making top tools and hammer. I see several threads with people recommending for the P5 with the explanation that it will do most everything a general blacksmith would want and will not wear you out like the P6. I think the P5 will be fine for most of what I would want to do but I sure would hate to get it and with I had the bigger one. All comments welcome.
-
I’d like to see a little jointery myself. If you don’t want to change lines of the outside how about riveting the pieces with the head on the inside and then countersunk and filed flat on the outside.
-
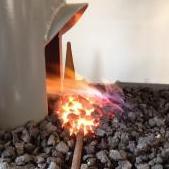
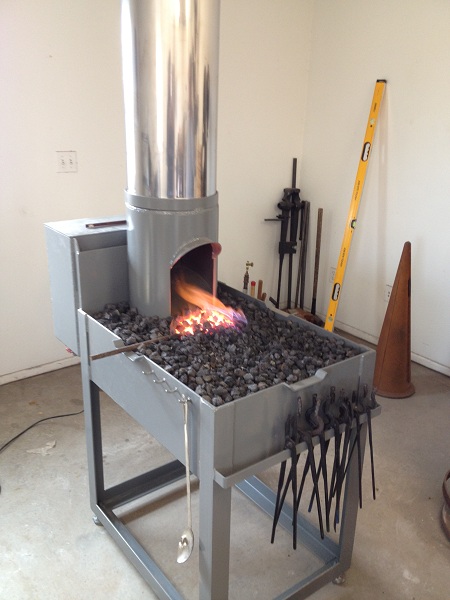
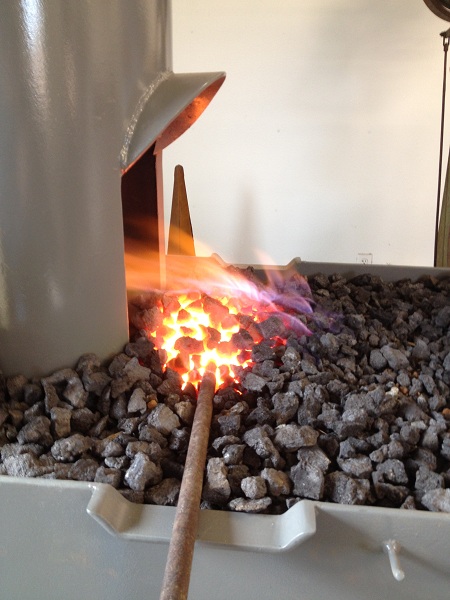
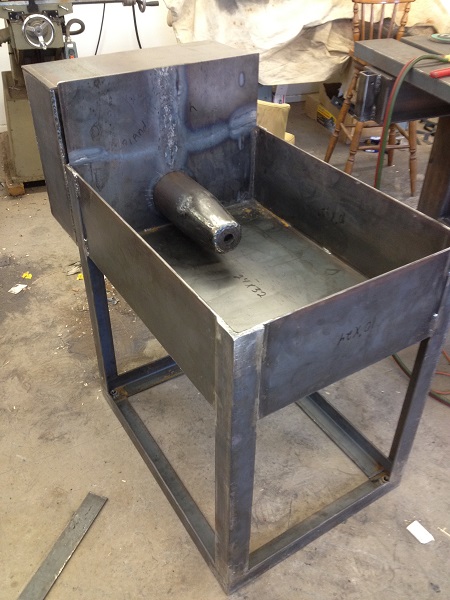
I really like the way this forge preforms. I played with the depth of the tue in the pan a little before settling on the depth. The only thing I would like to change is to have the cutout on the sides and front a little deeper. The pipe for the tue was just whatever I could find at the time. It was scrap of something for the oil-field. They use some strange sizes but I think it was close 7/16”. The disk at the front was made from ½” plate. I don’t think you would have any trouble with 1/8 as far as the fire is concerned. The water keeps it plenty cool. I can’t see any degrading of the pipe of the welds. I would be more worried about corrosion on the inside if the pipe.
-
If you can locate the forge close to a wall that you can penetrate you could use a Hofi style side draft and not have to use a booster fan.
-
Anvils - Nimba vs Rathole
kubiack replied to Ian Sayers's topic in Anvils, Swage Blocks, and Mandrels
I have no experience with either but have read positive reviews for both. It is my feeling that either will last a lifetime so I would go with which shape I thought would prove the most useful for the work I intended to do. There are a few others in that size range such as Refflinghaus. For most this would be a once in a lifetime purchase so I would make sure to get what I really wanted even if I had to save a litter longer to do so. -
I have been asked by a few people for pictures and as the ones above no longer seem to work I am posting some of them again. I am also including Mark Aspry's PDF for the bosh and flue. Blackmiths Flue Article.pdf Side Blast Forge Original.pdf

-
100# Little Giant diagnosis
kubiack replied to Adair's topic in Power Hammers, Treadle Hammers, Olivers
Do you have access to a mill or sharper? If so I have a few ideas. The old style hammers usually have some shims between the guide and frame which can be removed to adjust for ware. If there is enough room you might be able to machine some spacers on an angle to correct the alignment. Really I bet you could make the spacers with some careful filing and fitting and not even need access to machine tools. If said spaces would make the guide surface too far away from the frame the guide surface could be lined with some bronze sheet epoxied into place. A second option would be to weld a few build up layers on the guide surface and then machine it to the correct angle. If you don’t have access to any machine tools I bet this is something Roger Rice at Little Giant could do. I had him rebuild a ram for my 50# hammer and thought his work was good and his prices reasonable. Last and probable the most expensive option. Little Giant has the wrap around guide for 100# hammers available. It is pretty expensive but if this is holding the hammer up from making money it might be worth it. One final though. Have you tried fitting the ram in the opposite direction? I’m pretty sure they can be put in either way at least that is what I thing I remember from the Little Giant rebuild video. You might try that and see how everything goes together. Ok, two final thoughts. You might just call Roger Rice and ask his advice. Every time I have talked with him he has been very nice and willing to share his knowledge of these hammers. -
100# Little Giant diagnosis
kubiack replied to Adair's topic in Power Hammers, Treadle Hammers, Olivers
That would assume that the bearings were poured square with the rear slide and have not worn unevenly. It also assumes that the rear slide has not worn unevenly. I would still agree that those two place would be the datum but some judgement will have to be used when referencing them. -
This is an excerpt from his book on Google, page 46 he has an explanation as well as a drawing with the grain directions. It is in the chapter on forge welding so I would almost make the assumption that when he his referring to the grain direction he is talking about forge welded blades however his picture also shows the grain for a crane hook which would not be layered steel like a blade. https://books.google.com.mx/books?id=aTTOlliEPo8C&pg=PA46&lpg=PA4#v=onepage&q&f=false I once had a conversation with someone who forged items for a large defense contractor. He said that the items were forged to get the components close to the final shape before they were machined. He said very much the same thing that steel has a grain structure and that machining the components from billet would cut through the grains leaving the steel weaker that if they were kept intact by and forging close to the final shape.
-
If you do some searching there is video of Brooks - I think it was brooks - hardening process. It was basically a large torch heating the surface followed by a high pressure water spray. If you can the video it may give you a place to start from.
-
I have a double horned Peddinghaus I bought new several years ago and a pretty well worn Trenton. I would not be with out the double horned anvil either but like the shapes of a London pattern more for some operations. I would like to get something in the 200lb plus range and in good condition to replace the Trenton. I sure would not turn away something used in good condition but in my area it just makes more sense to me to buy new. The Trenton I'm going to keep for guests to use and when a bit of sway back is needed.
-
I worked for a week on a JHM Competitor (ductile iron) and it was a fine anvil. I'm just partial to steel anvils and am trying to determine if there are any new ones available in the US besides Emerson.
-
Is anyone besides Emerson making new steel London pattern anvils that are available in the US? I know TFS, JMH, and various other farrier suppliers make them in ductile iron. Emerson is the only one I can find making them out of steel. In my neck of the wood anvils in good condition are hard to find and sell for close per pound to a new Emerson. I like their 200lb Traditional anvil but do they have any competition?
-
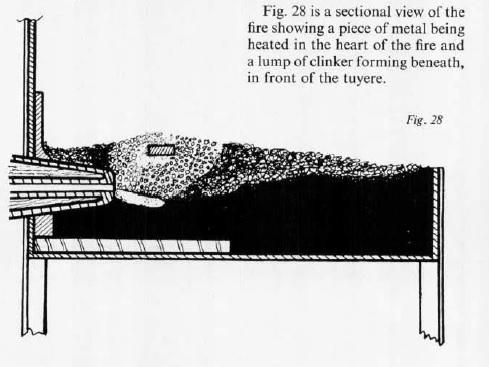
I have a side blast I built several years ago based on Mark Aspry's plans. There is a thread detailing the build on here somewhere. At any rate I would not bother with the fire bricks for the back of the bottom. I think the front of the tue is far enough away from the back that it will not cause problems. The you also want some room under the tue for clinker to build up. If you put brick and sand right to the bottom the tue will become clogged with clinker very soon. The clinker will also end up stuck to the fire brick and you will have to chip it off. I set mine up like it show in The Blacksmith Craft with coal dust filling the pan.