
kubiack
-
Posts
323 -
Joined
-
Last visited
Content Type
Profiles
Forums
Articles
Gallery
Downloads
Events
Everything posted by kubiack
-
Randy, thank you for the pictures and info you provided. I have finished all of my current projects and am ready to start constructions of the forge. I just need to finalize my design and gather the materials. I am going to follow Mark Aspery’s design for the boss and water cooled tuyure and also use his side draft flu that Ruben linked to above. Mark’s PDF states the forge pan should be 9.5” to 10” deep but there is no mention of the other dimensions. I have scene everything from 18” x 20” to 4’ x 6’ mentioned in various sources. What size should the pan be? I plan on using it for home décor items like panels, gates, railings, and hardware.
-
Thank you to everyone who replied. Ruben that PDF was exactly the information that I was looking for. Randy your picture was also quite helpful; since you used this forge can you give your impressions of how well you thought the combo worked.
-
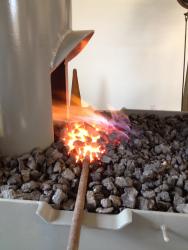
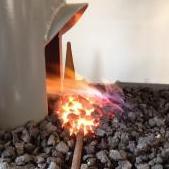
Sorry for the double post. I had the title wrong on the last one and thought everyone would think it was just another post for side draft hood, since that is what the title says. It is for a side draft hood but on a side blast forge which I have not scene before. I could not find a way to edit the title after it is posted. I am about to start construction on the last piece of equipment for my shop, the forge and need some input. I want to build a side blast water cooled forge. Most all of the side blasts that I have scene, never actually used one, have a hood to evacuate the smoke. However most every one here recommends a side draft hood. Has anyone here built one with a side draft hood, if so can you post some pictures? I can see how a side draft hood would work with the blast blowing up from the bottom and then is sucked sidewise into the hood. I question if it would be effective having the blast blowing sideways in the opposite direction from the suction of the hood.
-
I am about to start construction on the last piece of equipment for my shop, the forge and need some input. I want to build a side blast water cooled forge. Most all of the side blasts that I have scene, never actually used one, have a hood to evacuate the smoke. However most every one here recommends a side draft hood. Has anyone here built one with a side draft hood, if so can you post some pictures? I can see how a side draft hood would work with the blast blowing up from the bottom and then is sucked sidewise into the hood. I question if it would be effective having the blast blowing sideways in the opposite direction from the suction of the hood.
-
I am about to start construction on a side blast forge. I do most of my work in a gas forge but want a solid fuel forge for large and awkward shaped pieces. I will also be doing forge welding in it. I’m in a residential neighborhood and will be using charcoal for fuel. I would like to use a sacrificial stainless steel pipe for the tuyere instead of building it water cooled. What kind of life can I expect from the pipe with my stated use? If it is just going to burn up at welding temperatures I will build it water cooled. Any input would be greatly appreciated. Something like Irnsrgn posted here, http://www.iforgeiro...r-cooled-forge/ post 14, but without the butterfly valve. I will be using a hand crank blower instead. Irnsrgn how has the stainless pipe held up in your demo forge? Thanks, Brandon
-
I am back from class and had an absolutely wonderful time. I really can not say enough good things about the school and Chad and Brad Gunter. They are fine craftsman, wonderful teachers, and very gracious. They really have a gift for conveying the skills of this craft to their students. Everyone in the class was able to learn the basic skills of blacksmithing during the week class. In addition to the basics we also learned to forge and heat treat tool steel and forge welding. If there was anything we wanted to learn that was not part of the curriculum they made sure to find some extra time to show us. We were also encouraged to take pictures and dimensions of any thing we liked in the shop so we could copy them for our own use. The facility is top notch. There were 12 forging stations fully equipped with a coal forge, leg vise, good anvils, and all the tooling. Also available for our use were two treadle hammers, swage blocks, a floor cone, belt grinders, and pretty much any tooling imaginable. Though not part of the class there were 4 Little Giant power hammers, which I managed to sneak in a little time on. It was great to work in a fully equipped shop it really helped me decide what my next tool purchases will be. It was also eye opening to be surrounded by this much equipment and see how much work can be done with just the hammer and anvil. If you are thinking of getting instruction I highly recommend G3 Forgery School of Blacksmithing
-
I have recently acquired a 198 pound Trenton anvil from my father in law. He was given the anvil many years ago from a friend whose shop burned. My father in law used it on his farm for straightening bars and shafts so the soft face was not a problem for him. A file will cut the face very easily. The face is mostly flat but the edges are very worn. I am using it for general forging and it seems to move metal fine but I really have nothing to compare it to. How much would the anvil benefit from being hardened? Maybe something low tech like Hollis’s two 55 gallon drums and a couple of big wheelbarrows along with a garden hose technique. Thanks, Brandon
-
Thanks for all of the replies. I have scheduled my vacation and sent in my deposit of the September class at G3. Now I will have to get a new camera so I can post some pictures. Frank, I already mailed my deposit when I saw your response. Maybe next year I can take a more advanced course from you. I am in Santa Fe several times a year on my way to Pagosa Springs, I will try and stop in next time.
-
I am planning on taking the weeklong beginning class at Robb Gunter’s G3 Forgery School of Blacksmithing. Before I make my decision final I would appreciate comments from anyone who has attended. What did you think of the school and did you feel that it was worth the time and money it took to attend? Thanks. Brandon
-
Thanks for the replies. I have a home made naturally aspirated forge that is running on propane I want to convert it to natural gas so I don’t have to keep refilling my propane bottles. I was hoping to get by without having to convert it to use a blower. It looks like a little experimentation is in order to determine what kind heat I can get on 2 PSI.
-
Does anyone know PSI needed for a naturally aspirated burner running on natural gas? My shop is feed with a high pressure line that I believe is 2 psi. It has to be run through a regulator to lower the pressure for the heater. I could easily tap into it at full pressure for the forge. Will 2 psi be enough or will I still need to use a blower.
-
Man looses 'dream shop' to fire
kubiack replied to territorialmillworks's topic in Blacksmithing, General Discussion
Is there any worry about a heat link being melted by any of the hot operations in a forge/welding shop? My main concern is the potential for a head to fail while I was out of town and all of the water in the system be it in a tank or the municipal supply running until someone came back and found it. My thinking was putting up firerock and following safe fire practices would be a better solution. I would like to hear others opinions as to which of the two are better. -
Man looses 'dream shop' to fire
kubiack replied to territorialmillworks's topic in Blacksmithing, General Discussion
Keith, can you post any of the specifics for you sprinkler system. I have a wood framed shop that I will be finishing out in the next month or so. I have done a little research into fire suppression but was not planning a sprinkler. If I could put one in for a couple hundred I will consider it. How is the system triggered? If it is triggered buy smoke or heat do you disarm it when you are working in the shop and rearm when you leave? Is the water supply a municipal/well or holding tank? -
keeping Warm. Natural gas heater?
kubiack replied to Avadon's topic in Blacksmithing, General Discussion
I have been looking at getting an infrared tube heater for my shop. It looks like it would be a good solution for a metal shop which exhausts and brings in clean air because the infrared heats up the floor, people, and tools in the shop instead of the air. The one I was looking at, Infrared Radiant Gas Heaters, is gas fired and all of the exhaust is vented out of the building. Around my area these are common at restaurants where patio seating is used in the winter. -
It might also be polishing rod. In the oil fields around here they use a solid rod about and inch and a half to run inside of the drill stem to clean then out.
-
Thanks for the input, everyone. I think I will go with the set from Praxair. I have one of the smaller Victor setups that is about 15 years old and has given flawless service. It has been all I needed for welding and cutting however the rosebud tips available for it just does not have enough output. It is good to hear that I can expect reasonable service from the Praxair set. I try and buy the best equipment I can afford but I just can't justify the Victor.
-
Has anyone used the ProStar Victor style gas torch outfit from Praxair? I am looking for a larger torch so I can use a larger rosebud heating tip. The ProStar equivalent of the Victory Journeyman outfit is $295 as opposed to $695. According to the salesman the ProStar setup is made for them by Victor and on the same line as the Victor equipment. The only difference between the two is the finish and the name not being Victor. Also according to the salesman replacement parts are available from Victor. This is not for professional use so a new and name brand is out of the question; it is this or wait for a used name brand setup to become available.
-
The Blacksmith Journal had a few articles on forging a hack saw, issues 73 and 74. The author reported the ability to hold a high blade tension and good accuracy. They look like a viable alternative to a good commercially made unit.
-
I partake in the pipe on occasion. I prefer the Mountain Mist blend from one of our local shops. I got my first meerschaum pipe a while back and it is starting to color nicely. It’s nothing fancy, no face carvings or anything like that just strait simple lines but I like it. Do any of you other occasional pipe smokers get pipe bite in the mornings?
-
The Discovery Chanel series Time Warp had a segment of a samurai using a katana to cut through various objects. Apparently original segment just had him cutting through some mats but this second segment he was cutting large fish, pork shoulders, and various other smaller items. There was some video shot on high speed film of the katana cutting through a large pork shoulder bone and all. It was pretty impressive. Maybe they will show it again on a rerun.
-
I first learned O/A welding in junior high school shop class. I can still remember running that first bead. Something about using fire to melt metal and create really appealed to me. O/A welding just seemed to come natural and is still my favorite. We also learned stick welding in shop class but I found that to be much harder. It took going over to a friends fathers work, he welded pneumatic pressure vessels, to learn stick. While I was in high school my father got a Miller Thunderbolt AC/DC and set of Victor torches. He never used them much but I started making BBQ smokers and gas grills. I made the first one for me to use but then as any high school boy does I wanted a bigger one so I built a second. The first one was sitting in Dad’s drive and someone came by and bought it from me and I turned a good profit. For several years I made smoker and sat them in his drive and someone would buy them. I have now have O/A, Stick, and MIG welders. I mostly use the MIG just to tack stuff together and then do the actual welding with O/A or Stick; I just like them better.
-
Loading a Large Drill Press
kubiack replied to kubiack's topic in Drills, Post drills, Mag drills, etc
Jacob thanks for the advice. The drill has nice large table with t-slots I will get a vise for it once I have it fully operational. Andrew that is a nice looking dolly that you hammer frame is mounted on was it built specifically for moving the hammer? -
Saturday I picked up a Buffalo Forge #22 drill press, 2 large Jacobs Super Chucks, 3 small Jacobs Super Chucks, and a Brown & Sharp 215 micrometer. The drill press is in running condition and the bearings and gears seem to be in good shape. There is not any noticeable backlash in the quill but the quill auto feed and back gear engagement mechanism need repaired.
-
Loading a Large Drill Press
kubiack replied to kubiack's topic in Drills, Post drills, Mag drills, etc
I got the drill press home this weekend. It was way too large to load in a pickup without an overhead hoist. The person I bought it from had a -
Loading a Large Drill Press
kubiack replied to kubiack's topic in Drills, Post drills, Mag drills, etc
Thanks for the replies. I will remove the motor and lower the table and quill feed. My plan is tip it into the pickup bed pivoting the column on the end of the tailgate and then slide it into the bed. Looking at the press I think I could manage this but I am not sure of the weight. James do you have a ball park on the weight of the machine.