

anvil
-
Posts
3,246 -
Joined
-
Last visited
Content Type
Profiles
Forums
Articles
Gallery
Downloads
Events
Everything posted by anvil
-

How to forge a flatter.. No swage block used..
anvil replied to jlpservicesinc's topic in Tools, general discussion
A perfect place to use a rounding hammer, and do it on the face of the anvil, not the horn. Rotate it so the offset curve is down, use a 2 point contact on the parent stock to anvil face, and use the rounding hammer to center the curve on both sides. I use this technique very consciously when drawing a taper with both lengths curved. You can also use this to get a convex curve on one side, and a concave curve on the other. If this doesn't make sense, I'll post pics when I get home. -
Left coast,,, there went my offee!
-
New Anvil radius the edges, how much
anvil replied to tughill's topic in Anvils, Swage Blocks, and Mandrels
I round mine from 3/8" to zero. 3/8" at the step, and I end the taper before the hardy hole,, somewhere around where the heel begins. -
Excellent vid, Jen. And in my opinion the very best hot cut by far. It makes a clean straight cut and most important, is indispensable when making tenons etc. It starts the needed right angle and separates the mass for the shaft. It makes it very easy to forge the shaft without screwing up that shoulder. It also works for separating the mass for the shaft when making hardy tools.
-
dang, and i thought reading a 6' metal folding ruler to a 64th was good. I think the "th" makes it a fraction.
-
Heres a pretty good site that may help. http://www.beautifuliron.com/gs_drills_camelback.htm
-
my last was meant in jest.
-
Naa, you knife guys are in an economically competitive world. And not much room between makers to show your clientèle you are The Man! So, snow them with technogeek and it works every time.
-
I think you dont understand the hammer part. A piece of angle will keep it from moving for each blow you make. After the first blow you will have this visual reference that you can see and use the mark 1 eyeball to rotate your work where you want it. Then hit it again with the cut where you want it. Truth be known, after the first blow, your piece will have a flat spot and you can finish it on the face of the anvil.
-
Jen, I dont use jigs nor mechanical devices to roll my barrels., or anything else in my shop. I used his tool as an example to point out that roll'd barrels were common across time. I certainly have no idea what proportion of one vs another are. The only reason I brought this up is you implied a forged barrel was more "period". I don't accept that. But it's not worth an arguement or a debate. And yes, I've worked with many good Smith's as well as a few who were not so good. One way or another I learned from all of them. I very consciously chose to do this. I call that period of my life my contemporary version of being a journeyman smith. I can think of no better way to learn so many things about our craft. And as a bonus, it really helps in not developing techniques that are not truly good practices. If you work with little or no input from others it's far too easy to incorporate a bad habit and have no idea it's bad. Much less why its bad. Nor do I accept that Smith's of the past It's the same as today, go into a job shop and it's a daily grind, work for Whitaker etc and there is absolutely no feeling of "nothing special". Basically if you dont believe that what you do is special, no one else will. Let see if I can do a quick and dirty "how to" do a half penny scroll. I only know one way, so that a start. 1: Hang enough stock over the edge of your anvil to make a square cross section. 2: Use a half faced blow to forge down the transition to your dimension. 3: Taper the parent stock as much as you require and champfer edges if you choose. 4: Forge the square into a round. Remember, you can use your cross pen to move material out to accomplish this as well as forging it "in. The cross pen is a great way to heal those flat spots around the transition. Start here to roll the penny to get that nice vee and not a cold shut, as you mentioned above. Also, using the cross peen you can tune that critical transition where using a hammer to scroll it is too much. It can very gently move that penny just where you want it. Dang, there goes a "secret"! 5: roll it and scroll it. I do step 5 on the anvil and this is the most critical, so light blows and do only small increments. Then I do the rest with my bending forks. I made a hardy tool to start the scroll. It has a curved top, a concave area below the top and the top overhangs this and has a sharp edge. I'm sure you have seen similar. At a very frustrated time with this scroll, it helped, but after a short time i quit using it. It became easier, and gives me more control to just do it by hammer in hand. Hope this helps
-
Make a holding jig out of angle iron. A more complex tool would be a hardy tool with a vee groove. A round punch is, well, round, so you dont need to worry about being at a right angle to the long axis. Just punch it on the centerline.
-
Forging large Circles HELP
anvil replied to Hephaestus Smith's topic in Blacksmithing, General Discussion
Excellent vid. Made my whole week! And right on the mark. To be able to take what happens and make it fit is the sign of a true master! -
If you have Donald Streeter's book on colonial hardware, you will see a tool he copied from an early colonial piece that rolls barrels mechanically. This book is contemporary and he was a decade or more before me. He is from your part of the world. Also another big book "colonial ironwork by Sonn?" that shows many examples of rolled and forged barrels. Same in Europe. This conversation reminds me of that book. I'm unpacking, so will keep an eye out for it. It's my belief that rolled or forge welded was a choice made by the Smith to fit the situation. I started with colonial hardware, but other than an occasional barn or rustic business doo da it is not popular in my world. I then spent some time with a fine Sante Fe Smith named Tom Joyce. He lined me out on south western colonial hardware. A hot item. From there I hooked up with a custom hardware outfit in my community. I did her custom work for a long time. I did Far more than hardware for her, but hardware was the main stay. After a year or so she presented me with s job and I worked with the client and sid my own design. She introduced me to a few furniture makers. The main guy lived in Colorado Springs, but sold his work in Sante Fe. He dealt with a few galleries on a regular basis. He would send me a drawing of a period piece, supply a drop list for drawer/ door hardware, fasteners and whatever and a due date,,, after a few jobs. Good money and good experience. No room for error as any crudeness and I'd be gone. He kept us both busy. It was a very successful and creative time. Yup, half penny and snub end scrolls are tough. I still sweat bullets when I make them. It takes a lot to be able to make even one with no flat spots and a symmetrical "penny". And then to match them throughout a house full of doors is even harder. Keep it up, it takes time. No anger, dont read something Into what's not there.
-
I would say held at that temp for the proper time. And you are correct, Getting an even heat is critical. Most important, I believe that given a competent smith, and a competent knife maker and using the same type of steel, the smith with coal forge and knife maker with the best state of the art HT equipment, that when field tested, under normal usage, bla, bla, they will get dull with relatively the same amount of usage, and each will be sharpened in the same relative time. So my conclusion is that the best way to HT is the one that fascinates you the most. For me thats the traditional way backed by a laymans learning and library concerning contemporary methods and techniques. And I can see and respect that you are just as smitten by the high tech approach.
-
I used to think that too, but not in a long time. The time difference between the two is minimal, thus cost difference is minimal.So each is just a detail in my bag of tricks. One fits this situation, the other another. Cutting and fitting them together is far more critical than how you roll the barrel. If you rotate the bottom hinge 180 degrees in the plane of the door, it becomes the bottom hinge of this pair on the door, and to fix the pin deal, just remove it and put it in from the other top . There was actually a third. In the middle was a butterfly hinge to match.
-
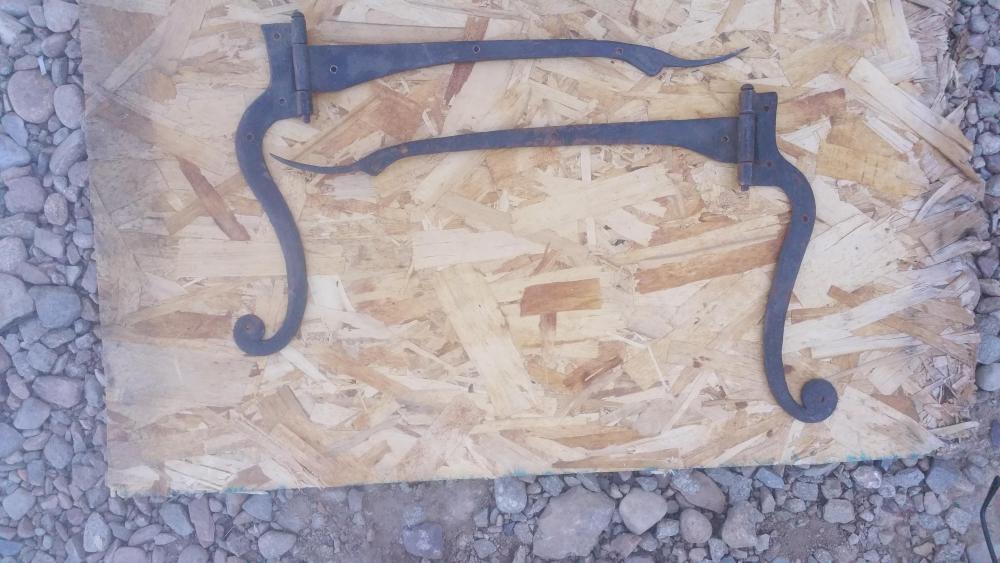
Heres another example. This was for doors in a log house. I think there were 10 doors. I showed these to Jen a while ago. I have the layout and how i do drawings and a layout stick to be able to match all now or in the future. Lol, she didnt like the rolled barrels. But they are about my favorite of all the hinges ive done.
-
Thanks,Marc,, Be proud of your joinery! Flaunt it, don't hide it.
-
It takes money to blacksmith !!!!
anvil replied to rthibeau's topic in Blacksmithing, General Discussion
Many times. Without a doubt I owe so much to them both! (Oops, nearly fried my phone in a teary moment just thinking of it.) -
It takes money to blacksmith !!!!
anvil replied to rthibeau's topic in Blacksmithing, General Discussion
As a professional Smith my investment is small. I've enjoyed the challenge of "by hammer in hand". My first forge and anvil are similar to all new to the craft. The bottom of an old cast water heater with tee post legs and two pieces of 1-1/2" pipe for a twyre. Rr track anvil. My first priority was property. Paid off via my " self imposed apprenticeship" as a farrier. First shop ( lasted 30 years) was 18'x20' with celutex walls. 2'x3' forge and my first 3-1/2" post vice and a portable cast rivet forge gifted from a rancher farrier customer. One centaur forge complete firepot, twyre, clinker ball and handle with a left handed ash dump. Two replacement firepots:~$300 124#pw $80. Refaced at Turly Forge Turley Forge: cant remember the cost. A half dozen assorted tongs and hand punches from Turley Forge Small post drill: $20 Pedel driven sickle sharpner" $20 Woodland Park Whitaker masters workshop brought me a 5'x10'x1" layout table and legs Upgrade to industrial post drill:$50 Upgrade to restored Camelback drill: $100 10' tall band saw:$100 (4' dia wheels!) 25# lil giant: taken in payment for working with Francis Whitaker, for crying out loud!! 25# Clay Spencer treadle hammer: cant remember the cost 255# trenton" I found two this size. The other was an arm &Hammer about the same weight. A SWABA gent offered to buy both if I would give him one. 184#pw, gifted from a local lady who knew Francis,, small worldism. The cost was to tell Francis she gave me this particular anvil. I got a major set of raised eyebrows from Francis in response, but no hint as to the story. a gifted 255 amp buzz box, Leased ox/actel bottles. I bought gage's and hoses and added a max important gas saver. Second piece of property(present situation) 10 year journada and a miracle. I missed a few tools, but generally the same situation. And no admission to this ride,,, just the desire, dedication, and determination to not quit. This small investment has taken me, as a traditional Smith from Beverly Hills to Prague and many points in between. -
Forging large Circles HELP
anvil replied to Hephaestus Smith's topic in Blacksmithing, General Discussion
Lol, its like the difference between a musician and a blacksmith. When a musician hits a bad note, it goes away, but a blacksmith mistake, you are immortal! -
"How to Forge a Set Hammer" (Steeled face) Video
anvil replied to jlpservicesinc's topic in Tools, general discussion
Lol, I was gone for 2 weeks. Got a lot of snow. Did the guy thing and got the jeep stuck, then got the ATV stuck. Then the lil kubota battery went south. Haven't had this a much fun in a long time. As soon as I get something dug out I'm moving my portable forge into the carport. Then, finally, I can show by example instead of verbal critiques. So, one small critique on your fine tool and as usual well done presentation. I'm guessing the final dimension of your set hammer was ~1-1\8" or 1-1/4"? I would have started with the finished dimension and done a small upset on the hammer face and saved a long drawn out experience. Also, a slight rounded surface on both hammer and steel might have saved your corner. The one time I did this I cut my rags more inboard than on the edges. I used the anvil step to back up for this. Also, my steel plate was the same size as the hammer. All in all, the end results was as it should be, so my input is just a different approach. In truth, I doubt your corner will be a problem. Again, nice job and vid. Your video technique is what I intend on using. Hope that's ok. -
What Steve said. It is not a good idea.
-
Common Basic Mistakes That Beginners Should Avoid
anvil replied to JHCC's topic in Blacksmithing, General Discussion
An ash dump works pretty well too to get rid of all fines, clinker etc. -
When looking at Kozzy's pic, you can see a shadowd round ring around the hole. Perhaps made from many around headed nails.
-
A true purpose for the ball bearing test!
