anvil
-
Posts
3,246 -
Joined
-
Last visited
Content Type
Profiles
Forums
Articles
Gallery
Downloads
Events
Everything posted by anvil
-
Read my post just above yours. Rout it out another inch deep and add an inch of fine sand. Level it in the sand and you are done.
-
Nope, no need. I just chisel it to a close fit. I apply a hot oil finish to my iron on the anvil enough and the oil probably helps. But most likely what matters the most is the scale will quickly will fill any voids. But the real trick is a close fit. Also, when setting your anvil into the sand, all you need to do is wiggle and/ or rock your anvil till its level. By the time you are level, the sand will have your anvil wedged tight. And years later, it's still level
-
It's like a lot of things in life, if you've never tried it, no explanation will convince you. Just couldn't resist. However, my edges are beveled from 3/8" to zero from the step to where the heel begins. And I use each 1.5" for different purposes all the time. And yet, the responses to not are valid. Use the dang thing till you have the experience to know whether you should or not.
-

What advice would you give to you?
anvil replied to Glenn's topic in Blacksmithing, General Discussion
Boy is that the truth. There is a reason during this phase of the iron age why those who make a living "traditionally" are the 1%'rs of all things iron! It does help when starting out to learn to cook air in 5 different ways. At least you will have a varied diet!!! -
I've used round bar with that lengthwise groove quite a bit. I like it. You can also vary the depth of the groove to create different "looks".
-
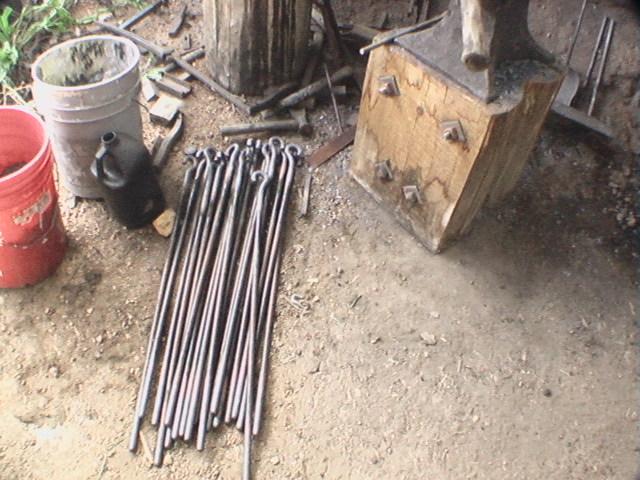
Heres my anvil stand. I've spoken of it a number of times and finally found a pic of it. I've used this style for many years. The first was made from a stump large enough to turn Into a rectangle, and the whole base of my anvil was notched Into the top with an apron big enough to hold a few tools. When I moved, I left it. This one was made from a stump a bit small. The feet hung over the edge. So I figured out a way to have the whole base of my anvil on the log and an apron large enough to hold a few tools such as chisels, center punch or scribes. It too is notched into the stump. It is notched in deep enough to put in a out an inch of sand for easy leveling and to deaden the sound. The fit, as you can see is a close fit. With this setup my anvil does not move in any direction and I do not need any mechanical fasteners that may prevent me from using all the curves of my anvil. Its buried ~ 2' into the ground. Although it was not meant to be moved, I have moved it to three or so different shops. Alas, it is not built to be jerked out of the ground by a backhoe or a bobcat, so will not grace my new shop. An unexpected benefit of this stump was its esthetics. I really like its unique shape, and still giving me all the room I need for an apron. Form follows function. The thru bolts are 1"all thread with a square headed nut forge welded on the end. The washers too are hand forged. It was in use for about 6 years and moved 3-4 times. The log joinery was done with an Alaskan mill and a chainsaw. Never did I lose any sand. My new stump will be of this design and I may choose an undersized stump just to get this design again
-
Throw them in your scrap pile. You will find a use,,,"someday". A friend will wander thru and if you let him, will put it to good use. Hang some on the walls as reminders of your roots. You will notice that your scrap pile will evolve with time. And, finally,,, Never forget, you can tell the quality of a blacksmith by the quality of his scrap pile.
-
What advice would you give to you?
anvil replied to Glenn's topic in Blacksmithing, General Discussion
If you want to blacksmith, never turn down a blacksmithing job. If you are coming from being a farrier or a welder, when you decide to make the change, never look back, and dont take anymore welding or shoeing jobs. Starting out, theres far more of them than smithing, and as sure as Murphy's law is true, you will always be too busy to get in the forge. Most important, never quit. -
What did you do in the shop today?
anvil replied to Mark Ling's topic in Blacksmithing, General Discussion
I highly recommend a gas saver for your torch setup. It's an addition that you can hang your torch to shut it off and a pilot light on it to relight without a striker. It's a great hands free setup that enables you to lose no heat messing around figuring where to put your torch safely so you can use your hammer. -
I wanted to add that you can get a nice look from rebar if you first forge it square. Then you can use it as is, or twist it.
-
You can get a nice twist with round stock if you chisel a line in it.
-
Steel I less expensive than aluminum or brass and plentiful. Nothing will teach you how to forge iron like forging iron.
-
I agree with Jen. I've never seen old handforged chain fire welded anywhere but on the rounded end. On the other hand, I've never seen modern chain welded anywhere but the side.
-
Help with 1075 for garden trowel
anvil replied to Wrought Iron Farm's topic in Blacksmithing, General Discussion
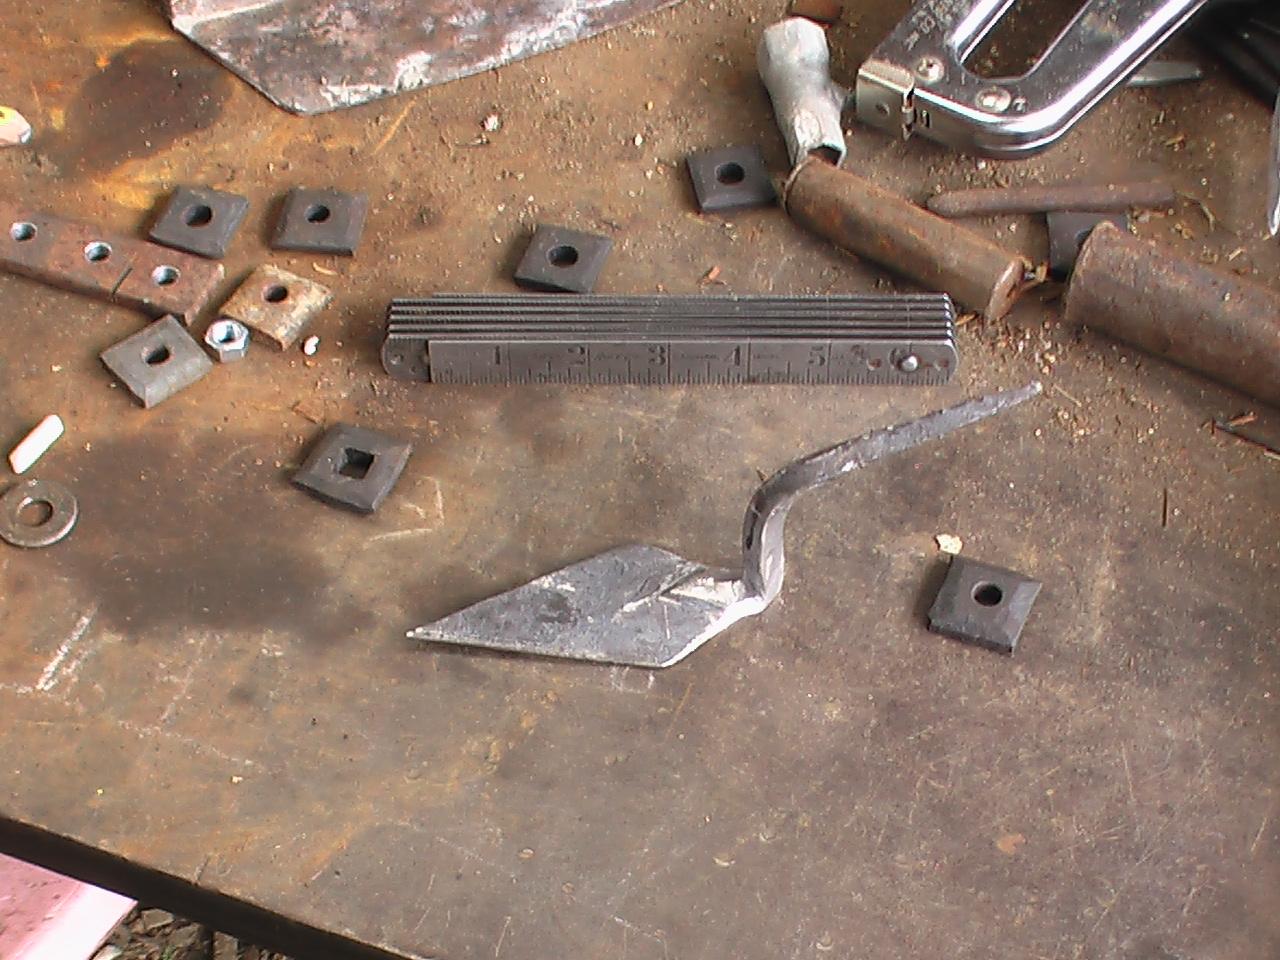
Heres some concrete tools I made. Not gardening tools, but concrete and stone are pretty abrasive. Made from mild steel. I believe I forged them from 5/8" square stock. So, 1075 is overkill, and no other heat treat needed. I did the walls for a 20'x40' shop with these. The back wall was 5' high, the front was3' and the side walls were concave to fit a curved log. The pic of the pointer shows the beginning of the stonework. Nothing beats making a tool, then useing it! Good luck and have fun

-
I agree with you, John, heat is the major factor in a basket. A consistent heat, and a good heat, when first twisting it closed, and as it cools, this cooler temp will open up the basket to whatever you need.
-
Just a bit of trivia, I believe it was Stuart Hill, Claydon forge, somewhere in England who brought us both the claydon knot and claydon clamp. He also was the smith who did the massive Gates/Screens for Queen Elizabeth's Jubilee. Truly a great smith.
-
Lol, One of the first things I ever made was a pair of tongs. They were far uglier than yours! Keep it up
-
Nice work, John. Ive done a few jobs with the Claydon clamp, but never Ive done a Claydon knot.
-
I would first off determine which forge, gas or coal, will be your primary. Then set it up as any of the above. I prefer a triangle, but am comfortable in many situations. Then, consider setting up the other forge as a stand alone setup, meaning with it's own anvil and post vice. This could be either permanent or portable. I understand space is always an issue. The benefits here are primarily, both forging stations are set up efficiently and,,, you have a second forging station avalable for many things such as a helper or a class.
-
I have a single man traditional architectural blacksmith shop. Me the manager confronts this issue with me the laborer all the time. During a job I nearly always make a "mistake". This mistake usually leads to the possibility of a minor, but perhaps, a very cool detail. I dont mean a design changing detail, more an esthetics improving detail. And a detail that would not require client approval. The choice is to continue as planned or add a bit of time and tune up the esthetics. My solution is to bid my jobs "time and material, not to exceed $X. The first factor in my decision is always the job deadline. First and foremost the deadline of the job. But as well, how will this affect my next comission. Most often if I feel I can fulfill the deadline issues, I go for the increase in esthetics and my "not to exceed" loophole allows me to do this at my own expense and for the benefit of the client. I consider the cost of the change is me choosing to pay for my own continuing education. This esthetic change also is an investment in my future. I consider it a form of advertisement.
-
Nice job, Jen, I e never seen that particular type basket before.
-
Cool idea, Jim! And a nice piece.
-
That is the truth. Tie that in to we blacksmiths are over a hundred years away from when we were common on every street and, and in the US our craft was nearly lost during the early to mid 20th century we will never have the basic knowledge that most apprentices had "back in the day". Thus the importance in passing on every possible way we come across to do any detail. So, Jen, another long post from you. And what did you get out of it? That by presenting different techniques I'm showing a better way than you? You do have a reading problem. Sheesh, I can't even compliment you on your journey without you coming down on me,,, lol, you can lead a horse to water,,, And yes you did cross the line, and on a public forum.. It's up to you to deal with that directly, or not. It's your choice.
-
Thanks, Jen, Thats all you needed to say the first time. But i have to add, that conversation had absolutely nothing to do with making a shoe from scratch,,, we were talking of turning a shoe over the horn. So perhaps you will understand my being confused. So lets cut to the chase. This is the third time ive done this with you. First time was quick ann dirty and with a humorous tone. The second was the post on half penny scrolls, I believe. I did that one very consciously in a gentle manner and even apologized for any misunderstanding you may have had. Time to be a bit more straight forward. To do this im going to show your journey that got you to this point. I'm doing this out of respect. I believe that understanding this journey that every working traditional smith makes is unique and is the only way to inspire new folks to give it a try. All of our journeys are different, with some similarities. They need to be brought out as there are no contemporary business plans that apply to craftsmen of any sort, especially blacksmiths. I look at your journey with much respect. This info comes from my reading your posts on the public forum here. Its a beautiful journey. The first vignette happens somewhere between 4-9 years of age. I have two beautiful daughters and this beginning of yours always brings them to my mind. I picture a fireplace or a wood burner in a living room and here you are heating bits of iron, hitting it with some sort of hammer on whatever worked as an anvil! Its a beautiful image and a fine start for any smith. Special kudos to your parents for not shutting you down for playing with fire in the living room! Next is a time between your late teens and early 20's where you had a colonial hardware business. You quit this due to not making enough money. You also have stated that after this, you could not raise your arm over your head for 2-3 years. Again, a great experience on your journey. Reasons dont matter, lessons and learning do. And for what its worth you are the only person ive ever met that became a farrier from the blacksmith's craft! If your time as a farrier was anything like mine, there was precious little time to do much else than be a farrier. It was dang hard for me, after 3 years, to cut back from 7 daze a week to 6! i was able to teach myself how to make pony shoes and draft horse shoes,,, but thats it. And I was not a hot shoer, I was, other than that, a cold shoer. And that brings up to this next phase. I believe you have stated that 3 or 4 years ago you have decided to pursue traditional smithing and become a teacher. You have stated as well that you dont believe that its possible to make a living as a traditional smith, thus your choice to set up a school and teach. A good goal, and one I respect. Anyone who can make a living between hammer and anvil, no matter their product, holds a special place in my eyes. One critique. I firmly believe that anybody can succeed as a traditional smith at this time. However, Id say, considering all the pathways that focus on iron in any manner, we working smiths prolly stand as true 1%'rs. So it certainly isnt easy. If i chose that, Id have to say I choose to teach, not do commission work, or whatever, not "you cant". Truth be, i know some great smiths who have chosen that pathway. Not a one has ever implied "you cant make a living as a traditional smith!" Now these last years of your journey. Again, much respect. I dont know how long I've been here, but its been long enough that the "nick" anvil was not in use. Ive come and gone as a participant but have lurked much of the time. I believe you became an internet entity in my life sometime during these last 2 years or so. Again you stand high in my regards for what you are doing. You, of all here, including me, spend more time in the fire than anyone. Not only that but you document your work with excellent video's. You definitely show the 3 "D"'s, desire, dedication, and determination I put this here because I want you and all on this forum to know how I feel about you. From the horses mouth, not anyones assumption. You might wonder why I do this. Its pretty simple. I have knowledge from a number of great smiths. I have a self imposed obligation to pass this knowledge on. Thus, during this last 4-5 years thats been my focus. I name them because i believe that adds to this 2000+ year continuum into the 21st century. So, with any luck, they continue to be apart of the lore from the time when i began smithing. And this keeps me active mentally, at the very least, as a working traditional smith, in another roll other than working commissions. When i do this, present "differences", I never have any expectations of anybody trying them, for any reason. However,Just like i had absolute faith that I would "succeed" as a traditional smith, I do know that there will be those who will try some of my suggestions. Ive had perhaps a short dozen who have let me know its been a help to them. I suspect there is an equal number that only know that someone named"anvil", wrote a post that helped them,,, and they will never know who anvil is. This bit is to let you know just who I post for. Its never for those who think I come from anger, or "to pick you apart". It is to present differences to those who are interested. Again, isnt that the reason we are here? Differences, Why do they bother you? Im puzzled. That has been your issue with me for a while now. What are differences? Your responses to me appear to be that im "showing" a better way than your way. Huh? I suggest that if this is your reason, you have a problem. So deal with it. I refuse to fall into that kind of discussion. Different means different. I look at different um, er, differently,,, Lets call these differences "techniques". Two techniques to create a similar detail. This gives the smith ways of changing the aesthetic of that particular detail. Wow, what a concept. Take a branch detail. You can, simply said, jump weld say a short piece of half square to the middle of a long piece of half square. works fine. note im leaving out details here. A second way is to take two pieces of half and weld them together for the branches. Then weld on the stem. One might think why do i need to do two forge welds to get to the same place as a single weld? Easy, the second way with two forge welds, gives me more material to play with this transition. I know you have problems with words, but until i get my forge running, thats as good as it gets. To sum that up, Jen, When you continually "critique me on being angry, and showing "only a different way", time and again, I can only guess that what you want is when you post a technique, you dont want me to show a different way for whatever your reason. Am I correct? And Hey, smoosh if you want. this whole thing started because i agreed with another here that using proper terminology is a plus. I still believe that. And smoosh might work on a bug, but it just dont fly in a blacksmith shop. And ive known and worked with too many fine lady smiths to get into that feminist deal. Two come to mind, and without a doubt if anybody ever pulled the fem card on them, you better be quick on your feet or have a good insurance policy. That would be Dorothy Stigler and Iron Maegan (Maegan Crowley) from Dolores just up the road. You are prolly about the same age, or at least closer in age to each other than either of you are to me. She is a top notch smith and often demos on the east coast. Well worth seeing if she is in your area. Not you per say, Jen as i hesitate to suggest anything to you. And without a doubt, we have clashed a few times over various things. "Picking" on you its not. Too bad you feel that way. However With your inability to read and understand words it makes the written word inappropriate. Thus a waste of time. We do know how you feel about my pics, correct? So they are not an option in our discussions. However, the trees are budding in the valleys,,,, Edit: Im not going to delete this post, but I want you to know that i had not read Frosty"s latest or yours before posting this.
-
Hand crank drill presses
anvil replied to Welding Rod's topic in Drills, Post drills, Mag drills, etc
They are great tools that will teach you a lot. The first thing it will teach you is just why blacksmiths punch holes.