
Another FrankenBurner
-
Posts
619 -
Joined
-
Last visited
Content Type
Profiles
Forums
Articles
Gallery
Downloads
Events
Everything posted by Another FrankenBurner
-
No worries. I didn't want you ending up in the dog house over a misunderstanding. Thank you for sharing your information.
-
The one time I had a moderator warning, I was able to respond to the moderator and it was cleared up easily. I'd be careful about public criticism of regulations/moderators. On the second post of the site guidlines page mentions contacting the owner(Glenn) to discuss matters like this in private.
-

is the end fitting of my t burner getting to hot?
Another FrankenBurner replied to CheechWizard's topic in Gas Forges
Wait, so you are saying the cart goes behind the horses. That makes sense, I think I got it now. Cheech, listen to Mikey. Before your burner is dialed in, there is no point playing with the nozzle. Dialing in your burner will most likely change where the flame rides within the nozzle. Then if you still need to, play with nozzles. -
Now you are getting to the beginning of my life. My earliest computer memory is playing 688 attack sub on a 286 while living on Guam. I have since played with a Timex Sinclair 1000. Upgradable 16K RAM pack. My favorite was the introduction in the manual, which I kept. Some highlights: You will enjoy computing. You will find it easy as well as enjoyable. You shouldn't be afraid of the computer. You are smarter then it is. So is your parakeet, for that matter. You will make mistakes as you learn. The computer will not laugh at you. Your mistakes will not do any harm to the computer. You can't break it by pushing the wrong button. You are about to take a giant step into the future. Everyone will soon be using computers for every part of their daily lives, and you will have a head start. A computer is a tool, like a hammer or a saw - or perhaps like a food processor. Hammers and saws generally do only one thing well. A food processor can perform different operations, and normally you can "program" it by simply pushing the proper buttons. In the near future, your personal computer will be able to dial and answer your telephone, monitor your burglar alarm, control appliances, water your lawn and perform many other duties for you.
-
Right. You don't want to use the little scorers for obvious reasons and the power steamers are also out. That does sounds like quite the chore.
-
No worries, I knew you were kidding. My intent was also humor. Ba dum tss.
-
is the end fitting of my t burner getting to hot?
Another FrankenBurner replied to CheechWizard's topic in Gas Forges
I sure looks like the flame is riding deep inside the nozzle. I don't have much experience with threaded fittings as nozzles. You could try a 3/4 coupler to see if it still holds the flame. You said 75% which I am guessing you are talking fuel pressure. What kind of pressure are you running for these pictures? What is the brass fitting in the side port of the inlet tee? That is blocking the air inlet. -
The cast nozzle is the way to go. I have completely abandoned metal nozzles. I recommend casting a few in cheapo plaster to find a good size/shape so you don't waste KOL. I prefer to cast the nozzle on it's own and then cast the forge liner to glue the nozzle in place. Printing the form and trying to ram KOL in place in the forge hasn't turned out as well for me.
-
It will do full animation of the hot end along it's path. It is very handy for narrowing down print problems. We could find a workable solution for your wall paper. I am very much looking forward to this as well. I am also waiting for the different varieties of conductive filaments to get there. It is all very awesome. We have been in the cnc game over here for a number of years but 3D printing is in a realm of it's own. I still remember the joy of emailing a product the first time.
-
Hopefully you avoid the "slightly used" part but it seems making more then one forge is in the cards for most. You build one and immediately think "next time I will..." and/or you use it for a while and come up with some reason to need/want another. The best advice that I see routinely is avoid the thought "I will build one forge and I will build it big enough that I can make everything I can ever imagine making." This usually ends in a disgustingly large forge which is not hot enough or uses so much fuel that it is very quickly abandoned. Using bricks allows internal volume to be adjustable which is very nice. We recently built a forge which is 185 in³ and it has become my favorite for general use. Now we are planning a forge at 50-75 in³. We also have a 150 in³ and a 450 in³. The 450 only comes out to play when it has to.
-
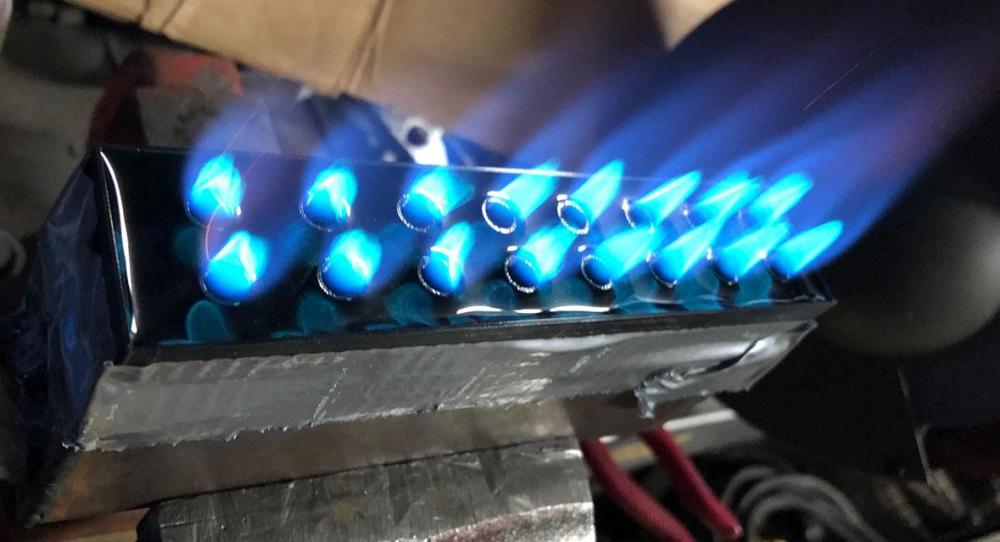
Thank you for the reminder Mike. I get ahead of myself and forget my manners from time to time. It is a beautiful blue flame and a hot looking forge. Nice job. One thing I just thought of, if you pull the nozzle back into the fire brick, the firebrick may be heated more which could cause the brick to crack.
-
is the end fitting of my t burner getting to hot?
Another FrankenBurner replied to CheechWizard's topic in Gas Forges
A good look at the flame will tell you what you need to know. If you can, get a picture of the flame. -
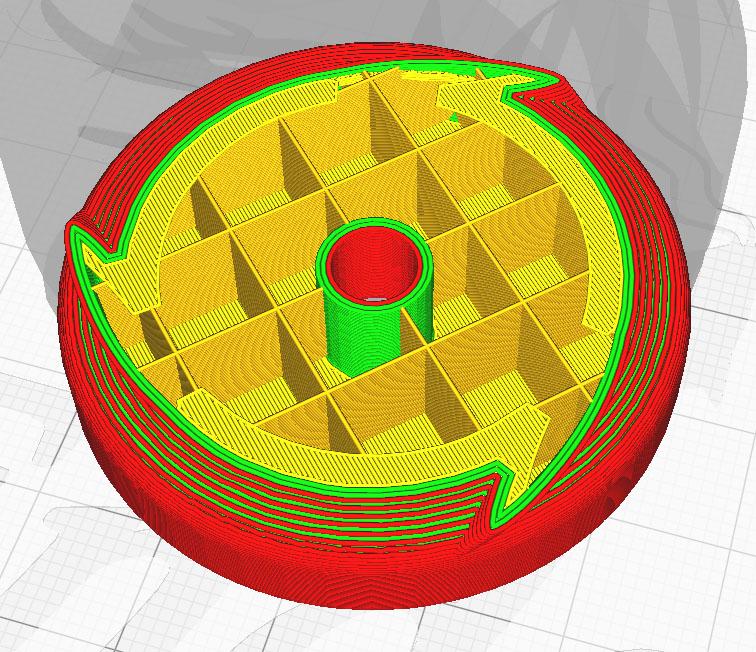
I am glad if anyone has learned anything from my posts. I learned a whole lot when I first found IFI. I am just playing around and reporting the results. I agree with Jerry on the 3D printing being something sci fi. Not only can I produce any shape I can draw on a computer but it roughly calculates the length of time for the print and cost of the part. In the case of v46, it states 2 hours, 59 minutes and $0.57. These figures are generated by the "slicer." The slicer is the software which takes the 3D model I produce in a cad program, hollows it based on a handful of settings, slices it into layers, and determines the layer paths to produce the g code the printer uses to run the extruder and move the hot end along the correct path. To give an idea of the amazing things happening here, the g code for v46 has 444,274 lines. Here is a shot of the sliced model at layer 46 of 353:
-
I have broken several of the K26 bricks but several people have reported good results using them. I was planning on coating them in plistix 900F. I only use them for baffle walls. I like the ceramic blanket, refractory, wash route for forge building. As to the forge welding, I slip a thin high alumina kiln shelf into the forge when welding. The flux melts into a goo puddle in the bottom of the forge which is sticky and you stick your irons in it. It's annoying. After I am done welding, I can remove the shelf and no more flux in the forge.
-
Your nozzle ends at the forge cavity which will cause it to over heat. If you can pull the nozzle back into the firebrick a ways, it will help. When I was using metal nozzles, I liked the outlet of the nozzle to be outside of or flush with the forge shell. Recessed beyond the refractory and the blanket. Another thing you might have going on is a nozzle which is too large. That image looks like the flame is back in the nozzle which also over heats it. With a metal nozzle, you want the diameter small enough that the flame rides at the outlet of the nozzle but big enough that it prevents flame lifting. This over heated nozzle then conducts heat up the mix tube. Nice looking tongs for a first time. Is this your first forged project of any kind? The jagged markings in your offsets are because the edges of your anvil are so sharp.
-
If you do attempt this, please keep us filled in. I have been wondering the same thing. When I get the time, I will be testing a few different refractories on the bricks in the hopes of armoring them enough to survive as baffle walls for my forges.
-
is the end fitting of my t burner getting to hot?
Another FrankenBurner replied to CheechWizard's topic in Gas Forges
What is the outlet size of your nozzle(the fitting at the flame end)? It looks like it opens pretty wide but this picture could be misleading. The wider the nozzle opens, the lower the fuel/air mix(FAM) velocity. The few Frosty T burners I played with had a fairly low velocity in the first place. The thread protectors which Frosty uses, don't open very wide. If your nozzle opens too wide, the flame will ride inside of the nozzle instead of at it's outlet which cause that nozzle to heat up like crazy. Not so good for a metal nozzle. I recommend pulling the burner and running it in open air. You are looking for the flame to ride right at the outlet of the nozzle almost floating outside of it. If it looks like it is inside the nozzle, it is the problem. If the nozzle is not threaded on but slid on, you can play with adjusting it's position back and forth. If you have to make a new nozzle, I would experiment a little to find the smallest nozzle diameter which still prevents flame lifting. Also, I would make it a nozzle which is slid on so it's position is adjustable(but I like adjustability). Out of curiosity, what is your nozzle? -
I have long intended on sending some to you and Mike, if you liked. I think your reports back, at the cost of the inducers, would be the bargain. Not only would they be third party tested by the trusted burner guys but if the reports back were good, it would be great PR for the inducers. Dickens free, Mike and Jerry approved. Not that I expect it but if the reports back were bad then I would head back to the drawing board with a better idea of what I am after. I would sleep better knowing you hadn't paid for something that didn't live up to the hype.
-
Thank you for every word of that. We'll get through our stuff. We look forward to getting back to making these things. Once we do, I will get one into your hands for a good testing.
-
Thank you sir. I was diagnosed with leukemia a few years back and I am still making my way back to humanity. Bumpy but good stuff. My father is now the one dealing with some health stuff. He is going into surgery next week. We view it as another thing to get over so we can keep getting on. I seem to recall someone talking about a dual purpose forge/furnace as being inefficient for at least one of the purposes. I think that same logic holds true with forge/water heaters. Yeah but... Cool... I have been trying for very hot. Thank you for the kind words. I agree, cool enough that I keep tinkering. A reducing flame is the easiest flame to produce. As Buzzkill mentioned, neutral or lean flames with reasonable output are more difficult. The increased resistance does add a whole new challenge to the situation. I look forward to experimenting with geometries to find the balance. I have noticed that any little thing in the way of flow can severely reduce induction. I had a few versions which tried to force things to happen. A couple succeeded but at a high cost of induction volume. In my experiments, finesse has been better then force for induction and mixing. There you go trying to slow unnecessary progress again. I completely agree, good enough is good enough. My current burner is good enough. We are very happy with it. If tinkering wasn't so much fun, I would stop.
-
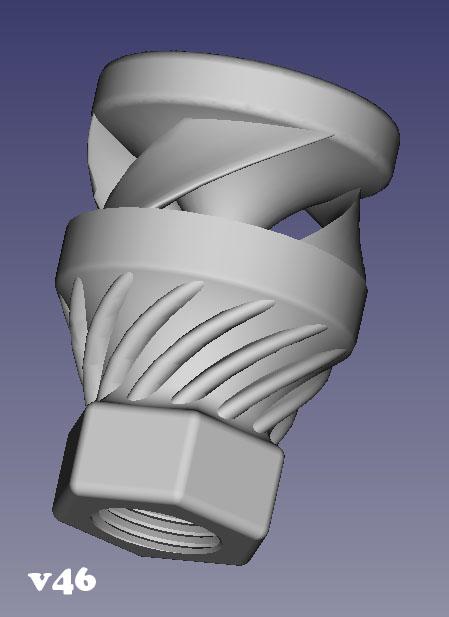
Sorry for the delay in response, I have been dealing with some health/life stuff. It is not a more radical intake. The flutes are cosmetic. The inside of the reduction is still streamlined. I have been playing with the NARBs a little bit. Originally I was casting blocks. I figured out a way to experiment a little faster: Water cooled prints. They can be lit until the water gets too hot, several minutes. This plenum is supplied from the left side which produced the unbalanced flames. I still have a lot to learn and a lot of experiments to learn it.
-
Ah. Those. I originally thought about adding cooling fins in that area but no longer think that is needed. Those were added for flair. They match the rotation of the ribs and transition well into the hex area. That is also the first version that has pipe threads.
-
I am not sure I know what folds you are referring to.
-
I sure hope you are exactly correct. The initial goal in all of this was to make a burner which would reduce my fuel usage. I know I have accomplished that. I recently replaced a 3/4 inch modified side arm burner, in my main forge, with one of my 1/2 inch burners. It is running a smaller mig tip at a lower pressure to get to the same forging temperature in the forge. This is with the burner running near it's low end. Also, there is no more dragon's breath to heat up the shop. I have not managed to run a full bottle out since the burner change. We are very happy with their performance in each forge and furnace we have tried them in. We are keeping a close eye on the refractory in each piece of equipment. Now we have to play in the mud to hopefully find a refractory solution using the zirconium silicate.
-
I don't know about flame temperatures. The exotic extreme heat thermocouples are a bit pricey. I originally based everything on reading the flame. Now we have tested the 1/2 inch version in a few forges and a furnace. We are happy with their functionality and performance. I have continued my experiments to understand the dynamics of each portion of the inducer and nozzle better. I continue to push for improvements in induction volume, mixing, and balanced induction curve. Melted nozzles, cracked kast o lite and broken firebricks are hopefully evidence that I am getting somewhere in terms of temperatures. Thank you for the information Mike and Jerry. When I started playing around with printed burners, I had no idea I would eventually have to start looking to upgrade refractories. Thank you for information and the link MonkeyForge. I read it all, along with all links along the way and all of your other posts. Did you ever finish up the forge from that post? Like Jerry, I was thinking more of a kiln wash. What you have done looks great. I had been looking into high alumina ceramics for nozzle experiments. Now I will play with the zircopax for that as well.
