sfeile
-
Posts
358 -
Joined
-
Last visited
Content Type
Profiles
Forums
Articles
Gallery
Downloads
Events
Everything posted by sfeile
-
Thank you, and you are welcome.
-
There is a small herd in a town in NY close to me that hangs out on the campus. They will actually wait and look for traffic before crossing the road.
-
Les is pretty spot on Chris. For smaller stuff you will be using a fairly low amperage and wont need super dark. My auto hood goes to 12 I believe, but I generally use 9 or 10 for most everything I do. Low amp tig 9, mig usually 10. 1/8 7018 it depends on indoors or outdoors. Indoors I use a darker setting. Fixed shade is nice and light, but the auto is nice when you are trying to do your own fits and tig tracking. Or crawling inside of a tight machine haha.
-
Weight mainly. For example this kitchen knife. Notice how it is balanced on my finger. For many chefs and even home cooks, a pinch grip at the ricasso area is quite common. Having to heavy of a forward balance, it makes the blade harder to control. Too heavy in the rear, and you lose cutting weight and have to work harder. Of course your balance point will vary with intended use. A chopping knife like a cleaver or heavy use camp knife, you want a forward weight to assist the chopping. A small paring knife or carving knife, you want the weight to the rear to assist with control.

-
One thing to watch as you get playing around trying everything at once, is how they affect your overall balance and what the intended use is. A little EDC like that, you may not notice a big difference, but you make a chef's knife and it is extra blade heavy, it can become uncomfortable to use in long sessions. On the opposite end, a large chopper/camp knife may not perform as efficiently being too light or handle heavy. Again, I know it's your first, but just more things to keep in mind as you move forward. I see some pretty good potential Chris.
-
It could be used that way, but with the skeletonizing (is that really a word?) that was done, it would be a little redundant. Just to me personally, it makes the lines look a little odd.
-
Not sure why you tapered the tang. To me, that looks a little bit odd. (But just personal opinion.) I can see some glue lines between the tang and the liner. Seems there wasn't even pressure when gluing the scales on. Also a bit of residual glue coming out at the ricasso that wasn't cleaned up. The brass pieces in the handle scales are off where your two halves aren't quite in the same alignment on the knife. There is also a bit of twist or warp between the blade and handle. It can be seen in the last forging photo, and also in the last finished photo. The plunge grind on the marked side looks to be just a bit deeper than the other side. I know those are a bit nit-picky for your first, but honestly it looks very nice over all. The shape is good, grinds are clean, distal taper looks even, looks comfortable and functional. You definitely seem to have the basics down and skills, now it's just refining the little things. Excellent result for your first though. I wish my first had turned out that good.
-
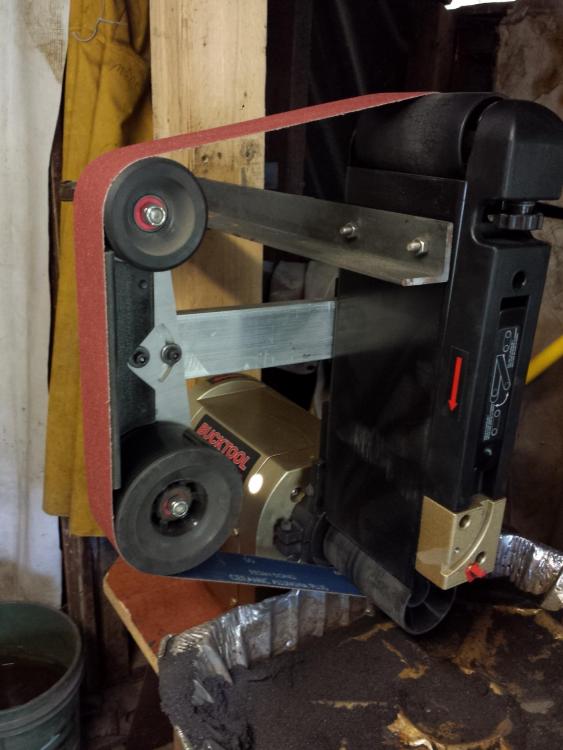
Nice job on the knife. For a reasonably low cost alternative for a belt grinder, I went with a Bucktool 4x36 and added a Jiffy conversion to it. This changes it to a 2x48 with flat platten and 2 contact wheel sizes. Gives me a lot more versatility and much bigger selection of belts available. The one thing I did notice is that the platten of the 4x36 will twist a little causing your tracking to go all funny. I solved this with some angle iron and a support post of my shop.
-

First knife shape object
sfeile replied to Dls1990's topic in Knife making Class General Class Discussion
I hope that was just a joke. There is no reason to point a blade to magnetic north when quenching other than maybe it is the best lighting option when heating or the way your shop set up happens to face by coincidence. There is no scientific reason that will alter the blade due to what direction it is pointed on a compass. -
Hardened Rebar Knife?!?!
sfeile replied to NCHammer's topic in Knife making Class General Class Discussion
It meets a higher yield strength, not a higher carbon content or harden-ability. A lot of bridge bars are a coated in an epoxy finish for corrosion resistance also, so you have that to deal with before you can even start to forge it. It is still made of recycled materials, so you still don't know what kind of steel you are getting. Free rebar can be used to make some things as Das said, but you can buy 1/2 inch structural round stock for around $16 per 20 feet at a supply house, and have better steel for general use. (24 feet of 1/2 inch rebar at home depot is $30.) Still not good knife material though. A rail spike isn't that good either. It doesn't have the carbon content needed to properly harden for a decent knife. I believe they are spec.'d to have no more than 0.30% carbon content in the HC rail spikes, and only 0.20% for standard spikes. They make a decent letter opener, but not really a quality hardened knife. Leaf spring or coil spring is generally a 5160ish material. Maybe not exactly, but similar. That averages around 0.56% to 0.64% carbon content. Much better and can still be had for free or very cheap generally if you are using recycled/scrap materials. 1095 steel is around 0.95% carbon content. If you are going to buy steel specifically for a knife, 1095 is easy to work with, fairly inexpensive, and easy to heat treat in a home shop. So while you can make a "knife" from rebar or rail spike, will it really be worth all of the time and effort you put into it? -
You may want to check your internal space of your forge compared to what your burner is rated at. As a general rule of thumb, a 3/4 inch burner correctly tuned should be good for 300-350 cubic inches of open space in a forge. If everything is good there, then you need to let your forge come up to temperature. It wastes a little gas and time waiting, but it provides much better results as you get a more even heat in your work.
-
Like Steve said, not all steels forge the same. Something else to consider. Did you grind to 1/8 inch then quench? Generally I like to leave mine a little heavy to allow grinding off any decarburization that may occur when quenching. For 1095 that you asked about specifically, the recommended forging temperature is between about 1700F and 2100F. Your normalizing temperature (the part where you heat it and then let it cool in air slowly) is about 1575F then down to room temperature. When you are ready to do your quench, your austenitizing temperature is 1475F. Thicker sections can be water quenched, but for under 1/4 inch thick an oil quench is a safer route. As far as burning the carbon out by placing it on one side repeatedly, that depends a bit on the type of forge you have and how much heat is in it. If you have a gas forge that the burner comes in at an angle and the whole forge is heated up properly and the same temperature, you should be fine. If you have a straight flame on a forge that isn't up to heat and you are using just the flame to heat the steel, then it could be a problem. With no details on your forge, we can't make a good assumption though.
-
Hardened Rebar Knife?!?!
sfeile replied to NCHammer's topic in Knife making Class General Class Discussion
Rebar is generally pot metal. It is recycled whatever steel. It may contain old car rims, pieces of structural steel, old axle shafts, whatever junk they can salvage. You may encounter a mildly harden-able spot or two, but not likely the whole bar will be. There are some higher grades of rebar with a little more consistency, but you won't find those at home depot and still won't be a good consistency or even known material. Just that they meet a higher strength (not hardness) requirement. Unless it's specified as a weldable rebar, it doesn't even like to take a weld without cracking or chunks breaking off. As Thomas said, you already had cracks in it with a simple squaring, do you really want to try and make a knife from that? 5160 or 1095 are good easy to quench in a home shop steels that can be had for the same or only slightly more than you paid for the rebar at someplace like Jantz supply. Even leaf spring is a better 5160-ish material that will yield better results than rebar. It's not guaranteed to be 5160, but usually has similar properties and can be used for practice, tools, and gifts. Just be careful of stress fractures and avoid broken pieces. -
Food acids will color carbon steel. As long as the blade is being washed and dried properly after use so that it is not rusting, the patina is normal.
-
What did you do in the shop today?
sfeile replied to Mark Ling's topic in Blacksmithing, General Discussion
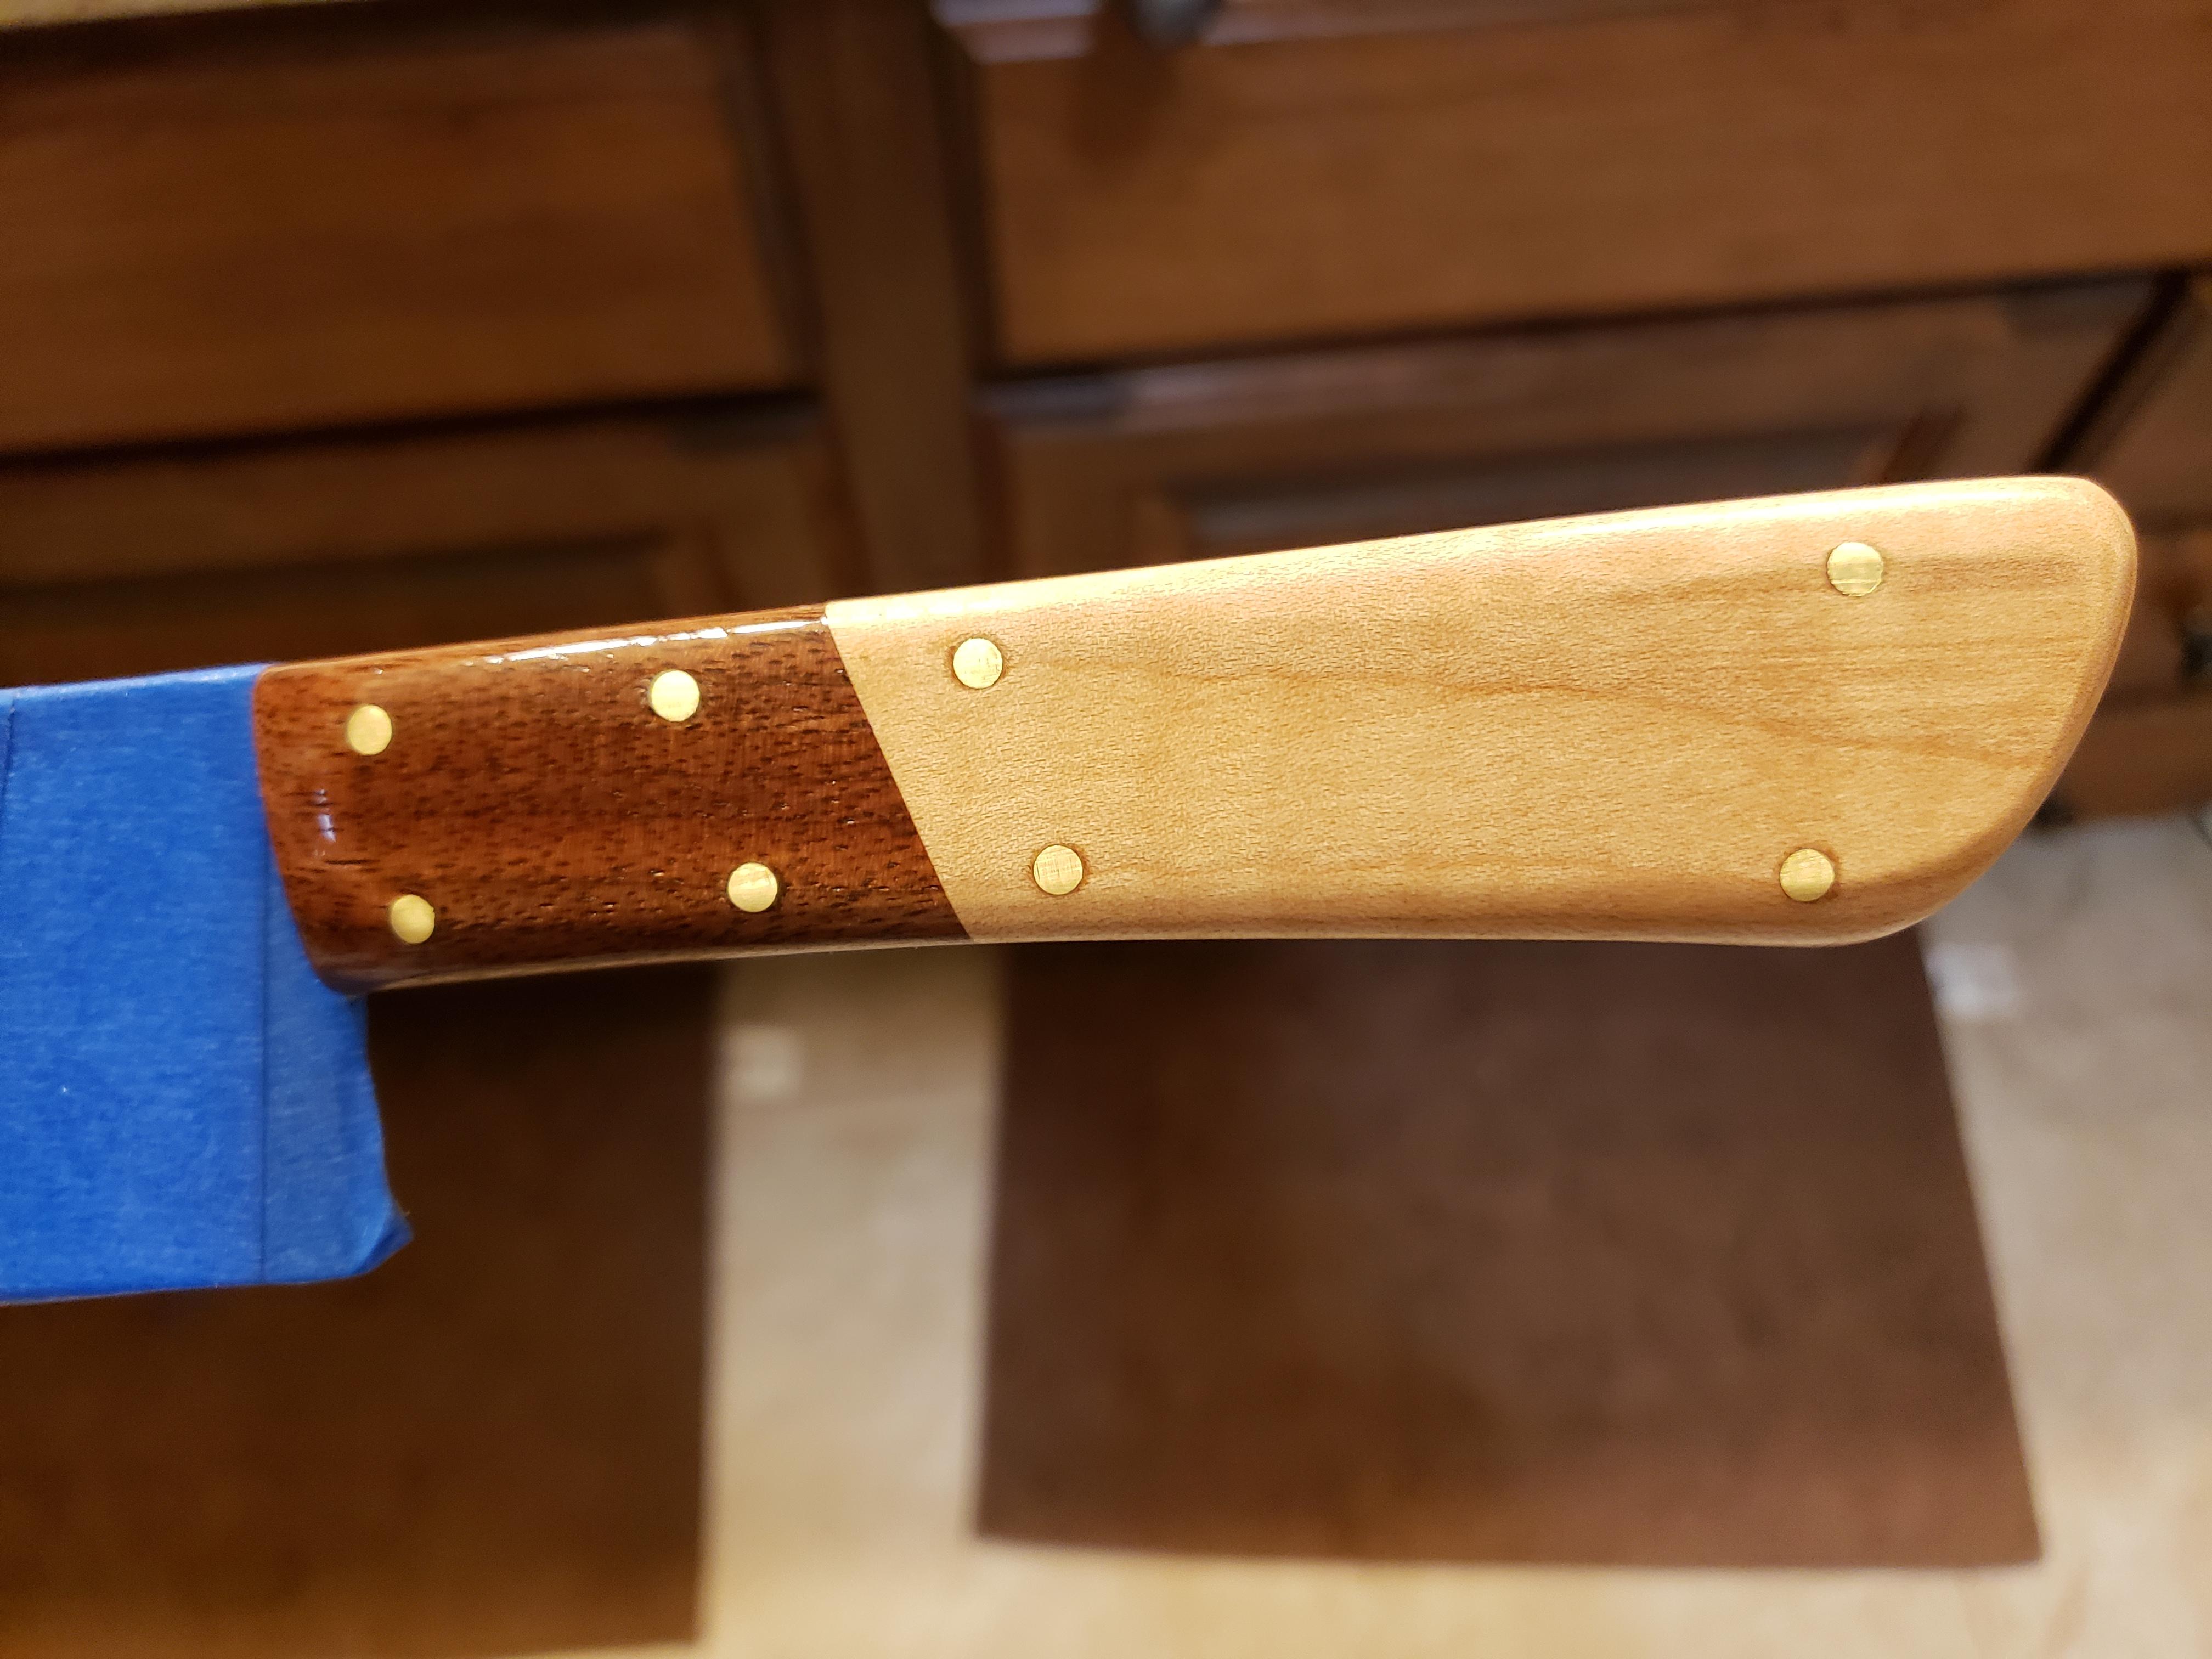
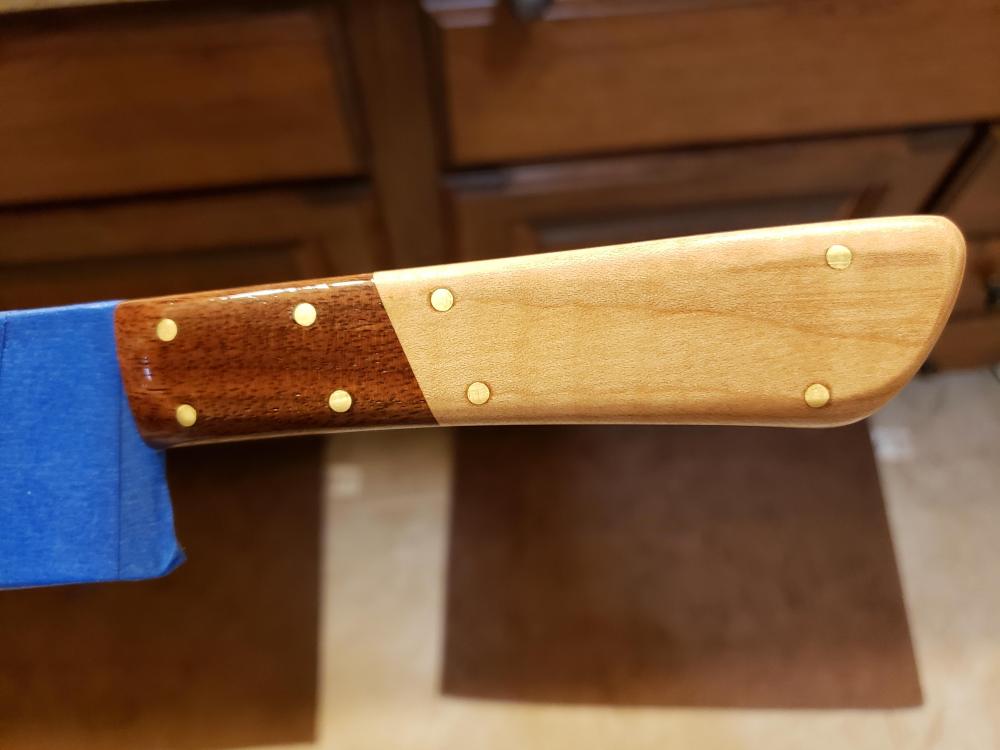
Haven't been around much lately, but just got done doing some catch up. Some awesome work everyone! Just got one project done, and waiting on a new delivery of 1095 that's supposed to be here today to start some more projects. Here's the one I just finished. 8 inch blade with black walnut and maple handle.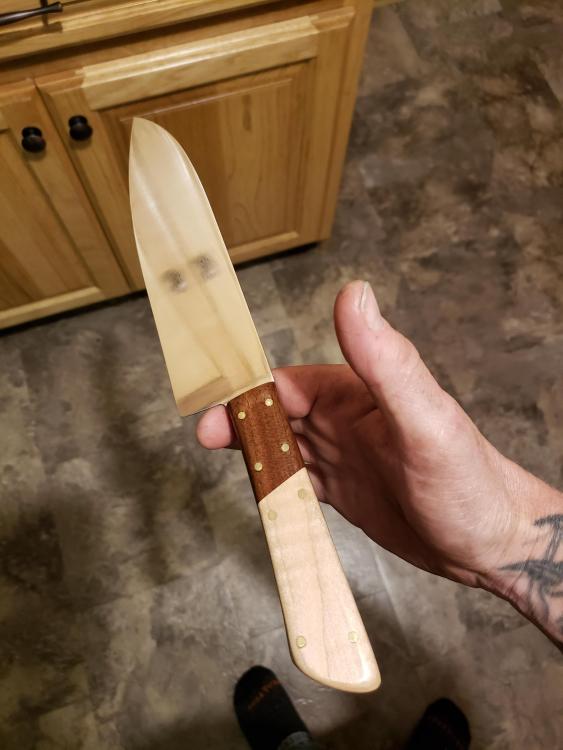
-
Steve, As I said, and not afraid to say it again, it is a great looking pattern weld. A few suggestions if you decide to do another one. Most, not all, but a general blade length is around 3 inches on a straight. Of course there is no hard fast rule on this, it's just more of an ease of use type of thing. On a one inch wide blade, optimally you would want closer to 0.278 inches for your spine thickness. Remember though that is measured from the point of the spine that contacts the hone though. So say for example you put a hollow grind on the blade and stopped the hollow grind 1/16 from the back of the spine. Generally, the top of the grind is where you will contact the hone, so you would figure from that point. So a 1 inch overall width blade with 1/16 between where your hone contact is and the back would be 0.260 for thickness. If you left 1/8 inch on the same 1 inch oaw, your thickness should finish at 0.243. The radius platen should give you a nice "near wedge" profile that is liked by many. My personal preference for use is the more flexible hollow grinds, but there is nothing wrong with the wedge/near wedge profiles. My biggest concern with the design you have is the lack of a tang for gripping the razor. Obviously not as big of a concern if this is more of a proof of concept type of thing, but for use it may prove to be a little difficult. Generally, (and again, no hard set rules for this, just common practice) you have room to pinch grip the razor tang with the thumb and two fingers between the blade and the handle scales using a third finger after the scales on the tail to hold the scales out of the way and increase control of the razor. It also provides a needed place to grip and flip the razor while stropping that won't interfere. I usually use 1/16 brass pin stock for pinning razors, but that is just me. When peening the ends, I can actually adjust the centering slightly to ensure it closes on center. I have seen screws, corby screws, and different size pins for this also, so it's a bit of user/maker preference there. When I make wood scales, I try to finish them out at around 1/8 to 3/16 thickness. It keeps them light and in balance with the blade. Your spacer on the end sounds fine, just be cautious if you extend it along the bottom. A properly honed straight razor has an edge fine enough that it will cut a hanging hair cleanly. A hollow grind razor is thin enough that you can flex it with a fingernail. So it doesn't take much at all to damage that edge. That's why a lot of razors you see have a wedge. As you close the razor, the taper on the tang at the pivot pin along with the wedge in the other end actually work to open the scales as you are closing the razor helping to keep them clear of the edge. A spacer will definitely work. I've seen many with them and have done it myself, you just need to use extra care ensuring you have the blade centered. Have you ever used CA finish? I've seen great results using it and it makes a very durable waterproof finish. It is beyond my patience level though and I always make a mess trying to do it, but it is a great finish for applications like shave brush handles and razor scales.
-
The damascus pattern looks very nice, and the wood doesn't look too bad. I think it fits ok with the whole look. As a straight razor user, the tail looks somewhat short short, and the tang is definitely too short for a comfortable grip. Your handle will always be in the way and not allow for a good grip or control unless you try to use it like a Kamisori. With no positive stop and no tang though, you would have very little means of keeping the blade from moving while you are holding the handle making for a rather dangerous shave. What are the dimensions of the blade? Mainly wondering about the width to spine thickness ratio. There is a formula to them to keep the proper bevel angle when honing. I can't tell for certain from the angle of the photos, but the blade looks thin in relation to the width. Generally you are looking for the width to be 3.6 times the thickness at the point where the spine contacts the hone. They are designed this way to rest the spine on the hone to keep the same bevel angle throughout the honing process. (Although a full wedge grind usually requires one layer of tape on the spine to make the secondary bevel.) It looks like there is a liner in the scales. Is that correct? If so, how do you intend to keep the blade from closing too far? A wedge may not work well with a liner. It would make the scales too thick to flex allowing the wedge to work properly. You can use a spacer in place of the wedge, but you will need to taper the tang near the pivot pin so the scale opening is thinner at the pin allowing the spine on the toe of the razor to catch and prevent the edge from coming through the bottom of the scales. You will need the taper with a spacer or a wedge. But again, I do really like the pattern you have in the blade. It does look stunning. Out of curiosity, what is the grind on the blade? My personal preference for use is a quarter hollow to a full hollow grind, but from the few I've made, they are an absolute pain in the behind to grind evenly on a single wheel. I haven't managed a full hollow with my grinding setup, but a quarter hollow is tough enough to do.
-
Mr. Slag, I just wanted to make sure it was because of something like an "Oops, I knew that" instead of the way I worded something. I'm not always good at explaining/expressing things correctly. I have to think to do that, and it makes my brain hurt.
-
Mr. SLAG I didn't intend to cause any ill feelings, and I apologize if I came across in a way that did. I hope it is not from something I said, or the way I said something.
-
Smokey: It looks like there is a little bit of a dip in the edge right where the belly curve starts. Again, it could just be the way it is photographed and the light shining funny on it. If you have had that piece of wood in a basement for three years, it should be plenty dry. Mr. SLAG: Pins will help the bond most certainly. The problem if the wood was green would be that it shrinks as it dries. Any place you make a hole and then secure that hole with something that doesn't move (such as epoxy or a pin) it increases the chance of a crack at that point as the wood shrinks around it. Smokey is pretty safe with this one as his piece should be plenty dry if it has been cut and stored for 3 years. I just wasnt sure from his initial post if he had just cut it directly from the tree in the yard, or if it was a saved piece that had been kept for some time.
-
Overall not bad. There looks to be a little bit of a warp in it. The edge looks uneven, but that is an easy fix if it is. (may just be the photo messing with me a little.) For a kitchen slicer like that, in my opinion, a full taper from edge to spine is much better than a short fat bevel at the edge. It cuts cleaner and with less effort without pushing apart what you are cutting as drastically. Say you are cutting a big onion, that short taper pushes your slice away and makes your cut start to go crooked because you are basically driving a thick wedge in there. It also cuts a little harder because of the thickness of the edge. A full taper will glide through easier and allow a straighter cut because your wedge is now much thinner and longer so it is displacing less in a short distance. Hope that makes sense, I'm not always the best at describing things..... Also for your wood. Not sure if you meant you went out and cut a piece off the tree, ot it was an older tree that had been down for a while. The reason I mention this, is if you cut it off it is still green wood. There is a chance it will crack as it dries maybe even a little more so now that there is a hole in the middle of it. Not bad for an early attempt though, and as long as you are learning with each one, you are making progress.
-
Ah, ok. That makes more sense. Looks pretty darn good!
-
I'm curious as to how you got such a smooth and even blade slot in a knap-able material. What material is it and how did you do that?
-
I just used wax paper. I wrapped around the lid and put a couple staples in the top to hold it in place so I didn't have to fight it, and then just lined the inside of the box. Mine are basically the same thing as what you made. I'm no expert, but the pressure sort of depends on what you are using. Blue jeans or flat material you aren't (shouldn't be) getting big amounts between the layers, but being flat could handle a little more pressure. Using something like scotchbrite or wood chips, you aren't going to want massive amounts or you will squeeze all of the resin out of your piece(s). I just used some of those quick grip bar clamps on each end and snugged them down just to hold the lid even and in place. Snug, but not reefing on them at all.
-
I've heard that the surf board resin works pretty good too. Guess it would depend on price over normal casting resin as to which would be better.