sfeile
-
Posts
358 -
Joined
-
Last visited
Content Type
Profiles
Forums
Articles
Gallery
Downloads
Events
Everything posted by sfeile
-
I actually just used fiberglass resin for body repair. Only thing I could get locally. It turns fairly dark though, so probably not something you want to use on a nice wood or something you are trying to show colors on. I just was doing it more for proof of concept to myself.
-
I made some of my own from an old pair of faded ripped blue jeans. My dad does custom cabinets so I just took some 3/4 cabinet grade plywood scraps and built a little box that the lid would just fit inside. Lined it with wax paper, then used a couple clamps to compress the lid down.

-

What did you do in the shop today?
sfeile replied to Mark Ling's topic in Blacksmithing, General Discussion
You are correct for knives and tools SLAG. Also correct on the sandpaper. They also have what is called lapping film that goes up as far as 0.3 micron "grit". There again, that is not needed for tools or knives. The quote KiltedWonder used was in relation to a post quite a ways back where he asked me what I used to sharpen a straight razor. A straight razor is quite a different animal when it comes to sharpening. The theory is the same. You are rubbing an abrasive on a piece of hardened steel to create an edge. The practice is a bit different though because you are dealing with such a fine edge on a very thin piece of steel. If you used the grits of stone or the pressure used to sharpen most knives you would flex the edge and never hit your apex all while grinding your material away at a very high rate. (I learned this the hard way while learning to hone my first razor......) An 800 grit stone to a straight razor is roughly equivalent to taking your chisel to a 36 grit belt sander. For tools and even good kitchen knives you are definitely correct, and your methods (as I'm sure you already know) give an excellent edge for their intended use. For a straight razor though, it takes a bit more finesse and refinement to efficiently and comfortably shave. -
What did you do in the shop today?
sfeile replied to Mark Ling's topic in Blacksmithing, General Discussion
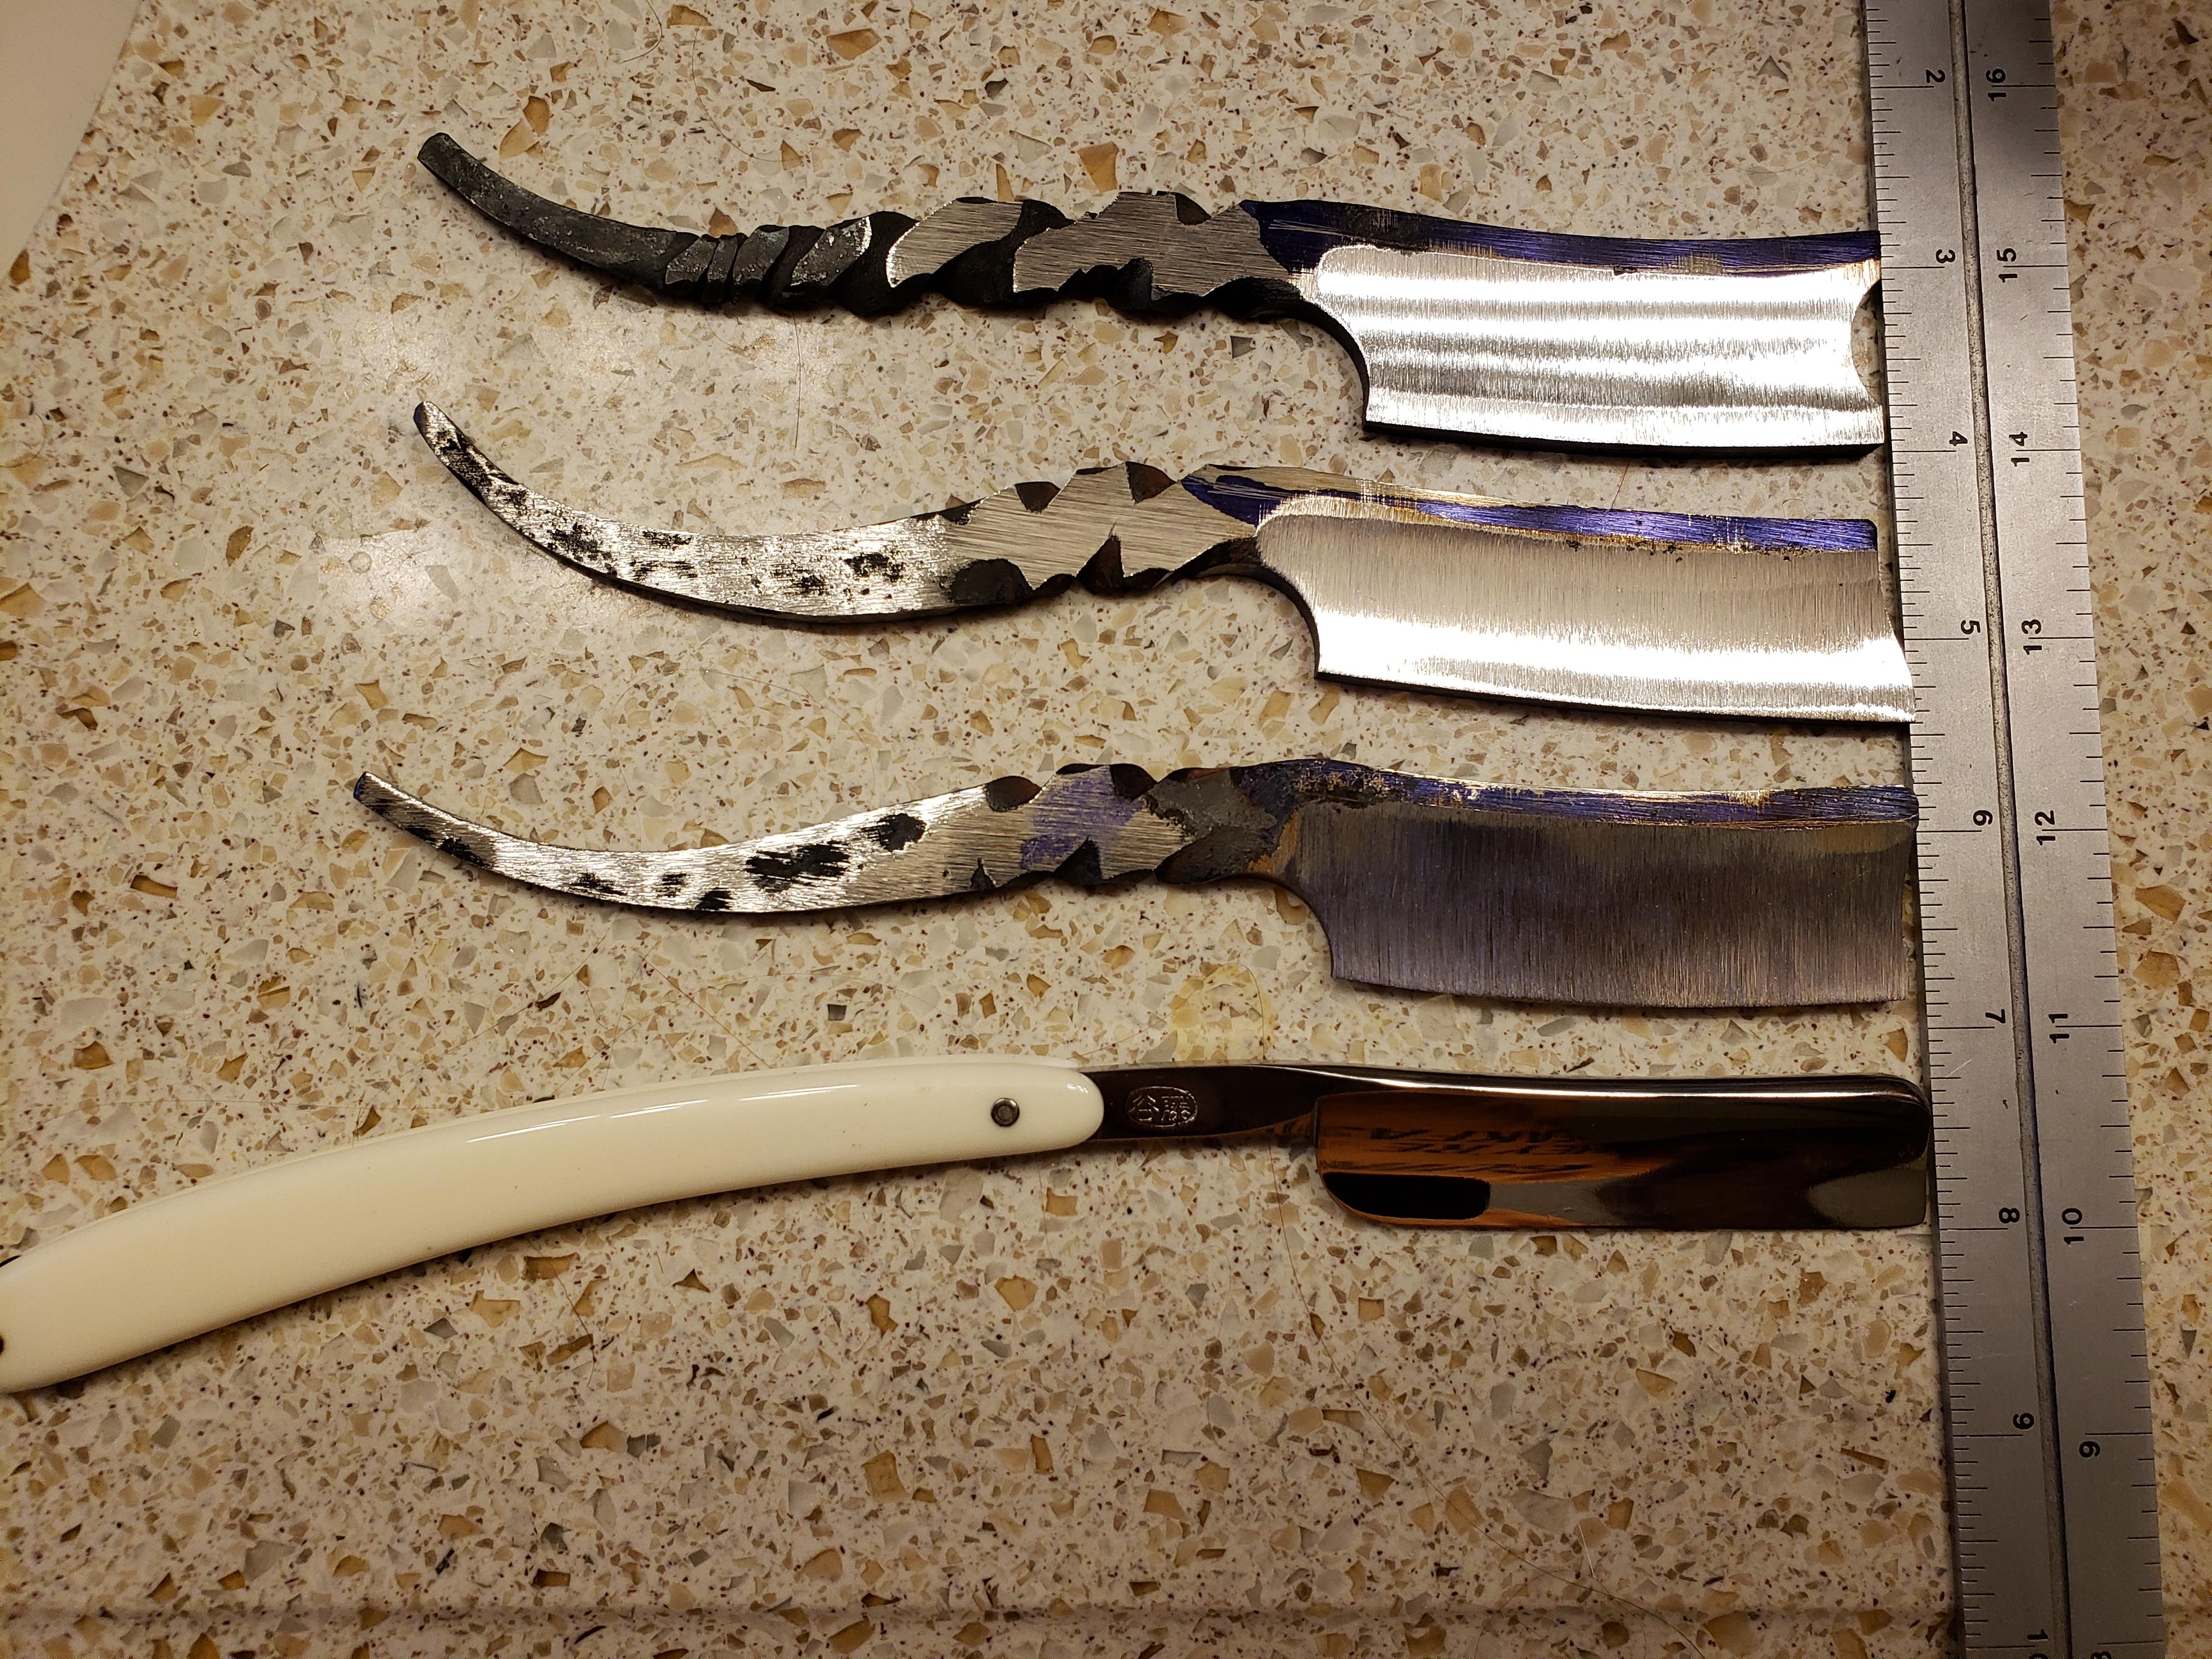
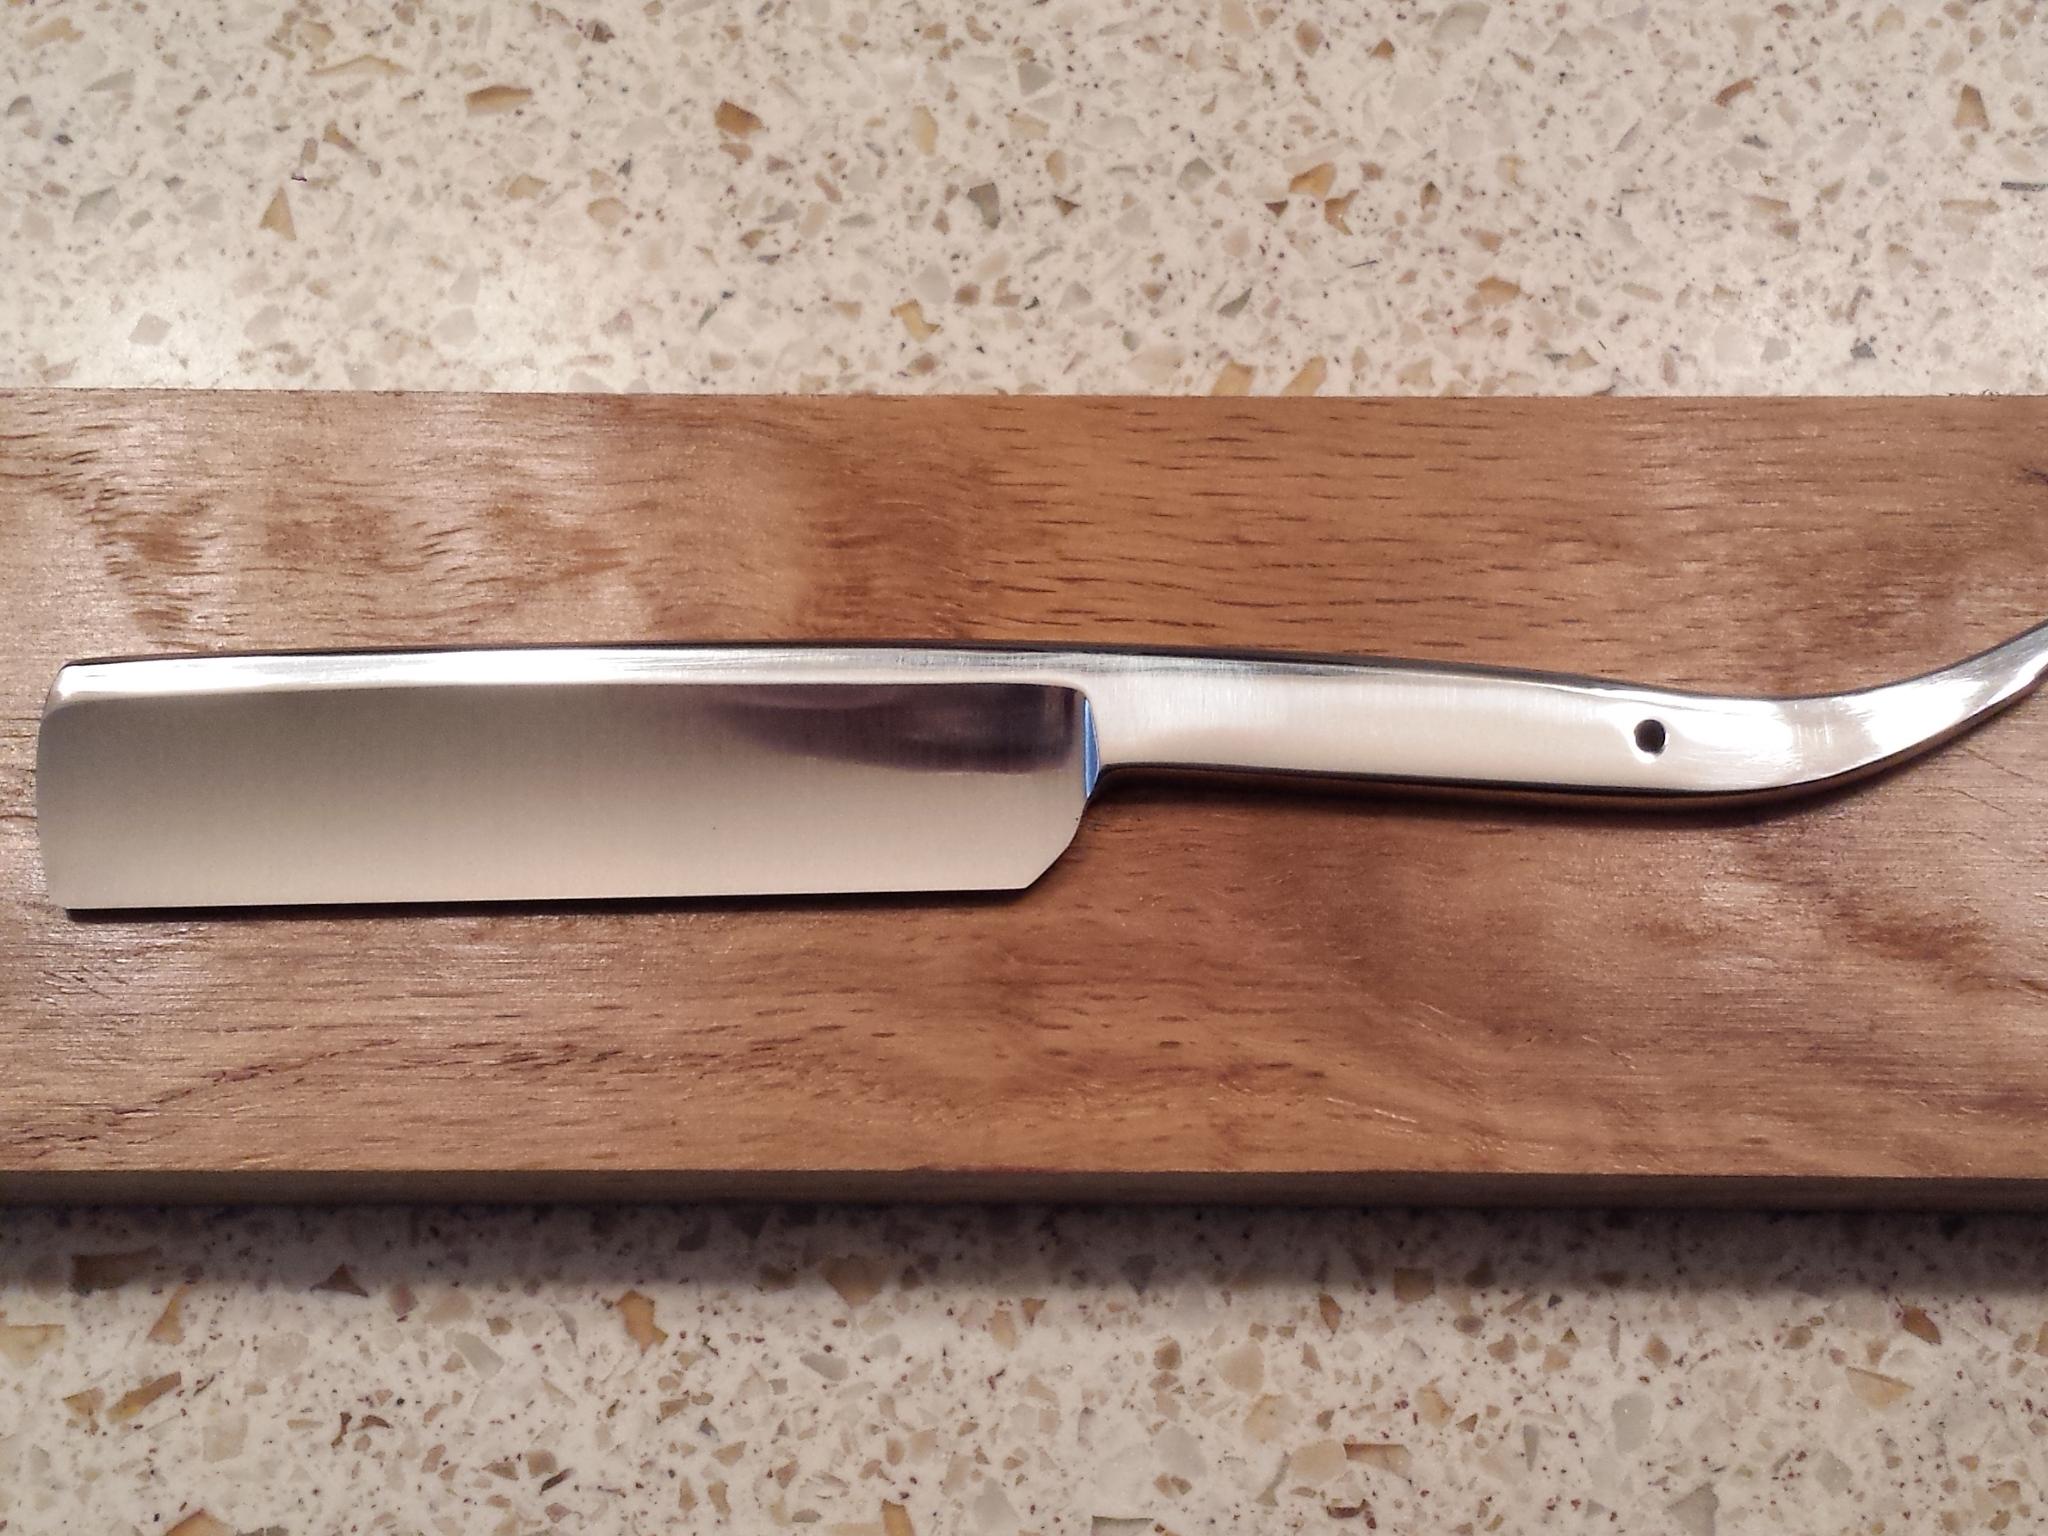
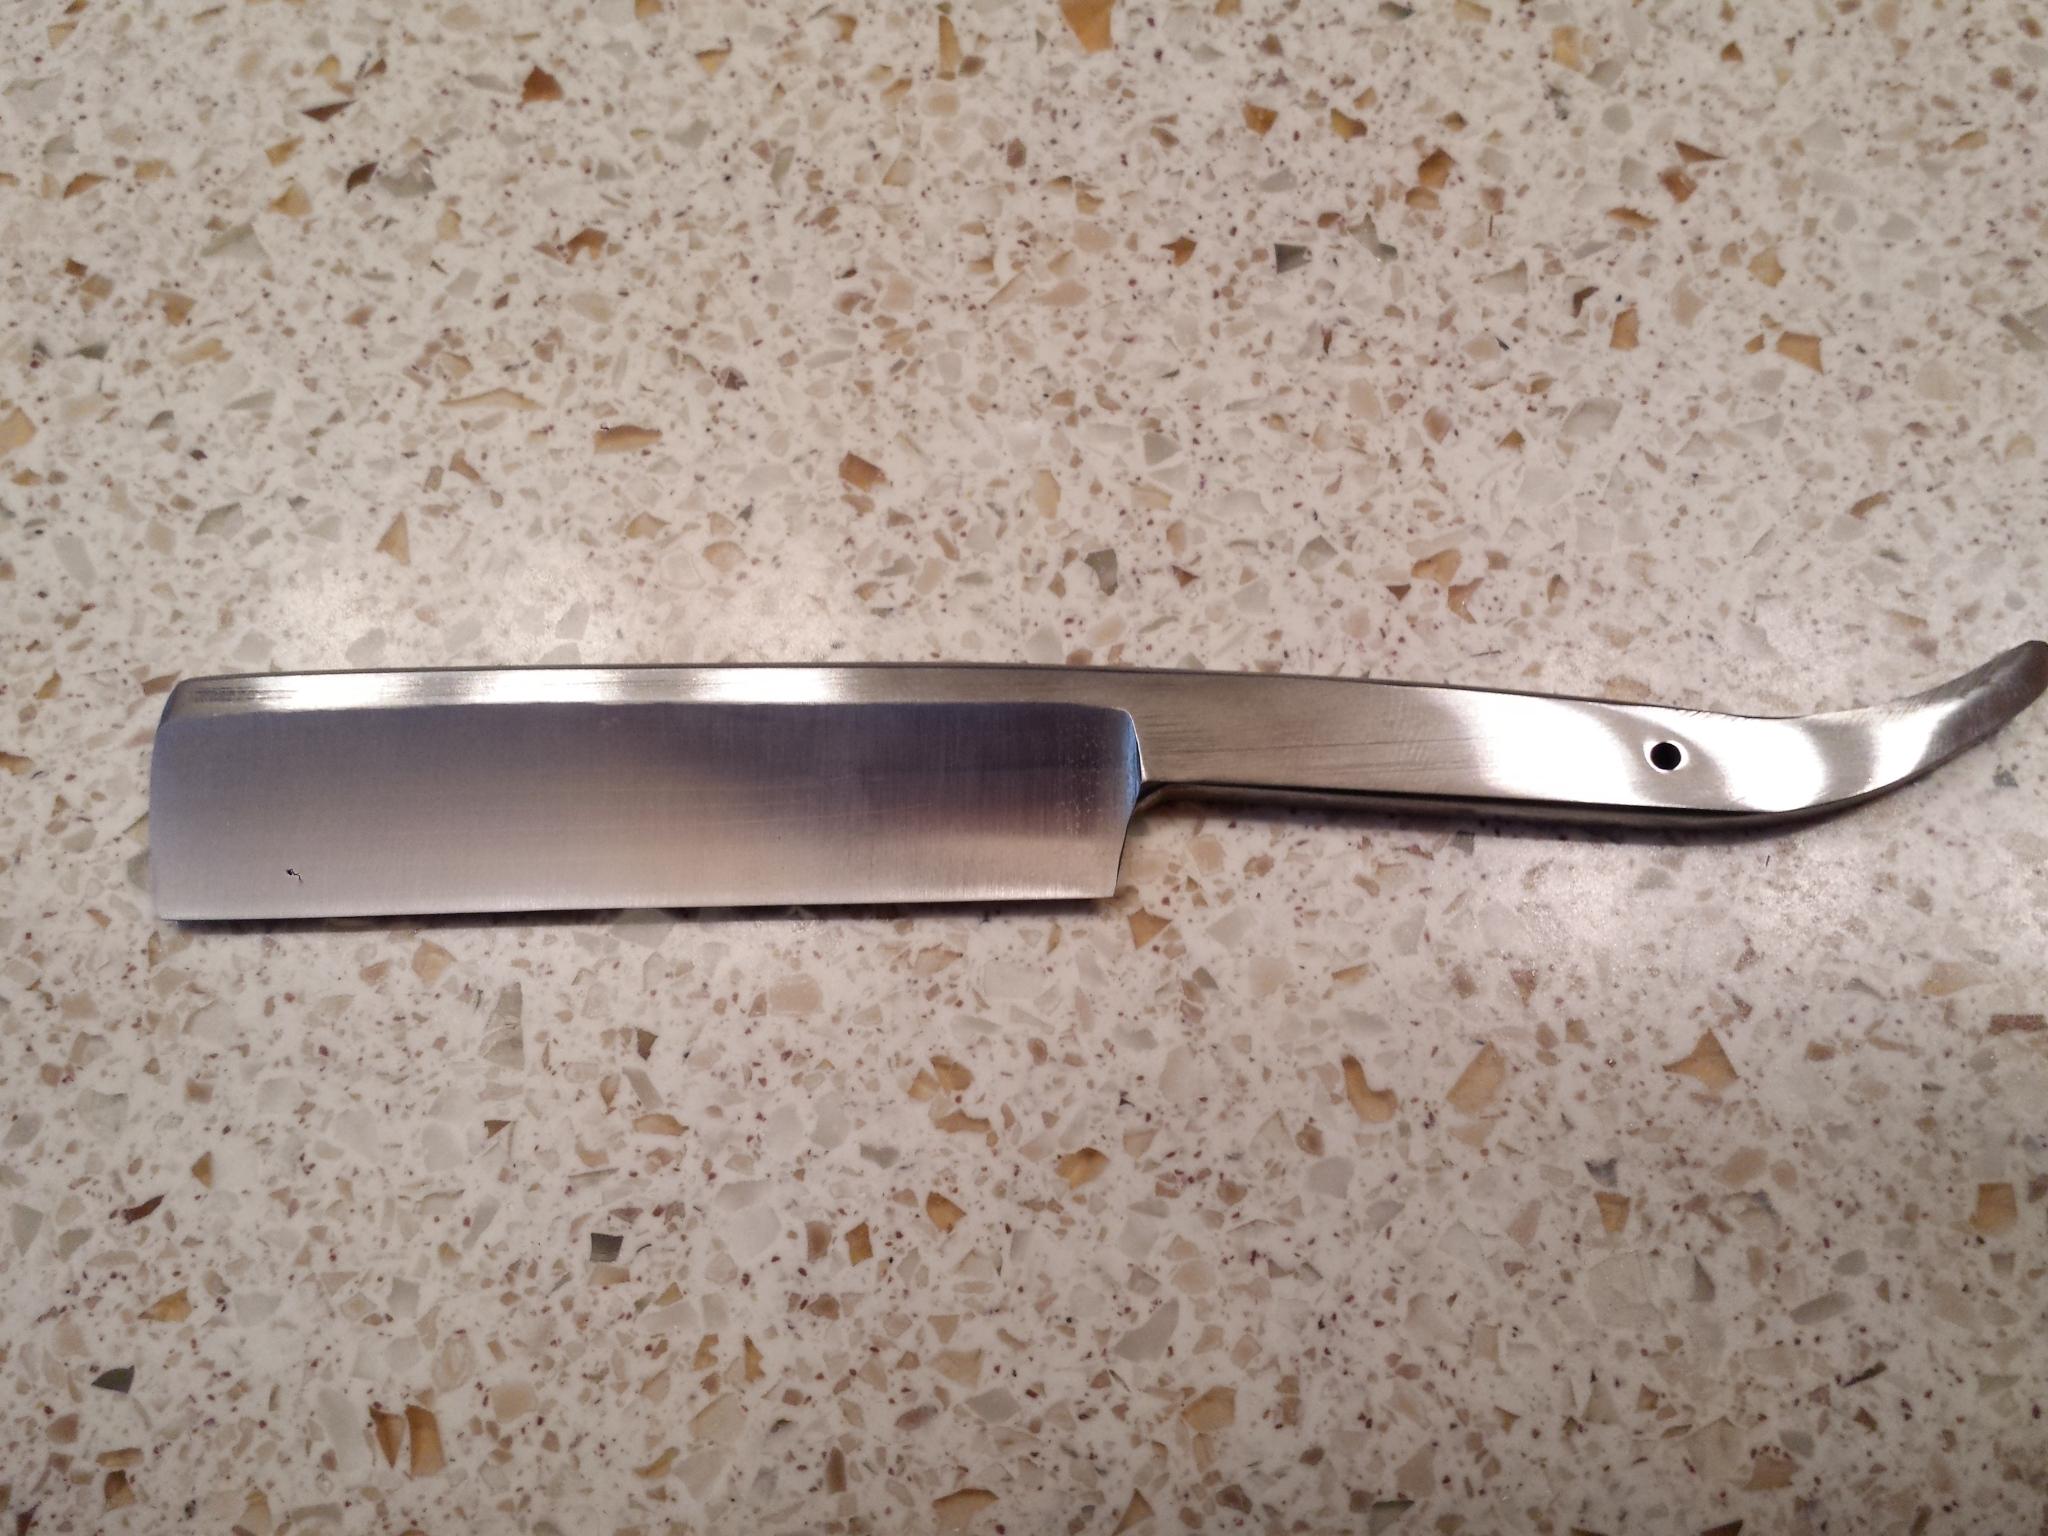
Thanks Mudman. I'm using a 3.3 inch wheel. Not ideal for this type of grinding, but it's what I have. An 8 inch would be better. I twisted them and then hammered them flat. Then a little cleanup on the grinder while evening my thickness. The top one isn't going to get scales on it. It is going to be a kamisori style, or non folding. It was decided afterwards and then thought of doing a full twist. It didn't work out too well trying to match the original twist with a second try, so I am going to forge another to replace it. It's actually a little bit thin for that width to have the proper bevel angle also, so I'll just practice my "smiling" grind on it. Or maybe narrow it a bit to change the ratio and salvage it. Not sure yet. -
What did you do in the shop today?
sfeile replied to Mark Ling's topic in Blacksmithing, General Discussion
Dang! Everybody has been doing some awesome stuff! Good job all! I spent some time hammering yesterday, and grinding today. Making a few "choppers". Still pretty rough, but they are starting to shape up. (Bottom one is a 5/8 blade for size reference.) The top one I am going to try a full bellied hollow grind. Not sure if I'm going to get it just right freehand grinding. It'll be a test for sure.
-
I've had good luck with the leaf springs I've used with a similar heat treat/temper to 5160. First I do two normalizing cycles. Bring it to just above where it becomes non-magnetic, let it air cool to black, then do it a second time. It should be around a bright cherry and 1575 degrees. If you don't have a thermo-couple or way to measure the temperature, a magnet will work, but pay attention and keep checking as you are bringing it up to heat so you don't get too hot. Also during this process and heating for the quench, be careful not to overheat your tip. It is thinner and will heat faster. Then heat back to just above non-magnetic again and let it soak at that temperature for about 3 minutes. Then quench in your oil. Canola oil can be bought at walmart for about six dollars and change a gallon if you strike out finding used oil. Keep your piece moving while it is in the oil. After it is cooled down to about room temperature, put it in whatever oven you are using to temper. I do mine at 400 degrees for one hour, cool, then do another one hour cycle. It gives me an edge that will slice paper, chop into a 2x4 about ten times, and still slice paper afterwards. Good hard edge, but still very durable. I also should mention I do test quench/temper on each set of leaf springs I have tried. So far they have treated like 5160 and that is an alloy often used for them. There are other alloys though so you are in essence dealing with an unknown steel. You may want to do a test piece before you do your actual knife. Use that to get the feel for the movement and to get a better idea of your colors as you are testing with a magnet. You've done a lot of nice work on your blade, so it would be worth the extra effort to play around a bit and make sure you have it figured out before you overheat it or find out that you have an alloy that reacts differently.
-
Mine wasn't as fancy as the ones you guys are posting, but I did make one last fall when I was first getting going.
-
What did you do in the shop today?
sfeile replied to Mark Ling's topic in Blacksmithing, General Discussion
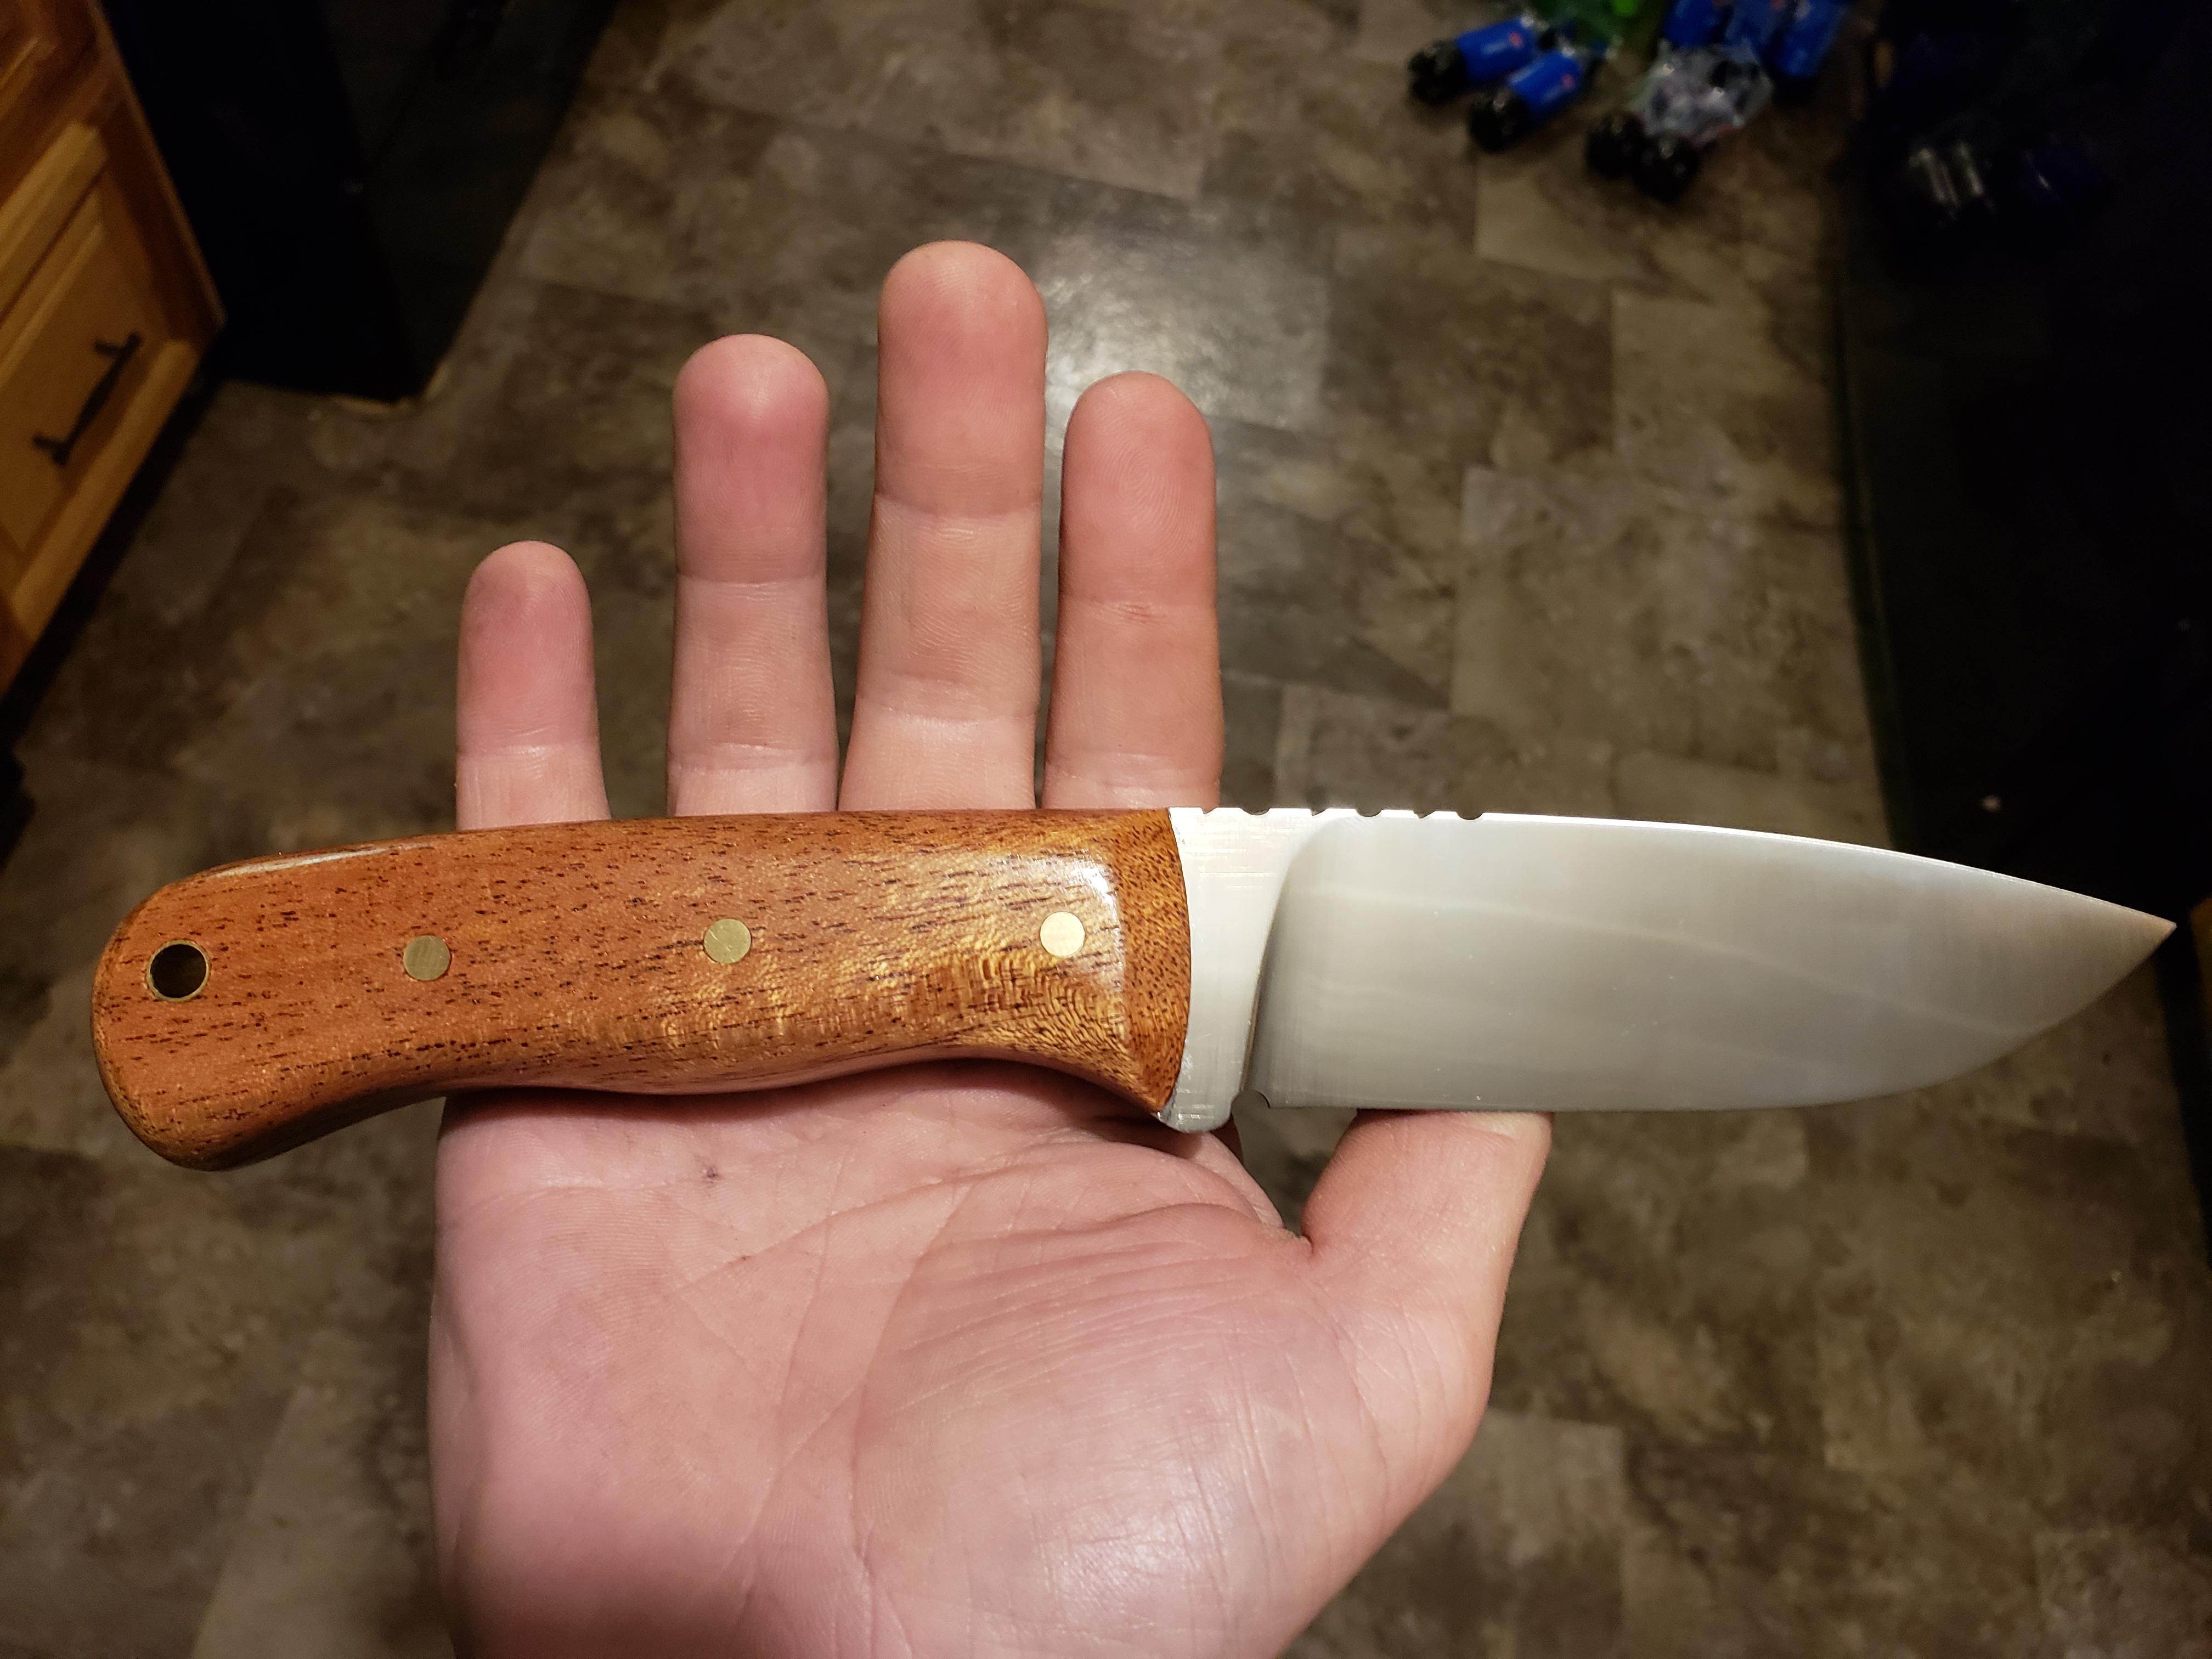
Thanks! I say it's 5160, but I can't tell you 100% honestly. It is leaf spring, but my sample pieces took a quench and temper very well using the specs for 5160 and I know it is an alloy that is sometimes used, so I just go with that. Short soak just above non-magnetic to an oil quench, then 2 one hour cycles at 400 gives me a blade that will do a clean paper slice, chop into a 2x4 eight or ten times, then still give me a clean paper slice directly afterwards. The handle I do know though, it is mahogany. -
What did you do in the shop today?
sfeile replied to Mark Ling's topic in Blacksmithing, General Discussion
Love the profile of that blade Jennifer. Looks like it has a great balance and should have an interesting pattern after etching too. I didn't have my fire lit today, but did some handle work. Should be lighting the forge tomorrow though as I have 3 more straight razors to hammer out. These will be a new experience as they will be "smiling" razors. Going to be interesting to grind....
-
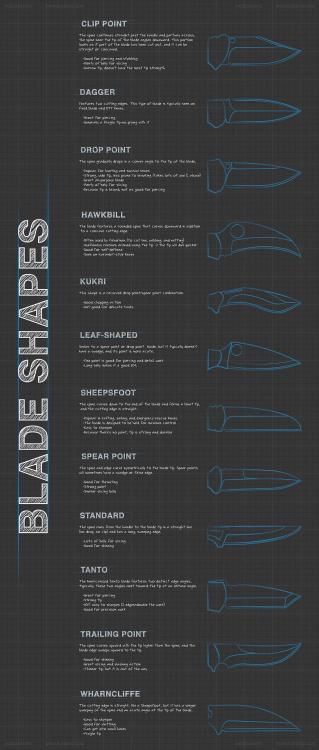
Not sure if this will come up full size if you save it, but this chart has a good reference point for many shapes. Here is the link if it doesn't. I don't think this link violates TOU. https://visual.ly/community/infographic/how/knife-buyers-guide-understanding-blade-shapes
-
What did you do in the shop today?
sfeile replied to Mark Ling's topic in Blacksmithing, General Discussion
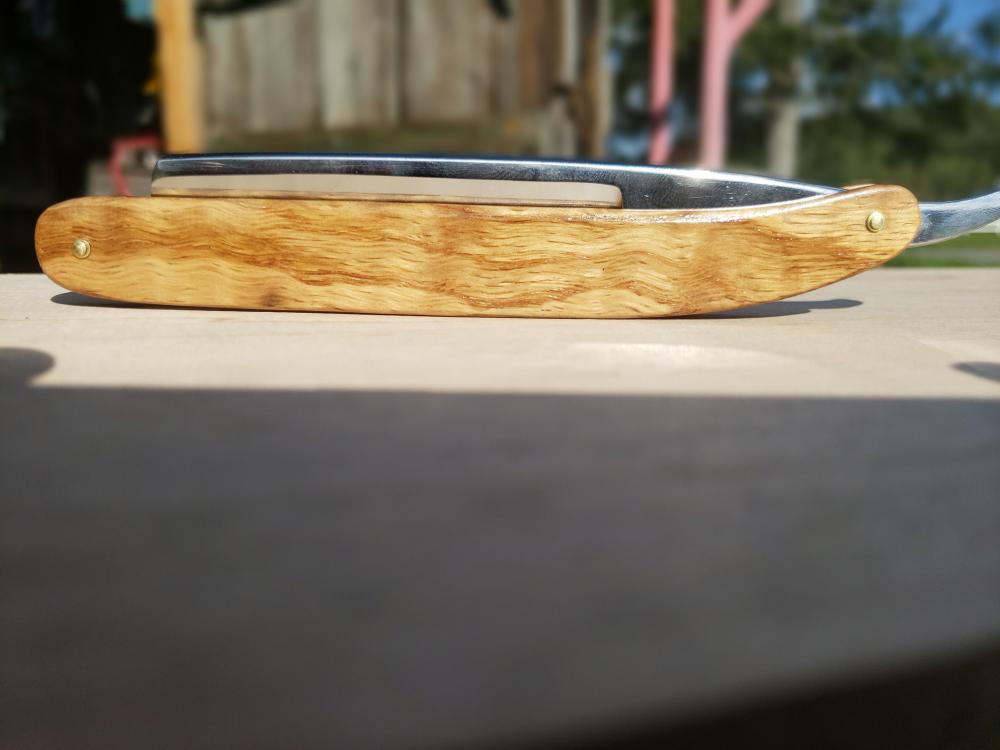
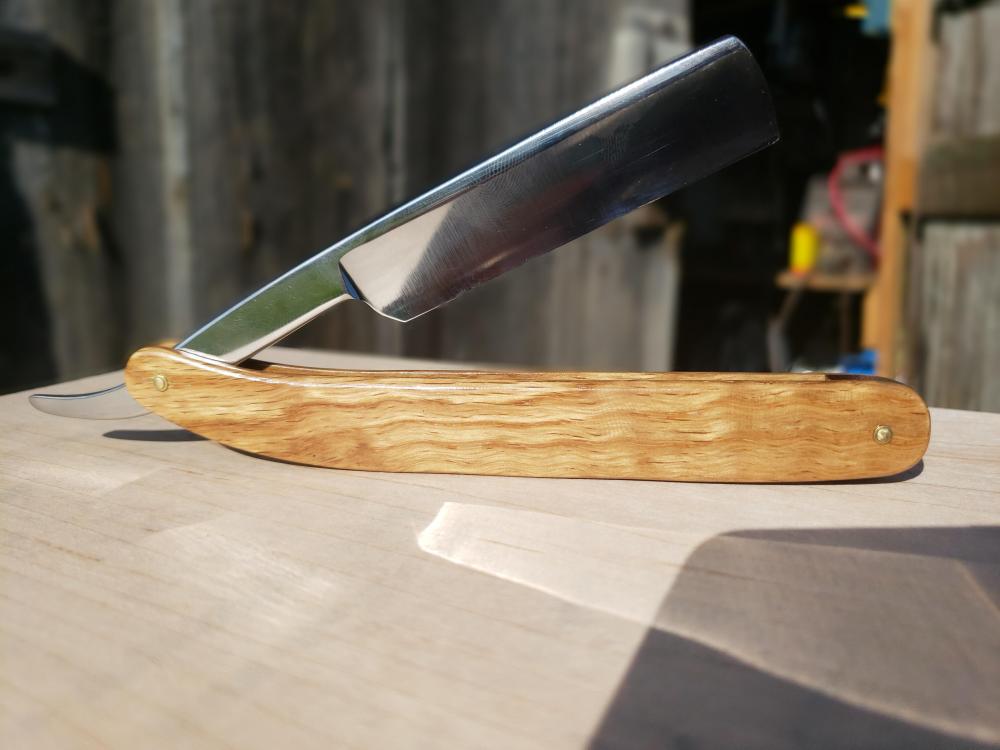
Das, that little guy looks awesome! Mudman, great work on those punches. Hans, that kiln looks fantastic! I was able to get out and do a little bit today. Got the razor ready for honing and a few final polishing touch-ups. It has white oak scales and a black walnut spacer. I didn't seem have quite enough taper in my tang to let a wedge work well, so I went with a spacer on this one.
-
What did you do in the shop today?
sfeile replied to Mark Ling's topic in Blacksmithing, General Discussion
I hear you Tomas. I was an Ironworker for 15 years walking on those little beams way up in the air. Then moved to millwright work, welding, and machinery moving and instalation. For me, "dressing up" for work is putting on my Carhartts. -
What did you do in the shop today?
sfeile replied to Mark Ling's topic in Blacksmithing, General Discussion
Thank you. I've been using them for about 5 years now and I agree, definitely no going back to electrics or the overpriced plastic things they call razors. I most certainly will post finished photos! -
What did you do in the shop today?
sfeile replied to Mark Ling's topic in Blacksmithing, General Discussion
Thanks Hans! -
What did you do in the shop today?
sfeile replied to Mark Ling's topic in Blacksmithing, General Discussion
Thanks Das. And yeah, where do you get your inspiration? -
What did you do in the shop today?
sfeile replied to Mark Ling's topic in Blacksmithing, General Discussion
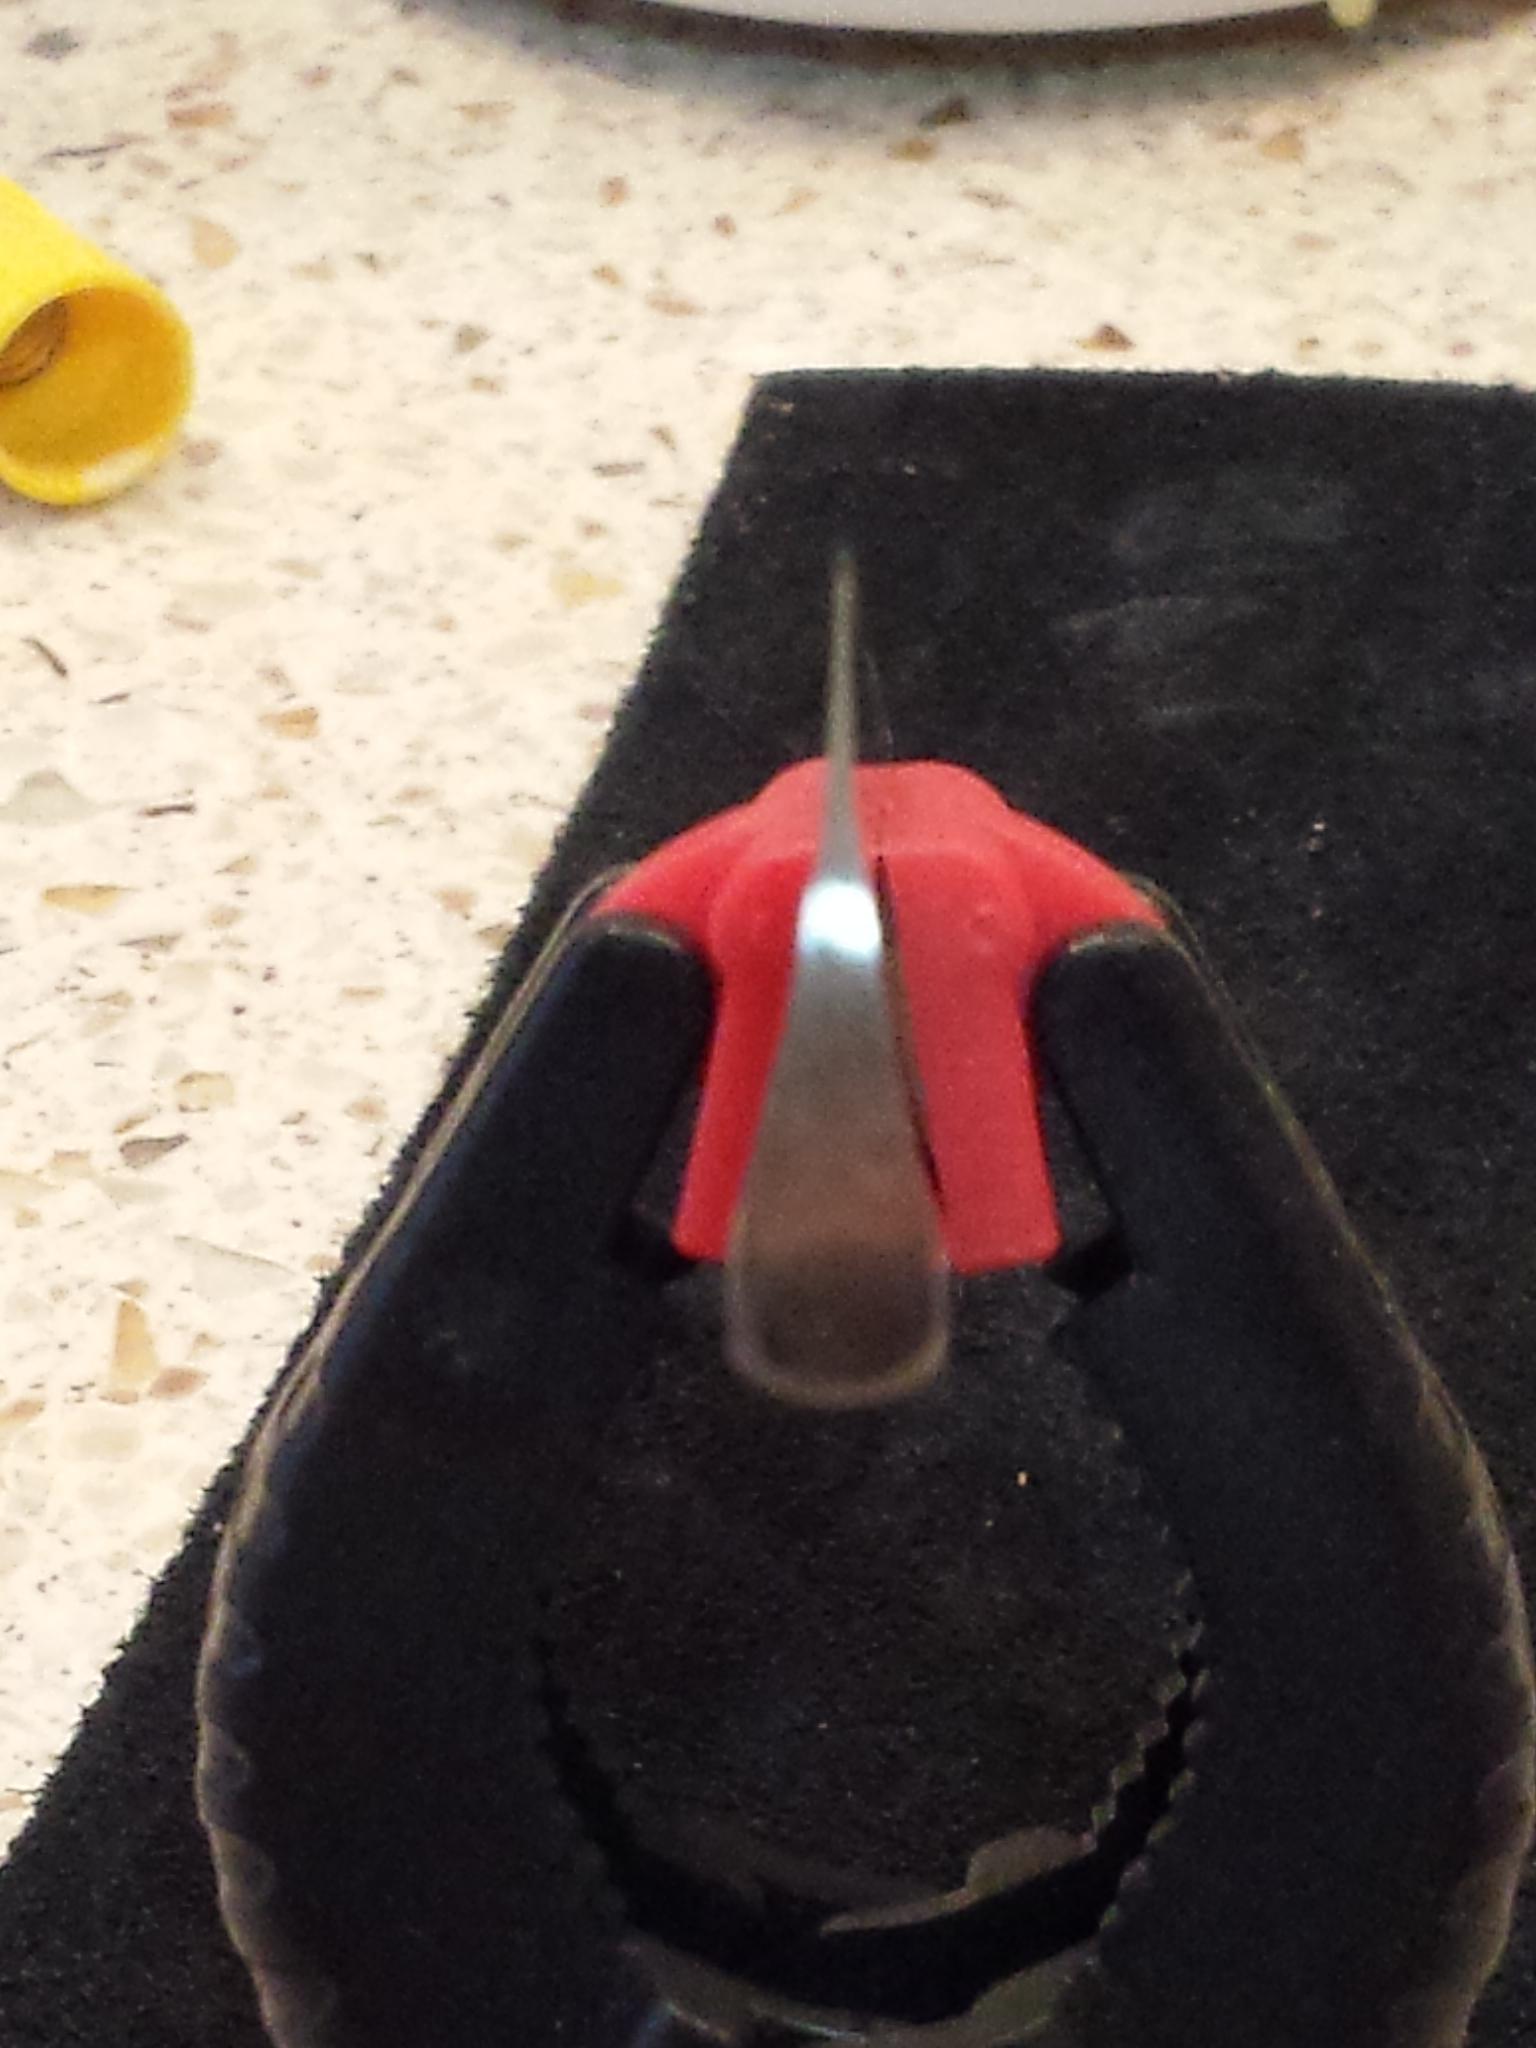
Thank you Jennifer. That one is sitting between a quarter hollow and half hollow grind. Full and extra hollow go way up towards the spine and are probably what you are used to seeing. I have some full hollow blades and boy they "sing" when you use them. You really need to be careful honing and stropping them though so they don't flex on you. I have some half hollow and I think one quarter hollow blades that shave very well also. Not a fan of the wedge and near wedge grinds though. I would have liked to have done more of a half to full hollow, but I'm limited by my contact wheel size. Or maybe more by my skill at this moment haha. This is actually only the second razor I have made, so maybe I can figure out how to better utilize my tools as I progress. -
What did you do in the shop today?
sfeile replied to Mark Ling's topic in Blacksmithing, General Discussion
Thank you kindly. -
What did you do in the shop today?
sfeile replied to Mark Ling's topic in Blacksmithing, General Discussion
Got all the final refinement and polishing done today. It's now ready for scales and honing. The white oak it's sitting on will be the scale material and it will have a black walnut wedge. I will probably add some "jimps" to the underside of the tang before I'm done also.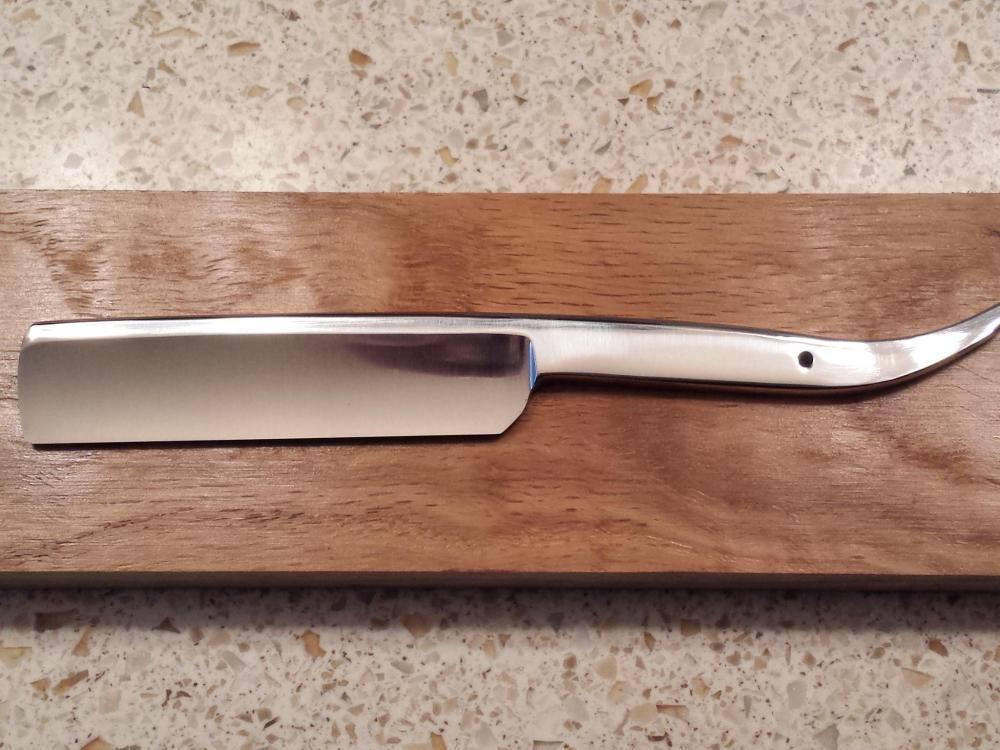

-
What did you do in the shop today?
sfeile replied to Mark Ling's topic in Blacksmithing, General Discussion
I use a shapton pro ceramic water stone in 2000 grit to set the bevel. Then the same stones in 5000 and 8000 grits until the previous scratch pattern is gone. After that I move to a 5+ Japanese water stone working through koma and tomo slurred to finish on just water. Roughly around 14000 grit. Strop it on leather, and it will cleanly cut a free hanging hair. -
What did you do in the shop today?
sfeile replied to Mark Ling's topic in Blacksmithing, General Discussion
They have cabinet screws, sheet metal screws, a lot of new electrical stuff is coming with square drive. They are out there, the trick is finding them locally. Some big stores like home depot or lowes, or even an electrical supply house should have something that would work Das. -
What did you do in the shop today?
sfeile replied to Mark Ling's topic in Blacksmithing, General Discussion
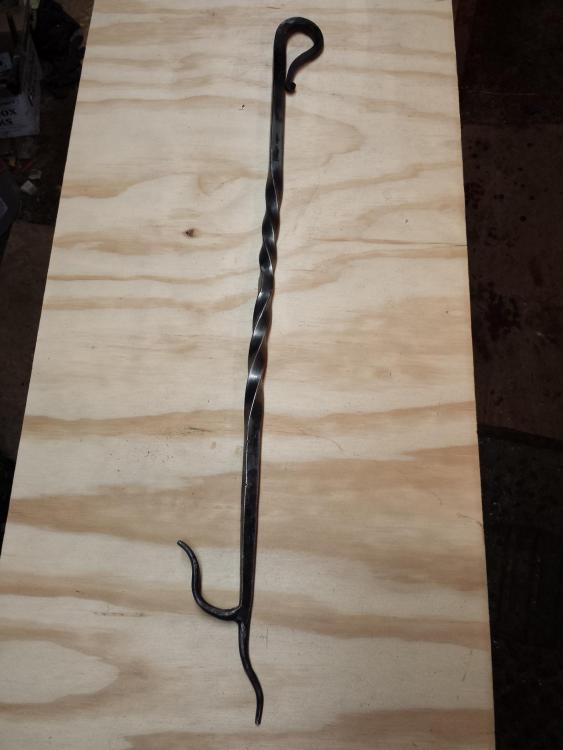
Thanks Das! That hook is awesome!! -
What did you do in the shop today?
sfeile replied to Mark Ling's topic in Blacksmithing, General Discussion
Thanks Mike! Yep, that's what I used. Gets tricky not to over heat it when it's that thin, but I think it turned out ok. That finish is from a 600 grit trizact belt. Turned out being a very nice satin finish. -
What did you do in the shop today?
sfeile replied to Mark Ling's topic in Blacksmithing, General Discussion
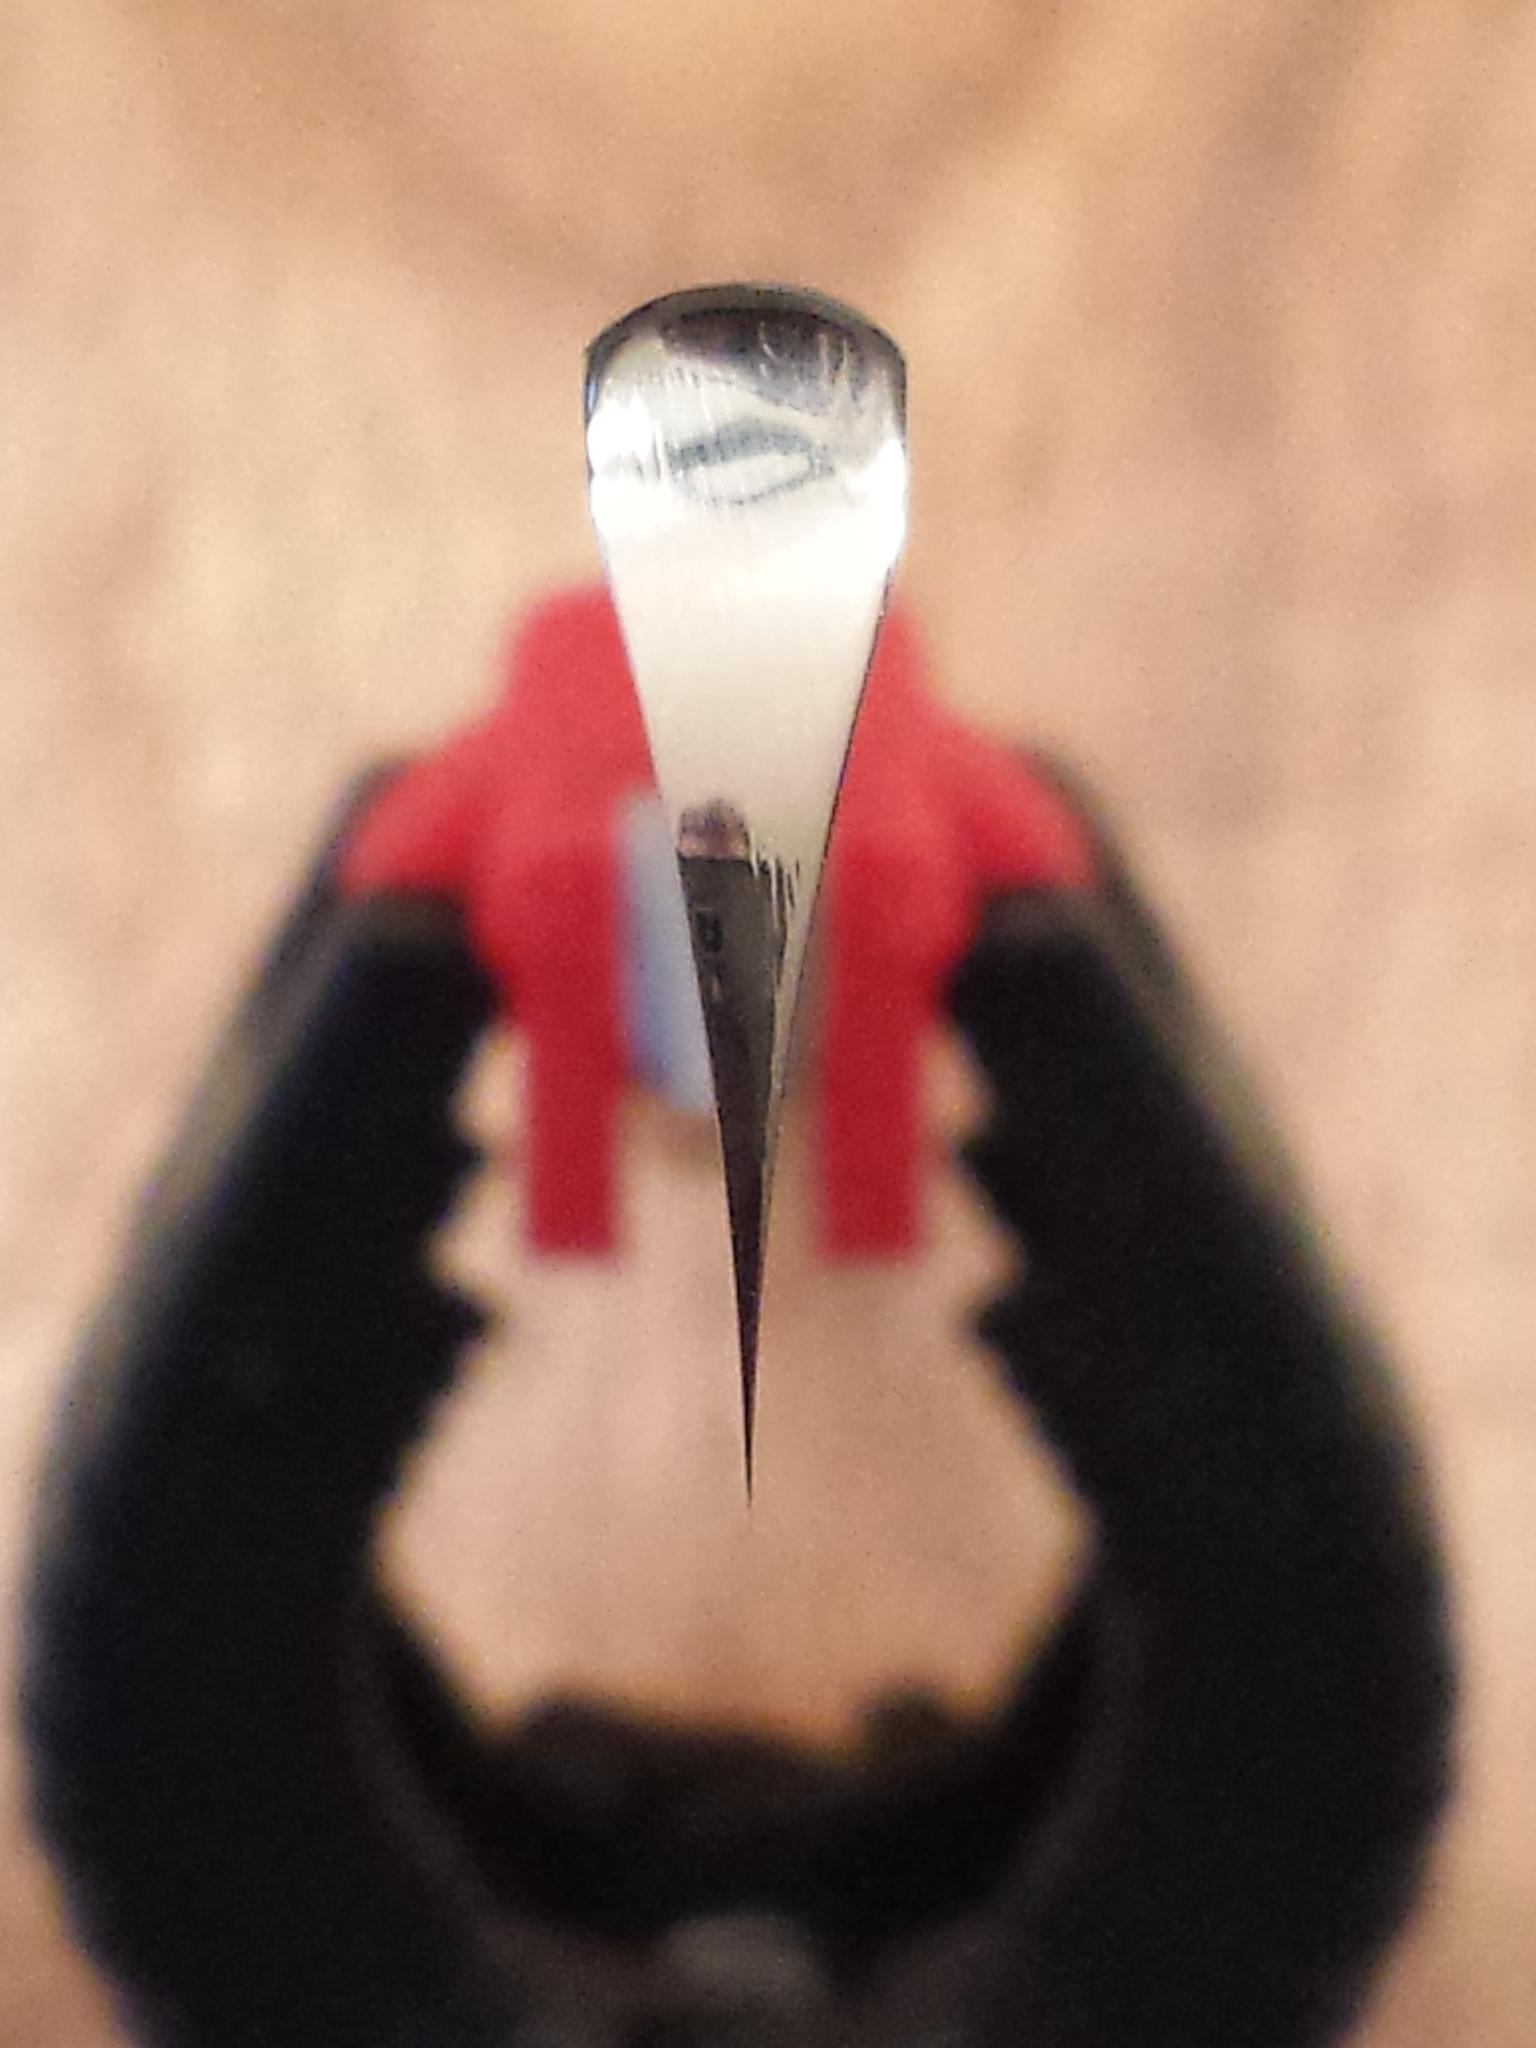
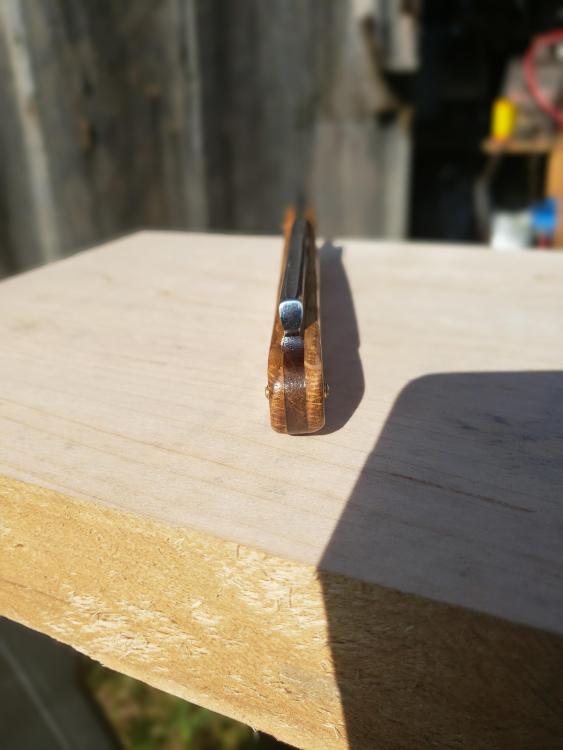
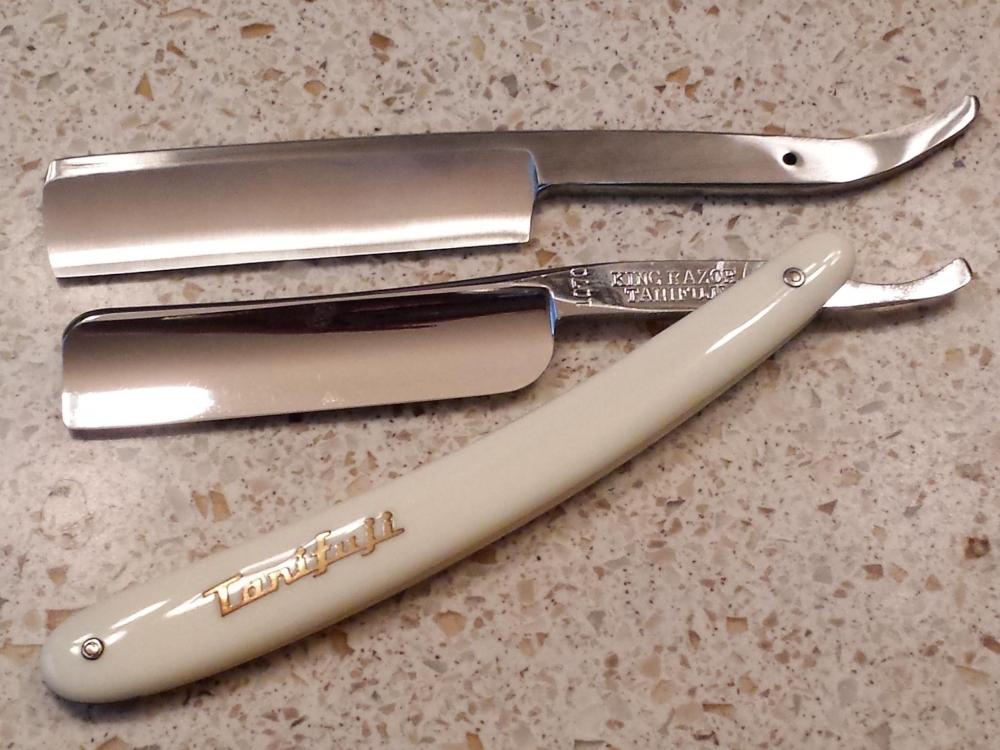
Got some more work done on the razor between swatting mosquitoes today. Quenched and tempered it yesterday, then got it just about ready for scales and honing today. Still a little refinement to do on the tang, but almost there. (Next to my Tanifuji for size reference) I actually got the edge centered. It's right at 1/2 hollow for the grind.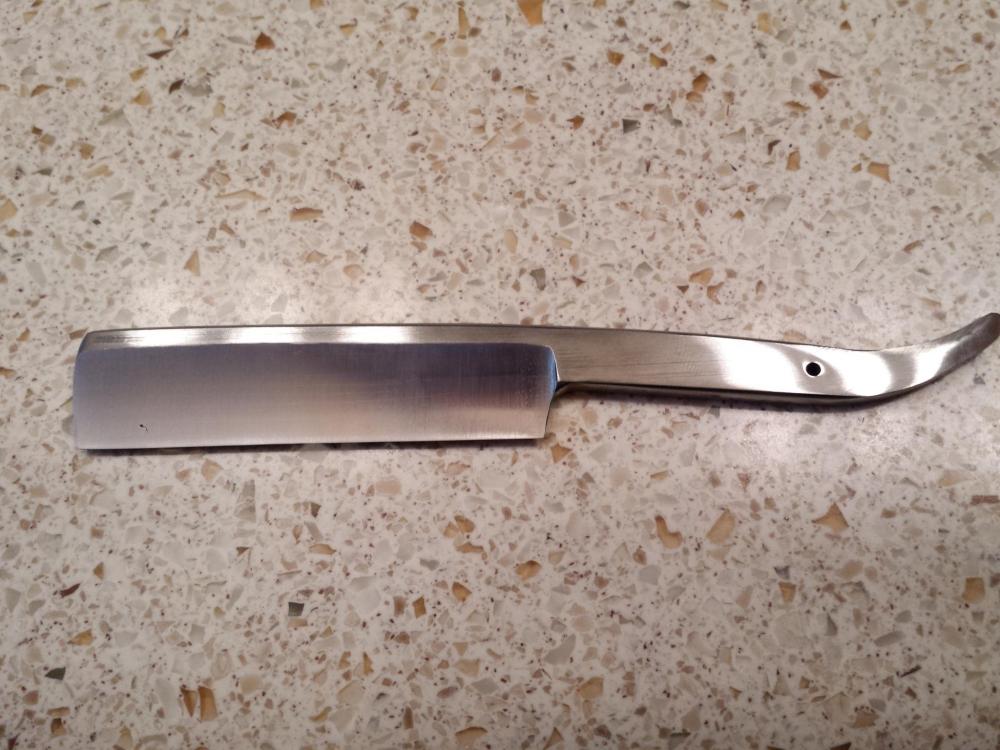

-
What did you do in the shop today?
sfeile replied to Mark Ling's topic in Blacksmithing, General Discussion
I never had issues with paper wasps, yellowjackets, or anything else while they were around. Even the swallows stayed away from my eaves. As intimidating as they look, they really aren't aggressive surprisingly. I climbed up on a ladder and they just hung around and watched while I dusted their entry. I took out an entire nest of yellowjackets one time with hot water and dishsoap, but these things would just get a little wet and annoyed by it. Hornet spray in a can? They laugh at it. I ended up getting tempo 1% dust and just a little bit at the entry and they are pretty much all done in a day. The tricky part is getting it at the entry when it's something that's a little more testy than they are. I got a bottle for about $15 that I think is a pound maybe? I'll have enough of that stuff to last me the next 50 years I think. It really doesn't take much. A squirt or two from one of those baby nose sucker bulbs is about all it takes. -
What did you do in the shop today?
sfeile replied to Mark Ling's topic in Blacksmithing, General Discussion
I've had nests of the European hornets around every few years it seems. The ones that are about as big as your thumb. When they are around, there are pretty much no mosquitoes or any other insects at all. Bad part of them, is while they aren't aggressive, they like to build nests IN the house. I really don't want to have to try out the Mrs.' eppi pen to make sure it works for her, so I have to evict them. If they would build somewhere else, I really like having them around.